


Live Streaming Backend Operations #
Polyv Live Streaming Backend is automatically assigned after a user registers a Polyv account. It supports operations such as creating, configuring, deleting, and assigning live streaming rooms. It also supports integrating backend functionalities into existing enterprise systems via Single Sign-On (SSO) or ODM methods.
Live Room Settings
Live Room List
Click "Live List" to enter the live room list page. The live room list displays all created live rooms, sorted by creation time by default.
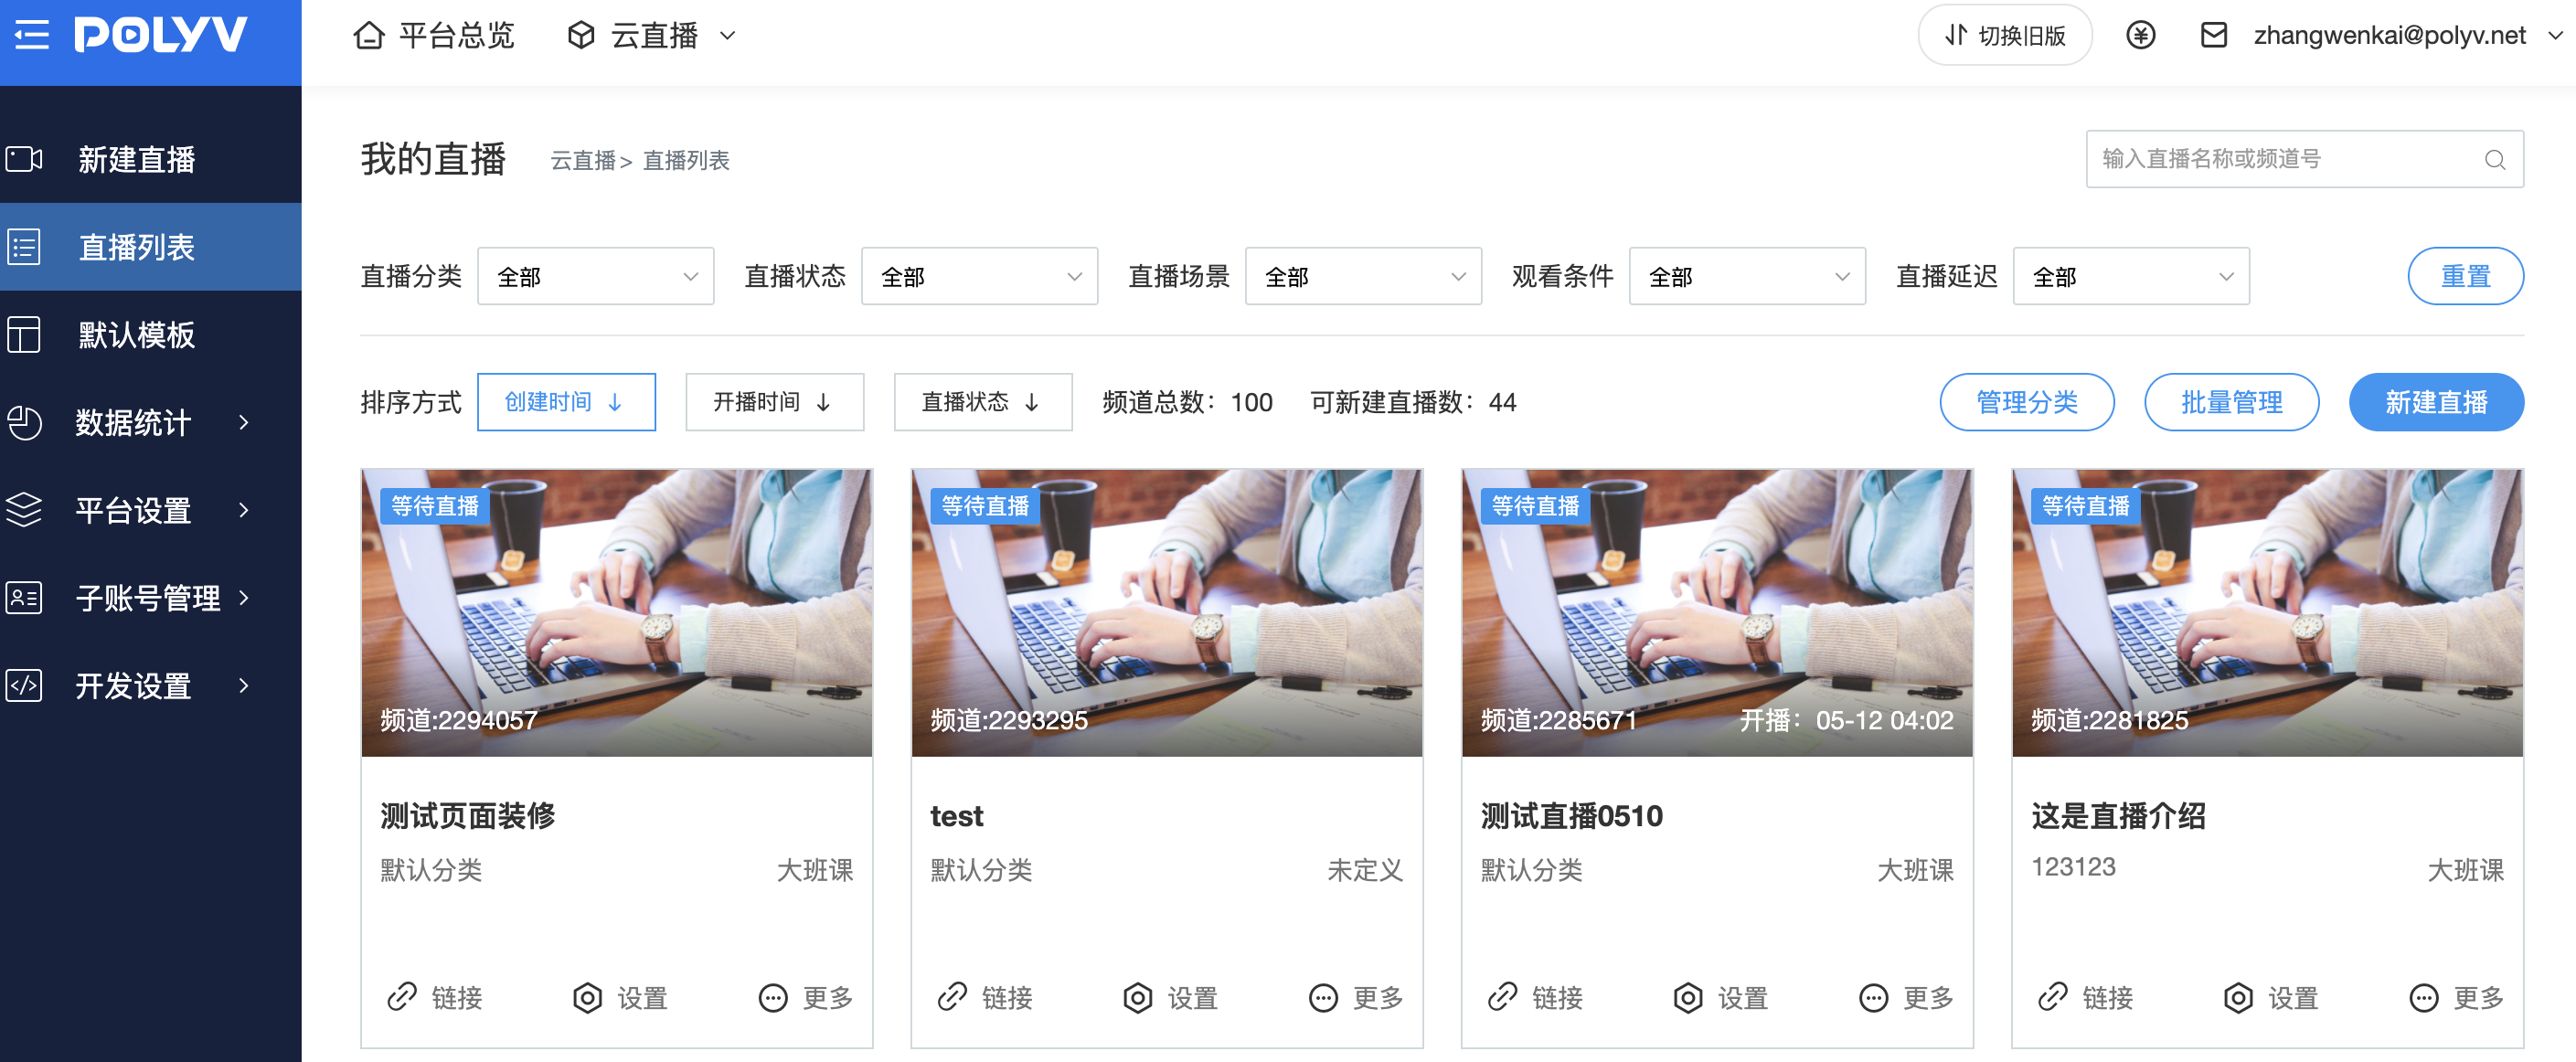
List Search:
The live streaming list supports fuzzy search by live room name or channel number. In the top-right corner, enter the live streaming name in the search box  to automatically search for related content. For example, enter "test" to search.

List Filtering and Sorting
The live streaming list supports filtering by live category, live status, live scene, live template, viewing conditions, and live delay. It also supports ascending or descending order based on creation time, start time, and live status. For example, to sort by creation time in ascending order, click on "Creation Time"  . To sort in descending order, click on "Creation Time" again
  .
.
When too many filters and sorting methods are selected, you can click "Reset" to clear all filters, sorting, and search conditions.
List Operations:
Create a New Live Stream
The live streaming list displays the current channel numbers you own and the number of new live streams you can create. Click "New Live Stream" to navigate to the new live stream creation page.
Live Category Management
Live streaming categories support the management of current live room categories. By categorizing live rooms, you can quickly find the corresponding live room. Click  to manage live streaming categories in the category management that appears.
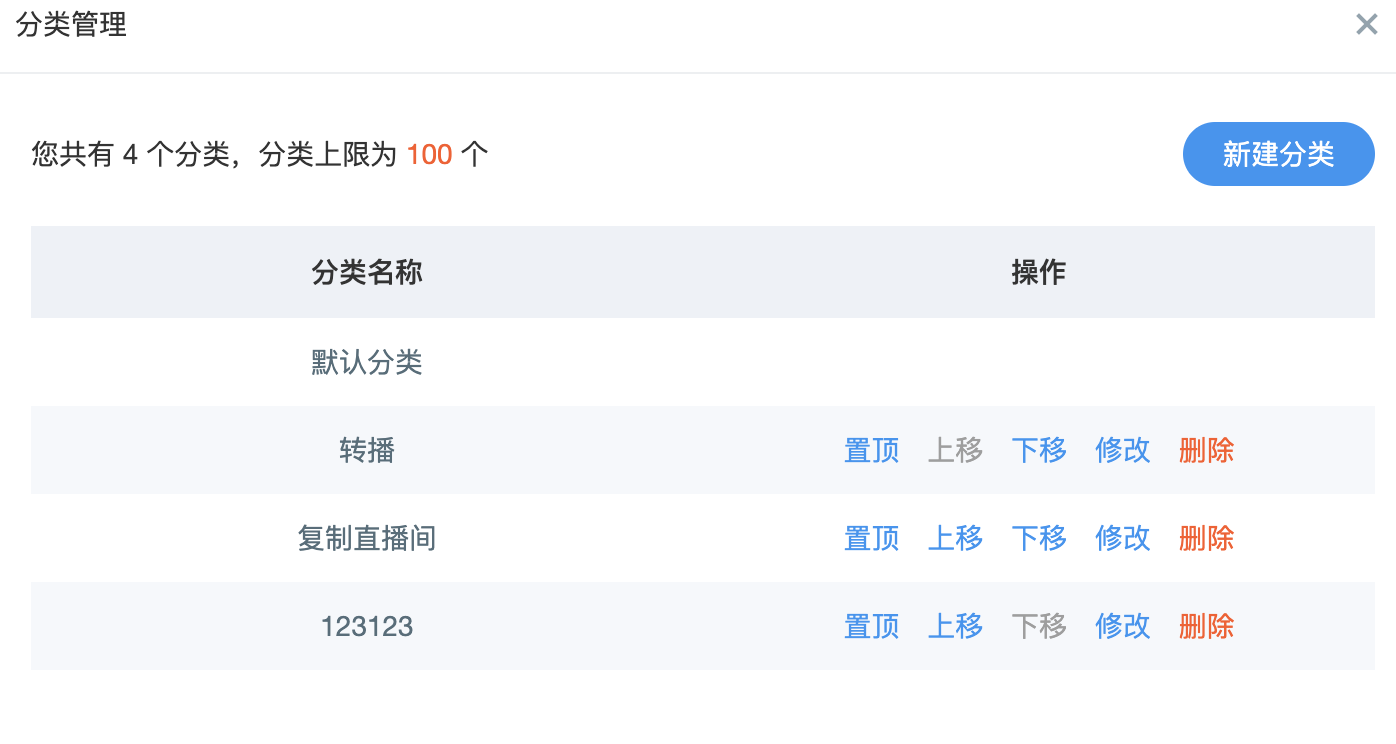
- New Category: Click "New Category",
 . The input field must not exceed 20 characters. After saving, a new category is added.
 - Pin to Top / Move Up / Move Down: In the category selection scenario, the order of the category list follows the order displayed in the live broadcast categories. If there are many categories, using the order adjustment feature can prioritize important categories. The default category is a default item, pinned to the top by default and cannot be changed or edited.
- Edit Category: Supports modifying the current category name. Select the corresponding category, click "Edit", enter the new category name in the pop-up edit box, and click "Save".
- Delete Category: Deletes the current category.
Move a Single Live Room
Click "More", 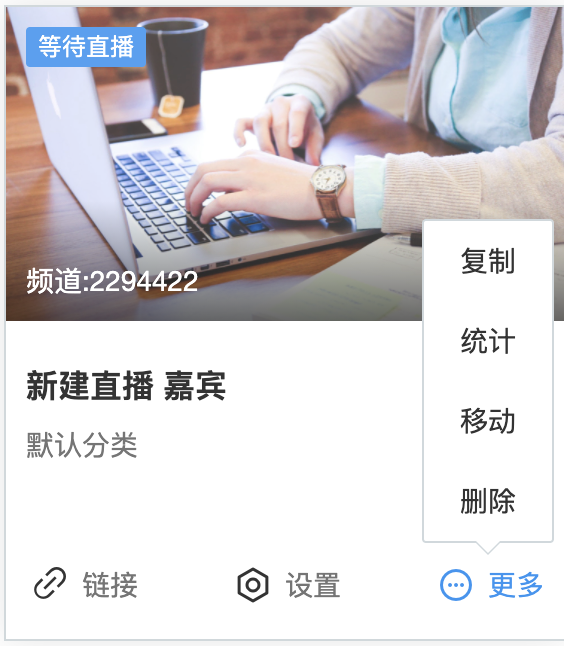 , then click "Confirm" to complete the live room category move.
Batch Move Live Rooms
Supports batch moving of live rooms for bulk category migration. Click  to access the batch processing page.
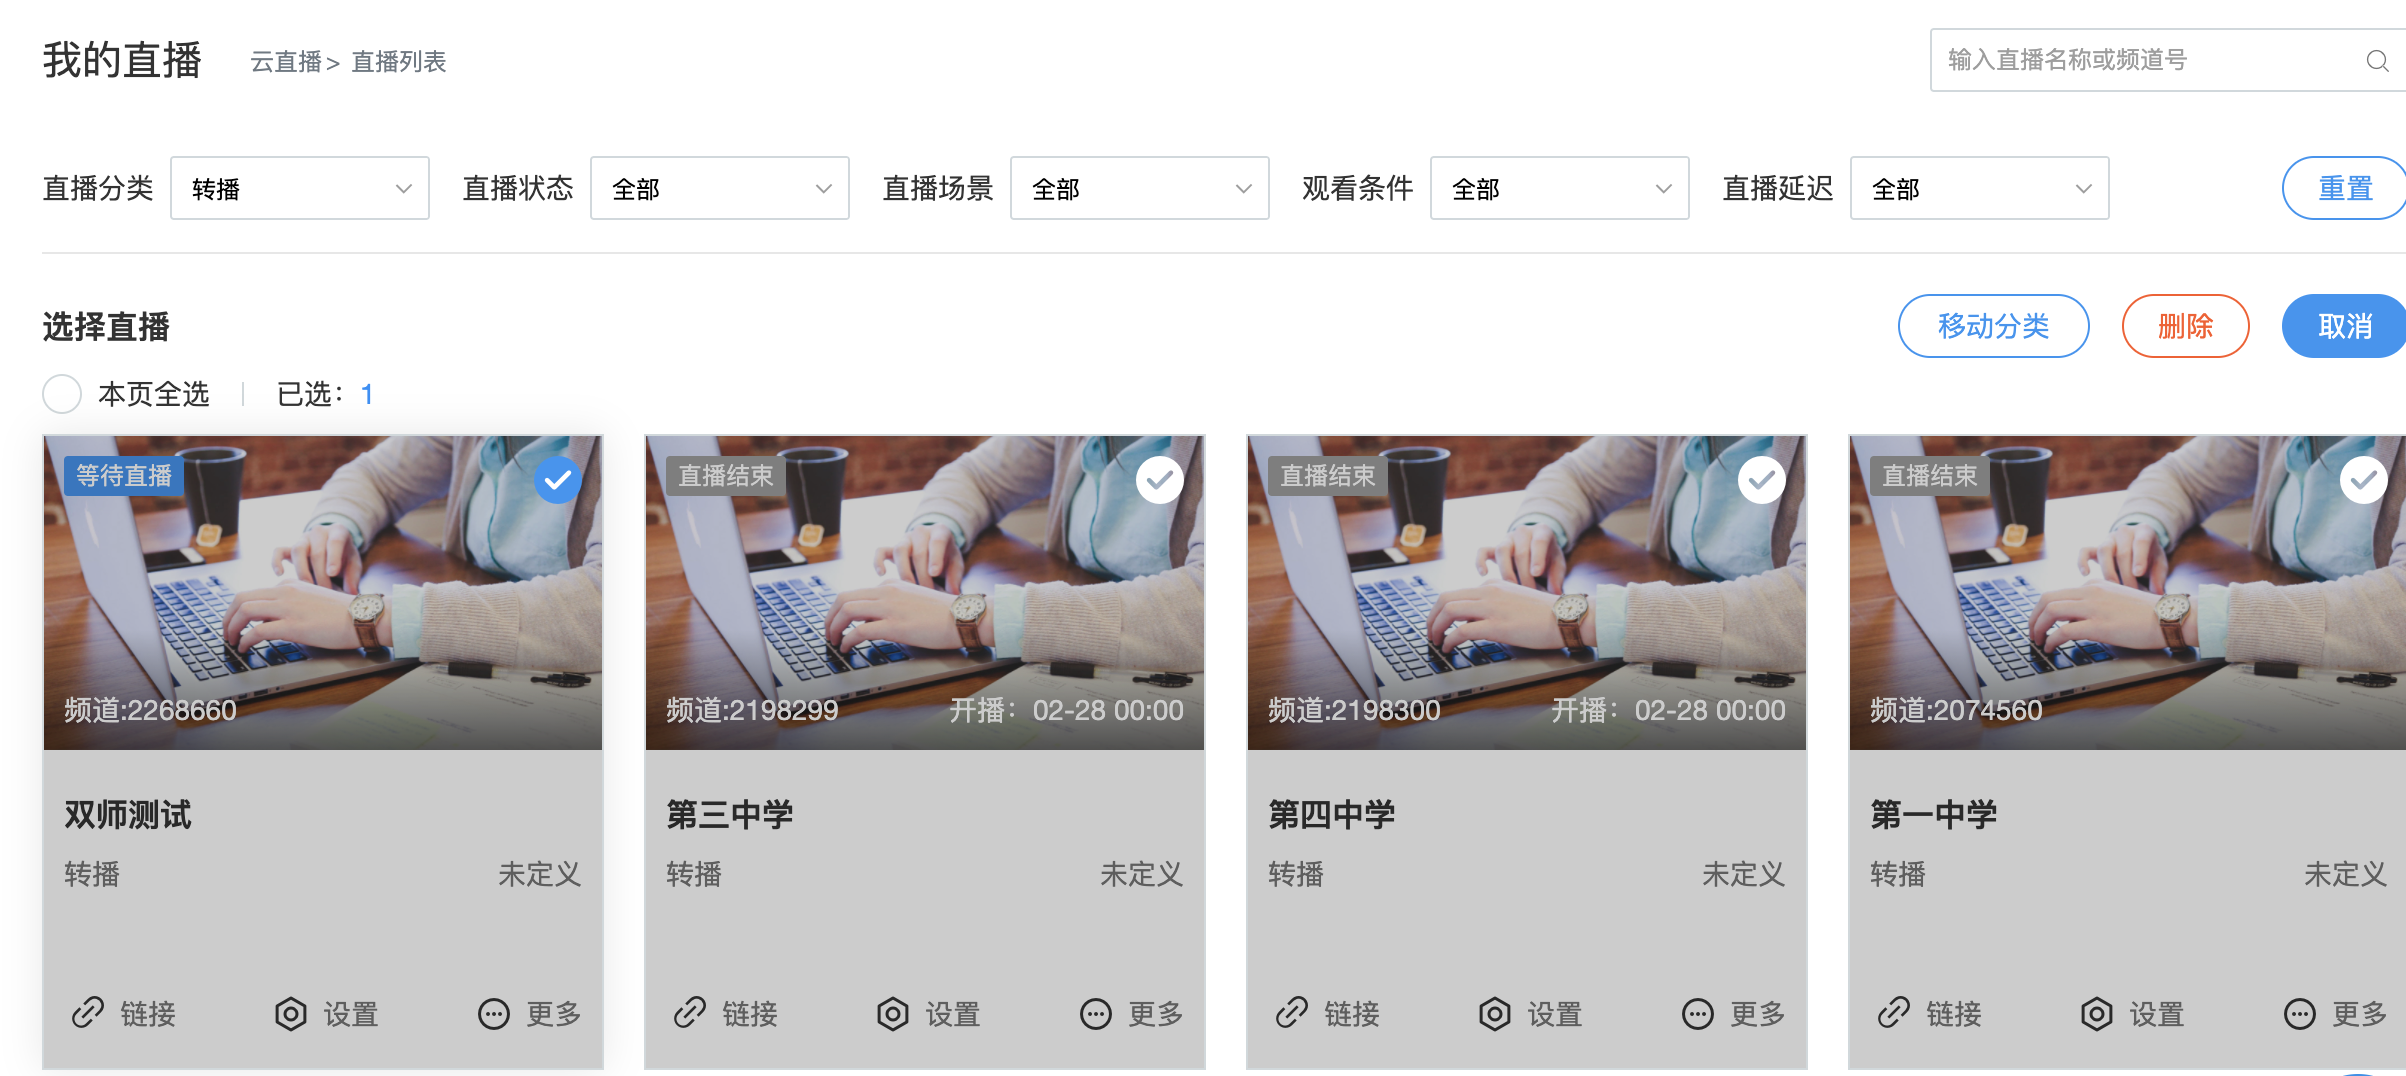
Select the live rooms to be processed. Multiple filter conditions are supported for selection, as well as selecting all on the current page. The page displays the number of selected items. Click "Move Category", choose the target category in the pop-up box, and click "Confirm" to complete the live room move.
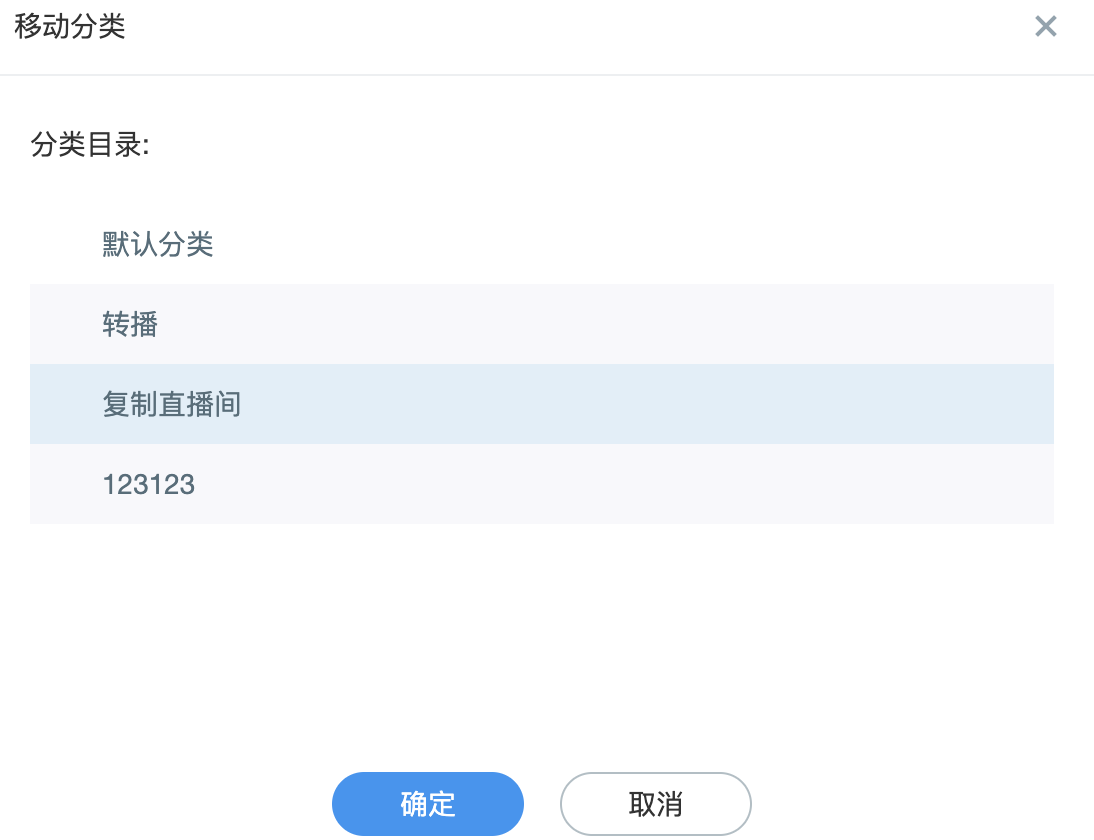
Copy Live Room
To improve the efficiency of setting up live streaming rooms, support is provided for duplicating existing live streaming rooms. After a successful duplication, only minor adjustments to the live streaming room are needed to complete the setup.
Select the live stream to copy, click "More", enter the name, category, and start time of the new live stream, then click "Copy Now". This will create a new live stream based on the selected one.
Copying a live room only duplicates the settings of the live room. It does not copy live room data such as replays, statistics, documents, chat records, registration records, or other related information.
Batch Delete Live Streams
Click to go to the batch processing page.
Select the live streaming rooms to delete. Supports multiple filter criteria for selection, as well as selecting all on the current page. The page displays the number of selected items. Click "Delete" to proceed to a secondary confirmation pop-up.
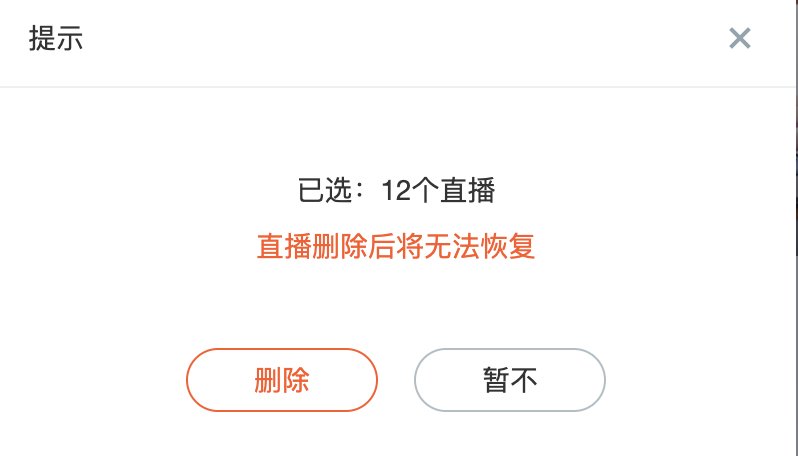
Click "Delete" to complete the batch deletion of live rooms.
Page Decoration
Page Decoration is a new feature added in the 3.0 backend. The design concept is to achieve "what you see is what you get." In the old version of the management backend, setting up the viewing page required navigating through multiple pages to complete a single configuration, resulting in cumbersome operations. In the 3.0 live streaming backend, all major operations related to the viewing page are centralized within the Page Decoration feature and are operated in a page-based display manner, effectively reducing operational costs. The settings for Page Decoration include: configuring a bilingual live room, setting up a warm-up video, player settings, live stream introduction settings, chat room settings, page menu settings, and more.
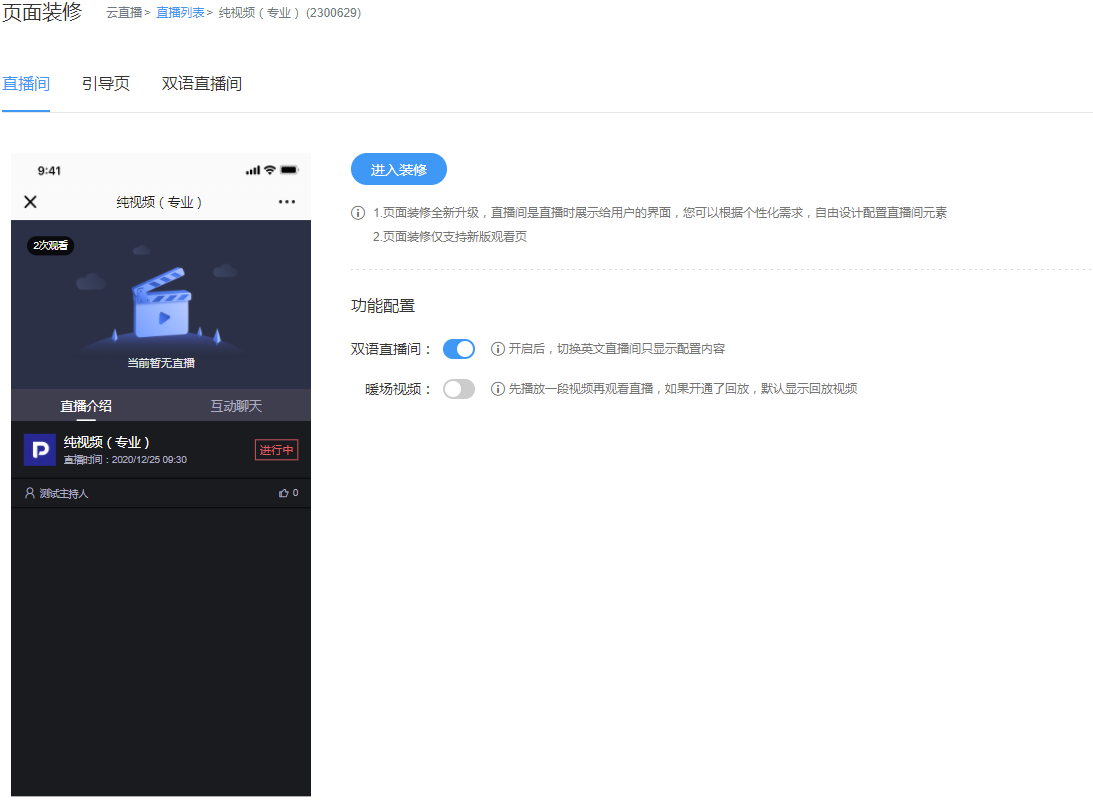
Note:
Page decoration only supports the new version of the viewing page and does not support the general settings of the old backend application. If you migrate from the old live streaming backend to the new backend and use the old viewing page, you will be prompted to switch to the new viewing page to use page decoration. If general settings are applied, you will also be prompted to view the general settings before using it.
1. Warm-up Video
Before the live stream begins, in certain scenarios, a video may need to be played, such as a promotional video or a brand video, to warm up the audience. In this case, you can directly use Polyv's warm-up video feature. The specific steps are as follows:
- Enter the page decoration settings and enable the warm-up video. Note that the live room may be reused, and there may be replay videos from previous live streams. If the replay of a previous live stream is enabled, the replay will be played first, causing the warm-up video to become ineffective.
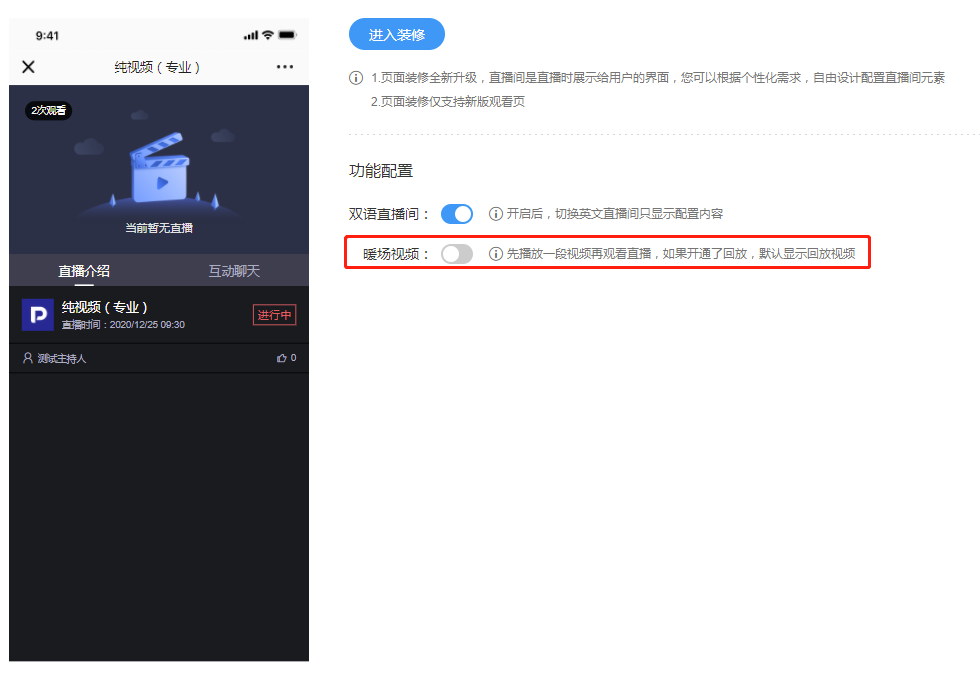
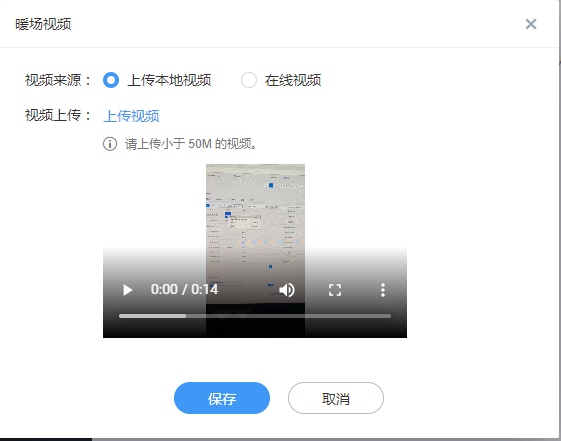
- Click "Settings" to access the video upload entry. Two video upload methods are supported: local upload and online video. Local videos must be smaller than 50MB. After selecting and uploading a video, you can preview it via on-demand playback. Click "Save" to save the warm-up video.
2. Setting Up a Bilingual Livestream Room
The bilingual live streaming room is primarily designed for multilingual usage scenarios. A common case is when a live room is viewed simultaneously by domestic and overseas audiences. For overseas viewers, the language in the live room needs to be translated into English for better understanding. Polyv has already automatically translated some default items when switching to English. However, certain information, such as the live room name and live stream description, cannot be directly translated. In such cases, the bilingual live streaming room needs to be enabled for separate configuration.
- On the page decoration page, enable bilingual live streaming, click "Enter Decoration", and select "Bilingual Live Streaming".
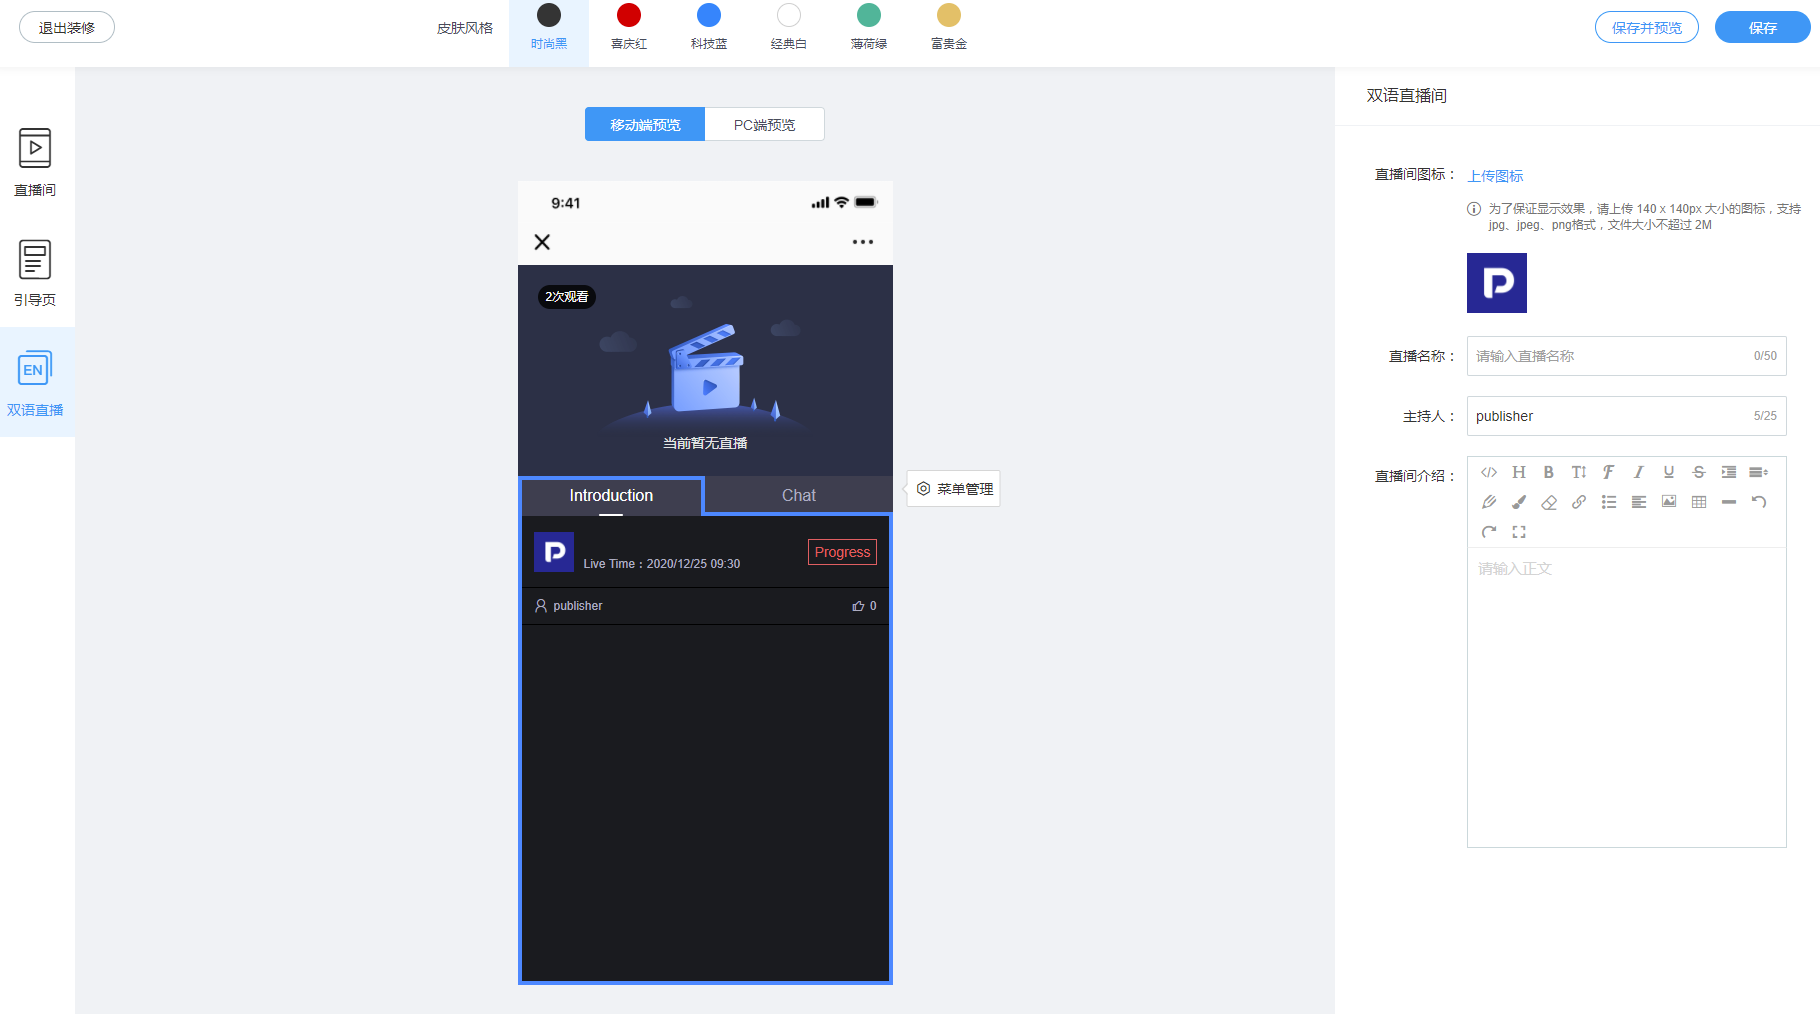
- After selecting bilingual live streaming, the page menu, live room name, live stream description, and host name must be configured independently; otherwise, they will display as empty values. Once configured, the effect is as follows:
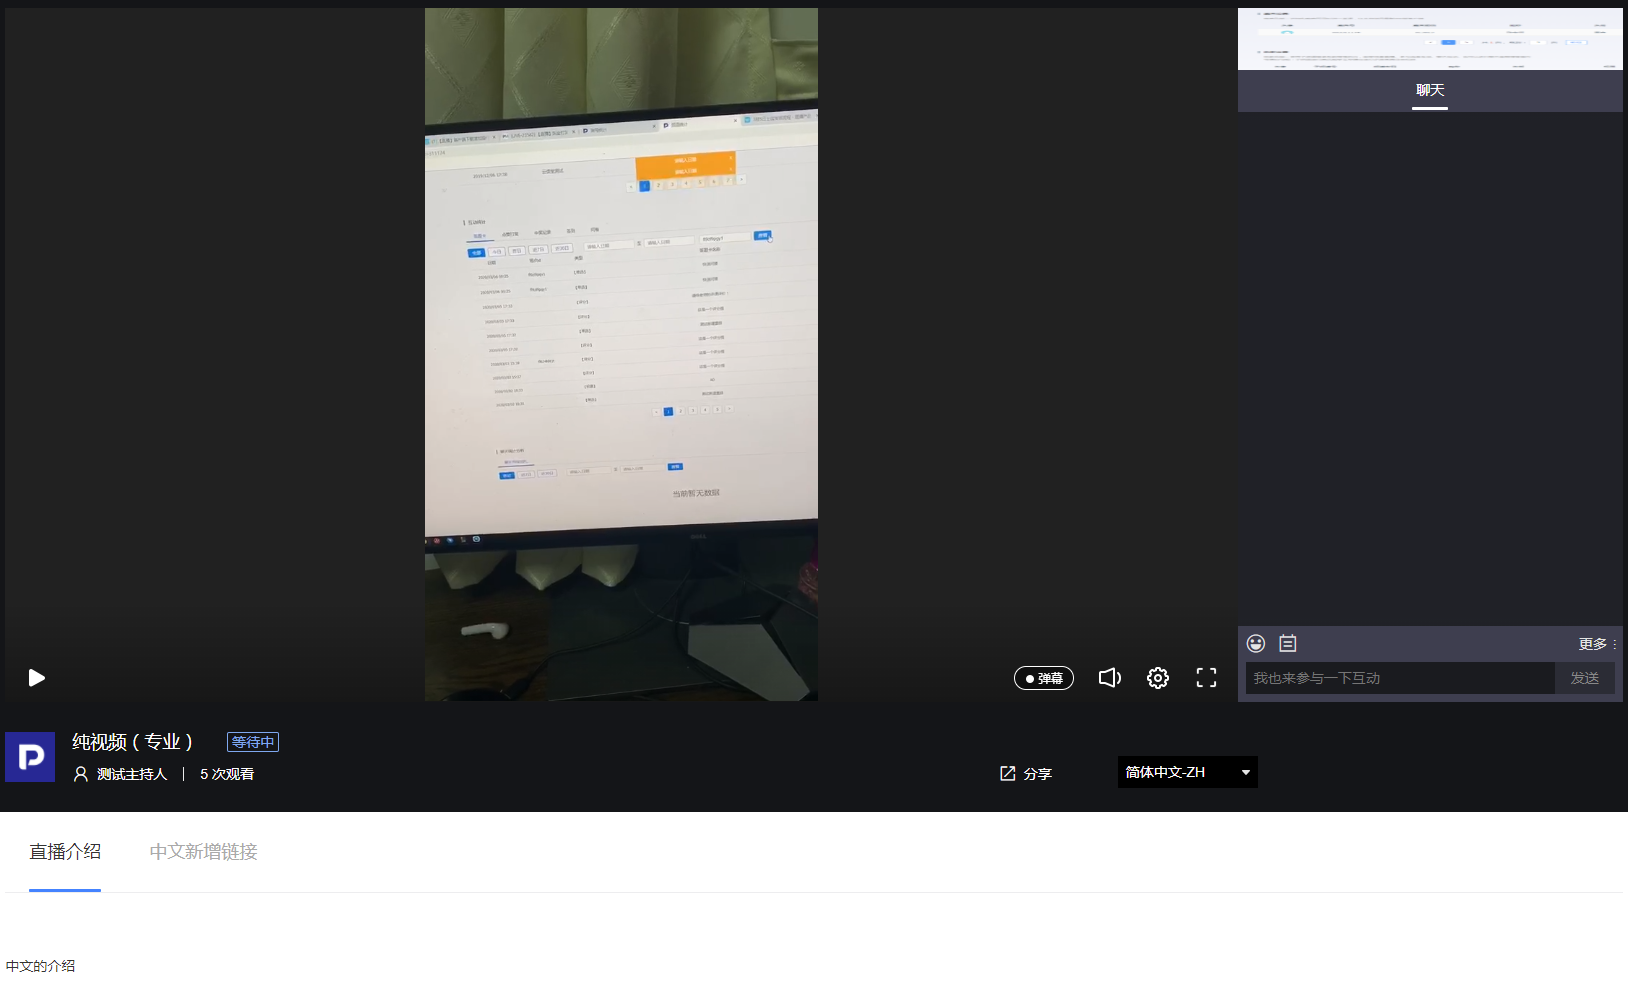 (Chinese)
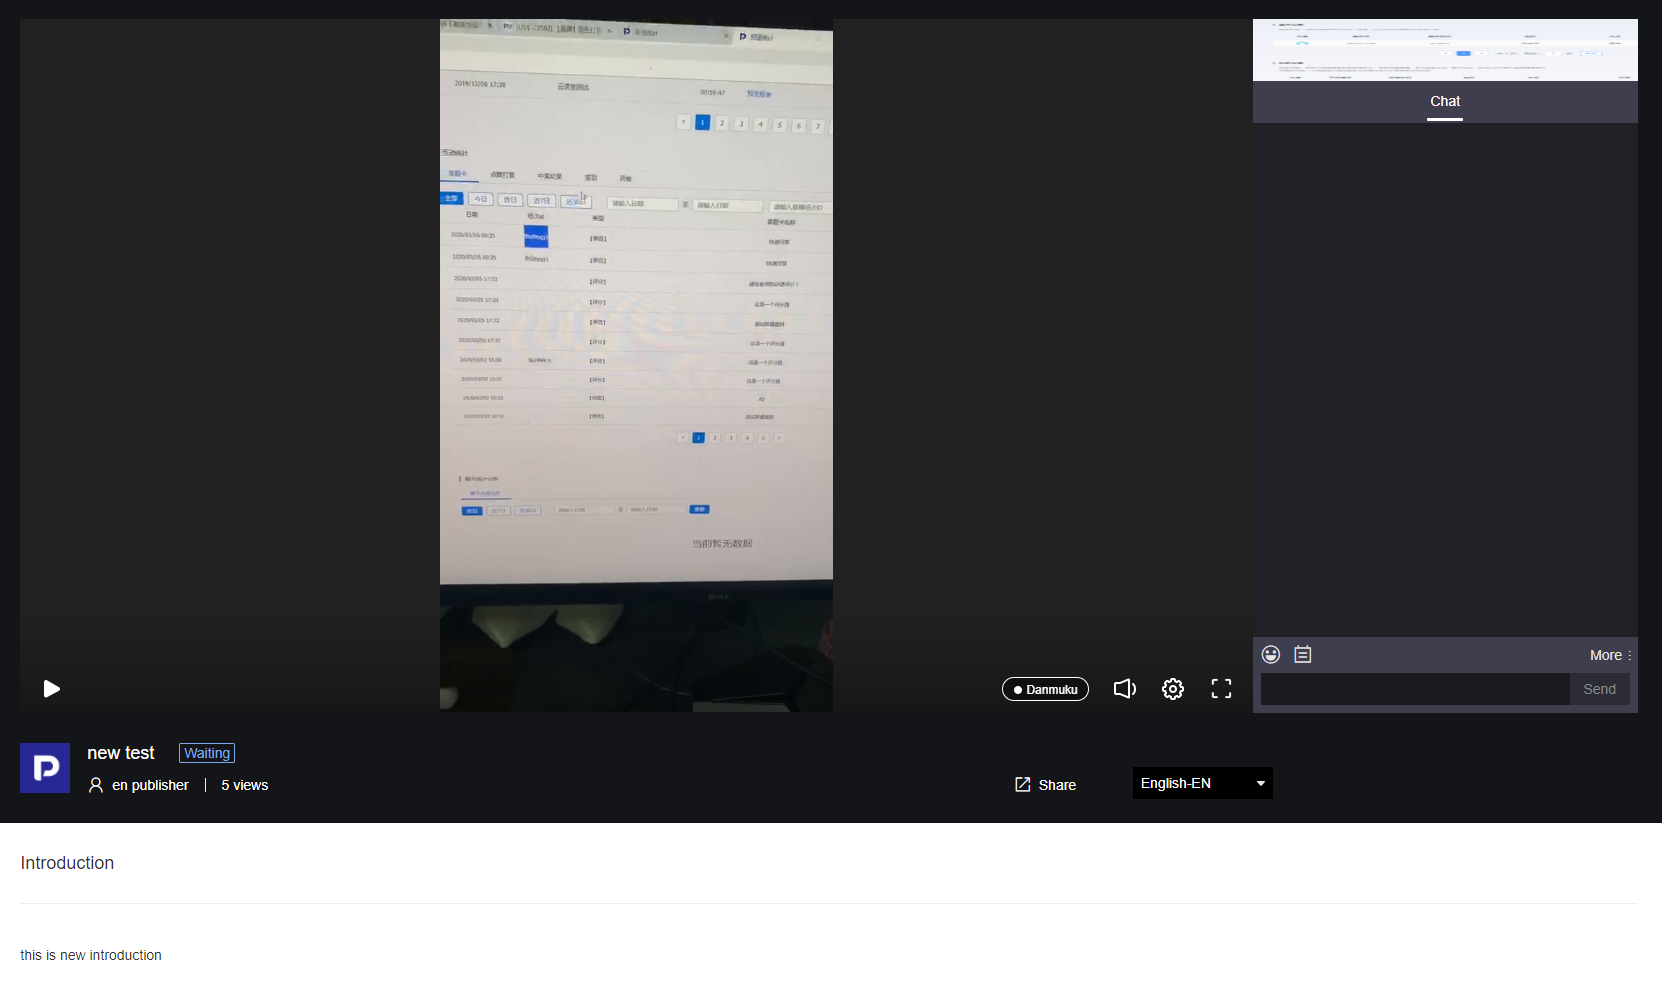
(English)
You can see that the live stream name, host name, and live stream description are all set independently. At the same time, menus available in Chinese can also be independently configured in English.
3. Basic Settings
- Watch Page Skin: Supports switching between 7 skins, including Fashion Black, Festive Red, Tech Blue, Classic White, Mint Green, and Rich Gold.
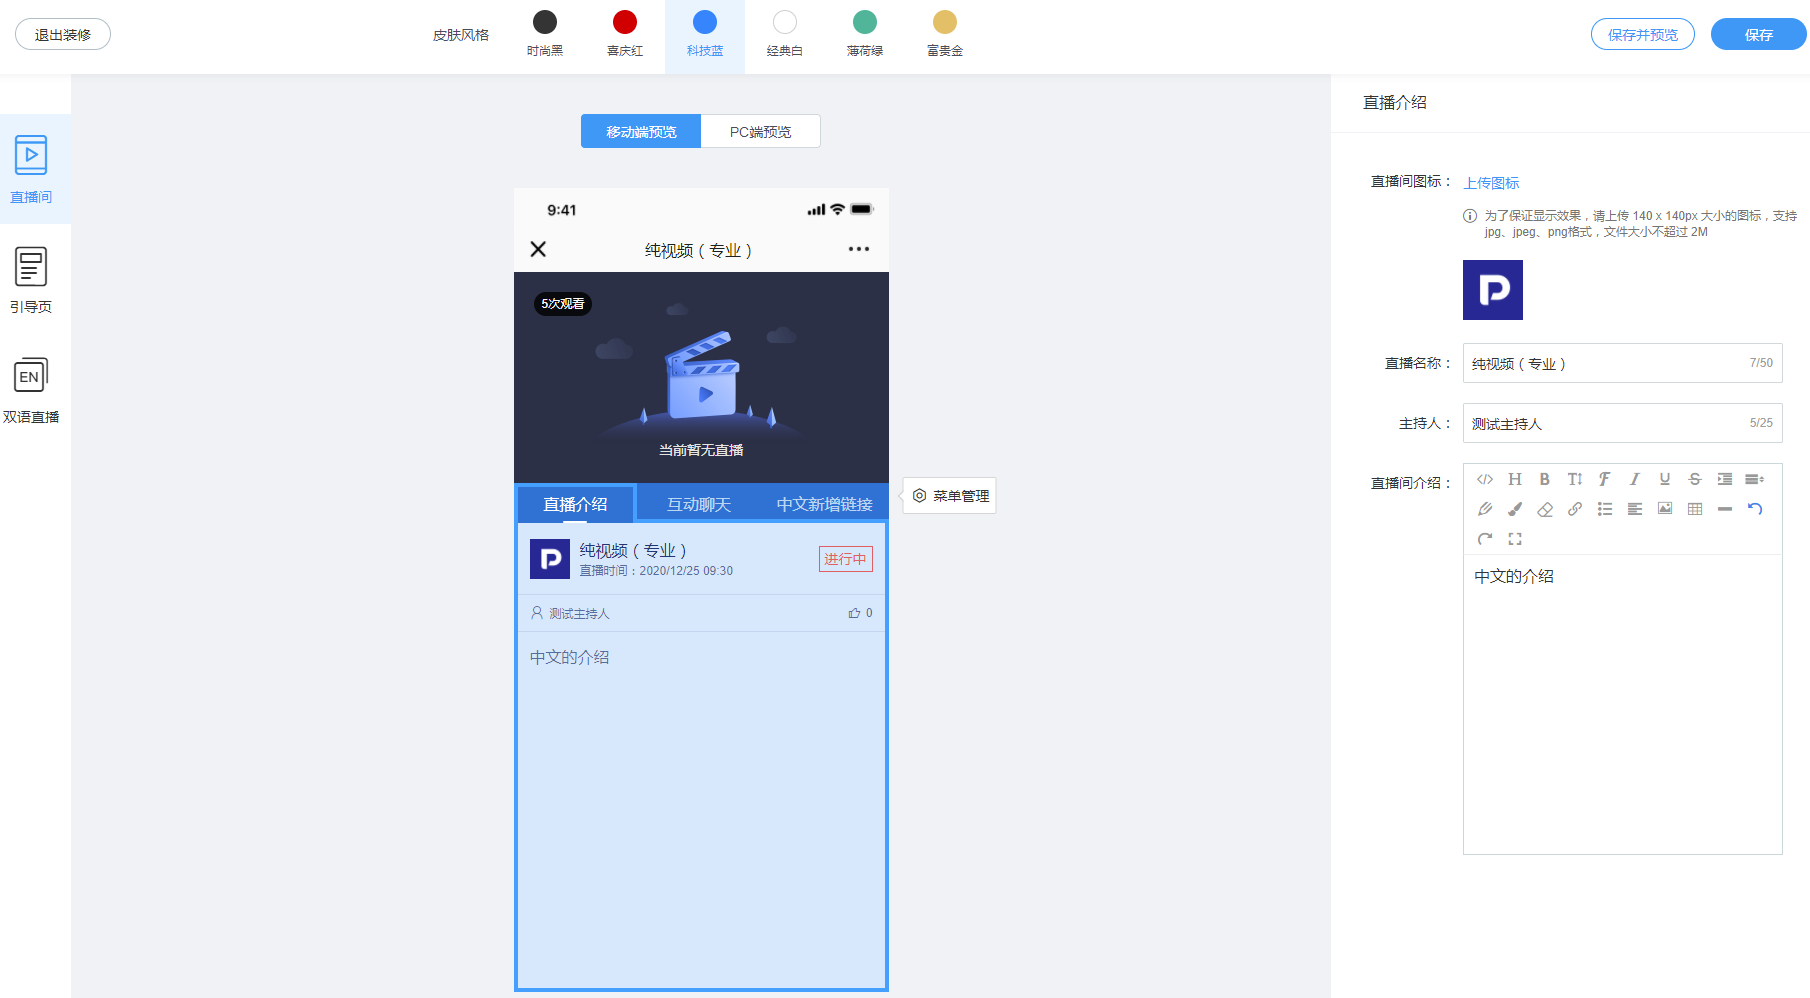
Save: After setting up the decoration content, you need to save it before submitting changes. Two saving methods are supported: "Save and Preview" and "Save". The difference is that "Save and Preview" will display a viewing address after saving, allowing you to click the link to view the online effect, while "Save" directly submits the modified content.
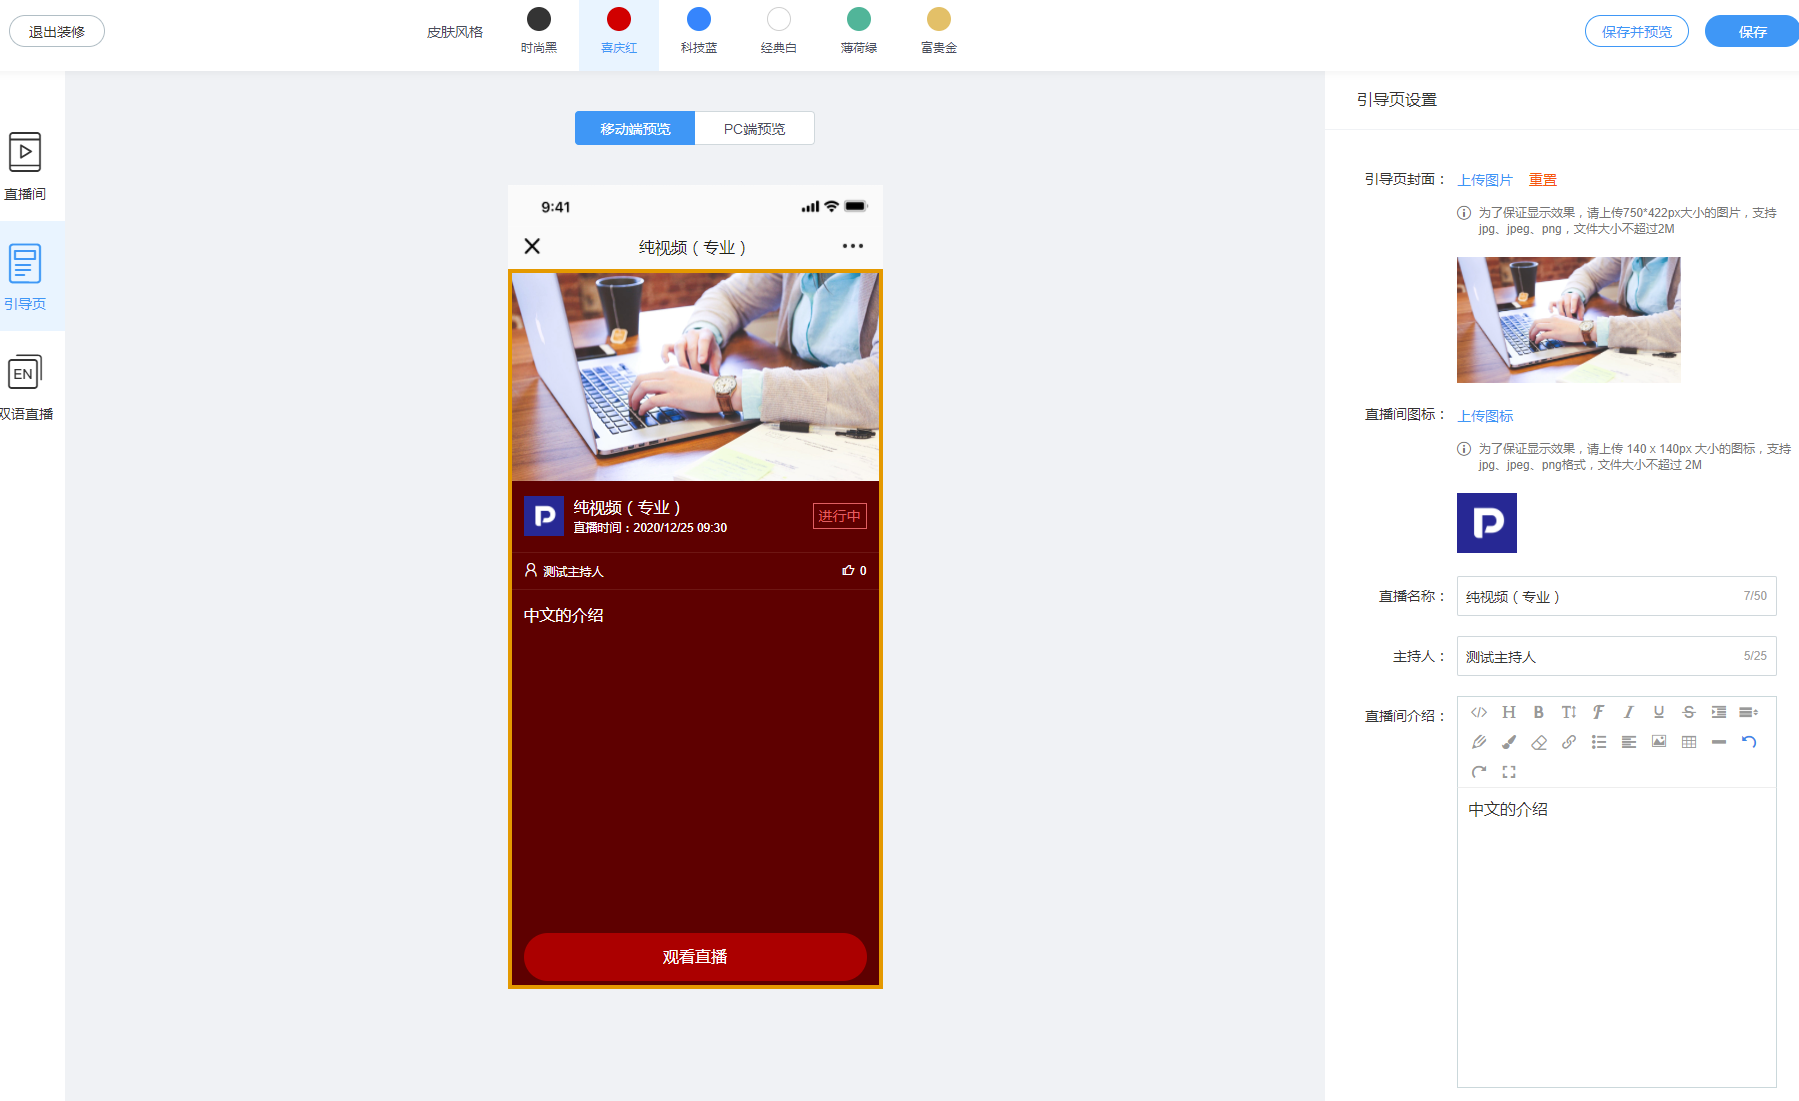
Guide Page: Before entering the live room, a guide page will be displayed. The guide page mainly hosts functions such as live room introduction, viewing condition verification, and live streaming reservations. If a cover image was uploaded when creating the live stream, it will be directly displayed on the guide page cover.
4. Player Settings
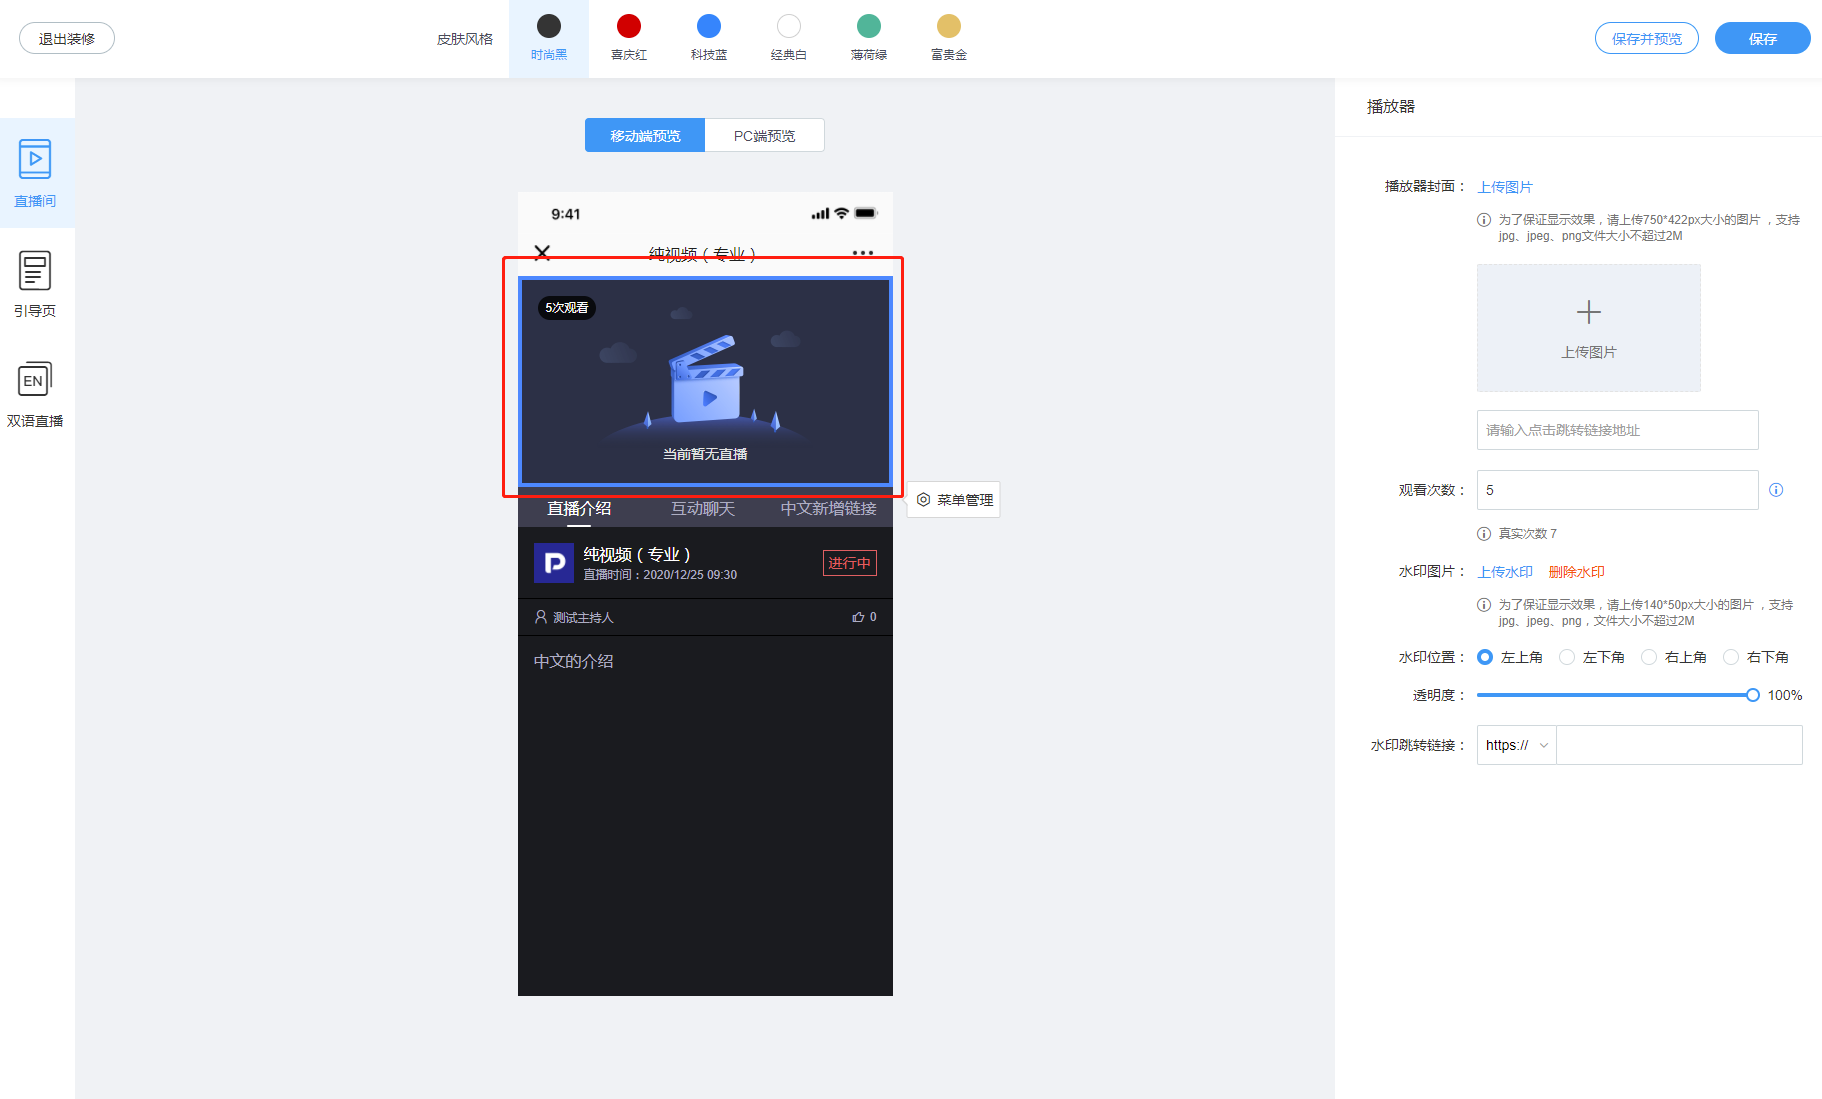
Enter page decoration, you can edit the player, including:
- Player Cover: Supports uploading a cover image for the player. Once uploaded, it can replace the default cover image. If both the player cover and a warm-up video are set, the warm-up video will be displayed first. The player cover also supports link redirection.
- View Count: There is a view count in the upper left corner, showing how many people have watched this live room (PV). It supports manual setting. To see how many people have entered the live room historically, refer to the actual count below. The actual count is not affected by manual settings.
- Player Watermark: Supports uploading a watermark for the player. You can set the watermark transparency, position, and redirection URL.
5. Live Stream Introduction Settings
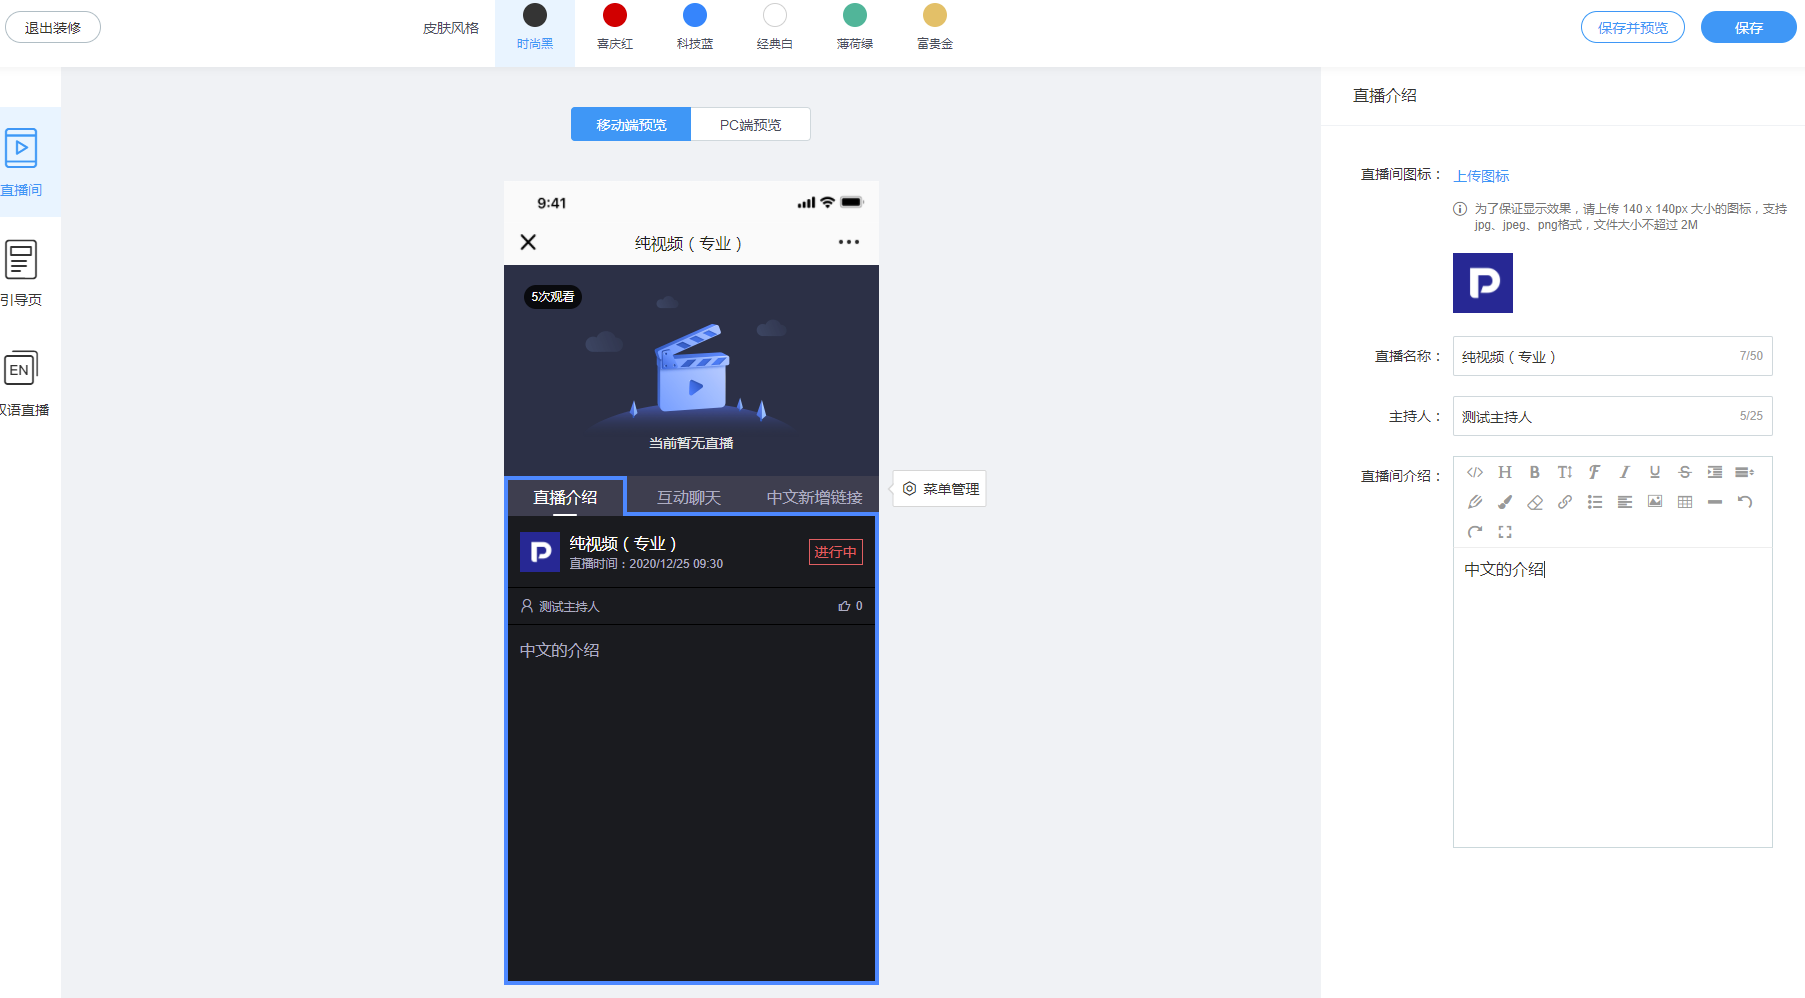
Supports setting the live room introduction page, including the live room icon, live stream name, host name, and live room introduction settings.
6. Chat Room Settings
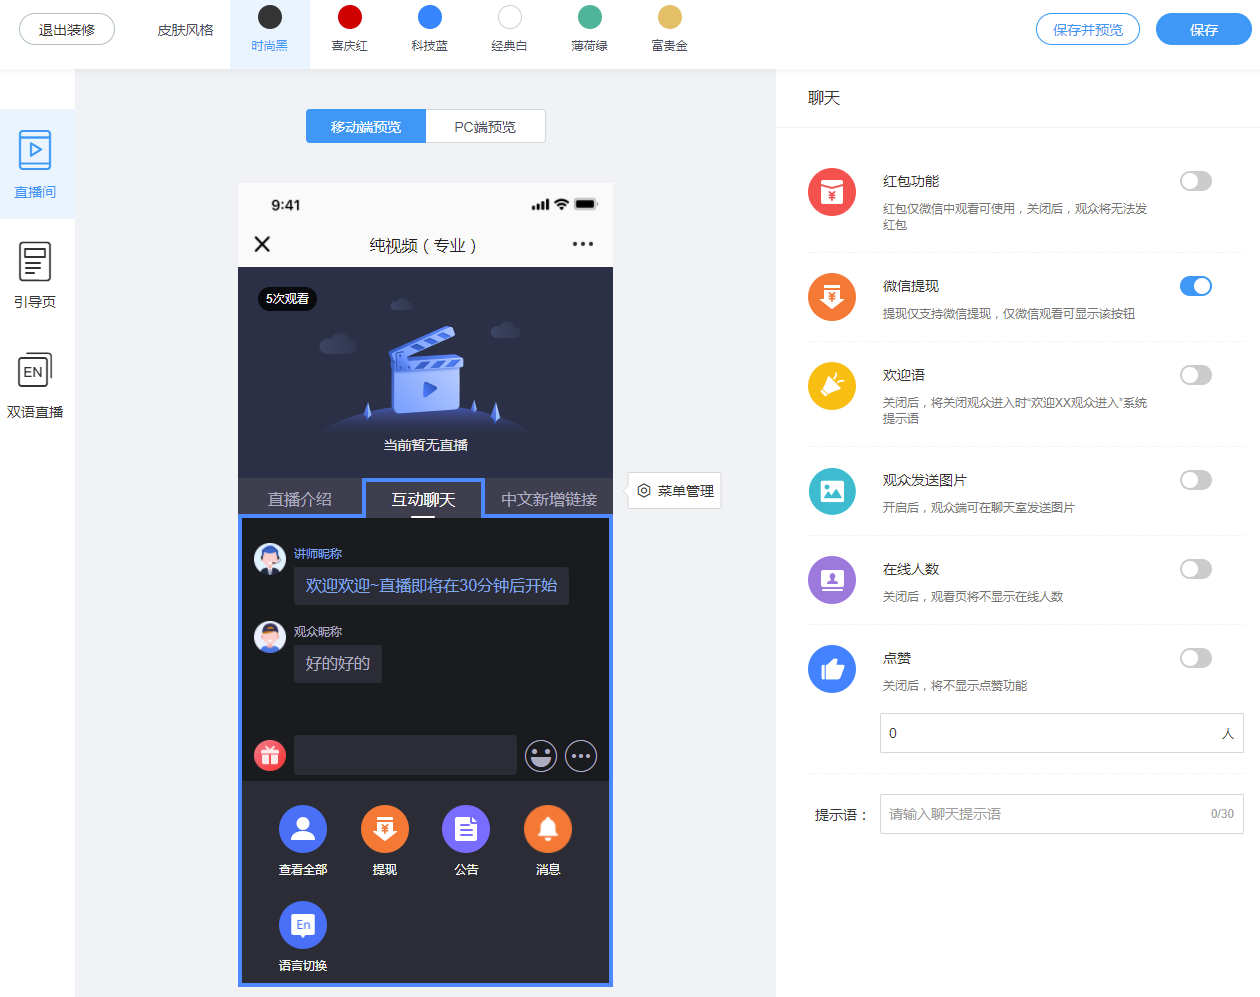
Chat settings primarily configure the chat room functionality, including:
- Red Packet Feature: Allows viewers to send red packets in the live stream. Common scenarios include marketing or year-end party events. Viewers send red packets in the group. Since red packets require payment, this feature is only supported when watching via WeChat.
- WeChat Withdrawal: Supports withdrawal via WeChat.
- Welcome Message: When a viewer enters the live stream, the chat room broadcasts the viewer's entry.
- Viewer Image Sending: When enabled, allows viewers to send images in the chat room.
- Online Viewer Count: Show/hide the current number of online viewers.
- Likes: Enable/disable likes on the viewing page, and allow manual modification of the current like count.
- Chat Prompt: The prompt text in the chat room. The default value is: "I'd like to interact too."
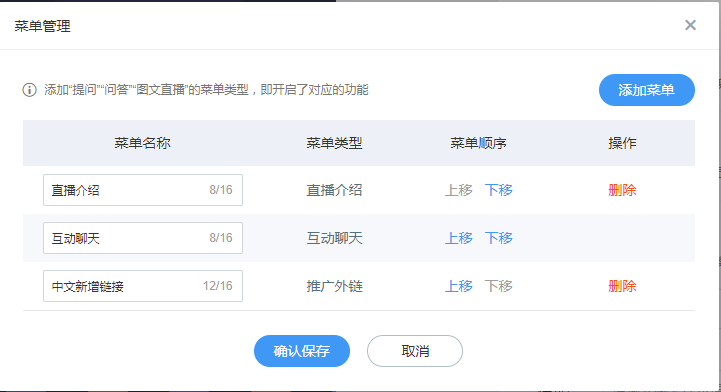
7. Menu Management
Supports management of page menus, including moving up, moving down, and deleting to adjust the position of each page. The page menus that can be added include:
- Live Stream Introduction Page: Live stream introduction page
- Interactive Chat Page: Chat page, including chat room settings
- Promotional External Links: Supports direct display of third-party web content, requires HTTPS, and all elements within the page must originate from HTTPS, otherwise it may cause a white screen
- Product List: Product library functionality
- Invitation Leaderboard: Invitation leaderboard feature in invitation posters
- Text & Image Live Stream: Text and image live streaming feature, requires separate activation
- Q&A: Supports viewers asking questions directly to the instructor, with options for the instructor to reply privately or publicly; the new version of the questioning feature
- Ask a Question: Supports viewers asking questions directly to the instructor; only one of "Ask a Question" and "Q&A" can be used at a time
- Custom Text & Image: Rich text and image introduction
Emotional Feedback
During offline classes, after explaining a certain knowledge point, the teacher can gauge whether students have understood by interacting with them and observing their facial expressions.
However, in an online setting, teachers cannot see students' expressions, and due to the limitations of online environments (such as latency and text-based interaction), it becomes particularly difficult for teachers to determine whether students have understood the material.
In the low-latency live streaming scenario of Polyv, to enhance interaction between teachers and students and make education more efficient, the host can configure an emotion feedback feature for the channel. Viewers can click emotion buttons to convey their feelings to others, with emotion messages transmitted in under 0.1 seconds, promoting real-time classroom interaction.
1. End Support Status:
Currently, emotional feedback is only supported in the three-panel mode. The audience side is limited to the web version, while the host side can view emotional messages on the client or web broadcasting interface. The APP side does not support this feature.
2. Instructions for Use:
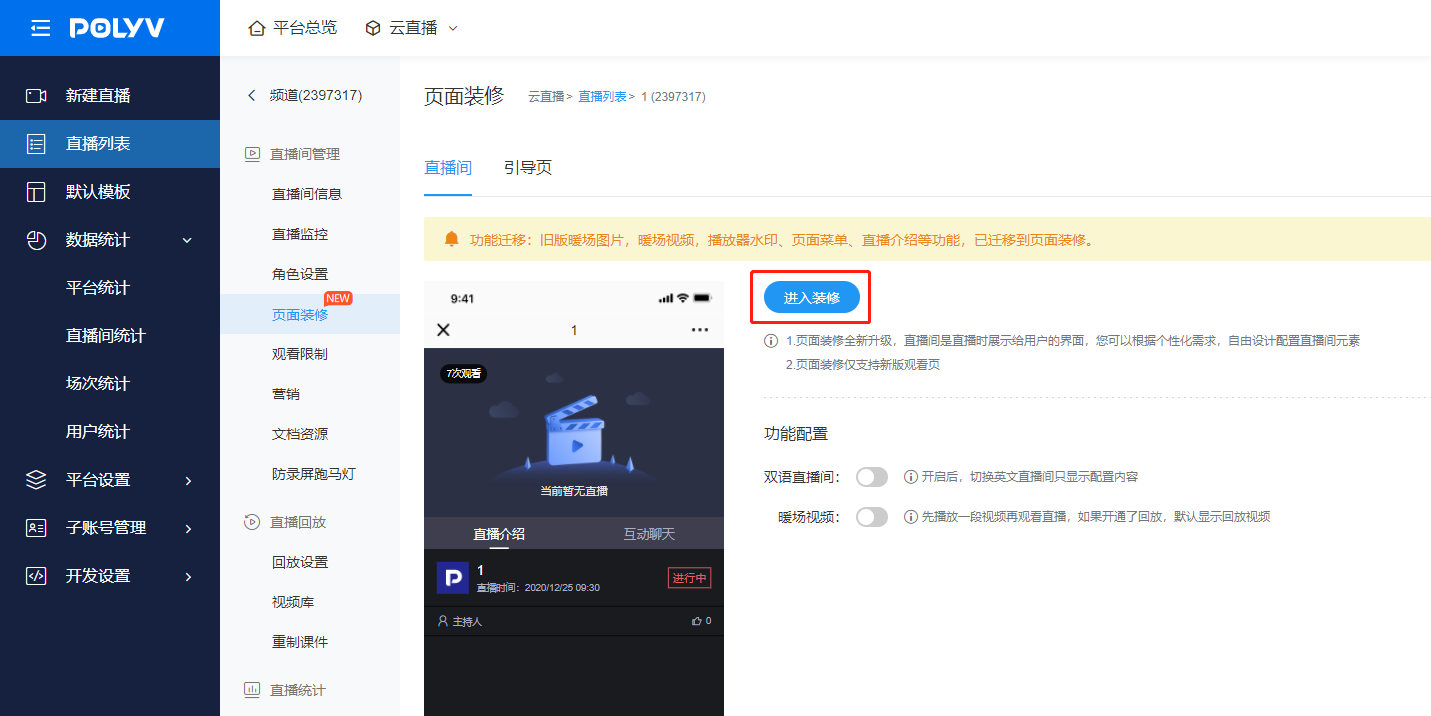
1. Open the New Backend - Default Template - Page Decoration
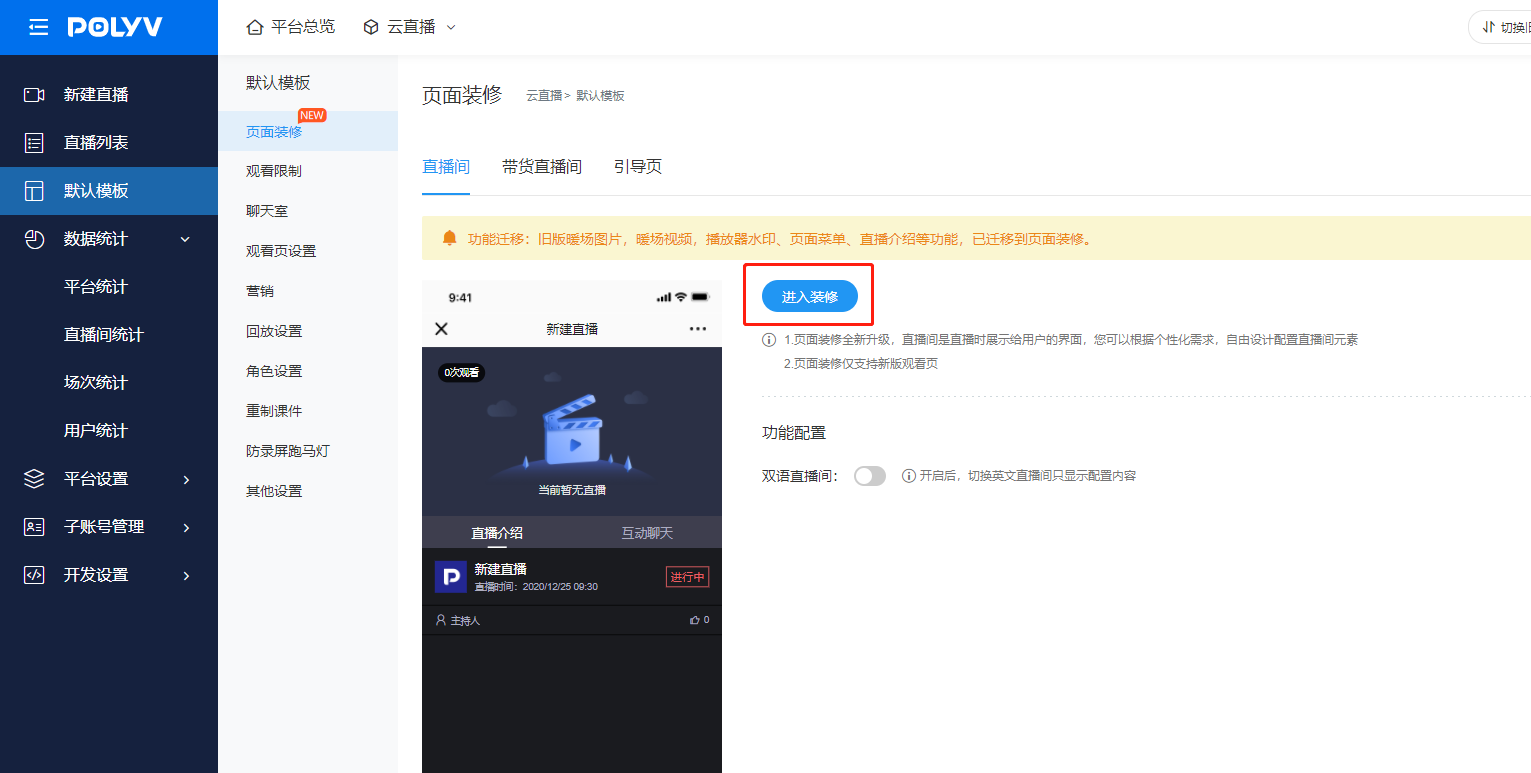
Enter the decoration page and enable emotion feedback.
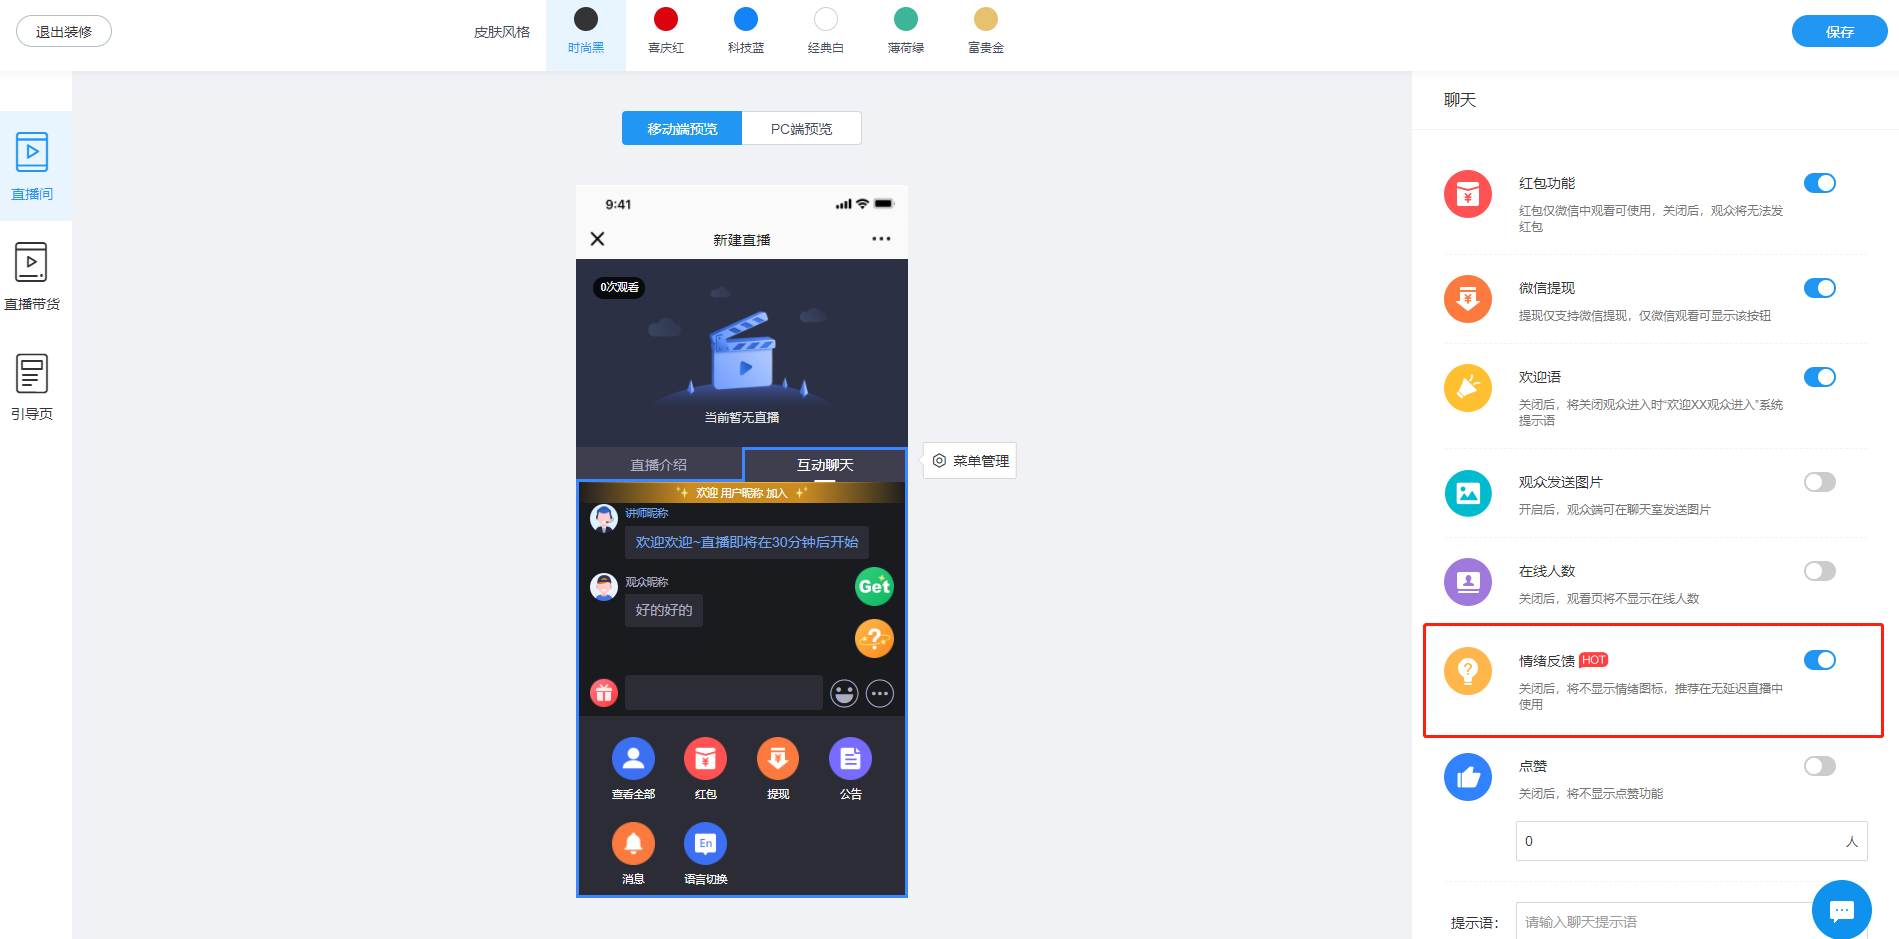
After enabling, click the Save button in the top-right corner. Once saved, the emotion buttons will appear on the viewing page of that channel.
This method applies to all three-screen channels using the default template. It can also be configured individually for a single channel. Click the live stream list, select a channel, and click Settings:
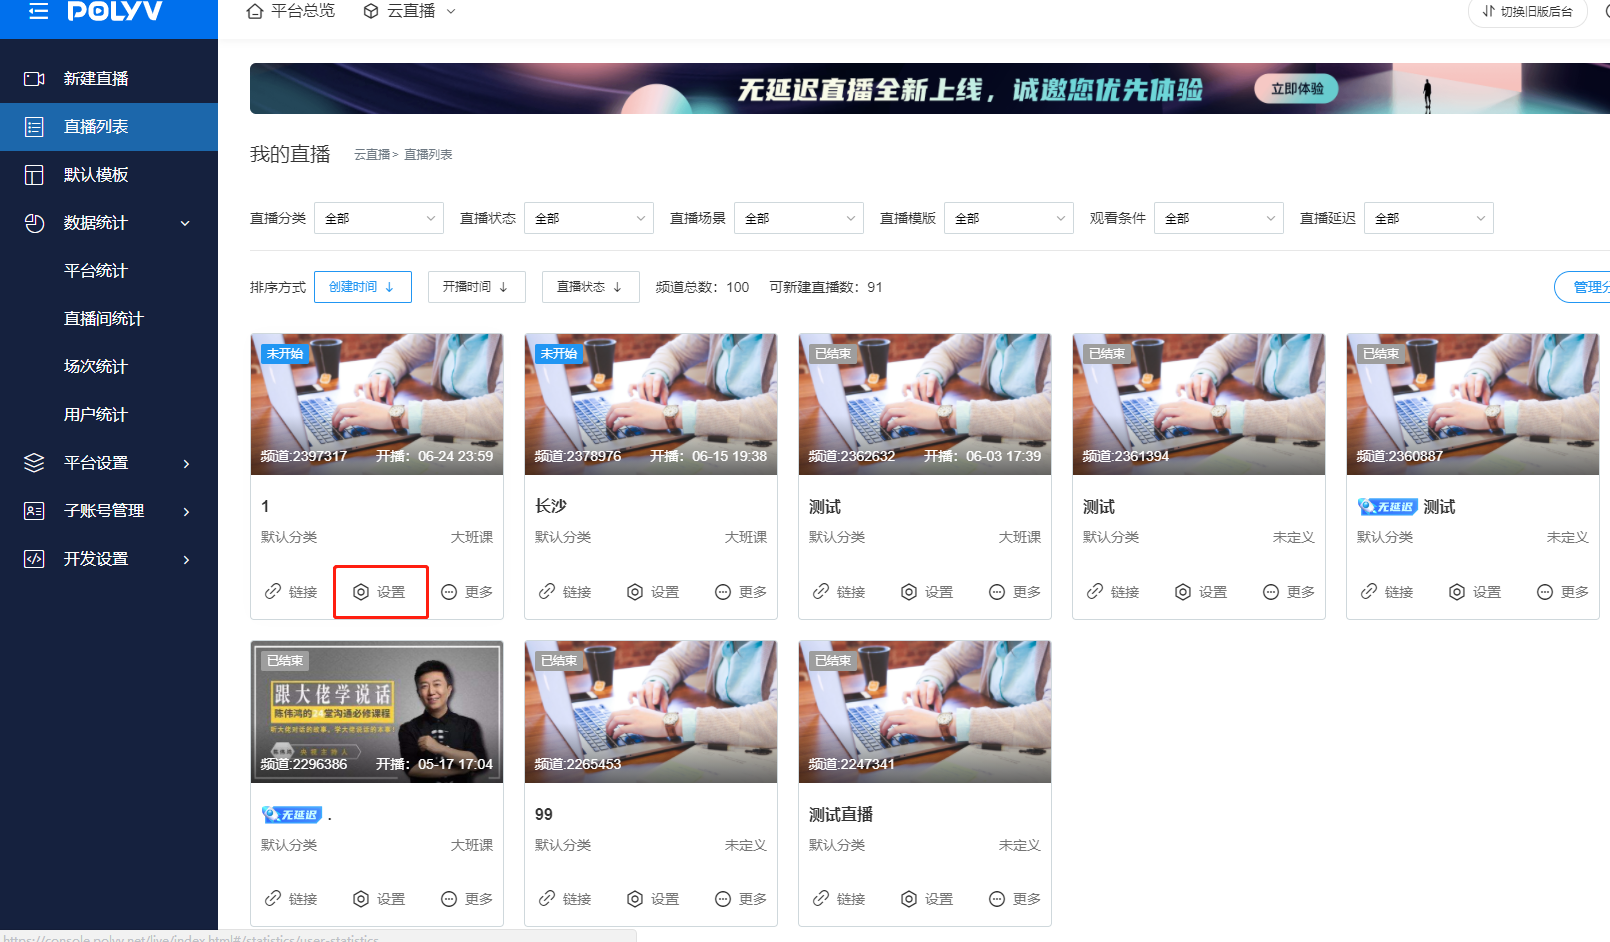
Under page decoration, enable emotional feedback for this channel individually.
2. Audience Clicks on Emotion Button
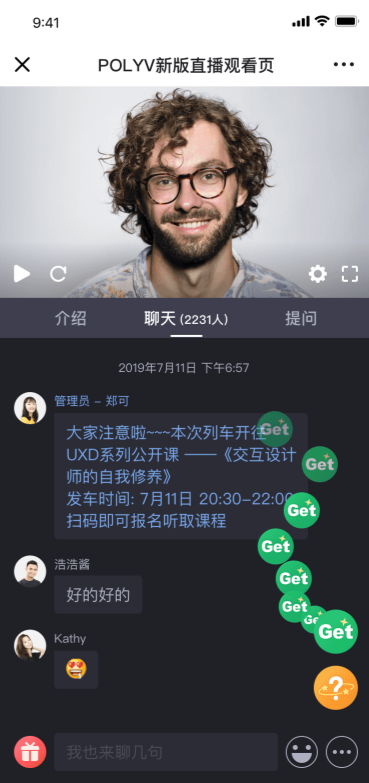
Each time an emotion button is clicked, a bubble corresponding to that button appears. The bubbles from emotion buttons are synchronized across all clients, meaning that when Audience A clicks an emotion button, Audience B and Teacher C can see the bubble appear simultaneously.
The logic mentioned at the beginning, where only 5 emotion messages are sent every 30 seconds, works as follows: when viewer A clicks more than 5 times, they can continue clicking and see the bubbles that appear from their own button clicks, but other viewers will no longer see the bubbles from their subsequent clicks. They will have to wait until the next 30-second interval to send emotion messages again.
3. The Anchor Receives an Emotional Message
The host can receive emotional messages sent by the audience on the web streaming interface or client, but the host cannot send emotional messages themselves.
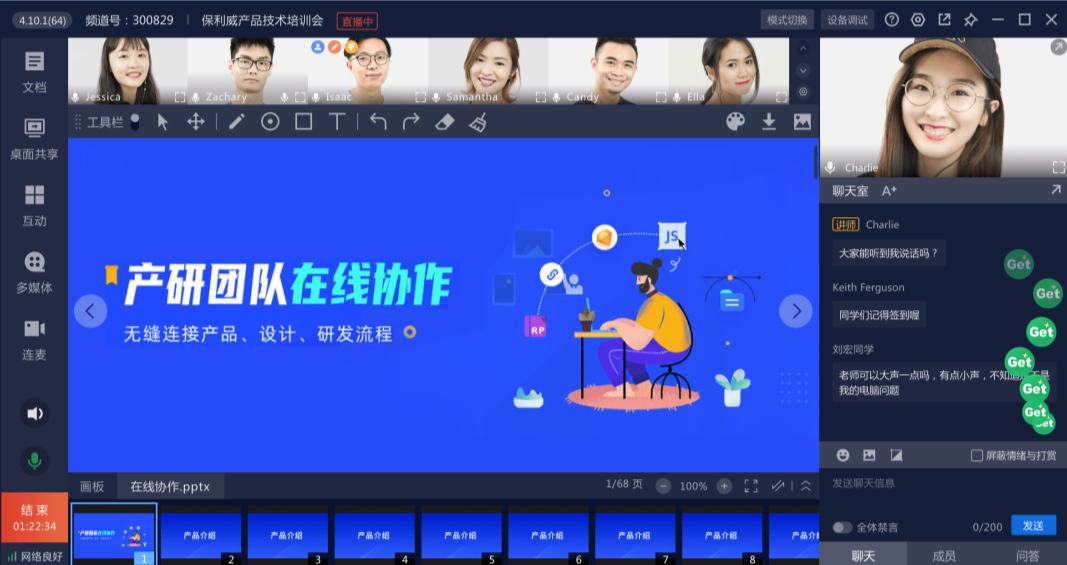
3. Notes:
Emotional feedback and the like function conflict with each other. When one is enabled, the other is automatically disabled. In other words, if the emotional feedback feature is used, the like function cannot be used.
To reduce lag in live streams and improve the viewing experience, each viewer can only send emotional messages 5 times within a 30-second window. If the limit is exceeded, the button can still be clicked, but other viewers will not receive the additional emotional messages.
Live Monitoring
1. Feature Overview
Live monitoring is mainly divided into two major functions: monitoring the live stream video and managing the chat room.
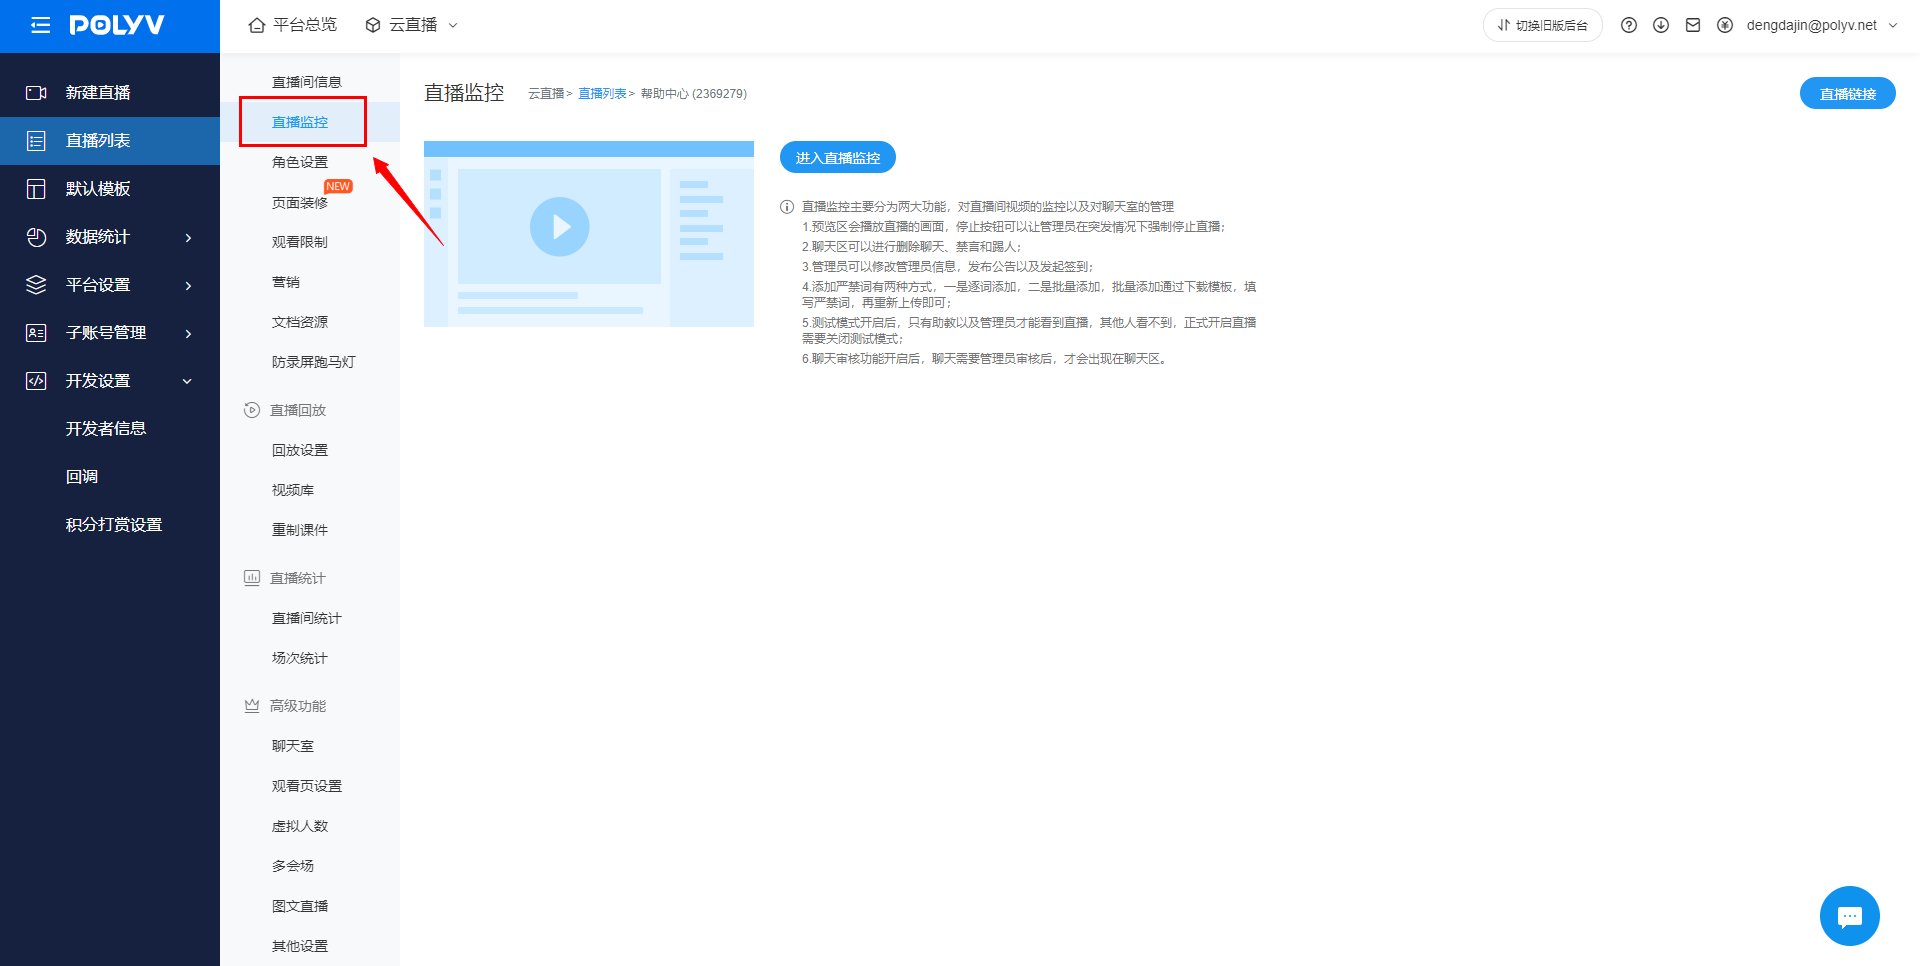
2. Operation Instructions
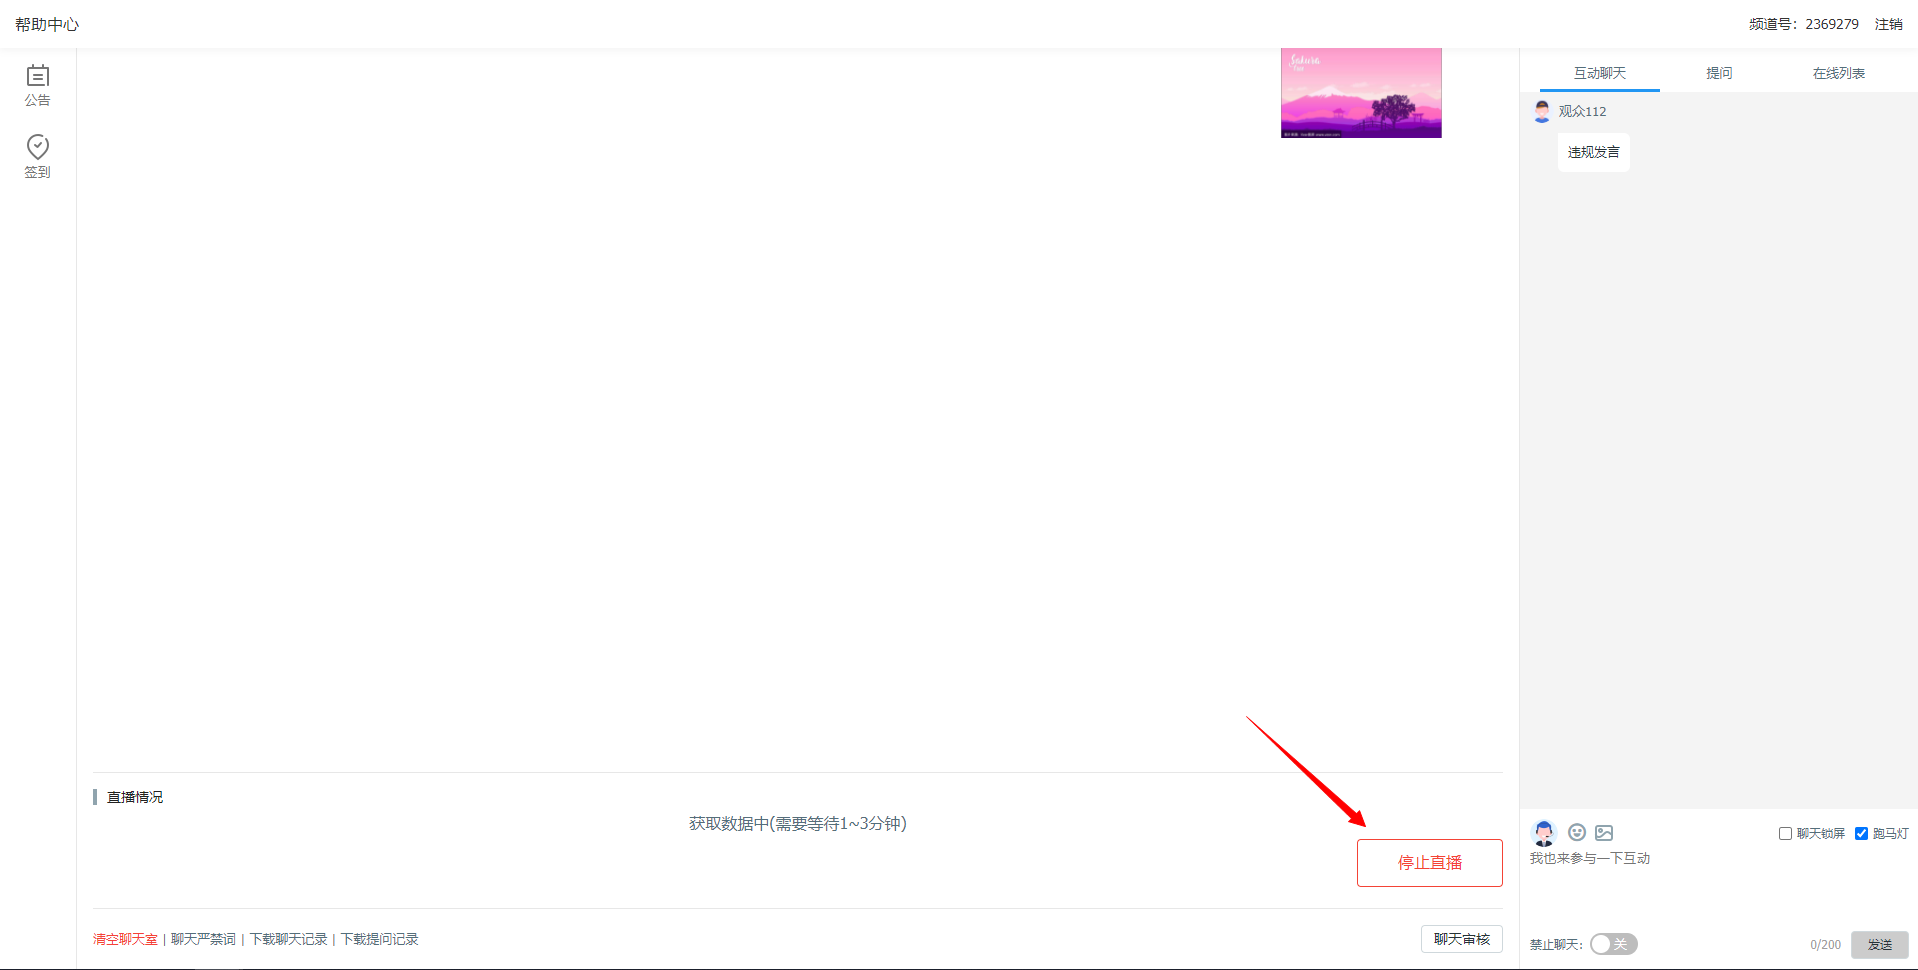
Preview Area
You can see the live streaming screen, and the stop button allows administrators to forcibly stop the stream in emergency situations.
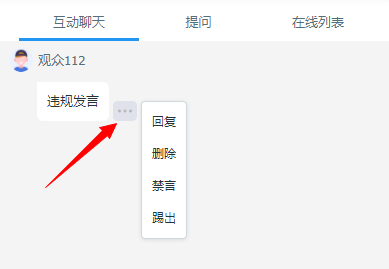
Speech Management
In the chat area, you can delete messages, mute users, and kick users.
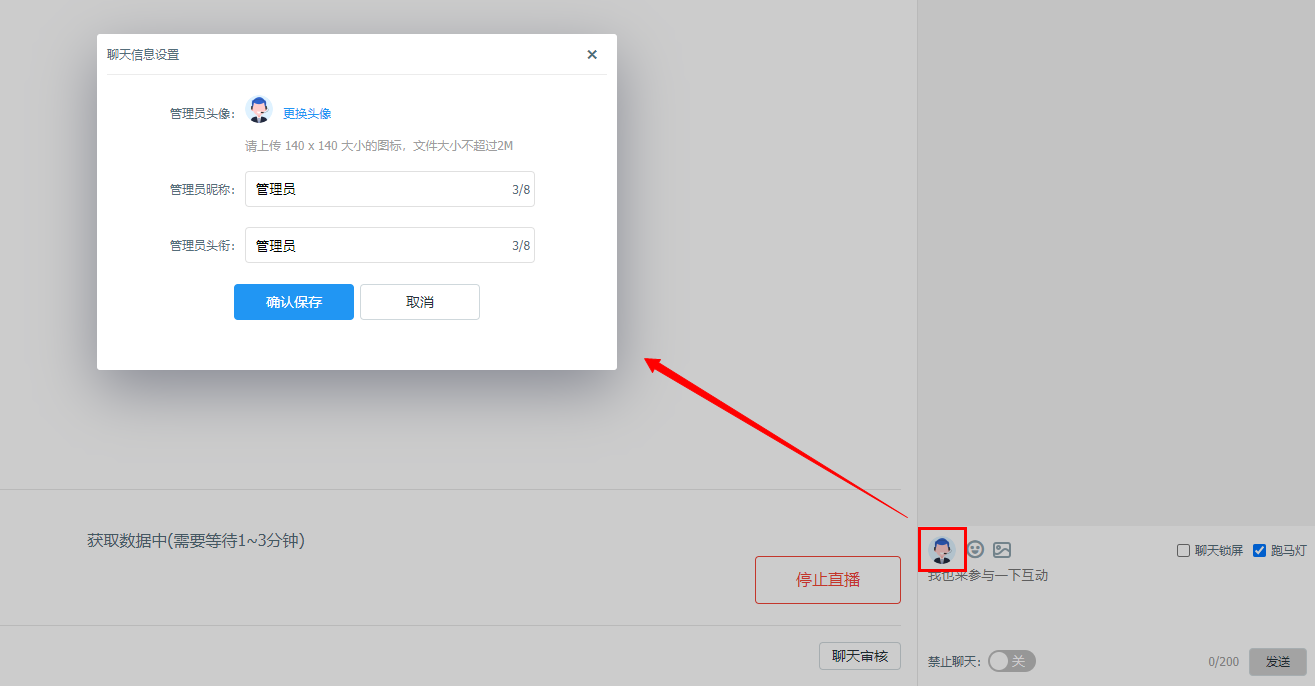
Modify Administrator Information
The administrator can modify administrator information.
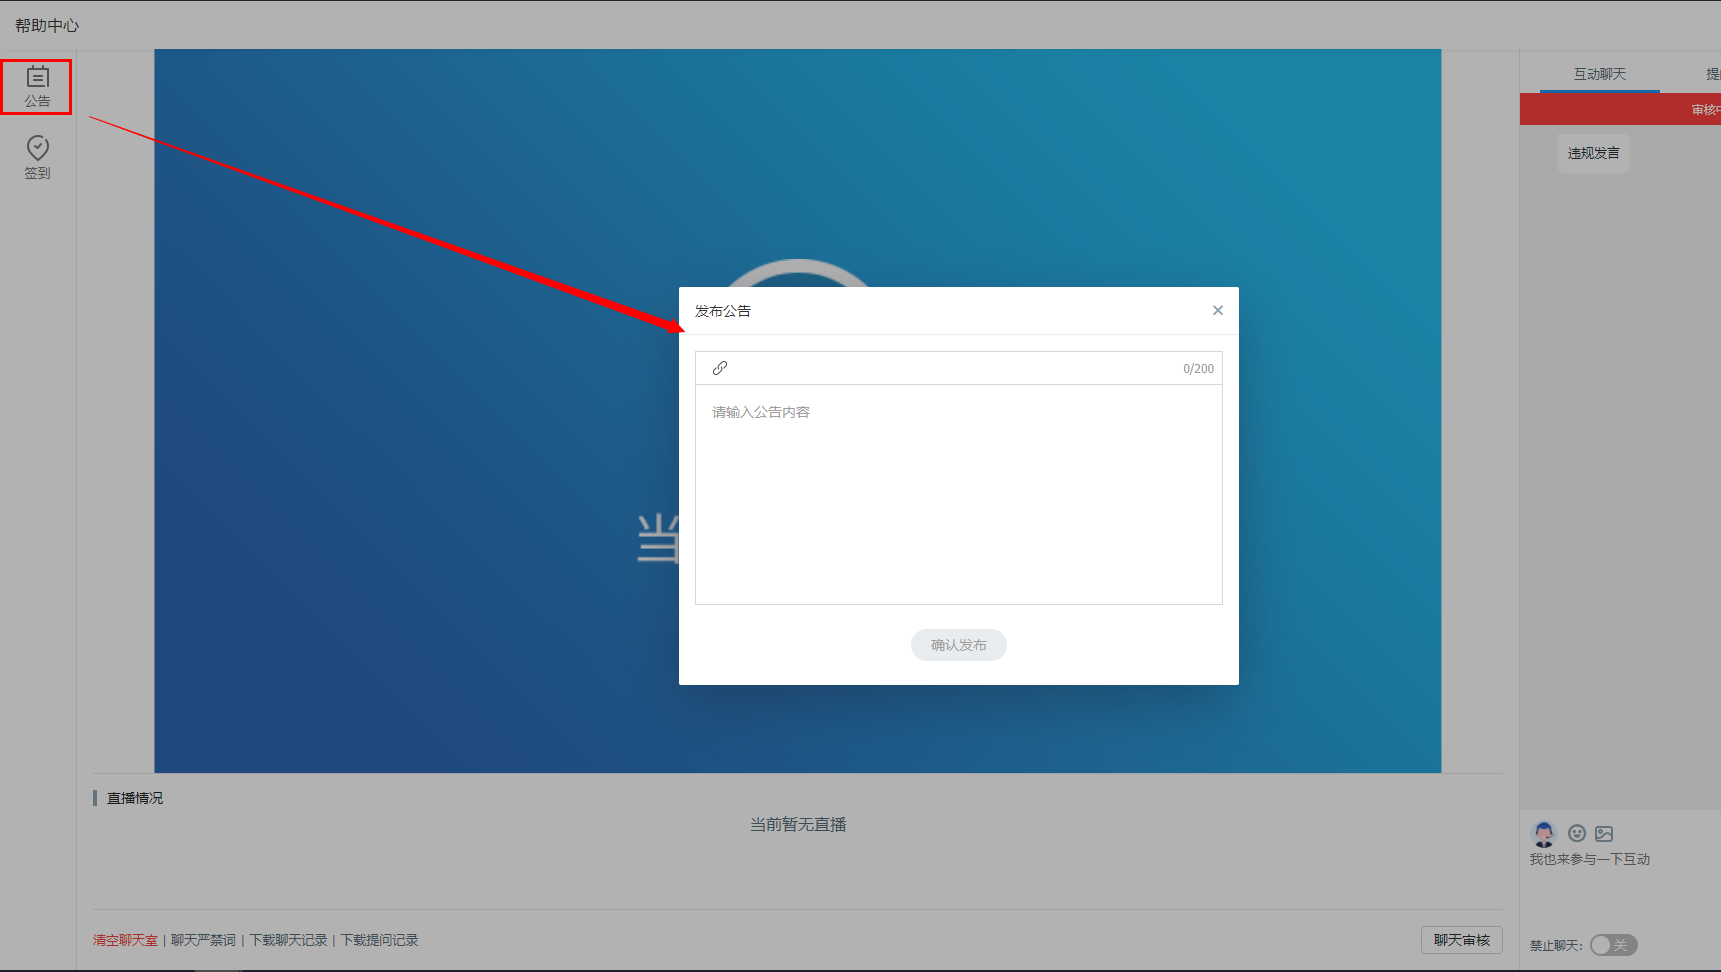
Publish Announcement and Start Check-in
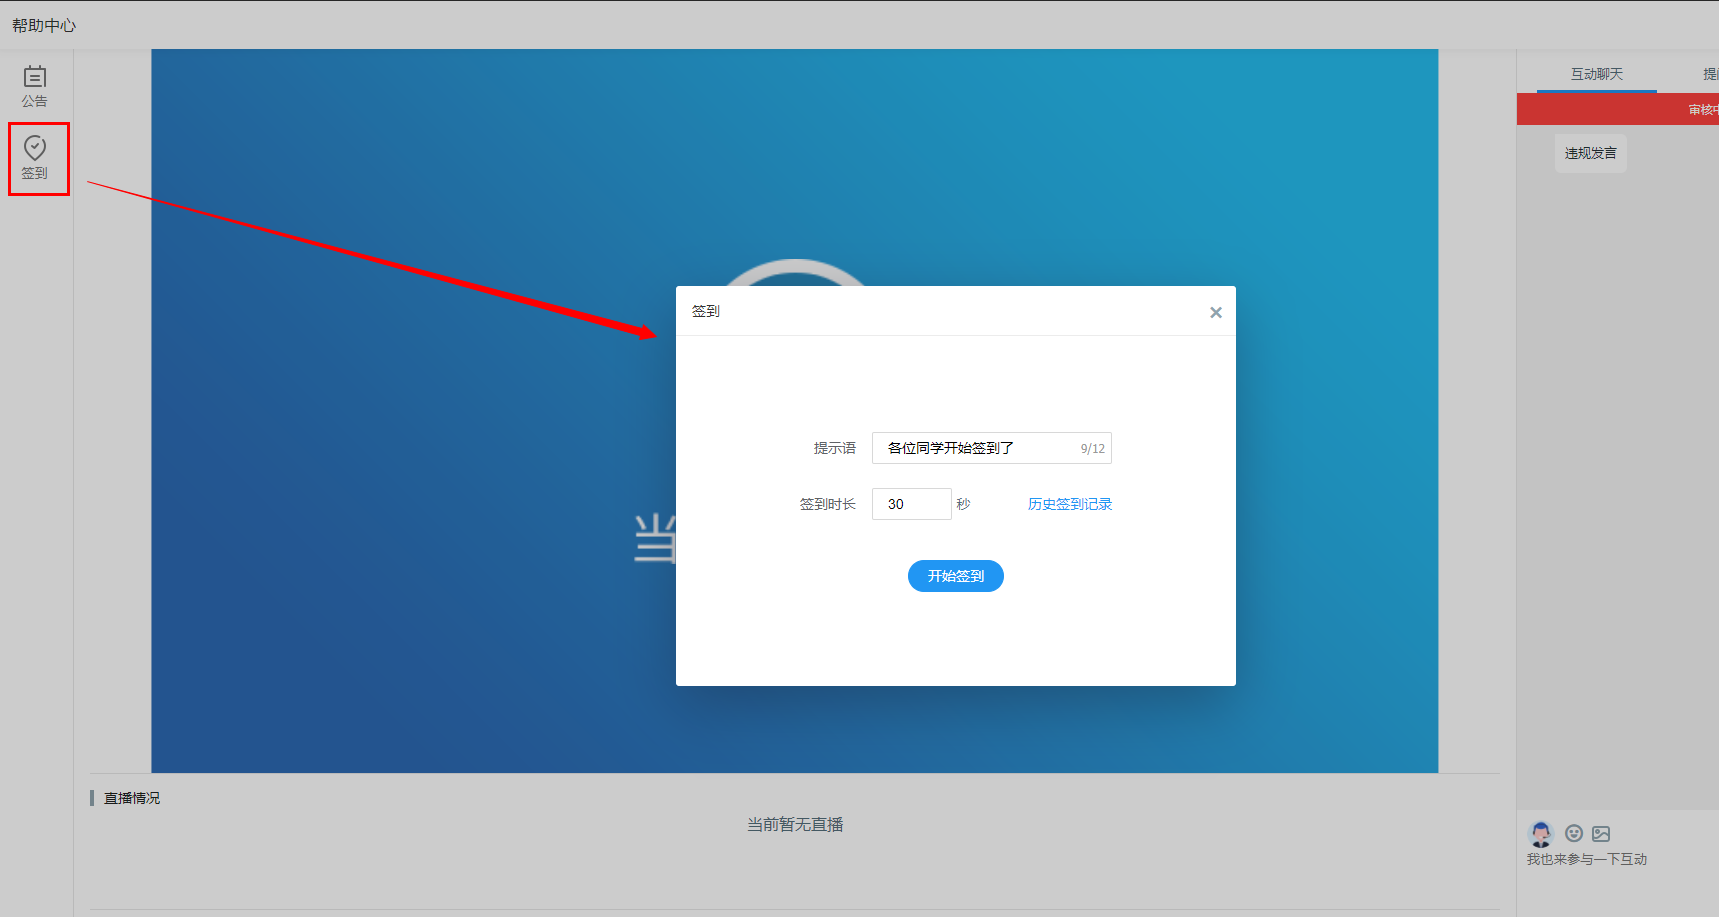
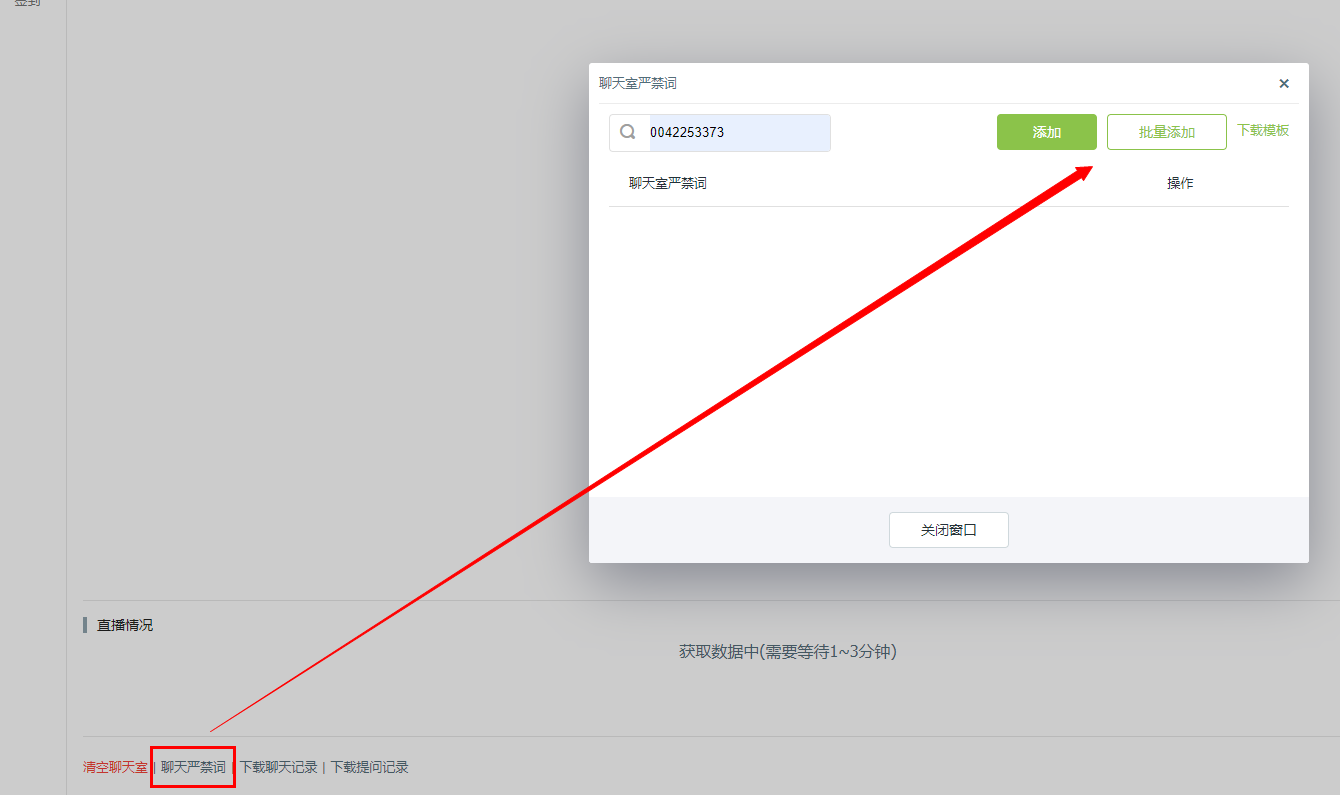
Chat Prohibited Words Management
There are two ways to add prohibited words: one is to add them one by one, and the other is to add them in bulk. For bulk addition, download the template, fill in the prohibited words, and then re-upload it.
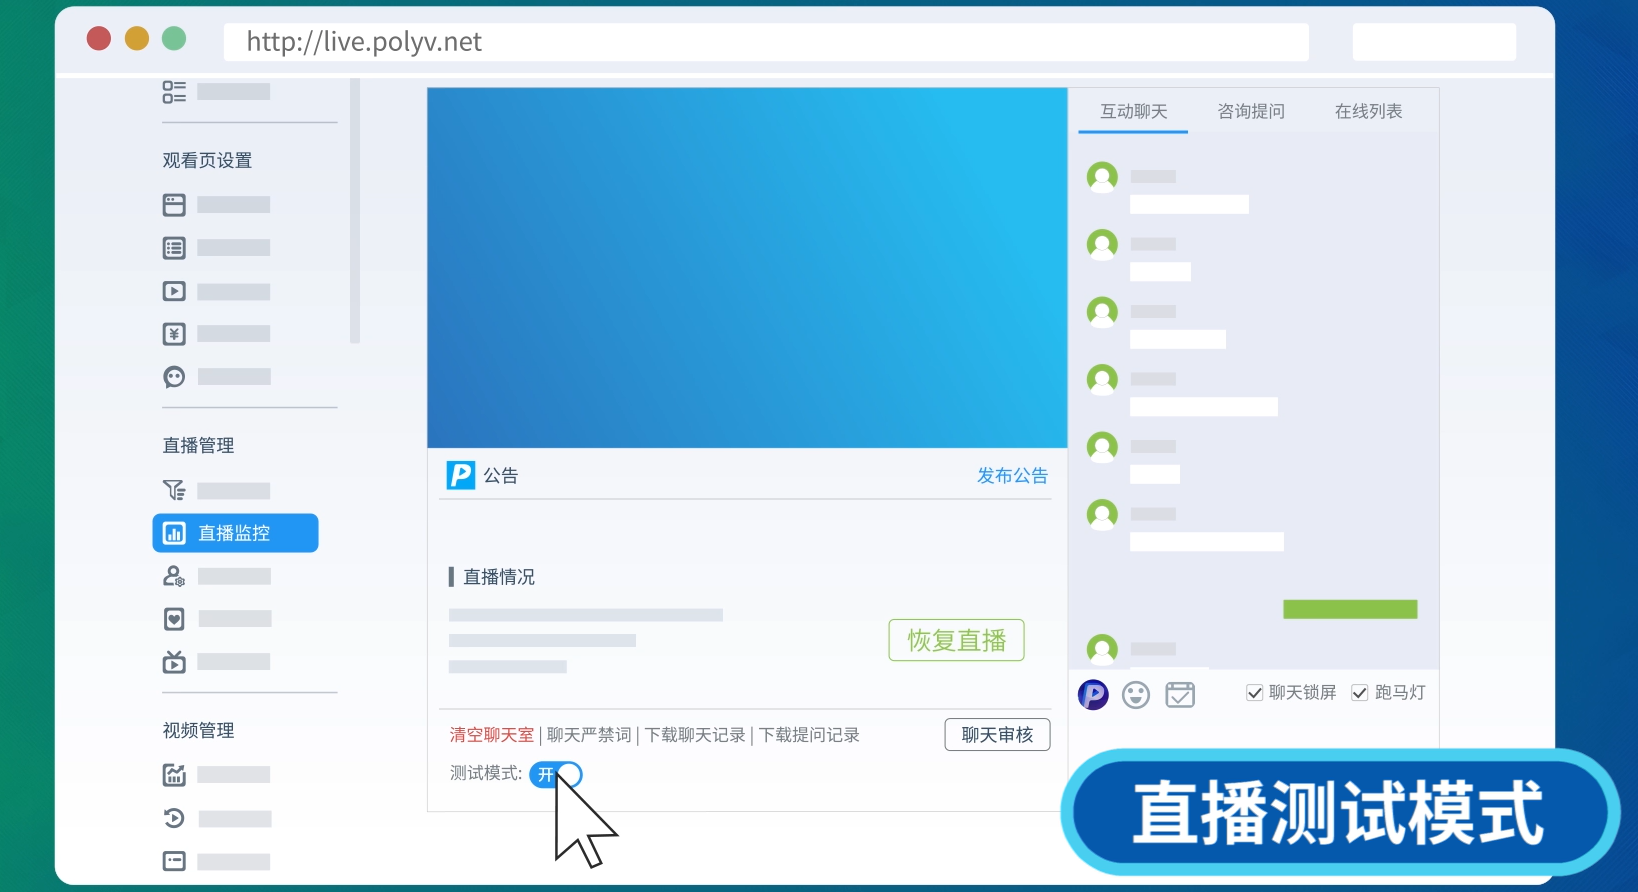
Test Mode
After the test mode is enabled, only teaching assistants and administrators can see the live stream; others cannot. To officially start the live stream, you need to disable test mode. The three-panel layout currently does not support test mode.
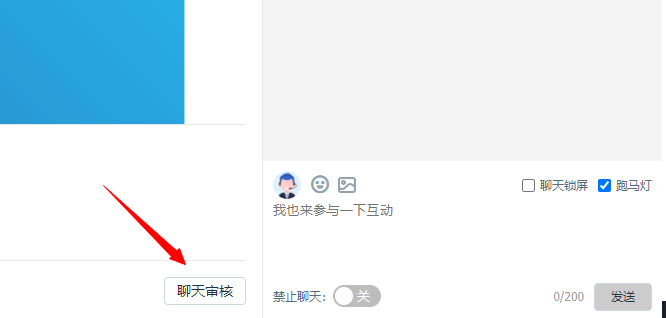
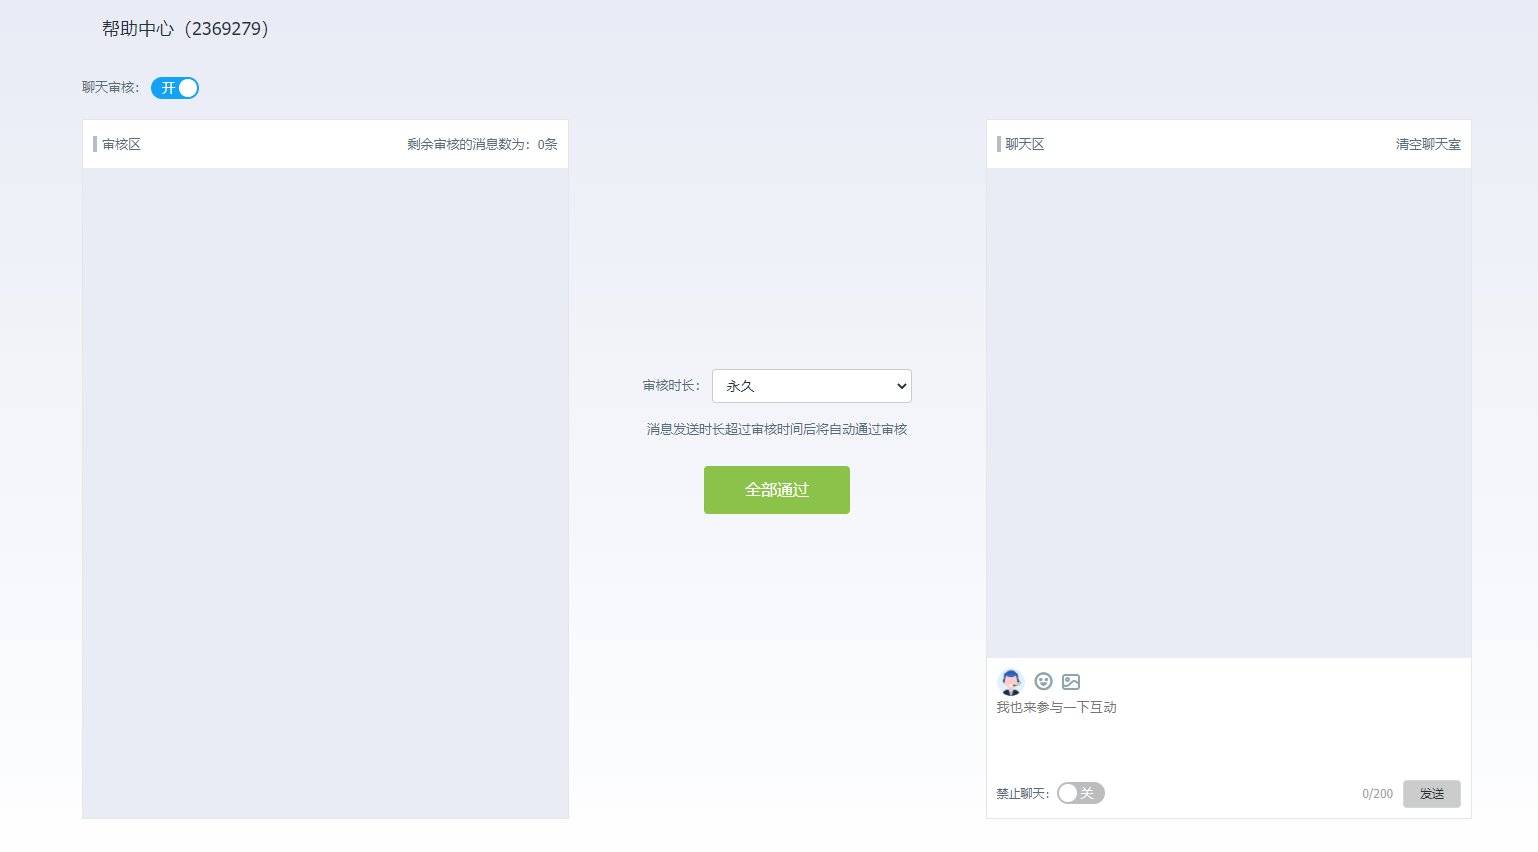
Chat Moderation
After the chat review feature is enabled, chats will only appear in the chat area after being reviewed by an administrator.
Viewing Condition Settings
Now, the viewing condition settings can have two conditions coexisting, but the two viewing conditions under the dual-condition mode cannot be the same. Additionally, shared viewing can only be set in the secondary viewing condition.
The dual-condition effect is as follows: selecting any verification method and succeeding will allow entry into the live stream viewing.
Pay-per-View:
In the backend, set the price for live streaming viewing and select the payment validity period. There are three options here; choose according to actual needs.
At this point, viewers need to pay successfully to enter the live streaming viewing page.
Whitelist Viewing:
Users on the whitelist can directly watch the live stream after entering the correct verification, which can also be understood as setting up VIP member users.
The specific setup is as follows: first, download the whitelist template table, enter the member list information, import it into the backend, and save it. Note that the imported template must be downloaded from here. Click "View Whitelist" to view the current list information.
Register to Watch:
In the backend, set the information that needs to be registered, such as name, phone number, etc. Up to 5 pieces of information can be configured.
On the live streaming viewing page, fill in the relevant information to watch the live stream. Click to view the registration list, check the information filled in by the audience, and export the list as marketing data support.
CAPTCHA Verification for Viewing:
In the backend, after entering the correct verification code, upload the QR code of the official account, fill in the prompt text, and you're done. This way, the audience can scan the QR code to obtain the verification code information and watch the live stream. The verification code is unique and specific. This viewing condition can help attract followers to the official account~
Custom Authorization:
For specific process and parameter descriptions, refer to: Custom Authorization
External Authorization:
For specific process and parameter descriptions, refer to: External Authorization
Live Stream Subscription Settings
1. Feature Overview
This feature is designed for scenarios where you want viewers to follow your WeChat Official Account. Obtain the QR code of your Official Account from the backend, upload it to the platform, and when viewers enter the live stream page, a pop-up window will display the QR code. Viewers can long-press the QR code to follow the account.
2. Instructions
In the "Live Stream Backend - Marketing - Official Account" section, enable the "Follow Official Account" option, upload the QR code of your Official Account, and confirm the save. A "Follow" button will then appear on the viewing page. If the "Auto Pop-up" option is enabled, the QR code and prompt text will automatically appear in a pop-up window. If disabled, viewers will need to click the "Follow" button to trigger the pop-up.

A QR code appears on the viewing page; long press to follow the official account.
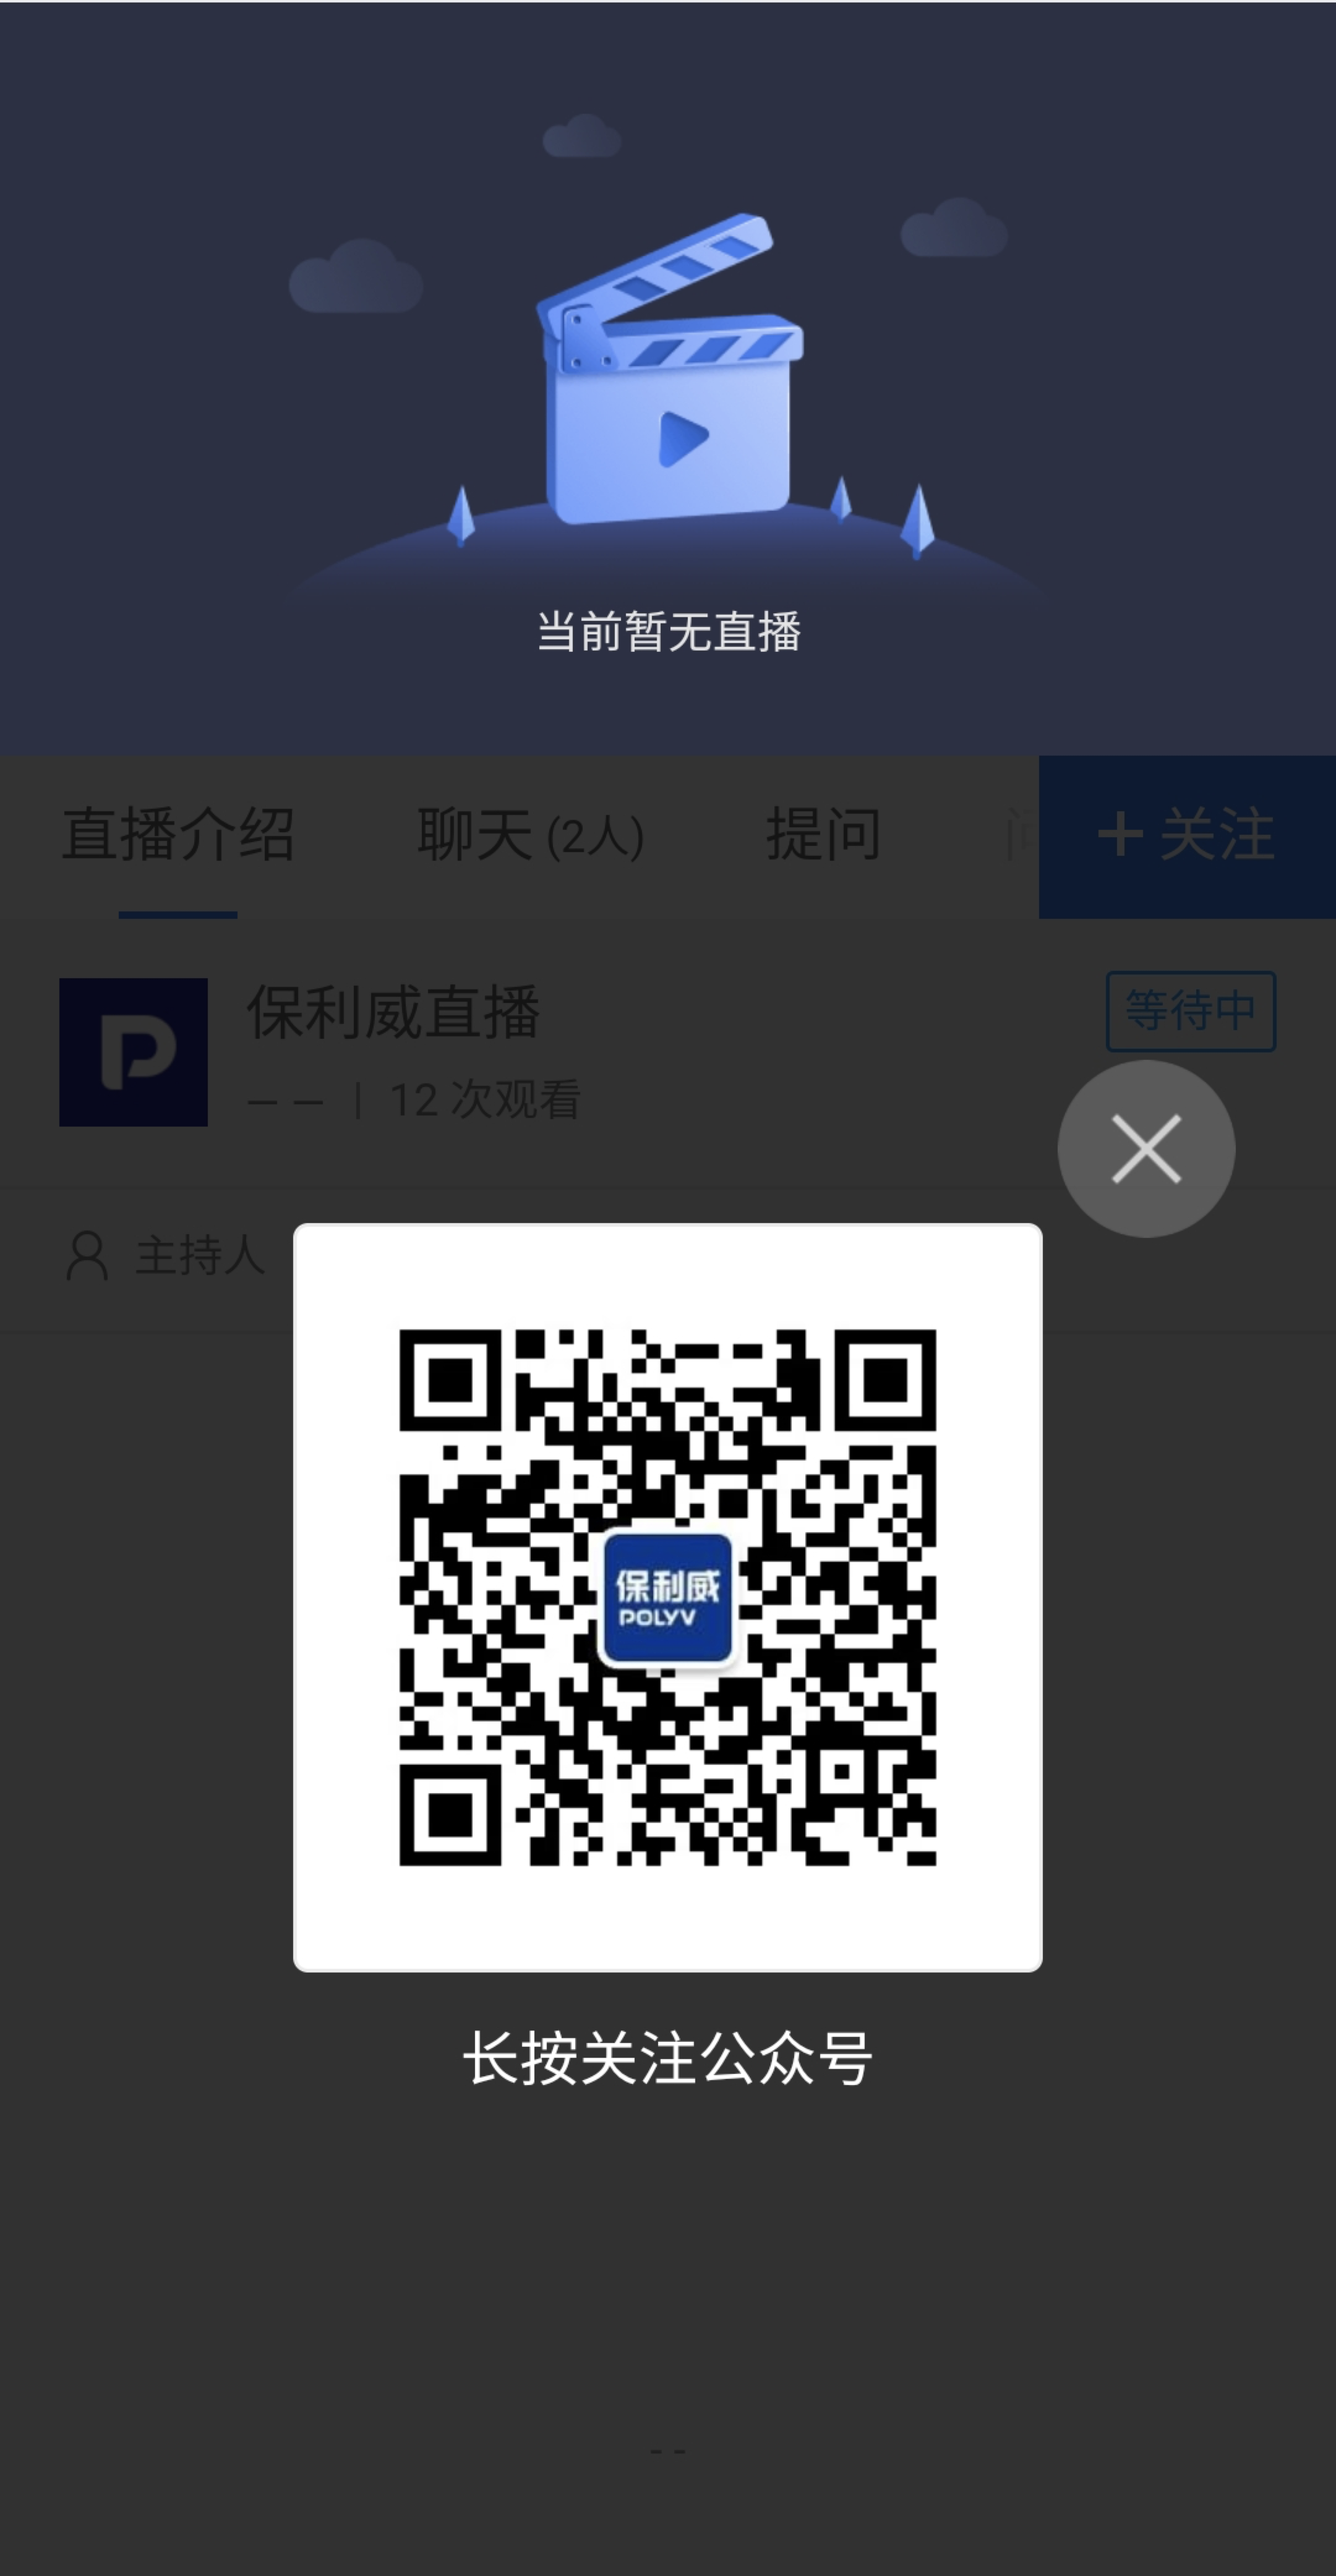
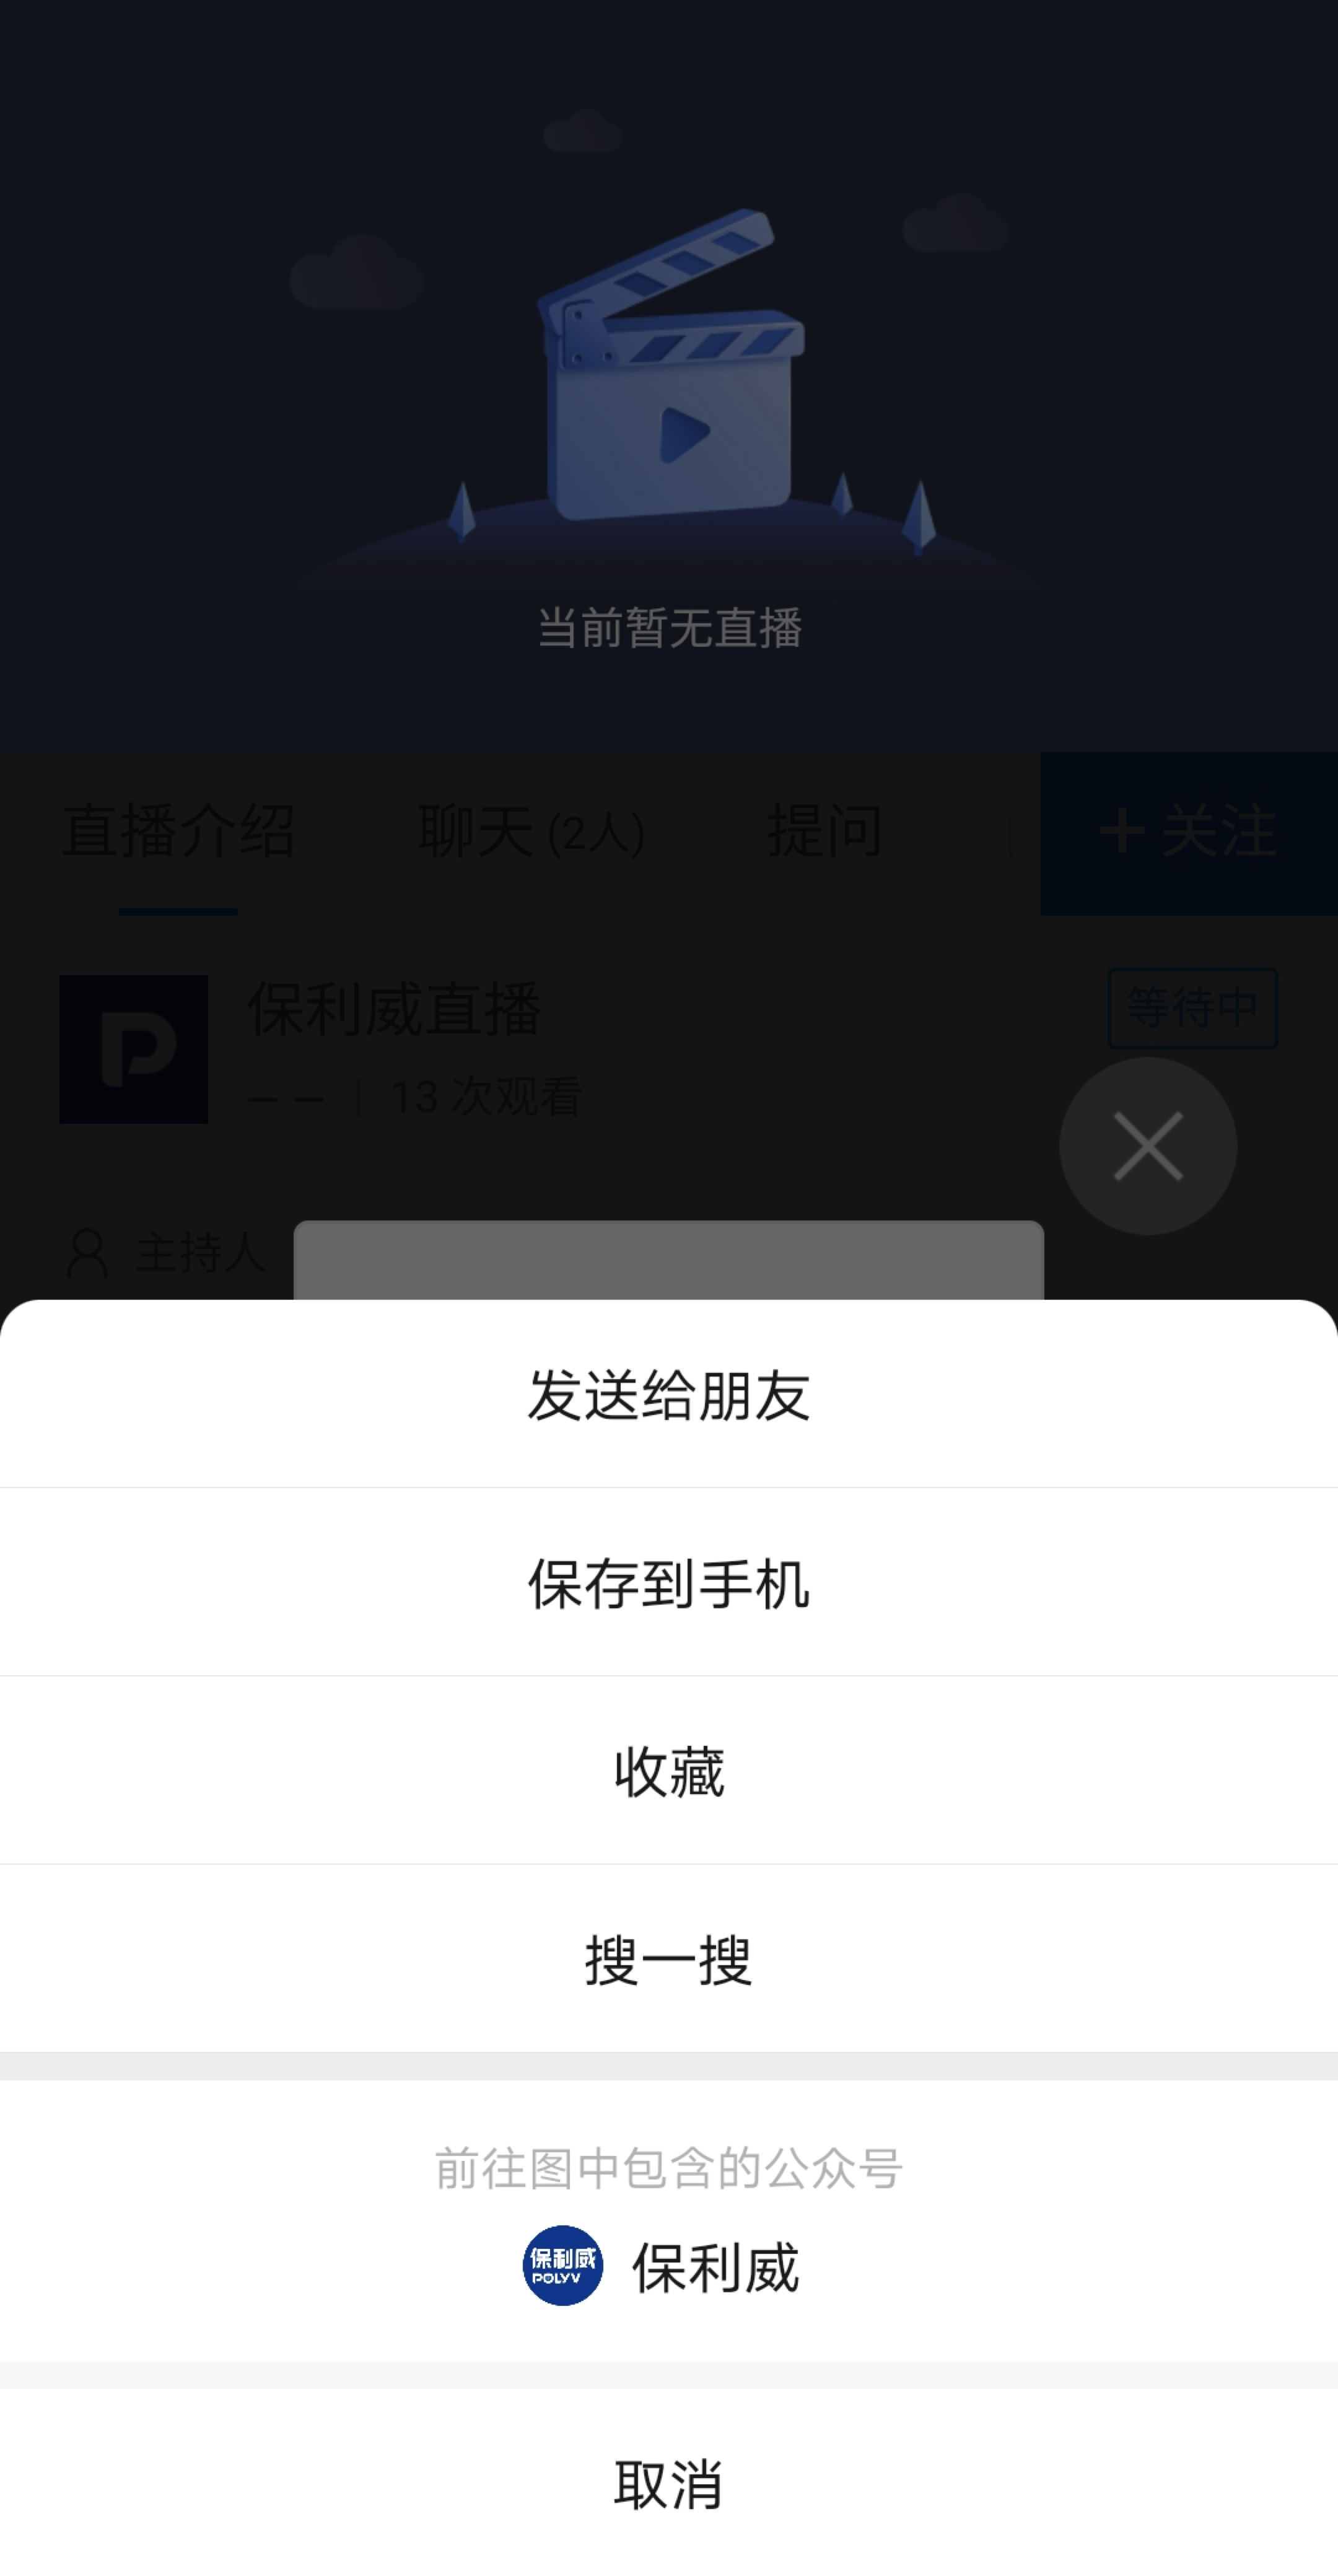
Note: QR code links, personal WeChat IDs, WeChat group links, and enterprise WeChat QR codes are all acceptable.
Marketing Promotion Settings
Want to increase live stream traffic, exposure, and achieve viral spread? The live streaming marketing feature can help you achieve this. Let's take a closer look:
Enter the channel number management backend and open the marketing settings.
Feature 1: Promotion
After enabling this feature, an entry point for following the official account will be displayed on the mobile viewing page during live streaming.
The specific settings are as follows: click to enable, set the entry text, which will appear on the right side of the custom menu bar, then upload a QR code smaller than 200KB along with a pop-up prompt text. You can preview the effect in the preview area on the right. Enable the active pop-up as needed, and after completing the settings, click Confirm to save.
Feature 2: Invitation Poster
Once this feature is enabled, you can automatically generate beautiful live streaming posters in just a few steps without any design work. The generated poster can be shared to WeChat, and viewers can enter the live room by scanning the QR code on their phones.
Let's take a look at the specific settings. First, you can replace the cover image. The cover image supports JPG, JPEG, and PNG formats, with a file size not exceeding 2MB. Then, set the live stream name, host, and start time. There are five poster styles to choose from based on the live stream's theme. After completing the settings, click Confirm to save. Finally, click the Download Poster button in the top right corner to share the image to mobile devices.
The Invitation Ranking feature helps you achieve live stream virality through marketing incentives. Once enabled, viewers can access the invitation interface from the bottom right of the mobile viewing page. After selecting a poster style, they can save the image and share it with WeChat friends. When a friend scans the poster's QR code to enter the live room, the viewer gains one invitation count. Clicking on the Invitation Ranking allows you to view each viewer's invitation count and ranking.
Feature 3: Share Settings
This section primarily edits the link content shared to WeChat. You can modify the channel icon, set the title and description, and preview the effect in the preview area on the right.
Both the WeChat client and web client support customizing the share URL. Once configured, when viewers open your shared link, they will be redirected directly to the custom address.
For the settings of advertisements and invitation card features, scan the QR code below to learn more details.
Video Library
Live Playback
Video Library is primarily used to store and manage live streaming replay videos. In the Polyv live streaming replay section, it includes live streaming staging, replay list, and on-demand list.
Live Streaming Temporary Storage
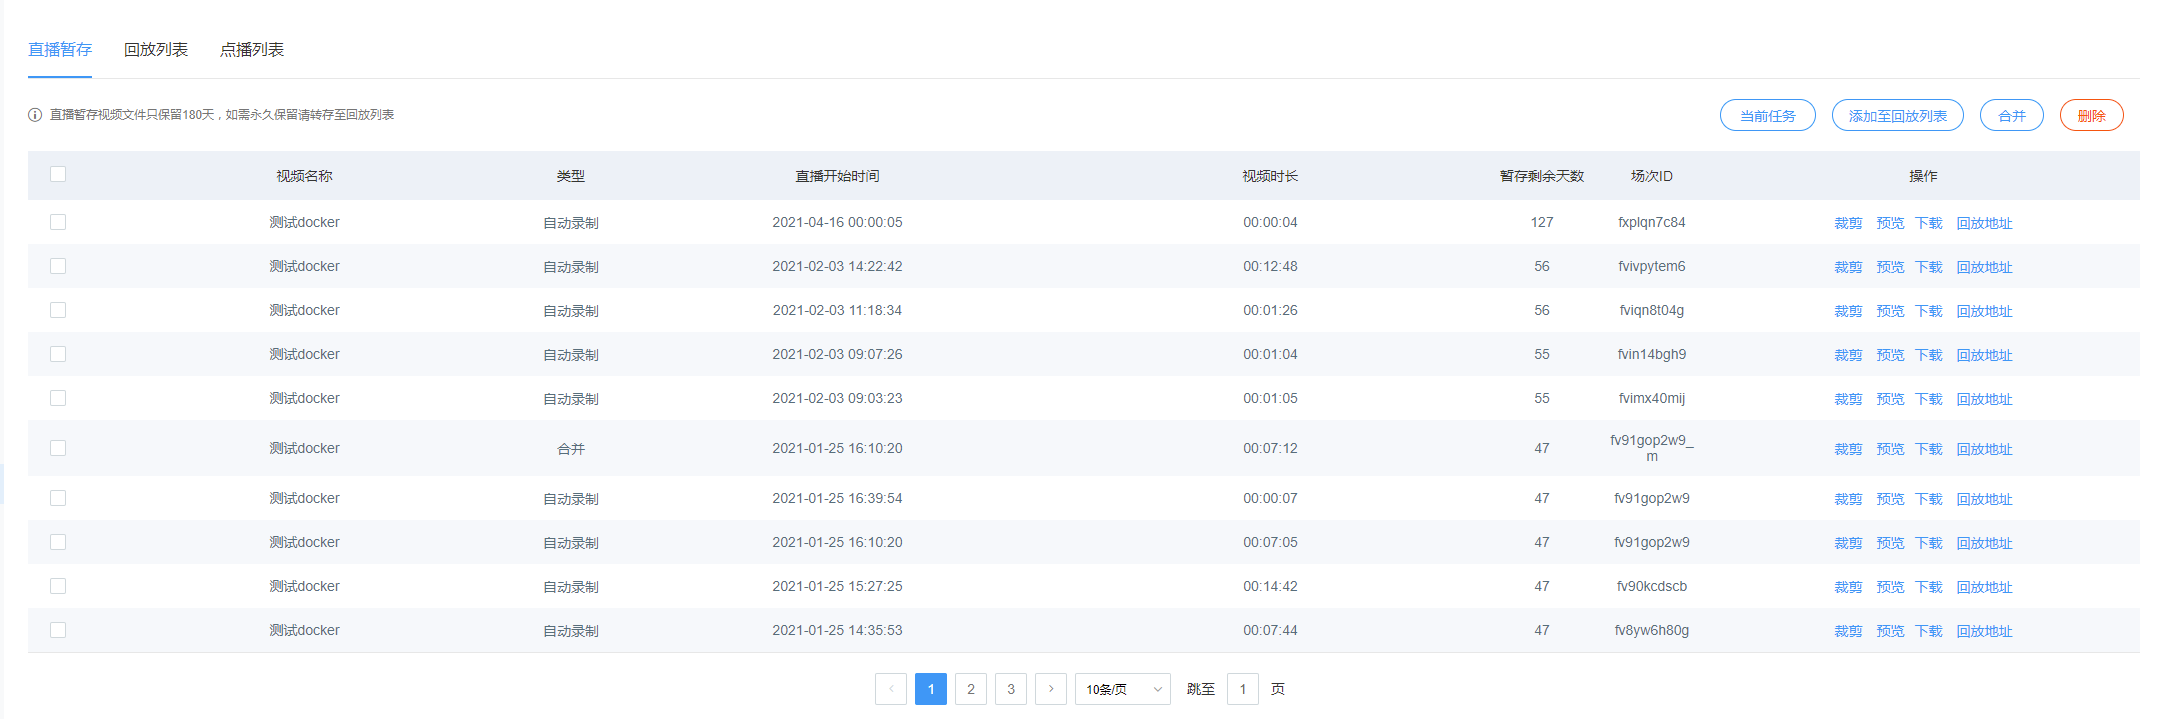
During the live streaming process, the replay video will be automatically recorded and saved in the live streaming temporary storage. The temporary storage retains the video for only 180 days. For permanent storage, the video needs to be transferred to the replay list, which requires purchasing a video-on-demand service. If you need to activate this service, please contact customer service or sales directly.
- Save: Select videos (supports multi-select and select all), click "Add to Playback List", fill in the video name after saving and the corresponding VOD category in the pop-up information, then click Save to submit. For automatic saving, go to "Platform Settings" -> "Channel Settings" and enable "Playback - Auto Save".
- Delete: Supports deletion of temporarily stored data. Deleted data cannot be recovered, so proceed with caution. Supports deletion of individual videos or batch deletion.
- Preview: Preview allows you to view the live playback video.
- Download: Supports downloading the playback video URL. For document + video templates, only the video is downloaded. Uncropped or unmerged videos support download in both mp4 and m3u8 formats. If the video has been cropped or merged, the corresponding temporarily stored video is downloaded based on the cropping or merging mode. See Cropping and Merging below.
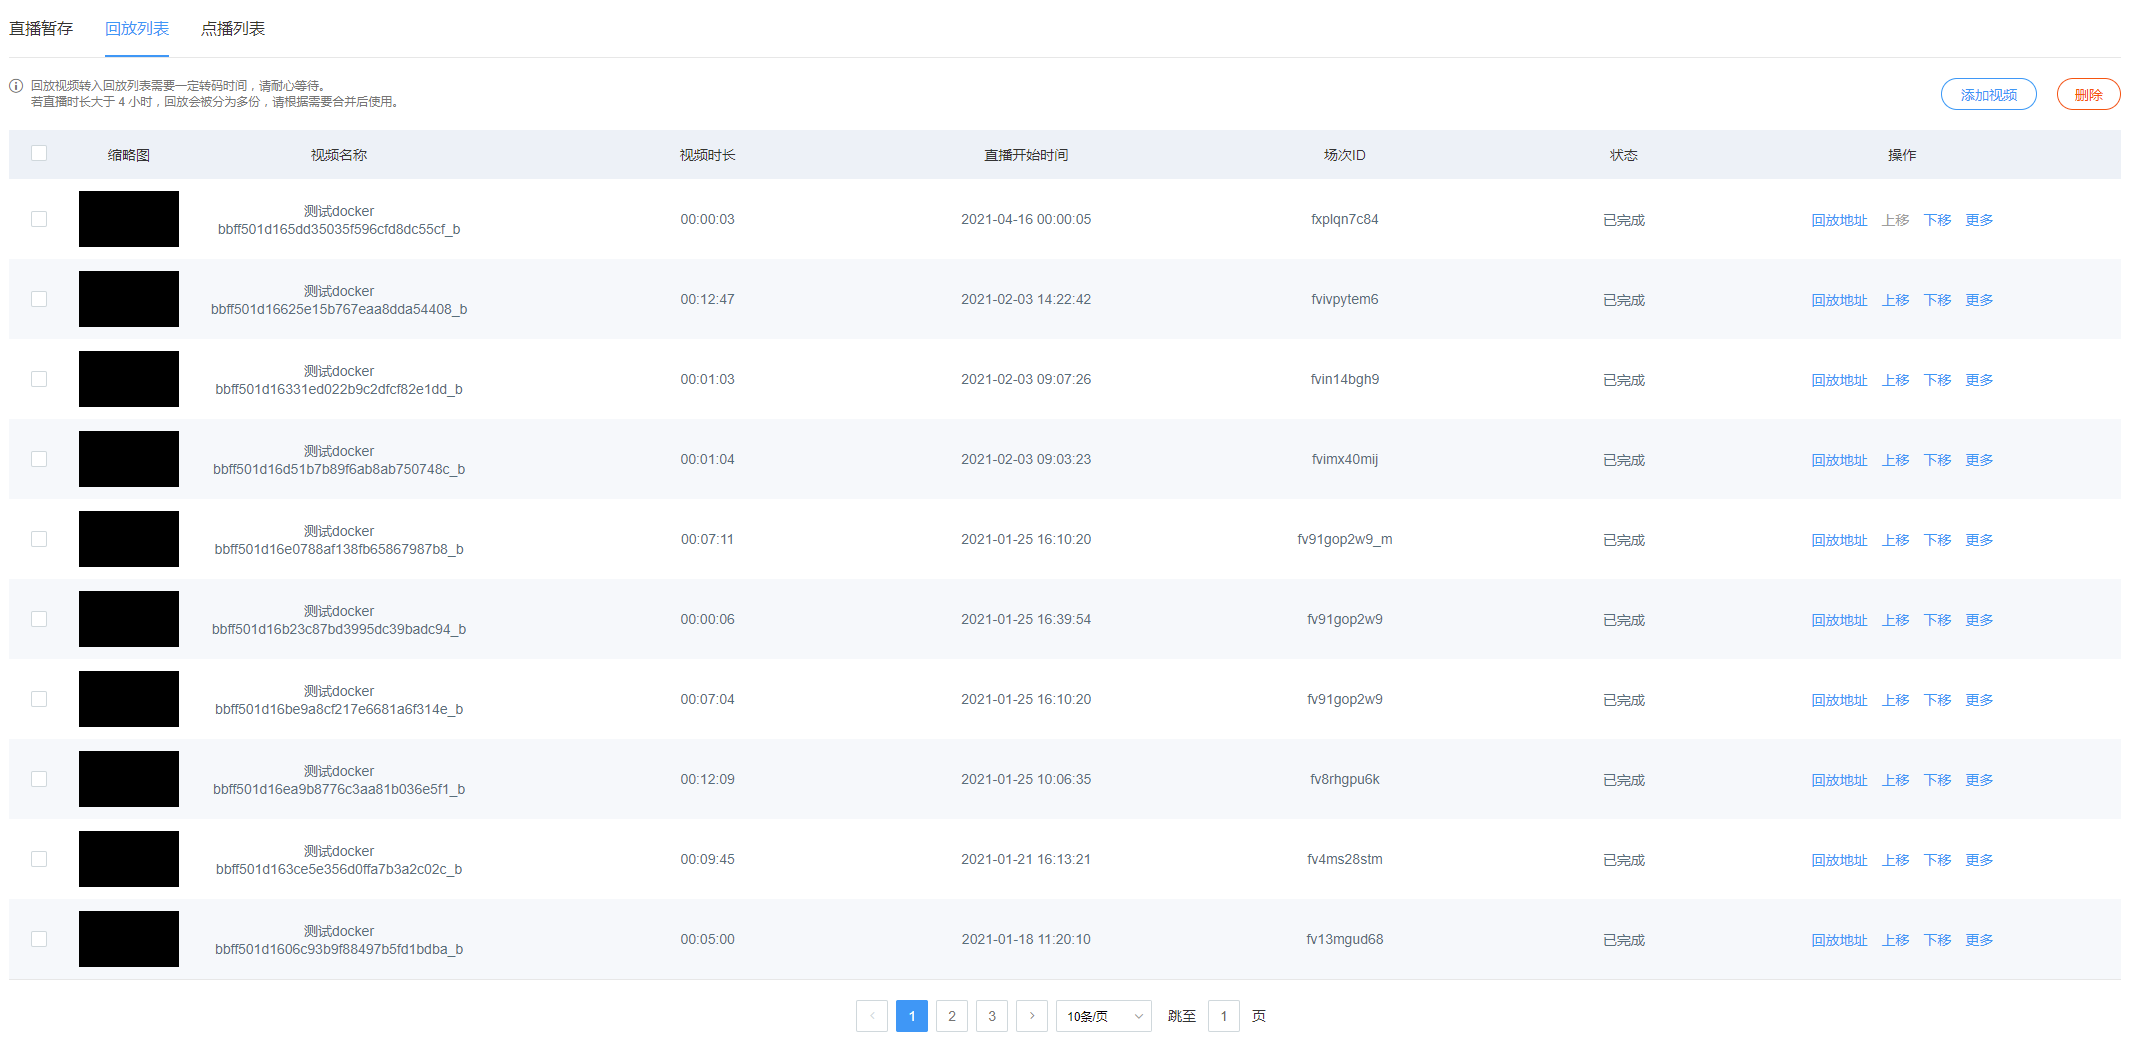
Playback List
The permanent storage of videos in the playback list uses Polyv's video-on-demand service.
- Delete: Supports removing videos from the replay list, both individually and in batches.
- Add Video: Supports adding previously removed videos back.
- Move Up/Down: When playing in list mode and the replay list is selected, the playback order follows the arrangement of the replay list. Adjusting the position of items in the replay list changes the playback order on the viewing page.
- Rename: Supports modifying the name of items in the replay list.
- Modify Cover Image: The viewing page supports playback in replay list mode, with a dedicated list page for users to watch. The replay list supports displaying a cover image, video name, and video duration.
The system supports automatically capturing and adjusting documents/videos as the default cover image. If the automatically captured image still does not achieve the desired display effect, it provides the ability to upload and modify images manually. Click "More" → "Modify Cover Image" to upload and make changes.
On-Demand List
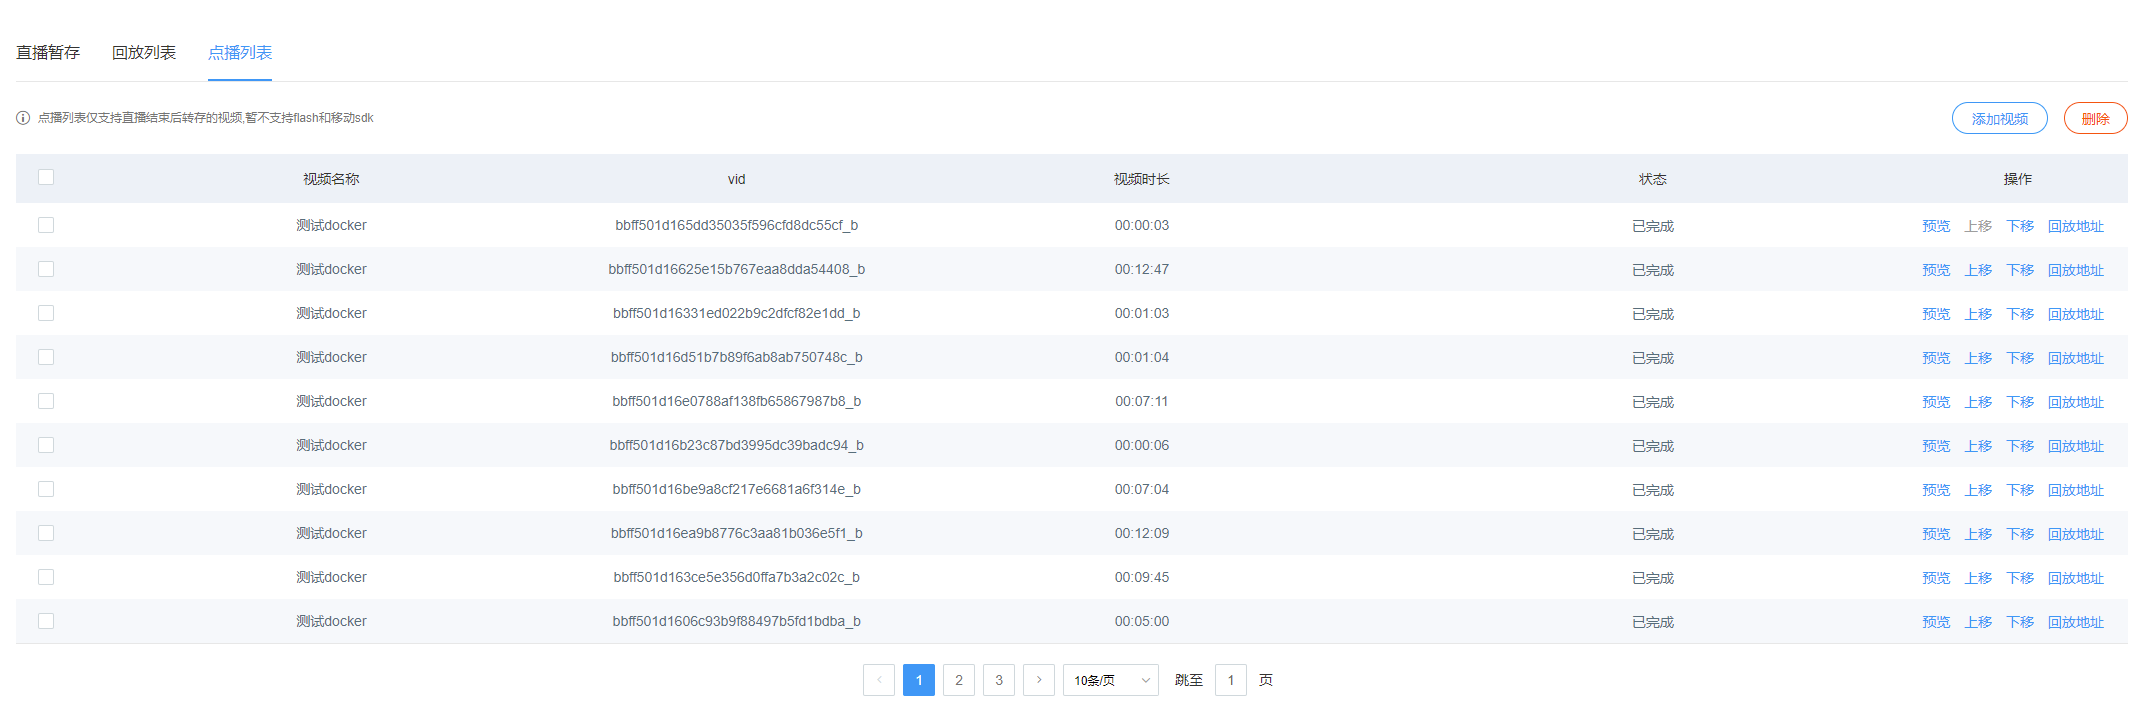
The on-demand list refers to the ability to select video files from the Polyv on-demand system for use as live stream replays. If the live channel uses a pure document template, simply add the corresponding channel number tag in the on-demand settings. If it is a document + video template, due to the progress synchronization between documents and videos, the on-demand video must be the replay video of that specific live room.
- Delete: Supports removing videos from the on-demand list, both individually and in batches.
- Add Video: Supports adding back videos that have been removed.
- Move Up/Down: When playing in list mode and the playback list is selected, the playback order follows the arrangement of the playback list. By adjusting the position of videos in the playback list, you can change the playback order of replays on the viewing page.
- Preview: Supports direct preview of replay videos.
Crop
Support cropping of temporarily stored videos. Cropping distinguishes between m3u8 and mp4 formats. By default, cropping uses the m3u8 format. To upgrade to mp4 cropping, please contact customer service for a free upgrade.
m3u8 Trimming
The m3u8 video format plays small segments each time, with each segment lasting approximately 6 to 12 seconds. Trimming directly cuts a specific segment, so the trimming accuracy for the m3u8 format is roughly 6 to 12 seconds. The steps are as follows:
- Select the video to be cropped in the staging area, then enter the cropping page.
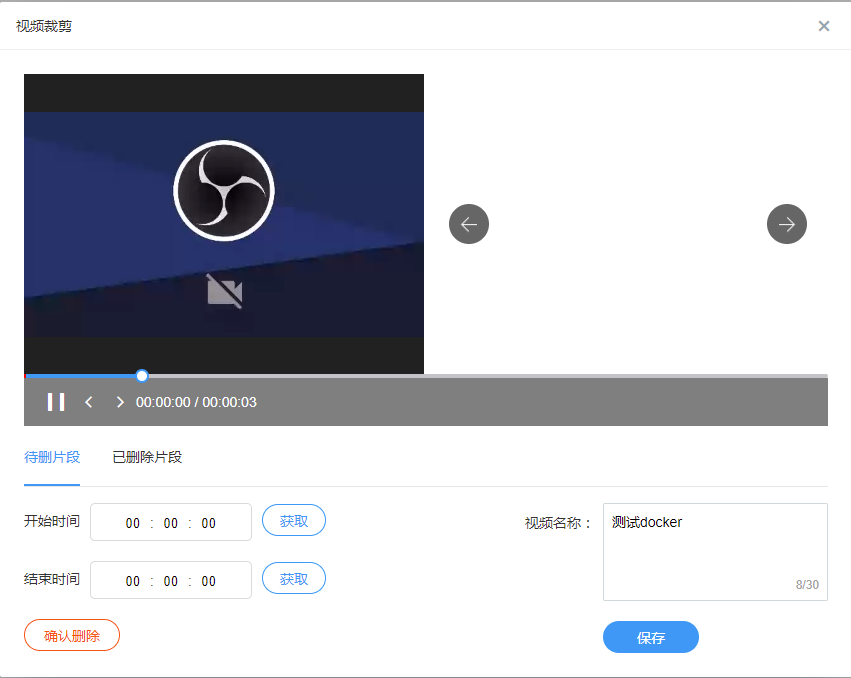
Select the location of the slice. You can obtain the corresponding slice to be captured by retrieving it.
Click Confirm Delete to delete the corresponding slice data. If you need to restore the corresponding slice, you can recover it from the Deleted Slices section.
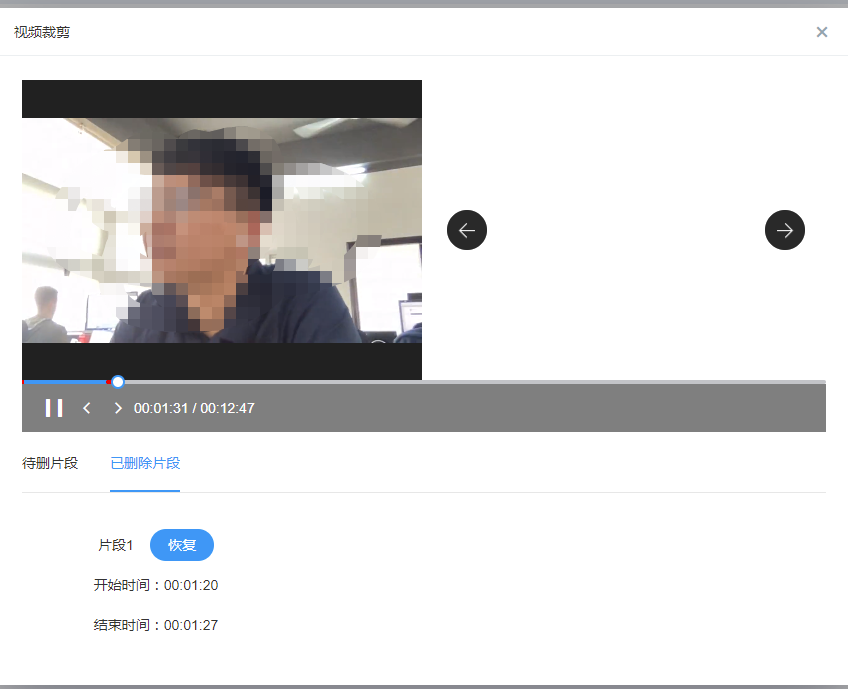
- Enter the name of the trimmed video and click Save to generate a new trimmed video.
MP4 Cropping
MP4 format cropping supports video trimming with second-level precision. The operation steps are as follows:
- Select the video to be trimmed in the staging area, then enter the trimming page.
Enter the start time and end time for cropping.
Click Confirm Delete to delete the corresponding video data. If you need to restore the data, you can recover it from the Deleted Clips section.
- Fill in the name of the cropped video, then click Save to generate a new cropped video.
Merge
Merging and trimming apply the same rules. If M3U8 trimming is enabled, the merged video will also be in M3U8 format. If MP4 trimming is enabled, the merged video will be in MP4 format. The merging order is based on the live stream start time of each video. Custom video merging order is not yet supported. The operation process is as follows:
- Select the videos to merge, then click Merge.

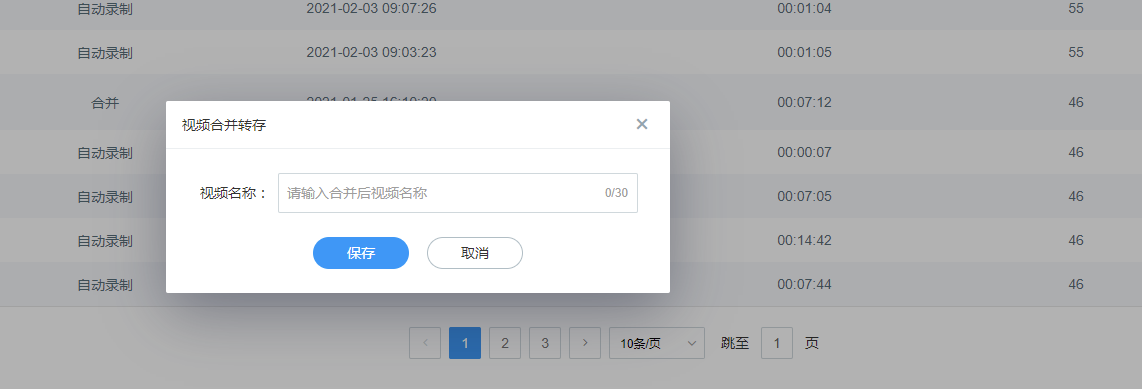
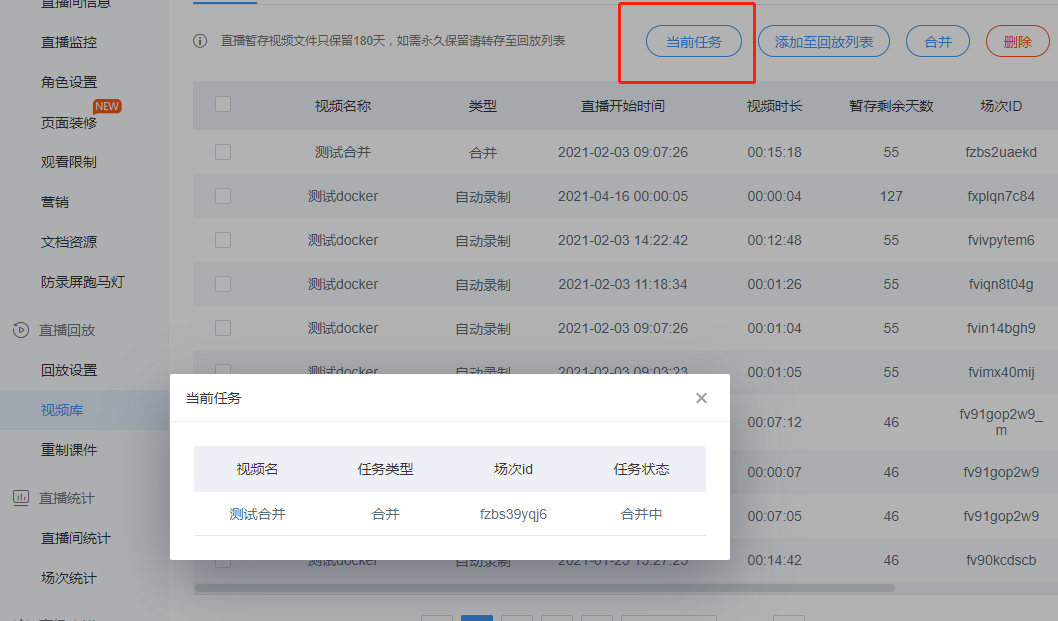
2) Enter the merged name, click "Confirm" to generate the merge. The merge will be performed in descending order of the live broadcast start time. If merging MP4 files, the process may take a while. You can click "Current Tasks" to view the current merge progress.
Remastered Courseware
1. Feature Overview
Under the document + video template, in addition to watching the replay on the Polyv viewing page, it is also necessary to download the replay for archiving, or to play it on your own platform or other platforms. However, other playback platforms only support video playback and do not support document playback. In the document + video mode, if only the video can be played, the overall replay experience is relatively poor.
In response to this situation, Polyv has pioneered a courseware remastering feature that creatively merges documents and videos into a single video file, allowing the original document + video (three-panel) mode experience to be perfectly restored in the video. To activate the corresponding service, please contact customer service or sales personnel for assistance.
2. Operation Instructions
New Remake
To create a new live streaming task, the replay video must already be saved to the replay list. Click "New Remake".
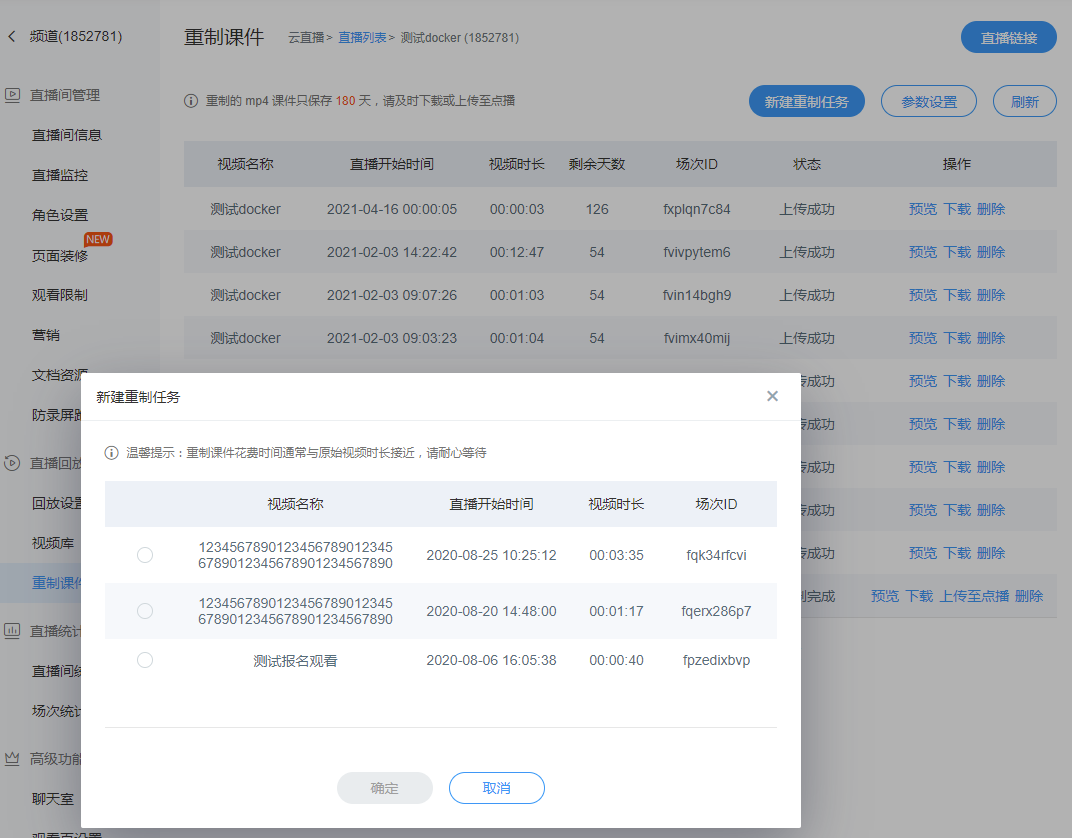
Select the replay video to be remastered, click "Confirm", and a remastering task will be directly added. If the remastering status updates slowly, you can click "Refresh" to get the latest status.
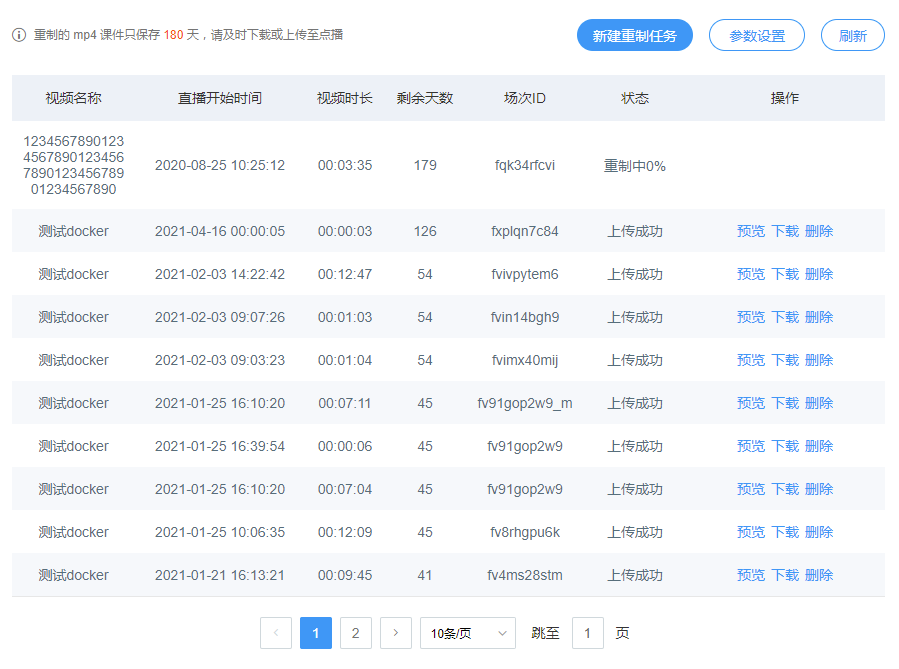
The final output of the remastered courseware is in MP4 format, supporting upload to on-demand, preview, download, and deletion. The remastered courseware supports automatic remastering, which can be enabled in "Platform Settings - Channel Settings" by turning on "Remaster Courseware - Auto Remaster". The remastered courseware is only temporarily stored for 180 days, so it is recommended to upload it to on-demand in a timely manner. If automatic transfer is needed, you can also enable "Remaster Courseware - Auto Transfer" in "Platform Settings - Channel Settings".
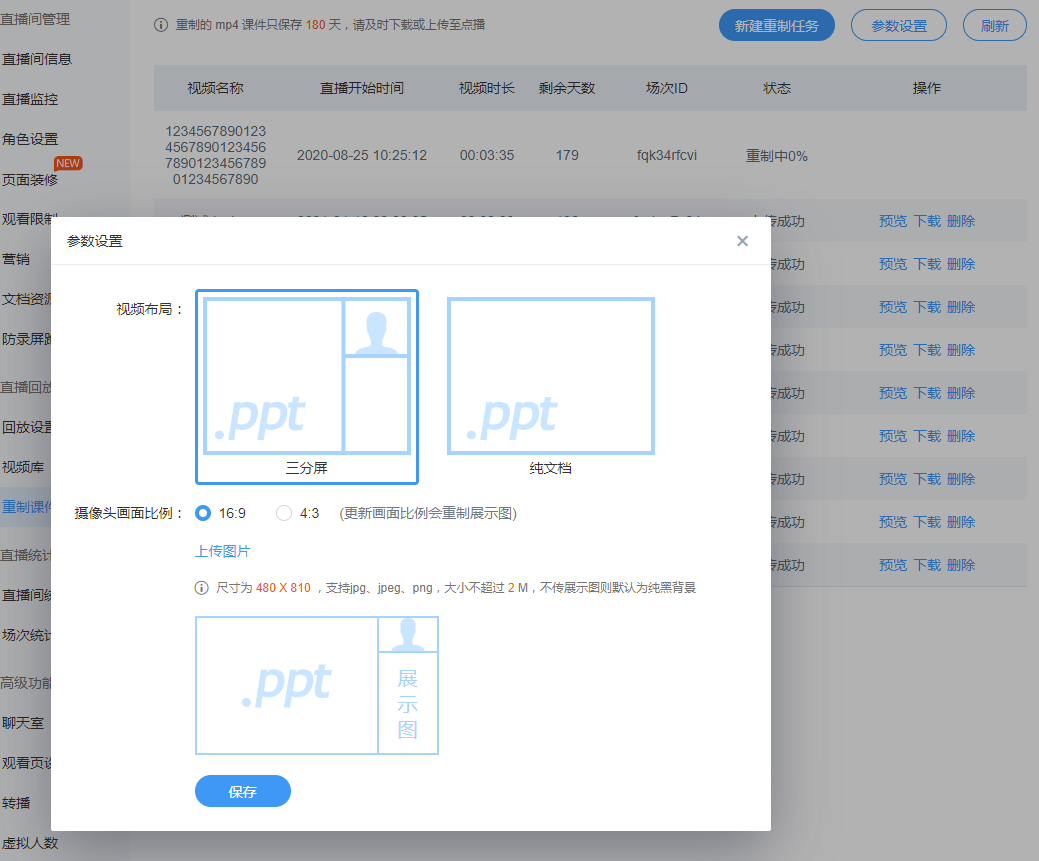
Parameter Settings
Video Layout: Supports a three-panel mode, as well as a document + audio mode.
Camera Aspect Ratio: During live streaming, two camera aspect ratios are supported: 16:9 and 4:3. It is recommended to set the camera aspect ratio according to the camera ratio configured during the live stream.
Display image: In a three-panel scenario, the original chat room display content supports overlay with a brand display image (if not uploaded, a black background image will be used by default).
Data Statistics
The summary statistics mainly compile live streaming data for all channels on different dates, including visit counts, watch duration, number of viewers, average watch duration per viewer, and average visit count per viewer.
Data statistics are categorized and compiled based on different conditions.
- Channel Summary: Aggregates live streaming data for each channel across different time periods.
- Daily Summary: Aggregates live streaming data for the current day across different time periods. Available in both list and chart views.
- Geographic Distribution: Shows the geographic distribution of live stream viewers across different time periods, including China and global distribution. The right side displays a top 10 regional share ranking.
- Viewing Devices: Shows the device distribution of live stream viewers across different time periods. The right side displays a top 10 device share ranking.
- Peak Concurrent Viewers: Shows the peak concurrent viewer count across different time periods. The right side displays a channel distribution table for the peak concurrent viewers.
- Channel Viewing Details: Tracks each viewer's activity, including watch duration, viewing address, and region.
- Channel Concurrent Viewers: Exclusive to channel statistics, allows viewing real-time concurrent viewer counts and historical concurrency data.
Live Streaming Anti-Screen Recording Watermark
With POLYV video marquee, you can achieve irregular movement of fixed text or visitor IDs across the video, thereby preventing screen recording.
- There are three types of marquee to choose from: fixed value, login username, and custom marquee.
- Fixed value means entering a fixed piece of content, which will scroll across the screen in the form of a marquee.
- Login username: When a whitelist or custom authorization is set, the marquee will display the viewer's username.
- Custom marquee allows you to call an API to set a personalized marquee style. For specific parameters, click the link below to view the API documentation.
Platform Settings
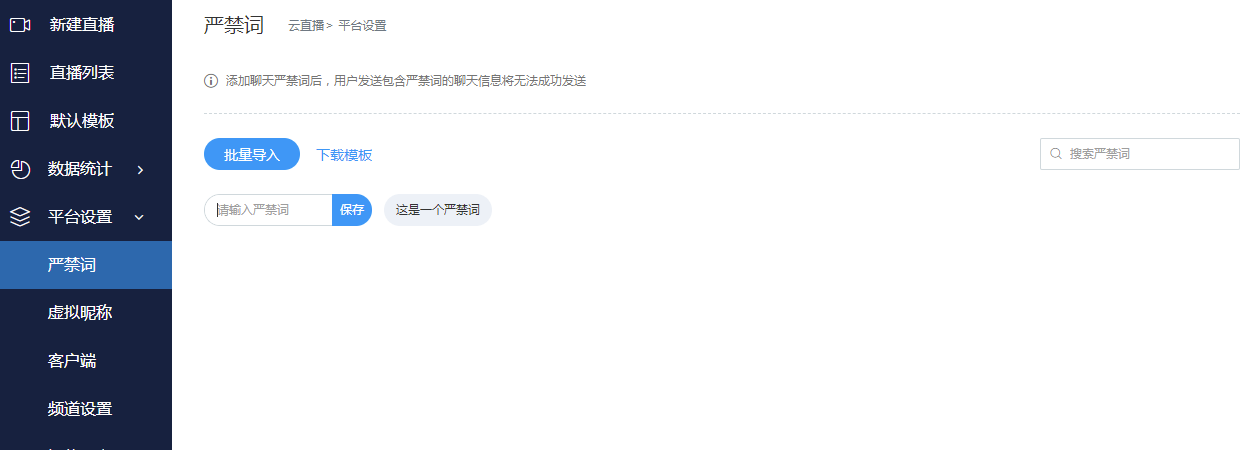
1. Prohibited Words
To prevent viewers from posting inappropriate comments in the live room, you can set up prohibited words in the chat room. After setting prohibited words, when a viewer sends a chat message that contains a prohibited word, the sender can still see the message as successfully sent locally, but the content will be filtered by the chat room and will not be visible to others. Prohibited words support batch import, individual addition, and searching for specific prohibited words.
2. Virtual Nickname
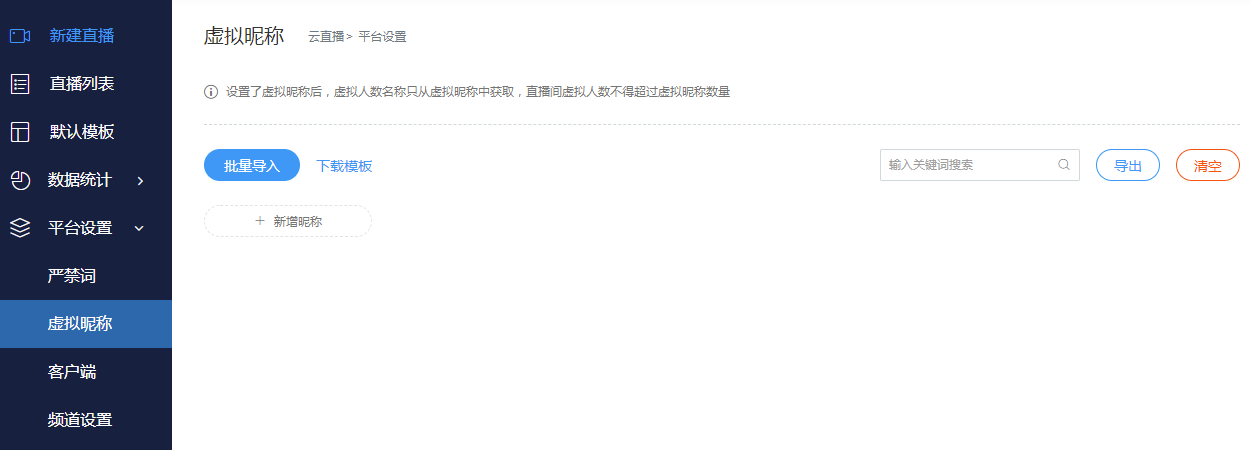
During a live stream, virtual audiences can be set to create a lively atmosphere in the studio. To enhance realism, the system supports presetting virtual audience names. Note that if the virtual nickname feature is enabled, the number of virtual users set cannot exceed the number of virtual nicknames. It supports adding, searching, and exporting both individually and in batches.
3. Client
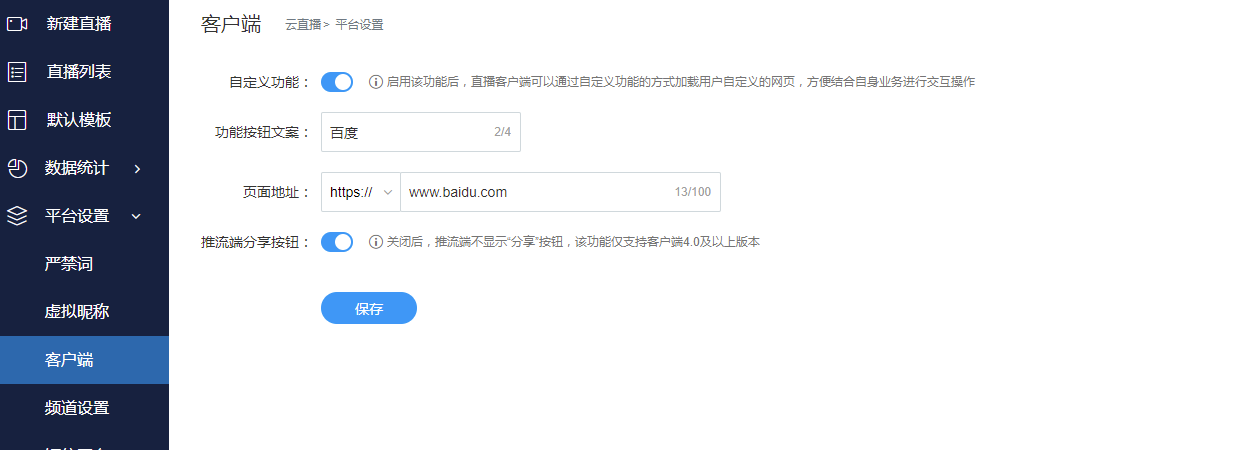
Client settings are primarily used to configure client parameters, including custom features and streaming sharing functionality.
Custom Features
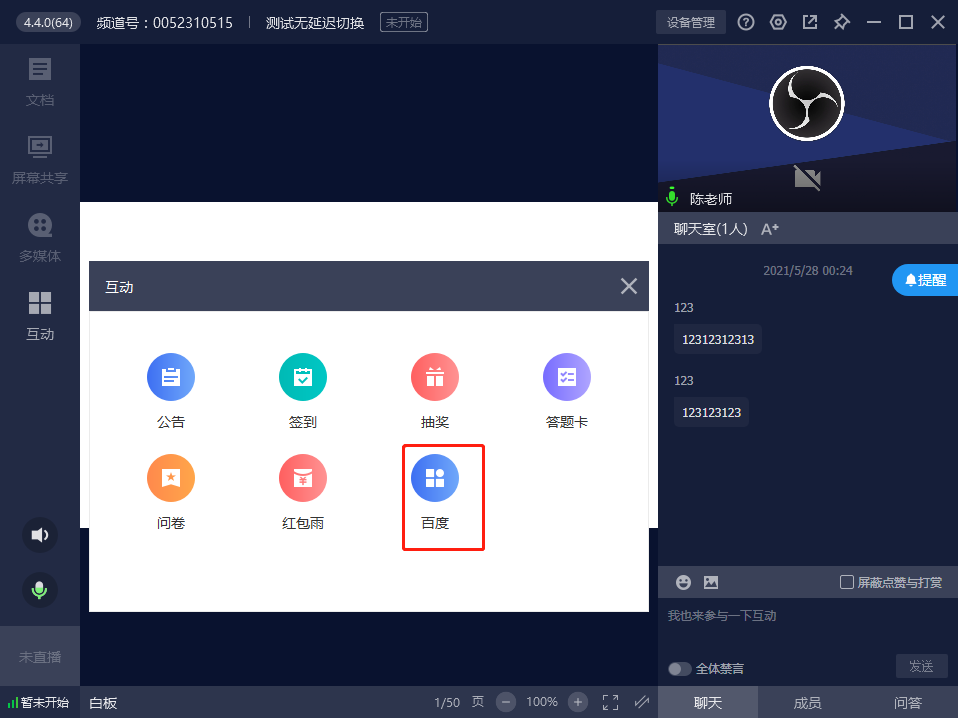
Through the custom feature, the client is supported to load user-defined web pages, facilitating interaction based on your own business needs. The corresponding custom feature will be displayed in the interactive feature content of client versions 4.0 and above. The operation is as follows:
- Set button name, set redirect URL
- Start the client, click on Interaction, and you will see that the custom function just added has taken effect.
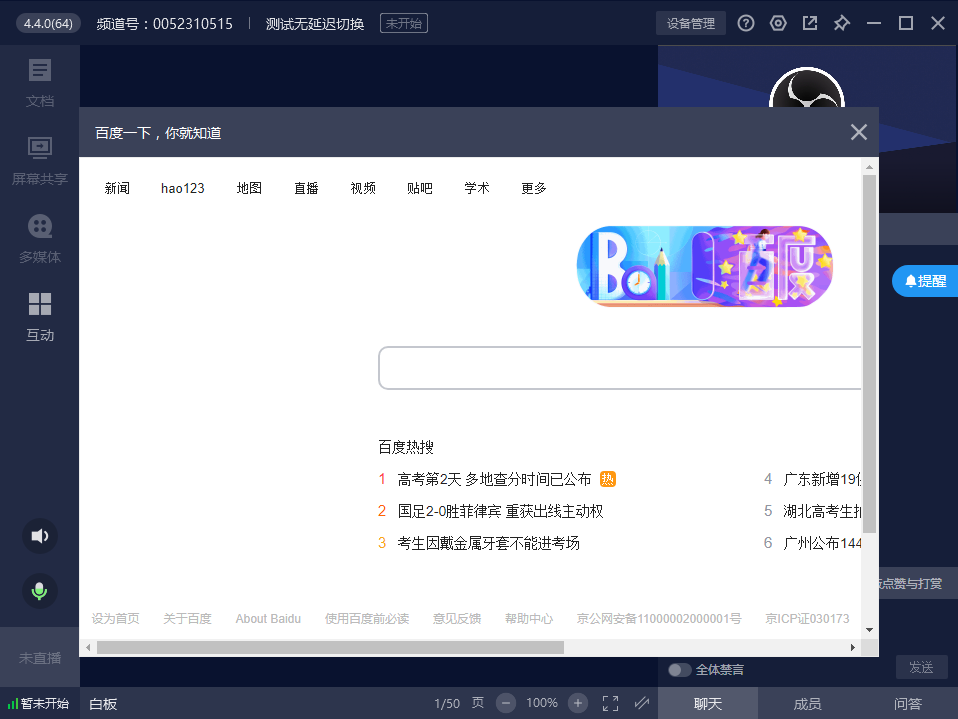
- Clicking on this interaction will load the corresponding web page address.
Streaming End Sharing:
If the sharing button on the streaming end is disabled, the sharing toggle will no longer be displayed on the client side.
Teaching Assistant Settings and Sub-channel Management
Using the assistant settings, you can manage sub-channels. Additionally, you can access the assistant backend and the director console.
1. Each live channel can create up to 40 sub-channels.
2. Assistant information can be modified, such as nickname, title, password, avatar, etc.
3. Announcement and check-in permissions can be enabled for assistants. In three-panel mode, PPT page-turning permissions can also be enabled.
Adding Live Streaming Management Personnel (Live Streaming Sub-accounts)
If there are many live streaming activities within the enterprise and the super administrator cannot manage all live channels alone, sub-accounts can be created and assigned to internal management personnel to assist in live streaming business management. You can set functional permissions and data management scope for sub-accounts, enabling dedicated personnel to manage specific tasks. This helps distribute management pressure while ensuring secure and orderly management.
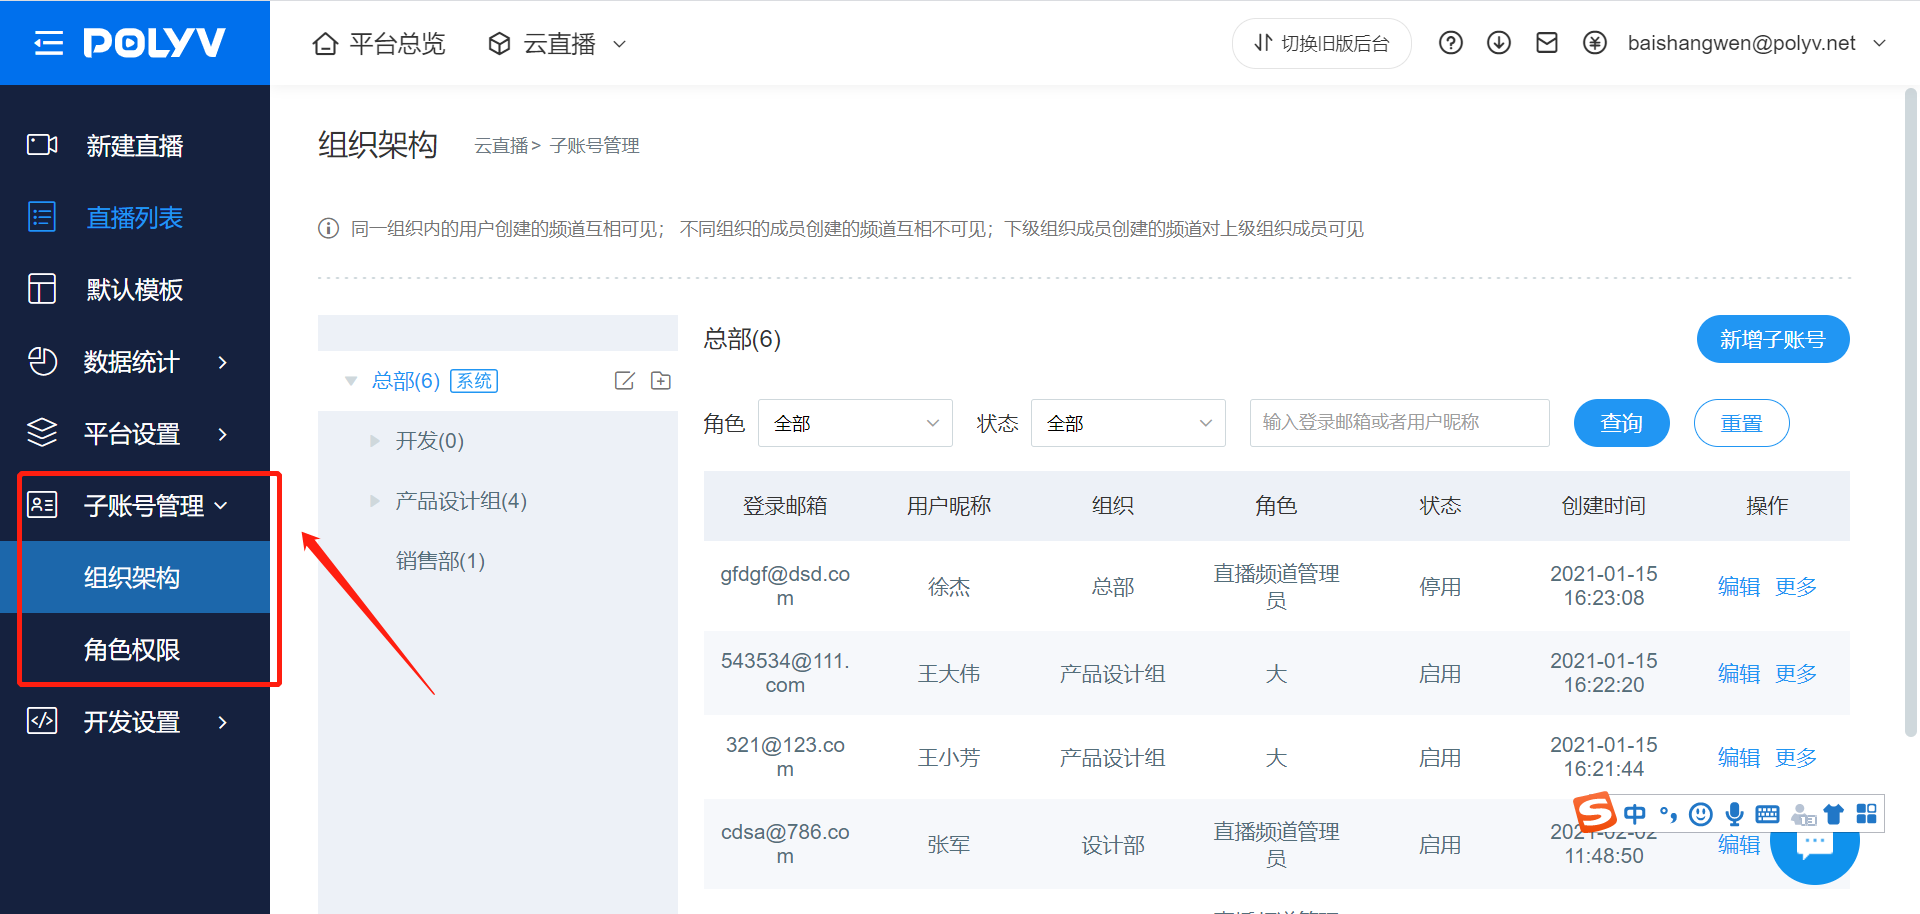
1. Explanation of Terms
Organizational Structure: Refers to the hierarchical relationship structure among backend sub-accounts. It can be set up based on the actual organizational structure of the enterprise or customized according to online management relationships. The organizational structure has a superior-subordinate distinction. Sub-accounts in a superior organization can view and manage the live channels of subordinate sub-accounts, while sub-accounts at the same level can view and manage each other's channels.
Role: In the Polyv backend, a collection of specific functional permissions is considered a role. By associating a sub-account with a role, the sub-account automatically obtains all the functional permissions of that role. This facilitates enterprises in managing sub-account permissions without needing to repeatedly set permissions for each sub-account.
Sub-account: A backend account with specific business management permissions. It is used to assist the super administrator in completing backend operations for the organization, and its account permissions are determined by the associated roles.
2. Organizational Structure Management
Add Organization
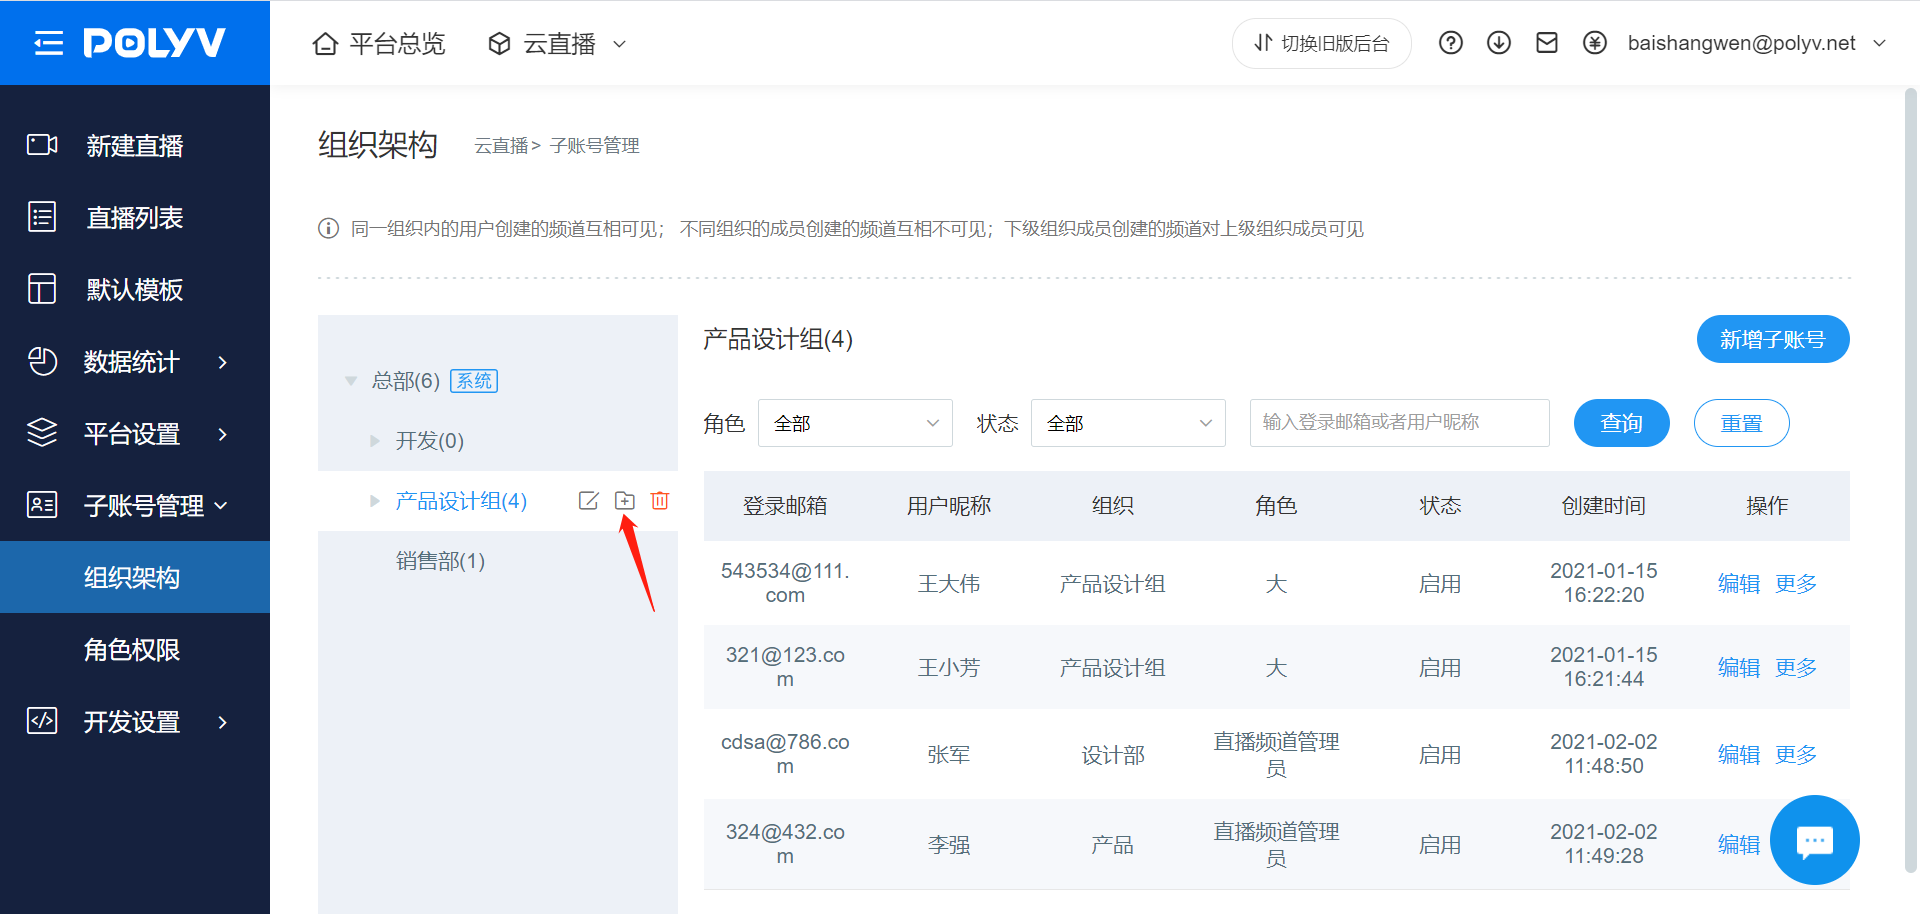
Open the [Sub-account Management - Organizational Structure] page, hover the mouse over the organization name area, click the Add button, and open the Add Organization pop-up window.
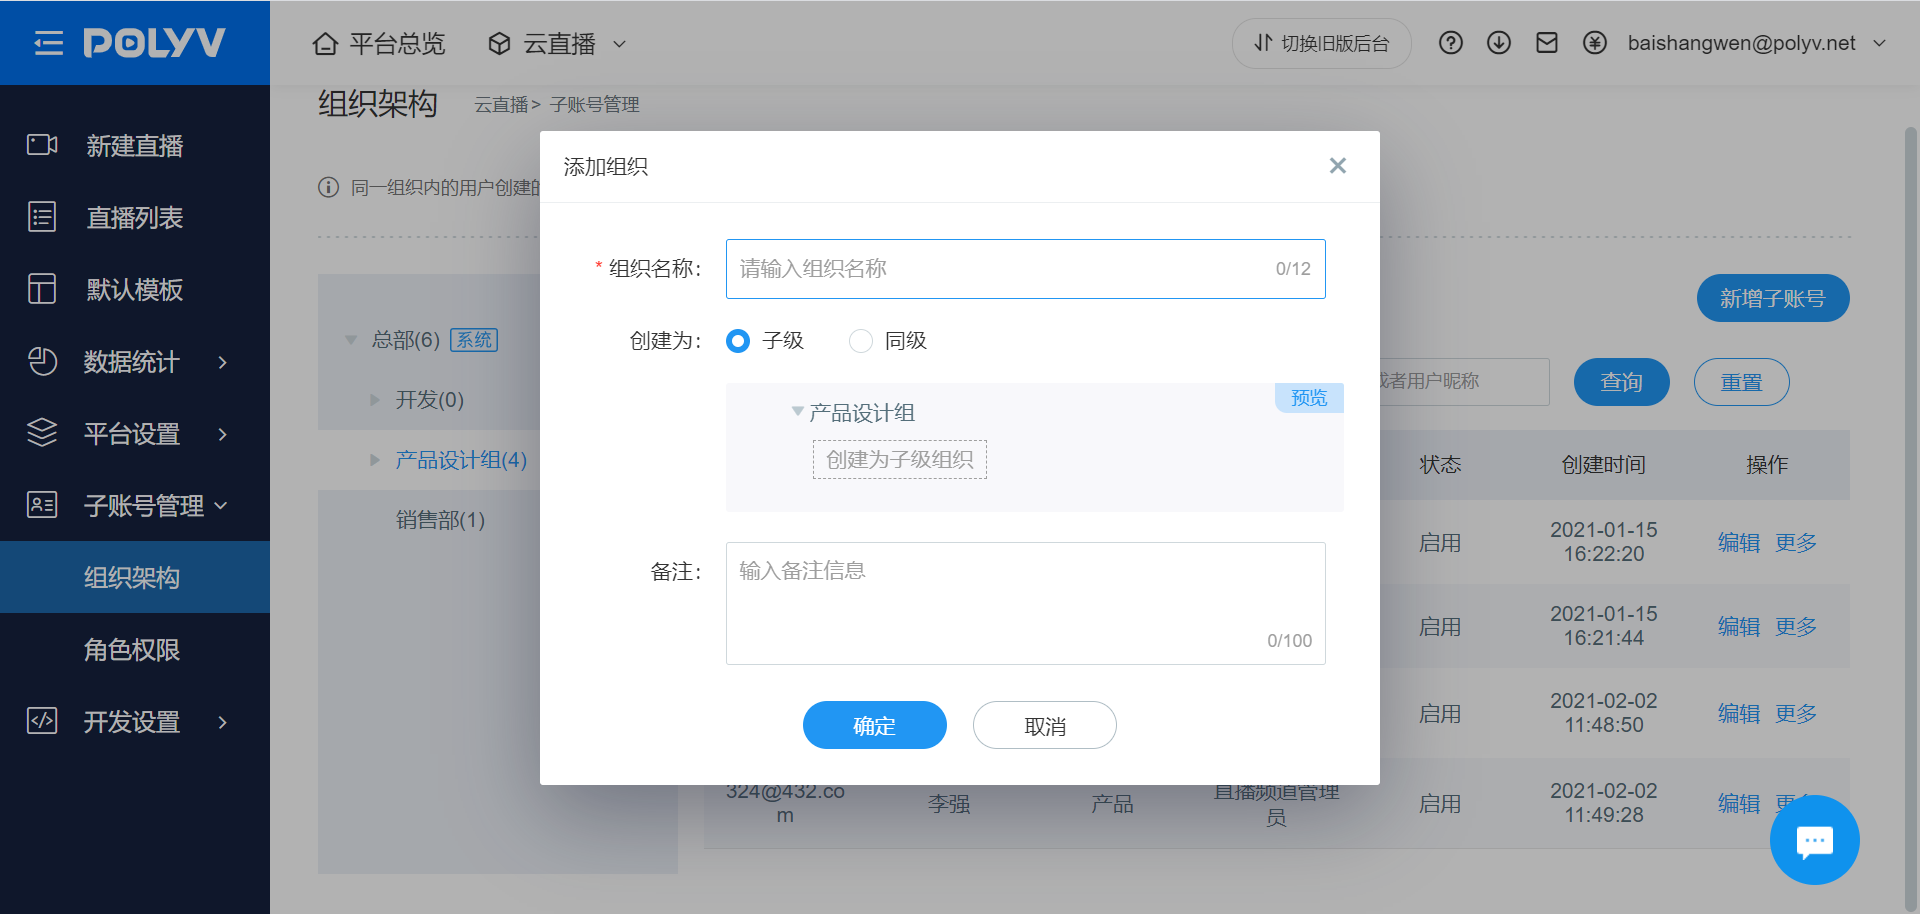
Enter the organization name, set the parent-child relationship of the organization, fill in the remarks, and click the Save button to complete the addition.
Note:
You can only create organizational structures downwards, such as subordinate or peer-level organizations, and cannot create superior organizations.
The default limit for the number of organizations is 30. To expand this limit, please contact the business personnel to apply for activation.
Delete Organization
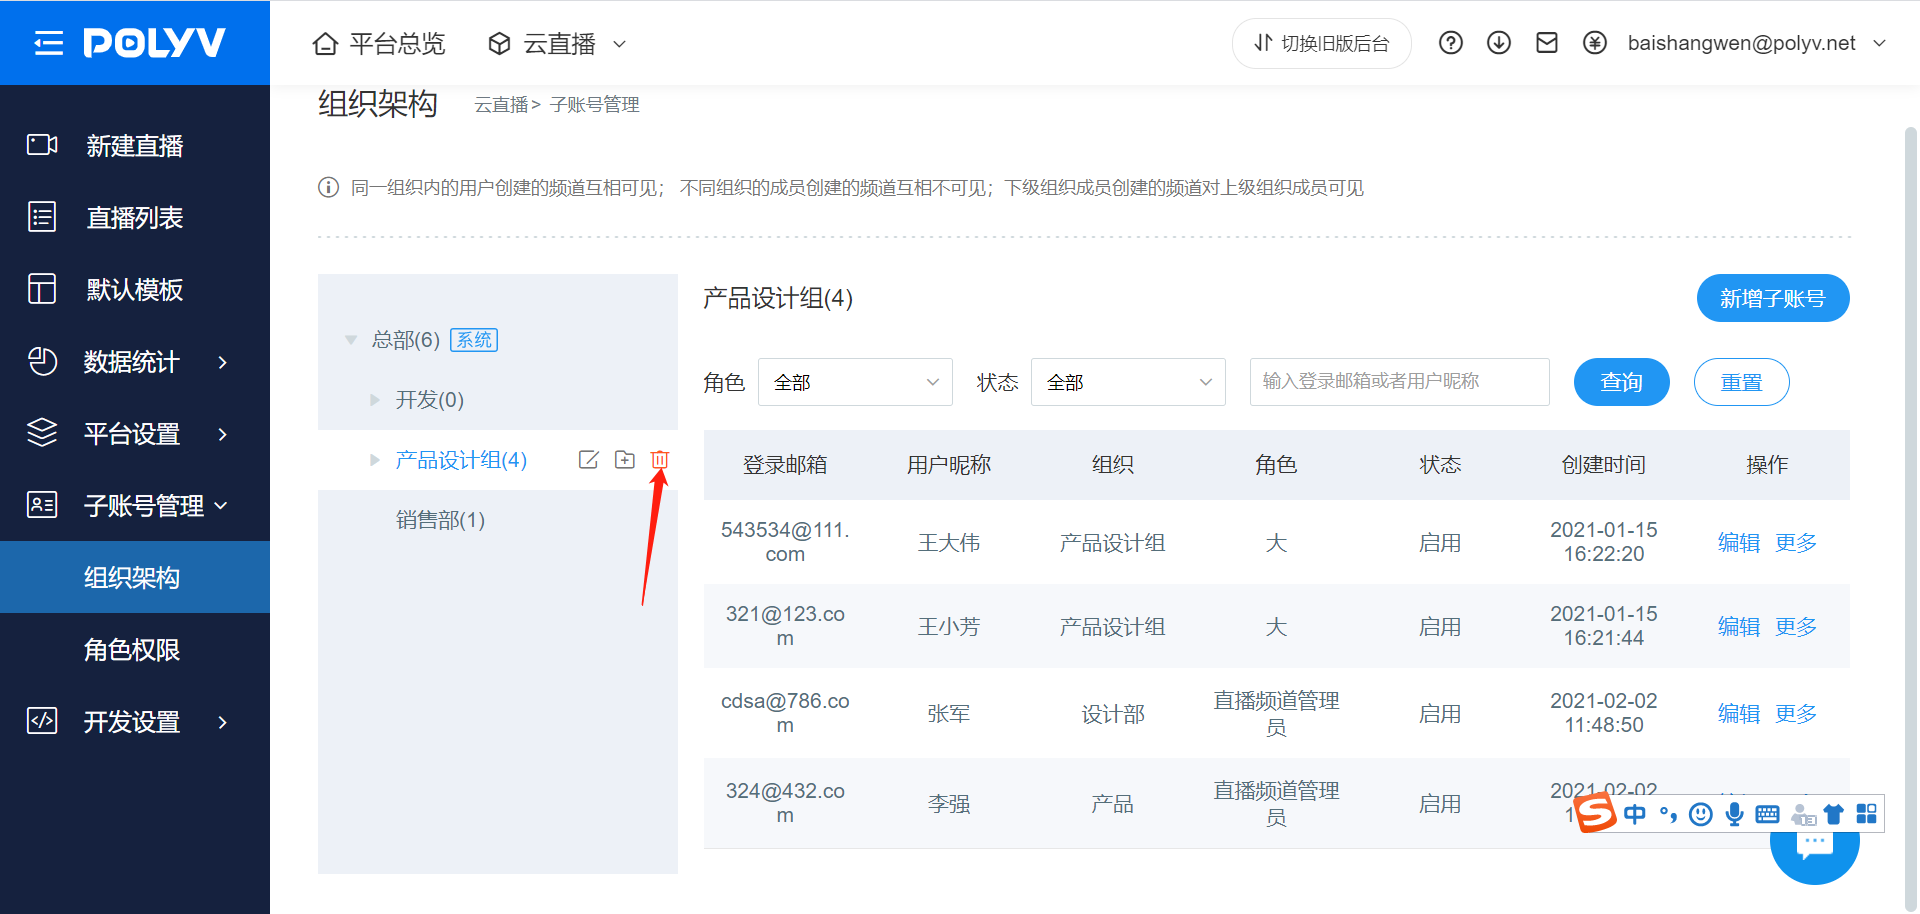
Open the [Sub-account Management - Organizational Structure] page, hover the mouse over the organization name area, click the delete button, and open the delete confirmation dialog.
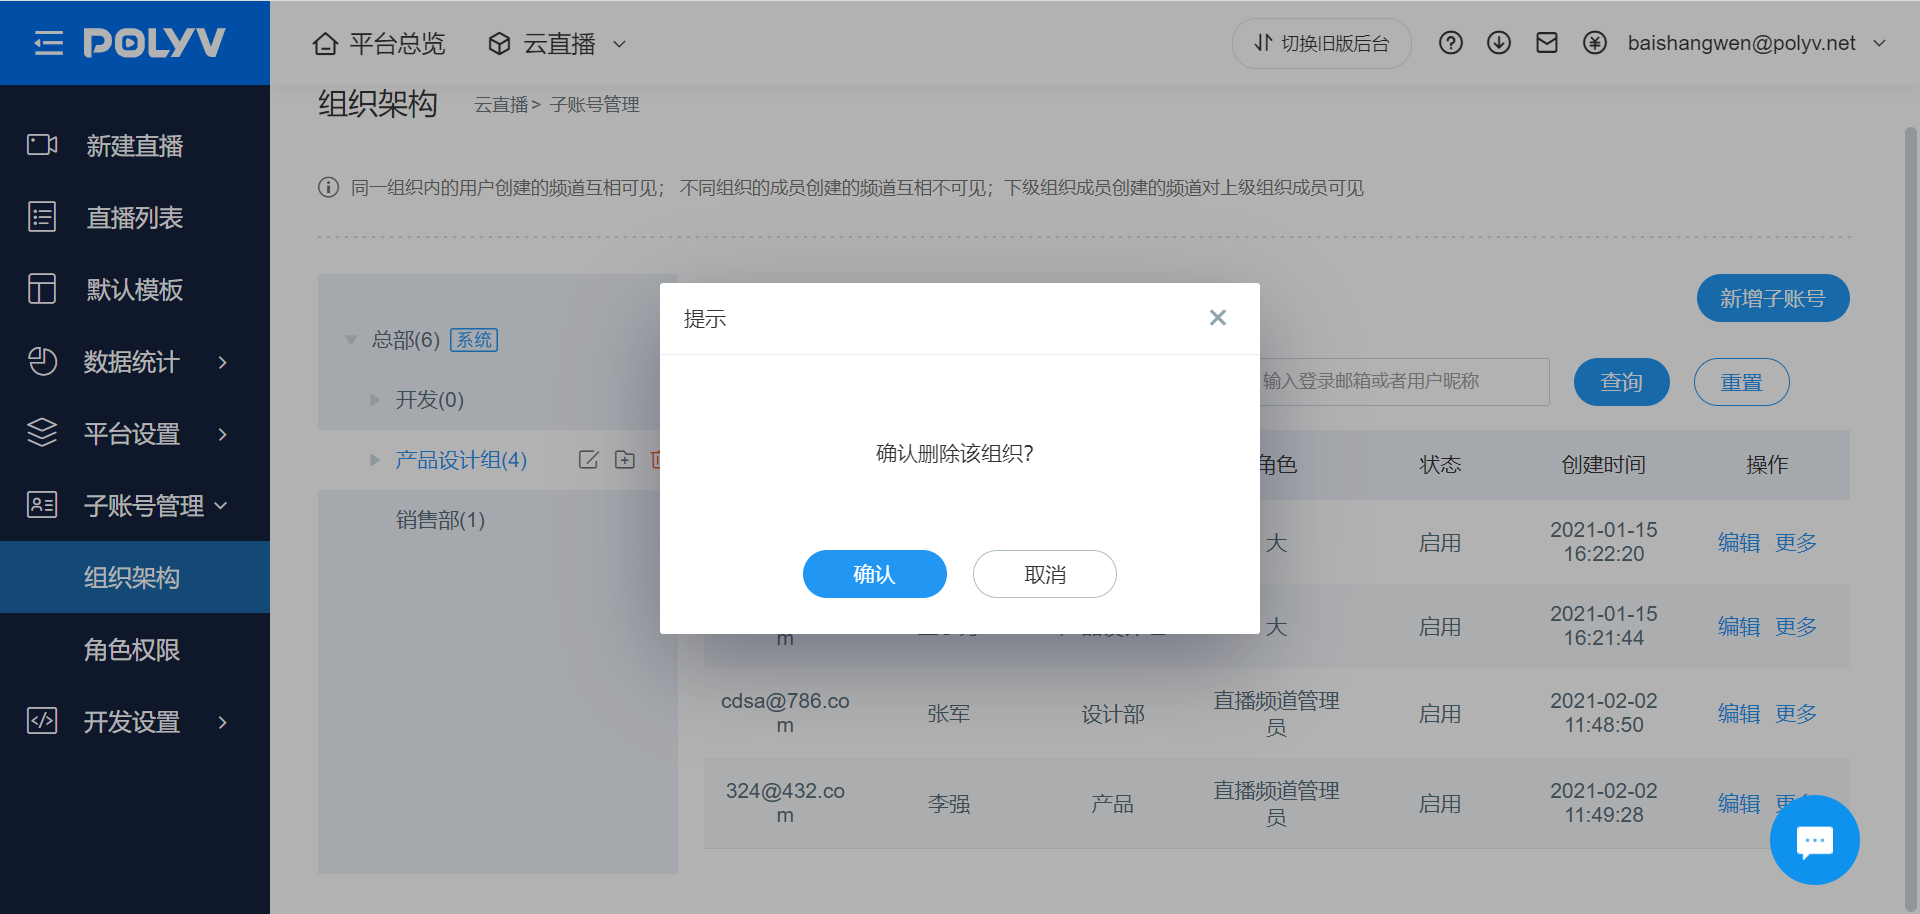
Click the Confirm button to delete the organization.
Note:
After deleting an organization, all sub-organizations under the original organization will also be deleted.
If there are already sub-accounts in the organization, please delete the users within the organization before deleting the organization.
Modify Organization
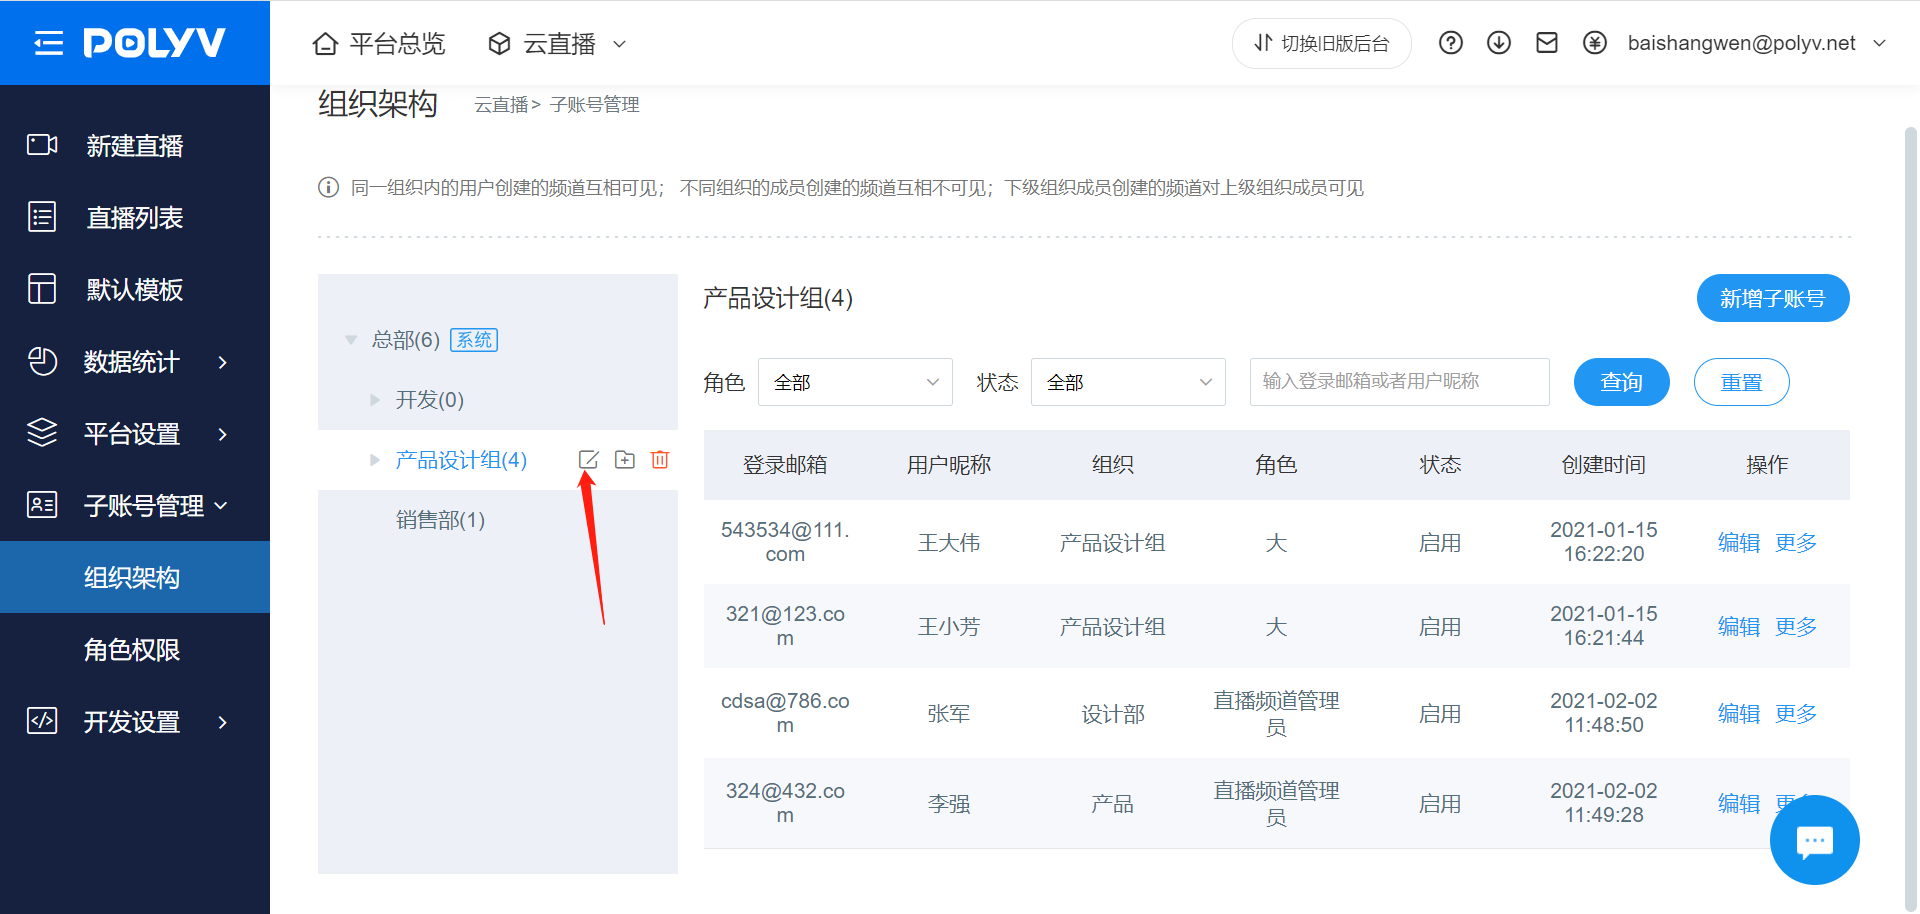
Open the [Sub-account Management - Organization Structure] page, hover the mouse over the organization name area, click the delete button, and open the delete confirmation dialog.
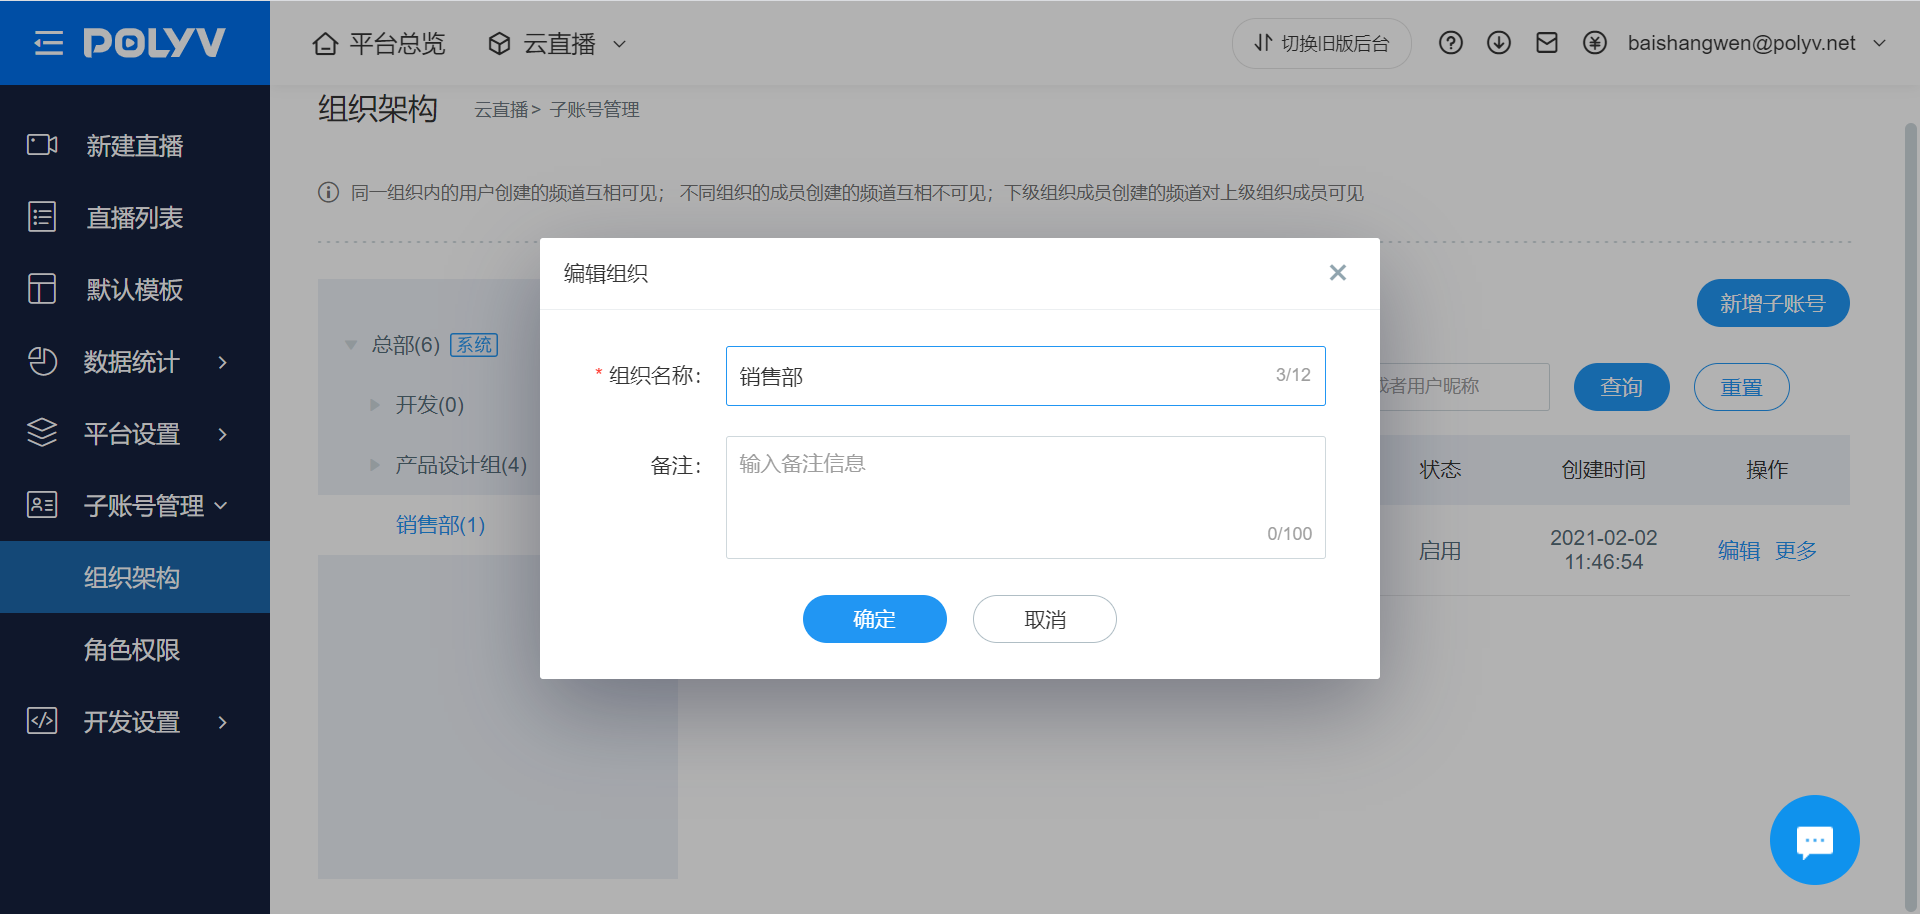
After entering the new organization name and notes, click Save to complete the modification of the organization information.
Note:
Unable to modify the organizational hierarchy; only the basic information of the organization can be modified.
3. Role Management
Add Role
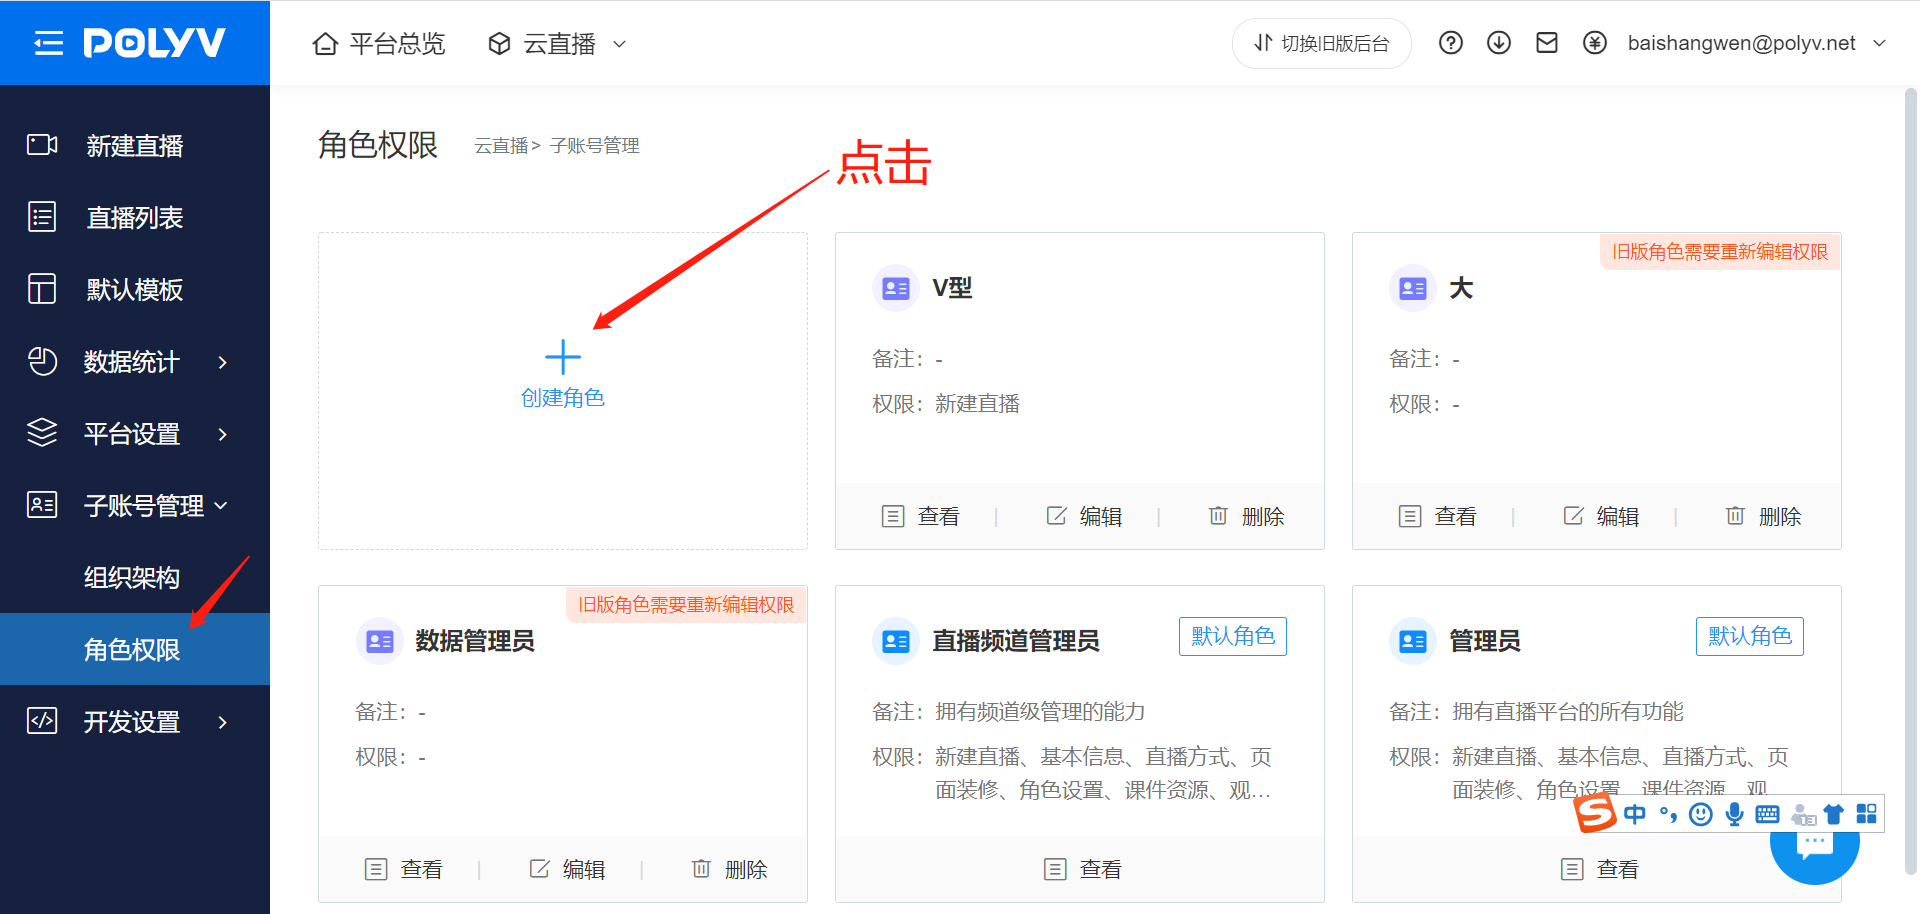
Open the [Sub-account Management - Role Permissions] page, click the Create Role button, and enter the Add Role page.
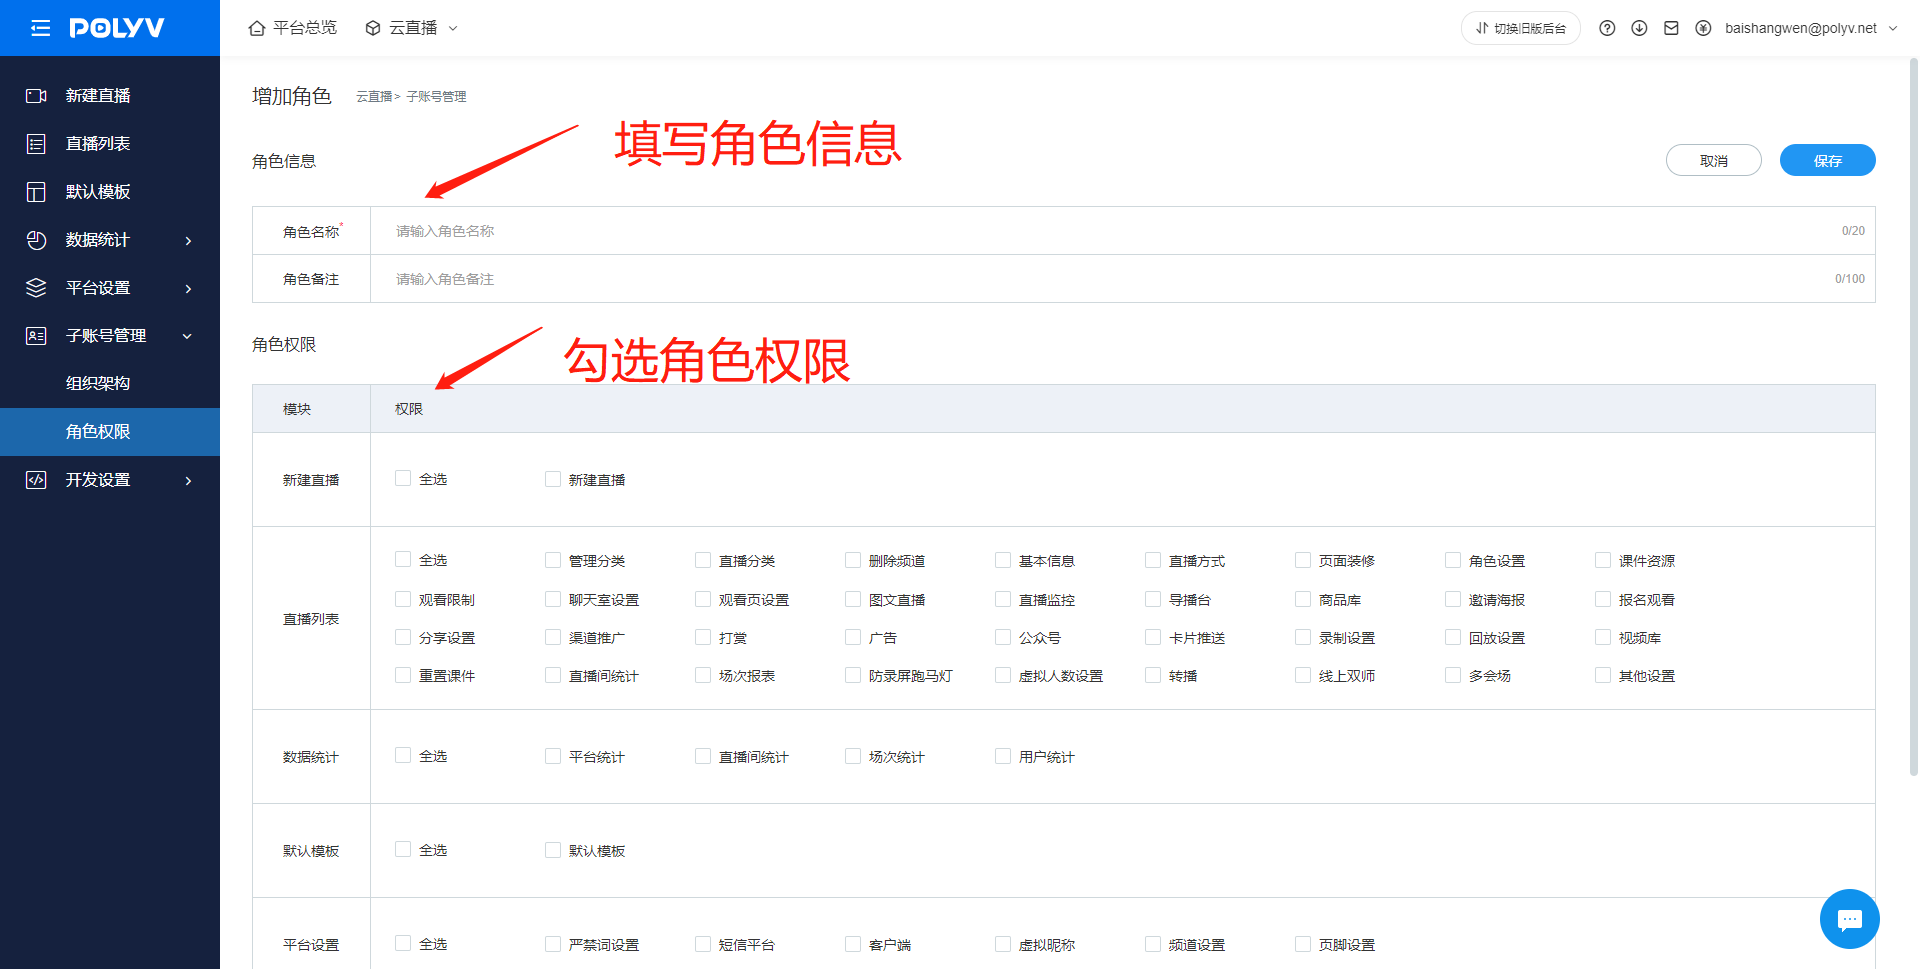
On the new role page, you can set the role name and description; select permissions by checking menus, then click the save button to complete the creation.
Note:
By default, the backend generates two fixed roles: the administrator has all permission functions of the live streaming platform; the live channel administrator has all permissions for channel management.
By default, you can create up to 10 roles. If you need to expand this limit, please contact the business team to request activation.
Delete Role
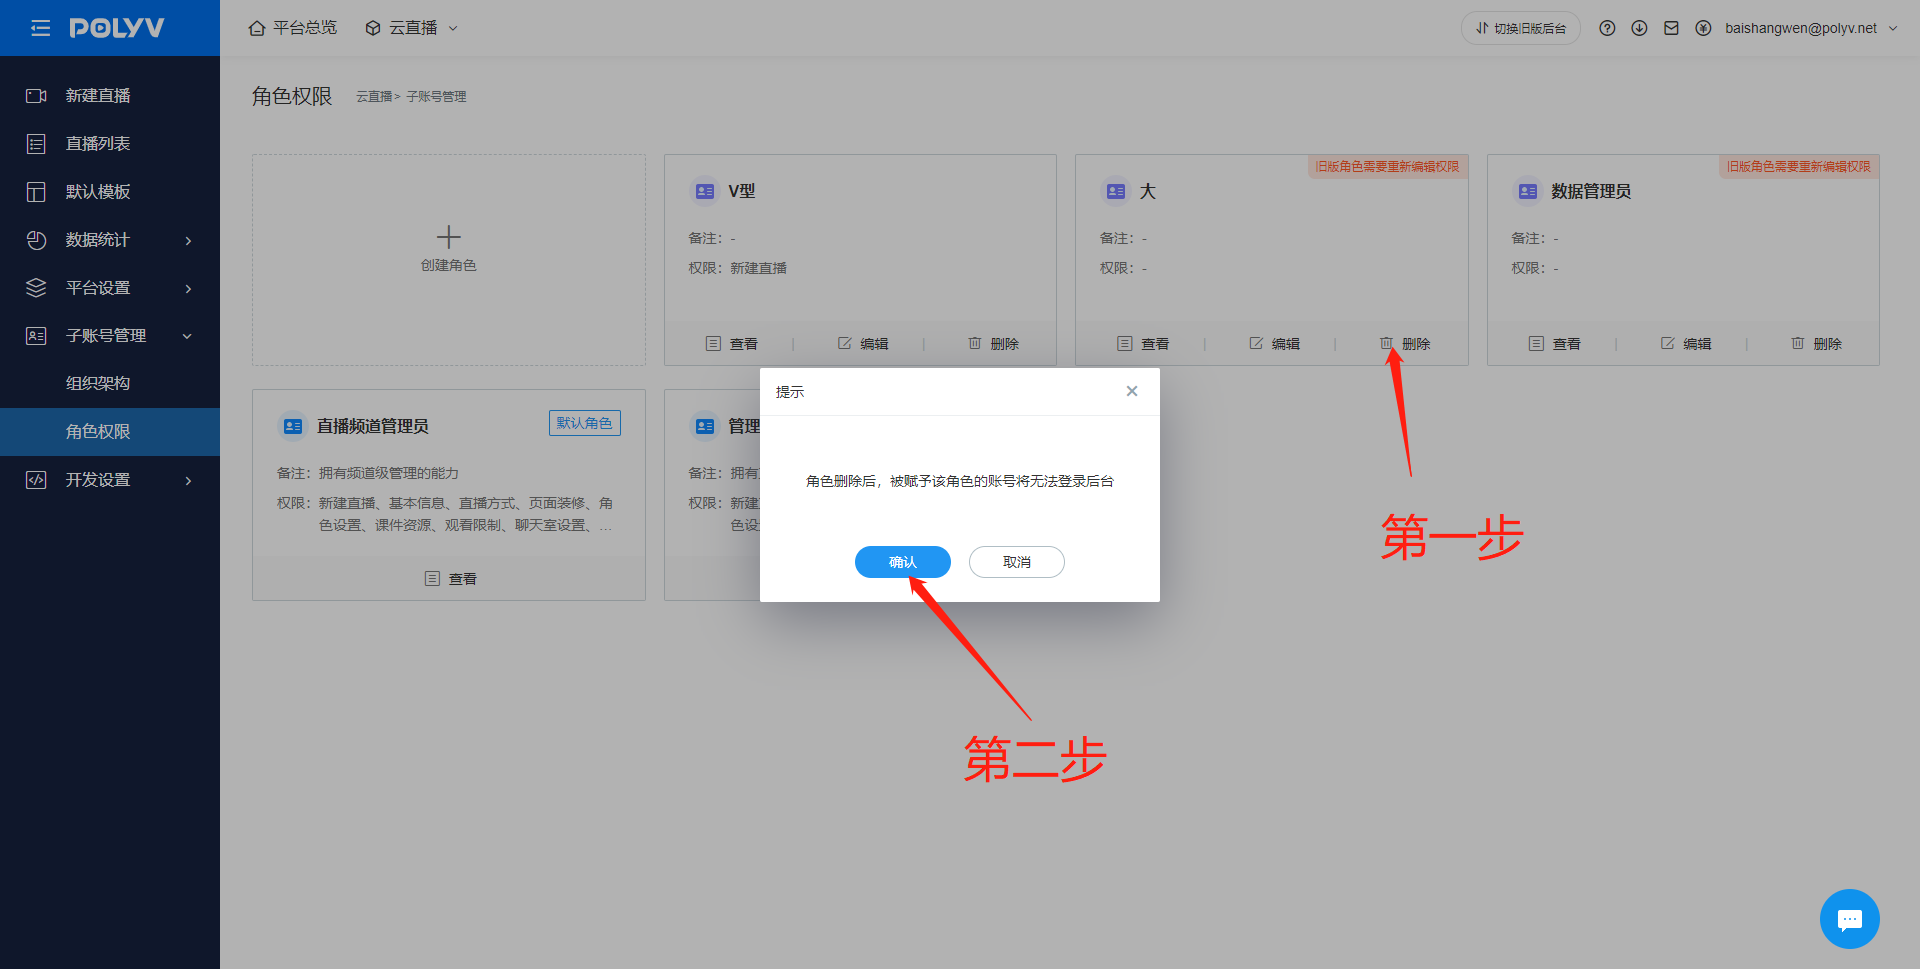
Open the [Sub-account Management - Role Permissions] page, click the delete button inside the role card, open the confirmation dialog, and click the confirm button to delete the role.
Note:
Default roles cannot be deleted.
After the role is deleted, accounts assigned that role will be unable to log in to the backend.
Modify Role
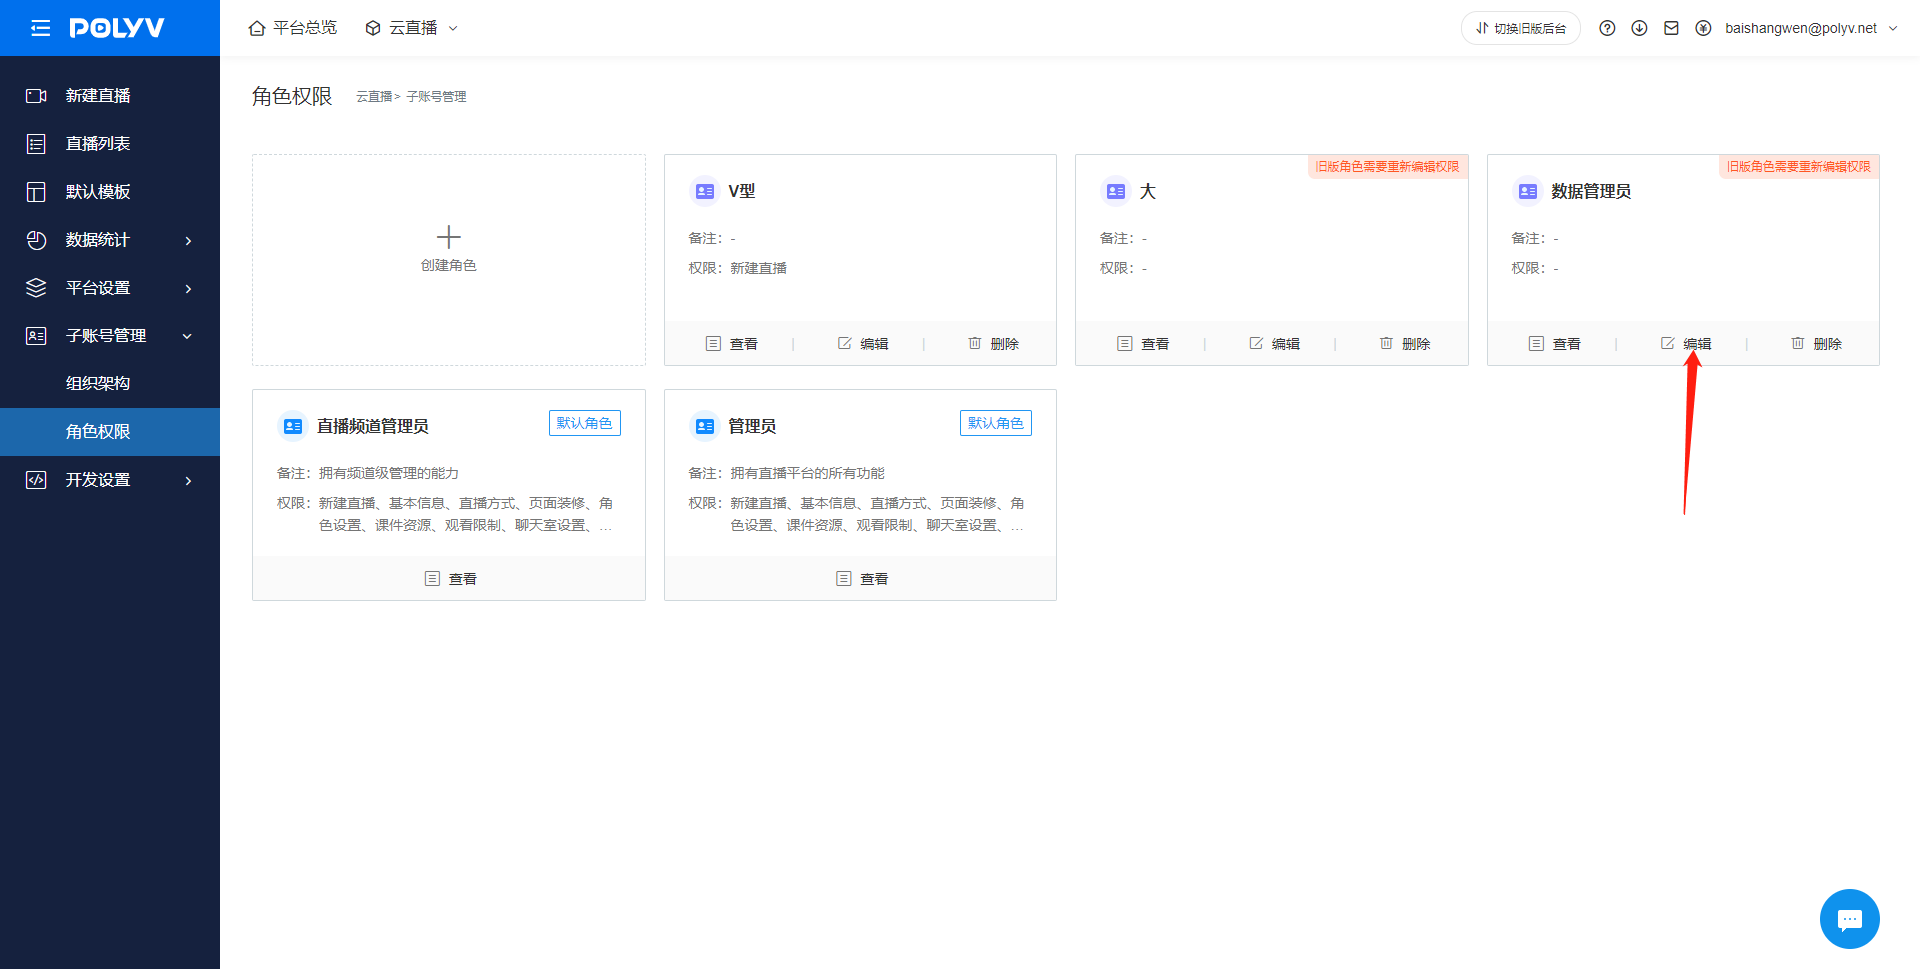
Open the [Sub-account Management - Role Permissions] page, click the edit button inside the role card, and open the edit role page.
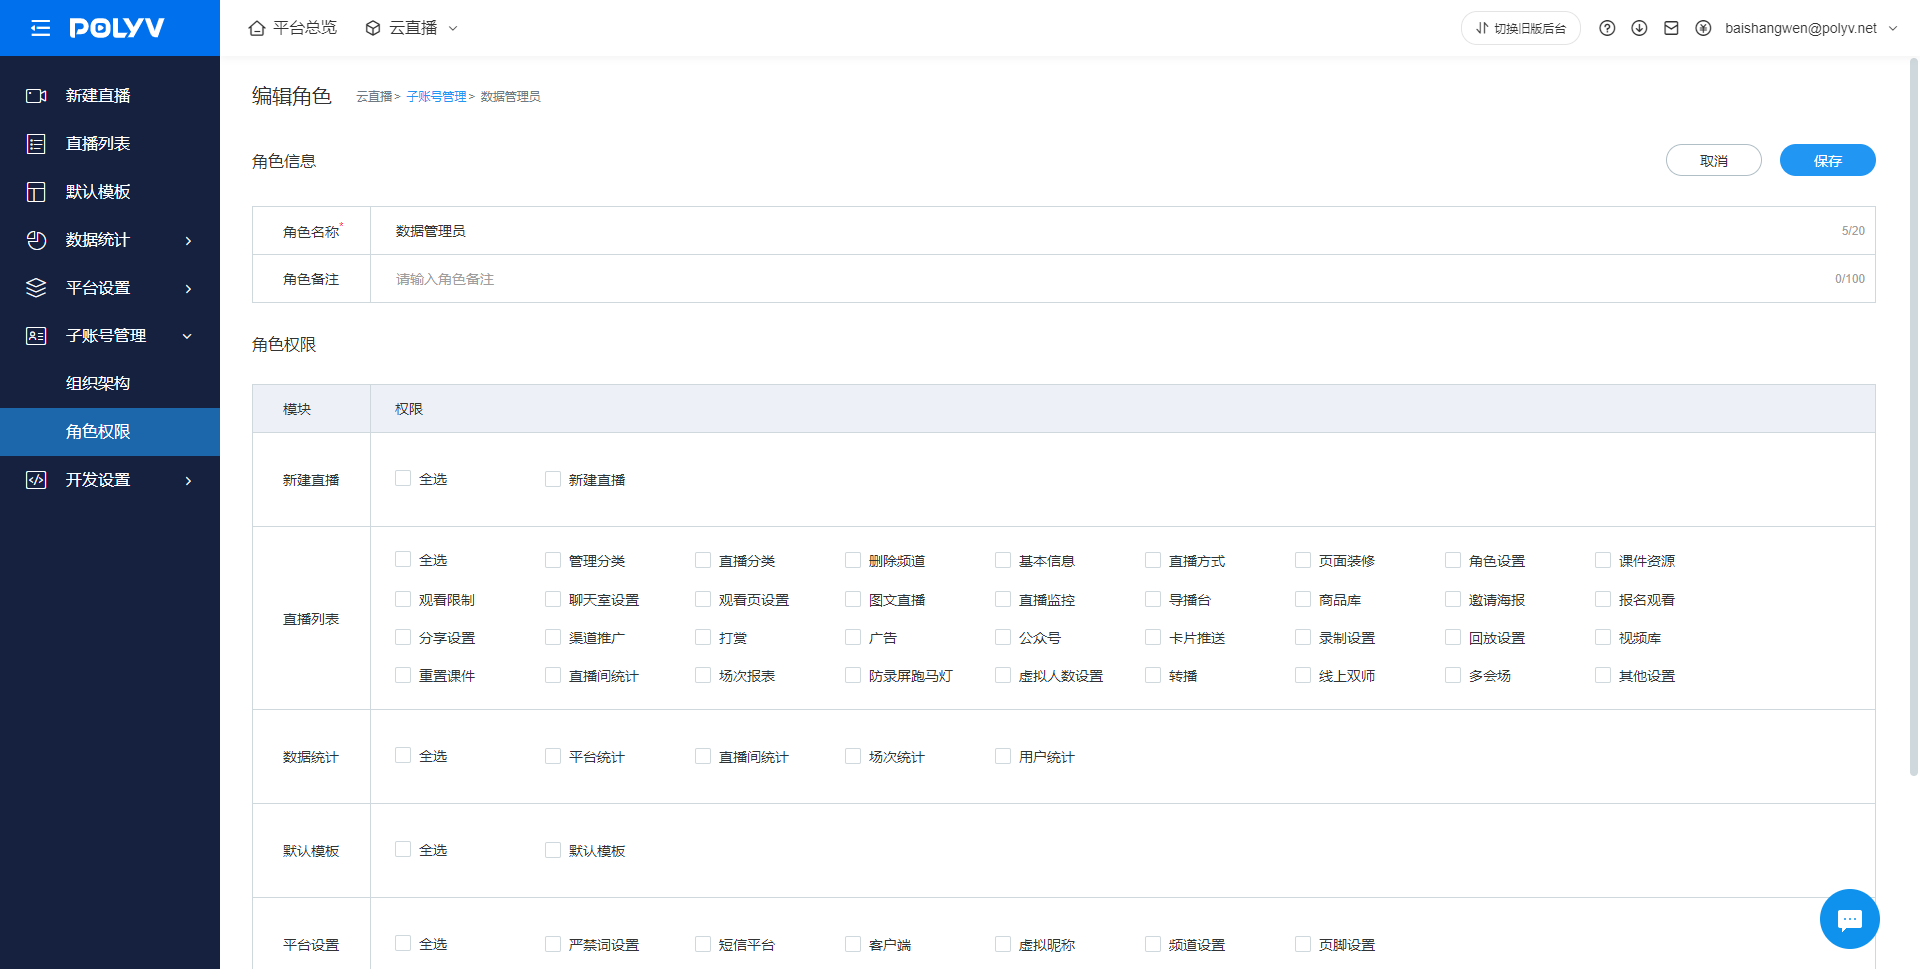
On the edit role page, you can modify the role's name and notes; select permissions by checking menus, and click the save button to complete the changes.
Note:
And the default role cannot be modified.
After modifying role permissions, the permissions of all associated sub-accounts will also be updated.
4. Sub-account Management
Add Sub-Account
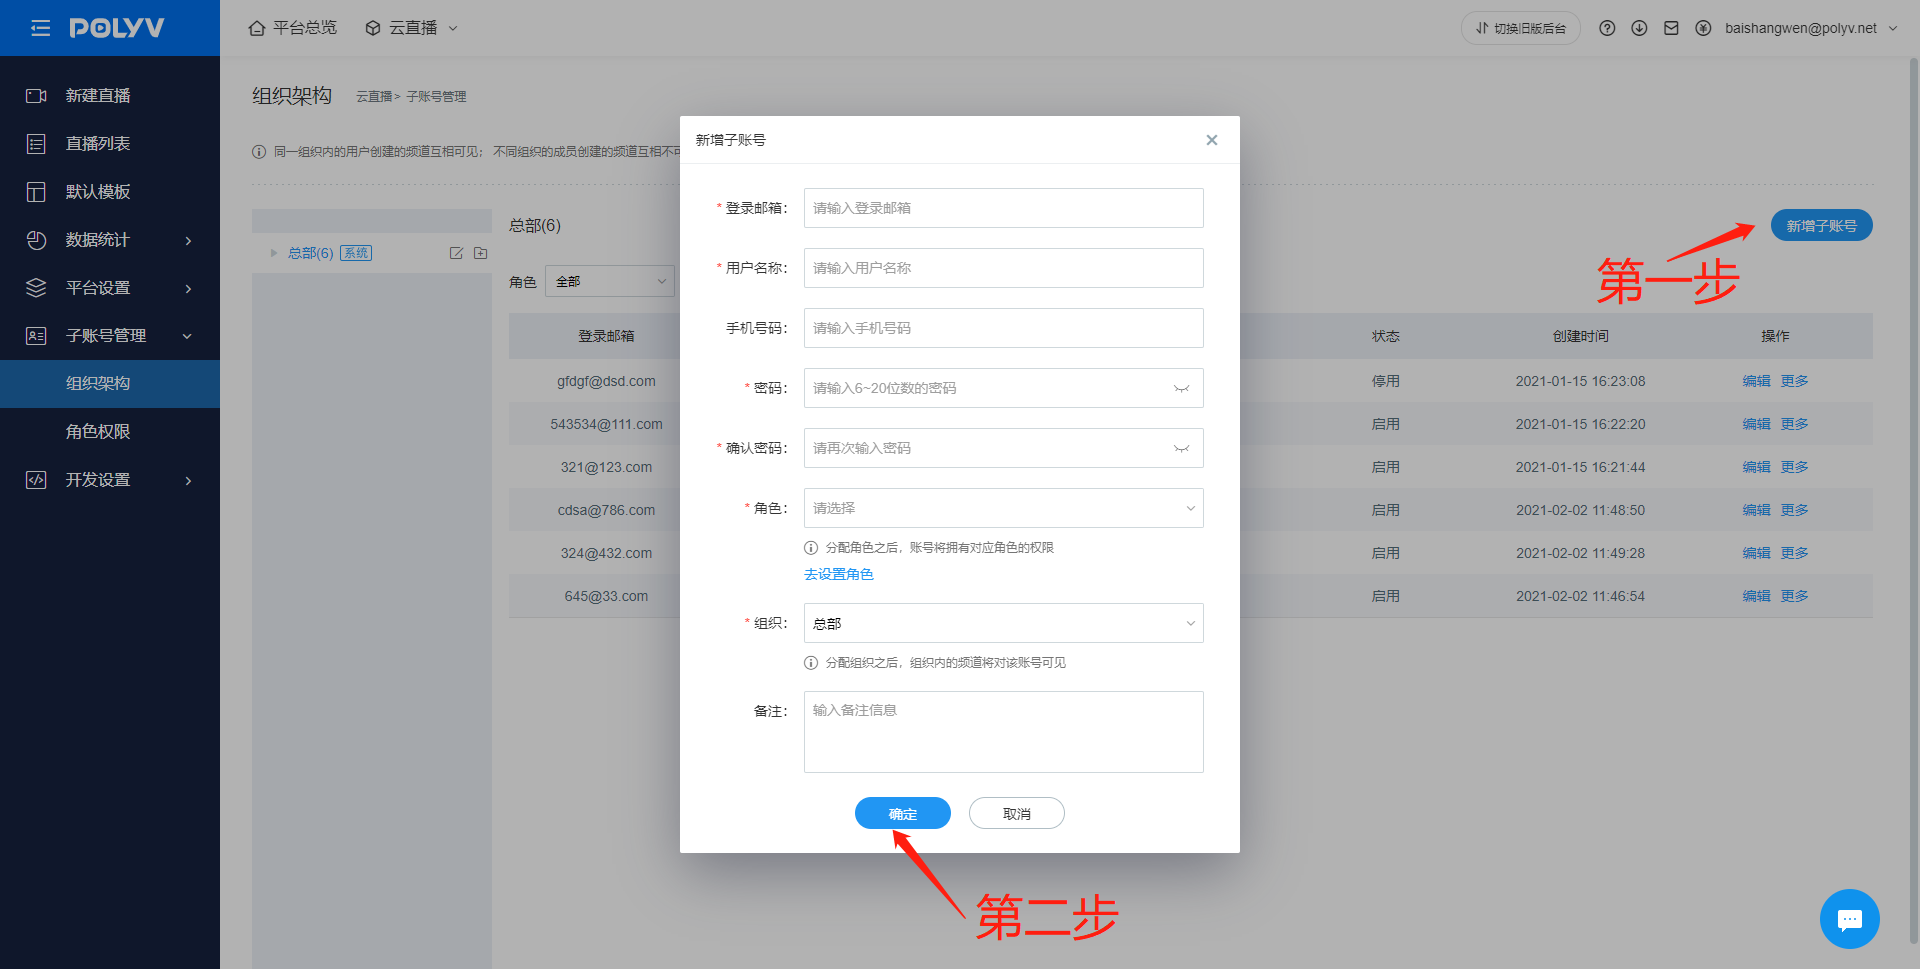
Open the [Sub-account Management - Organization Structure] page, click the "Add Sub-account" button to open the "Add Sub-account" window. Fill in the sub-account information in the window, set the organization to which the sub-account belongs, associate role permissions, and click the "Save" button to complete the creation.
Note:
A sub-account can only belong to one organization and be associated with one role.
By default, you can create up to 5 sub-accounts. If you need to expand this limit, please contact the sales team to apply for activation.
Delete Sub-Account
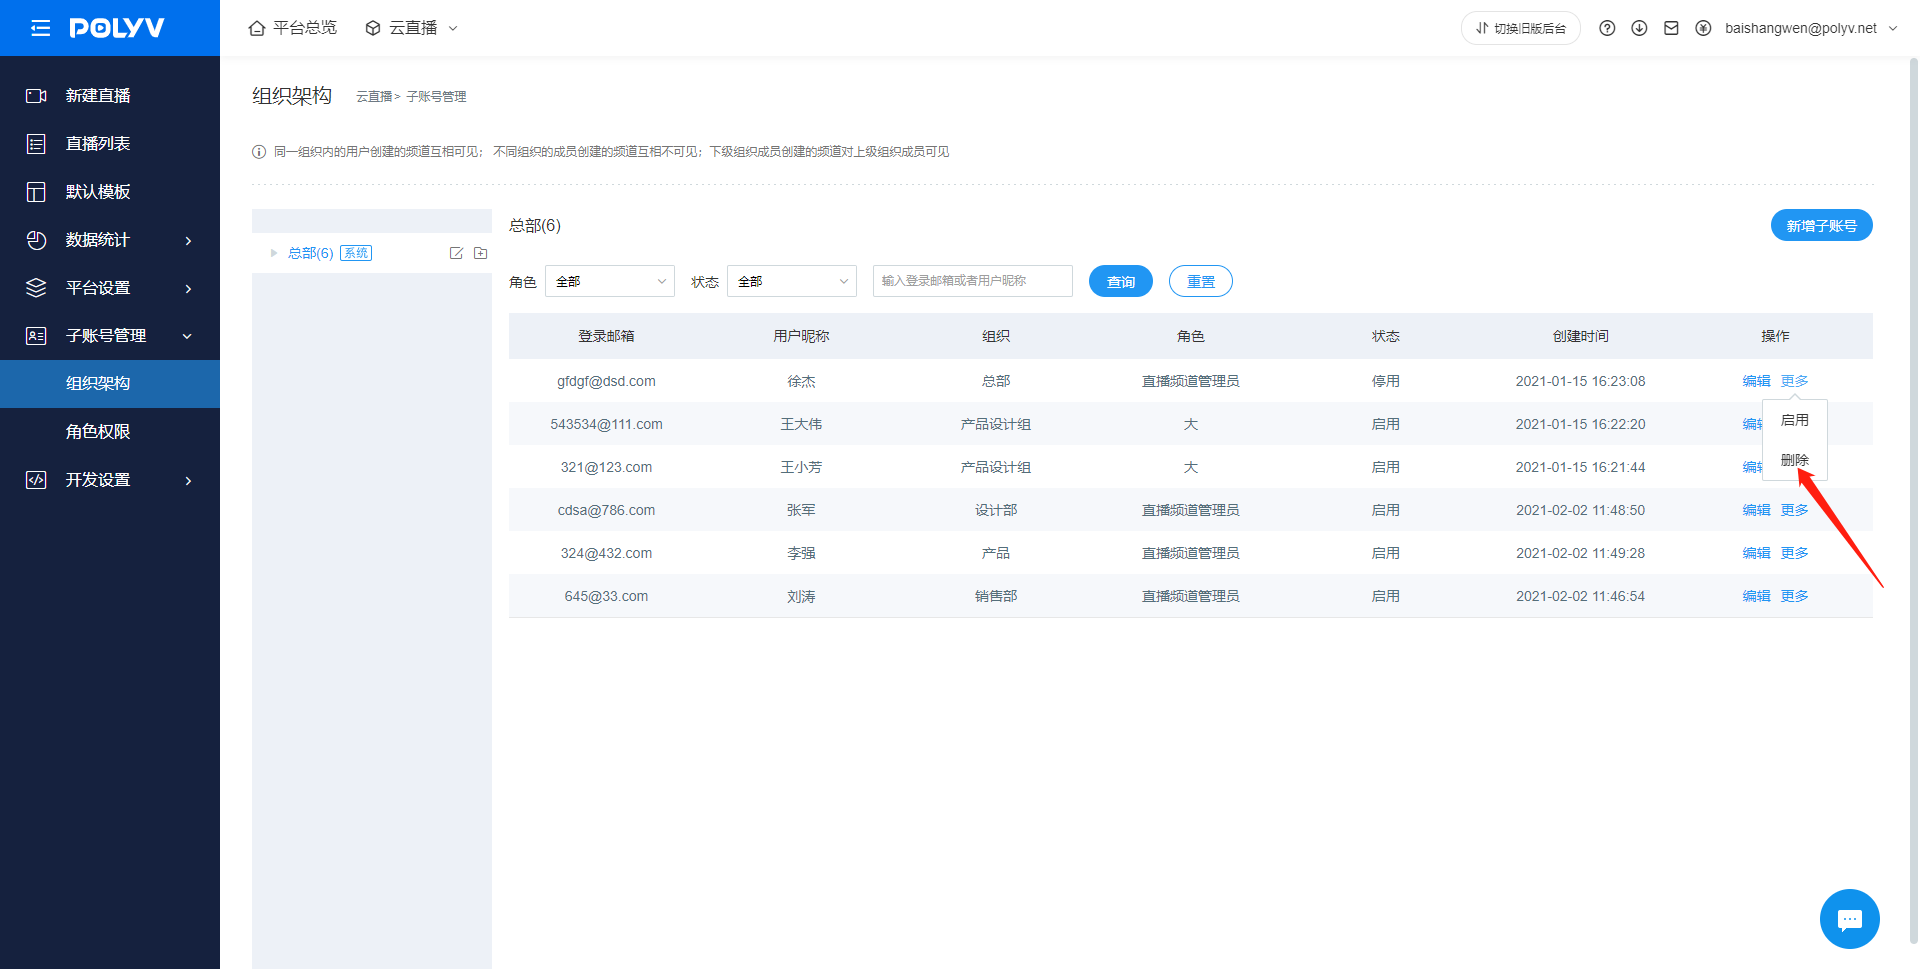
Hover over the sub-account list, click the delete button in the more options area, and the delete confirmation dialog will open.
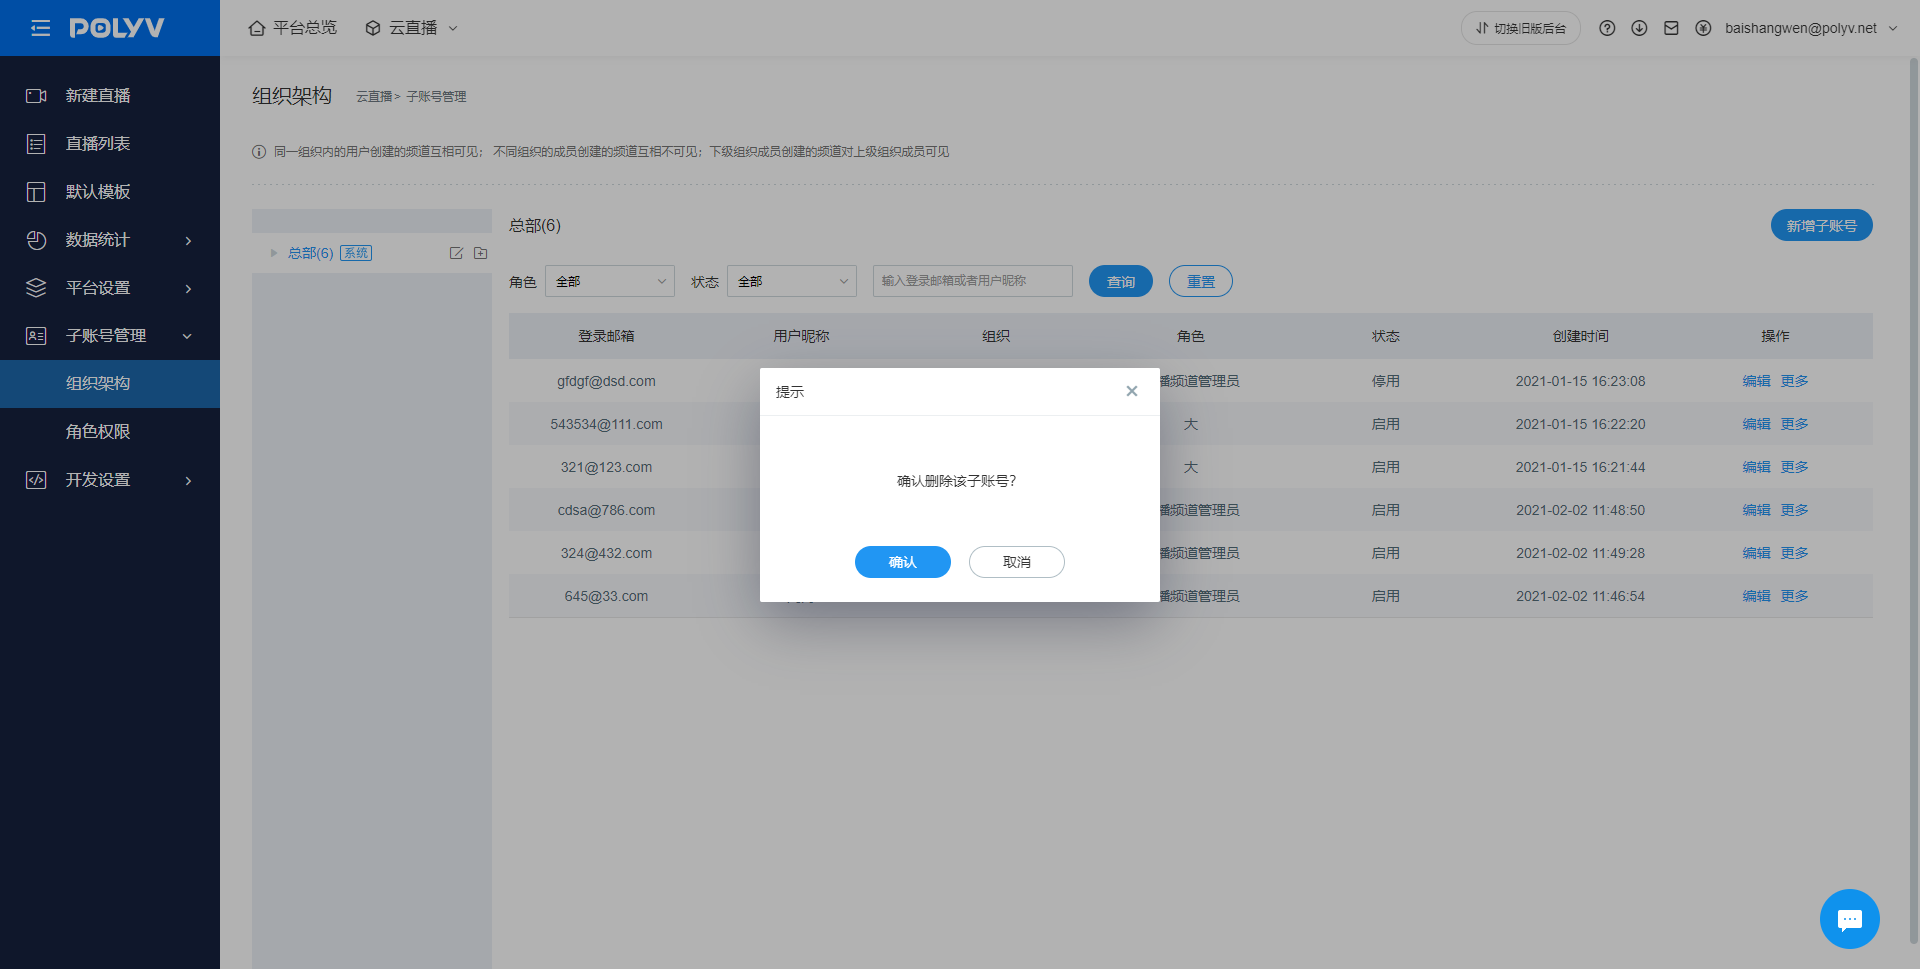
Click the Confirm button to complete the deletion.
Note:
After deleting a sub-account, the sub-account can no longer log in to the backend; all channels created by the original sub-account will be transferred to the super admin account for management.
Deactivation only means that the sub-account cannot log in. The channels of a deactivated sub-account will not be transferred to the super admin account.
Modify Sub-Account
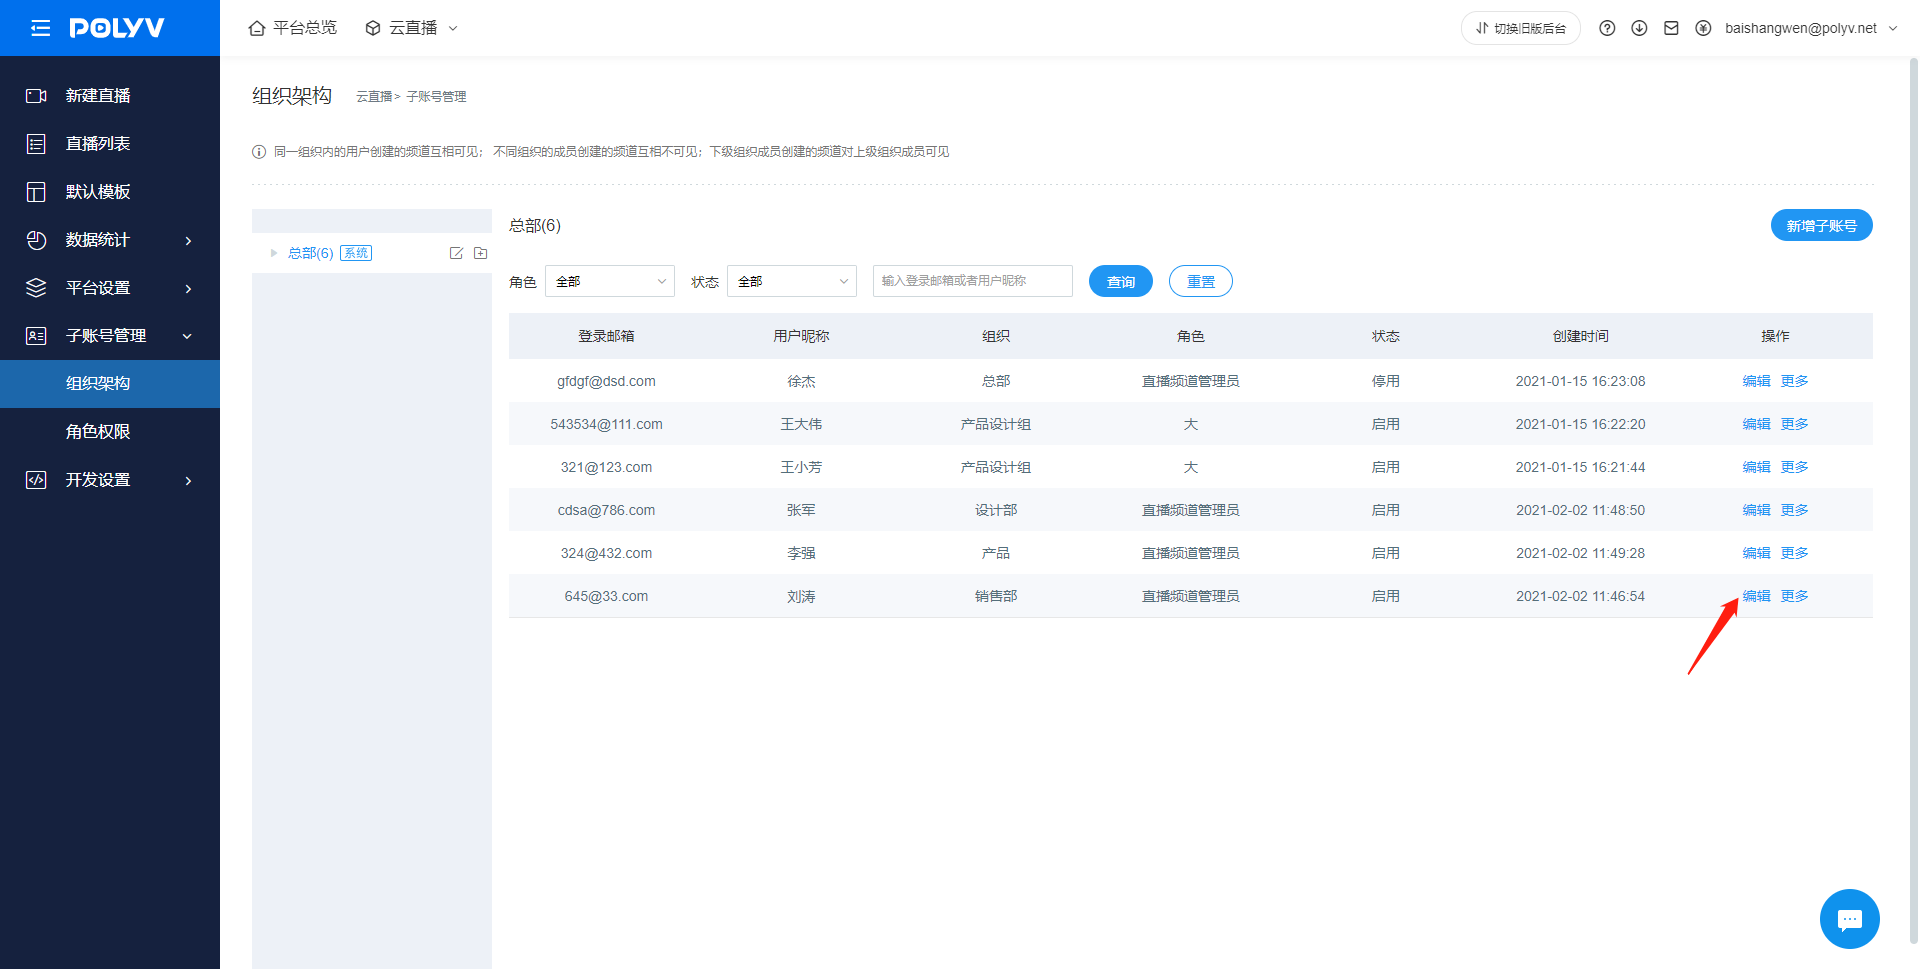
Open the [Sub-account Management - Organizational Structure] page, click the sub-account edit button with the mouse, and open the sub-account editing window.
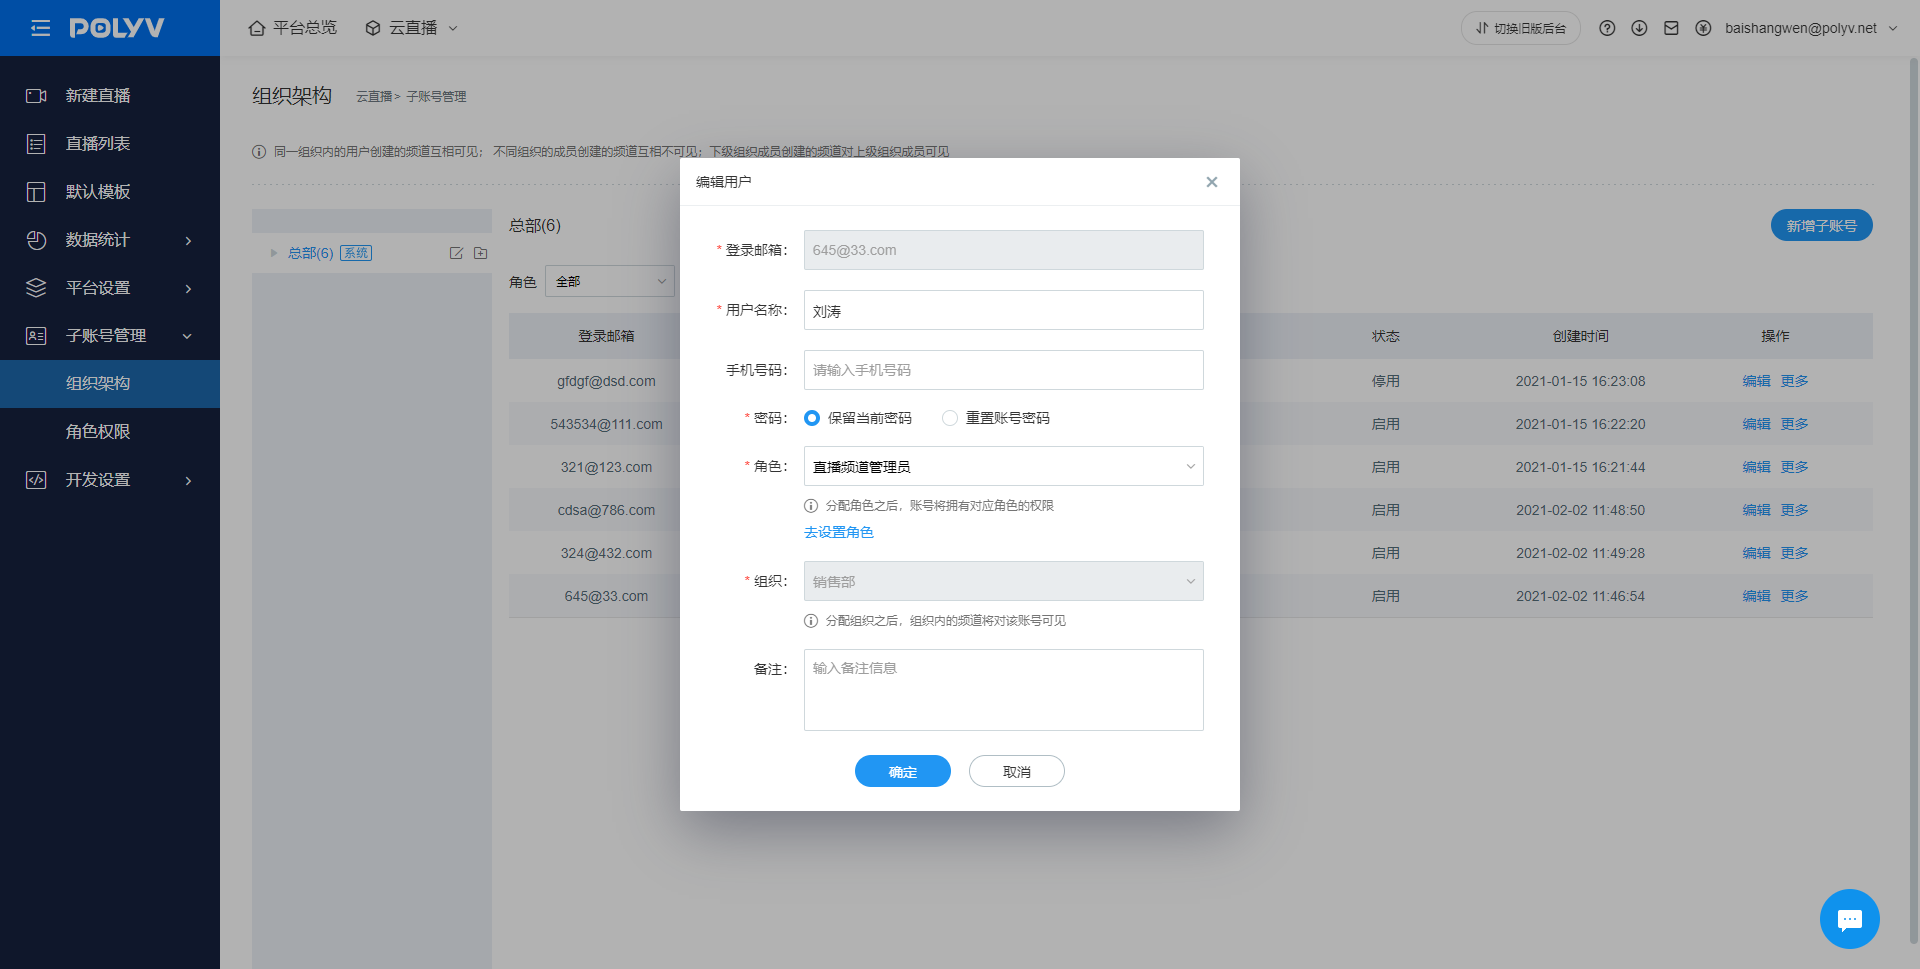
You can modify sub-account information in the window, set associated roles, and click the Save button to complete the modification.
Note:
The organization to which the sub-account belongs cannot be modified for the time being.
5. Sub-account Migration to the New Backend Instructions
To help users quickly apply old backend sub-accounts to the new backend, Polyv provides support for fast migration:
- Organization Structure: Fully retain historical data, no adjustments needed.
- Sub-accounts: Fully retain historical information, no adjustments needed.
- Roles: Retain role types, reconfigure the functional permissions for custom roles (due to adjustments in the new backend page, reconfiguration based on the new page functions is required).
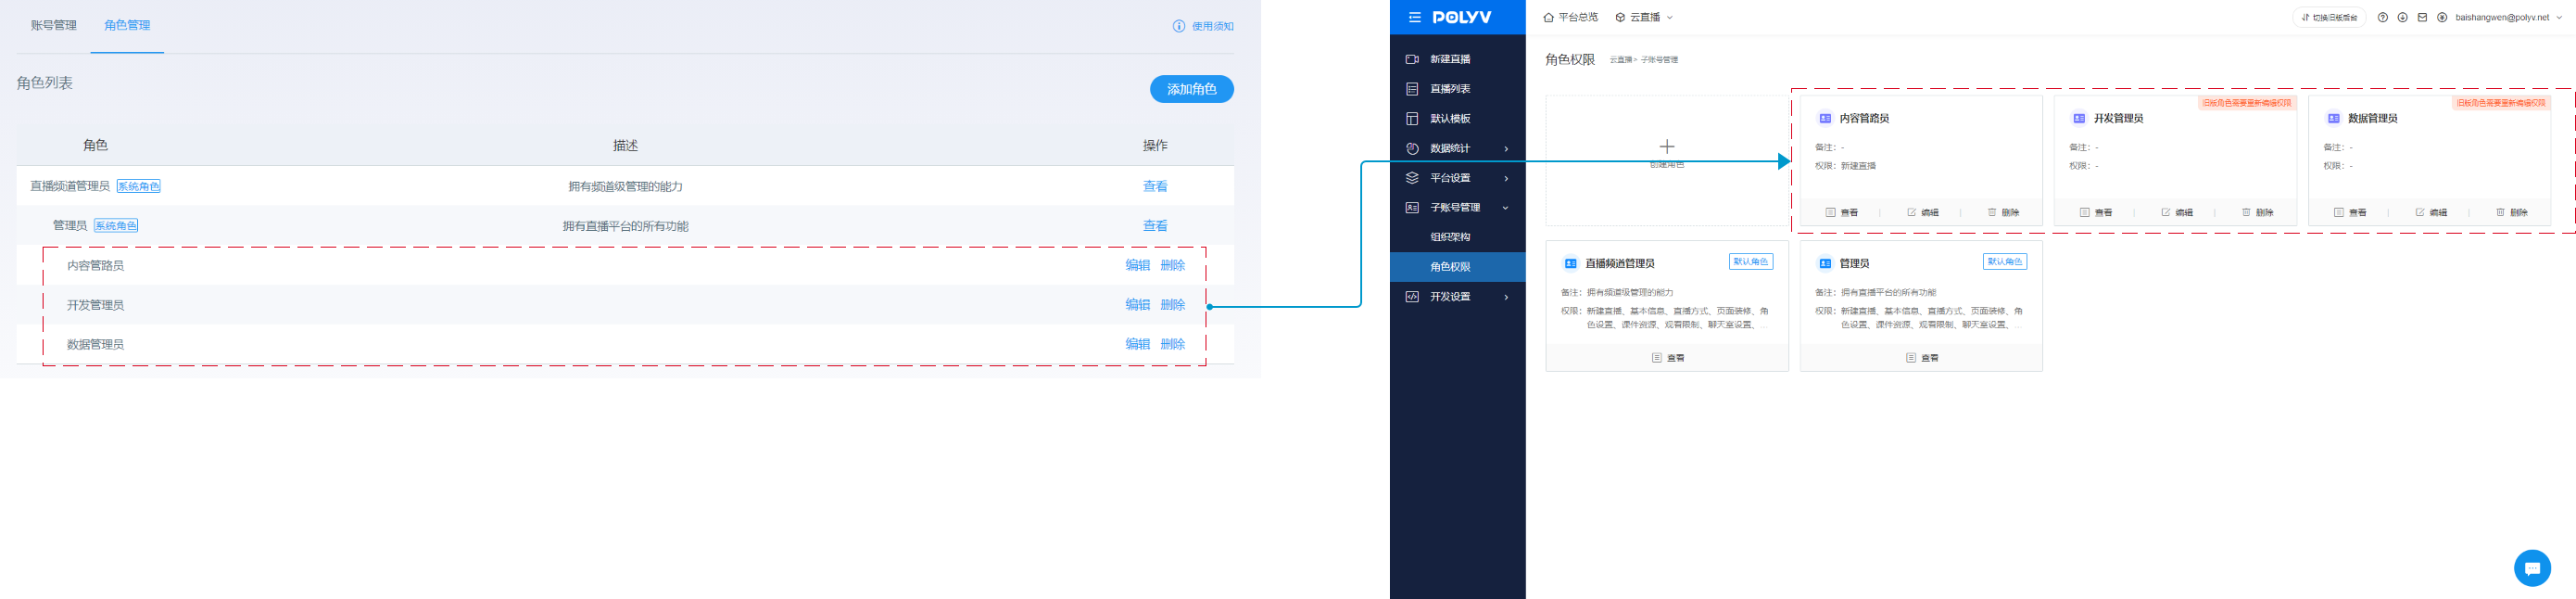
Open the [Sub-account Management - Role Permissions] page, locate the role card with red text in the upper right corner, click the edit button inside the card to open the edit role page, configure the functional permissions, and after configuration is complete, the red text in the upper right corner of the card will disappear.
Note:
If no function is set for a custom role, the function defaults to empty.
Default roles do not require configuration.
Cloud Distribution
1. Feature Overview
- After a live stream starts on a Polyv channel, it can be simultaneously distributed to other platforms for broadcasting, increasing the live stream's exposure and traffic, thereby enhancing the influence and effectiveness of the live streaming business.
- After the live stream ends, a report of the live stream data can be shared on mobile devices, enabling secondary promotion and sharing.
- If you need to distribute to overseas platforms, please contact your account manager.
2. Operation Instructions
2.1 Operation Flow
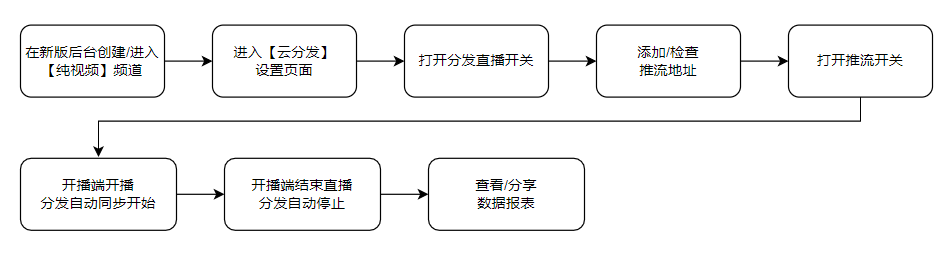
2.2 Specific Operations
1 Create/Enter a Video-Only Channel
- Currently, cloud distribution only supports the distribution of [Video-Only] channels in the new backend. It supports both standard latency channels and zero-latency channels. Distributing live streams from these two types to other platforms will introduce additional latency, the extent of which mainly depends on the conditions of the third-party platform.
2 Enter the Cloud Distribution Settings Page
- In the left secondary navigation of the channel settings page, locate Advanced Features - Cloud Distribution and click to enter the Cloud Distribution - Distribution Settings page.
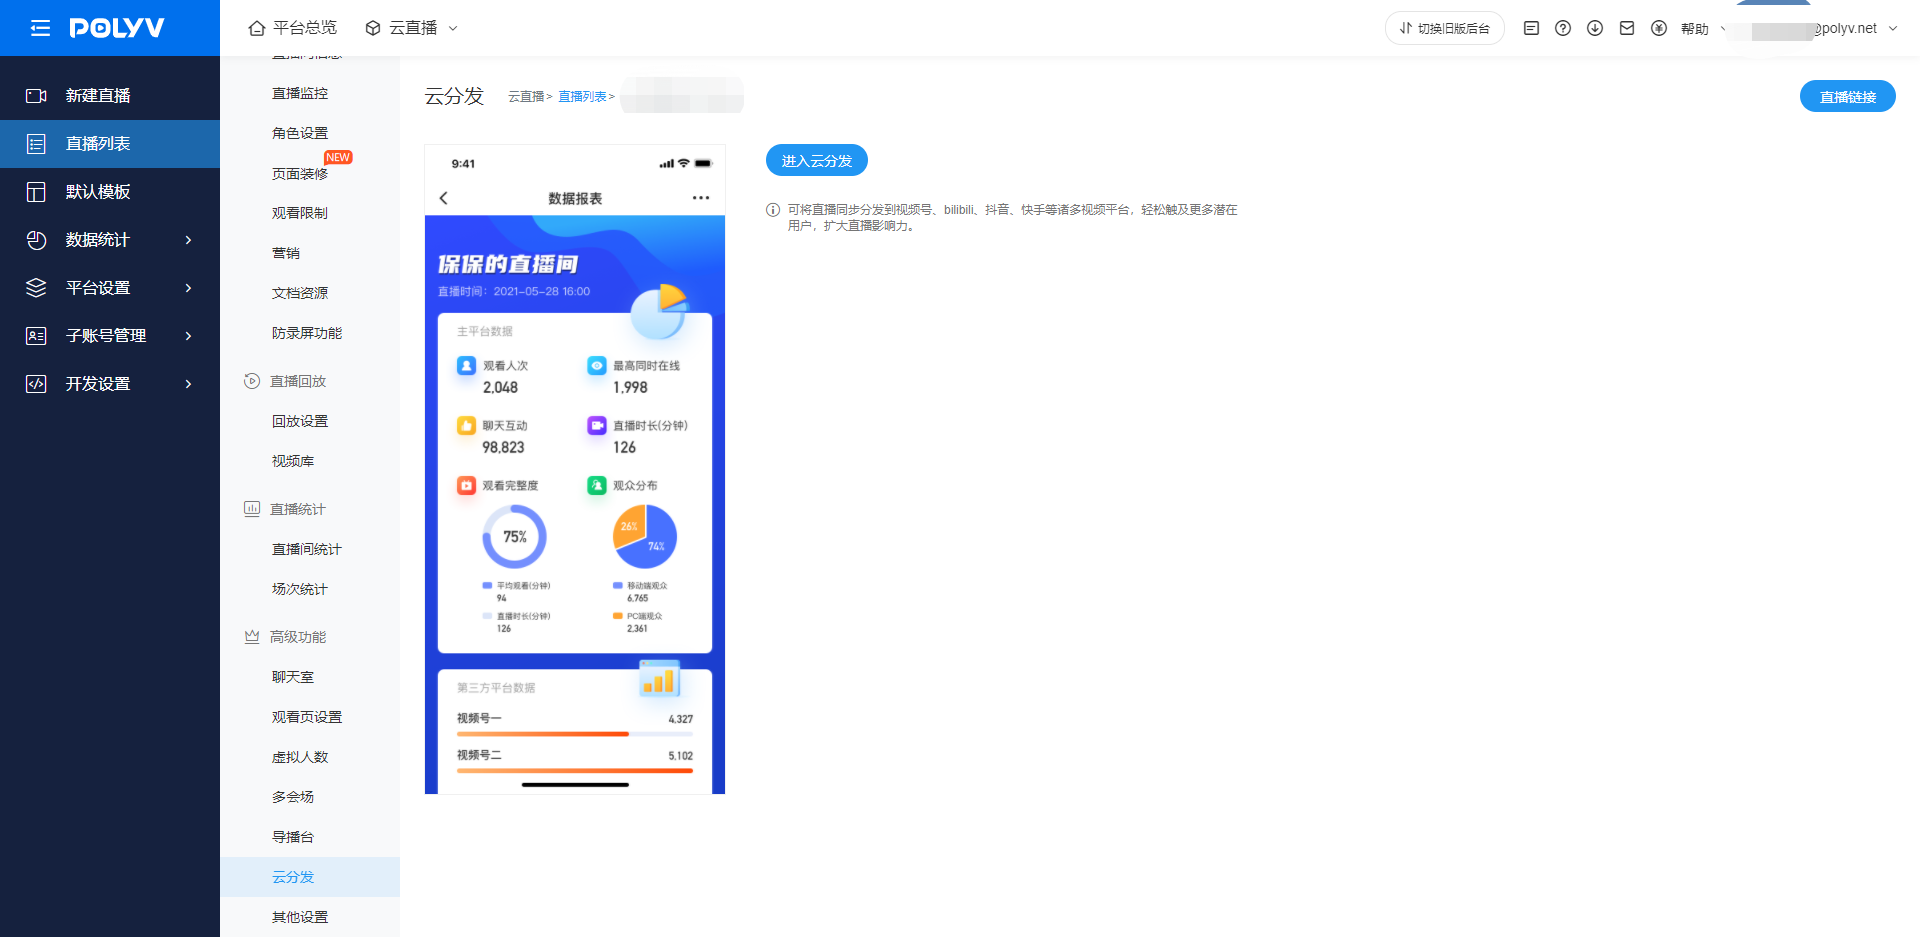
3 Enable Distribution Live Streaming
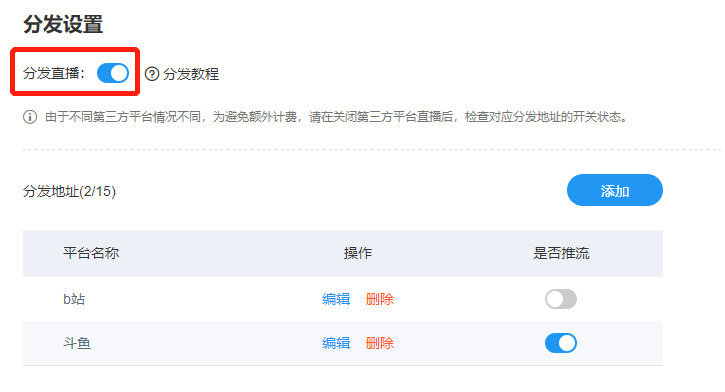
4 Add/Check Push Stream URL
- Click the Add button. In the pop-up window, enter the platform name, push URL, and live stream code to distribute.
- For details on how to obtain the push URL and live stream code, click this link: How to Obtain the Push URL and Live Stream Code
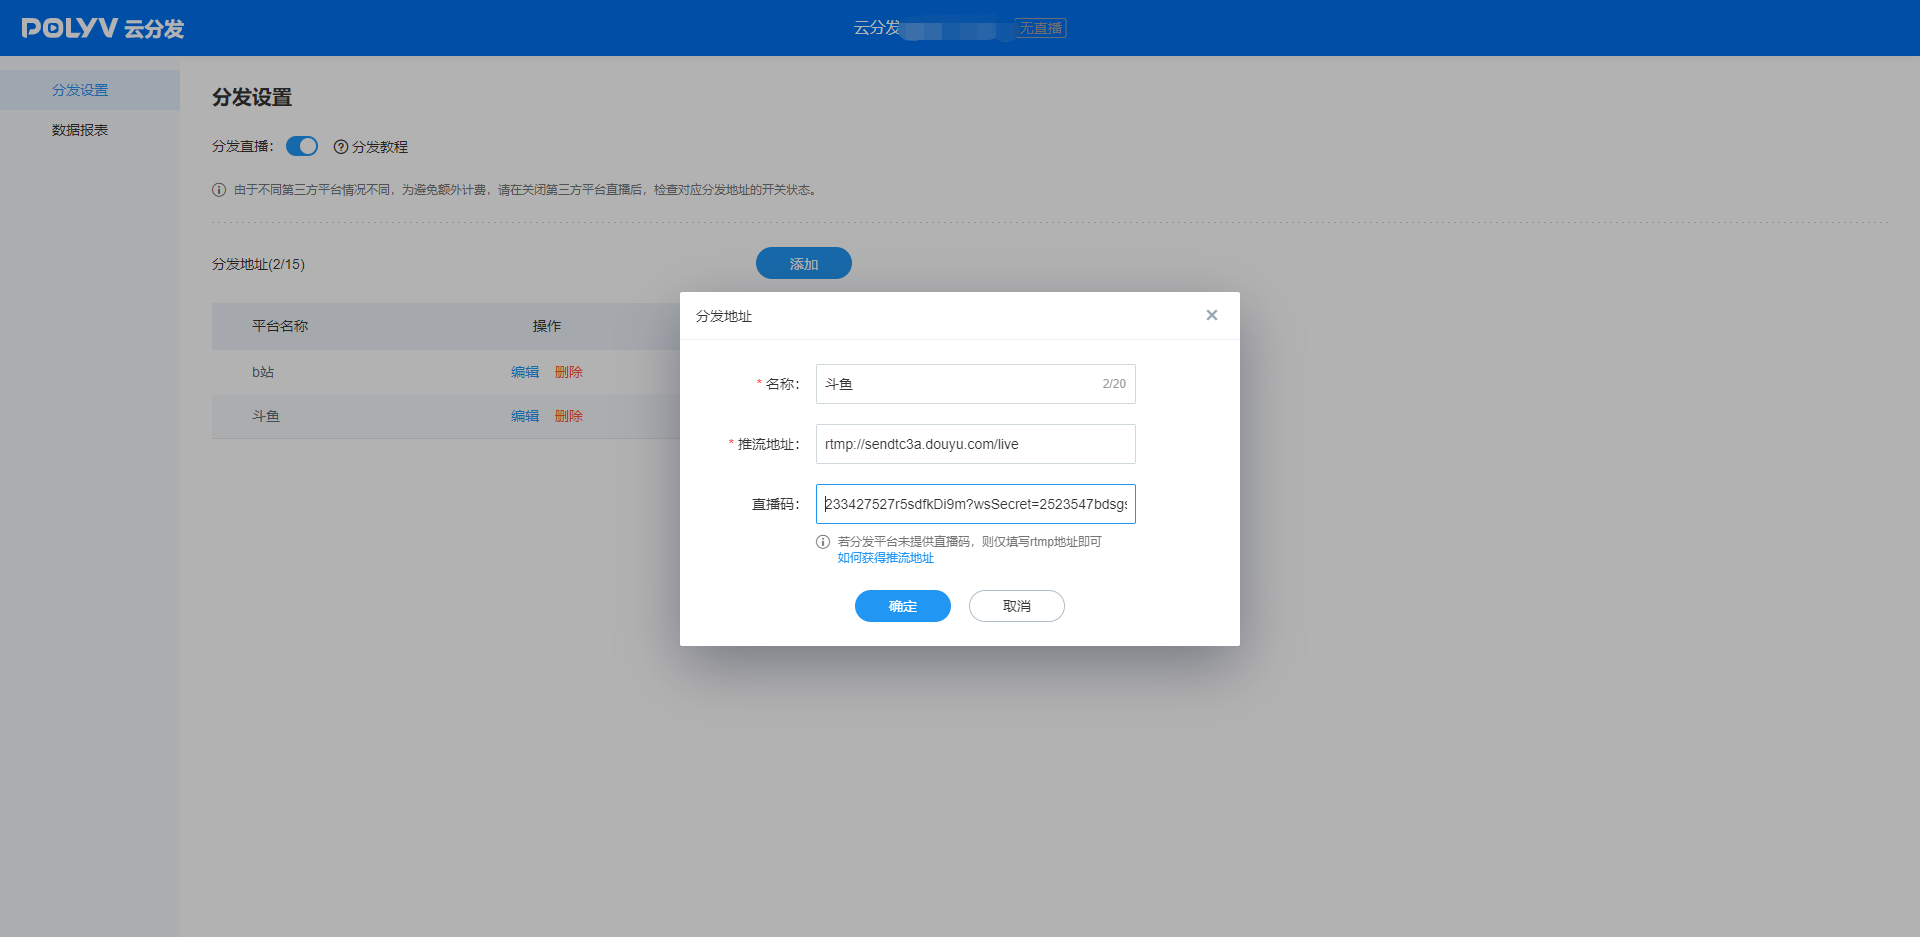
In the distribution list, click Edit or Delete on the right side of the corresponding platform to modify or remove it.
The maximum number of distributable platforms is 15.
Note: According to the rules of different third-party platforms, their push stream addresses and live stream codes need to be updated as required. Therefore, before each distribution, check whether the push stream address has expired.
5 Enable Streaming
- After adding or editing the corresponding platform, set whether to stream on the far right.
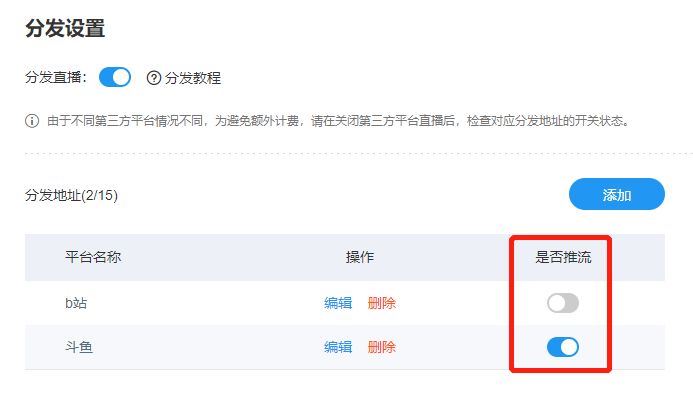
6 Starting a Broadcast on the Broadcasting End
- After configuring the distribution platform, go to the broadcasting end to start the live stream, and ensure the 【Stream Push Switch】 is turned on.
- Once the broadcast starts on the broadcasting end, distribution will automatically begin simultaneously. You can check the effect on the corresponding platform's viewing page.
- During distribution, you can stop pushing the stream, (re)start pushing, edit, or delete the distribution address at any time.
- When the 【Distribute Live Stream】 switch is off, distribution will not be initiated even if the broadcasting end starts streaming. Note: Depending on the rules of different third-party platforms, you may need to start the live stream on their platform first before it can support displaying streams distributed from other sources.
7 Ending the Live Stream from the Broadcasting End
- When the broadcasting end ends the live stream, distribution automatically stops as well.
Note: Due to differences across third-party platforms, to avoid additional charges, please check the switch status of the corresponding distribution address after closing the live stream on the third-party platform.
8 View/Share Data Reports
Approximately one hour after the live stream ends, you can view the data for the corresponding session on the [Cloud Distribution - Data Reports] page. You can view detailed data reports or modify the session name.
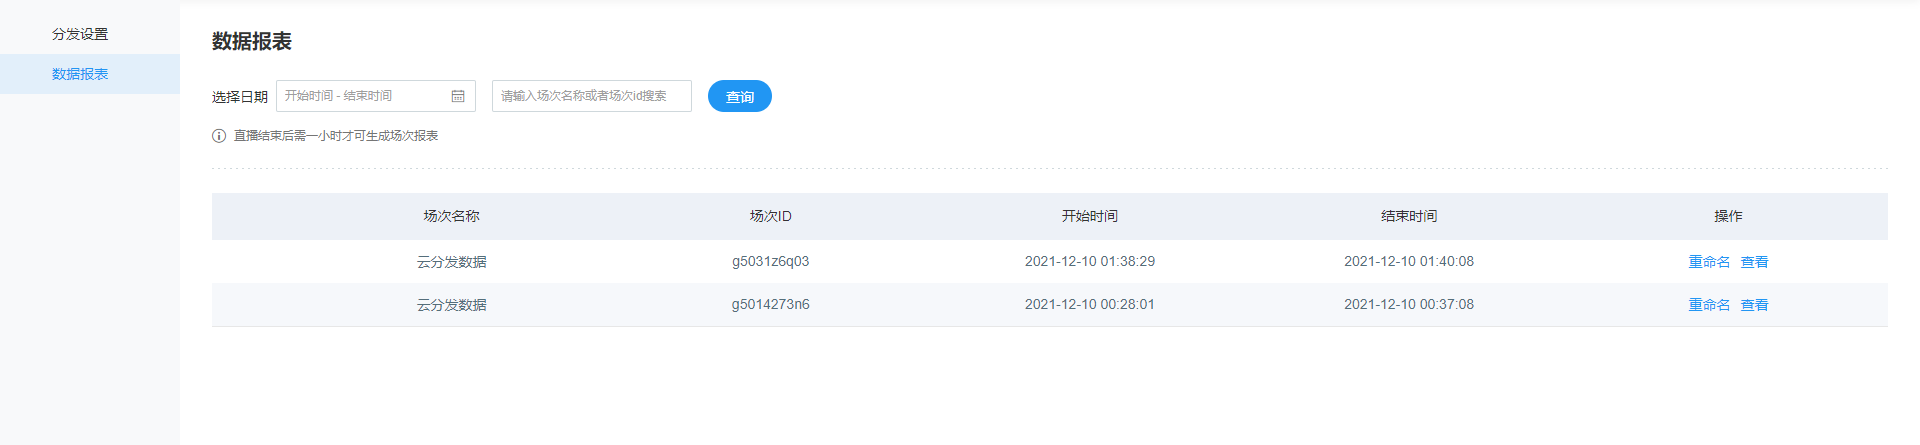
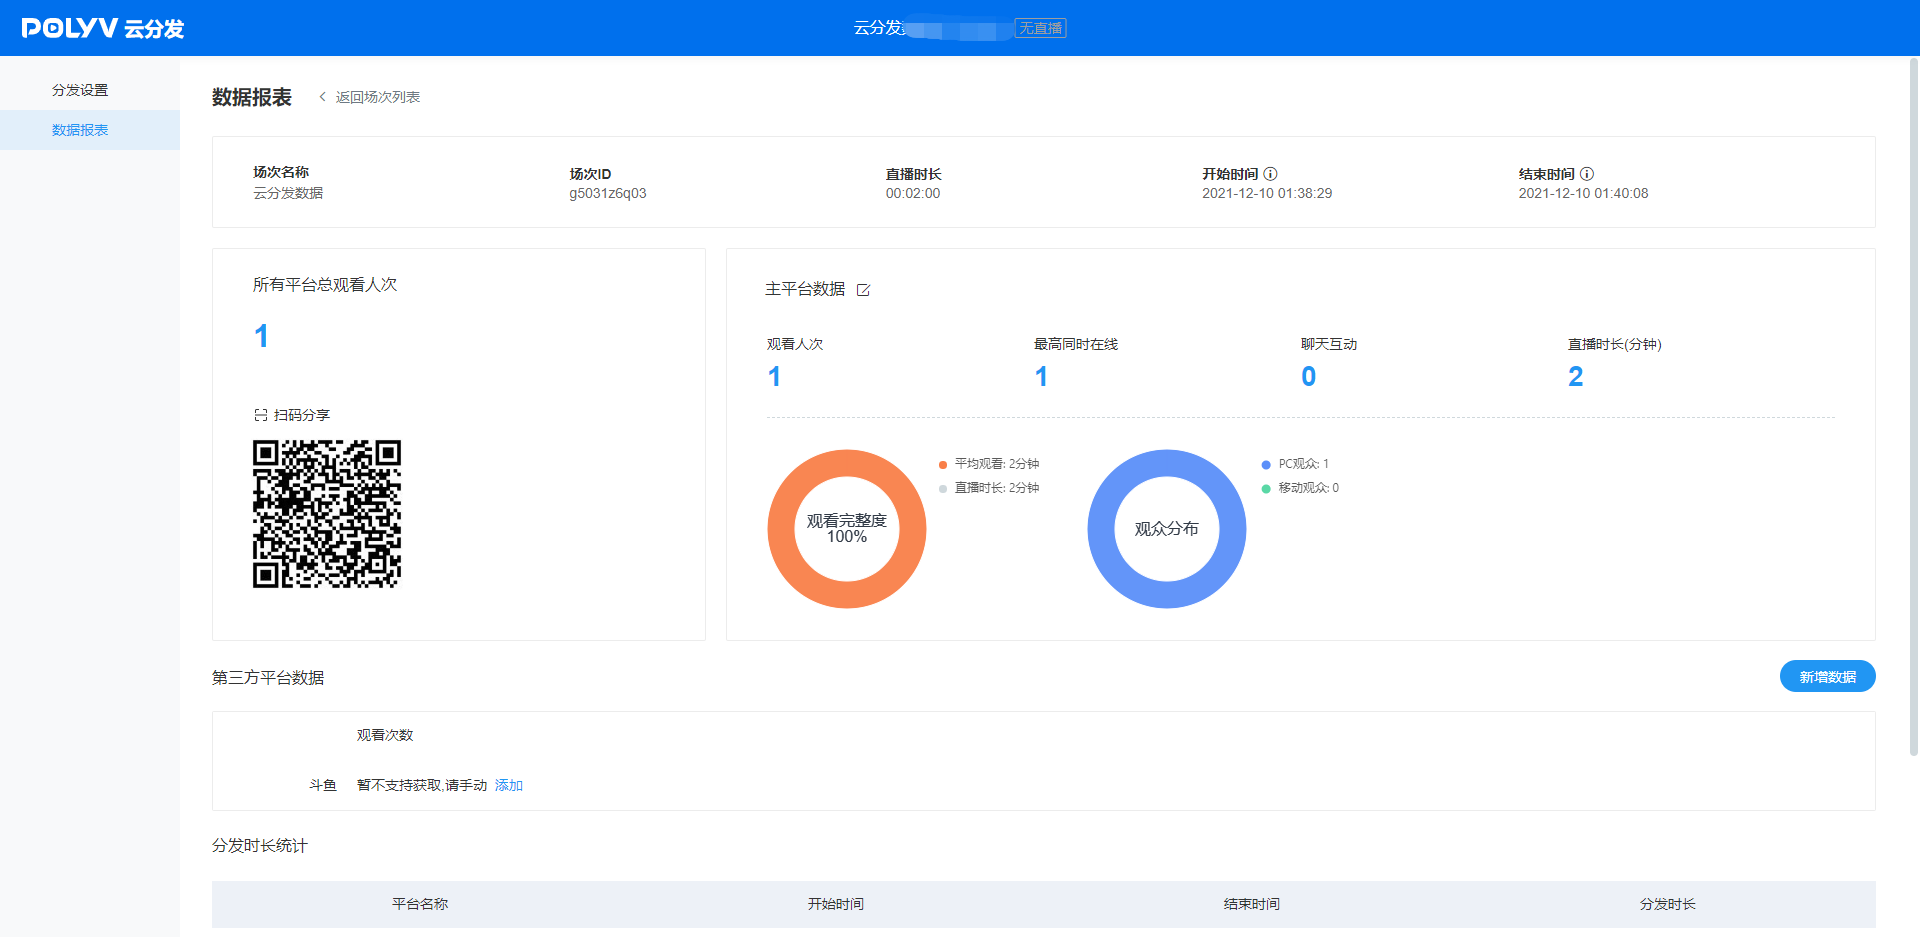
The data report displays the live streaming data for the viewing page corresponding to the Polyv channel as the broadcasting end. The name of the main platform data title can be modified.
In the lower half of the page, you can manually enter and modify the view count data from third-party platforms.
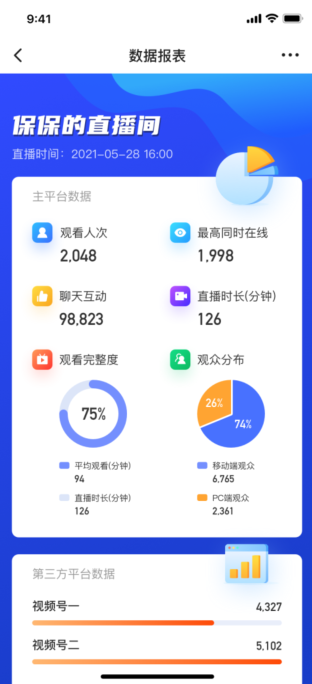
After filling in and confirming the data report, you can scan the QR code at the top left of the page to view the mobile data report sharing image. After each modification, refresh to obtain the latest QR code.
After opening via WeChat scan, you can long-press the image to send it to friends or save it to your album for secondary promotion and sharing after the live stream.
- For each session, you can view: the platform name for each stream push, the distribution start and end times, and the distribution duration (in minutes, rounded up to the nearest minute). If multiple streams are pushed simultaneously, the durations are recorded separately.
Live Relay Function
Live Relay Function
PolyLive's live streaming relay function can fully leverage the resources of renowned teachers, enabling multiple classes to watch the same content. It can be used in scenarios such as online dual-teacher instruction and audience viewing through different channels.
How exactly is it implemented?
- Rebroadcasting is a content distribution feature that simultaneously distributes live content from a main channel to multiple sub-channels.
- The main channel can view chat content from all sub-channels, centrally manage all viewers, and initiate interactive applications across all sub-channels.
- Chat rooms between sub-channels are independent; viewers can only see the chat content of their respective sub-channel. Teaching assistants in sub-channels can assist the main channel's instructor in managing students in the current channel, and coordinate interactive features such as quizzes, surveys, and lucky draws, which only take effect within the current sub-channel.
Usage Steps
- First, contact your account manager to enable the rebroadcast feature. Then, log in to the Polyv Cloud Live Streaming backend, click "Create New Live Stream," and the default channel type is "Initiate Rebroadcast," which is the main channel. To create a sub-channel, select "Receive Rebroadcast." Sub-channels will have a "Receive Rebroadcast" indicator. Note that channels from different scenarios cannot be linked; standard live streams can only be linked to standard live stream channels, and three-screen streams can only be linked to three-screen channels. Here, we select the three-screen option.
- After creation, enter the main channel settings. In the live room, select "Channel Rebroadcast." Detailed rebroadcast rules are provided here; it is recommended to read them carefully. Next, click "Link Receive Rebroadcast Channels," check the sub-channels you want to rebroadcast, and the rebroadcast setup is complete.
- Now, log in to the client using the main channel account and password to start the live stream. The linked sub-channels will synchronously play the live content.
- The chat content of Channel 1 will be displayed exclusively in Channel 1 and will not appear in Channel 2. Sub-channels are independent of each other and do not interfere.
Financial Management
Includes operations such as viewing account balance, available resource package usage, viewing bills, viewing tips and pay-per-view income, and withdrawing funds.
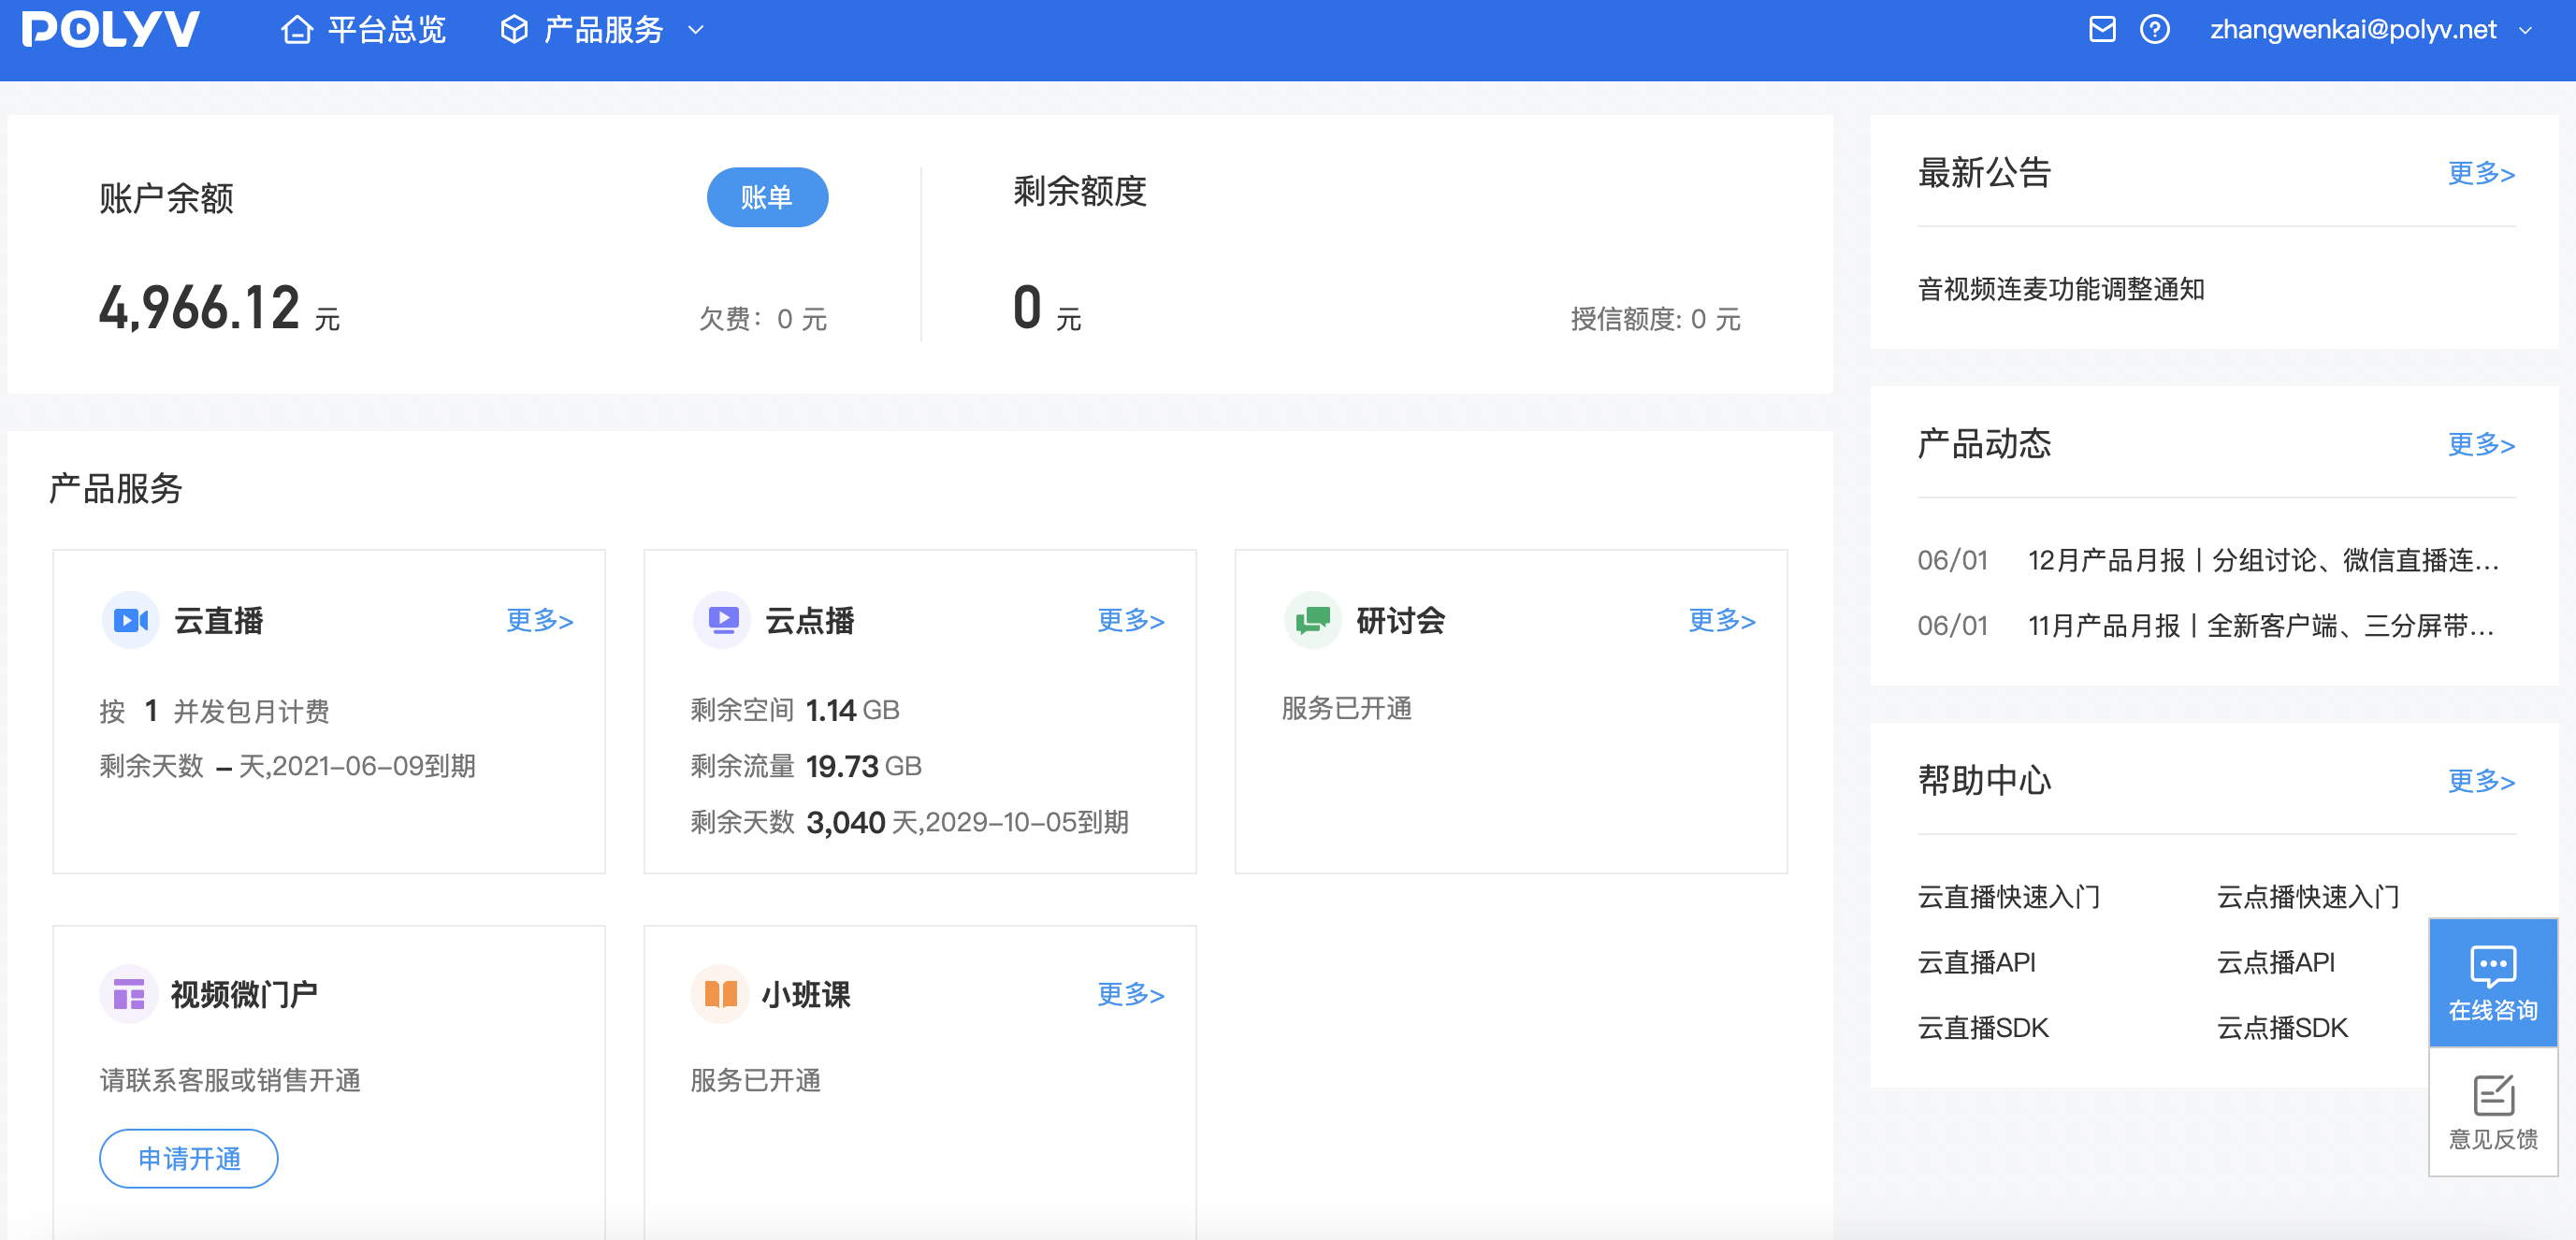
1. View Account Balance and Resource Package Availability
After logging in, you can view your balance and available resource packs on the product homepage.
2. View Bill
- On the product homepage, click [Bill] or [View Detailed Bill] to enter the [Finance Center - Bill Page].
- The bill consists of three sections: Bill Overview, Bill Details, and Usage Details.
2.1 Bill Overview: View monthly consumption, aggregated by day and billing item, mainly for a consumption summary.
2.2 Bill Details: View daily consumption, aggregated by day and project details, mainly for daily consumption specifics.
2.3 Usage Details: View each consumption-generating behavior record, mainly for analyzing user viewing behavior, not recommended as a basis for financial reconciliation. - Related Terminology
3.1 Billing Cycle: The billing period divided by calendar month.
3.2 Billing Date: The date the bill is generated, distinct from the usage date.
3.3 Usage Date: The date resources are consumed, distinct from the billing date.
3.4 Transaction Type: Differentiates between usage settlement and amount settlement.
3.4.1 Usage Settlement: Settlement by deducting resource packages.
3.4.2 Amount Settlement: Settlement by deducting account balance.
3.5 Record ID: The unique ID of the consumption record, such as viewer ID, task ID, etc.
3. View Tips and Pay-Per-View Revenue
- Enter the Financial Center
1.1 In the live streaming backend, click the account email in the upper right corner of the page, and select Financial Center from the dropdown menu.
1.2 Click the Billing entry on the product homepage. - Click the left navigation bar - Revenue Details to view all revenue records.
4. Withdrawal
- You need to bind your bank card before withdrawing.
- Click on "Financial Center" in the left navigation bar, then select "Withdraw" to bind your bank card information, and click "Withdraw" to proceed.
- Please note the following requirements for current withdrawals:
3.1 Account balance must be ≥ 1,000 RMB.
3.2 Withdrawals can only be made once per month.
3.3 The settlement period is from the 25th to the 30th of each month; withdrawal requests made during this period will be processed in the following month.
<script>
  new Vue({
    el: '#player',
    data() {
    return {
      vodPlayerJs: 'https://player.polyv.net/script/player.js',
      vid:'88083abbf5e44c658c35ee5f3f5697d4_8',
      vid2:'88083abbf593941c95d94d6ea7f419c7_8',
      vid3:'88083abbf50f3f8a735848fab5f78b89_8',
      vid4:'88083abbf58fbcb4af30338bc97696c1_8',
      vid5:'88083abbf58d8fb52335f63c551b8a6f_8',
      vid6:'88083abbf59343e8825bc831112c03a3_8',
      vid7:'88083abbf5d2f96e5dc6cac262cd5359_8'
    };
  },
  mounted(){
      this.loadPlayerScript(this.loadPlayer);
  },
  methods: {
    loadPlayerScript(callback) {
      if (!window.polyvPlayer) {
        const myScript = document.createElement('script');
        myScript.setAttribute('src', this.vodPlayerJs);
        myScript.onload = callback;
        document.body.appendChild(myScript);
      } else {
        callback();
      }
    },
    loadPlayer() {
      const polyvPlayer = window.polyvPlayer;
      this.player = polyvPlayer({
        wrap: '#player',
        vid: this.vid ,
        autoplay:false
      });
      this.player2 = polyvPlayer({
        wrap: '#player2',
        vid: this.vid2 ,
        autoplay:false
      });
      this.player3 = polyvPlayer({
        wrap: '#player3',
        vid: this.vid3 ,
        autoplay:false
      });
      this.player4 = polyvPlayer({
        wrap: '#player4',
        vid: this.vid4 ,
        autoplay:false
      });
      this.player5 = polyvPlayer({
        wrap: '#player5',
        vid: this.vid5 ,
        autoplay:false
      });
      this.player6 = polyvPlayer({
        wrap: '#player6',
        vid: this.vid6 ,
        autoplay:false
      });
      this.player7 = polyvPlayer({
        wrap: '#player7',
        vid: this.vid7,
        autoplay:false
      });
    }
  },
  destroyed() {
    if (this.player) {
        this.player.destroy();
        this.player2.destroy();
        this.player3.destroy();
        this.player4.destroy();
        this.player5.destroy();
        this.player6.destroy();
        this.player7.destroy();
    }
  }
  })
<script/>
