


Adding Live Stream Managers (Live Sub-accounts)
If a company has many live streaming operations and the super admin cannot manage all live channels alone, sub-accounts can be created and assigned to internal managers to assist with live business management. You can set functional permissions and data management scopes for sub-accounts, enabling dedicated management for specific tasks, which reduces management pressure while ensuring security and order.
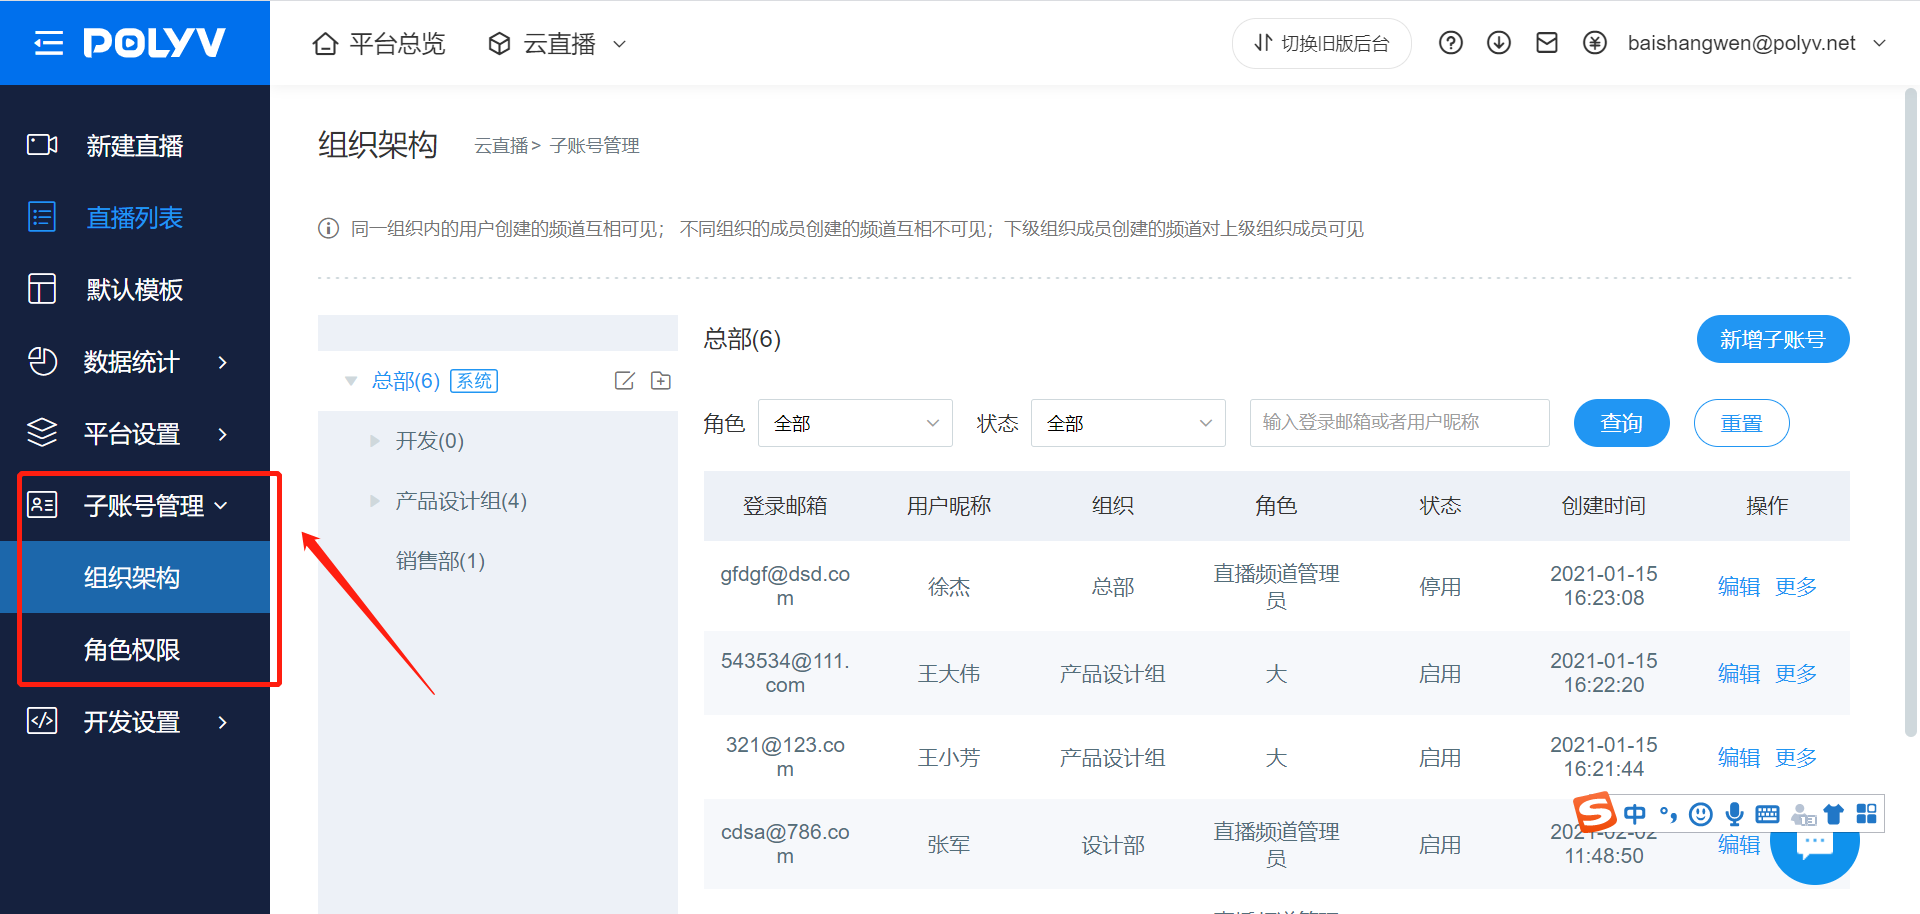
1. Glossary
Organizational Structure: Refers to the hierarchical relationship structure between backend sub-accounts. It can be set up based on the company's actual organizational structure or customized according to online management relationships. The organizational structure has a superior-subordinate hierarchy. Sub-accounts in a superior organization can view and manage the live channels of sub-accounts in subordinate organizations. Sub-accounts at the same level can view and manage each other's channels.
Role: In Polyv's backend, a collection of specific functional permissions is considered a role. When a sub-account is associated with a role, the sub-account inherits all the functional permissions of that role. This facilitates permission management for sub-accounts, eliminating the need to repeatedly set permissions for each sub-account.
Sub-account: A backend account with specific business management permissions. It assists the super admin in completing backend tasks for the assigned organization. The account's permissions are determined by the associated role.
2. Organizational Structure Management
Adding an Organization
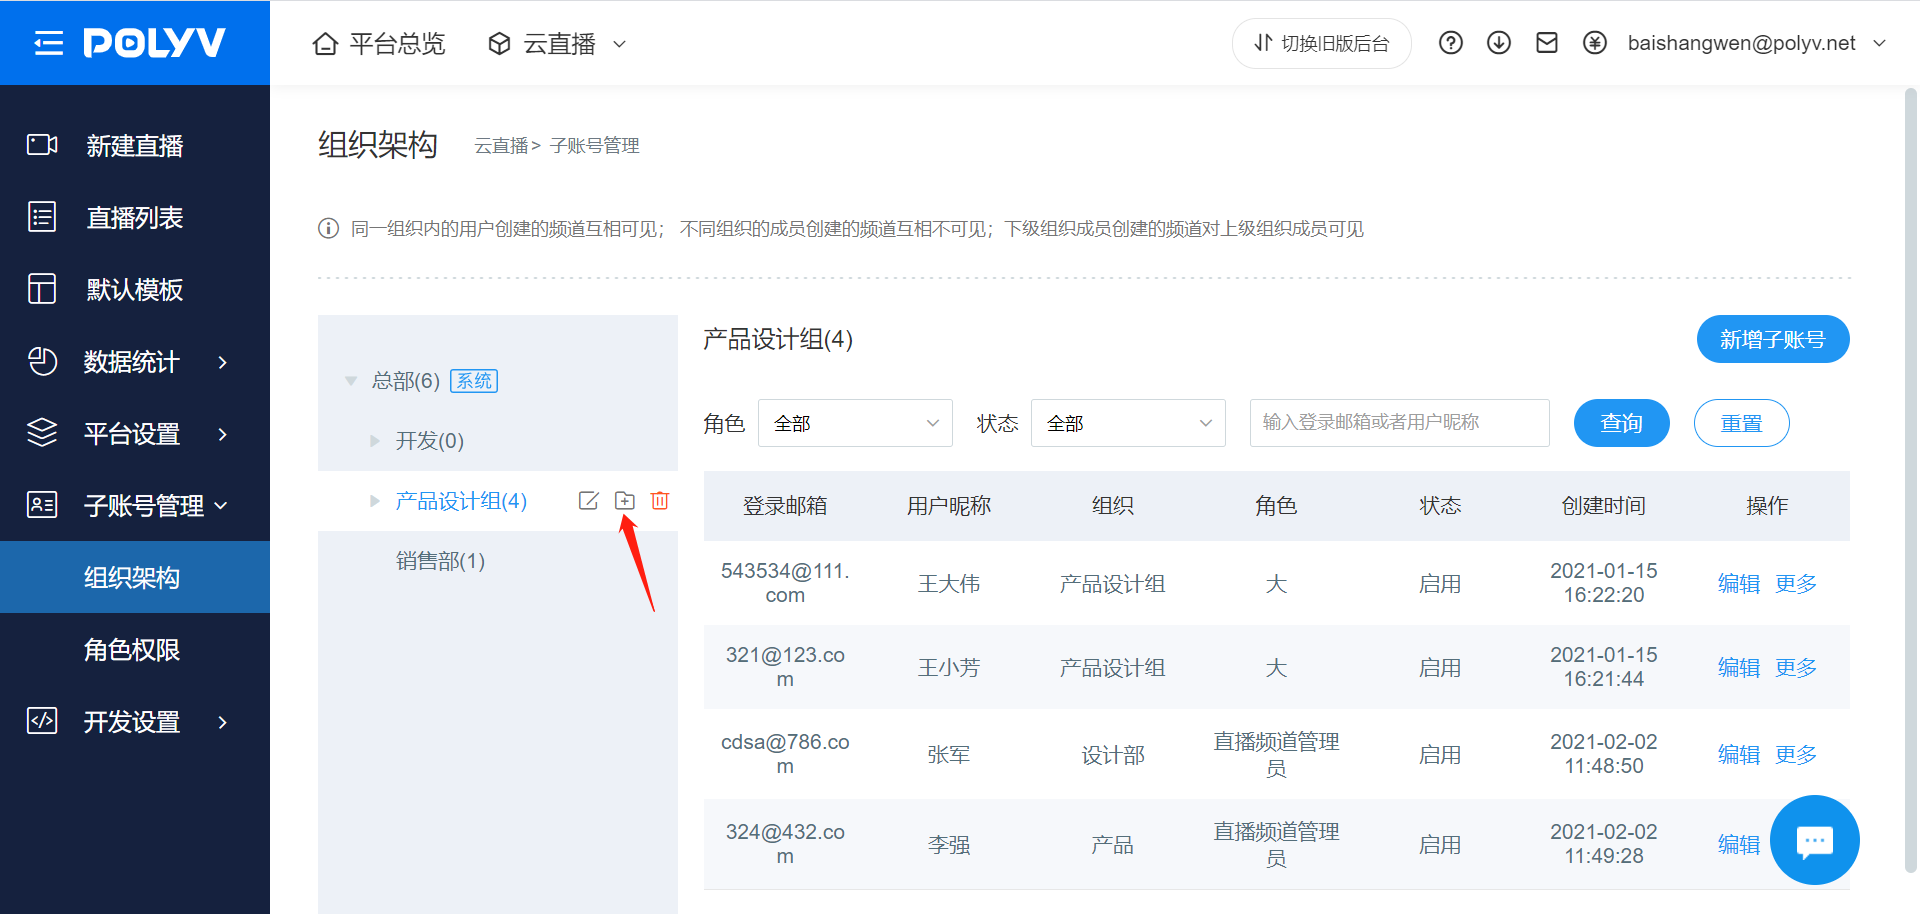
Navigate to the [Sub-account Management - Organizational Structure] page. Hover the mouse over the organization name area, click the Add button, and the Add Organization pop-up will open.
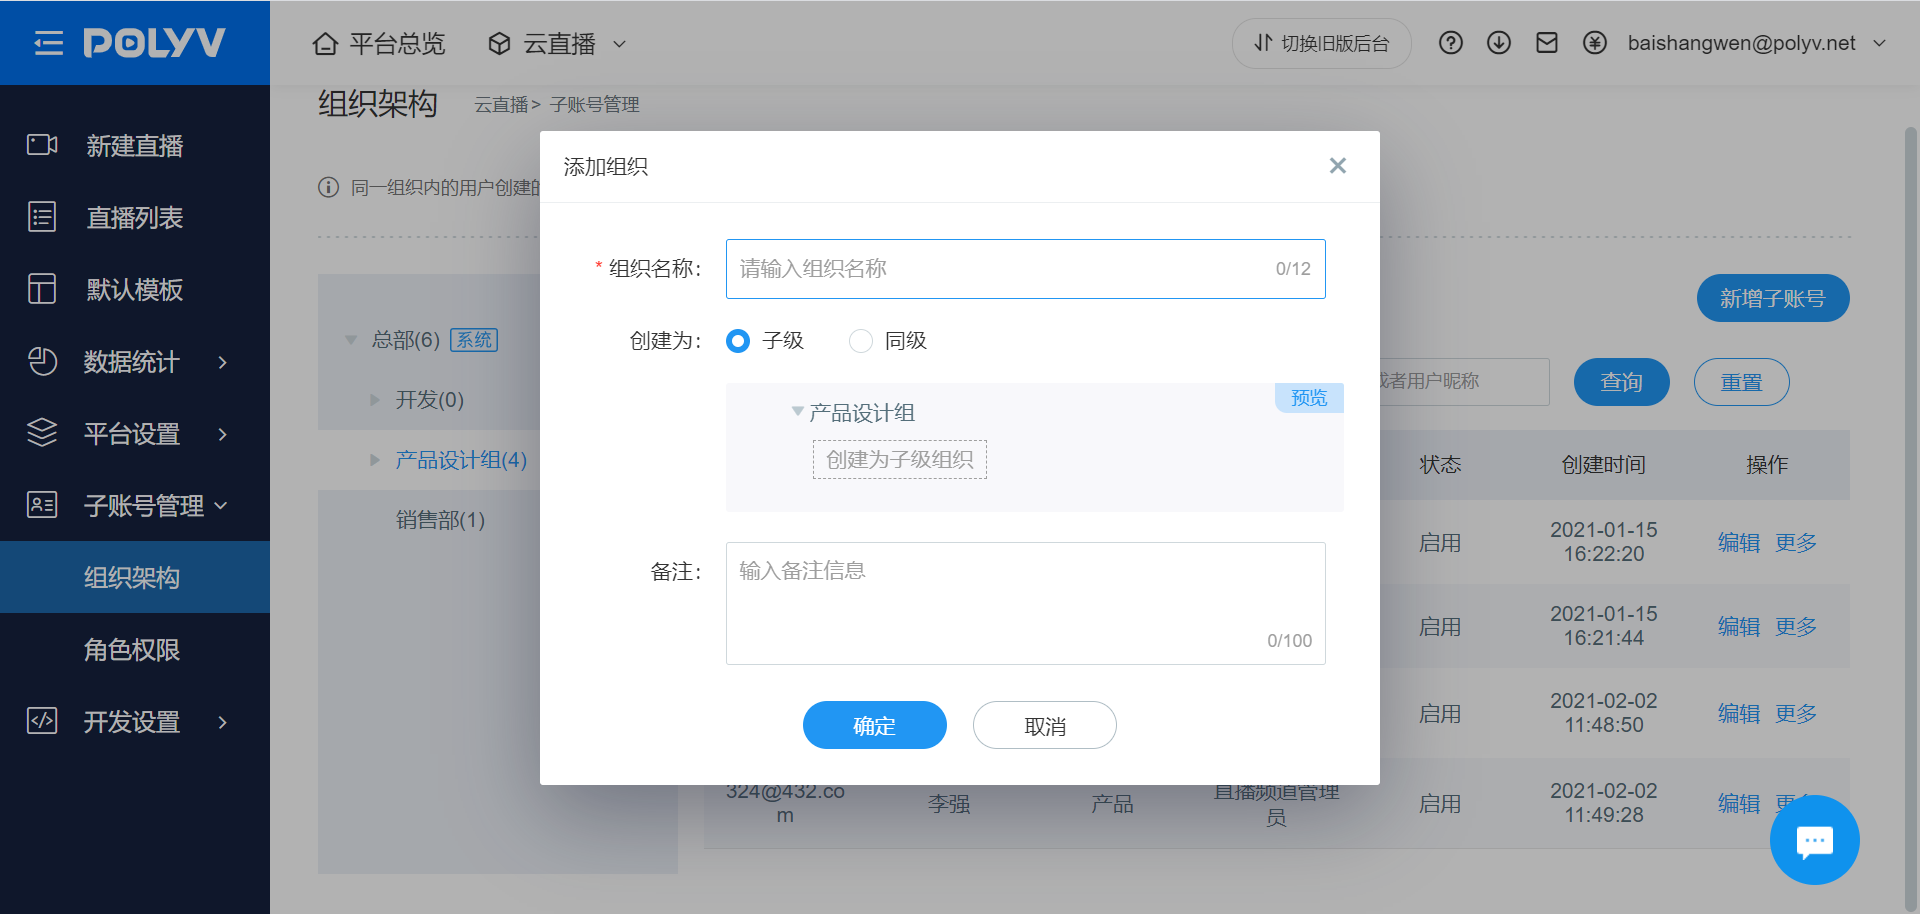
Enter the organization name, set the superior-subordinate relationship, fill in remarks, and click the Save button to complete the addition.
Note:
Organizations can only be created downwards (e.g., subordinate or sibling organizations). You cannot create a superior organization.
The default limit for organizations is 30. To expand this limit, please contact the sales team.
Deleting an Organization
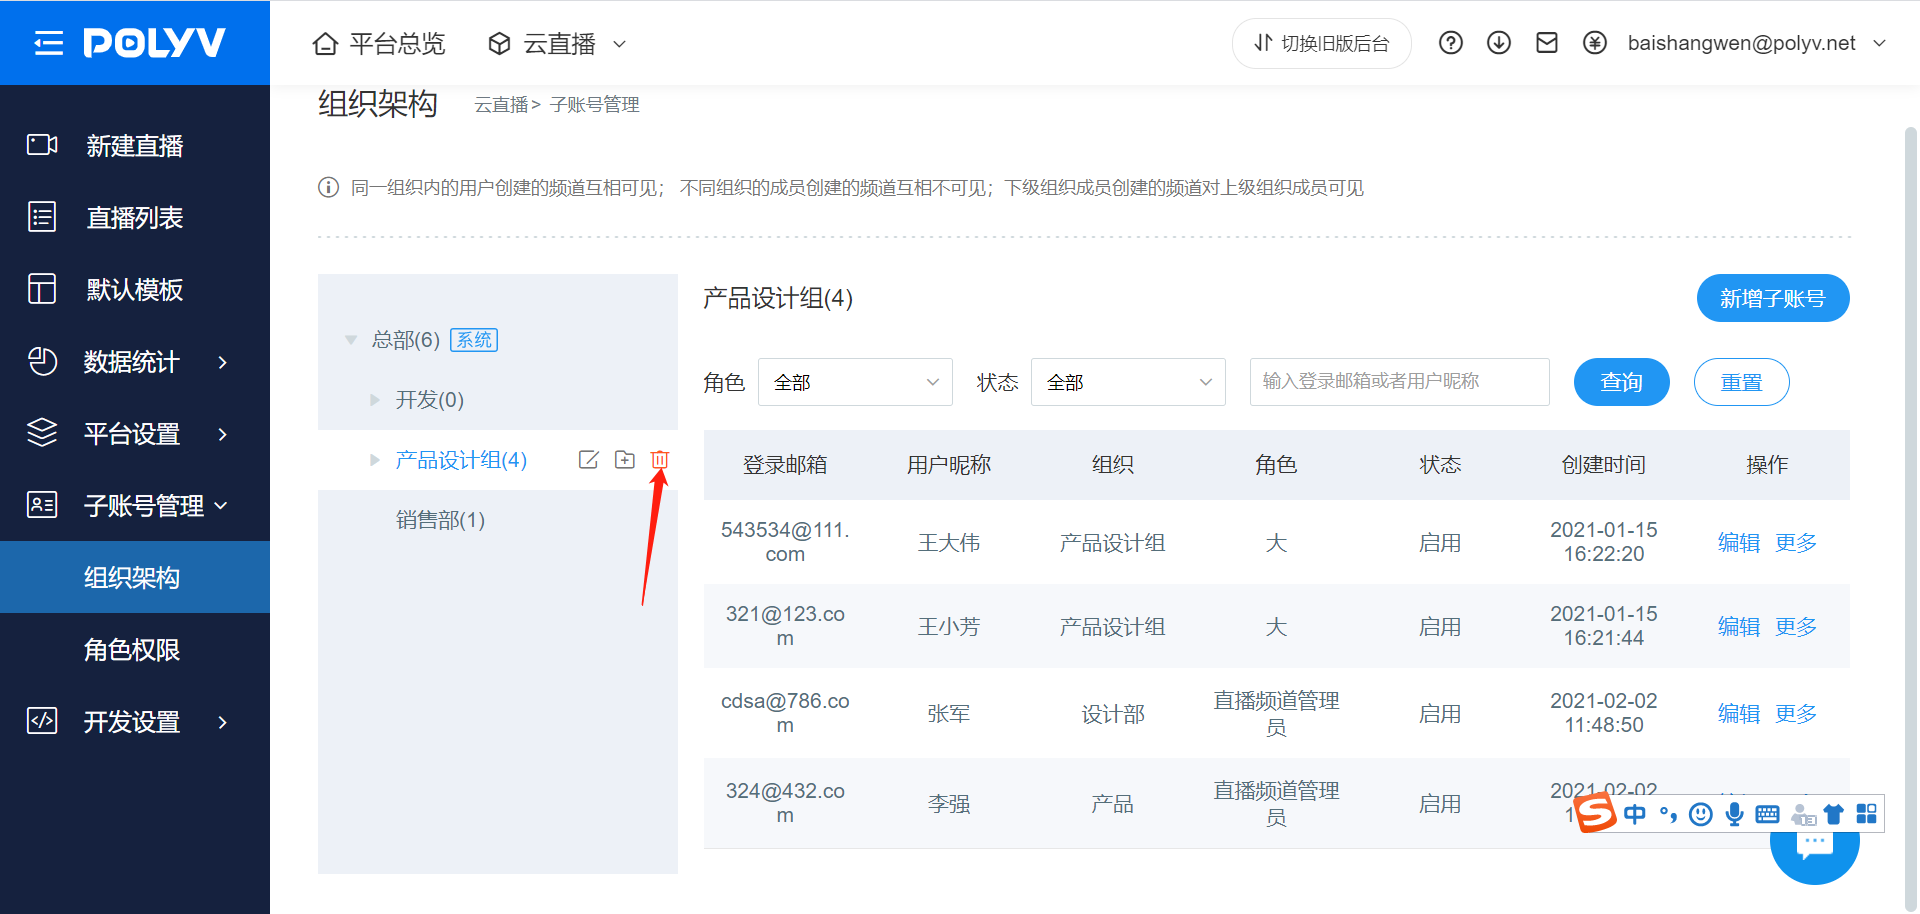
Navigate to the [Sub-account Management - Organizational Structure] page. Hover the mouse over the organization name area, click the Delete button, and the deletion confirmation pop-up will open.
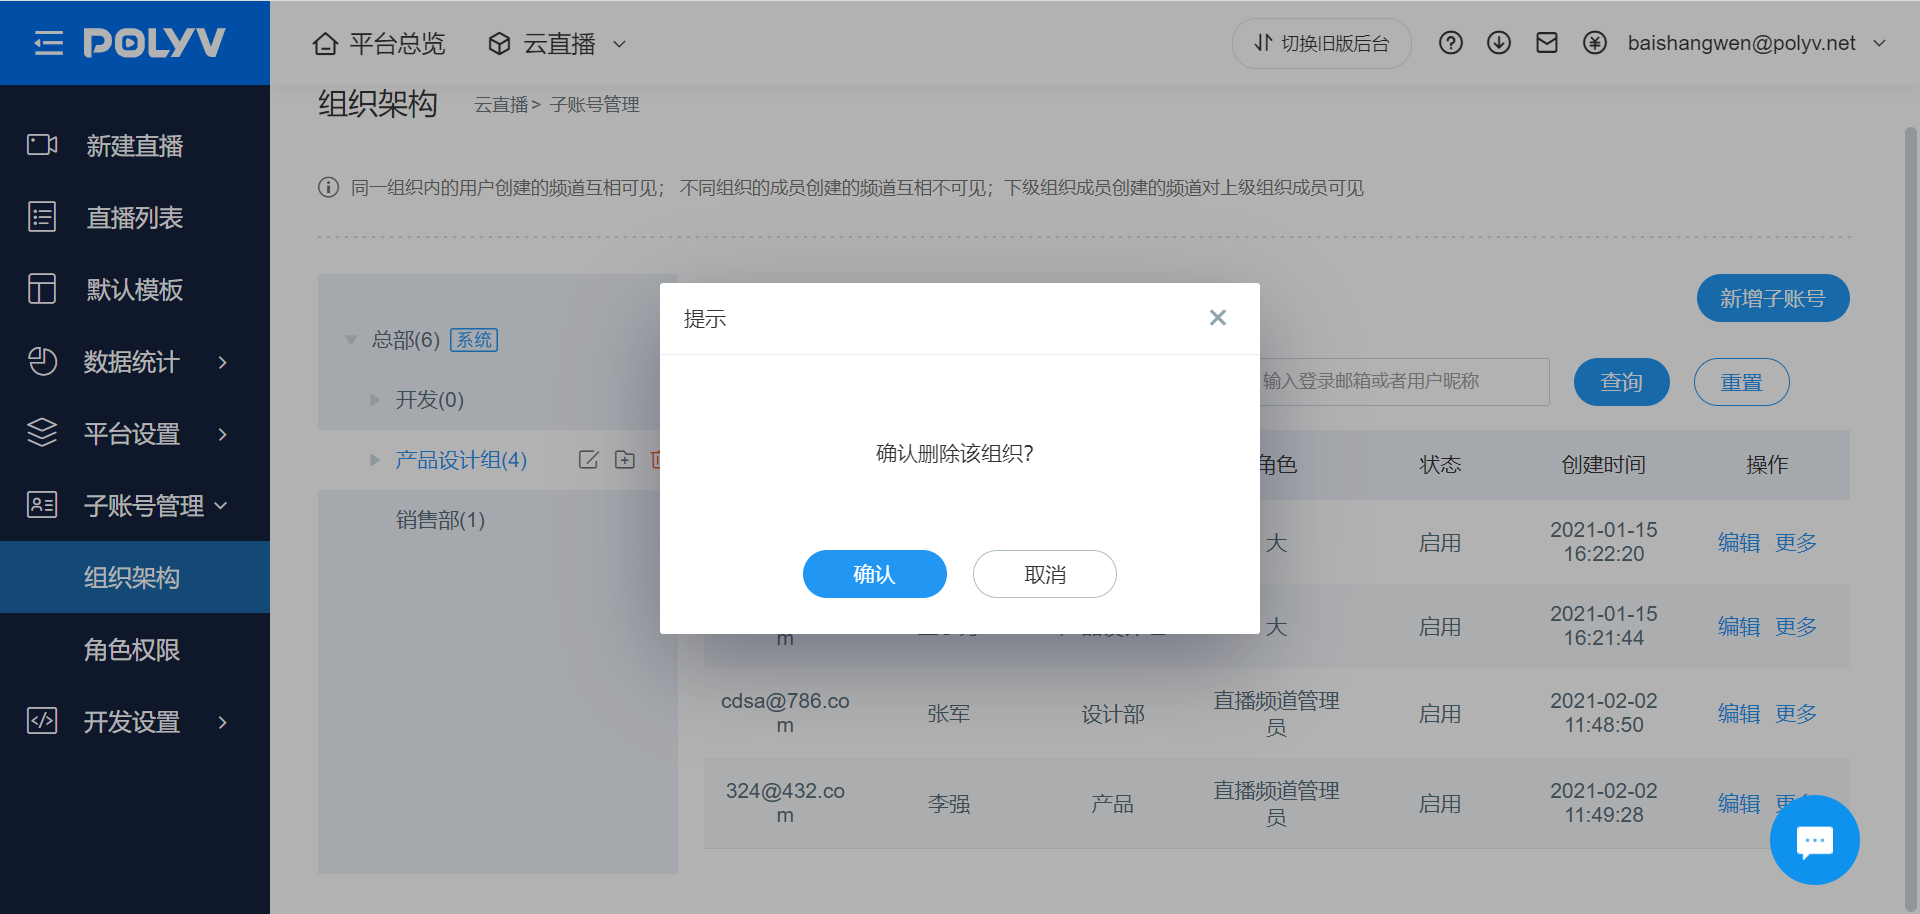
Click the Confirm button to delete the organization.
Note:
Deleting an organization will also delete all its subordinate organizations.
If the organization already contains sub-accounts, please delete the users within the organization first before deleting the organization.
Modifying an Organization
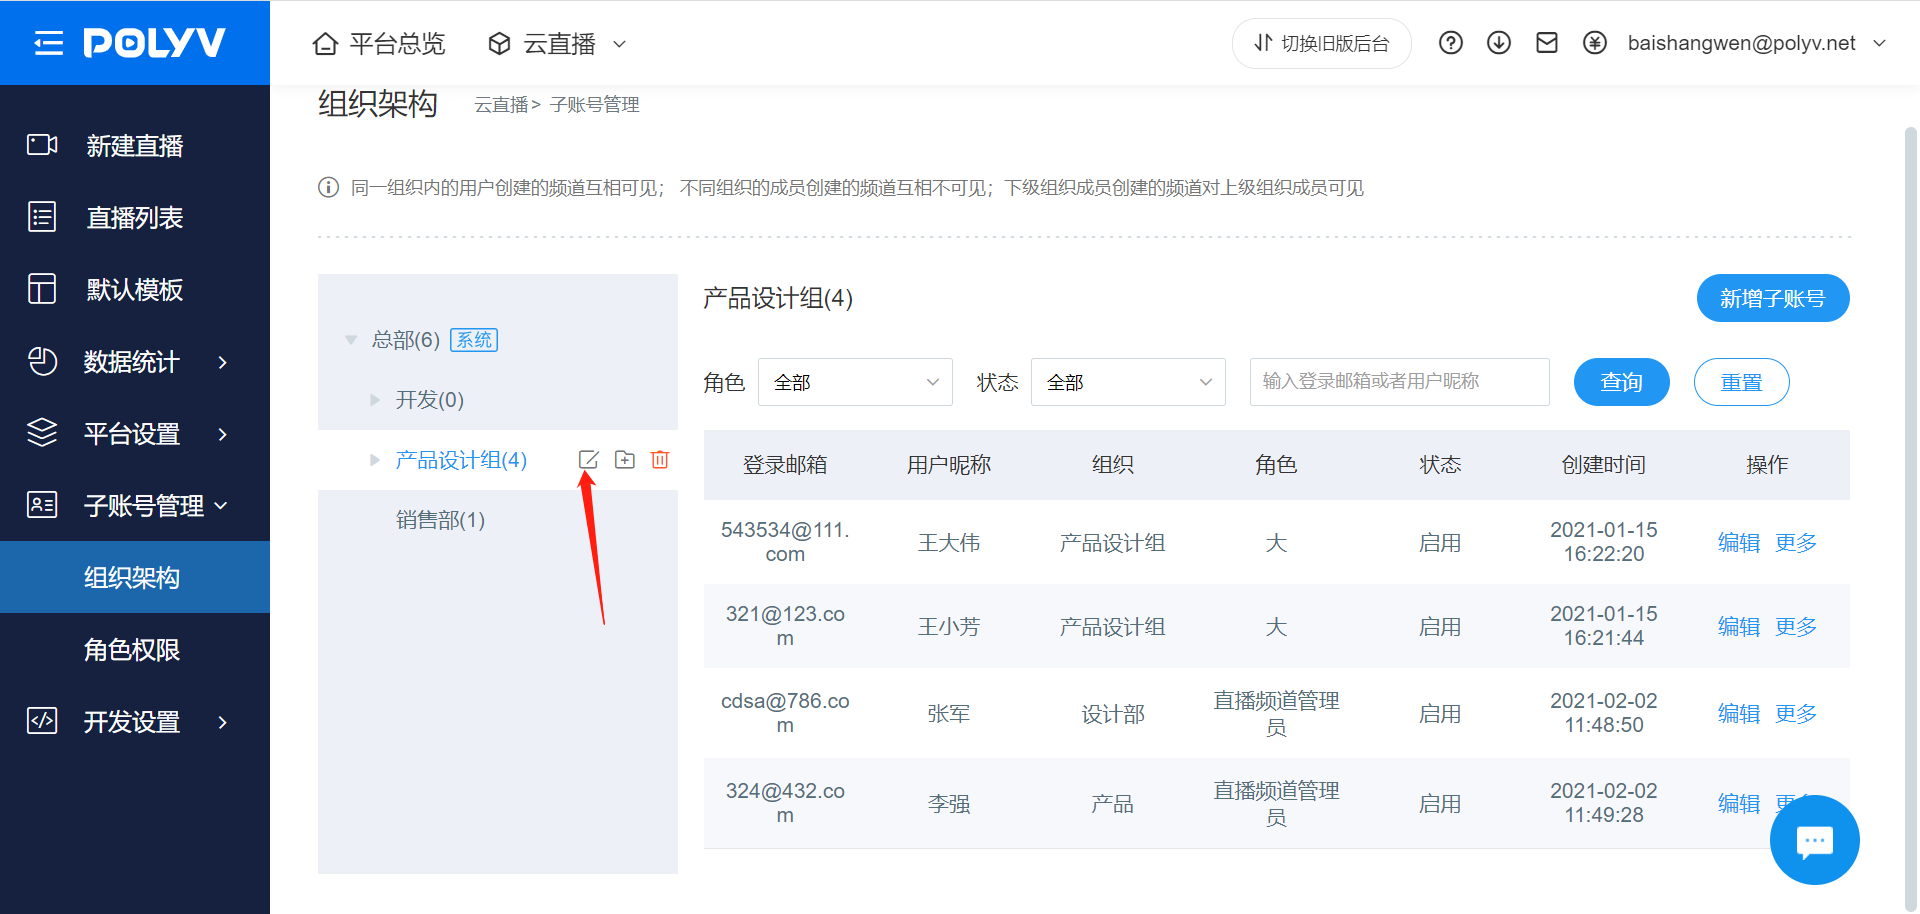
Navigate to the [Sub-account Management - Organizational Structure] page. Hover the mouse over the organization name area, click the Delete button, and the deletion confirmation pop-up will open.
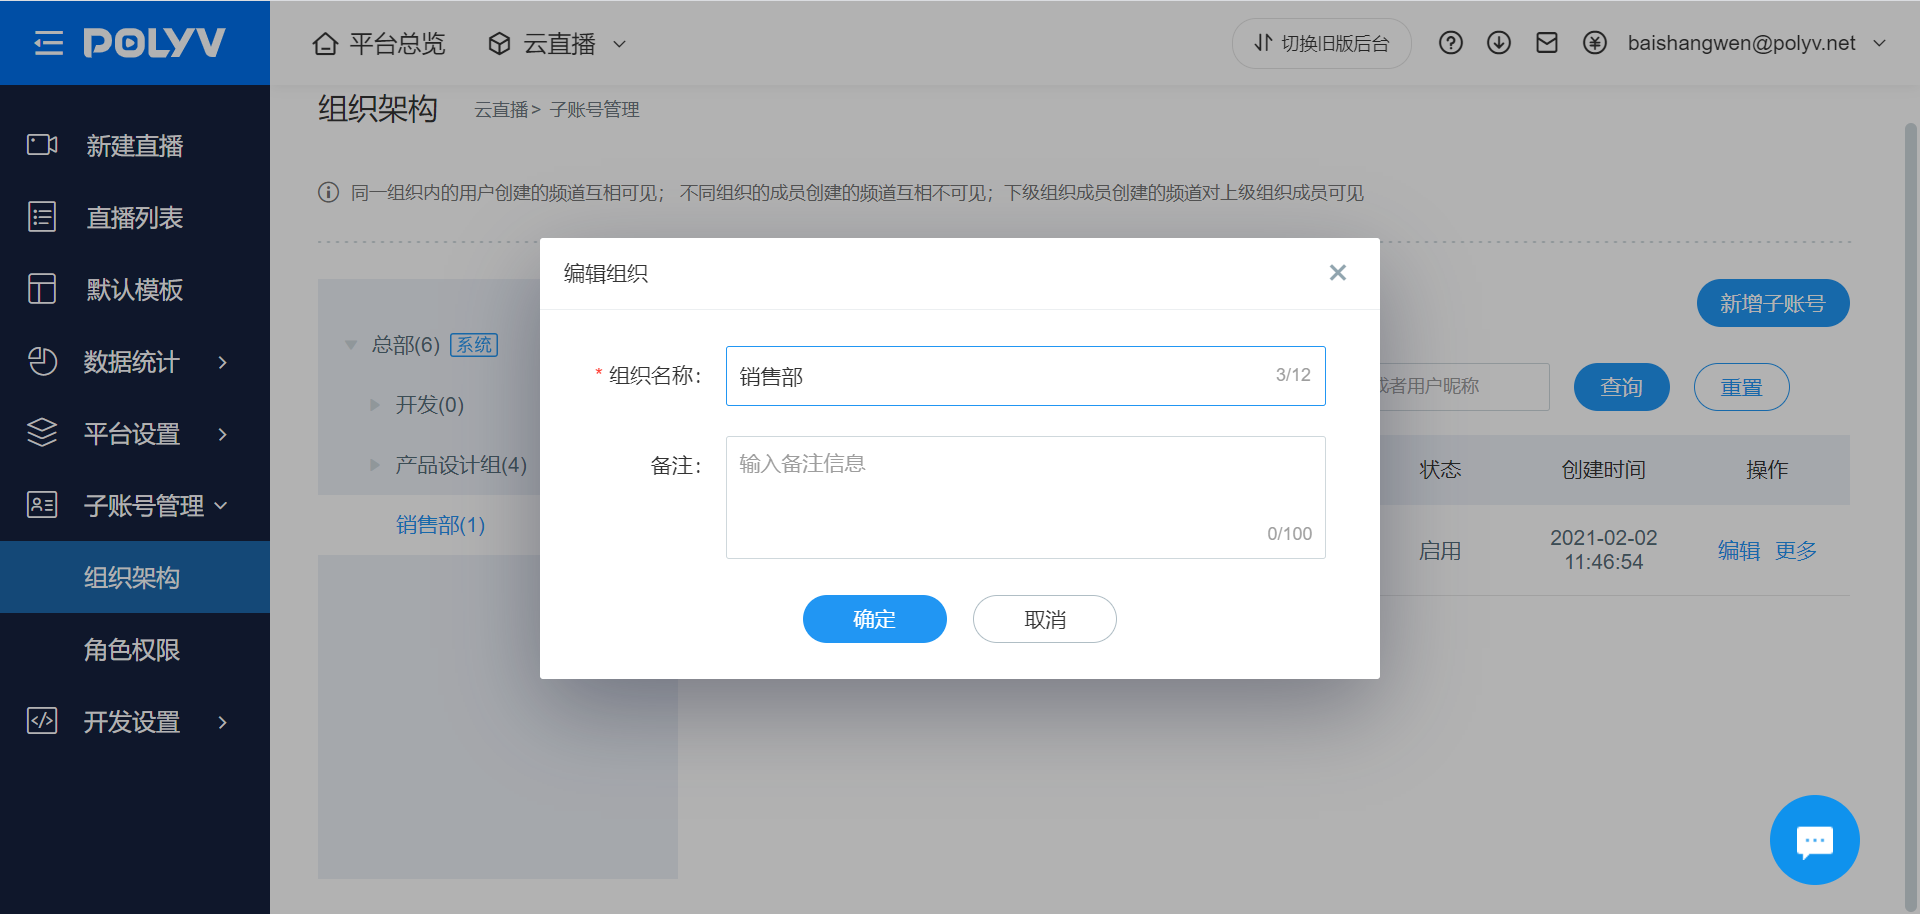
Enter the new organization name and remarks, then click Save to complete the modification.
Note:
The organizational hierarchy cannot be modified; only the basic information of the organization can be changed.
3. Role Management
Adding a Role
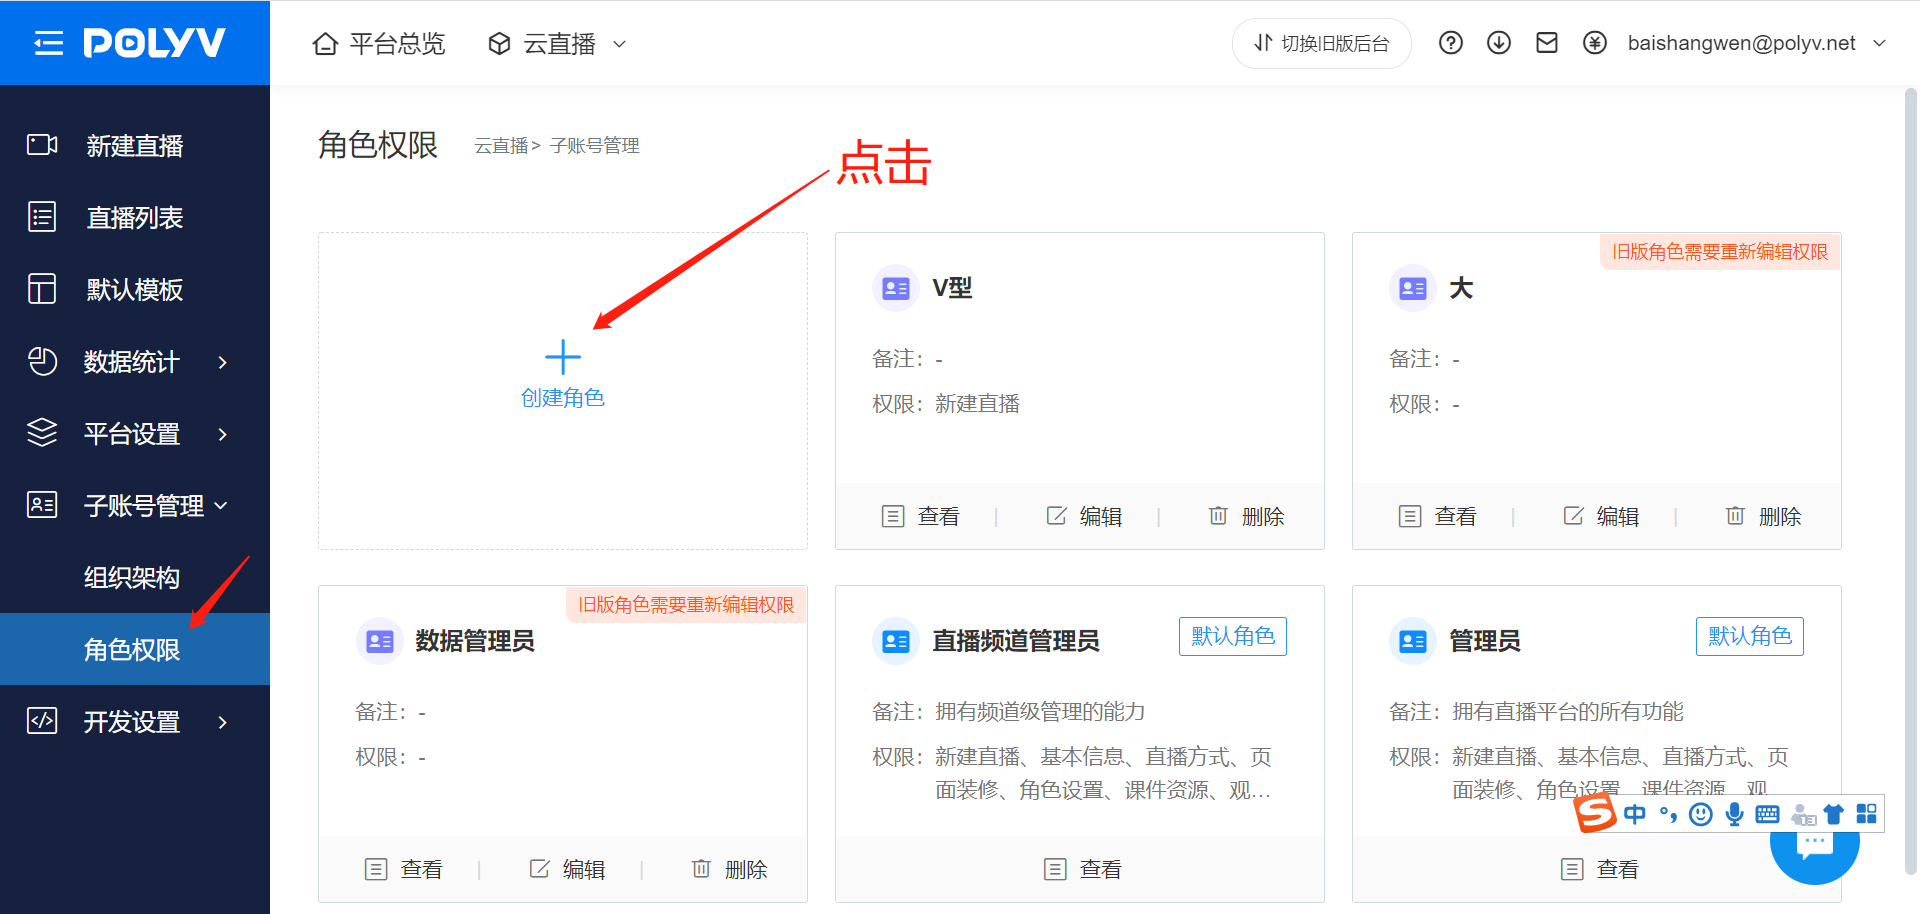
Navigate to the [Sub-account Management - Role Permissions] page. Click the Create Role button to enter the Add Role page.
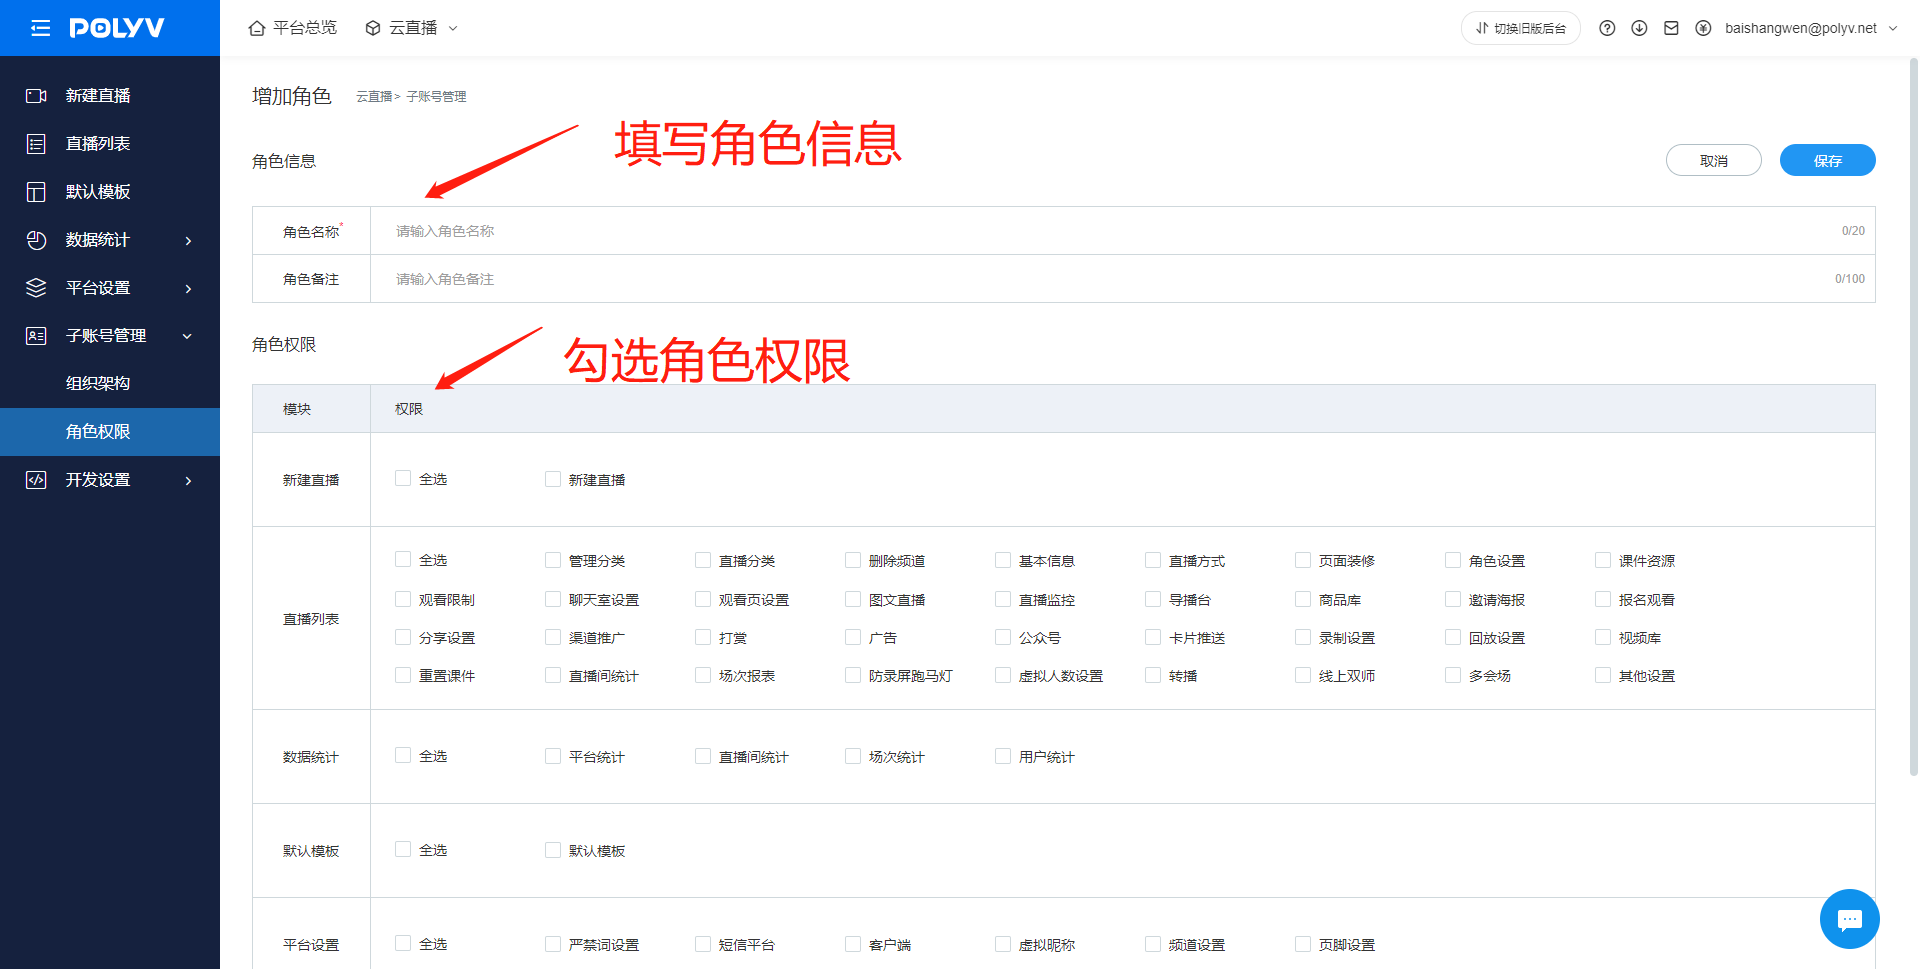
On the Add Role page, you can set the role name and remarks. Select permissions by checking the corresponding menu items, then click the Save button to complete the addition.
Note:
The backend generates two default fixed roles: the Admin role has all permissions for the live streaming platform; the Live Channel Admin role has all permissions for channel management.
By default, you can create 10 roles. To expand this limit, please contact the sales team.
Deleting a Role
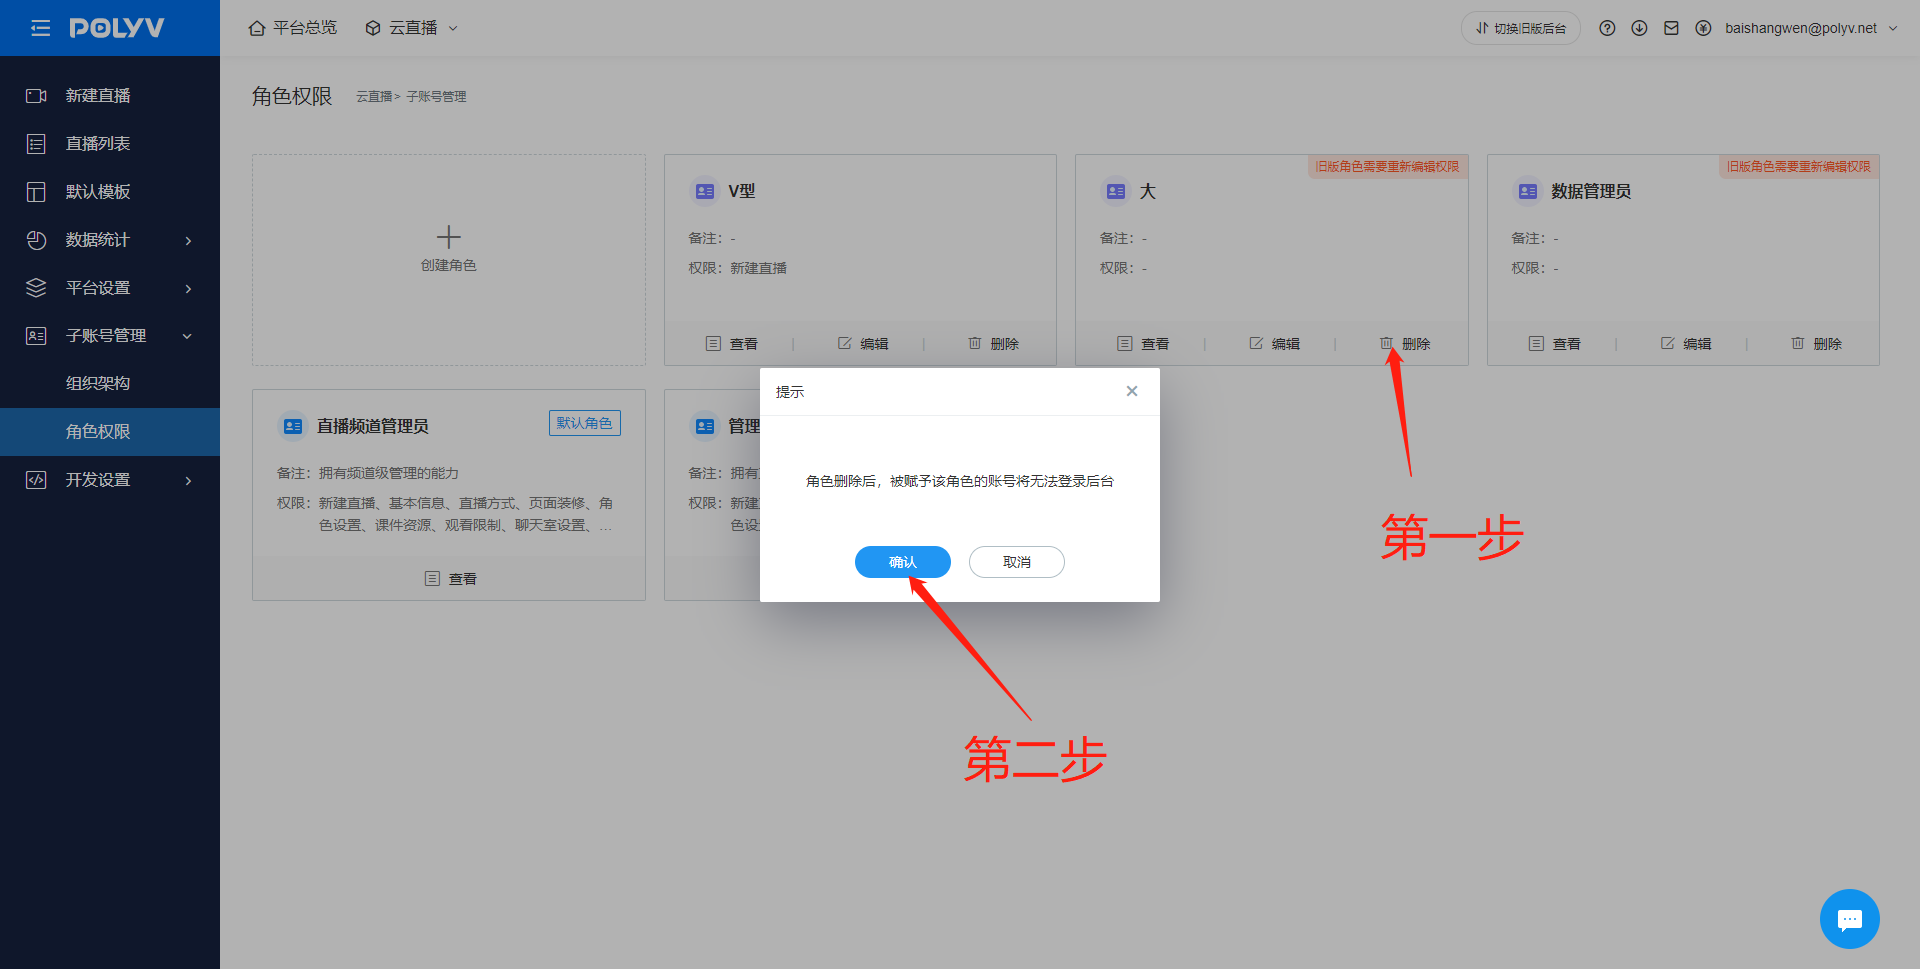
Navigate to the [Sub-account Management - Role Permissions] page. Click the Delete button inside the role card, then click Confirm in the pop-up to delete the role.
Note:
Default roles cannot be deleted.
After a role is deleted, accounts assigned that role will be unable to log in to the backend.
Modifying a Role
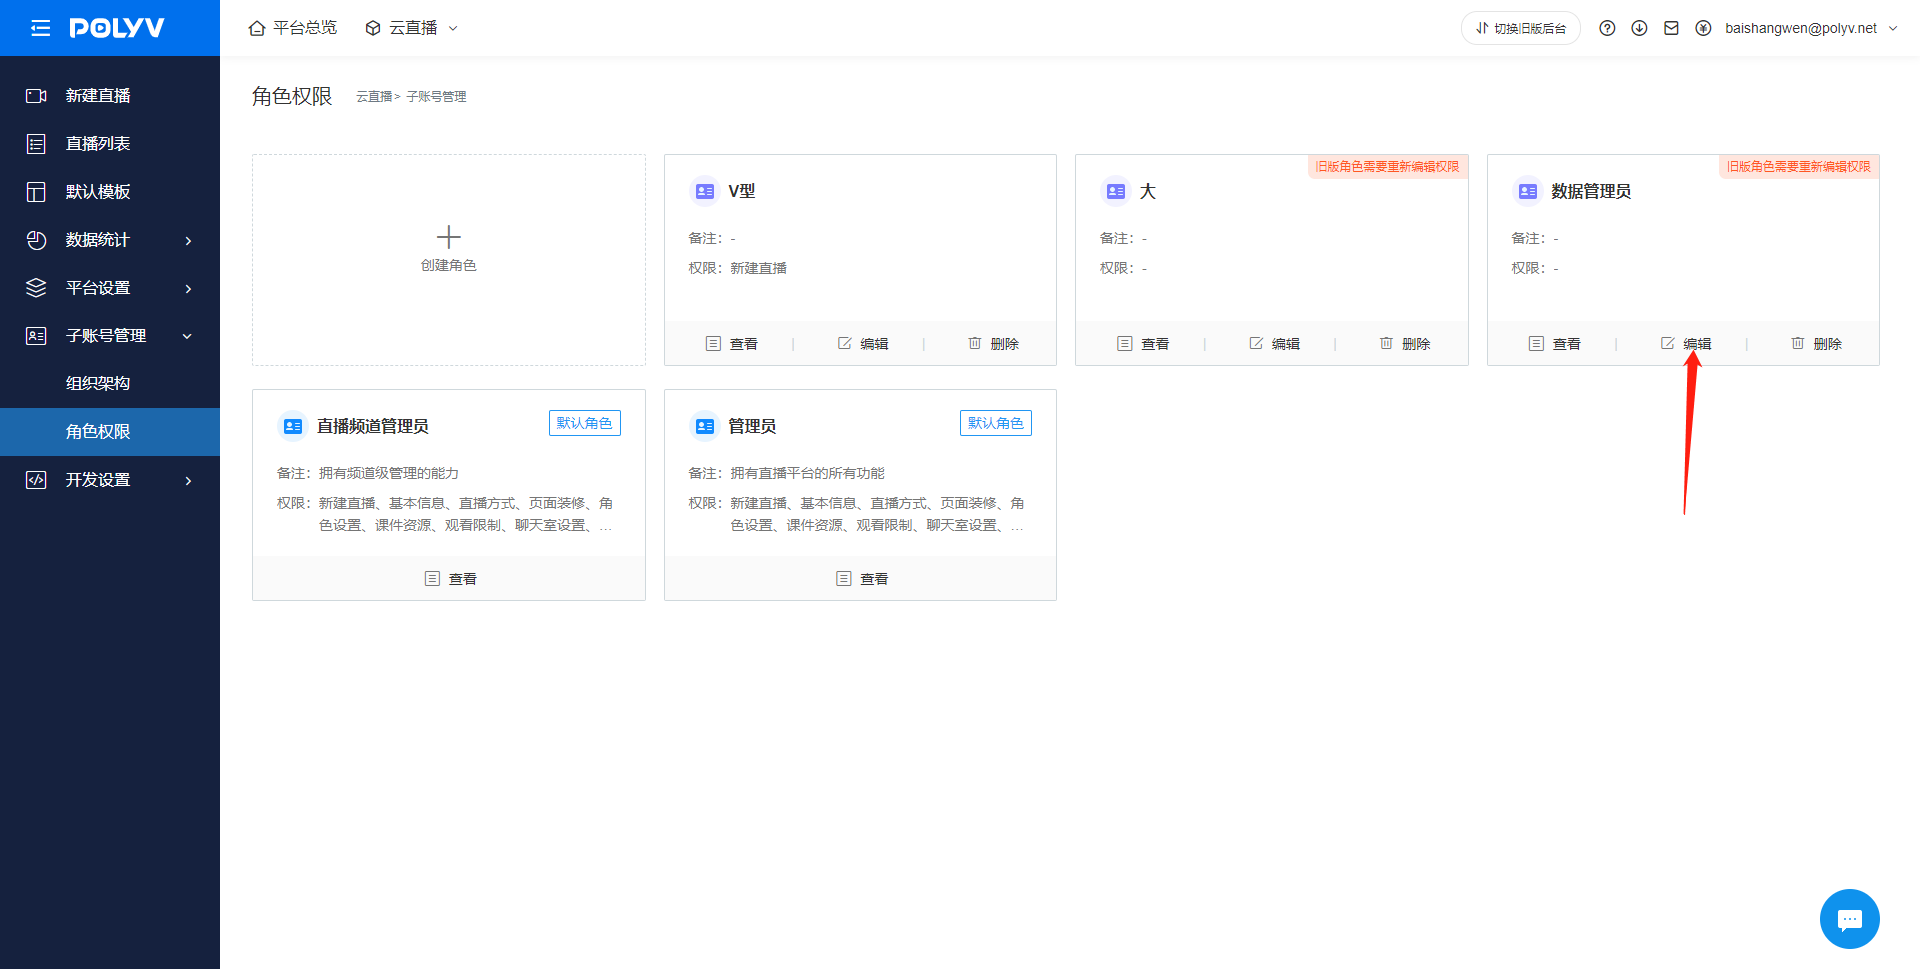
Navigate to the [Sub-account Management - Role Permissions] page. Click the Edit button inside the role card to open the Edit Role page.
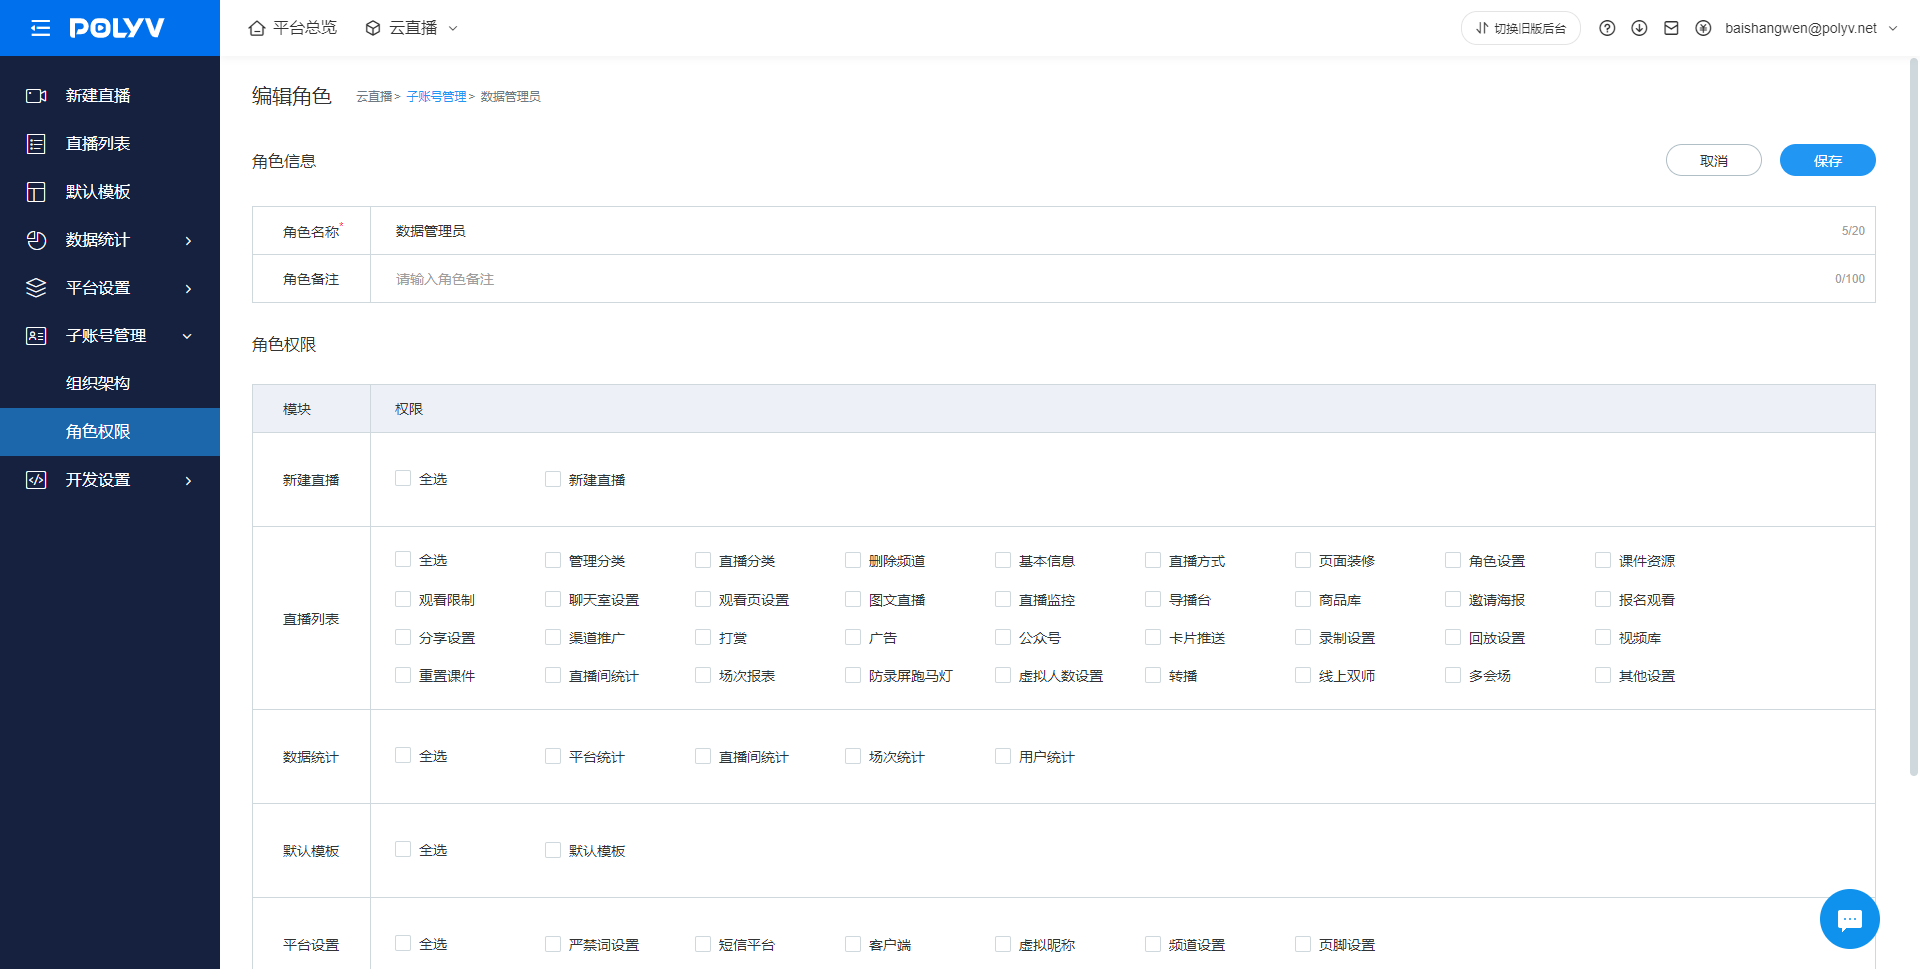
On the Edit Role page, you can modify the role name and remarks. Select permissions by checking the corresponding menu items, then click the Save button to complete the modification.
Note:
Default roles cannot be modified.
Modifying a role's permissions will update the permissions for all associated sub-accounts.
4. Sub-account Management
Adding a Sub-account
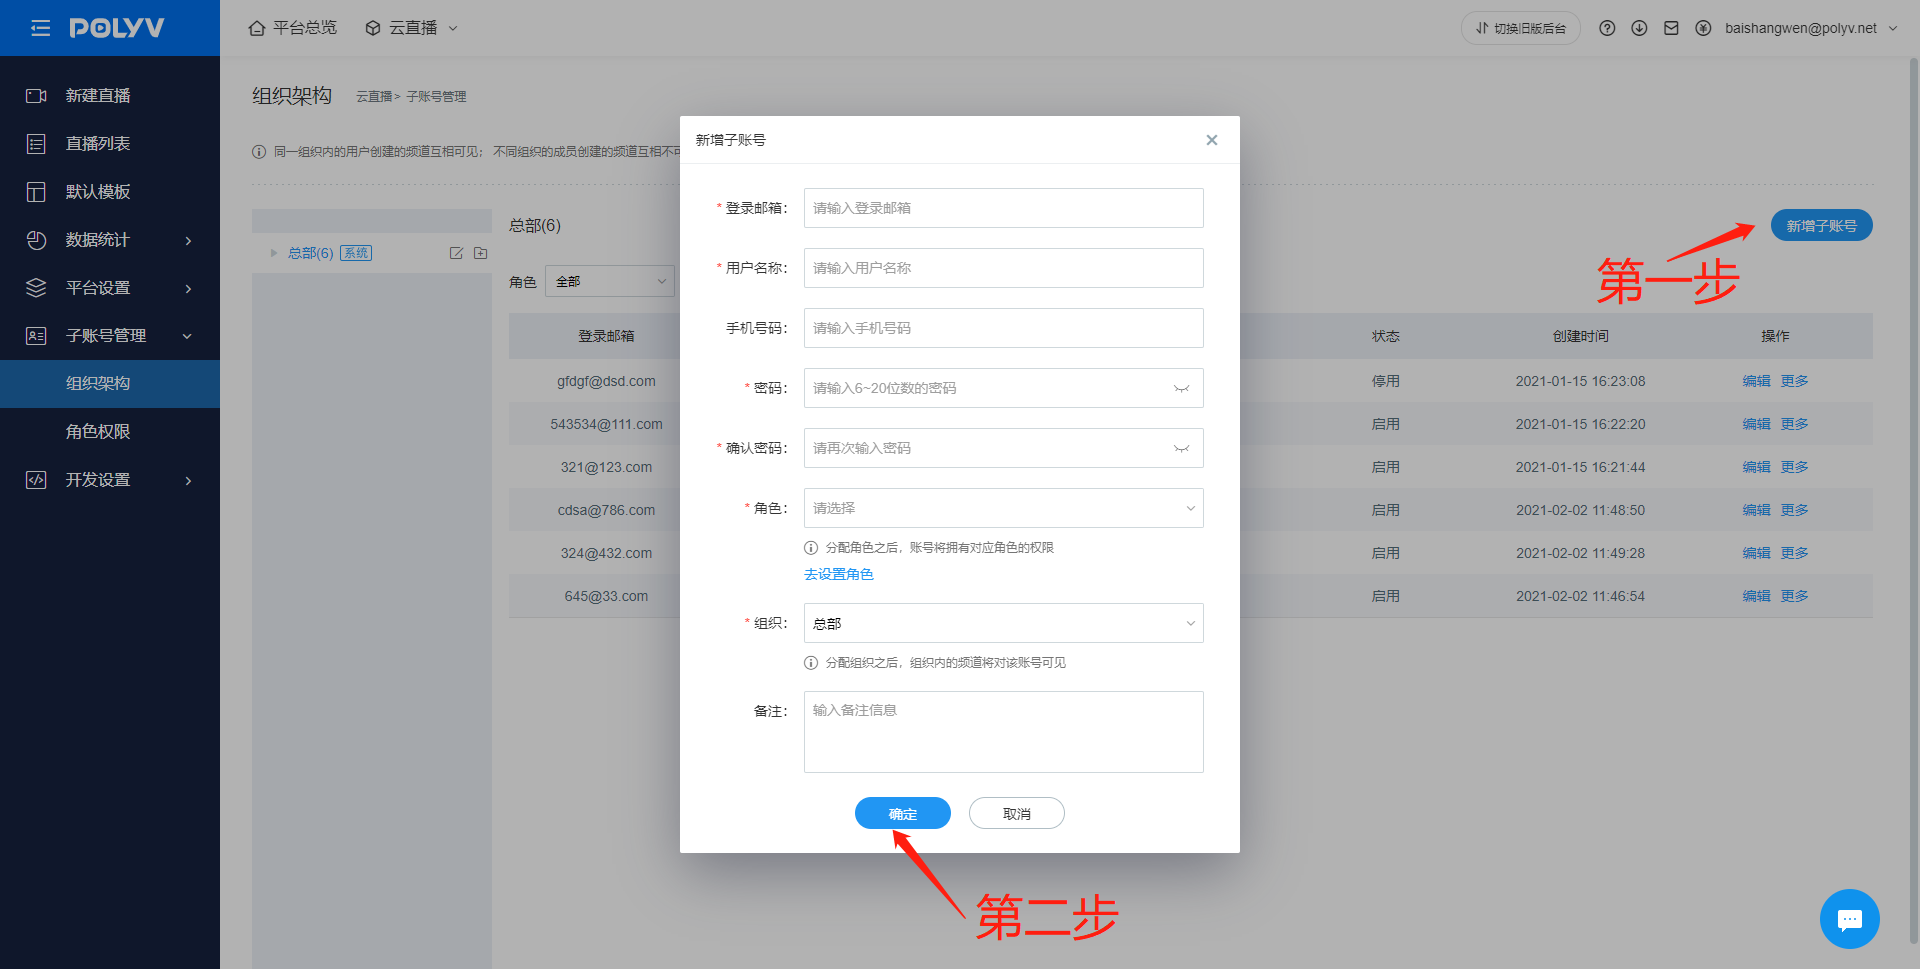
Navigate to the [Sub-account Management - Organizational Structure] page. Click the Add Sub-account button to open the Add Sub-account window. Fill in the sub-account information, set its organization, associate a role, and click the Save button to complete the creation.
Note:
A sub-account can only belong to one organization and be associated with one role.
By default, you can create 5 sub-accounts. To expand this limit, please contact the sales team.
Deleting a Sub-account
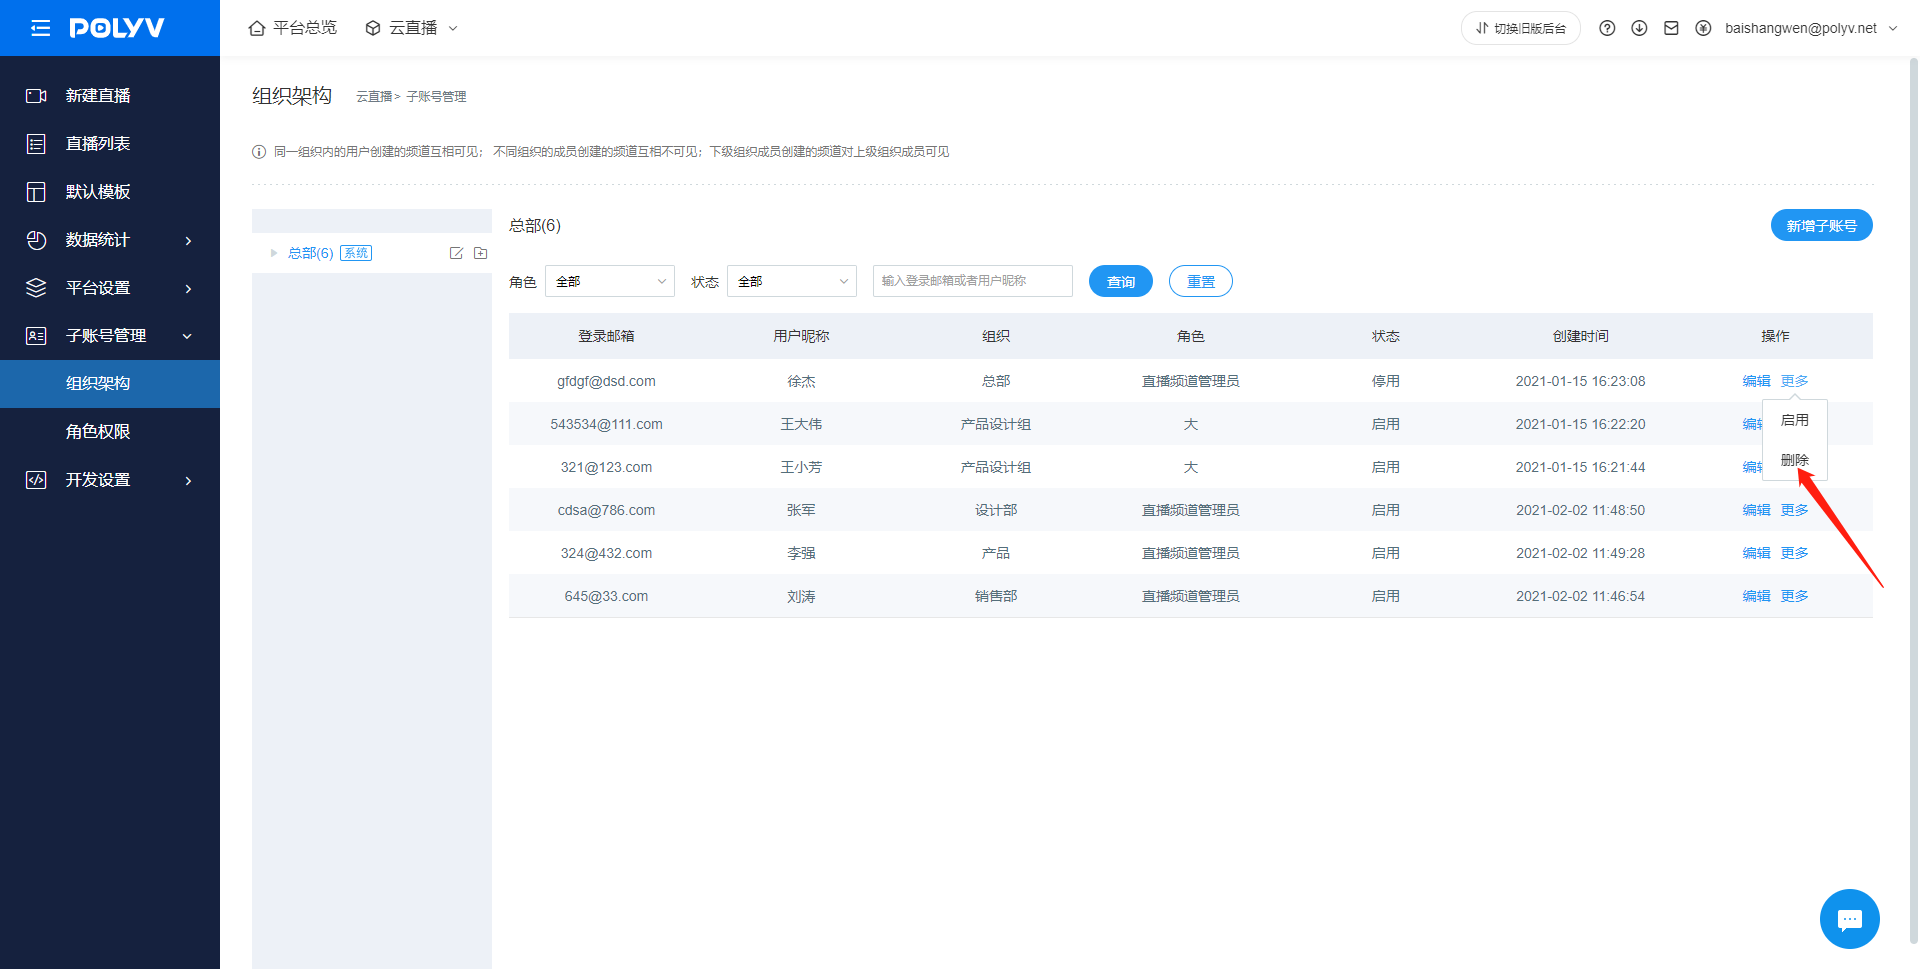
Hover the mouse over the sub-account list, click the More button area, then click the Delete button to open the deletion confirmation pop-up.
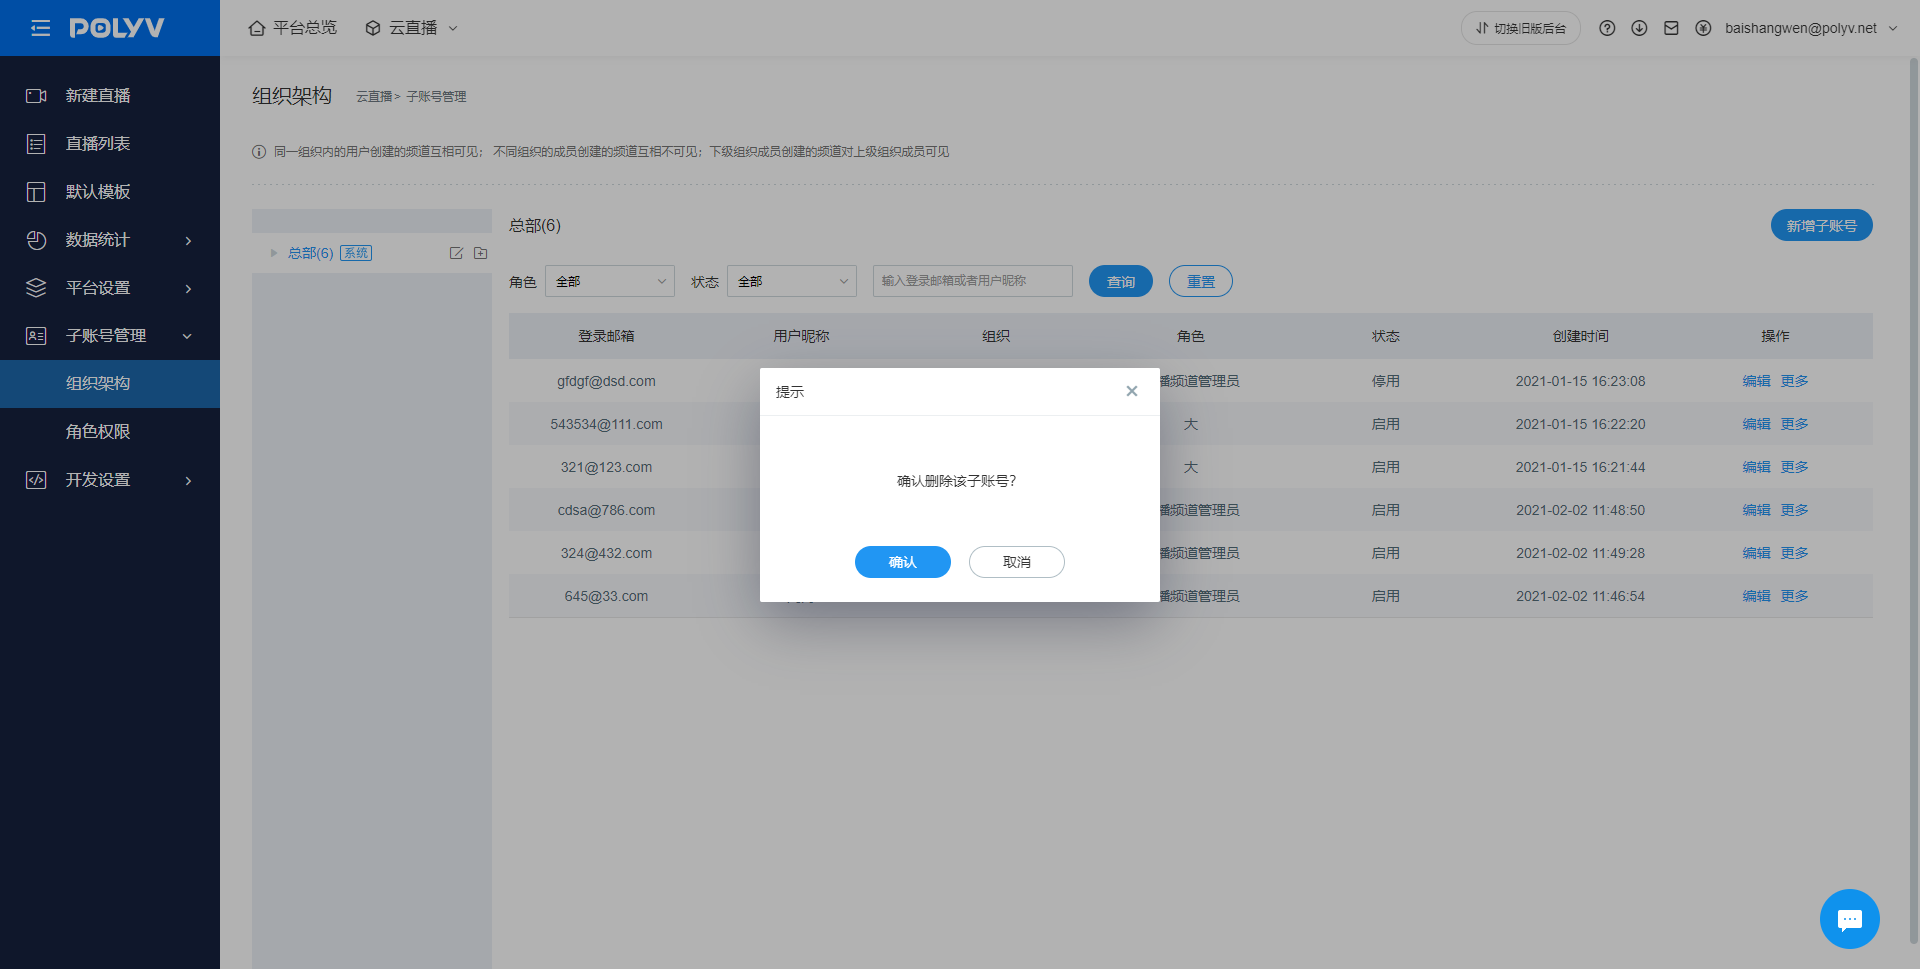
Click the Confirm button to complete the deletion.
Note:
After deleting a sub-account, it can no longer log in to the backend. All channels created by the deleted sub-account will be transferred to the super admin account.
Disabling a sub-account only prevents it from logging in; channels under a disabled sub-account will not be transferred to the super admin.
Modifying a Sub-account
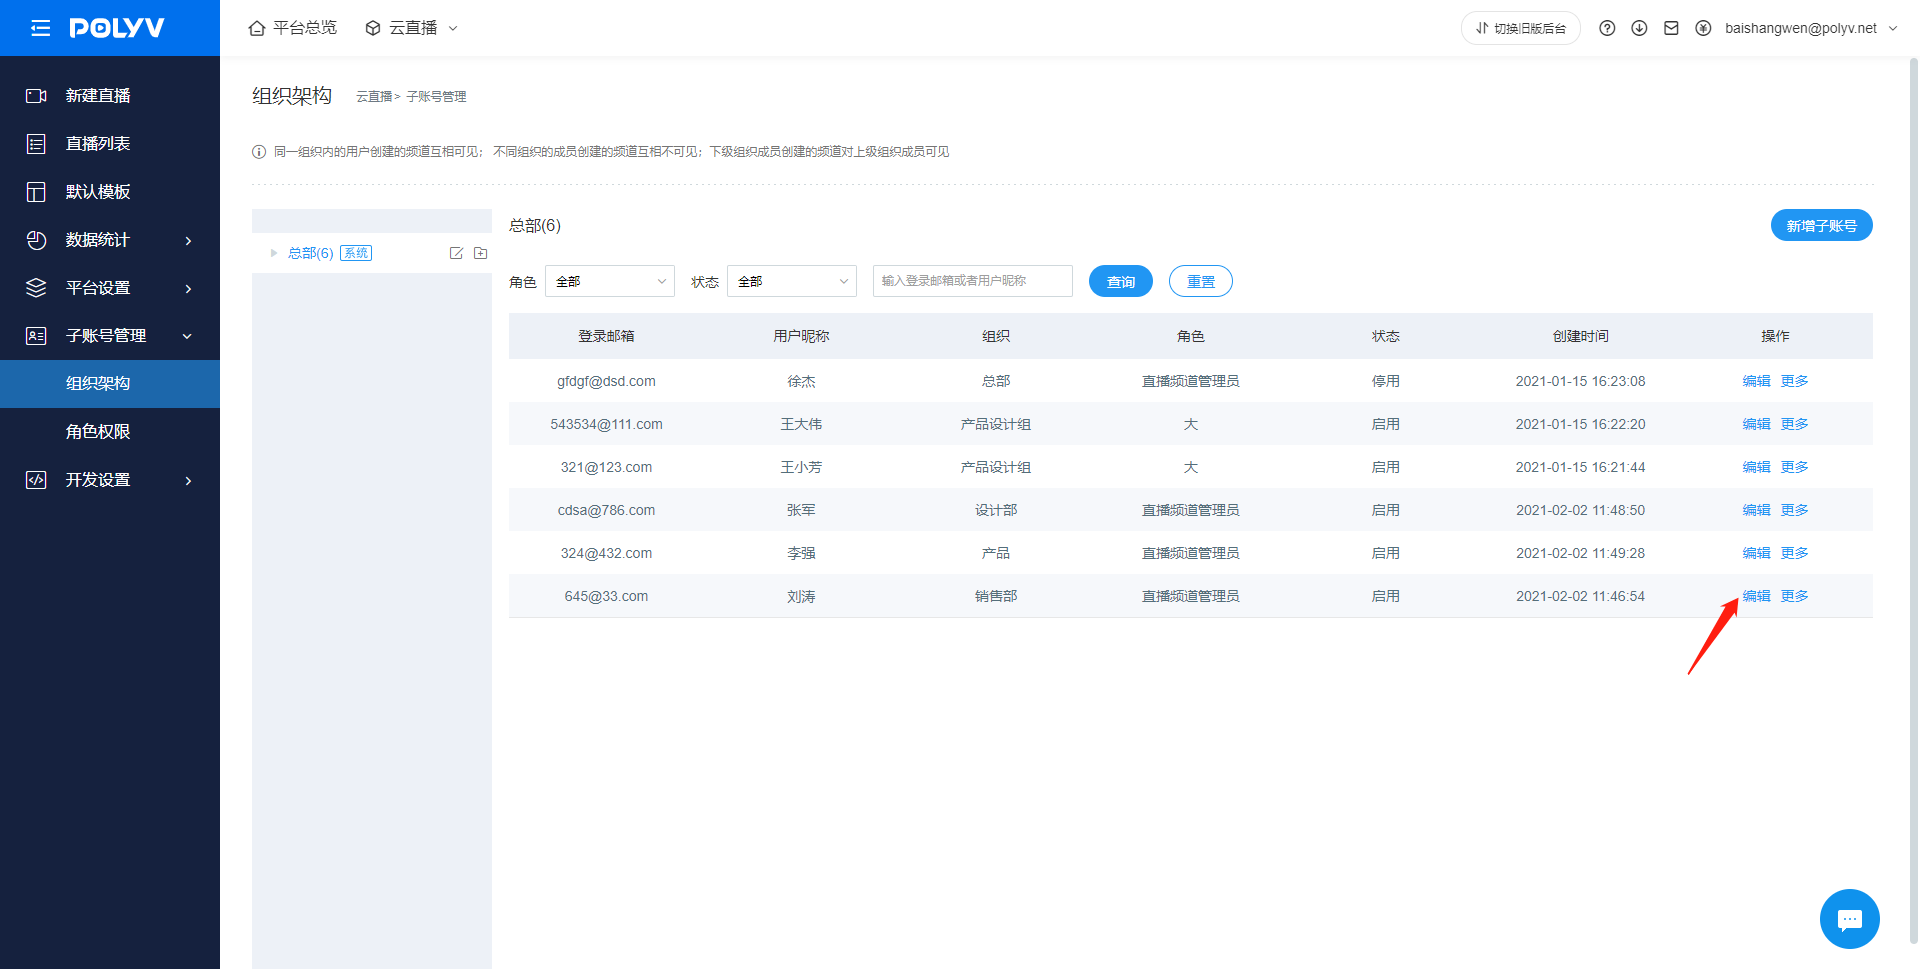
Navigate to the [Sub-account Management - Organizational Structure] page. Click the Edit button for the sub-account to open the Edit Sub-account window.
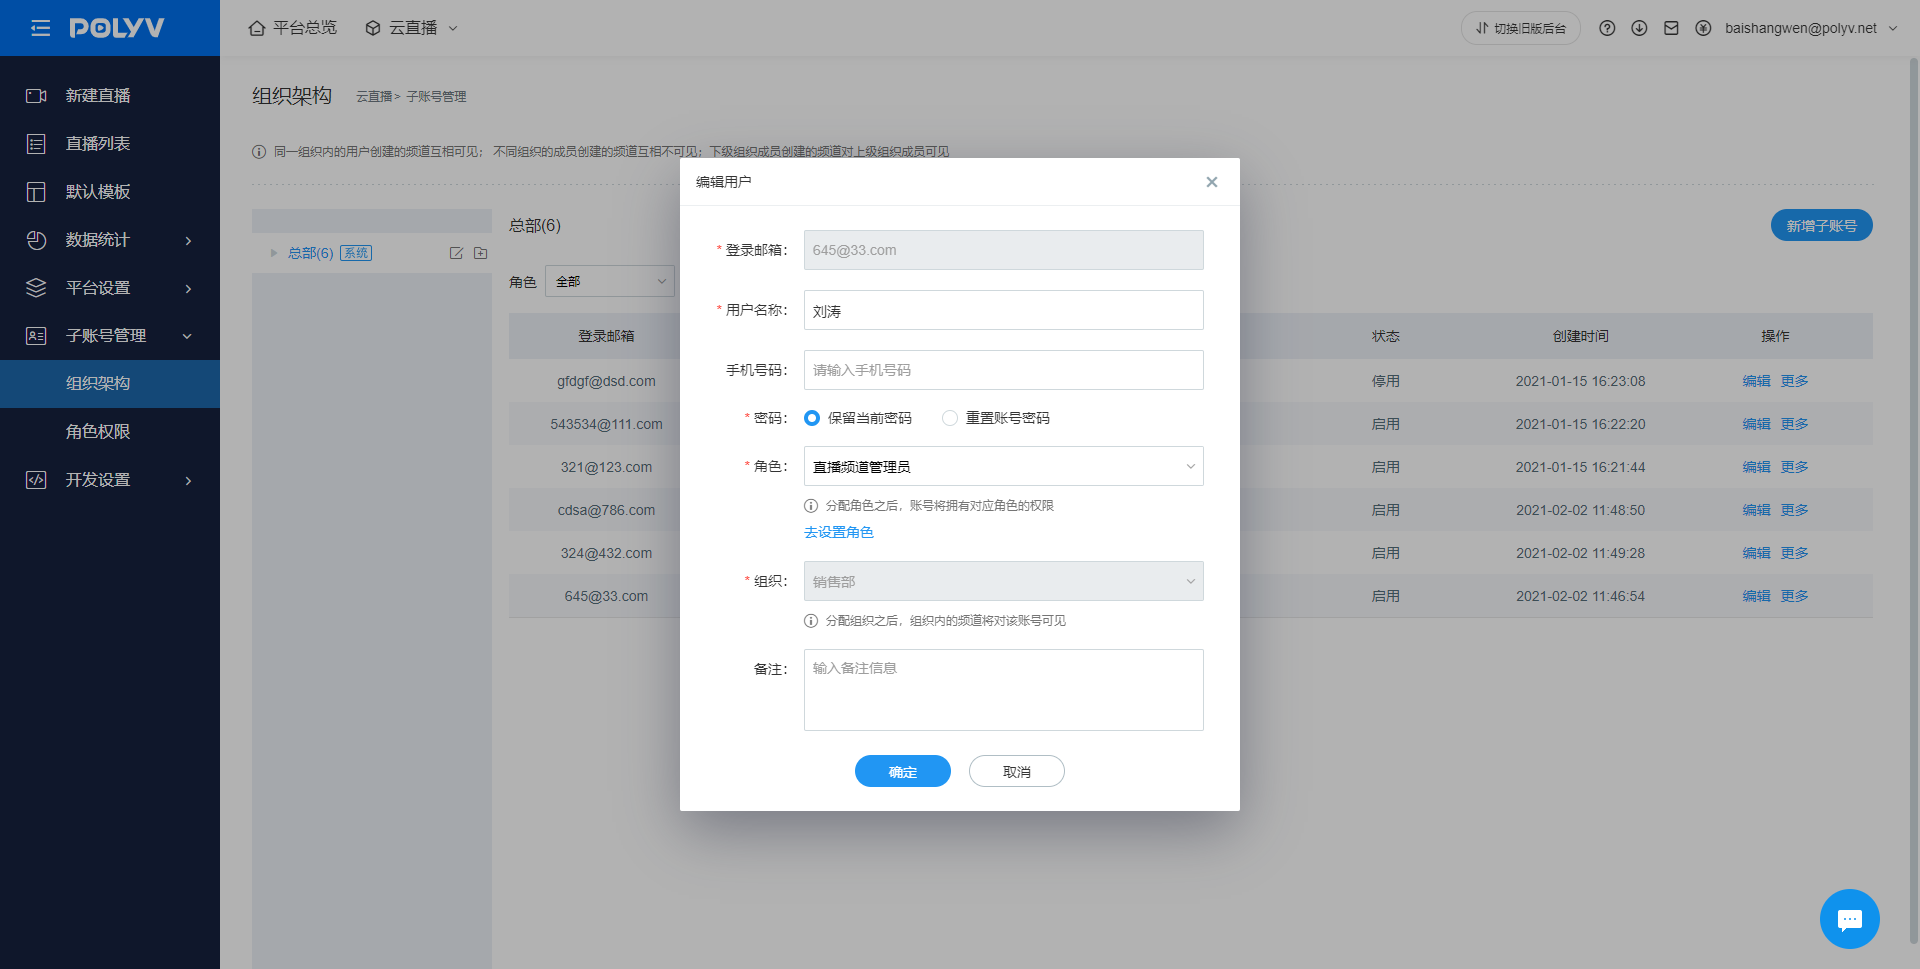
In the window, you can modify the sub-account information, set the associated role, and click the Save button to complete the modification.
Note:
The organization to which a sub-account belongs cannot be modified at this time.
5. Sub-account Migration to the New Backend
To help users quickly apply old backend sub-accounts to the new backend, Polyv provides a convenient migration support:
- Organizational Structure: Historical data is fully retained; no adjustments are needed.
- Sub-accounts: Historical information is fully retained; no adjustments are needed.
- Roles: Role types are retained. You need to reconfigure the functional permissions for custom roles (the new backend page layout has changed, so permissions need to be reconfigured based on the new page functions).
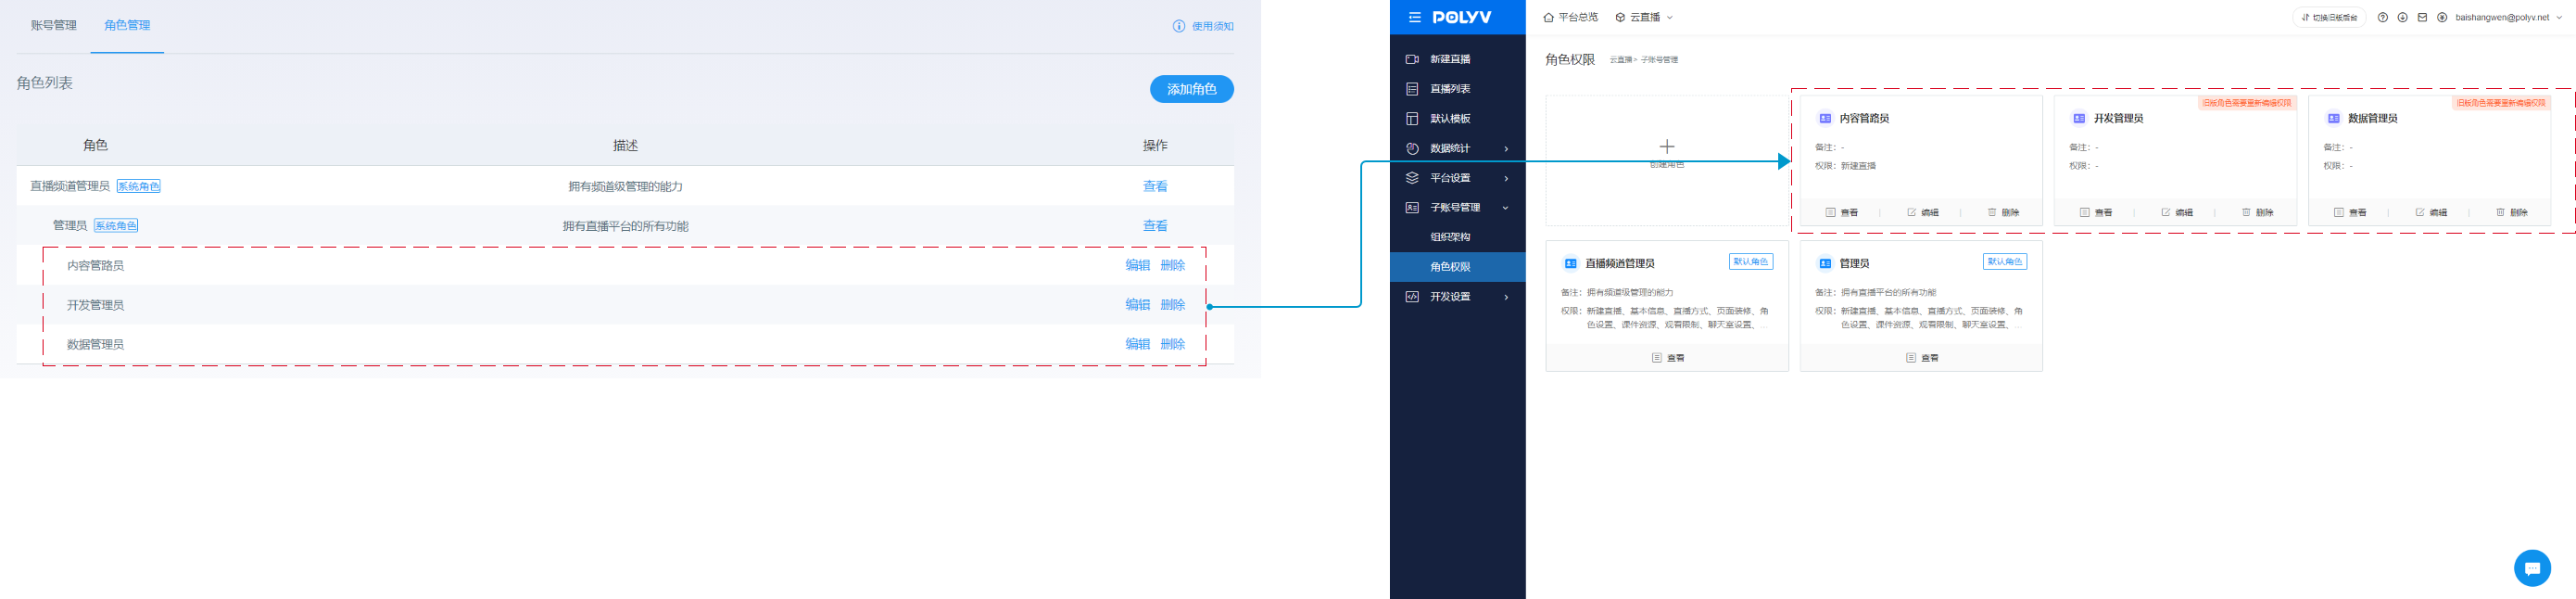
Navigate to the [Sub-account Management - Role Permissions] page. Find the role card with a red text prompt in the top right corner. Click the Edit button inside the card to open the Edit Role page, configure the functional permissions. Once configured, the red prompt text in the top right corner of the card will disappear.
Note:
If a custom role's functions are not set, the functions will default to empty.
Default roles do not require configuration.
