


Client Broadcasting Operation (Three-Screen Layout)
I. Client Usage Instructions
This document provides functional usage instructions for the Polyv 4.x broadcasting client.
The Polyv client broadcasting feature is widely compatible with various live streaming scenarios. In terms of viewing formats, it offers options such as pure video, three-screen layout, and horizontal/vertical screens. Application scenarios include marketing promotions, large conferences, professional training, online classrooms, and more.
Additionally, it boasts powerful features, allowing flexible layout of the live stream画面 and support for multi-scene switching; supports adding rich materials like multimedia, images, and documents; is compatible with external capture cards, and is equipped with advanced functions such as AI keying, AI beautification, and 17-person video co-hosting to meet the needs of different users in various situations.
II. Preparation Before Starting
1. Recommended Hardware/Environment
Computer Hardware Configuration:
| Configuration | Recommended Configuration | Minimum Configuration |
|---|---|---|
| System | Windows 10 2004+, macOS 10.15.0+ | Windows 7 SP1+, macOS 10.15.0+ |
| CPU | i5-8400 or higher | i3-4160 |
| RAM | 16 GB | 4 GB |
| Graphics Card | GTX 750 or higher | Integrated Graphics |
Optional Hardware:
- Recording: External camera, DSLR/camcorder + capture card;
- Audio Input: Lavalier microphone, headset microphone, professional microphone;
- Audio Output: Headphones, external speakers;
- Studio: Green, red, or blue screen backdrop;
- Network: Ethernet cable, 4G network aggregator.
2. Live Streaming Client Download
- Win (64-bit) Client Download: https://soft.polyv.net/rc/PolyvLiveSetup64.exe
- Win (32-bit) Client Download: https://soft.polyv.net/rc/PolyvLiveSetup.exe
- Mac Client Download: https://soft.polyv.net/rc/PolyvLiveSetup.dmg
- Notes on Using the Client on Mac
3. Registration and Login
Register and log in to your Polyv account, then enter the Polyv management console.
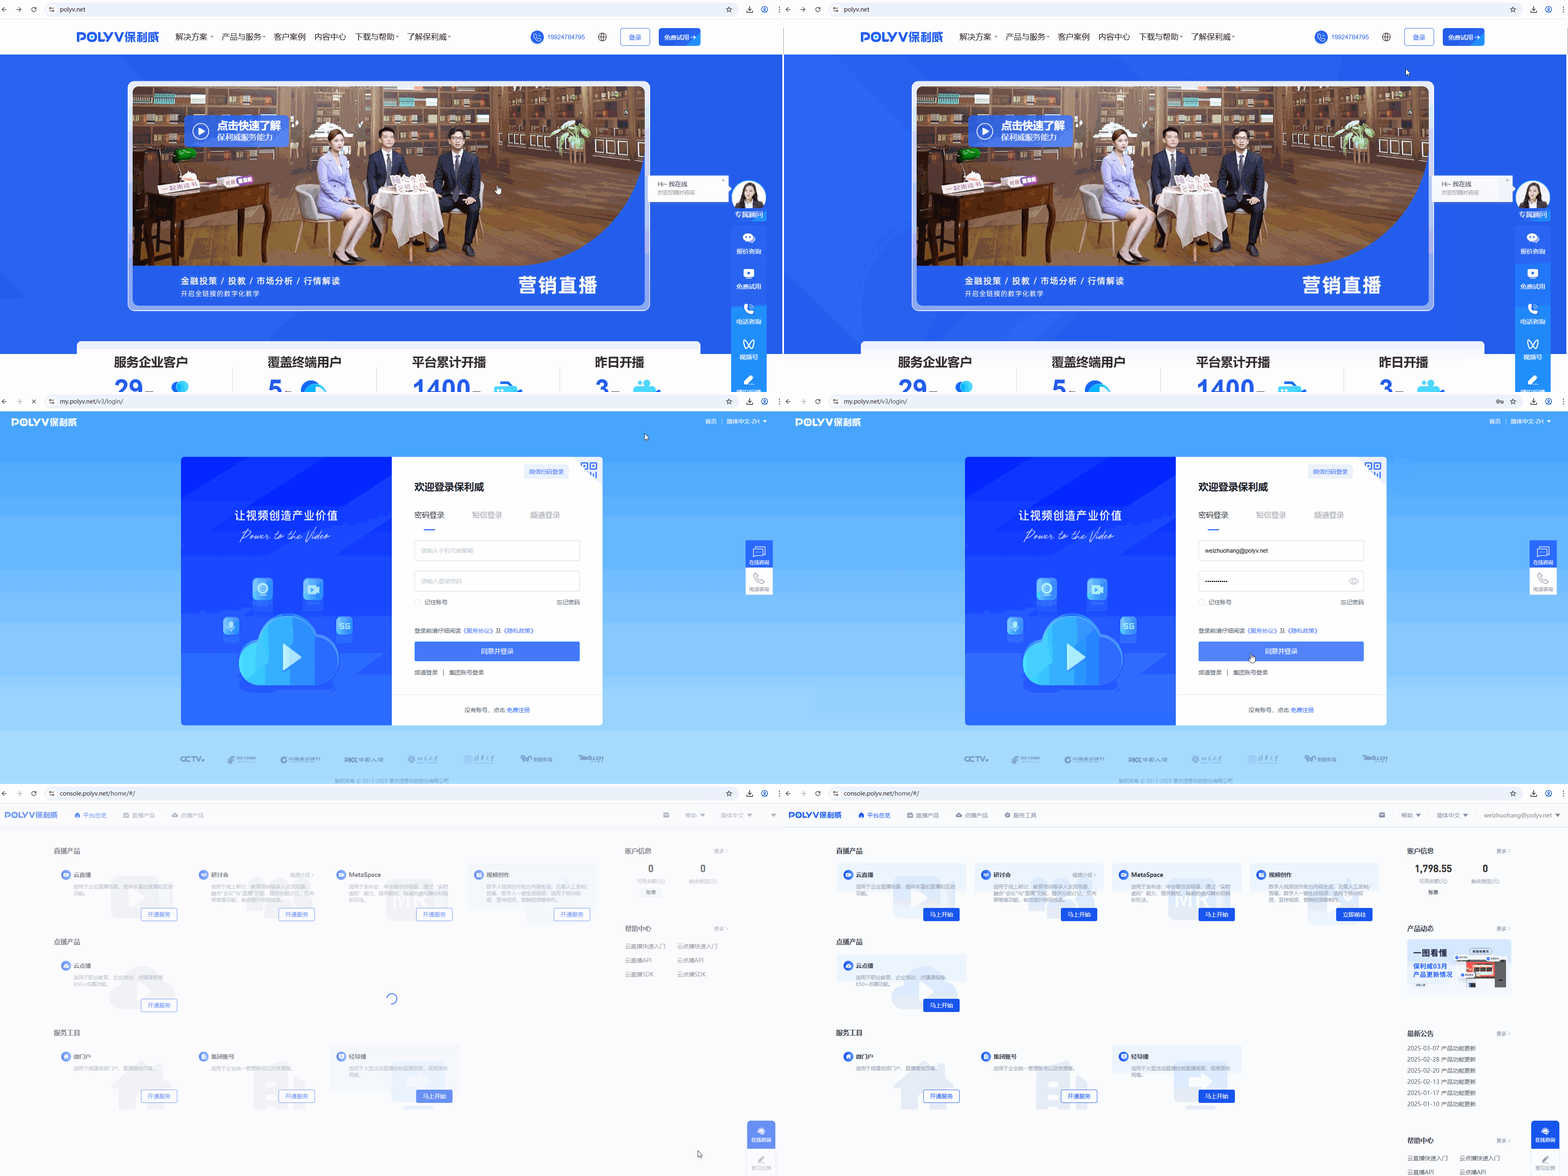
4. Create a Channel
Enter the management console, click "Start Now" under Cloud Live -> New Live Stream. Fill in the live room name, select the Document + Video Channel (Three-Screen Layout) Template for the live stream template, and click "Save and Create Live Stream" at the bottom to create a live room with the three-screen layout template.
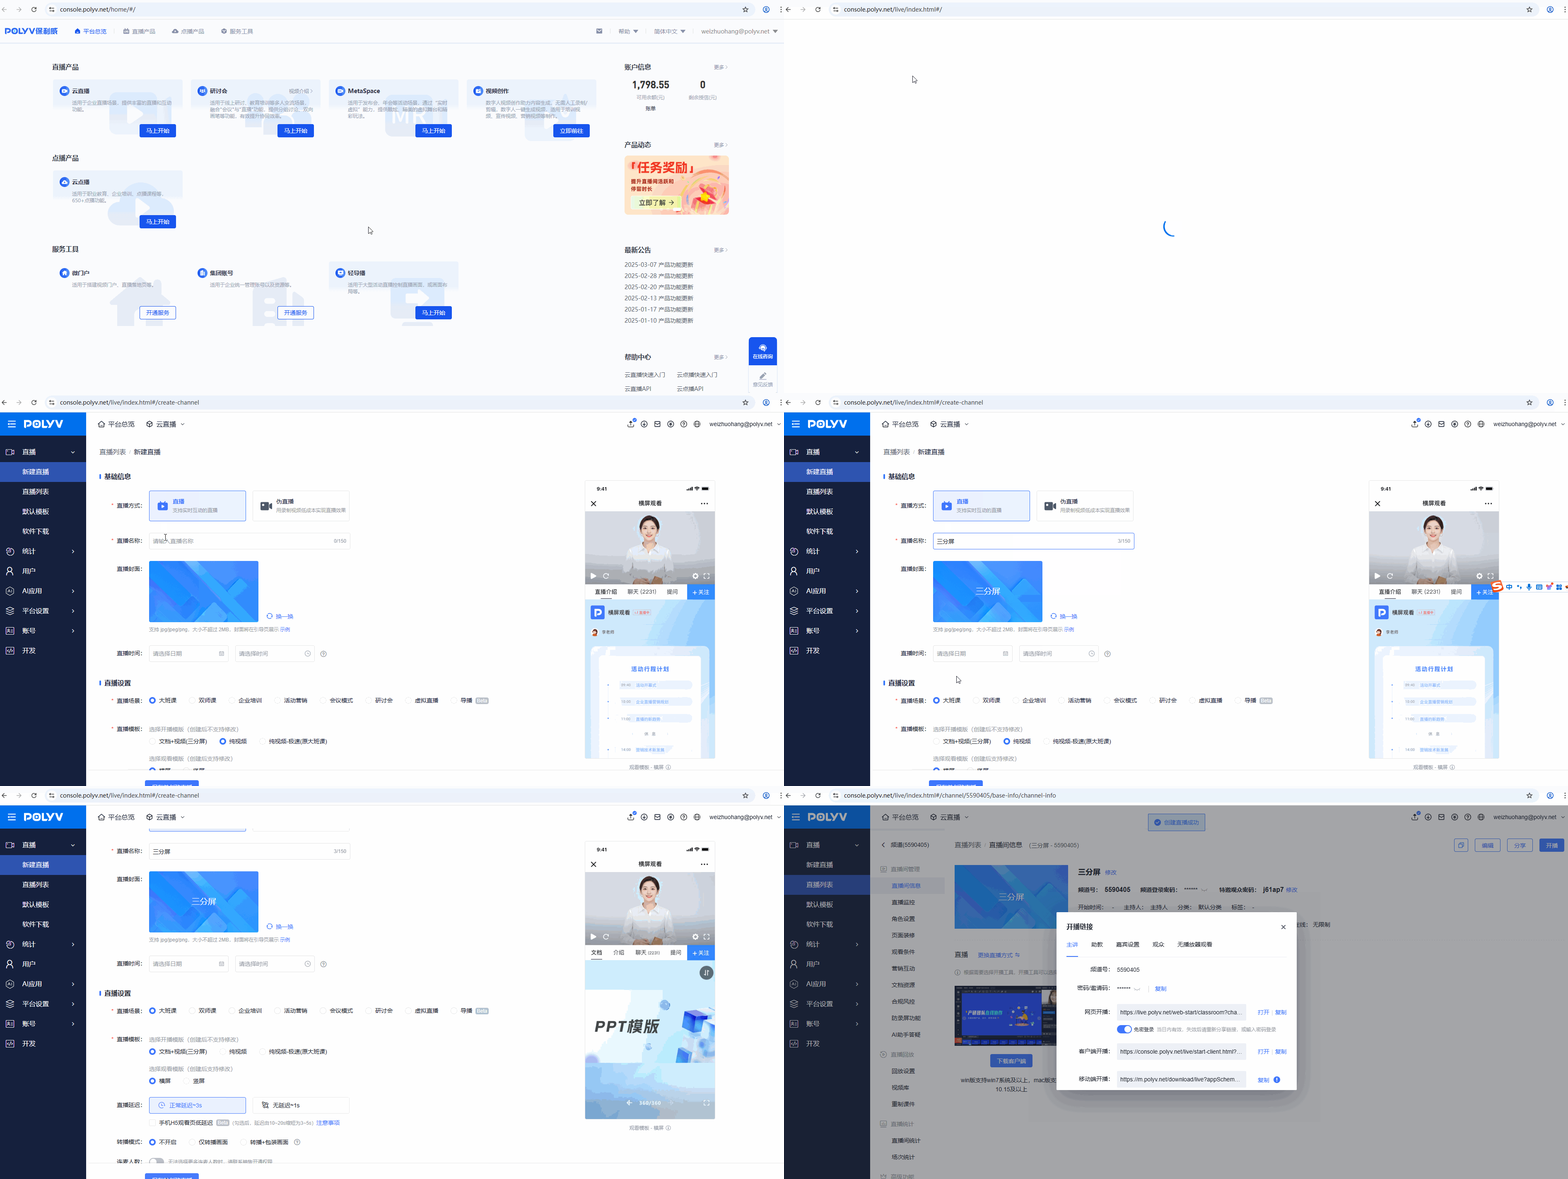
5. Enter the Client
Method 1: Manually open the client. Click the "Go Live" button in the top right corner of the channel backend to view the channel number and password. Manually copy this information into the client to log in.
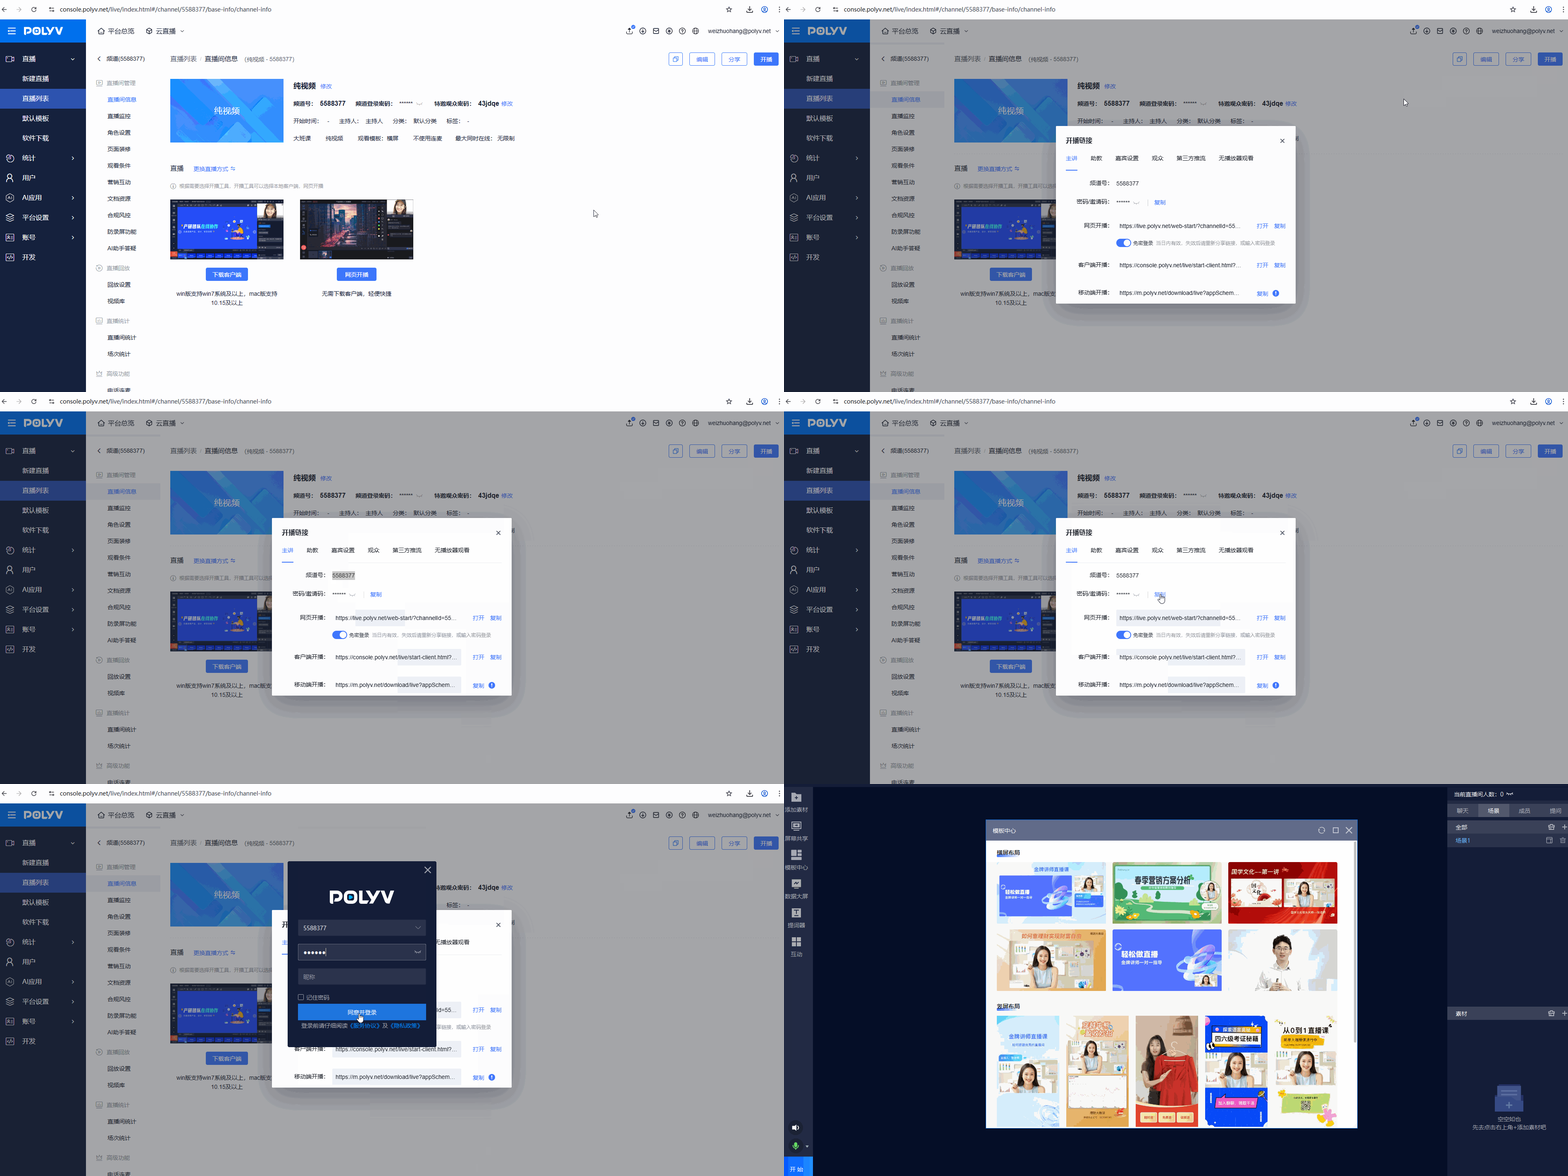
Method 2: Click the "Go Live" button in the top right corner of the channel backend, select "Client Go Live", and click "Launch New 4.0 Client" in the pop-up webpage. This method automatically launches the client and enters the corresponding channel (the client should be closed first, otherwise it cannot be launched).
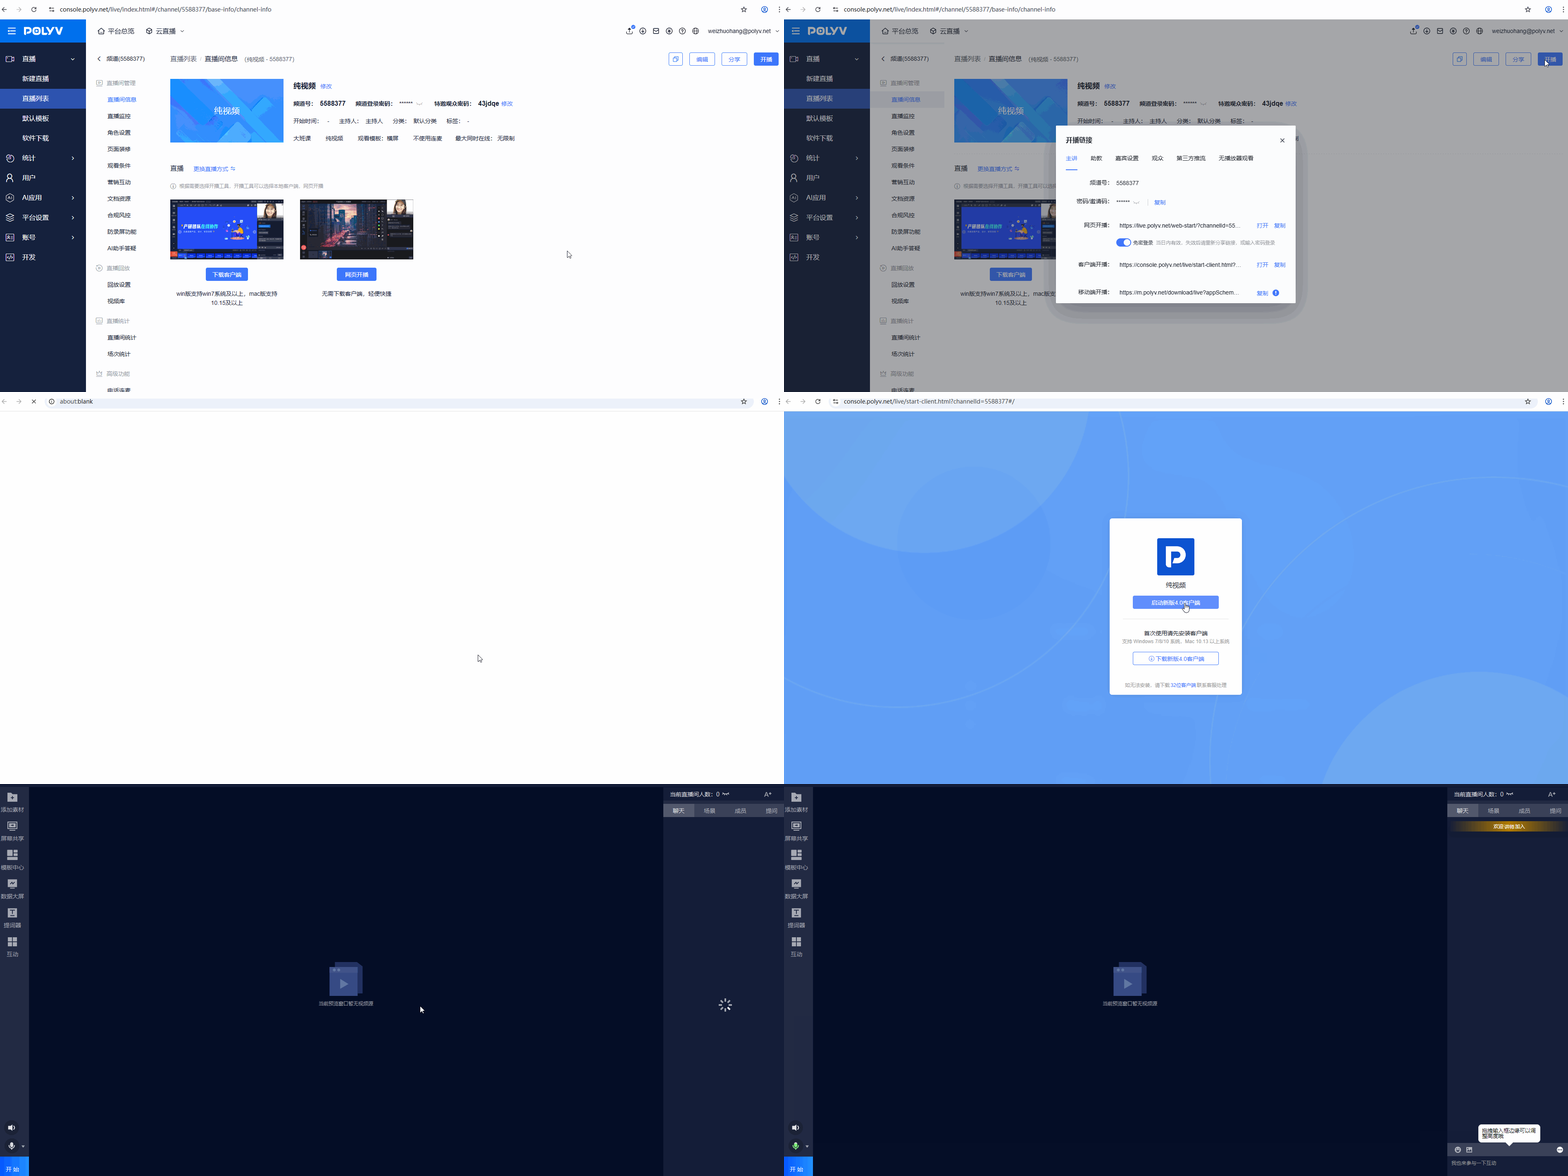
Note:
- When logging in with the channel number as a teacher identity, you can start/end the live stream;
- When logging in with a sub-channel and the co-hosting limit is 0 (co-hosting function not used), you can log in to the client with the backend cloud director console;
- When logging in with a sub-channel and the co-hosting limit is ≥ 1 person, you cannot log in to the client.
III. Main Interface Overview
The 4.x client supports two broadcasting templates: Pure Video and Document + Video (Three-Screen Layout). The main differences are as follows:
| Feature | Pure Video Template | Document + Video Template |
|---|---|---|
| Switch between Live-only and Co-hosting + Live | ✔️ | ✔️ |
| Local Recording | ✔️ | ❌ |
| Multi-scene Switching | ✔️ | ❌ |
| Material Addition & Screen Layout | ✔️ | ❌ |
| Insert Multimedia | ✔️ | ✔️ |
| Desktop Live Streaming | ✔️ | ✔️ |
| Desktop & Software Window Sharing | ✔️ | ❌ |
| Interactive Whiteboard | ❌ | ✔️ |
| Documents | ✔️ | ✔️ |
| Representative Co-hosting | ✔️ | ✔️ |
| Audience Hand-raising to Co-host | ✔️ | ✔️ |
| Beautification | ✔️ | ✔️ |
| Keying | ✔️ | ✔️ |
| Text Interaction (Chat, Questions, Q&A) | ✔️ | ✔️ |
| Member Management (Online Count, Member Search, Mute, Kick) | ✔️ | ✔️ |
| Interactive Apps (Announcements, Check-in, Lottery, Quiz Cards, Forms, Red Envelope Rain) | ✔️ | ✔️ |
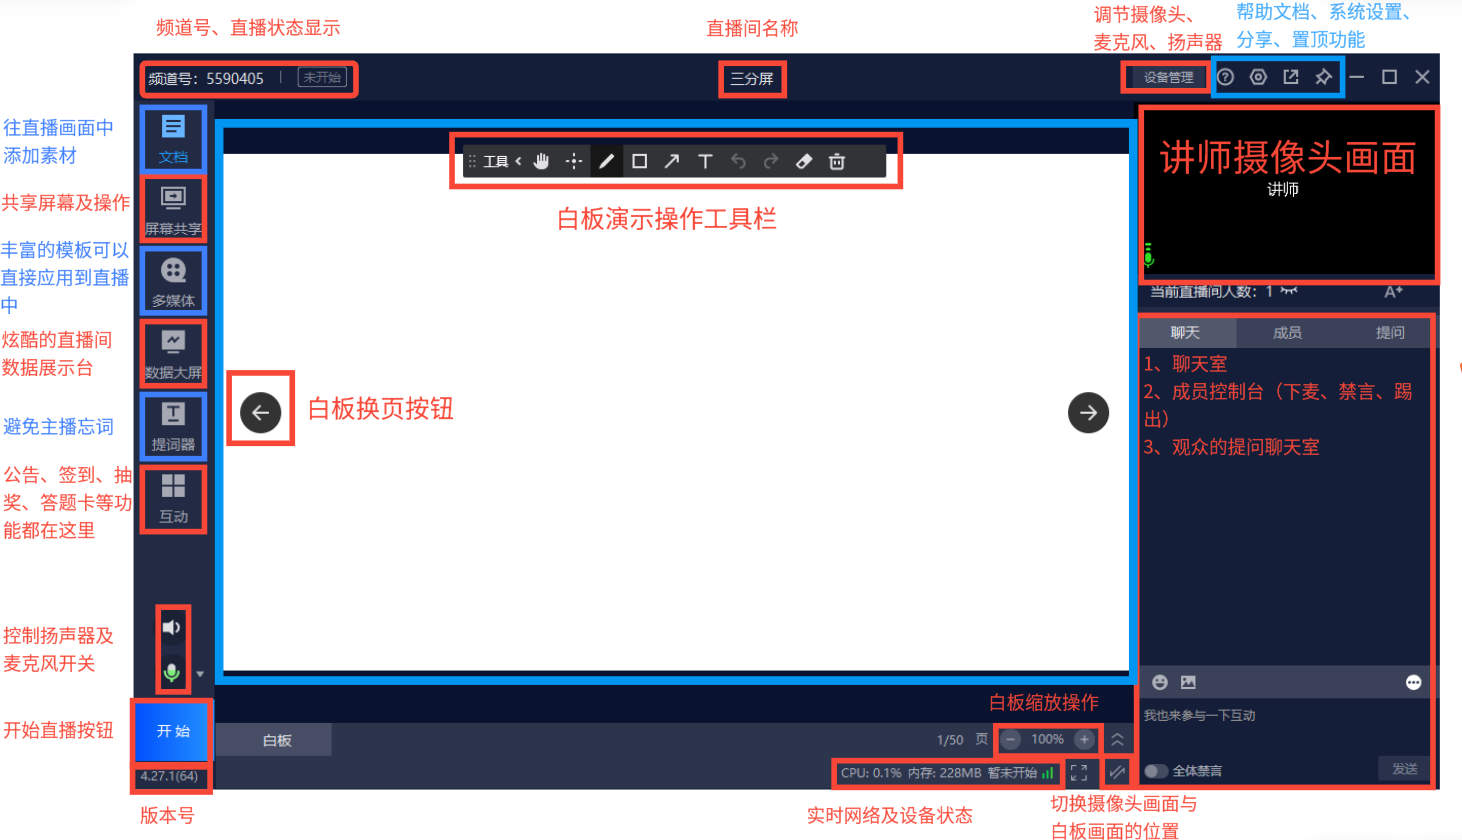
Document + Video (Three-Screen Layout) Template Client Interface Function Introduction:
IV. Mode Switching
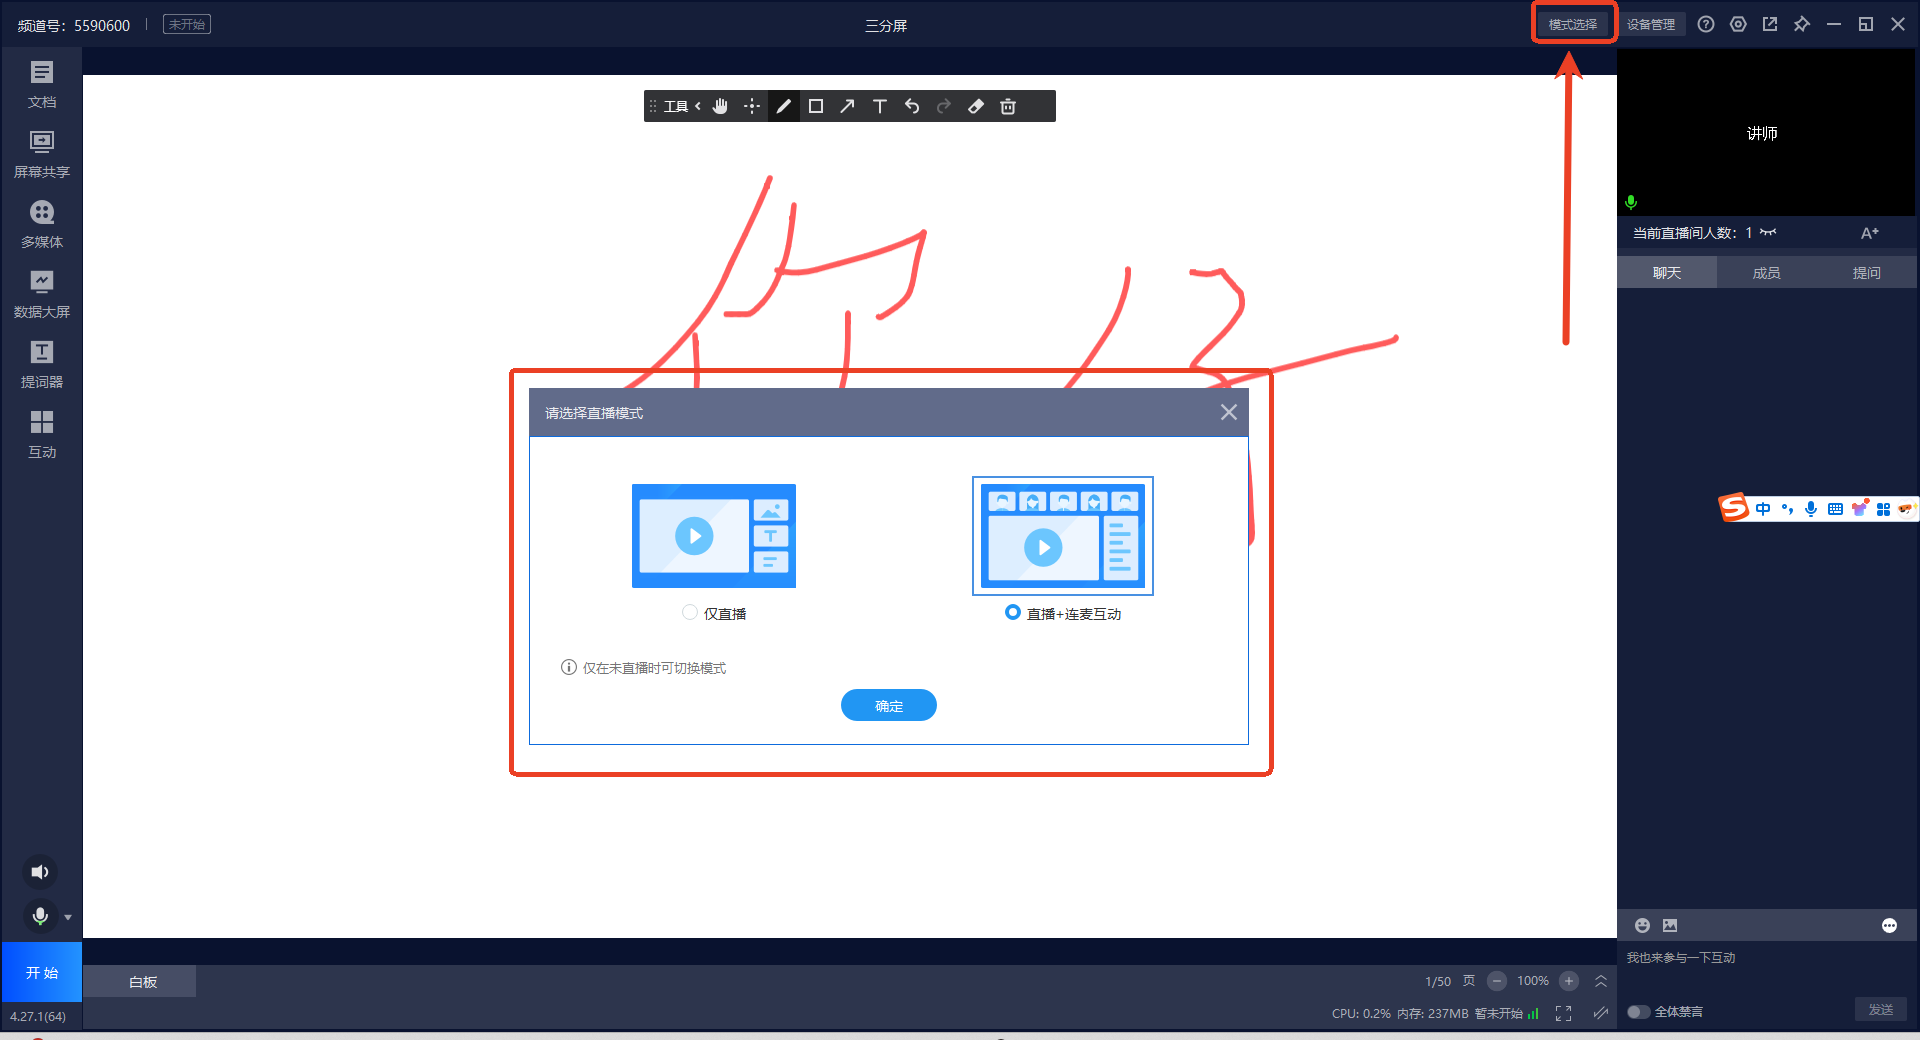
| Mode | Applicable Scenario |
|---|---|
| Live-only Mode | Suitable for scenarios not requiring co-hosting, large events (HD recording of main speaker), HD screen recording teaching, etc.; |
| Live + Co-hosting Mode | For live streams requiring audio/video co-hosting calls and a large audience of listeners; |
| Recording Mode | For scenarios requiring client recording instead of live streaming (not available in the Document + Video template); |
V. How to Debug Devices
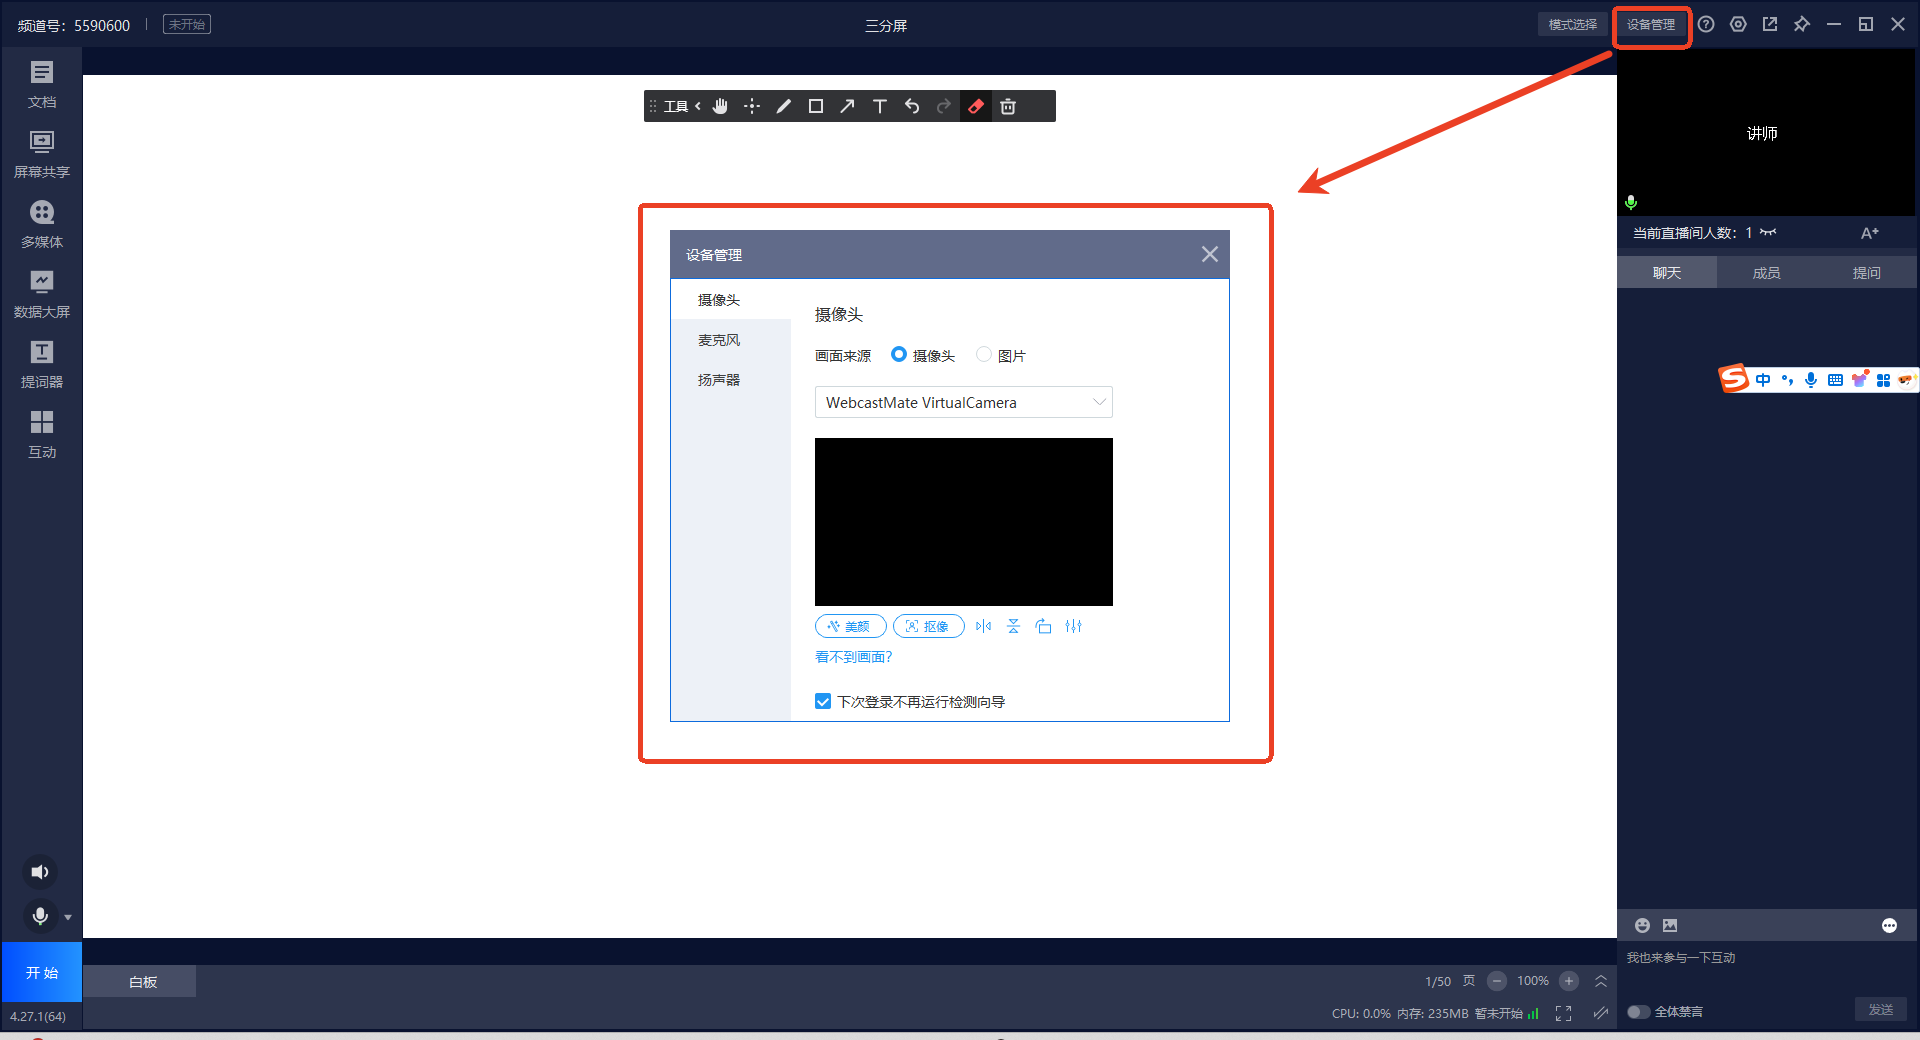
Click the [Device Debug] button at the top of the client. A dialog box will appear.
Camera
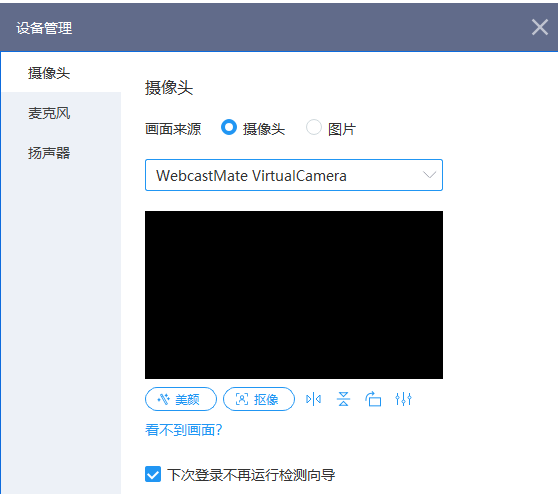
- You can select the video source: webcam or image;
- Beautification: Adjustable parameters include Smoothing, Whitening, Sharpening;
- Keying: Choose between professional green screen or AI automatic keying.
Microphone
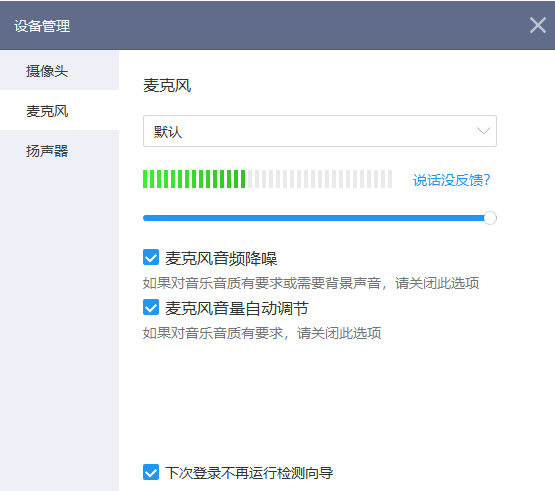
- When working normally, modifying the microphone while speaking will show a horizontal level bar. If not displayed, try switching devices or adjusting system settings;
- Adjusting the microphone volume changes the volume heard by the viewing end;
- When external noise is high, increase the noise reduction intensity, but this may make the sound sharper and quieter. Adjust appropriately;
- When input sound is low, increase the microphone boost, but this may cause popping. Adjust appropriately.
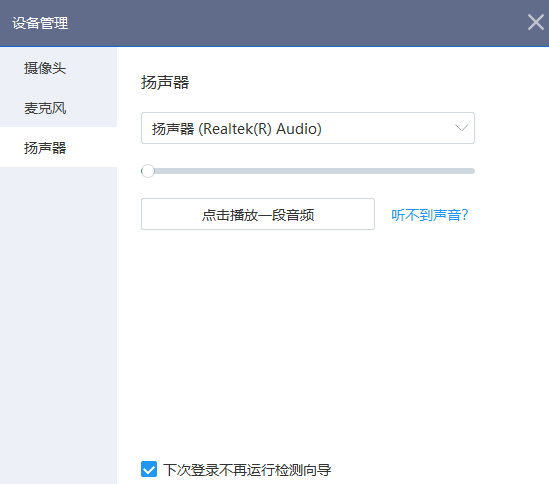
Speaker (Audio Output)
- Speaker Test: Click to play audio. If you hear sound locally, the speaker is normal. Otherwise, switch devices or adjust system settings;
- Live-only Mode (co-hosting limit is 0): Adjusting the speaker volume affects the computer system sound heard by the audience. For example, lowering it makes system sounds like music quieter for the audience;
- Live + Co-hosting Mode: Adjusting the speaker volume affects the local external playback volume, not the sound heard by end-users. To let end-users hear computer system sounds, enable the [Capture System Sound] function in settings.
VI. How to Use Documents
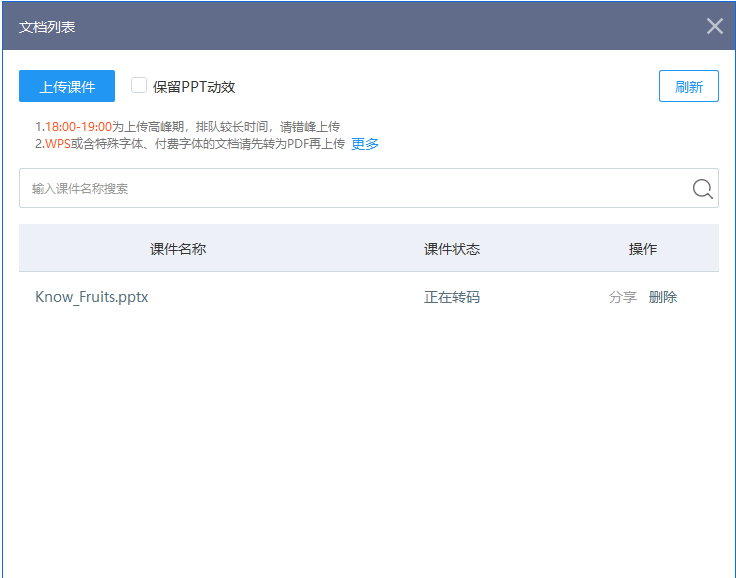
- Uploaded PPTs will be transcoded. A small number of PPTs may have compatibility issues with some content after transcoding. Please refer to the suggestions for uploading PPTs;
- In the Pure Video template, documents do not support animated PPT transcoding;
- Documents can be uploaded in the management console first; the client does not need to re-upload and can apply them directly.
Document + Video Template (Three-Screen Layout)
- Adding Documents: Click the [Documents] button in the left navigation bar. A document selection popup will open. Click [Upload Courseware] to upload a new local document.
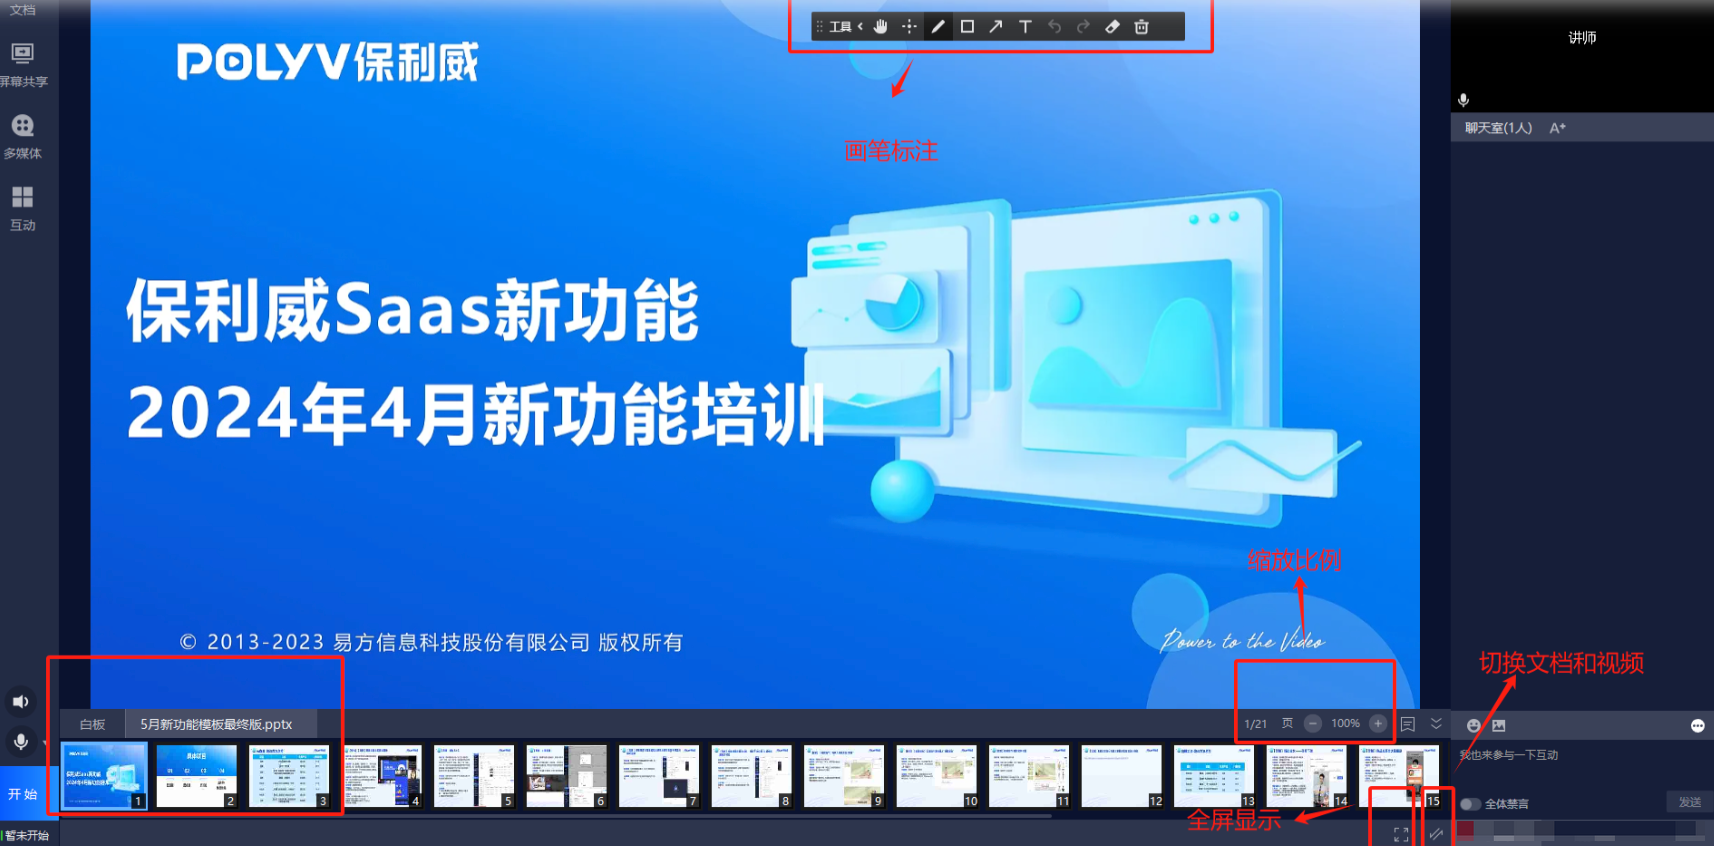
- Using the Whiteboard: By default, the whiteboard function is displayed when the software opens, with 50 whiteboards available for use;
- Switching Between Documents and Whiteboard: Added documents will have a tab with the document name to the right of the whiteboard. Click the tab to switch to another document;
- Document Page Turning: Click the [Expand] button to show page navigation for quick page turning and locating a specific whiteboard. Click again to collapse the navigation;
- Pen Annotation: You can annotate and write on the whiteboard or applied documents;
- Switching Document and Video: Click the [Switch] button to swap the positions of the document and video. Click again to restore;
- Full-screen Display of Document Area: When the document is the main screen, click the [Full Screen] button to maximize the document display. Suitable for scenarios where you need to project the document locally for the live audience to see. Press ESC to exit full screen.
VII. How to Screen Share
Document + Video (Three-Screen Layout) Template
To use screen sharing, click the [Screen Share] button in the left navigation bar. The client software will collapse into a top toolbar style. More operations can be performed through the top toolbar, such as turning on the camera, toggling the microphone, displaying chat & members, using interactions, using co-hosting, switching shares, etc.
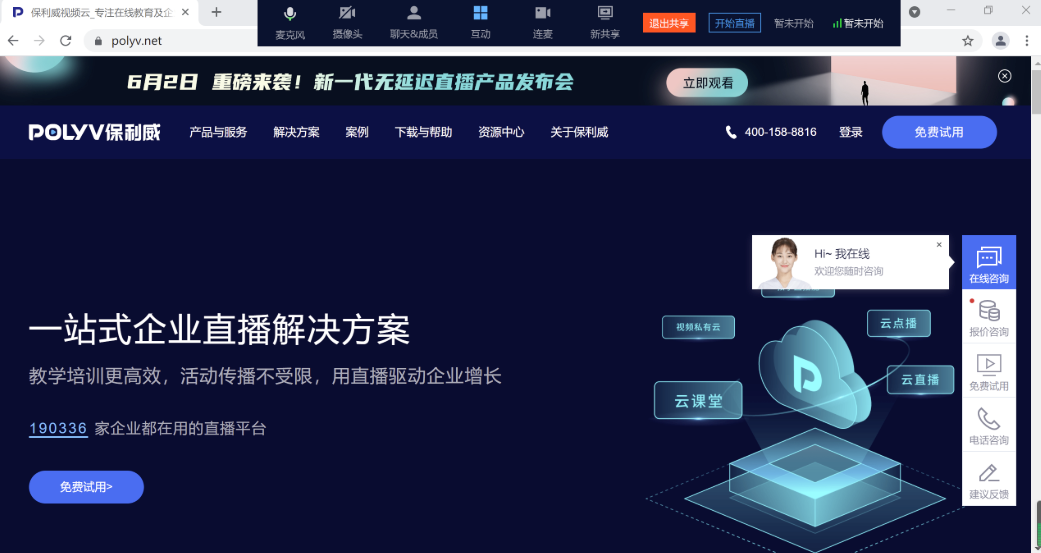
Screen sharing toolbar:

VIII. How to Insert Multimedia
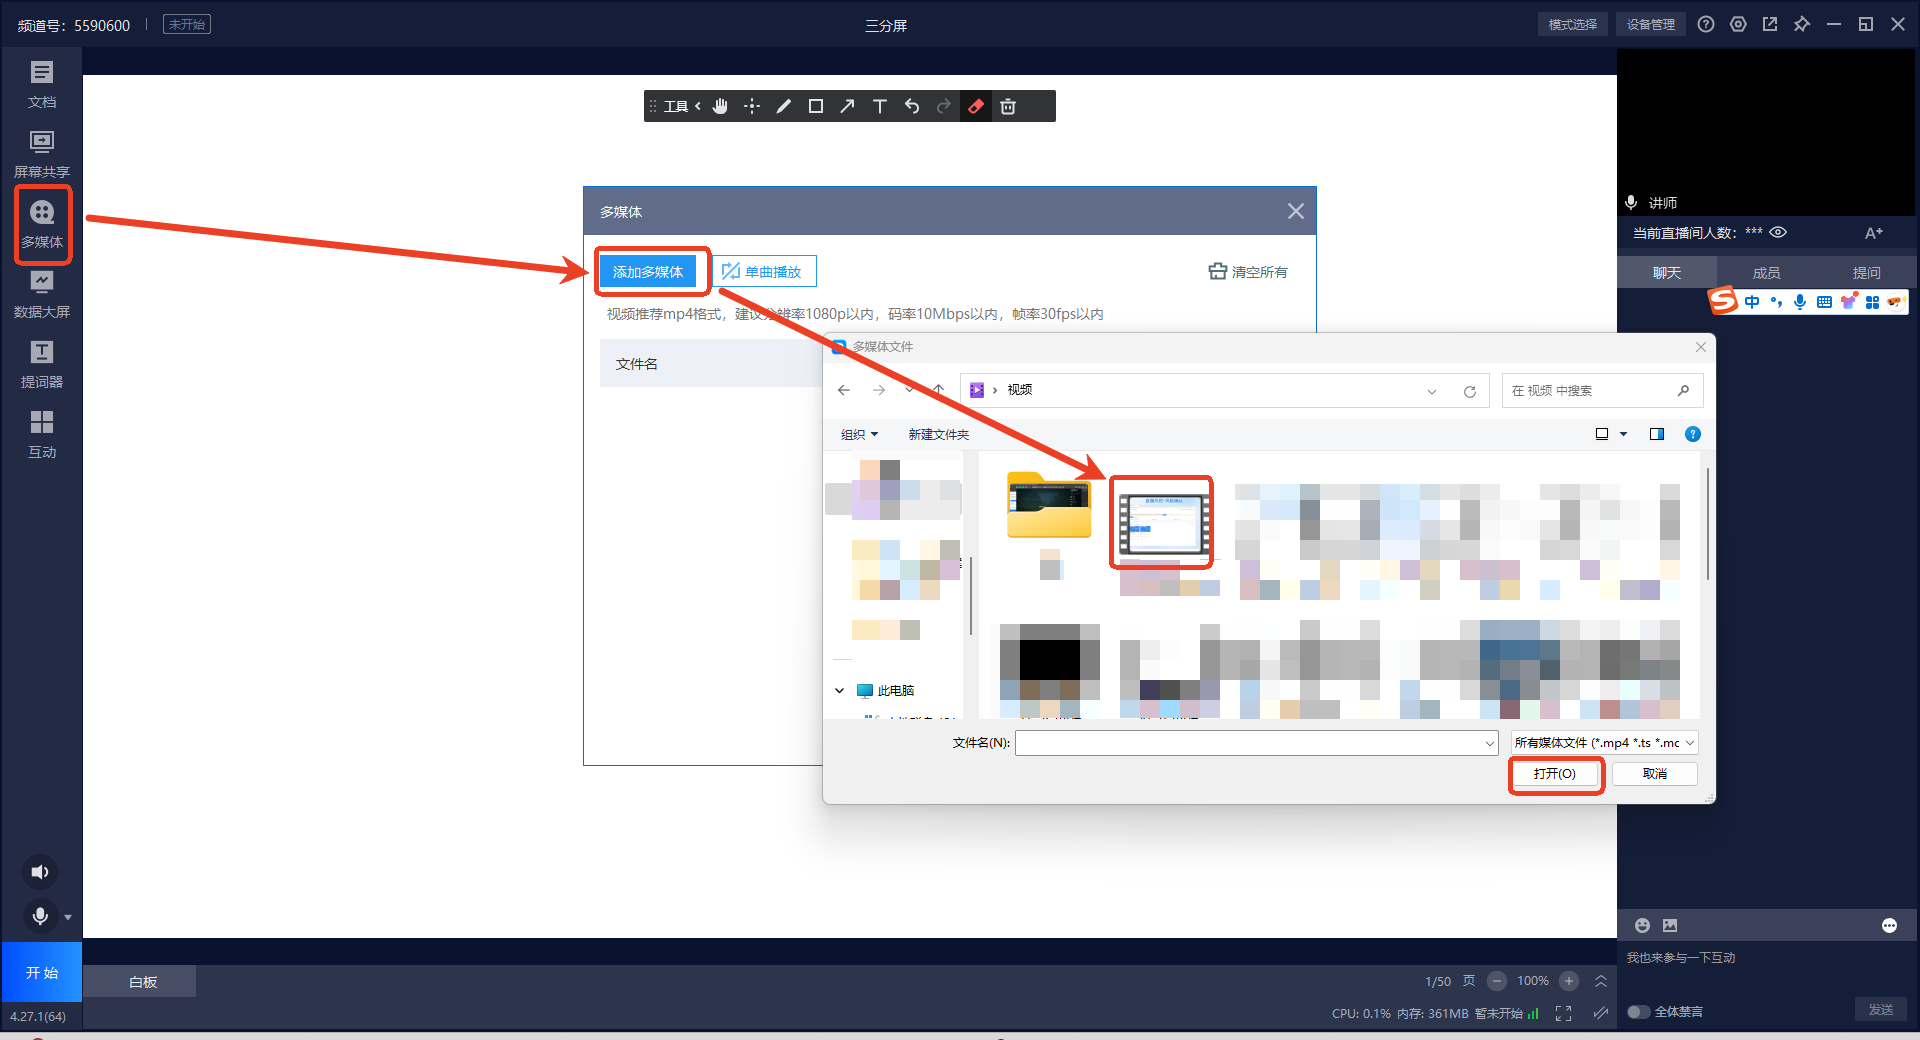
Click Multimedia in the left function bar, select Add Multimedia, choose the file to add, and click Open/Confirm.
IX. How to Co-host with the Audience
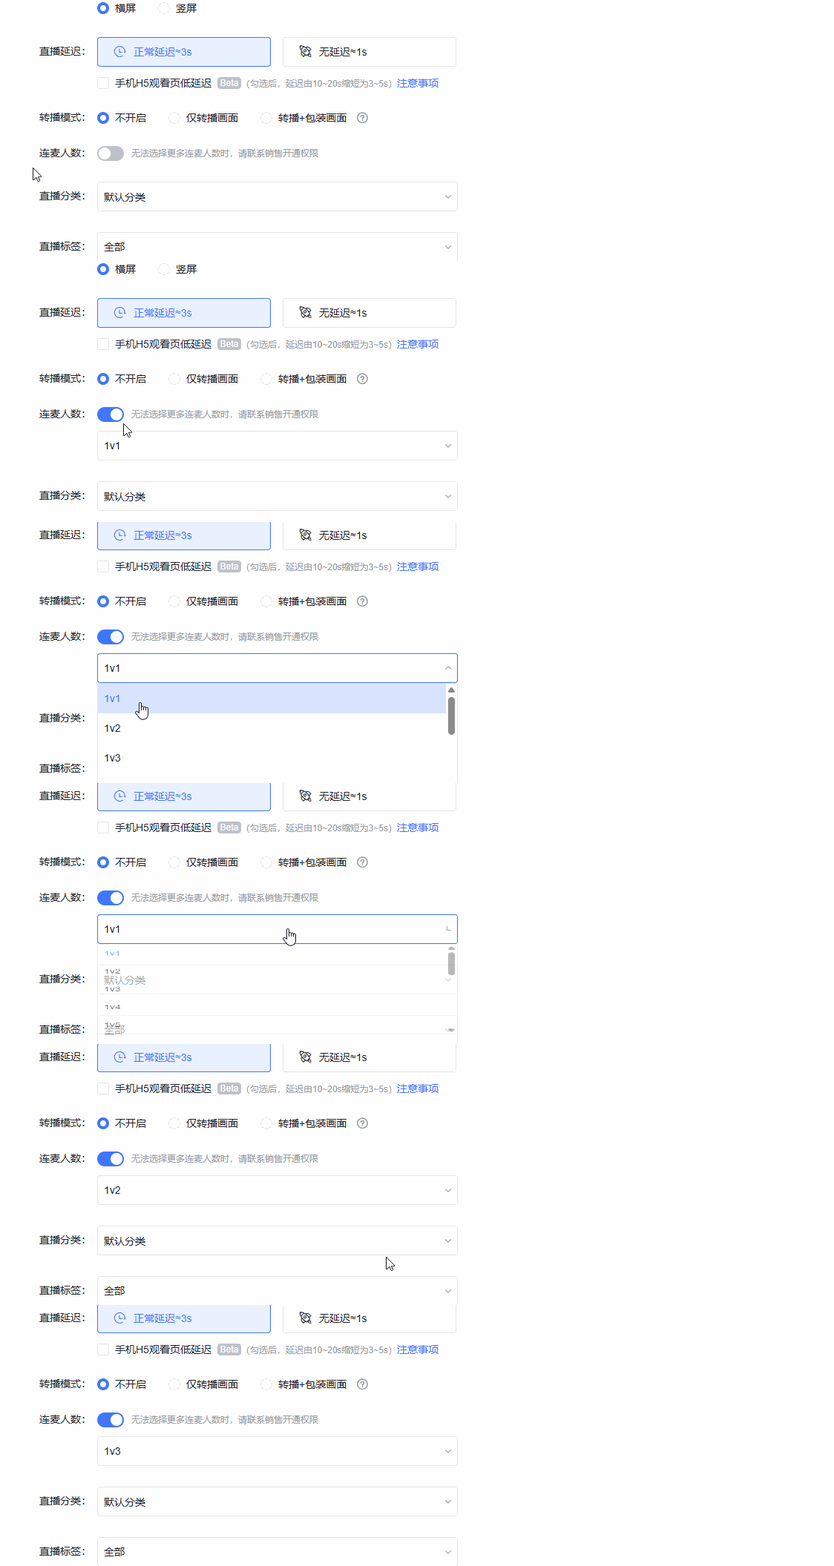
When creating the live room, remember to enable and select the number of co-hosts to support co-hosting.
Co-hosting Supported Platforms and Versions:
| Platform | Version |
|---|---|
| Web | Chrome 60+ / Safari 11+ / Firefox 56+ / Opera 50+ / Edge 79+ / QQ Browser 10+ / 360 Safe Browser 10+ / 360 Speed Browser 12+ |
| Android | Android 4.1 and above |
| iOS | iPhone or iPad with iOS 9.0 and above |
| Windows | Windows 7 and above |
How to Start and End Co-hosting:
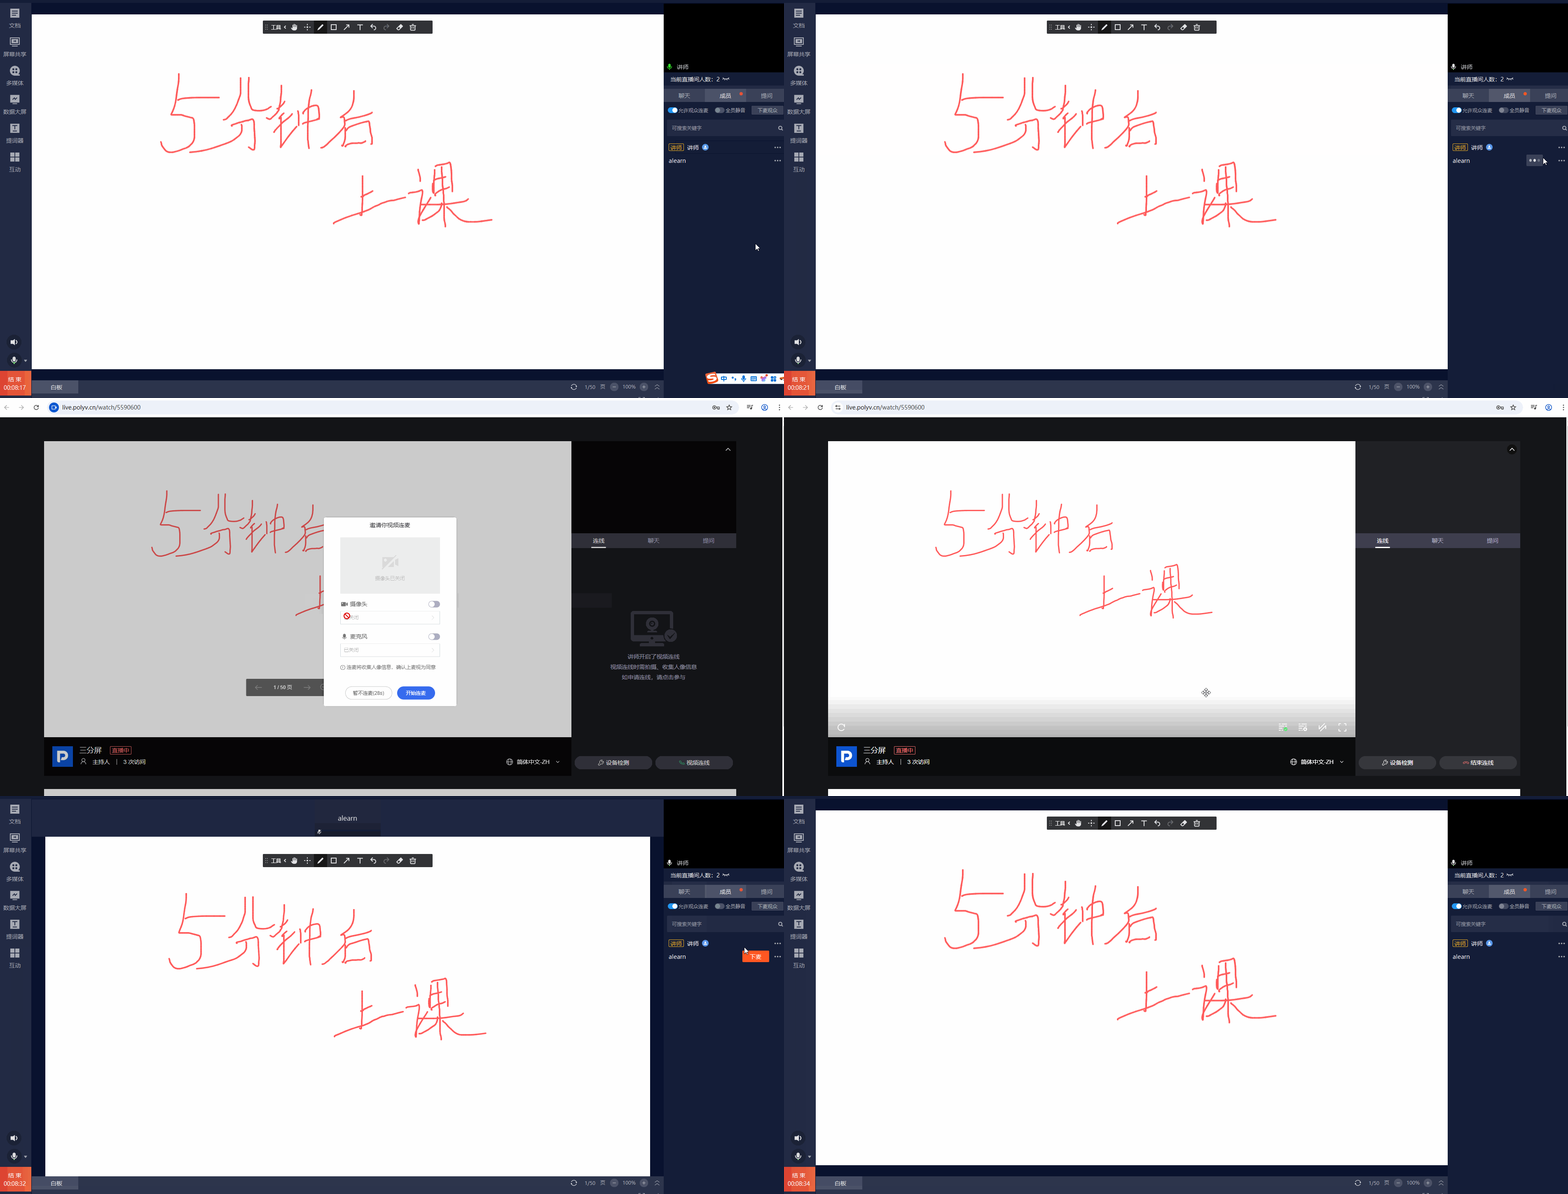
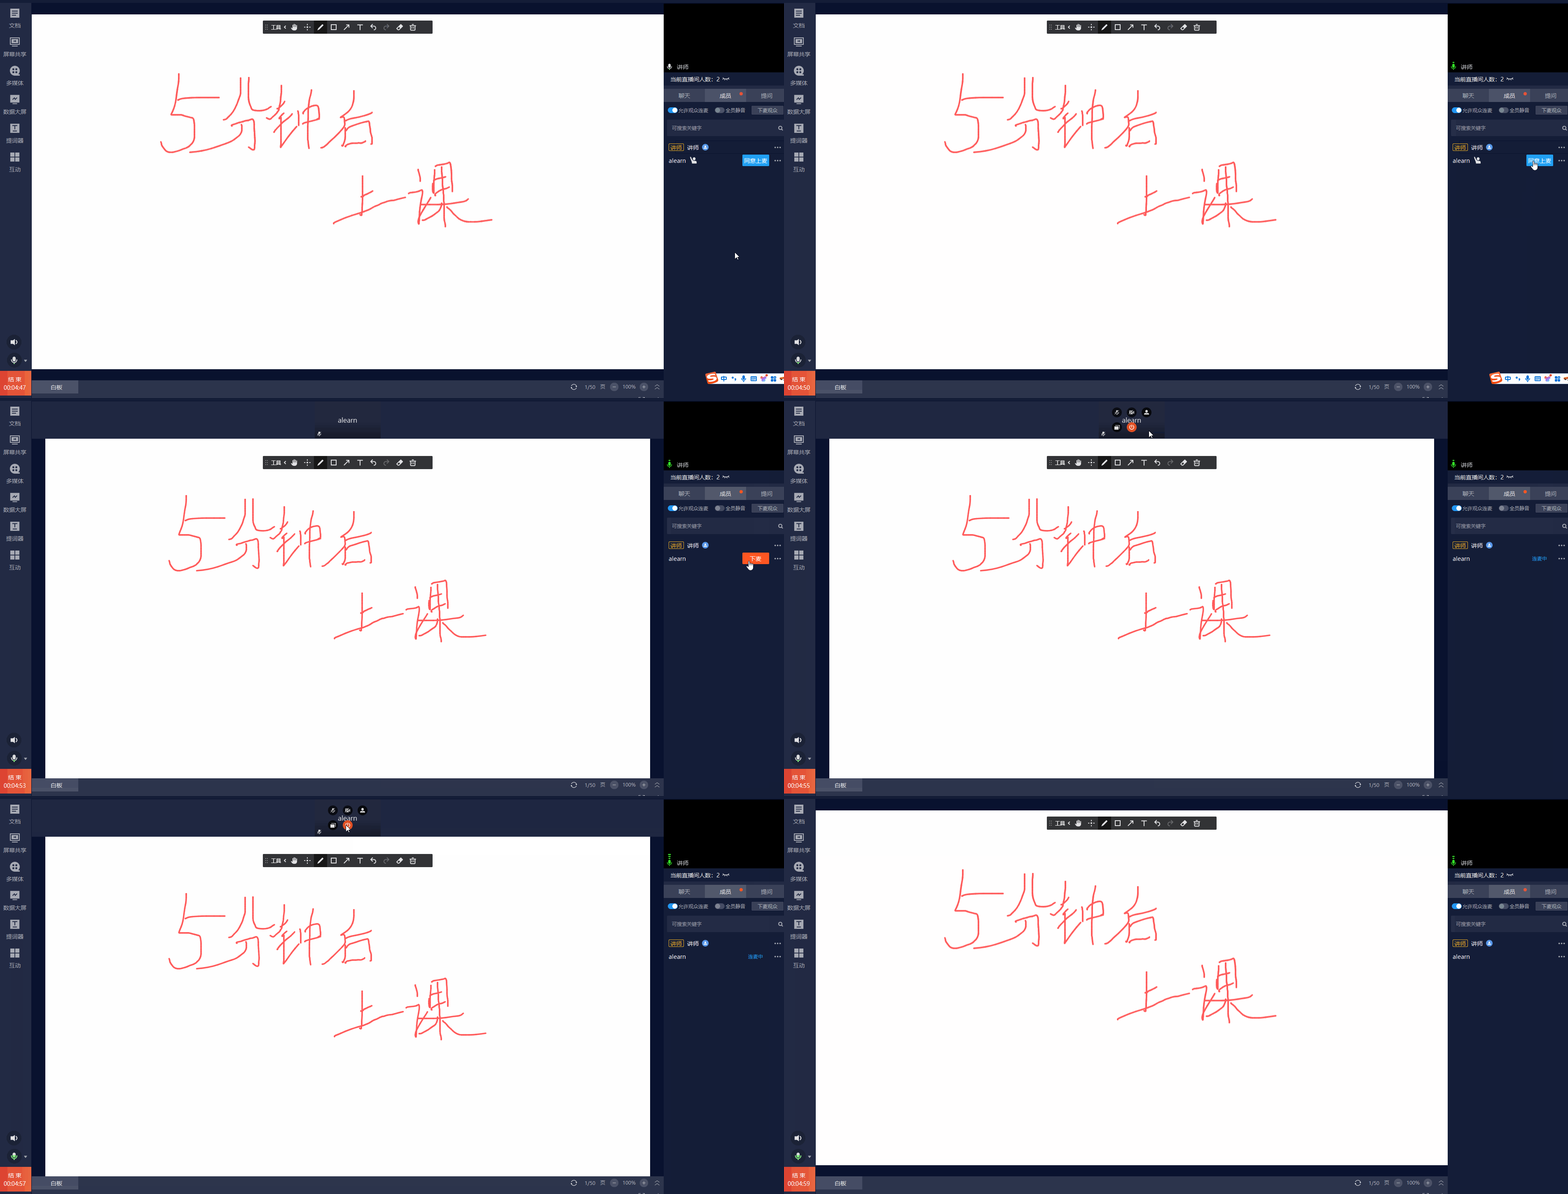
- Audience Application: The co-hosting application function appears on the audience end. After the user applies, a [Go On Stage] button appears in the member management area on the right;
- Co-hosting Operation: Click the [Go On Stage] button to start an audio/video call with the audience member;
- Co-hosting Continuation: Closing the co-hosting popup does not interrupt the co-hosting. Only clicking [End Co-hosting] will end all calls.
Changing the Co-hosting Method:
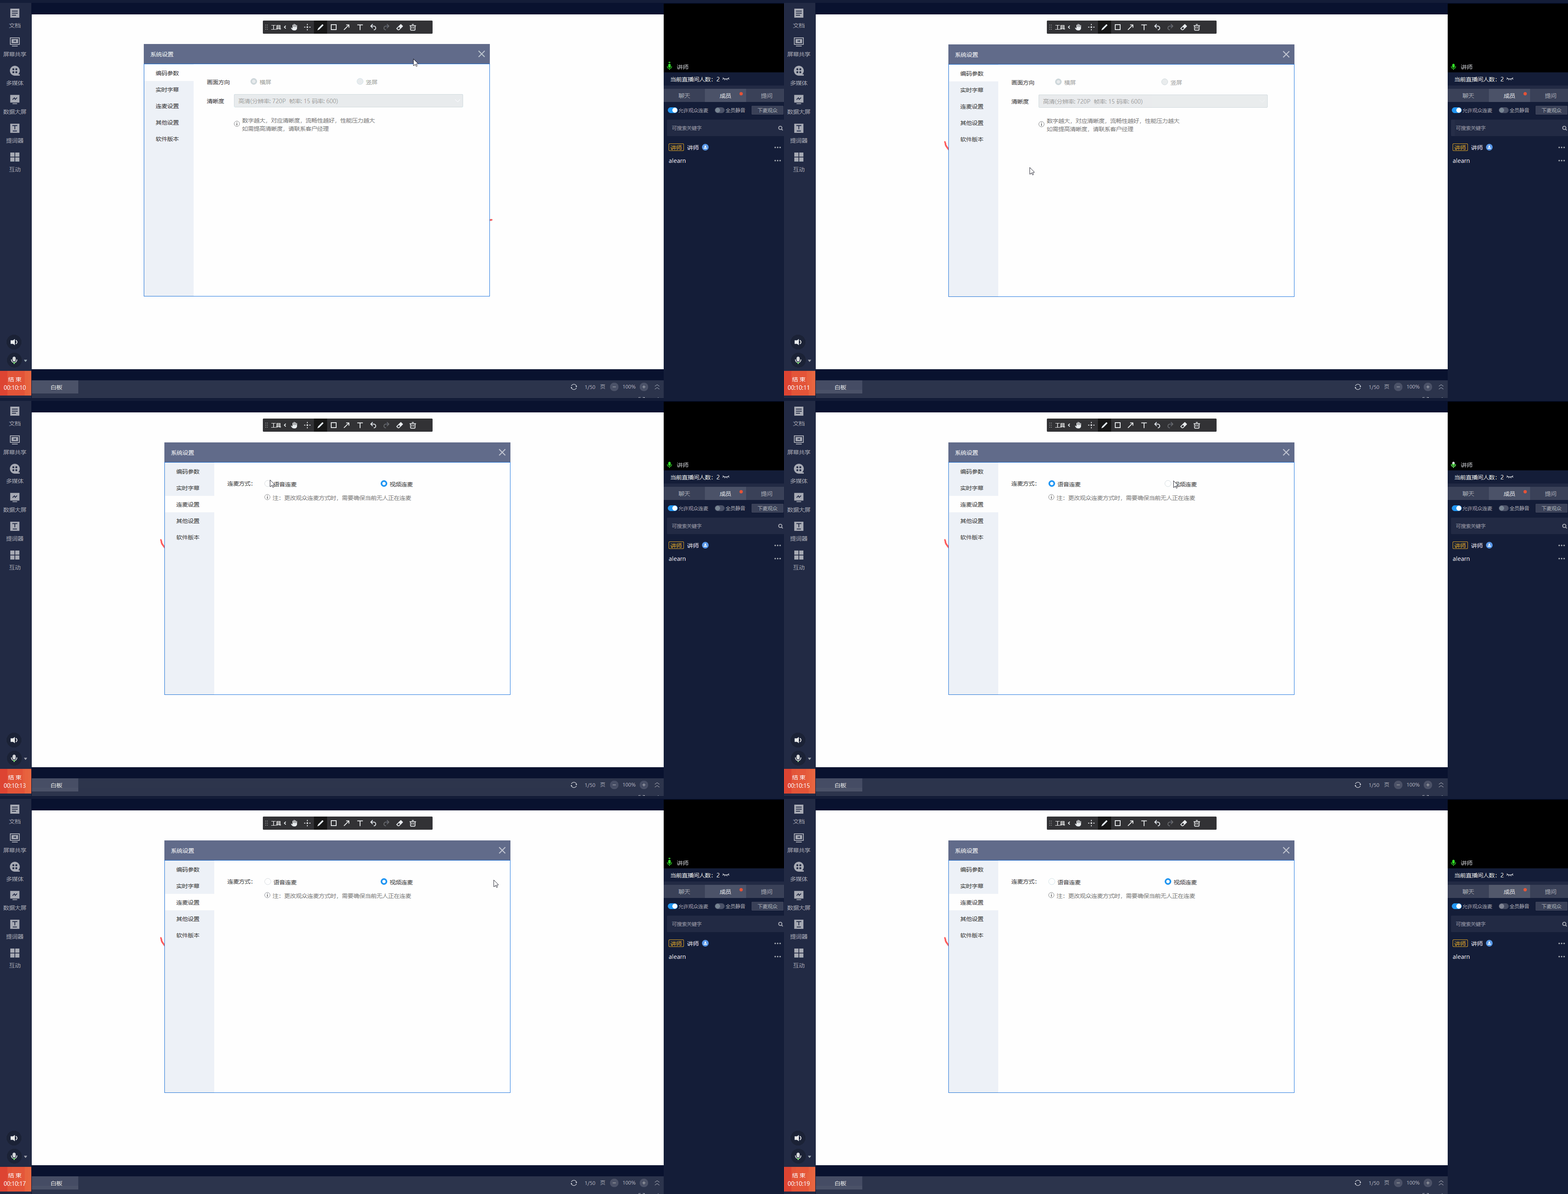
- Fixed Co-hosting Method: Once co-hosting starts, the method cannot be changed. The default is video co-hosting;
- Modifying Co-hosting Method: To change to audio co-hosting, you must first end the current co-hosting;
- Audio Co-hosting Applicable Scenario: Suitable for situations where the audience does not need to show their face or has poor network conditions.
Changing the Video Layout:
- Local Projection Layout: To allow the offline audience to see equally sized co-hosting screens, switch the video layout to the tiled layout;
- Does Not Affect Online Layout: This operation does not affect the screen layout for the online audience;
- Modifying Online Layout: To adjust the screen layout for the online audience, go to [Settings] -> [Other Settings] -> [Mix Layout] to modify.
X. How to Manage Members
- Live-only Mode: Members can be muted or kicked;
- Live + Co-hosting Mode: Members can be muted, kicked, have their microphone or camera toggled (for co-hosted users), taken off stage, granted/revoked presenter permissions, granted/revoked pen permissions, set as the primary screen, or globally muted;
- Special Members: Instructors, teaching assistants, administrators, and guests are special roles with special identifiers. They cannot be muted or kicked;
- Audience: Regular members who can be managed by instructors, teaching assistants, administrators, and guests;
- Searching Members: Enter a member's nickname keyword and click the search button to match a list of members whose nicknames contain the keyword. The host can further manage them.
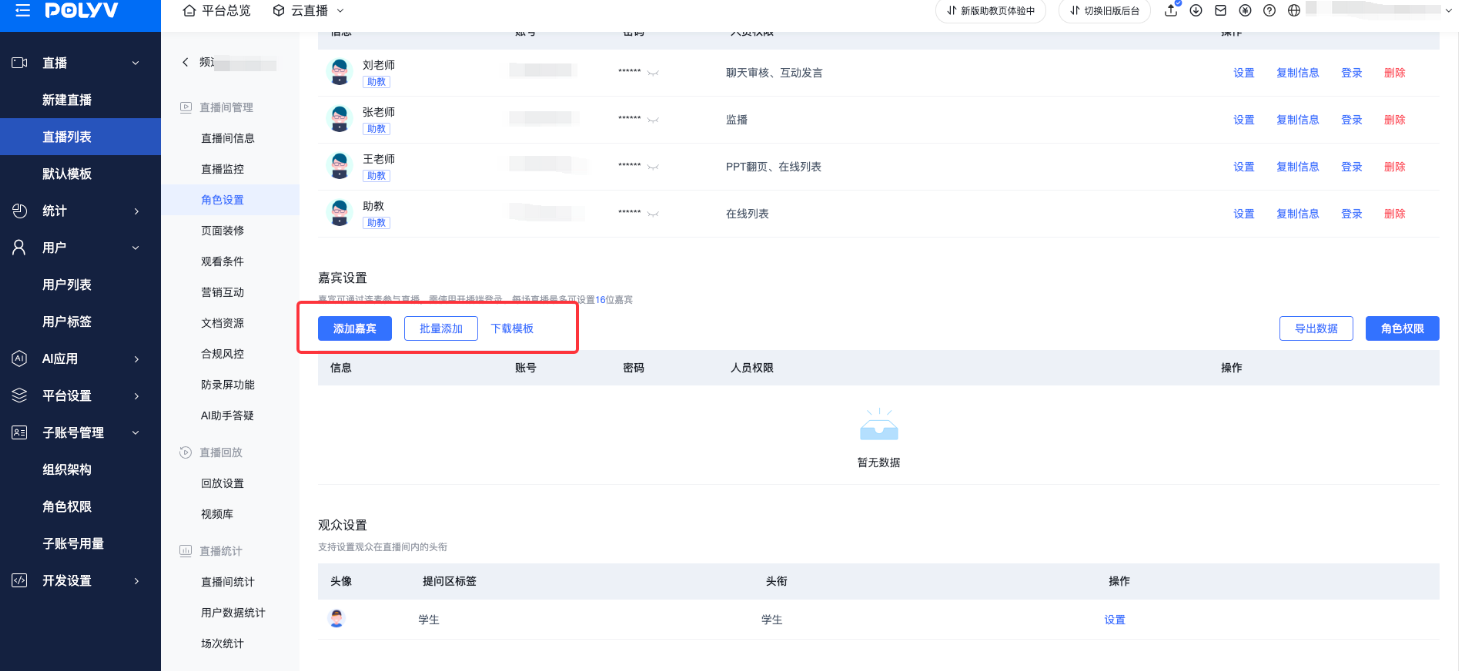
- Obtaining Guest Sub-channel Number and Password: In the Document + Video channel, go to the management console -> Role Permissions to add a guest and obtain their sub-channel number and password.
- Presenter Permission: In Live + Co-hosting mode, within a channel, the instructor always has presenter permission. Guests can be granted presenter permission by the instructor. With presenter permission, users can operate documents, sync page turns to others, use the pen, share screens, play multimedia, and initiate interactive functions. Granting presenter permission automatically grants pen permission. The instructor can only authorize presenter permission to one person at a time;
- Pen Permission: In Live + Co-hosting mode, within a channel, pen permission can be granted individually to a guest who is already on stage. This user can then annotate on the current document or whiteboard but cannot turn pages. The instructor can authorize pen permission to multiple people, up to the number of people on stage;
- Set as Primary Screen: In Live + Co-hosting mode, when a co-hosted user is set as the primary screen, they occupy the main position in the client and viewing end screens, highlighting their importance.
Member Operation Permission Table (Live + Co-hosting Mode):
| Permission Function | Instructor | Guest | Teaching Assistant | Backend Admin | Audience |
|---|---|---|---|---|---|
| Toggle Hand-raising Co-hosting | ✔️ | ❌ | ❌ | ❌ | ❌ |
| Control On/Off Stage | ✔️ | ❌ | ❌ | ❌ | ❌ |
| On-stage Call | ✔️ | ✔️ | ❌ | ❌ | ✔️ (Some PC Browsers) |
| Toggle Others' Camera | ✔️ | ❌ | ❌ | ❌ | ❌ |
| Toggle Others' Microphone | ✔️ | ❌ | ❌ | ❌ | ❌ |
| Grant/Revoke Presenter Permission | ✔️ | ❌ | ❌ | ❌ | ❌ |
| Grant/Revoke Pen Permission | ✔️ | ❌ | ❌ | ❌ | ❌ |
| Add Documents/Whiteboard | ✔️ | Requires Presenter Permission | ❌ | ❌ | ❌ |
| Sync Document/Whiteboard Page Turns | ✔️ | Requires Presenter Permission | ❌ | ❌ | ❌ |
| Write/Annotate on Current Page | ✔️ | Requires Presenter or Pen Permission | ❌ | ❌ | ❌ |
| Screen Share | ✔️ | Requires Presenter Permission | ❌ | ❌ | ❌ |
| Insert Multimedia | ✔️ | Requires Presenter Permission | ❌ | ❌ | ❌ |
| Initiate Interactions | ✔️ | Requires Presenter Permission | ✔️ | ✔️ | ❌ |
| Mute, Kick | ✔️ | ✔️ | ✔️ | ✔️ | ❌ |
- Note: The Pure Video template does not support syncing document/whiteboard page turns to others, nor does it support multiple people writing/annotating on a single document simultaneously.
XI. Introduction to Chat, Questions, and Q&A
The chat, question, and Q&A functions respond to the backend settings of the channel. In the management console, chat and question functions are enabled by default. If the corresponding function menu is missing in the client, you need to go to the management console to enable it.
- Chat Function: Public chat room. Supports sending text, emojis, and images. Can filter likes and tip messages, enable/disable global mute, and quote and reply to user messages;
- Question Function: Audience question messages are only visible to special members who can reply. Other audience members cannot see them;
- Q&A Function: Audience Q&A messages are only visible to special members who can reply. Instructors, teaching assistants, and administrators can send them privately to an audience member or broadcast them to all audience members.
XII. Introduction to Interactive Apps
Interactive functions can enhance communication and interaction between the host/instructor and the audience, making the live stream more engaging and increasing audience participation. In the left navigation bar, click Interactions. A function popup will appear. If the interactive function you need is not in the popup, please confirm with your business contact if it has been enabled.
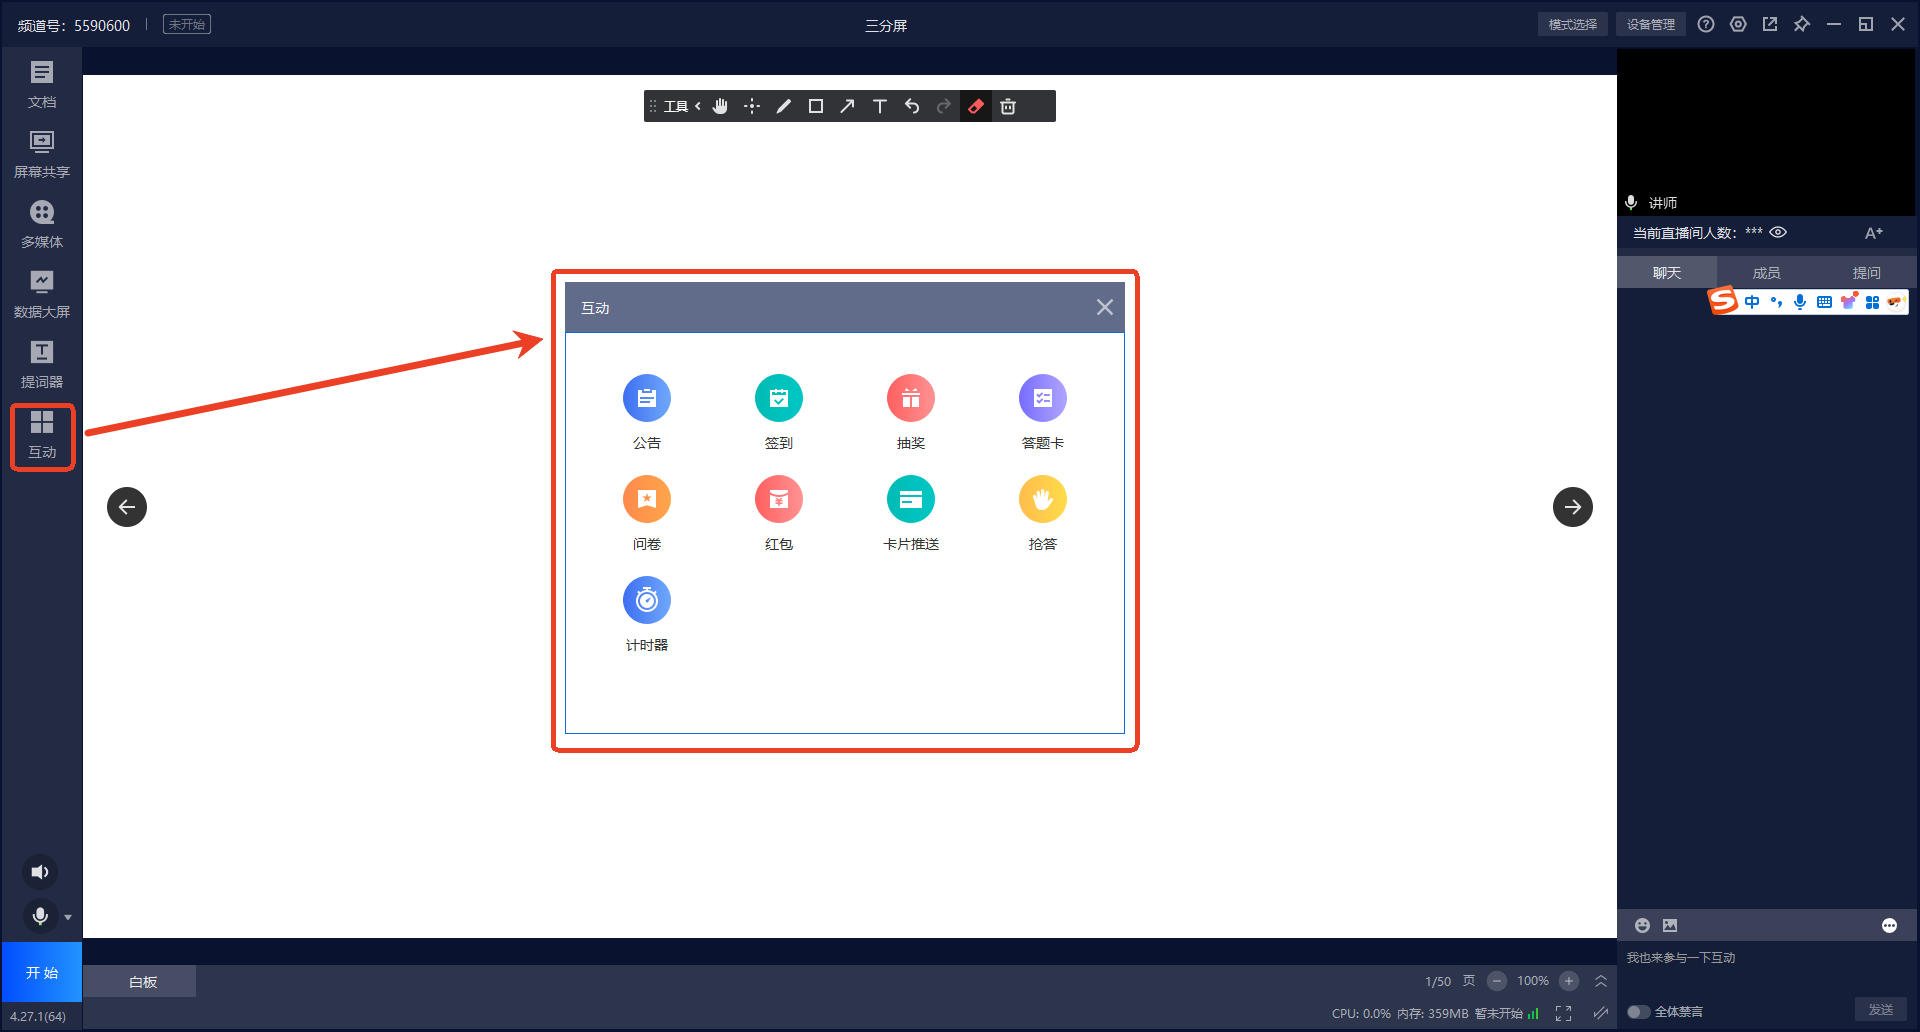
- Announcement Function: After sending an announcement, a forced popup window will be displayed on the audience end. Used for strong reminder scenarios;
- Check-in Function: Counts the audience present within a specified time period;
- Lottery Function: Used to liven up the live room atmosphere or increase live stream attention. Can set prize information, prize claim details, etc., to improve prize distribution efficiency;
- Quiz Card Function: Used for in-class quizzes to reinforce learning content. Can send questions with only options or questions with a stem and options;
- Form Function: Used for exams in teaching or
