


Common Issues with Client Broadcasting
Windows Client Installation Error Handling
I. Missing .dll Files
Symptom: Prompt: "The program can't start because ****.dll is missing from your computer. Try reinstalling the program to fix this problem."
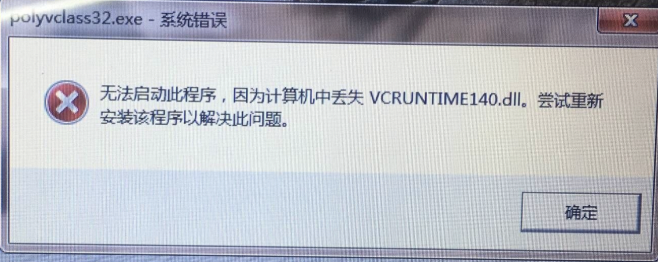
Cause:
Missing files such as MSVCR120.dll, VCOUNTIME140.dll, api-ms-win-crt-runtime-l1-1-0.dll are common dynamic link library (DLL) file issues among many Windows errors.
Solution:
Click to download the vcredist tool (Note: Install the version corresponding to your operating system, X86 for 32-bit, X64 for 64-bit).
If the file is still missing after installation, contact technical support to copy the corresponding file from C:\Windows\SysWOW64 on their computer to the same path on yours.
II. Unable to Locate Program Entry Point on Dynamic Link Library
Symptom:
Prompt: "The procedure entry point ucrtbase.abort could not be located in the dynamic link library api-ms-win-crt-runtime-l1-1-0.dll."

Cause:
The local api-ms-win-crt-runtime-l1-1-0.dll version is too low or does not exist.
Solution:
- Install
the vcredist tool (Note: Install the version corresponding to your operating system, X86 for 32-bit, X64 for 64-bit).
If the error persists after installation, use PC Security Manager to scan your computer and select one-click repair.
If you are on Windows 7 version 7600, the issue may persist even after the PC manager repair. Check your current system version: Press Win+R simultaneously, type winver.exe and press Enter, then check if the system version is 7600.
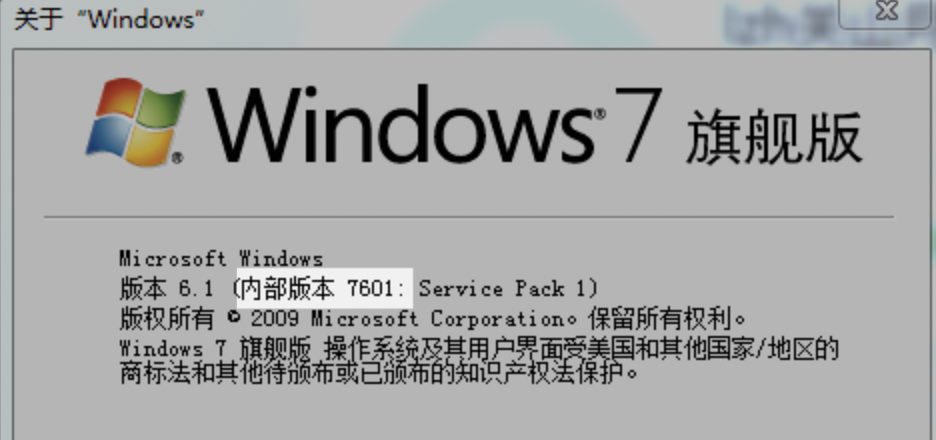
If yes, download the corresponding operating system patch from the Microsoft official website, apply the patch, and then use the repair tool above again. (This patch may take over an hour to apply. Note: Only perform this step after testing all previous steps. Also, applying the patch may remove built-in Office tools.)
III. Antivirus Software Error
Symptom:
Antivirus software like 360 prompts: "A program is trying to modify ****".
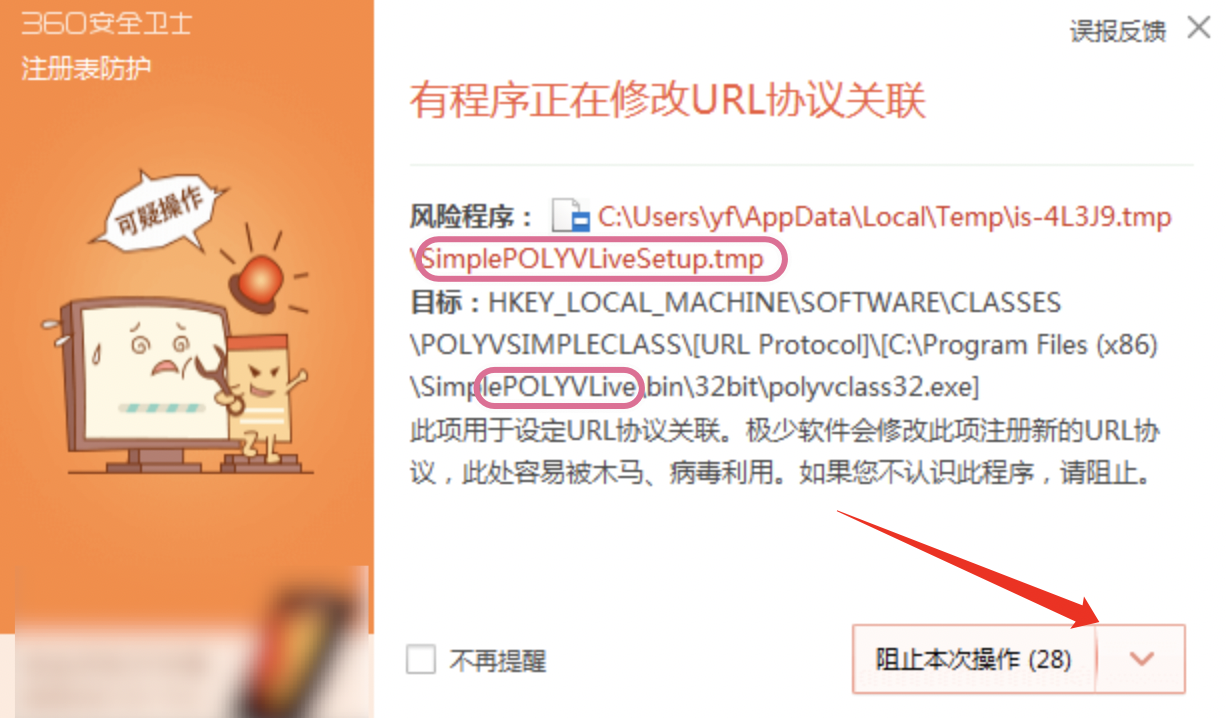
Cause:
False positive from antivirus software.
Solution:
If you are certain the software was obtained through official channels (Official Website, Apple App Store, Tencent App Store) or sent by your assigned technical support or account manager, and confirm that the program warned in the popup is a POLYV program.
Please click Allow this operation, Allow all operations of this program, and Trust this program. Report this situation to your account manager, and we will communicate with the antivirus software vendor promptly to reduce false positives.
IV. Downloaded Installation Package Incomplete
Symptom:
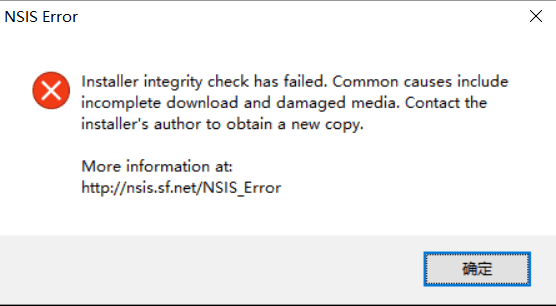
Cause:
The installation package is incomplete or corrupted.
Solution:
Re-download the installation package from the Official Website. If it still fails, try downloading with a different browser or contact technical support for assistance.
V. Abnormal Opening on XP System
Symptom:
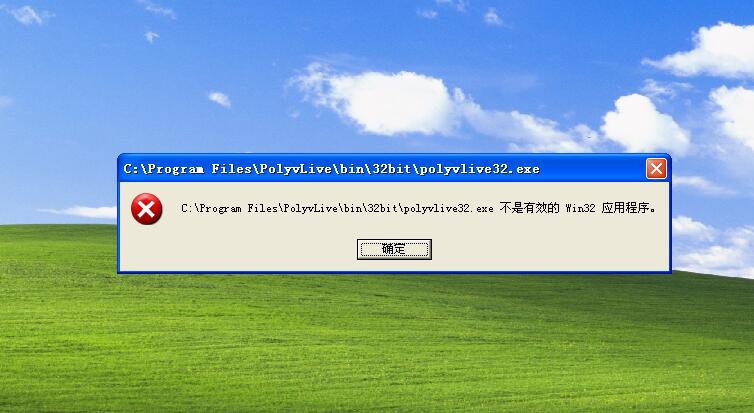
Cause:
The live streaming software does not support systems below Windows 7.
Solution:
Upgrade your system or switch to a device running Windows 7 or higher.
Login Prompt: Failed to Obtain Secret Key
1. Error Prompt

2. Error Message:
Failed to obtain secret key
3. Solution
Check the local time on your computer, or try switching networks
Login Prompt: Unspecified Error Handling
1. Error Prompt
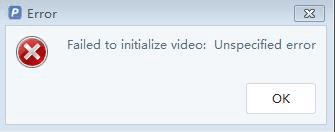
2. Error Message
failed to initize video :unspecified error
3. Solution
Try updating your graphics card driver and then reinstalling. If updating the graphics card doesn't work, the graphics card may be too old and unsupported. If possible, replace the graphics card. If not, you may need to replace the computer.
Laptop Light On After Login, But Camera Feed Blocked
If the client shows no error but the camera feed appears as a blue image, this is caused by 360's automatic protection system.
1. Error Prompt
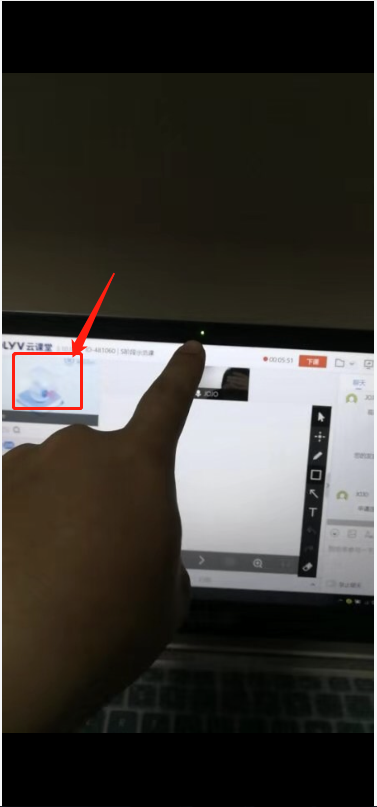
2. Error Message
No camera feed displayed, but the camera light is on.
3. Solution
Open [360 Security Guard] -> [Feature Set] -> [360 Privacy Guard], click [Privacy Protection], then set [Camera Anti-Peeping] to [Disabled].
macOS 10.15: Black Screen When Sharing Screen
1. Error Prompt
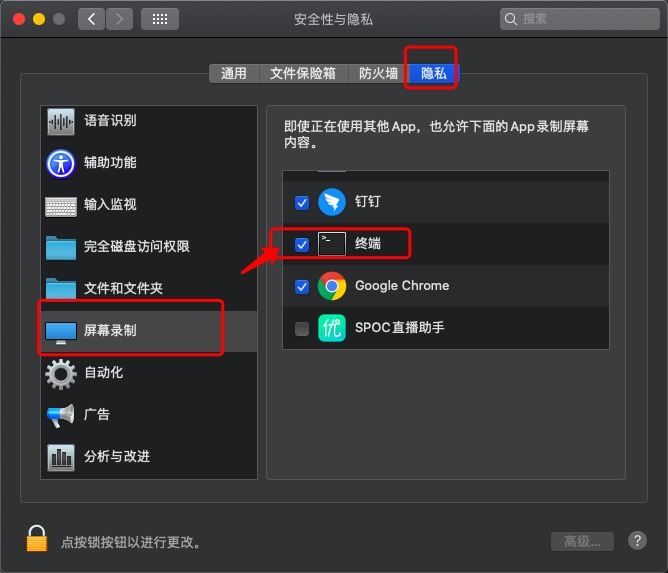
2. Error Message
Black screen when sharing screen using Live Assistant on Mac 10.15
3. Solution
Go to [System Preferences] -> [Security & Privacy] -> [Privacy] -> [Screen Recording], and check "Terminal".
Mac Broadcasting: Unable to Capture Microphone Sound
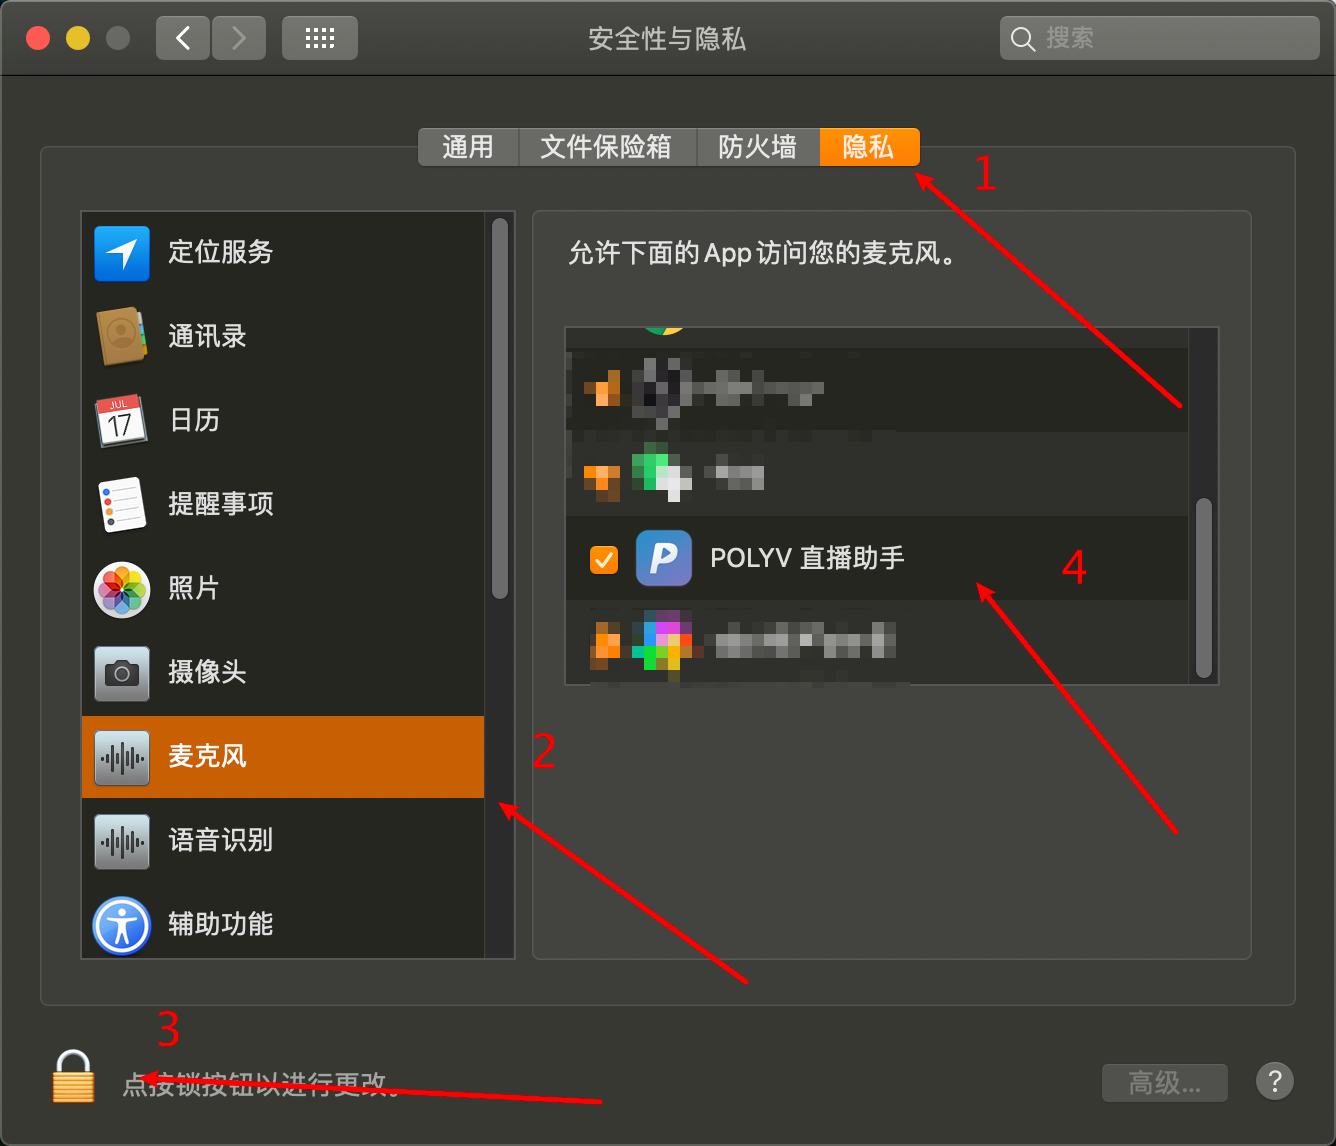
1. Using Microphone
To use a microphone with Mac Live Assistant, you need to configure settings in Security & Privacy. See the steps below.
2. Using Speakers
Due to Mac's strict application review process, if you haven't installed live streaming software before, the software may not be able to access system audio devices. This can be resolved by installing Soundflower.
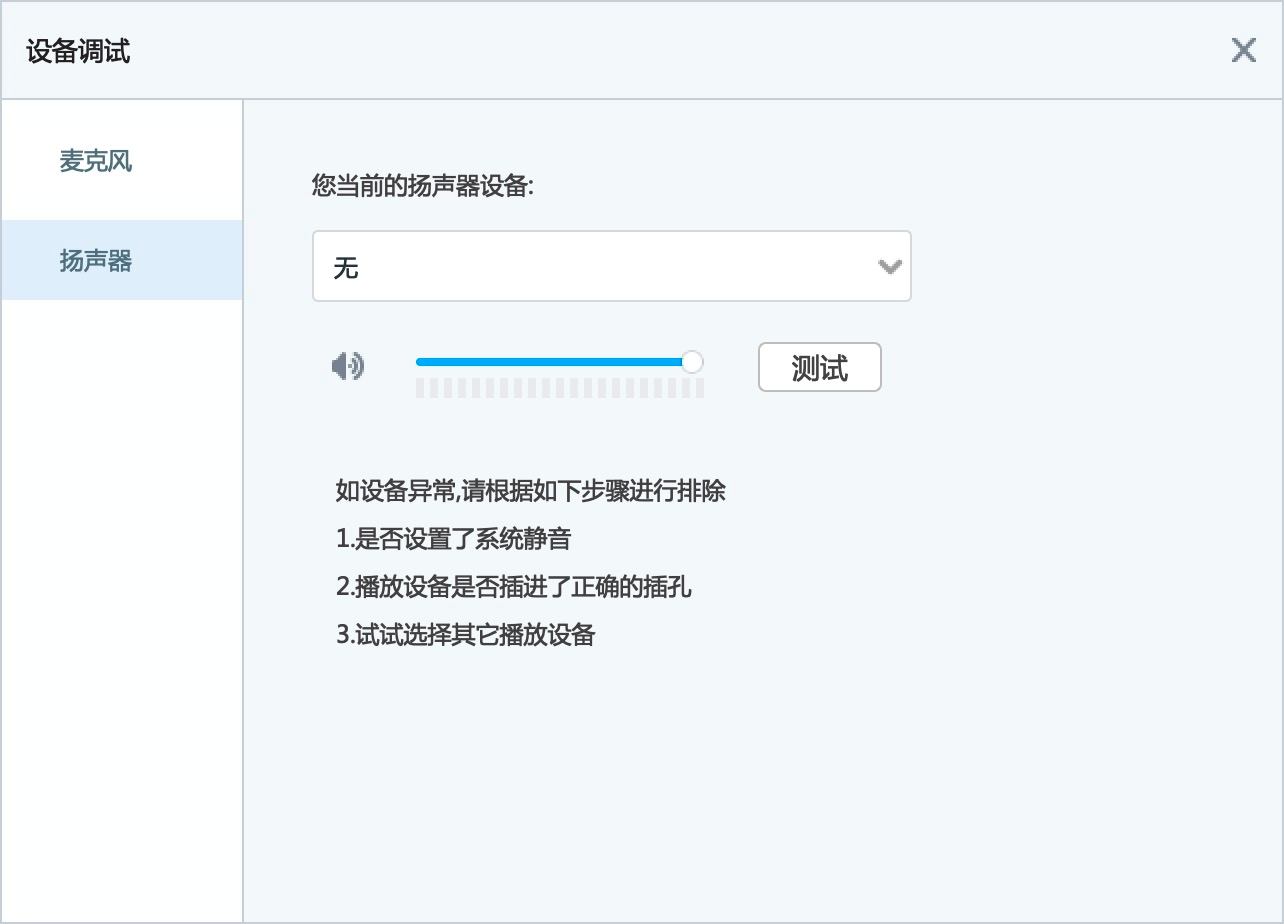
Soundflower download link: https://soundflower.en.softonic.com/mac
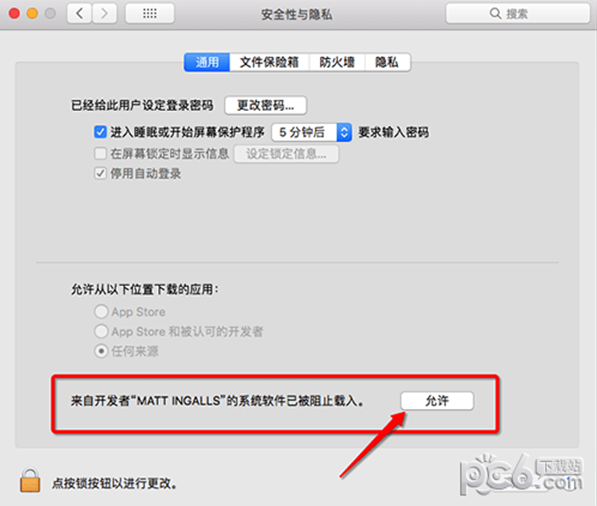
- During Soundflower installation, the system will prompt you to change settings. Click "Allow" in the "System Preferences" popup to complete the installation. (If the "System Preferences" popup doesn't appear, open it manually. After clicking allow, the installer may report failure; simply reinstall.)
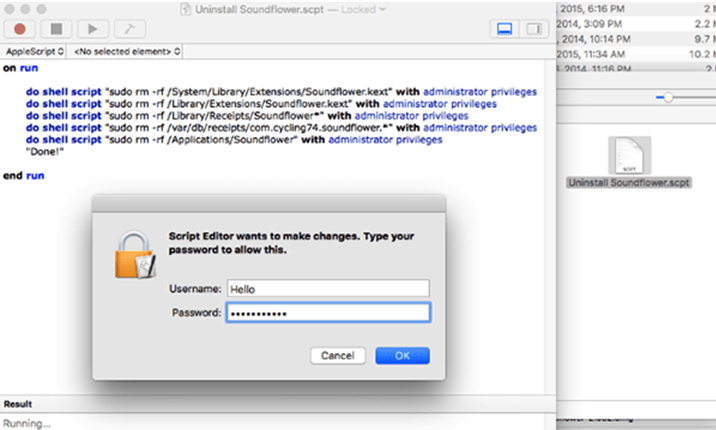
Run the Uninstall Soundflower.scpt script from the resource package to uninstall old versions of Soundflower. Click the "Play" button to execute the script (you will be prompted for your system password, i.e., your lock screen password). This will uninstall any old version of Soundflower on your system. Restart your computer after execution.
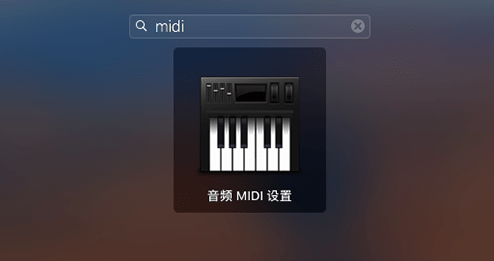
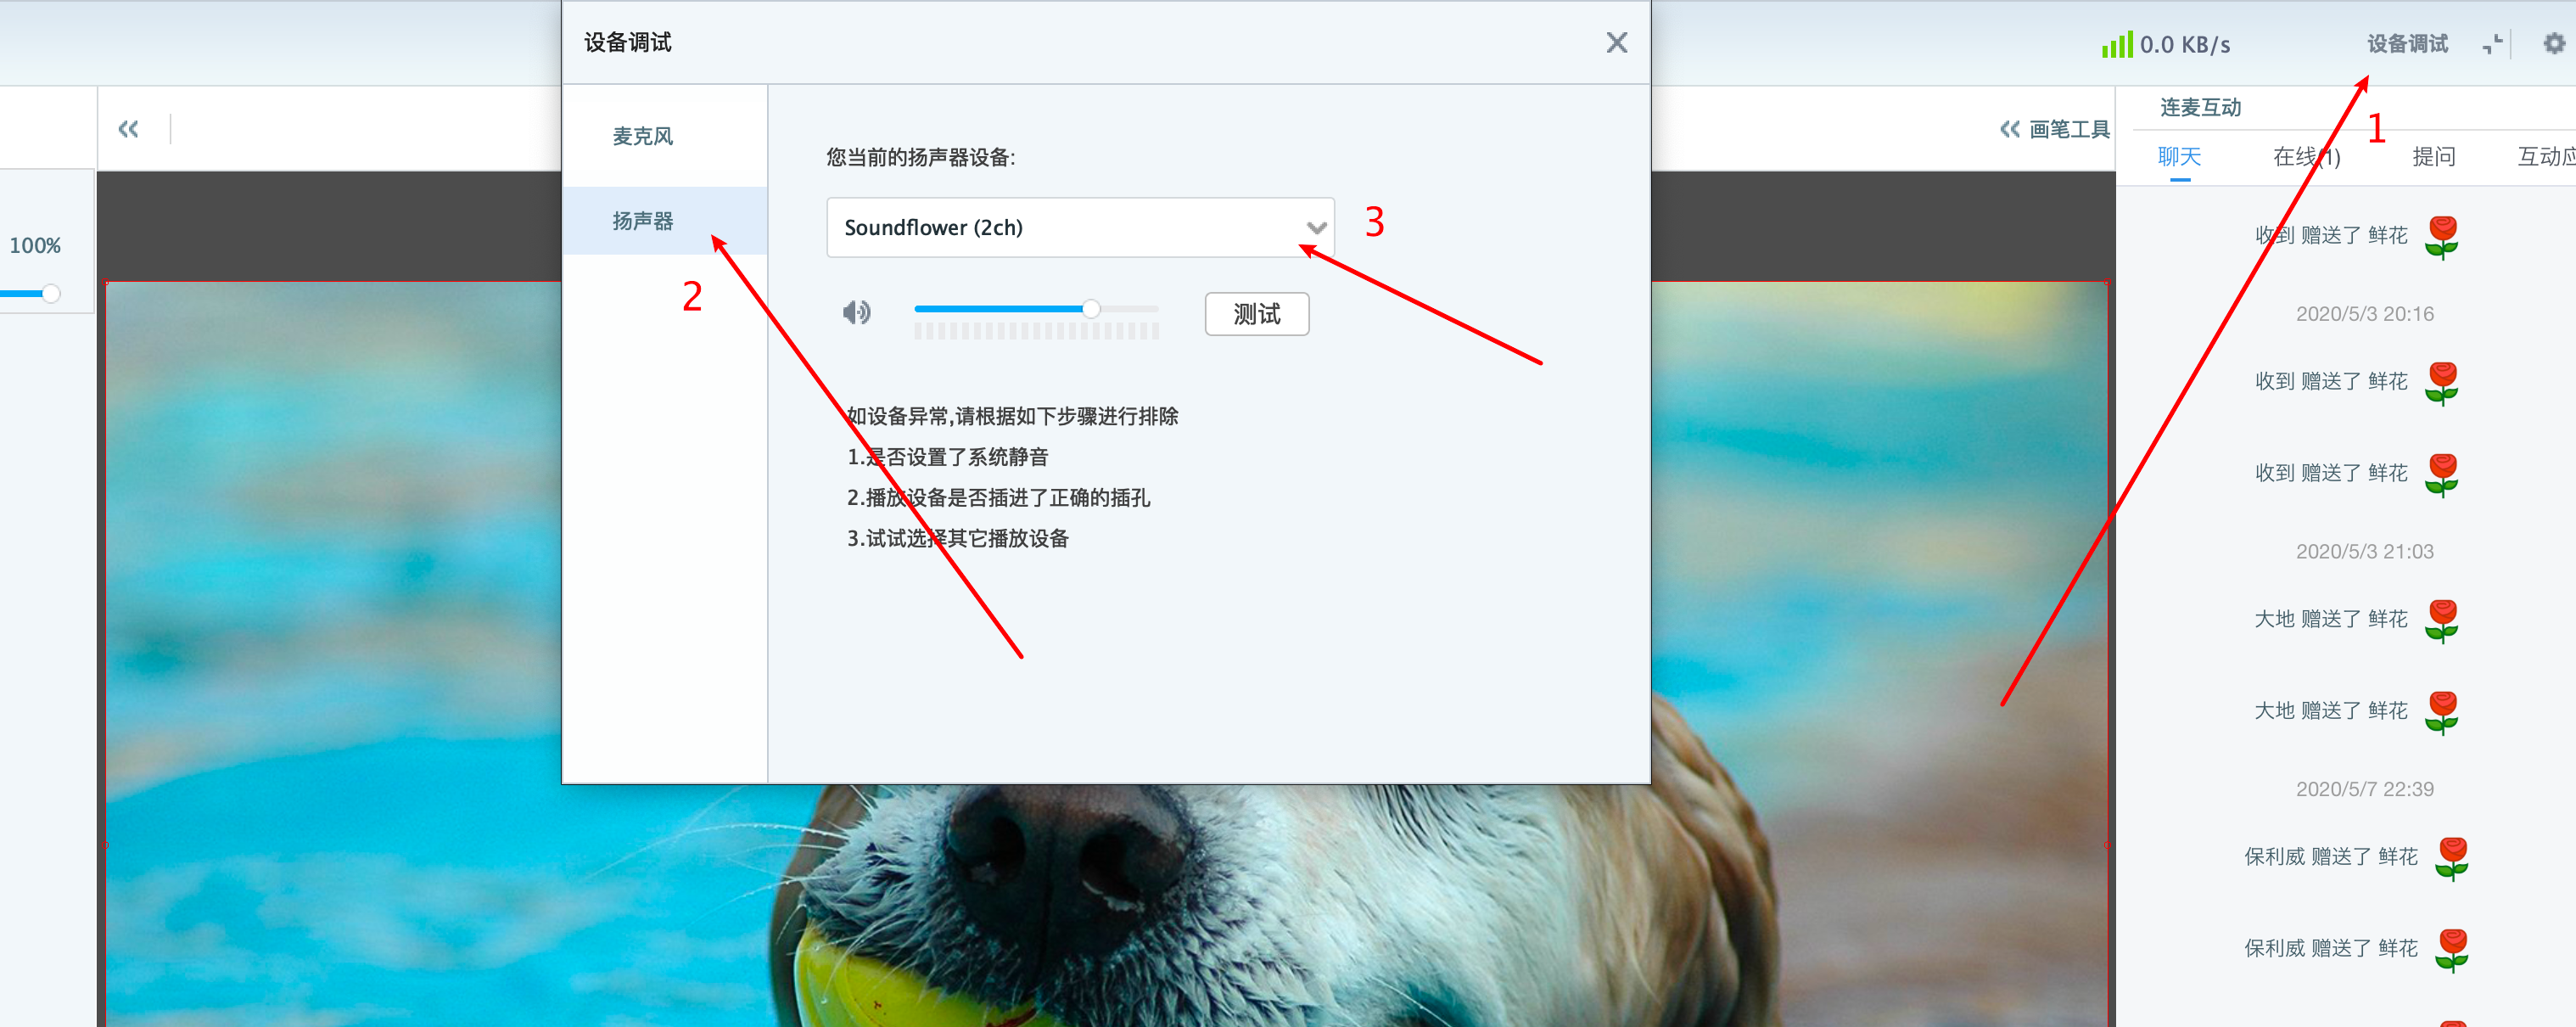
- Click the "Launchpad" rocket icon at the bottom of the system interface. In the search bar at the top of the interface, type "midi" to find and open Audio MIDI Setup.
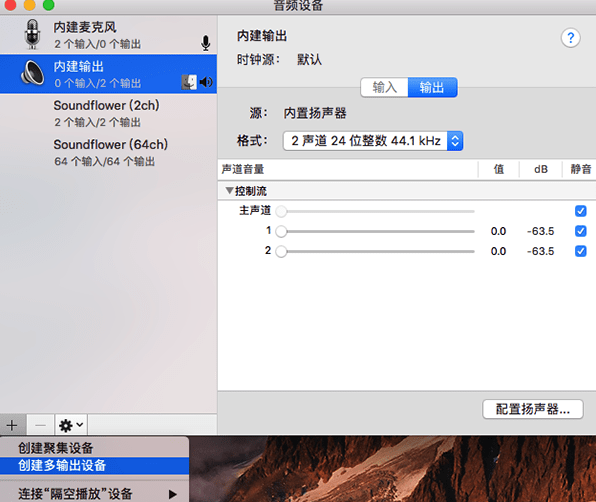
- Click the "+" button and select "Create Multi-Output Device". Create a multi-output device.
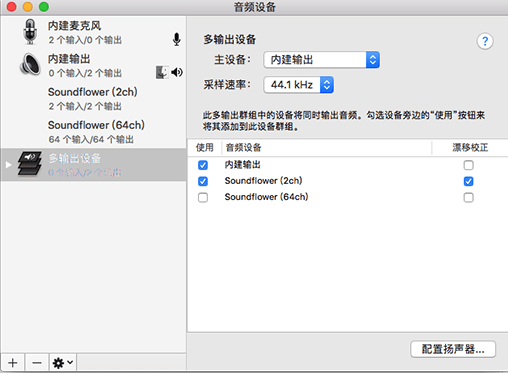
- Check "Built-in Output" and Soundflower (2ch).
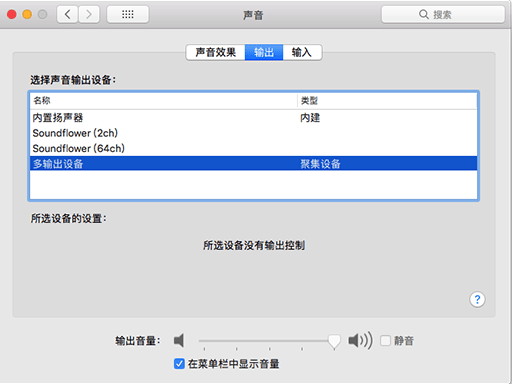
- Now open "System Preferences" -> "Sound". You should see Soundflower 2ch and 64ch, as well as the multi-output device you just created, under Output. Select the "Multi-Output Device" we created.
- Go back to the Live Assistant's device test - Speaker, and select Soundflower (2ch).
 Note:
Note:
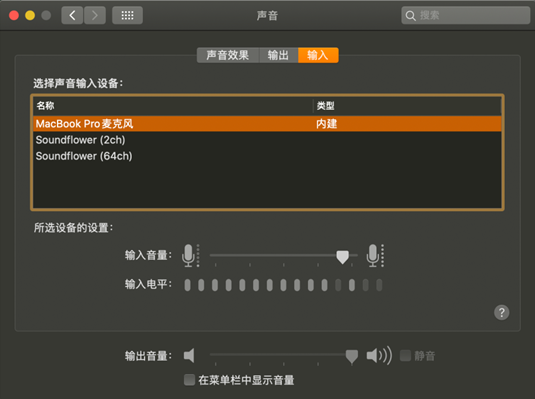
Soundflower is downloaded to resolve the issue of not being able to select a speaker device; no changes to microphone settings are needed. Select the corresponding device under Input in Sound settings. If the input level shows movement, the microphone device is working normally.
POLYV Cloud Classroom: Camera Not Capturing Image
1. Issue Symptom
When using POLYV Cloud Classroom, the camera fails to capture, resulting in a black or transparent camera area.
2. Issue Cause
Various possible causes:
2.1 Hardware device damaged
2.2 Hardware device occupied
2.3 Antivirus software privacy settings or permission restrictions
2.4 Graphics card driver outdated
2.5 Incompatible capture method
3. Solution
3.1 Open POLYV Cloud Classroom's "Settings - Camera" and check if the current device selection is correct.
3.2 Check if the hardware is occupied or faulty. Use third-party software like WeChat or QQ for a video call to see if the camera works normally. If it works, proceed to the next step. If not, first check if another program is using the camera. If unsure, restart the computer to reset the camera state. If it still doesn't work after restarting, consider replacing the device.
3.3 Check if the system's antivirus software has enabled privacy restrictions or blocked POLYV Cloud Classroom's usage requests or restricted permissions.
3.4 Update the graphics card driver, e.g., using Driver Booster.
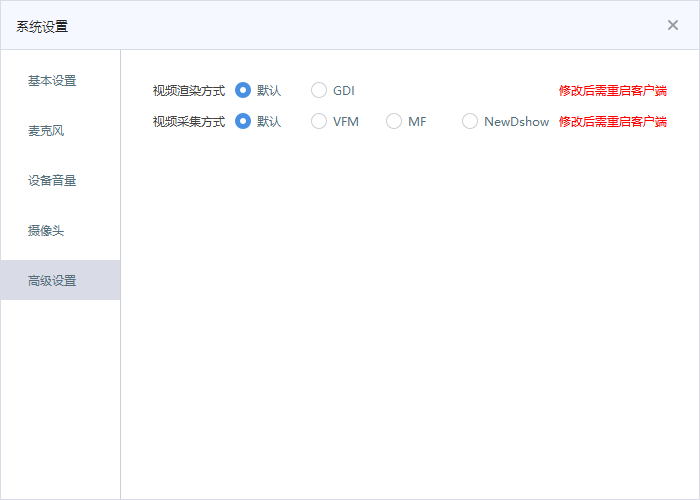
3.5 Try switching the video rendering method and video capture method in POLYV Cloud Classroom's "Advanced Settings" one by one. Changes take effect after restarting the client. Choose the setting that works.
Live Co-hosting Echo Troubleshooting Guide
If a teacher encounters echo during live co-hosting, try the following:
Wear headphones during co-hosting if possible (significantly reduces echo issues).
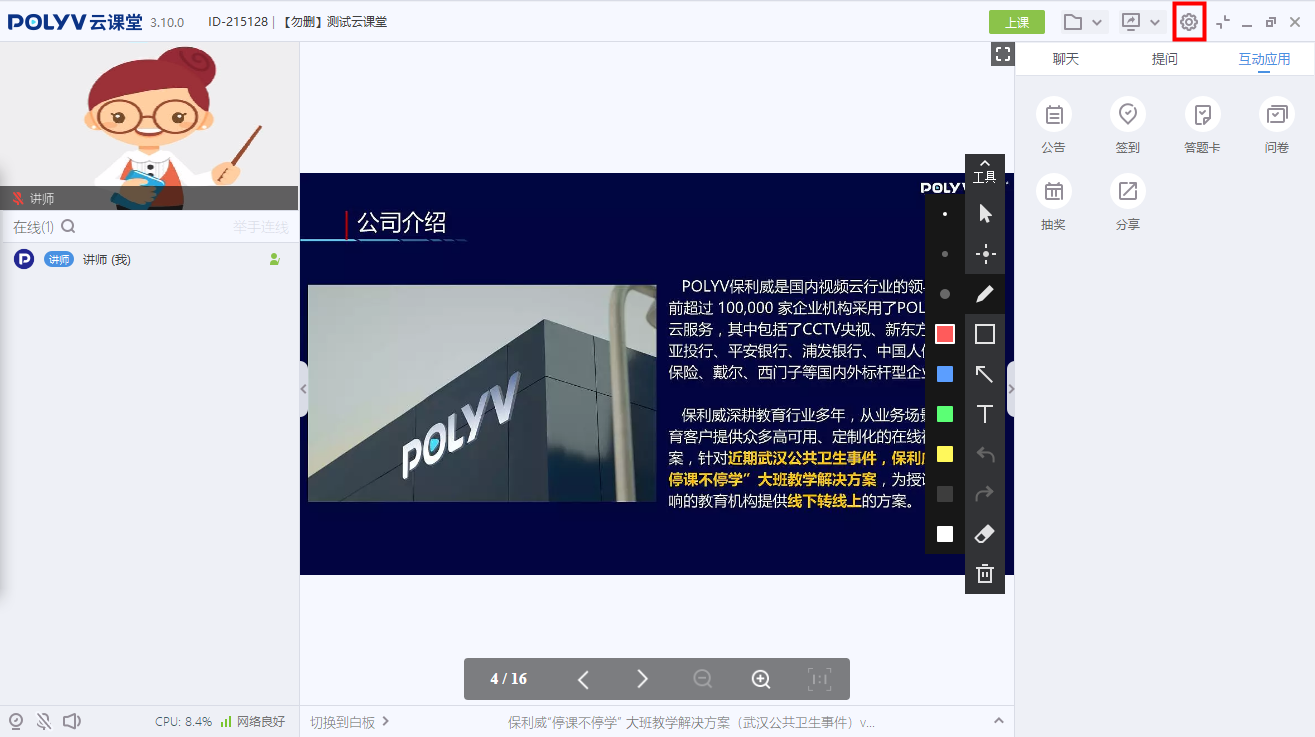
The teacher's client needs to disable system audio capture.
Do not open the video viewing page on the teacher's computer.
If a student doesn't need to speak after connecting, have the student mute their microphone first, or the teacher can mute all students' microphones. Students can unmute when they need to speak.
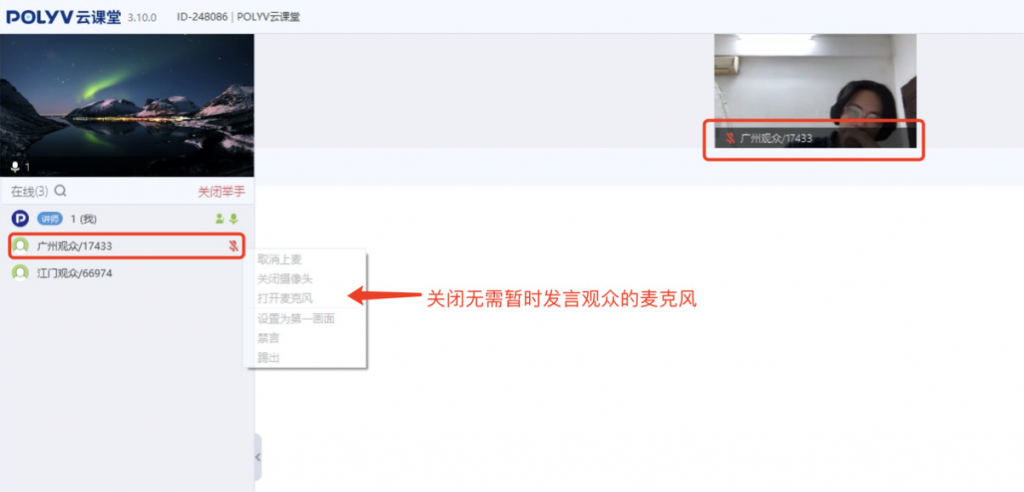
Try toggling the "Capture System Audio" switch off and on several times.
Disable "Capture System Audio" and restart the client.
Adding Desktop Window (Screen Capture Source - Share Desktop) Preview Area Black Screen
I. Shared Desktop Black Screen
Symptom
After adding a screen capture source and selecting "Share Desktop", the desktop sharing material option appears, but the preview area shows no shared image.
Cause
Primarily due to graphics card interaction issues (dual graphics cards). The default graphics card does not support capture.
Solution
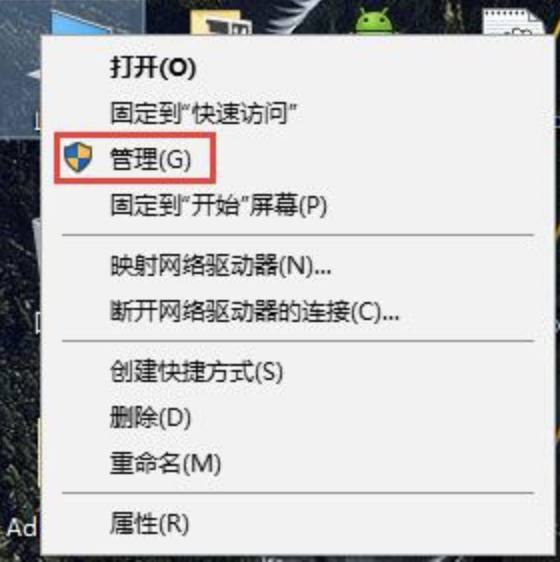
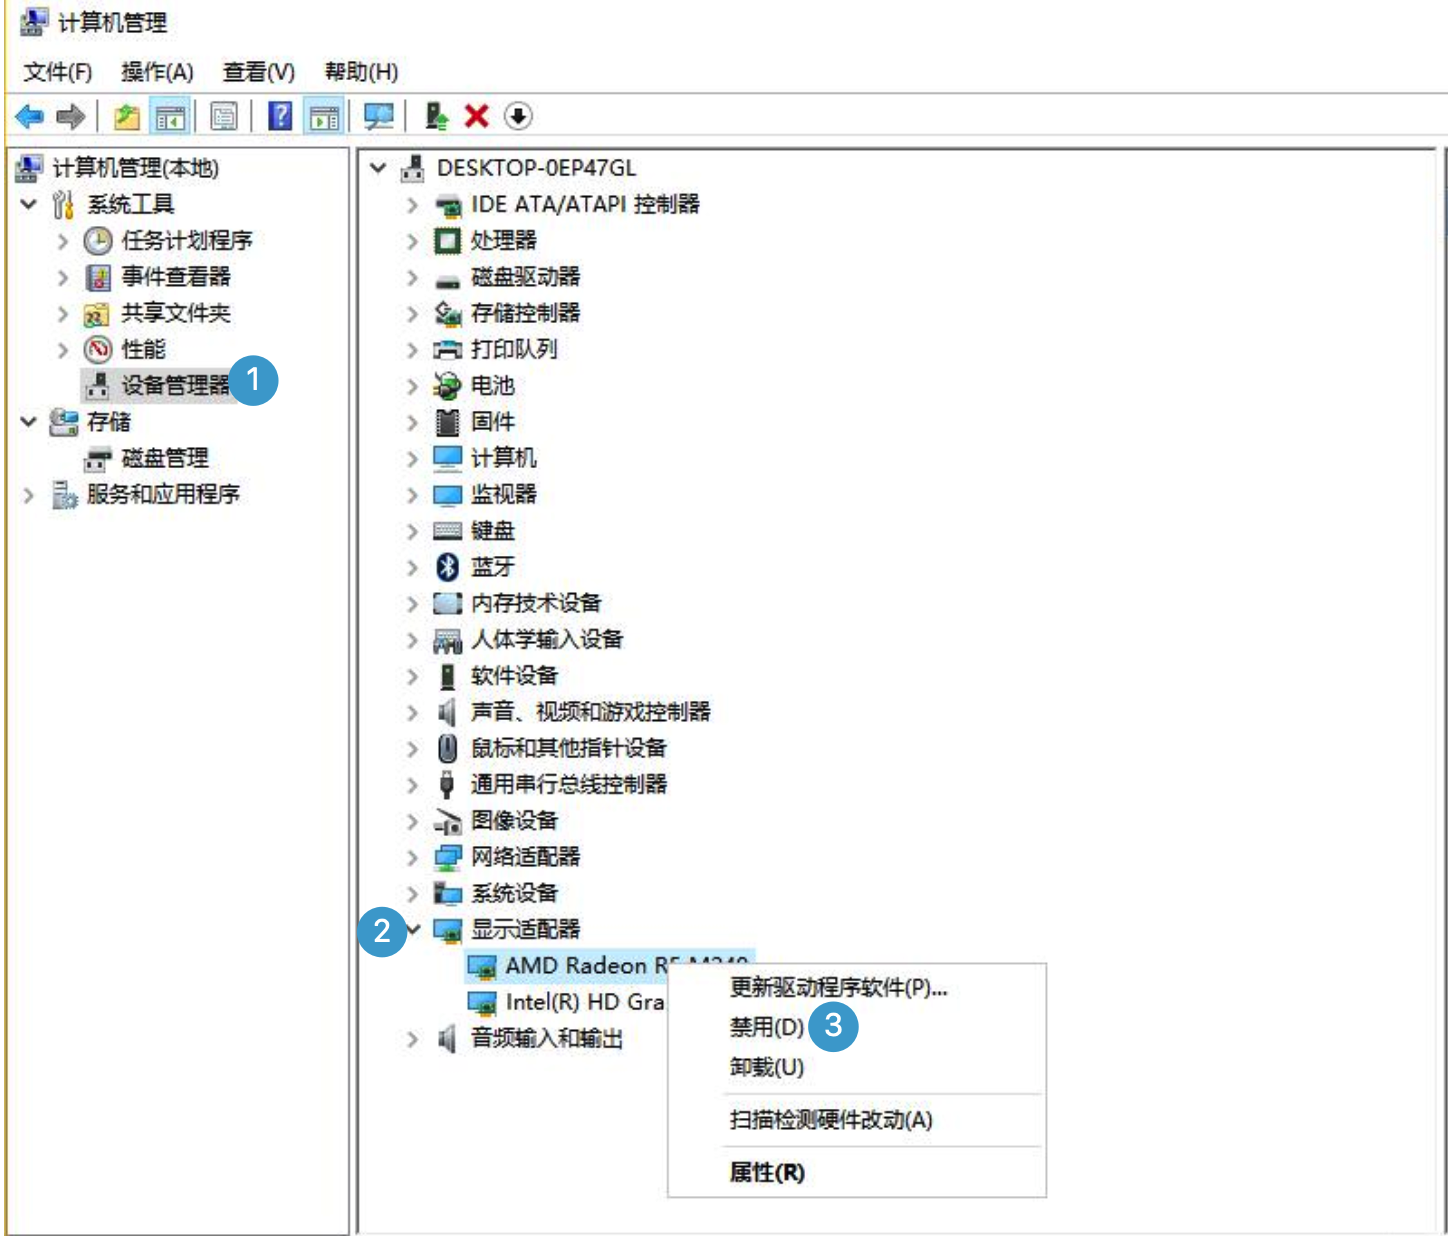
Right-click "This PC" -> Manage -> Device Manager -> Display Adapters -> Disable the first default graphics card.
II. Shared Window No Image
Symptom
After adding a screen capture source, selecting "Window Share", and choosing the corresponding window, the material option appears, but the preview area shows no image.
Cause
Cause 1: The software has a transparent layer. The Live Assistant can only capture the transparent layer and cannot display content.
Cause 2: D3D capture has compatibility issues with the graphics card.
Solution
Shared window issues are difficult to diagnose. It is recommended to use "Share Screen" instead.
Viewer-Side Audio Issues
Symptom
When broadcasting using the live client, viewers experience microphone static, noise, or popping sounds.
Solution
Step 1: Check for Multiple Pages Open
Check if the viewing page is also open on the broadcasting computer. If so, close the viewing page or mute it.
Step 2: Check CPU Overload
- Check if the area at the top of the live client displays a warning: "Encoding overload! Please lower video settings or use a faster encoding preset."

If this appears, try the following to reduce CPU usage:
- Close unnecessary programs during the broadcast, or restart the computer.
- Lower the streaming parameters in the live client settings to recommended values, and disable local recording.

Step 3: Check Live Client Audio Channel Settings
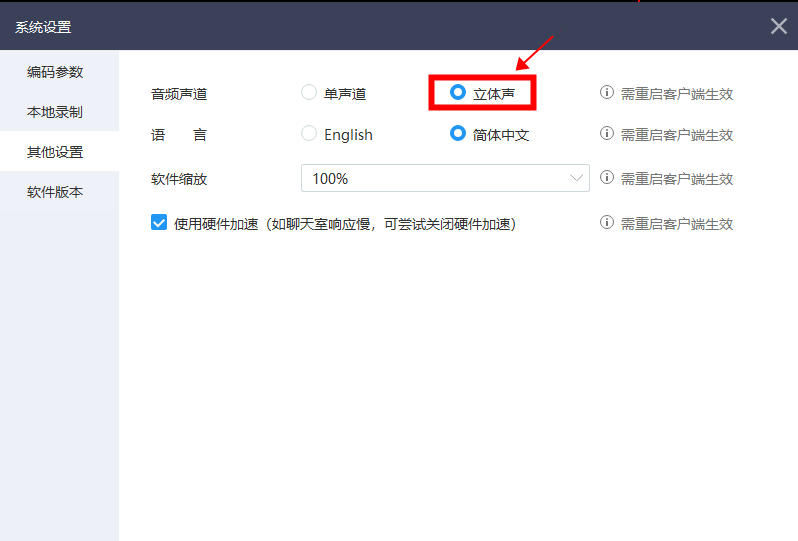
In the live client settings, check "Stereo", then restart the client before broadcasting.
Step 4: Adjust System Hardware Volume Settings
If the microphone volume indicator in the live client's device test frequently shows full bars, try lowering the microphone boost level. Also, try adjusting the computer's microphone device volume settings. Instructions for Windows and Mac are as follows:

Windows System
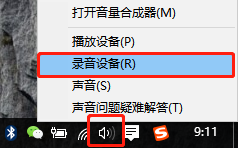
Find the "Volume" icon in the bottom-right taskbar, right-click, and select "Recording devices".
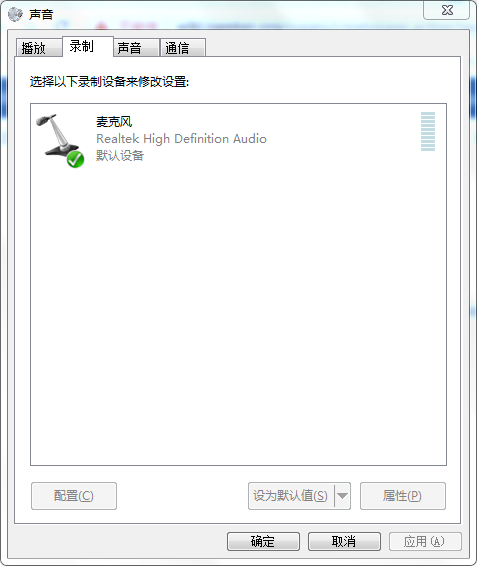
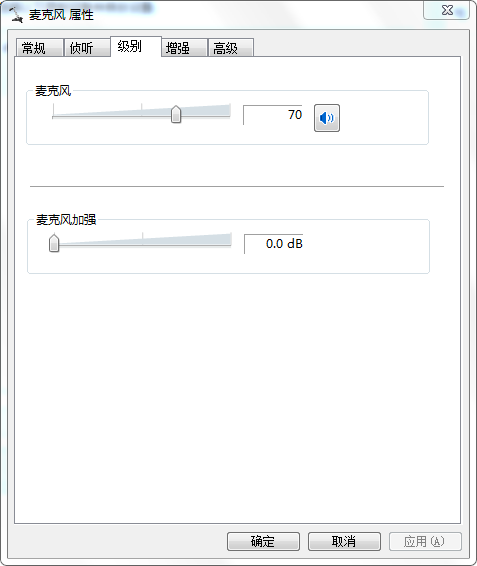
Click the device in use -> Right-click Properties -> Levels. If there is a microphone boost setting, disable it. Then adjust the microphone volume to around 70-80 (adjust based on actual testing; generally, disabling microphone boost should resolve popping issues).
If noise persists, check the "Noise Suppression" or "Acoustic Echo Cancellation" options in the Enhancements tab.
If still ineffective, the microphone hardware may be damaged. Consider replacing the microphone.
Mac System
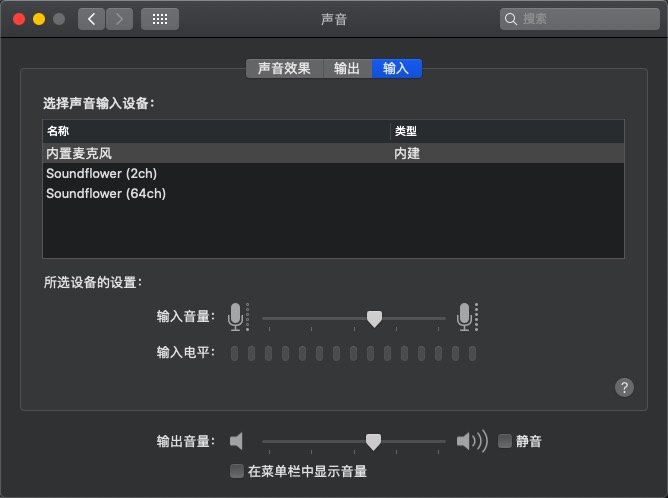
Open System Preferences -> Sound -> Input, and adjust the volume of the corresponding microphone device to around 70 (adjust based on actual testing).
What is "Disable Windows 7 Aero Effect"?
This feature only exists on Windows 7 devices. The Aero glass window effect built into Windows 7 consumes more CPU and graphics card rendering resources. Disabling it can improve overall operating system performance, indirectly improving the performance of the live client software for smoother operation.
How to Fix Client Display Being Too Small?
On some high-resolution monitors, the client's main interface may still display at 100%, making buttons difficult to operate due to their small size. In this case, go to [Settings] -> [Other Settings] -> [Software Scaling] and increase the software scaling ratio to prevent the display from being too small. Note: The client software needs to be restarted for the change to take effect.
How to Change the Client Display Language?
Switch the display language in [Settings] -> [Other Settings] -> [Language]. Note: Restart the client software for the change to take effect.
How to Manually Check for the Latest Software Version?
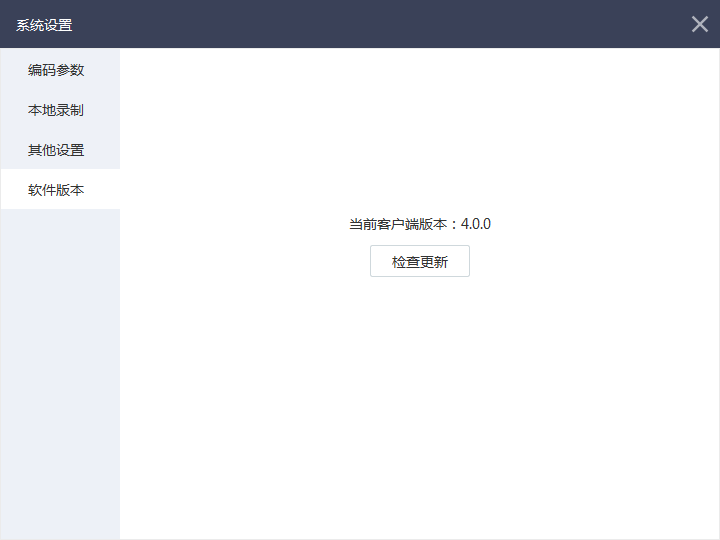
In [Settings] -> [Software Version], click the [Check for Updates] button to manually update. If a new client version is available, you can download the latest installation package to update.
What to Do If the Client Device Test Cannot Select Capture Card Audio?
Currently recommended capture cards: Magewell USB Capture, Tianchuang Hengda UB100
For these capture cards, you can find the corresponding audio source device under the Microphone option in the client device test.
Known issue: The Tianchuang Hengda UB530 capture card cannot find an audio device on the 4.x client. If you encounter this issue, please contact
