


POLYV MR Streaming User Manual
Hardware & Network Requirements
Use a computer and live streaming accessories that meet live streaming hardware requirements. You can refer to our recommended configurations and choose based on your actual needs. The most basic live stream requires a computer, a camera, a microphone, and a clean, simple background.
【Recommended Hardware Configuration】【Cloud Push Version】
- Computer Hardware Recommendations:
- OS: Windows 10 or later
- GPU: Dedicated 2GB GPU or higher
- CPU: i5 or higher
- RAM: 8GB or higher
- Studio: Green, red, or blue screen, or a clean, clutter-free background
- Audio: Lavalier microphone, headset microphone, professional microphone
- Video: External camera supporting 1080P, or camera + capture card
- Network: Ethernet cable, 4G network aggregator
- Monitor: If the host needs to stand in front of a green screen or far from the computer, equip a large monitor as a return screen so the host can see their position in the virtual stage.
【Recommended Hardware Configuration】【Local Push Version】
- Computer Hardware Recommendations:
- OS: Windows 10 or later
- GPU: NVIDIA 3080 or higher
- CPU: i7 or higher
- RAM: 32GB or higher
- Studio: Green, red, or blue screen, or a clean, clutter-free background
- Audio: Lavalier microphone, headset microphone, professional microphone
- Video: External camera supporting 1080P, or camera + capture card
- Network: Ethernet cable, 4G network aggregator
- Monitor: If the host needs to stand in front of a green screen or far from the computer, equip a large monitor as a return screen so the host can see their position in the virtual stage.
【Recommended Network Configuration】
- Uplink: 10 MB/s or higher
- Downlink: 5 MB/s or higher
【Browser Requirements】
MR uses web-based streaming technology. A Chrome-based browser is required for live streaming. It is recommended to use the latest Google Chrome or other Chromium-based browsers, such as QQ Browser, 360 Speed Browser, etc. Safari, Firefox, IE, and other browsers are currently not supported for initiating live streams.
【Preparing the Live Channel ID】
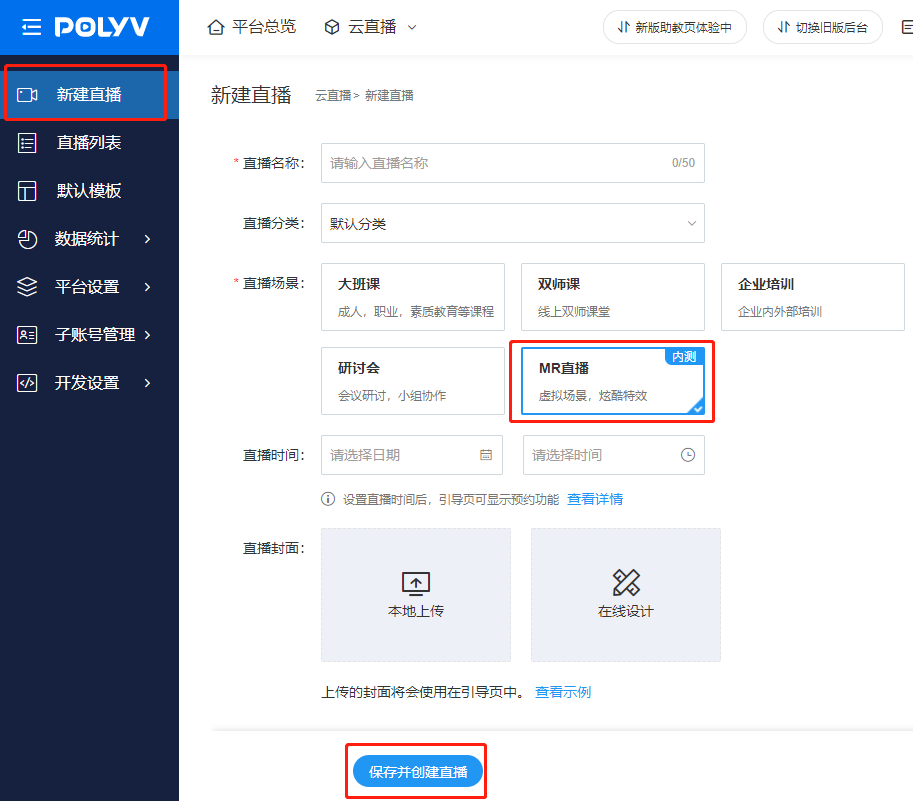
A channel ID is required to initiate a live stream. A channel ID is equivalent to a live room. Log in to the Polyv backend, click "My Live Streams," then "New Live Stream," select "MR Live Stream," and create it.
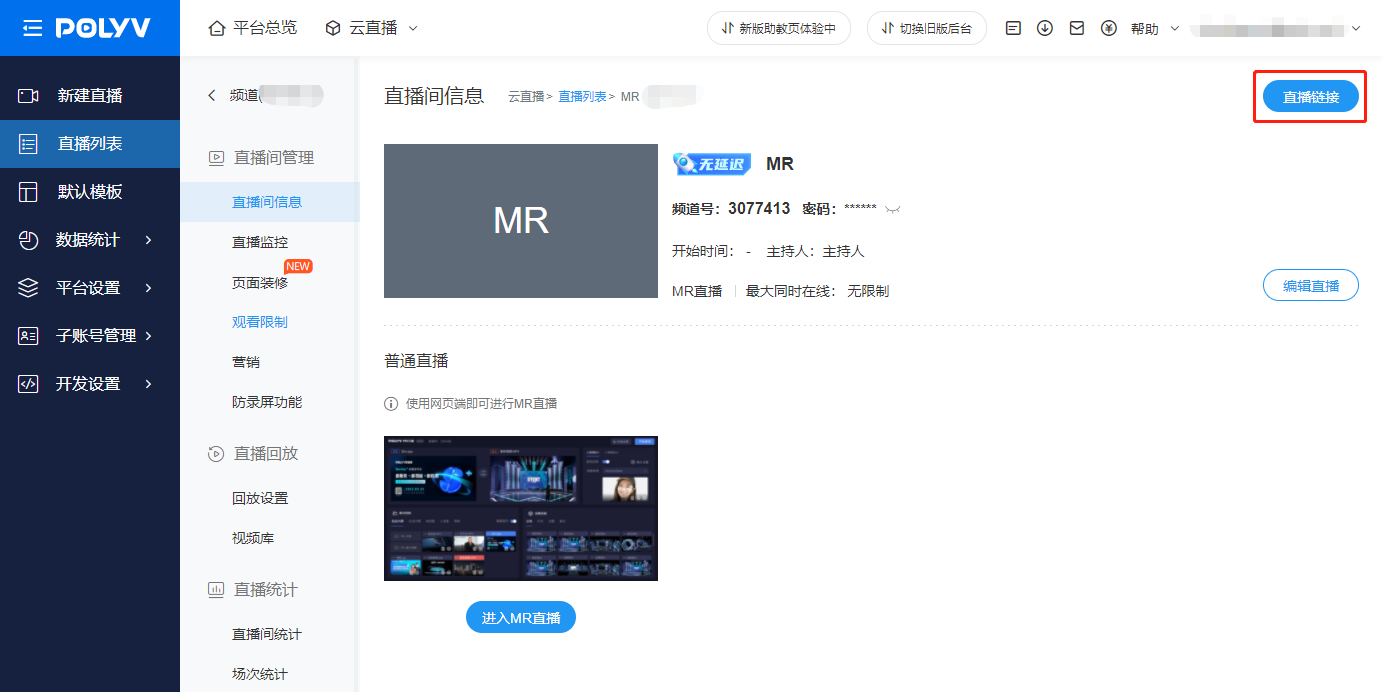
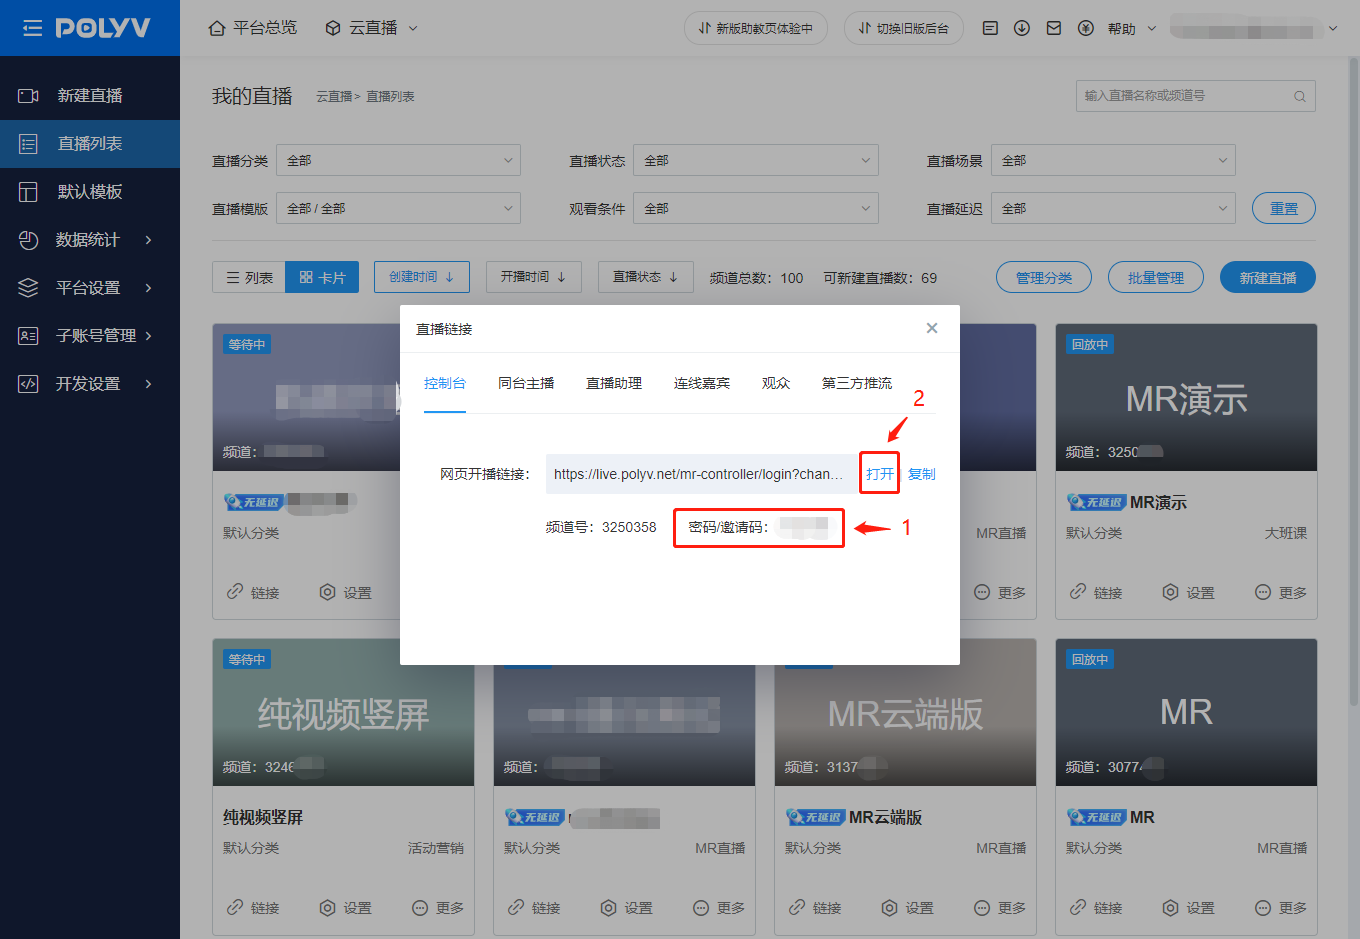
After creation, click the live stream link, copy the console password, and open the console link to log in.
MR Operation Instructions
Selecting a Scene
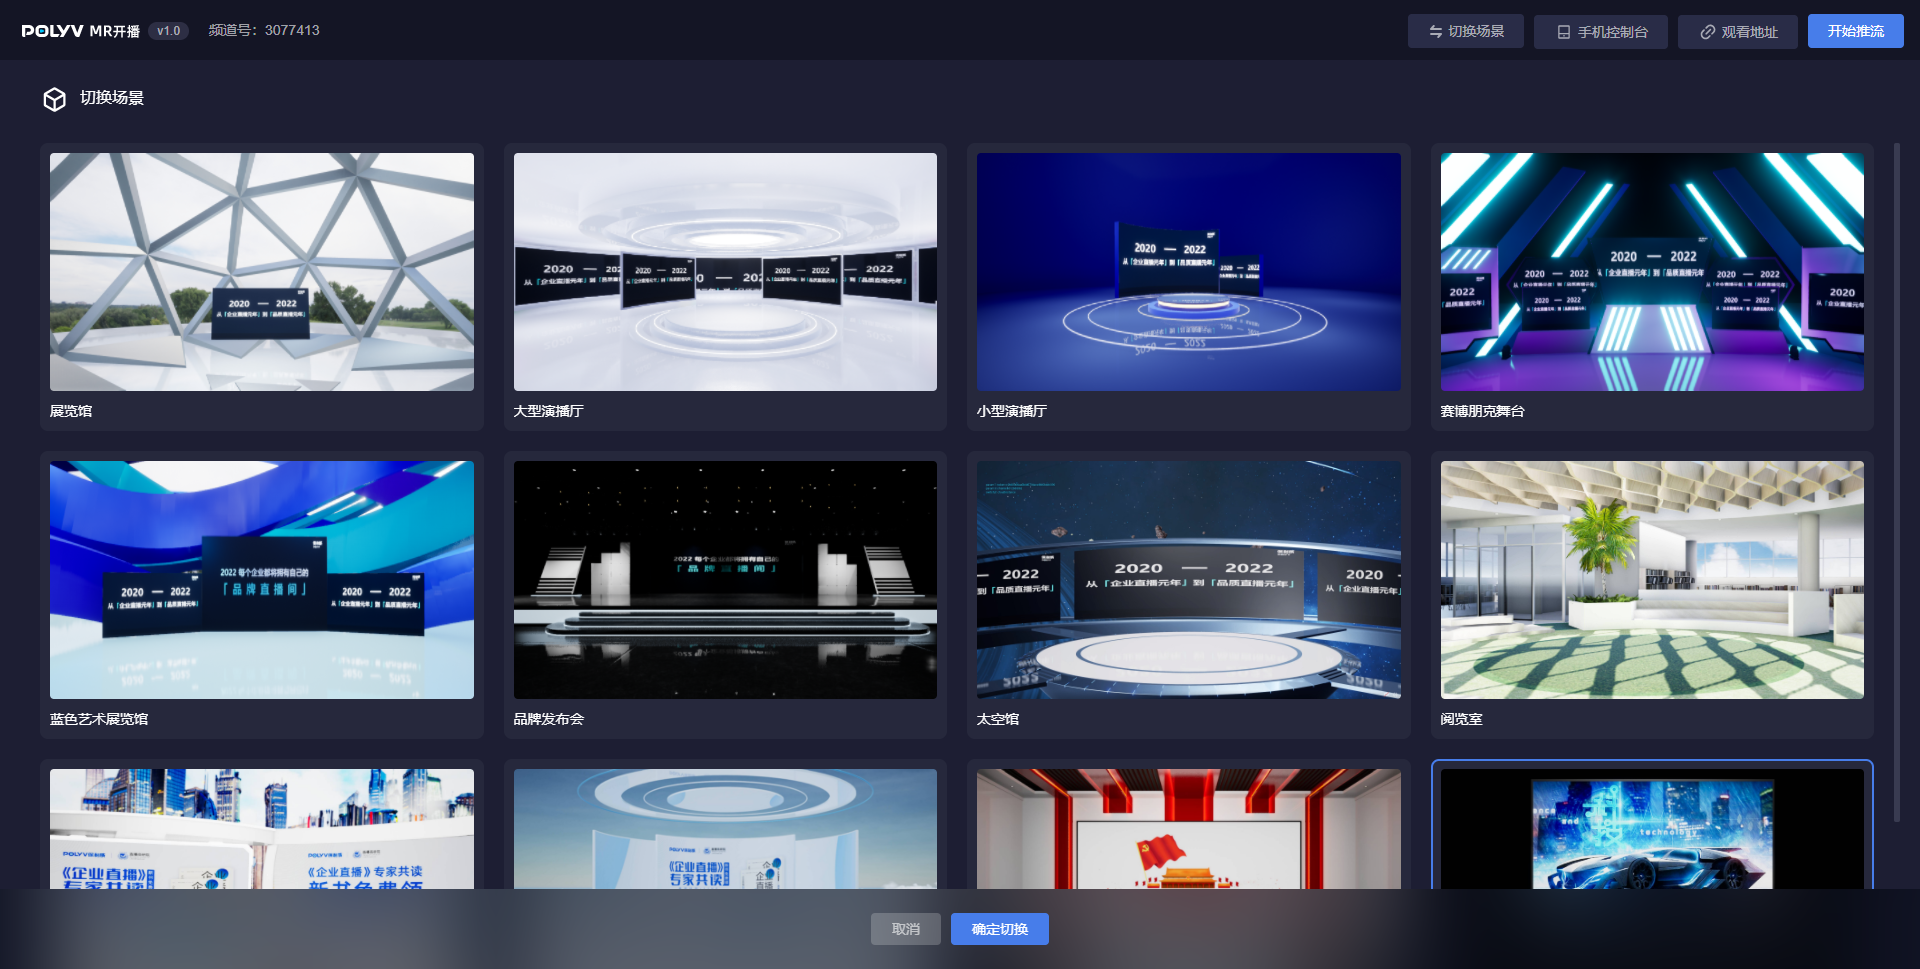
Before entering the MR streaming interface, you need to select a virtual scene. You can choose any scene you want to use. You can also switch scenes at any time after entering the streaming interface.
Camera Settings
Video Source & Microphone
Upon first entry, the Polyv built-in demo video is selected as the host's video source by default, making it convenient to debug the stage effects on the control console.
The microphone device is bound to the video source. To enable the microphone, you first need to switch the video source to the local camera.
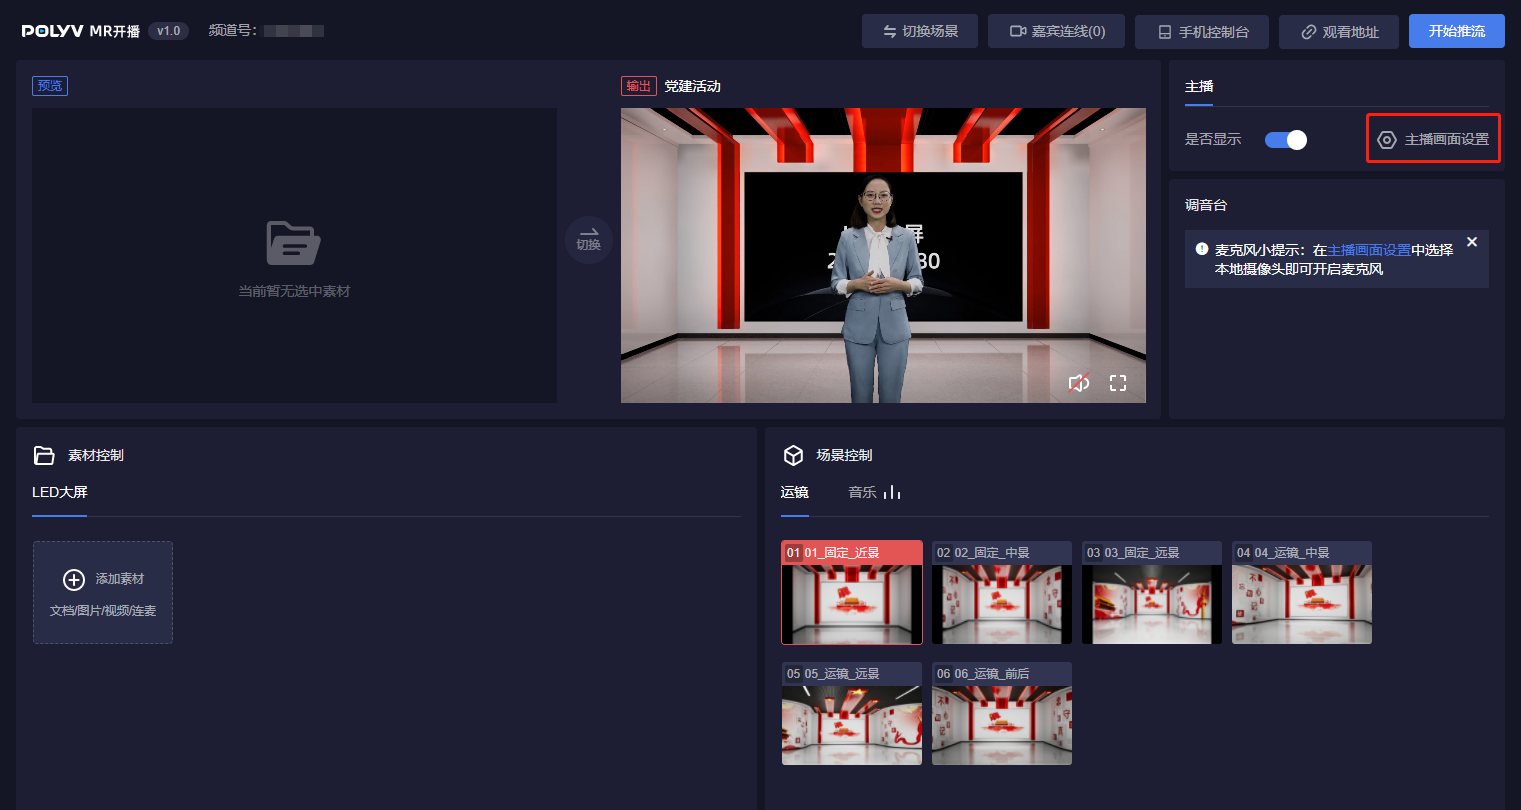
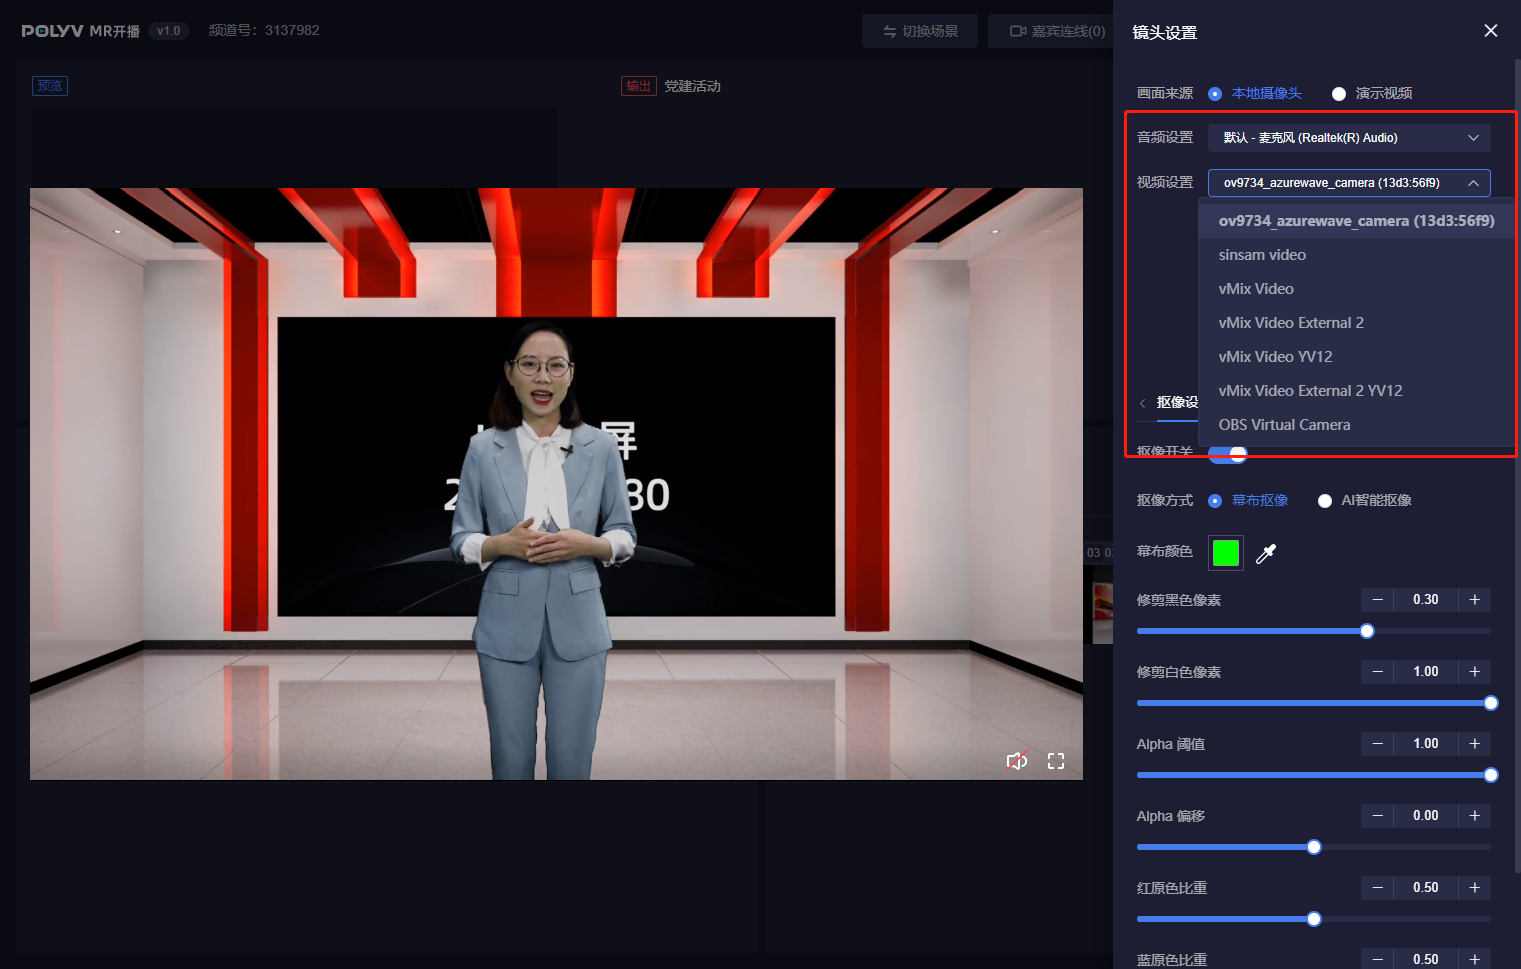
Click on Camera Settings. In the pop-up interface, under "Video Source," select "Local Camera." If you have an external camera device, you can also select it here. After selection, the local video will be output to the virtual scene.
Keying Method
We support two keying methods: solid-color screen keying and AI smart keying.
When using screen keying, a green screen is recommended for better results compared to other colors. After setting the screen color, you can use functions like Keying Settings, Color Correction, Crop, and Debug to adjust the host's video for the best keying effect. Related keying tutorials can be found at Reference Link.
When using AI keying, keep the background clean and tidy. When using AI keying for the first time, wait 5-10 seconds. The video may freeze during this time, which is normal.
Position, Size & Zoom
You can adjust the character's position and size. We provide three dimensions for position adjustment. You can adjust position and size by dragging the progress bar or manually entering values.
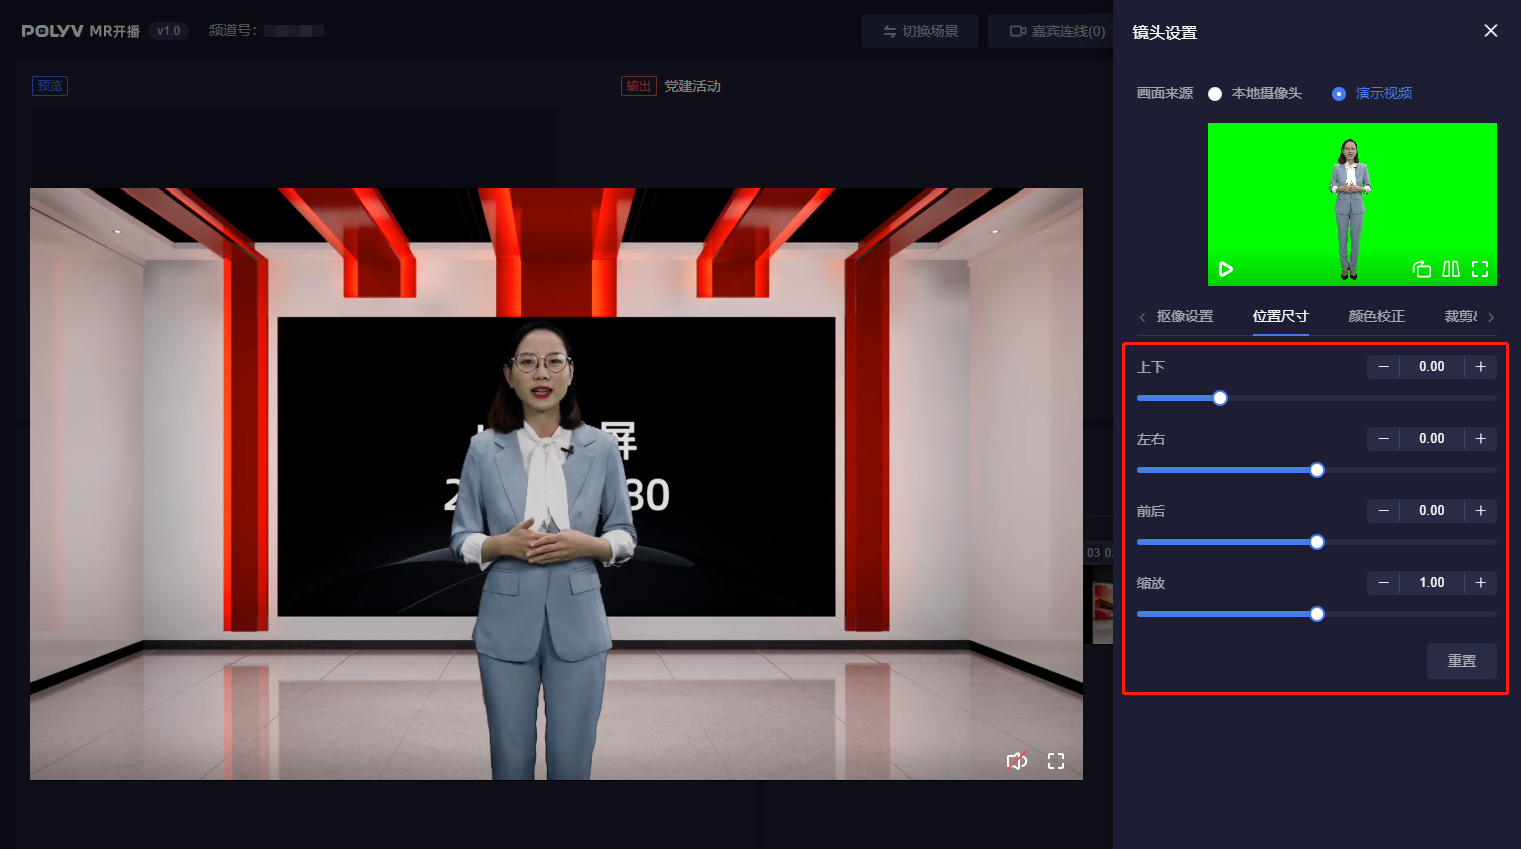
When adjusting position or size, it is recommended to first switch to the camera movement commonly used during the live stream before making adjustments.
When the keyboard is focused on an input field, you can hold the ↑↓ keys for quick adjustments.
Control Console
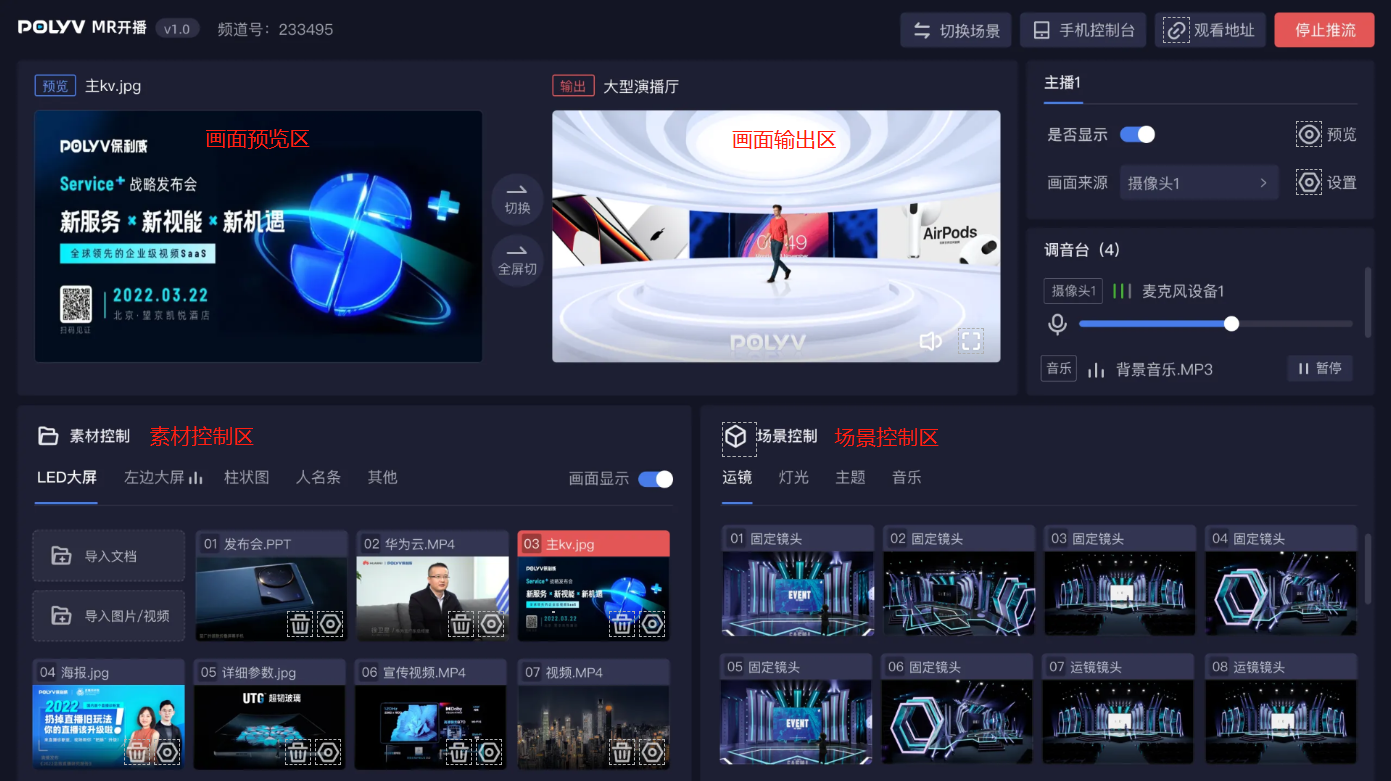
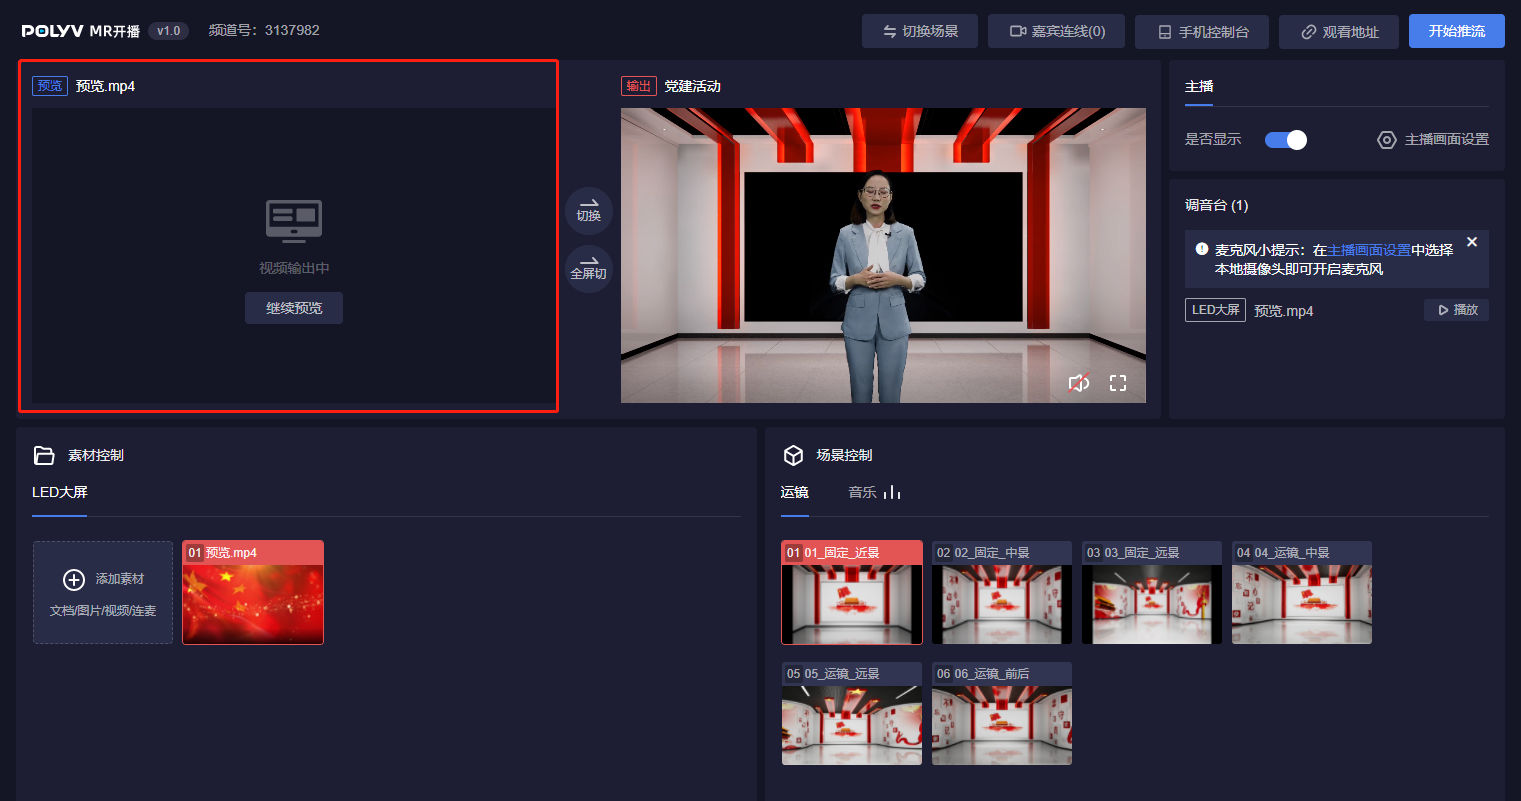
The overall control console interface is divided into:
- Material Preview Area: Used to preview PPT, images, or audio/video materials.
- Video Output Area: The final live stream video seen by the audience.
- Material Control Area: Used to manage materials for the live stream, set 3D data charts, etc.
- Scene Control Area: Used to control scene-related functions, such as switching camera movements, background music, etc.
Screen Material Control
Each scene is basically equipped with a screen. Some scenes have multiple screens. Screens support uploading PPT, image, and video files.
All uploaded materials are stored in the cloud. Each time you enter an MR live stream, previously uploaded materials are retained and do not need to be re-uploaded. It is recommended to upload all necessary materials before the official live stream starts to prevent delays caused by cloud upload times.
Applying Materials
Click a material to place it in the preview area for preview. Click "Switch" to switch the material to the scene. Click "Fullscreen Switch" to output the material fullscreen to the live stream video.
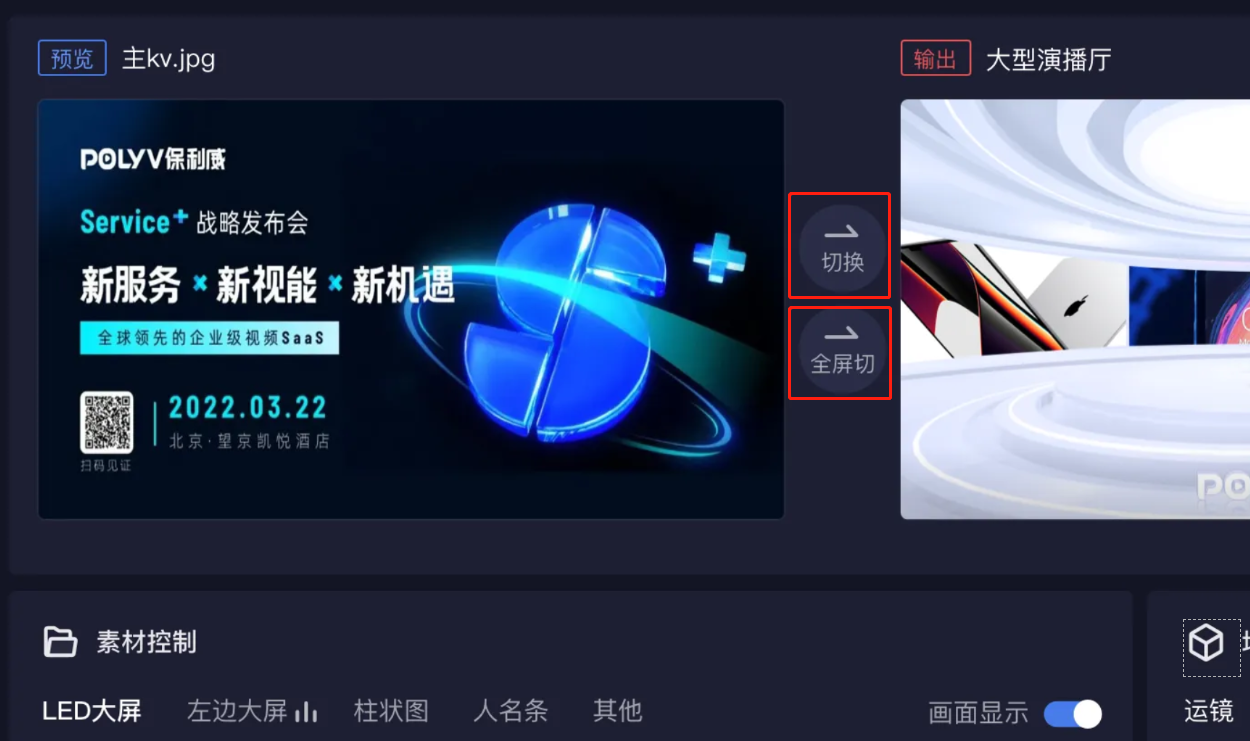
After switching a video material, to prevent the video from continuing to play in the preview area and causing audio clutter, the preview is paused by default. You can continue previewing the video in the preview area without affecting the output area.
After switching a PPT material, for efficient page turning, the preview area and output area remain synchronized. Turning a page in the preview area immediately turns the page in the output area without needing to click "Switch" again.
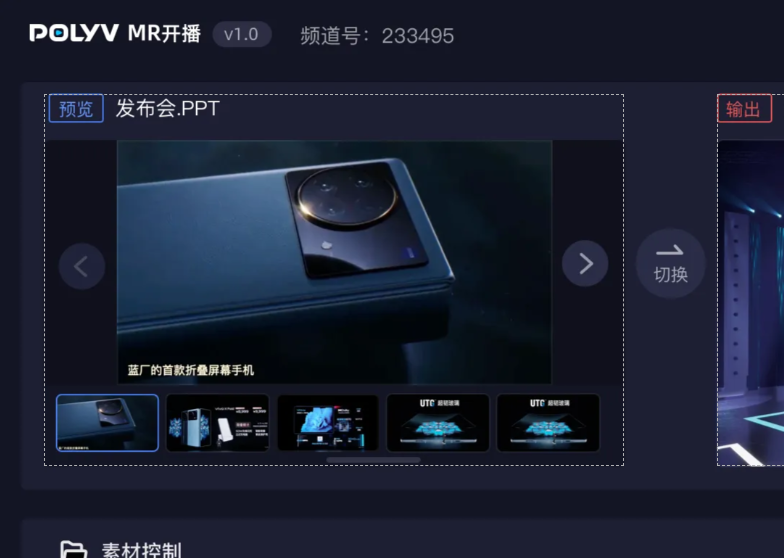
PPT materials support page turning via a presenter remote, allowing the host to turn pages even when away from the computer.
When a material is switched to fullscreen, adjusting camera movements or performing other operations on the scene will still take effect, but they won't be visible on the output video. This can be understood as the material completely covering the scene. Click "Exit Fullscreen" in the output area or switch any material normally to exit fullscreen.
Double-clicking a material allows for quick switching.
Camera Movement
Each scene has at least 2-3 fixed camera positions and 2-3 camera positions with movement, depending on the scene's size.
We also implement a camera tracking logic. Regardless of how the host adjusts their position, the camera will always keep the host facing it, preventing the host's side or back from being captured.
Music Settings
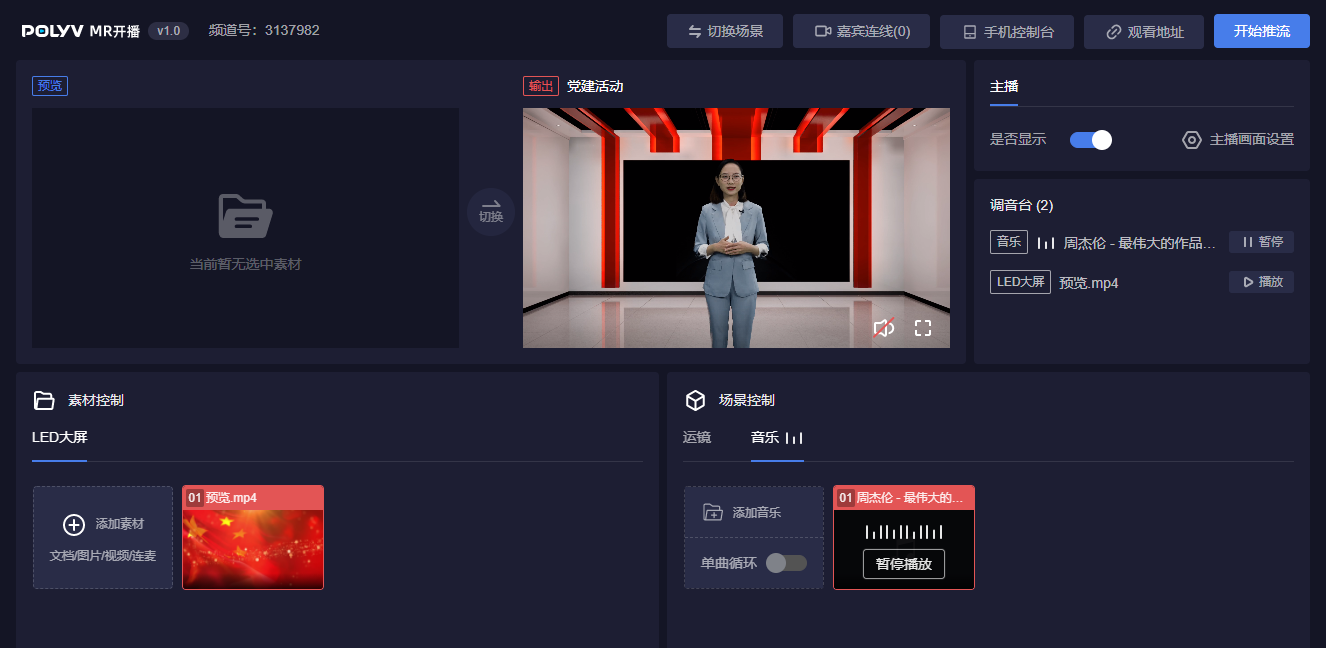
Each scene has a music function. Uploading and applying music is similar to screen materials. You can upload, preview, and then switch. The difference is that music can be controlled for play/pause, single track loop, etc.
Data Chart Settings
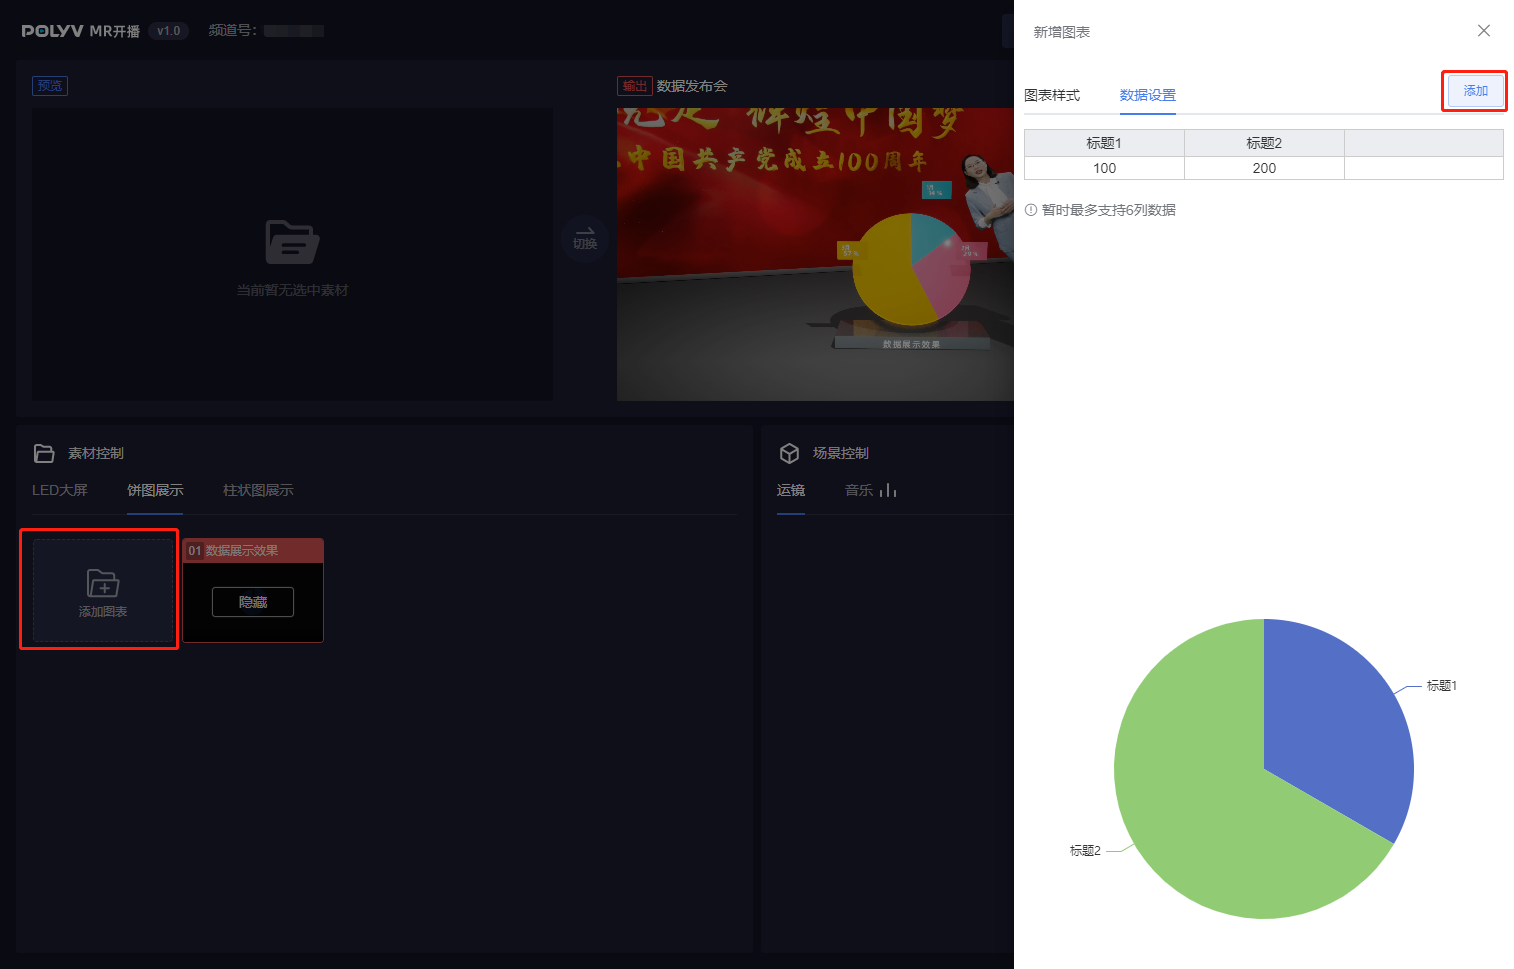
Some scenes have a 3D chart function. Enter data in the settings, set the data title, and click "Add" to create a new 3D data chart.
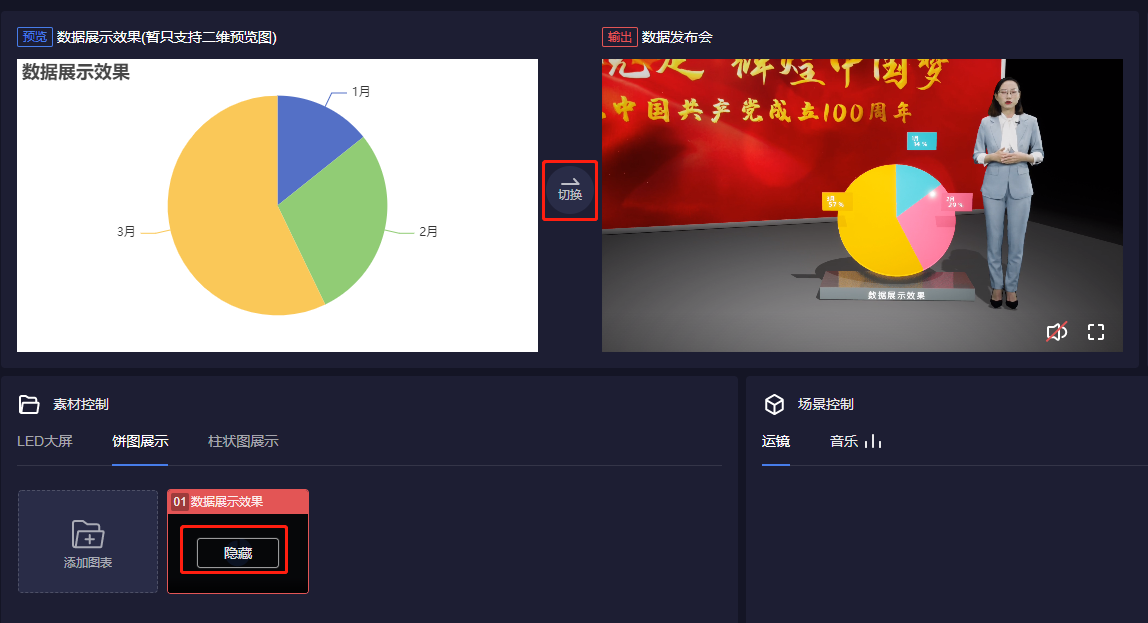
Switching 3D charts is the same as other materials: click to preview or double-click to switch. The difference is that 3D charts support hiding. After switching, click the chart in the material control area to hide it.
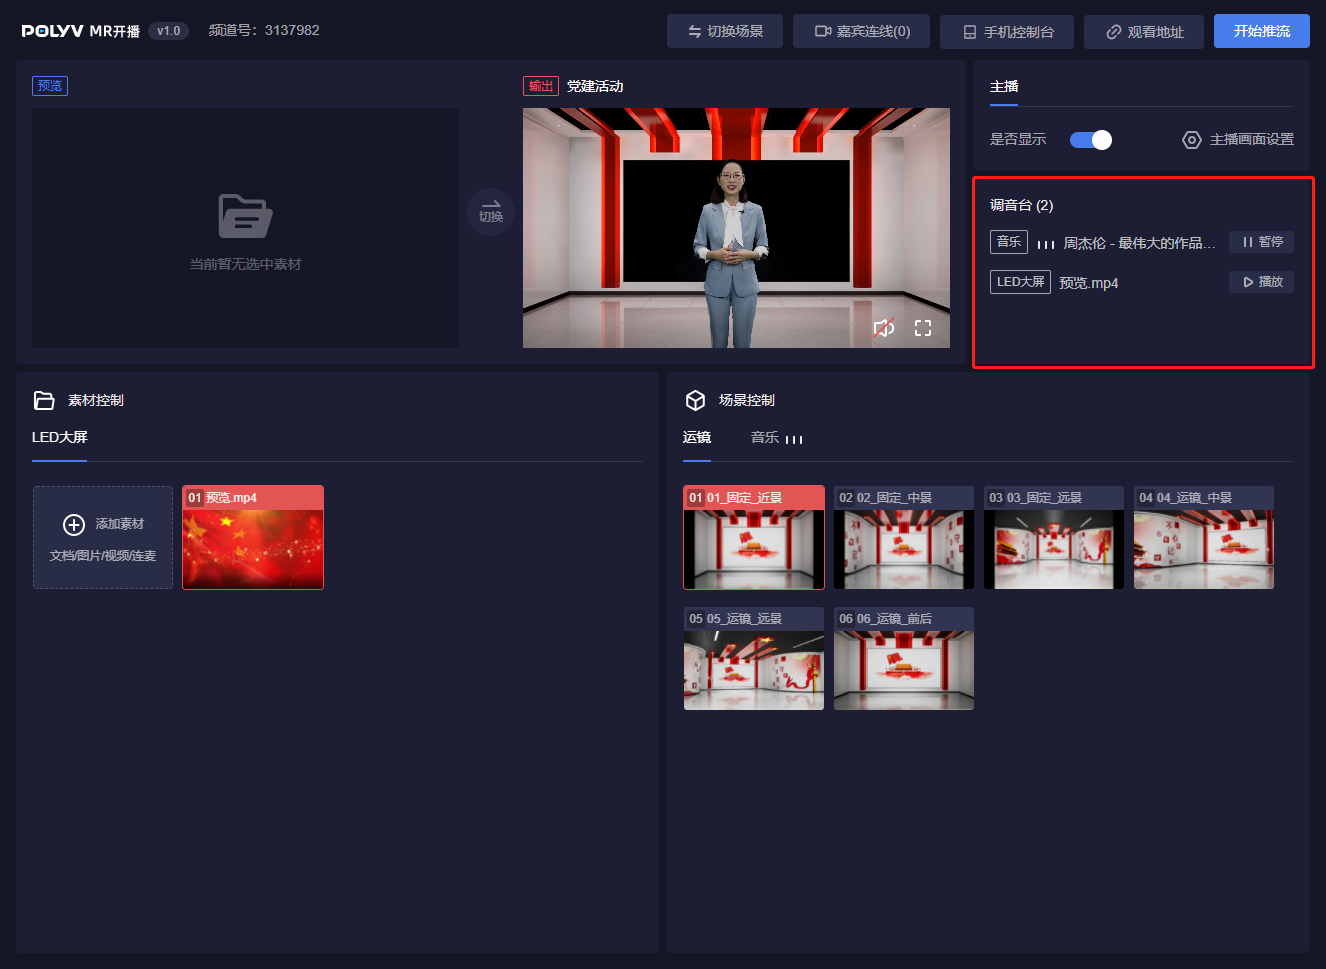
Audio Mixer
Use the audio mixer to control all sounds input into the virtual scene, including the microphone switch and video/music play/pause.
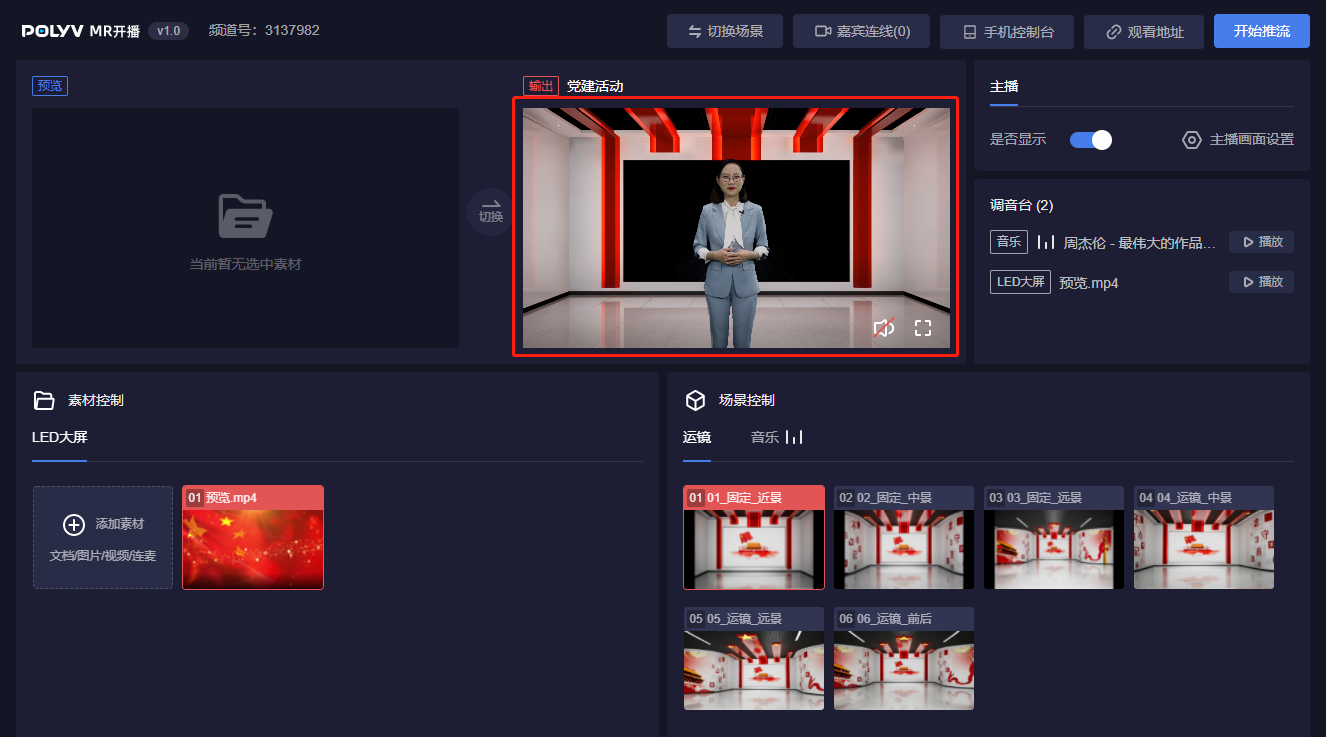
Video Output Area
The video output area displays the live stream video. The video will be approximately 1 second behind your actual operations, which is normal.
Co-streaming
MR's co-streaming function supports two methods: Guest Connection and Co-host Stage. The difference lies in whether the connected user appears as a guest on the screen or as a host, keyed into the virtual scene.
Co-streaming users can see the live stream video and appear on camera even when the stream is not live, facilitating testing.
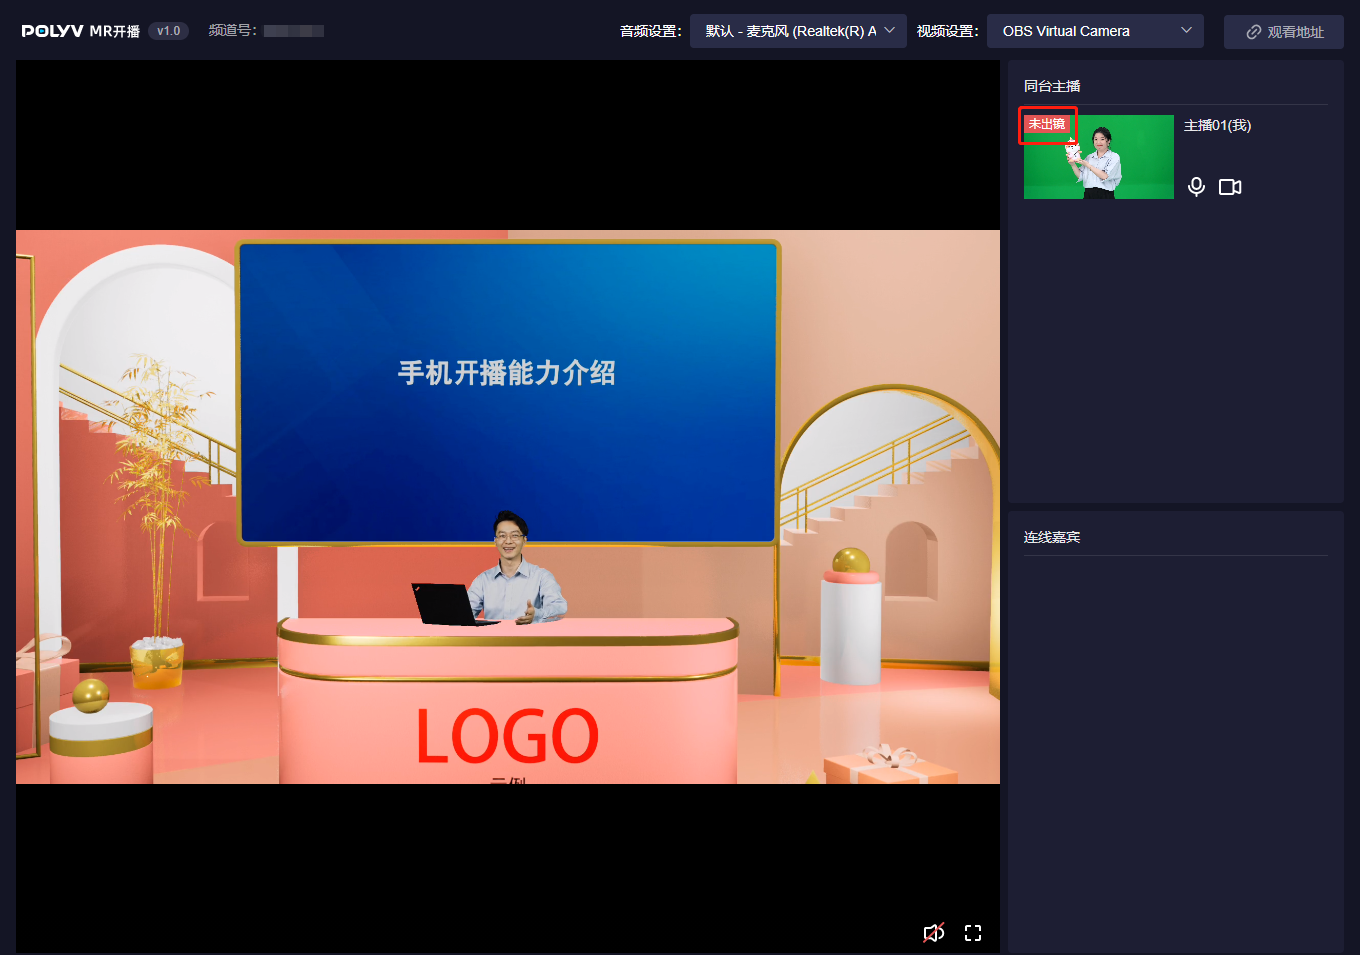
After a user connects, they are in either an "On Camera" or "Off Camera" state. When the console places the connected user into the virtual scene and displays them, they are "On Camera"; otherwise, they are "Off Camera." To prevent connected users from affecting the live stream's video and audio, they cannot communicate with other connected users while "Off Camera." They can only communicate with other connected users after being set to "On Camera."
Below are the specific usage instructions:
Guest Connection
Function Description: Guests connect by opening the guest connection address via a web browser. Once connected, the guest can be used as a screen material, displayed on a screen within the scene. This is typically used when the guest lacks hardware like a green screen and is simply connecting as a regular guest for conversation.
Usage Instructions:
- Go to the backend, find the corresponding MR channel, click "Live Stream Link," and select the "Guest Connection" option.
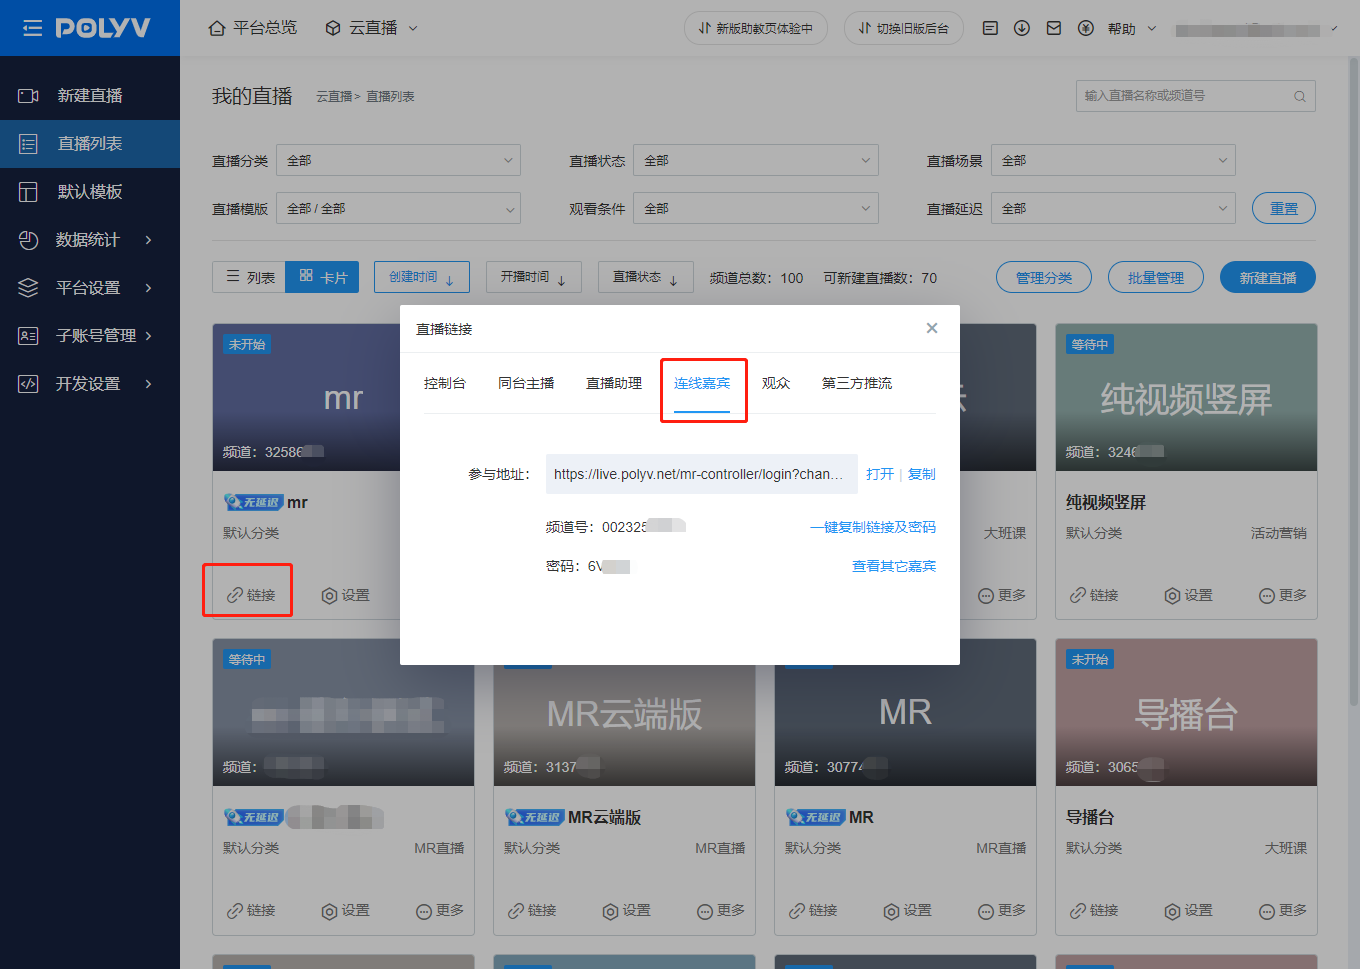
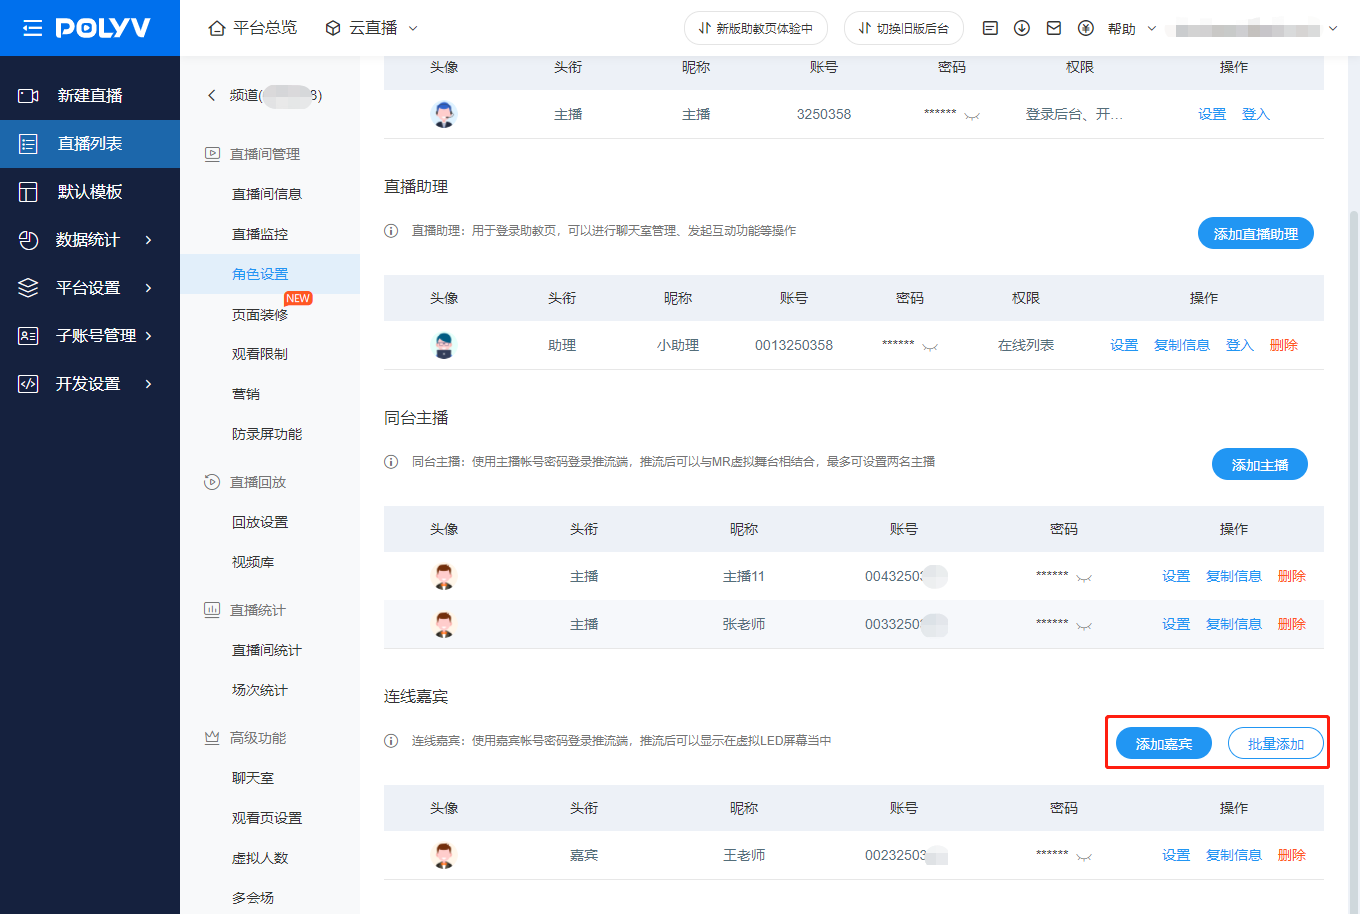
By default, only one guest's information is displayed. For multiple guests, click "Channel Settings" - "Role Settings." Here you can add/view multiple guest accounts and modify guest nicknames and passwords.
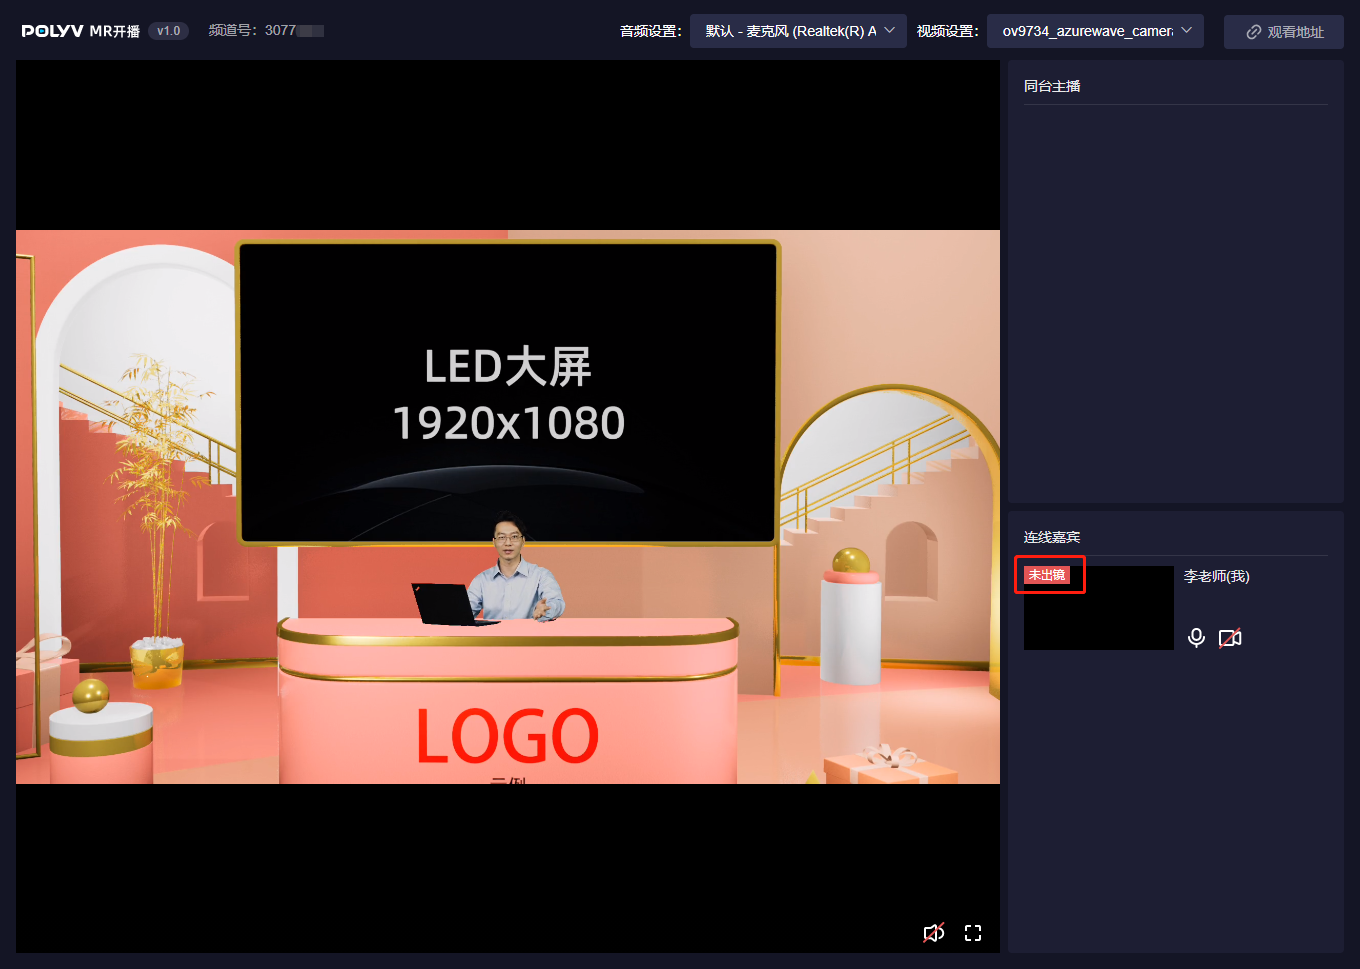
- Send the connection address and password to the guest. The guest must log in using a Chromium-based browser (same requirements as the console). After logging in, the guest is "Off Camera" by default. They can see the live stream video but cannot see other connected users, and other connected users cannot see them.
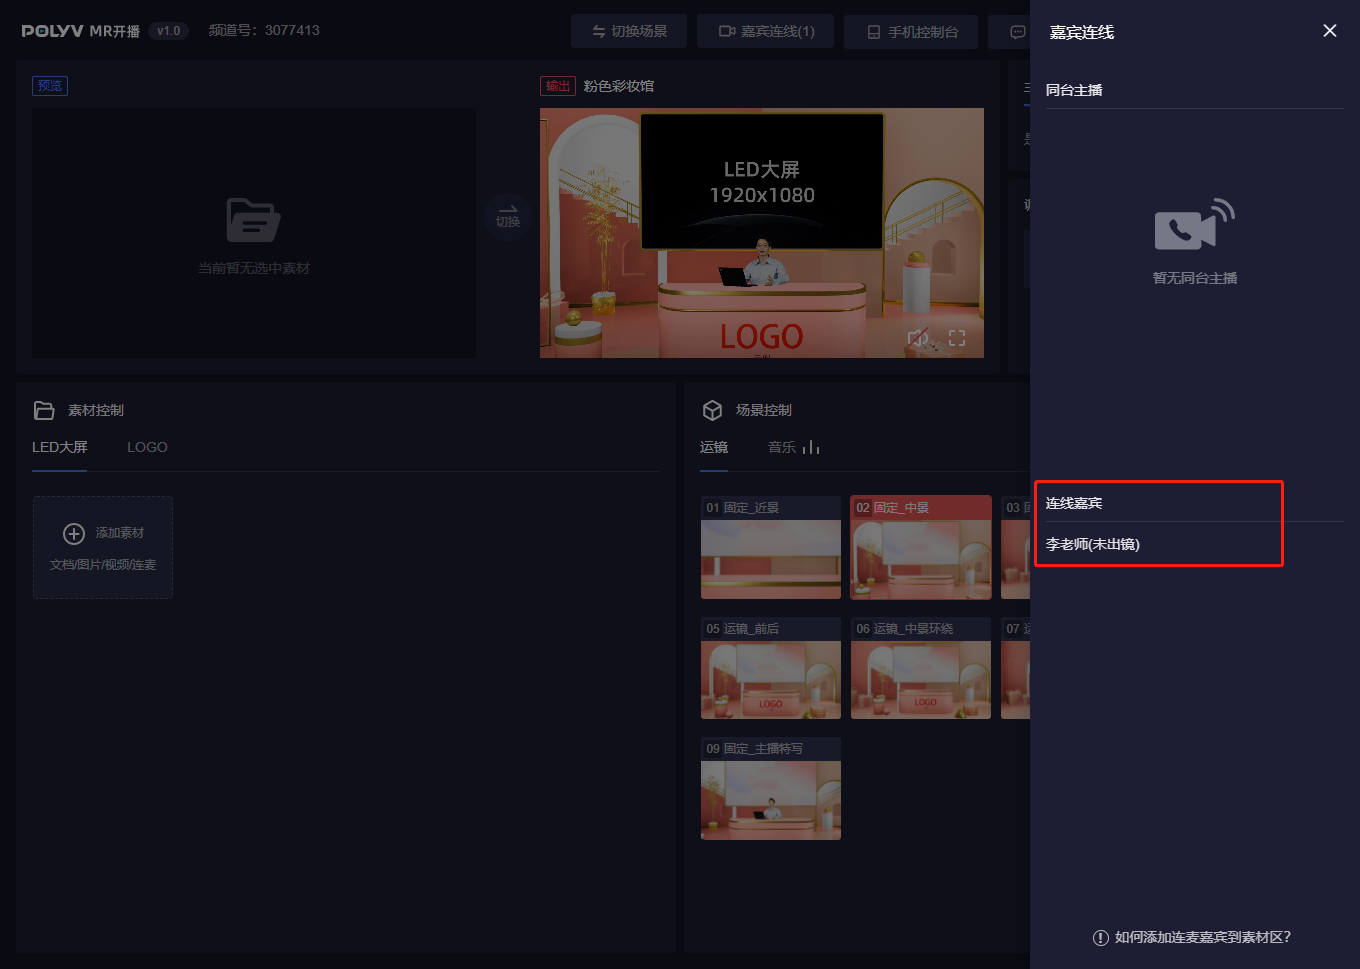
- The console can now see the user as connected in the "Guest Connection" list.
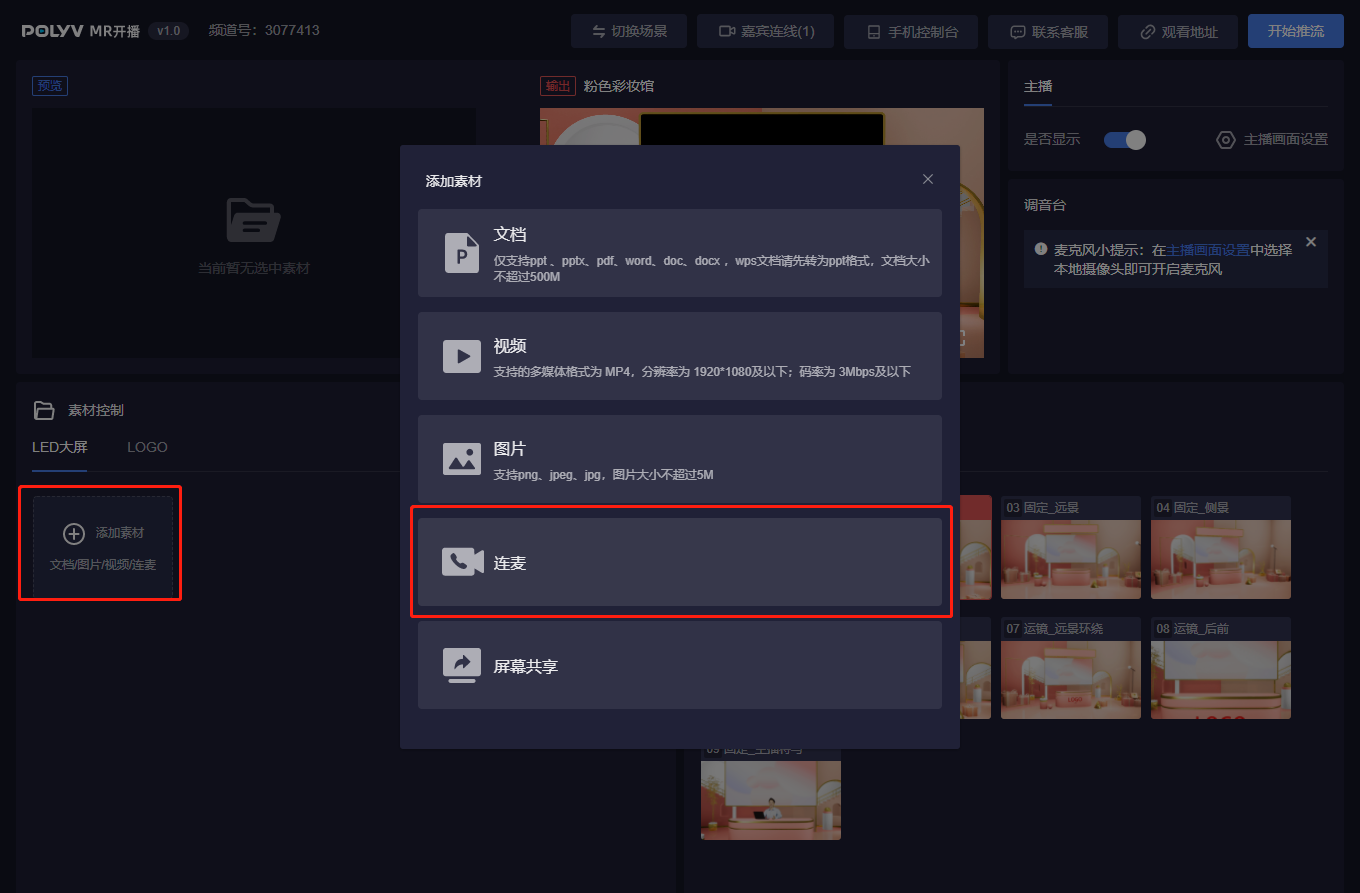
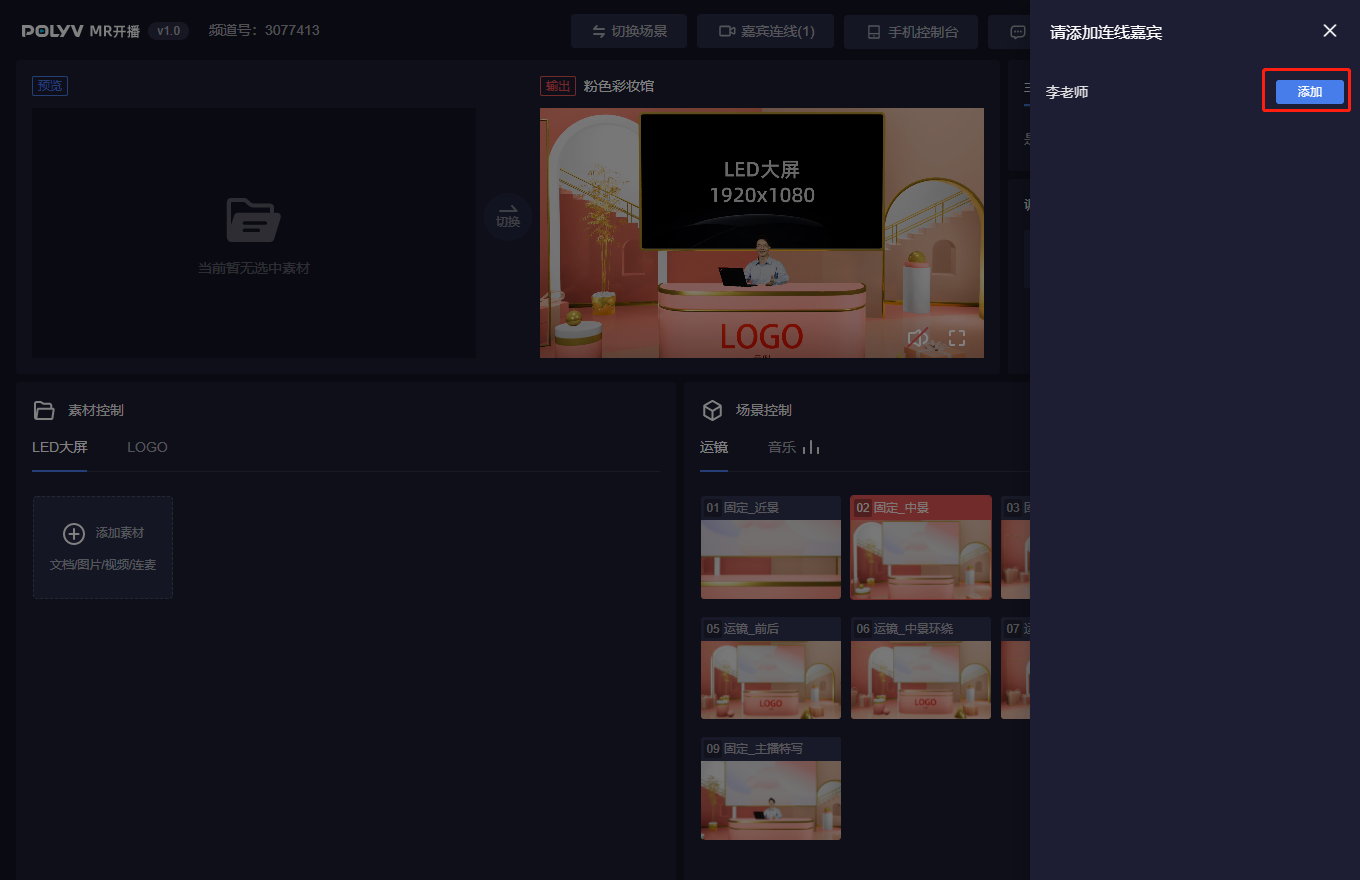
In the screen material area where you want to display them, click "Add Material" - select "Guest Connection" - then select the corresponding connected user.
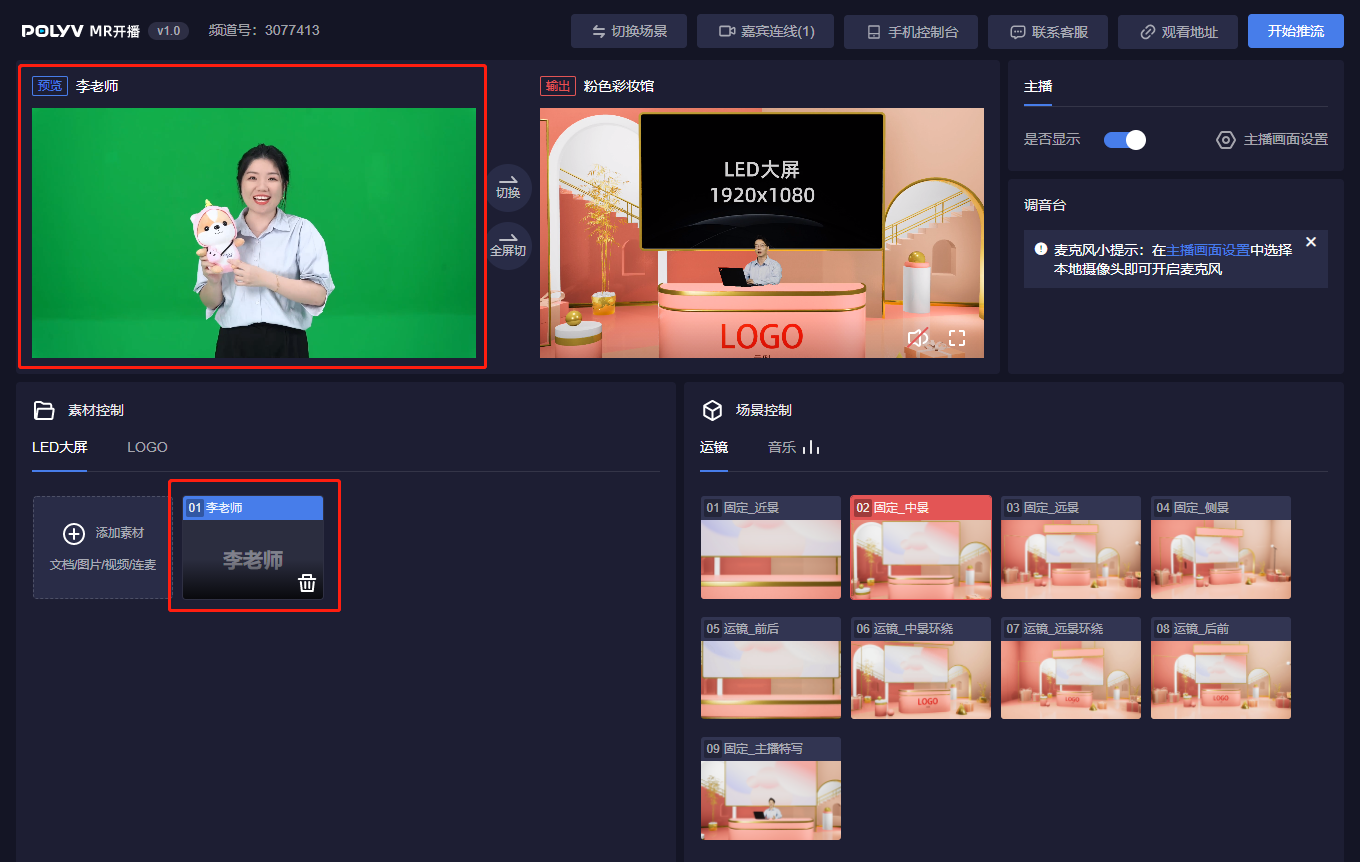
The user is now added to the screen materials. Click the material to preview the guest's video and hear their audio in the preview area. Ensure everything is correct before switching to the scene.
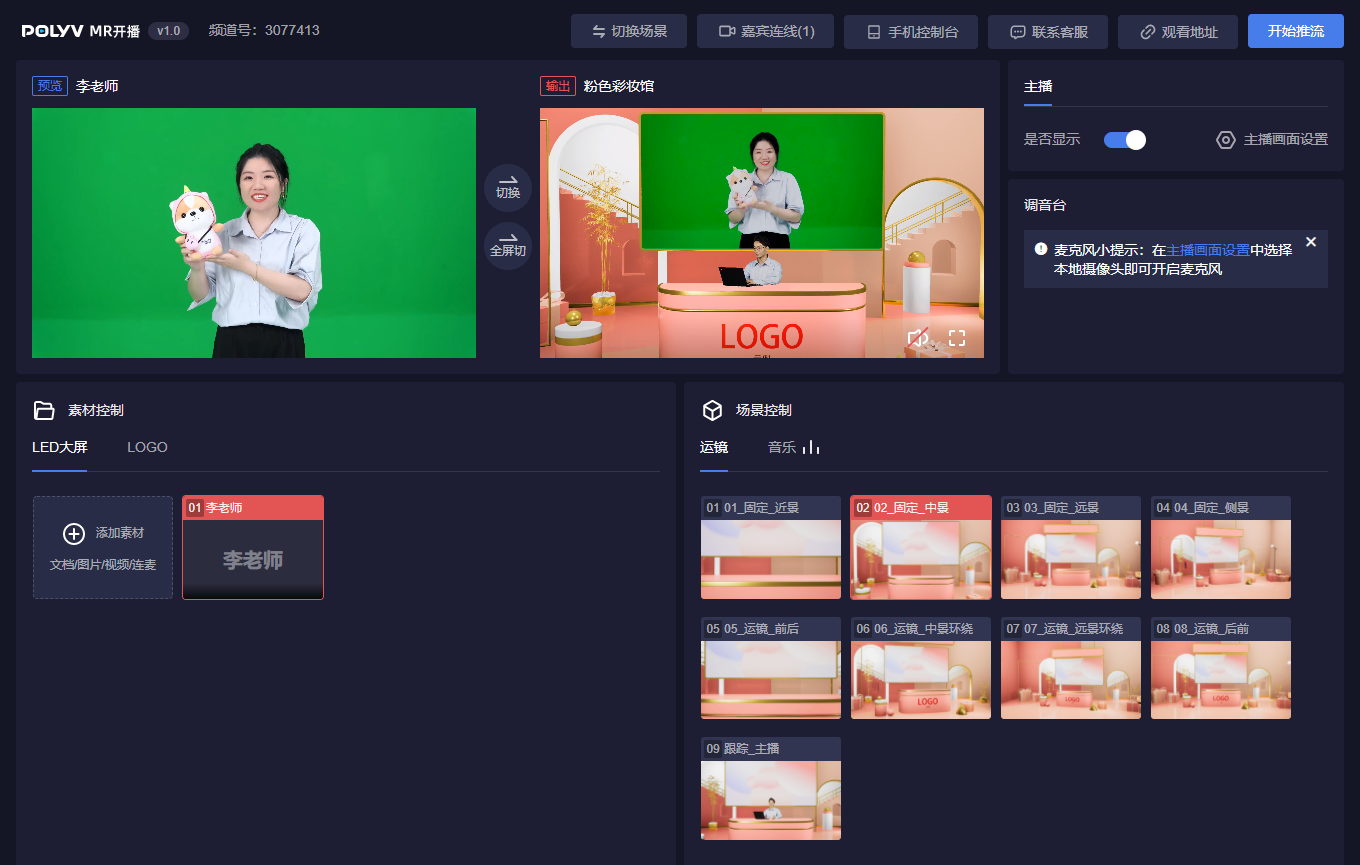
- When the console switches the guest's video to the screen, the guest becomes "On Camera." If there are other "On Camera" users, this guest can now see and talk to them.
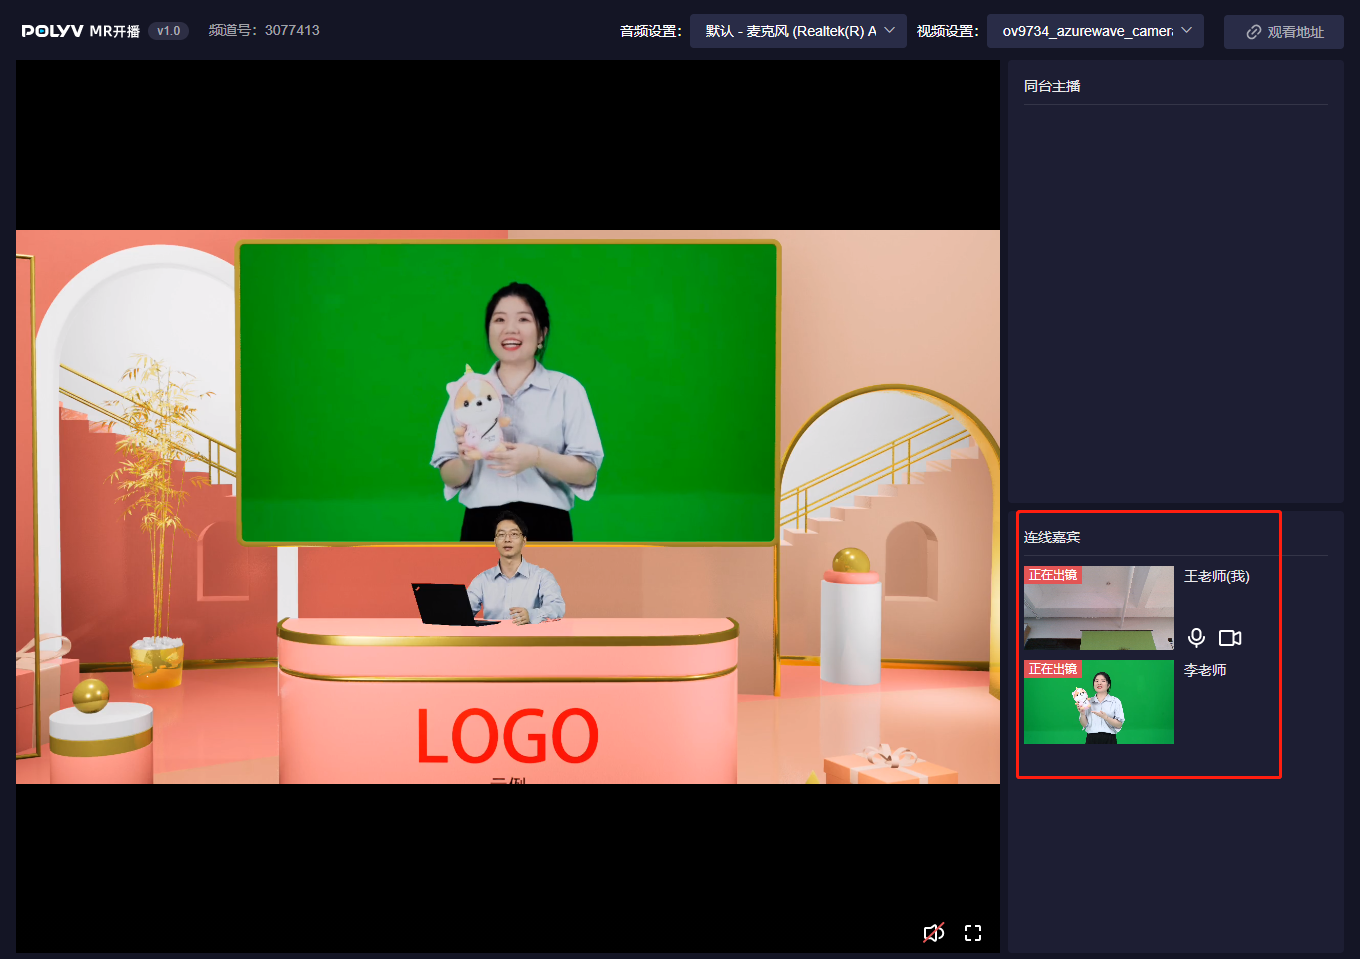
Co-host Stage
Function Description: Co-hosts connect by opening the co-host stage address via a web browser. Once connected, the co-host can be used as the host's video source within the virtual scene. This is typically used when the co-host has hardware like a green screen and can connect as a remote host or create a remote co-hosting effect with the console host.
Usage Instructions:
- Go to the backend, find the corresponding MR channel, click "Live Stream Link," and select the "Co-host Stage" option.
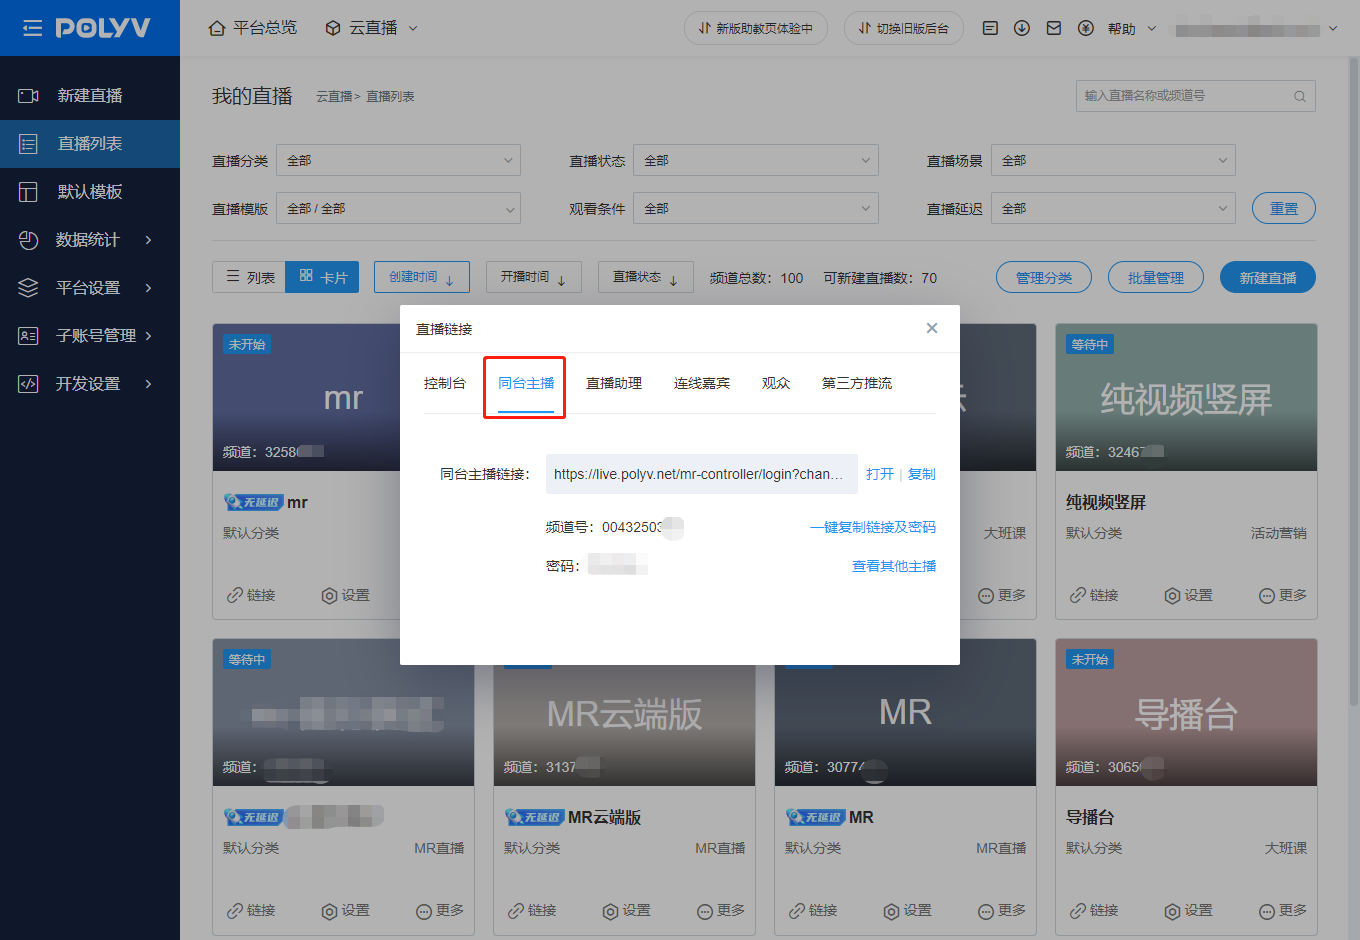
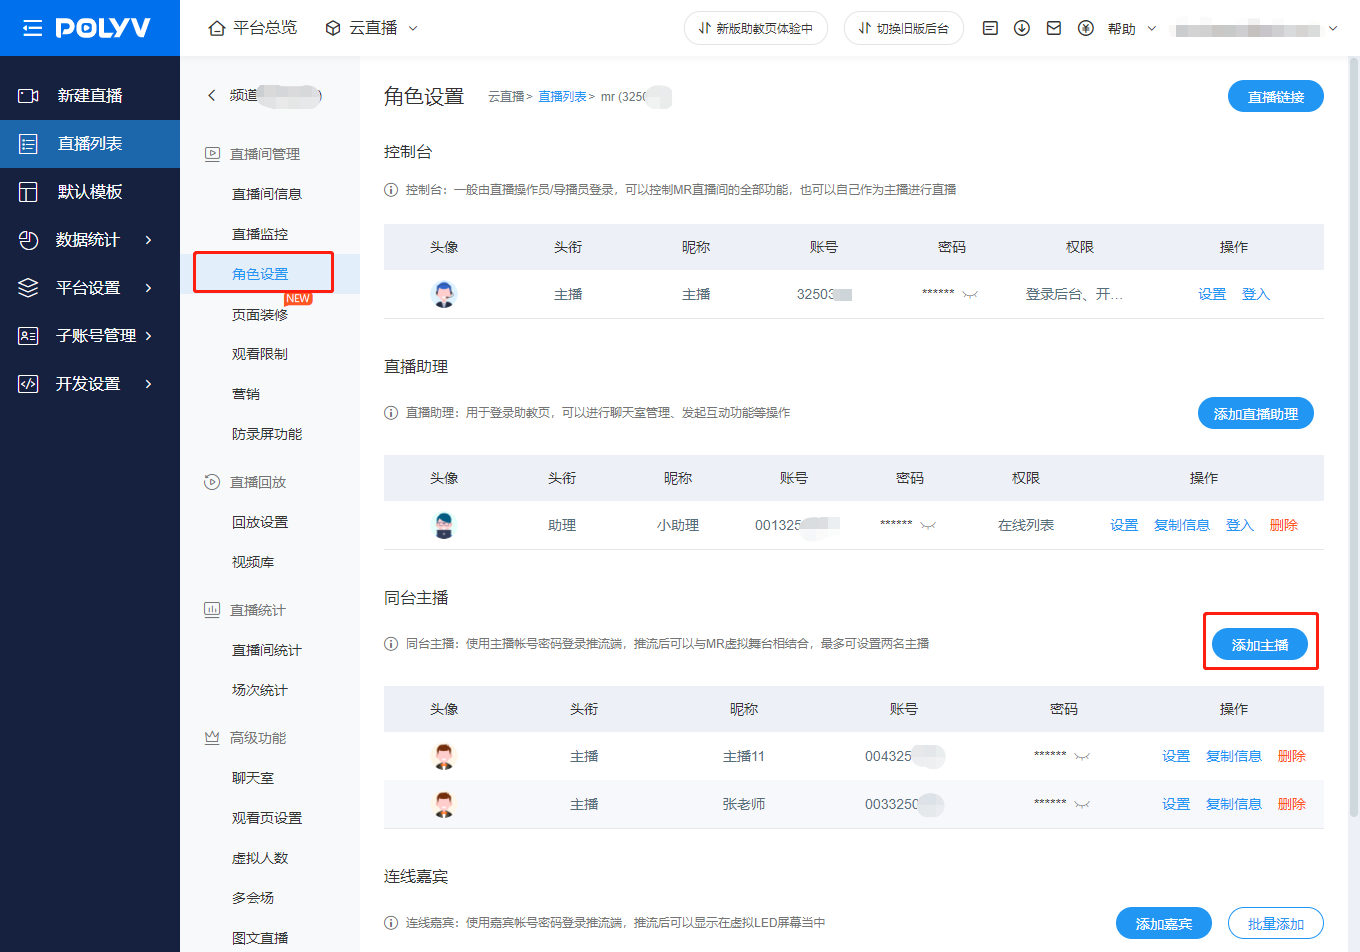
By default, only one co-host's information is displayed. For multiple co-hosts, click "Channel Settings" - "Role Settings." Here you can add multiple co-host accounts and modify nicknames, passwords, etc. Currently, a maximum of two co-hosts can be set.
- Send the connection address and password to the co-host. The co-host must log in using a Chromium-based browser (same requirements as the console). After logging in, the co-host is "Off Camera" by default. They can see the live stream video but cannot see other connected users, and other connected users cannot see them.
- The console can now see the user as connected in the "Guest Connection" list. In the host's video source settings, select "Co-host Stage" and then select this user.
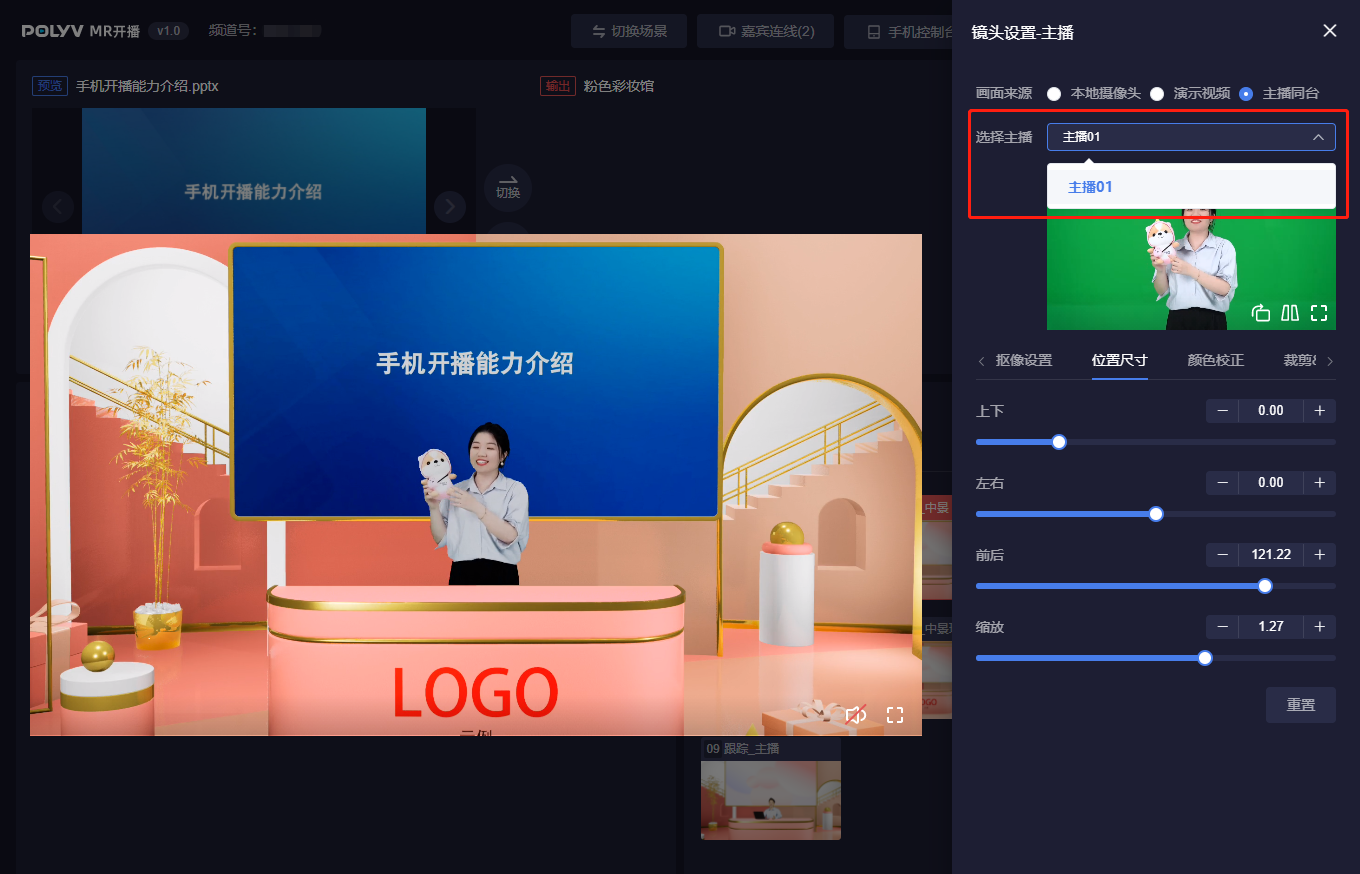
Now enable the host's video display. The user will appear in the virtual scene. You can perform keying, position adjustment, and other operations on this co-host's video.
- When the console displays the co-host's video, the co-host becomes "On Camera." If there are other "On Camera" users, the co-host can now see and talk to them.
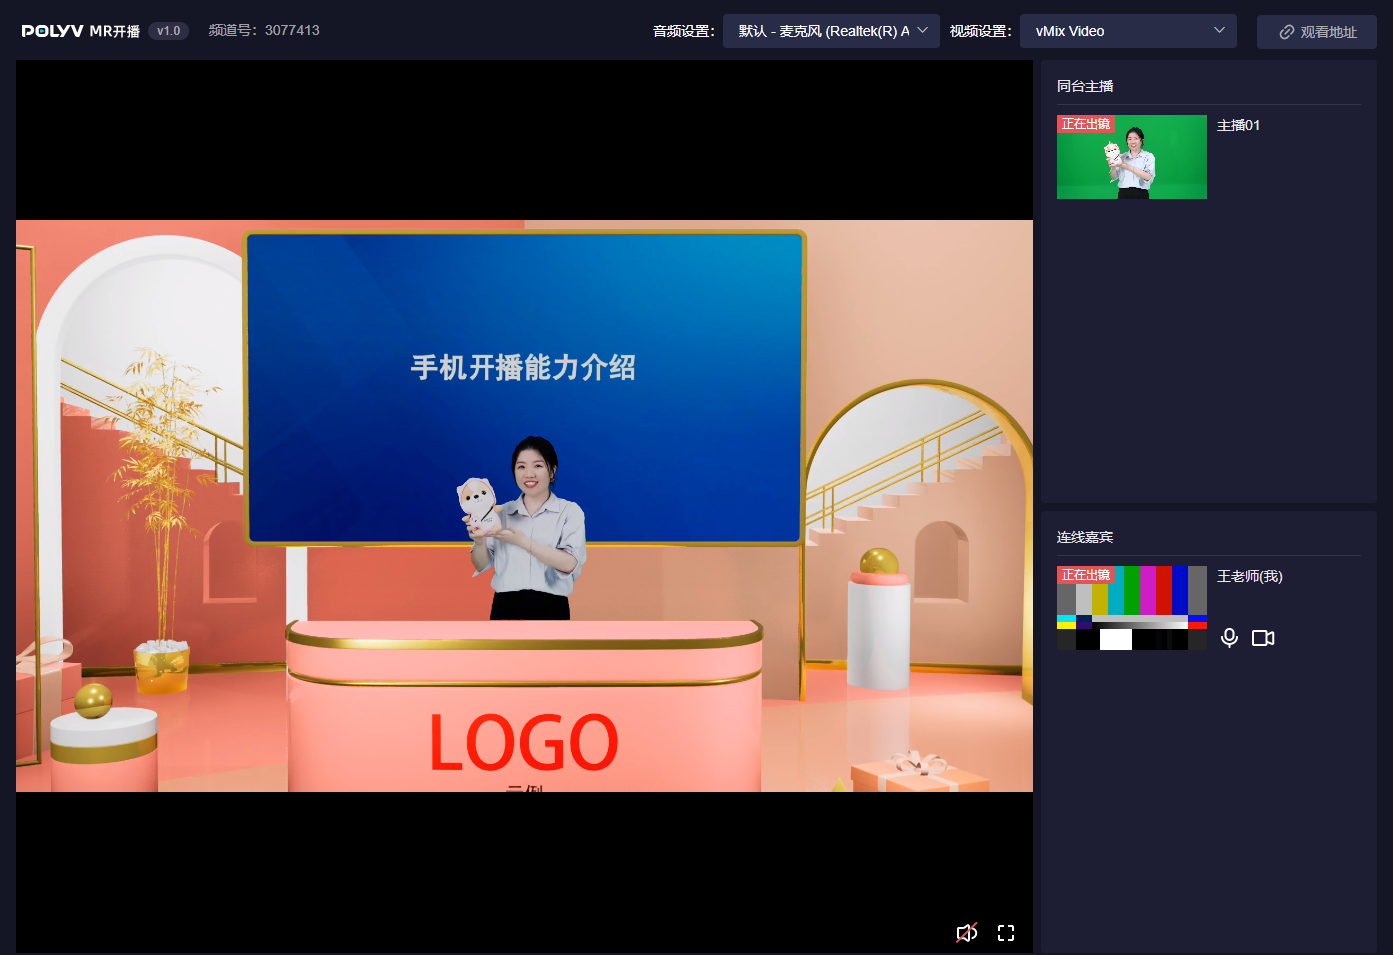
Currently, only the "Brand Launch" and "Knowledge Sharing" scenes support dual-host display.
Hardware & Network Requirements for Co-streaming Users
Configuration requirements for co-host stage users are the same as for the console. Refer to the first chapter of this document.
Network requirements for guest connection users are the same as for the console. Hardware requirements are less strict; a green screen, HD camera, lavalier microphone, and other professional equipment are not necessary. A computer with a standard camera and headphones is sufficient for participating in an MR connection.
Browser Requirements for Co-streaming Users
Both guest connection and co-host stage users are recommended to use the latest Google Chrome or other Chromium-based browsers, such as QQ Browser, 360 Speed Browser, etc. Safari, Firefox, IE, and other browsers are currently not supported for participating in MR co-streaming.
Mobile Console
Scan the QR code to enter the mobile console and control the scene. The mobile console has common functions like material switching and camera movement switching. Functions like camera settings, material upload, or data configuration still need to be done on the computer.
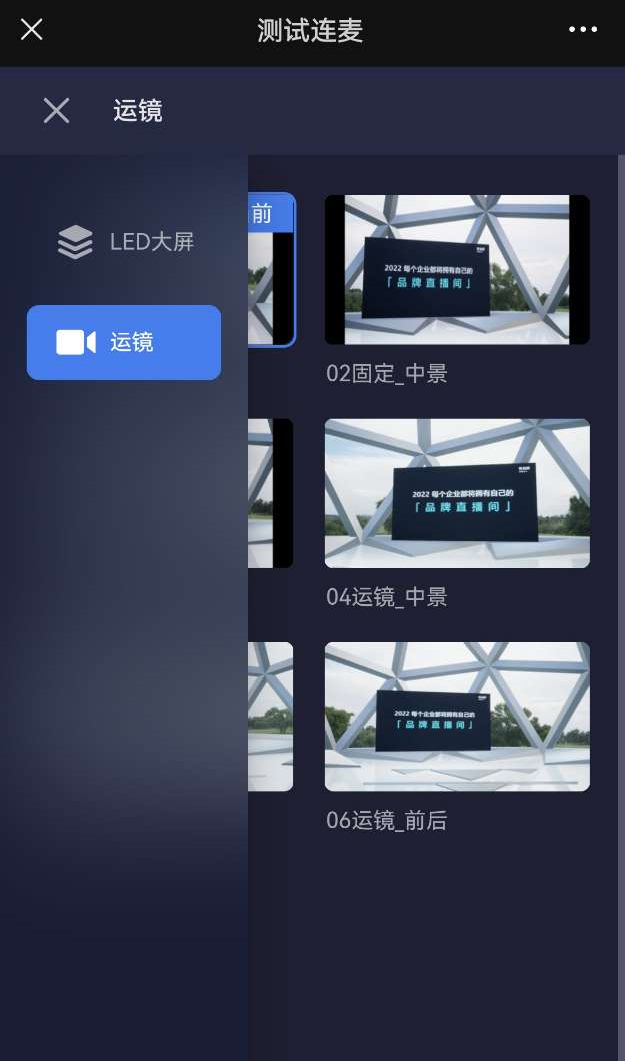
The computer and mobile console are typically used as follows: Before the official live stream, use the computer to upload necessary materials, configure relevant data, and debug the host's position and keying parameters. During the host's live stream, the host can use the mobile console on stage to switch materials, turn PPT pages, or show/hide data charts.
Streaming
After completing all pre-live stream preparations, click "Start Streaming" to push the output video to the channel's viewing page.
MR channels use Polyv's low-latency technology for streaming. The delay between the viewing page and the control console is kept within one second to ensure the best MR live stream effect.
