WeCom Feature Operations (Requires Activation)
1. WeCom Authorization & Integration
1.1 Scan Code Authorization
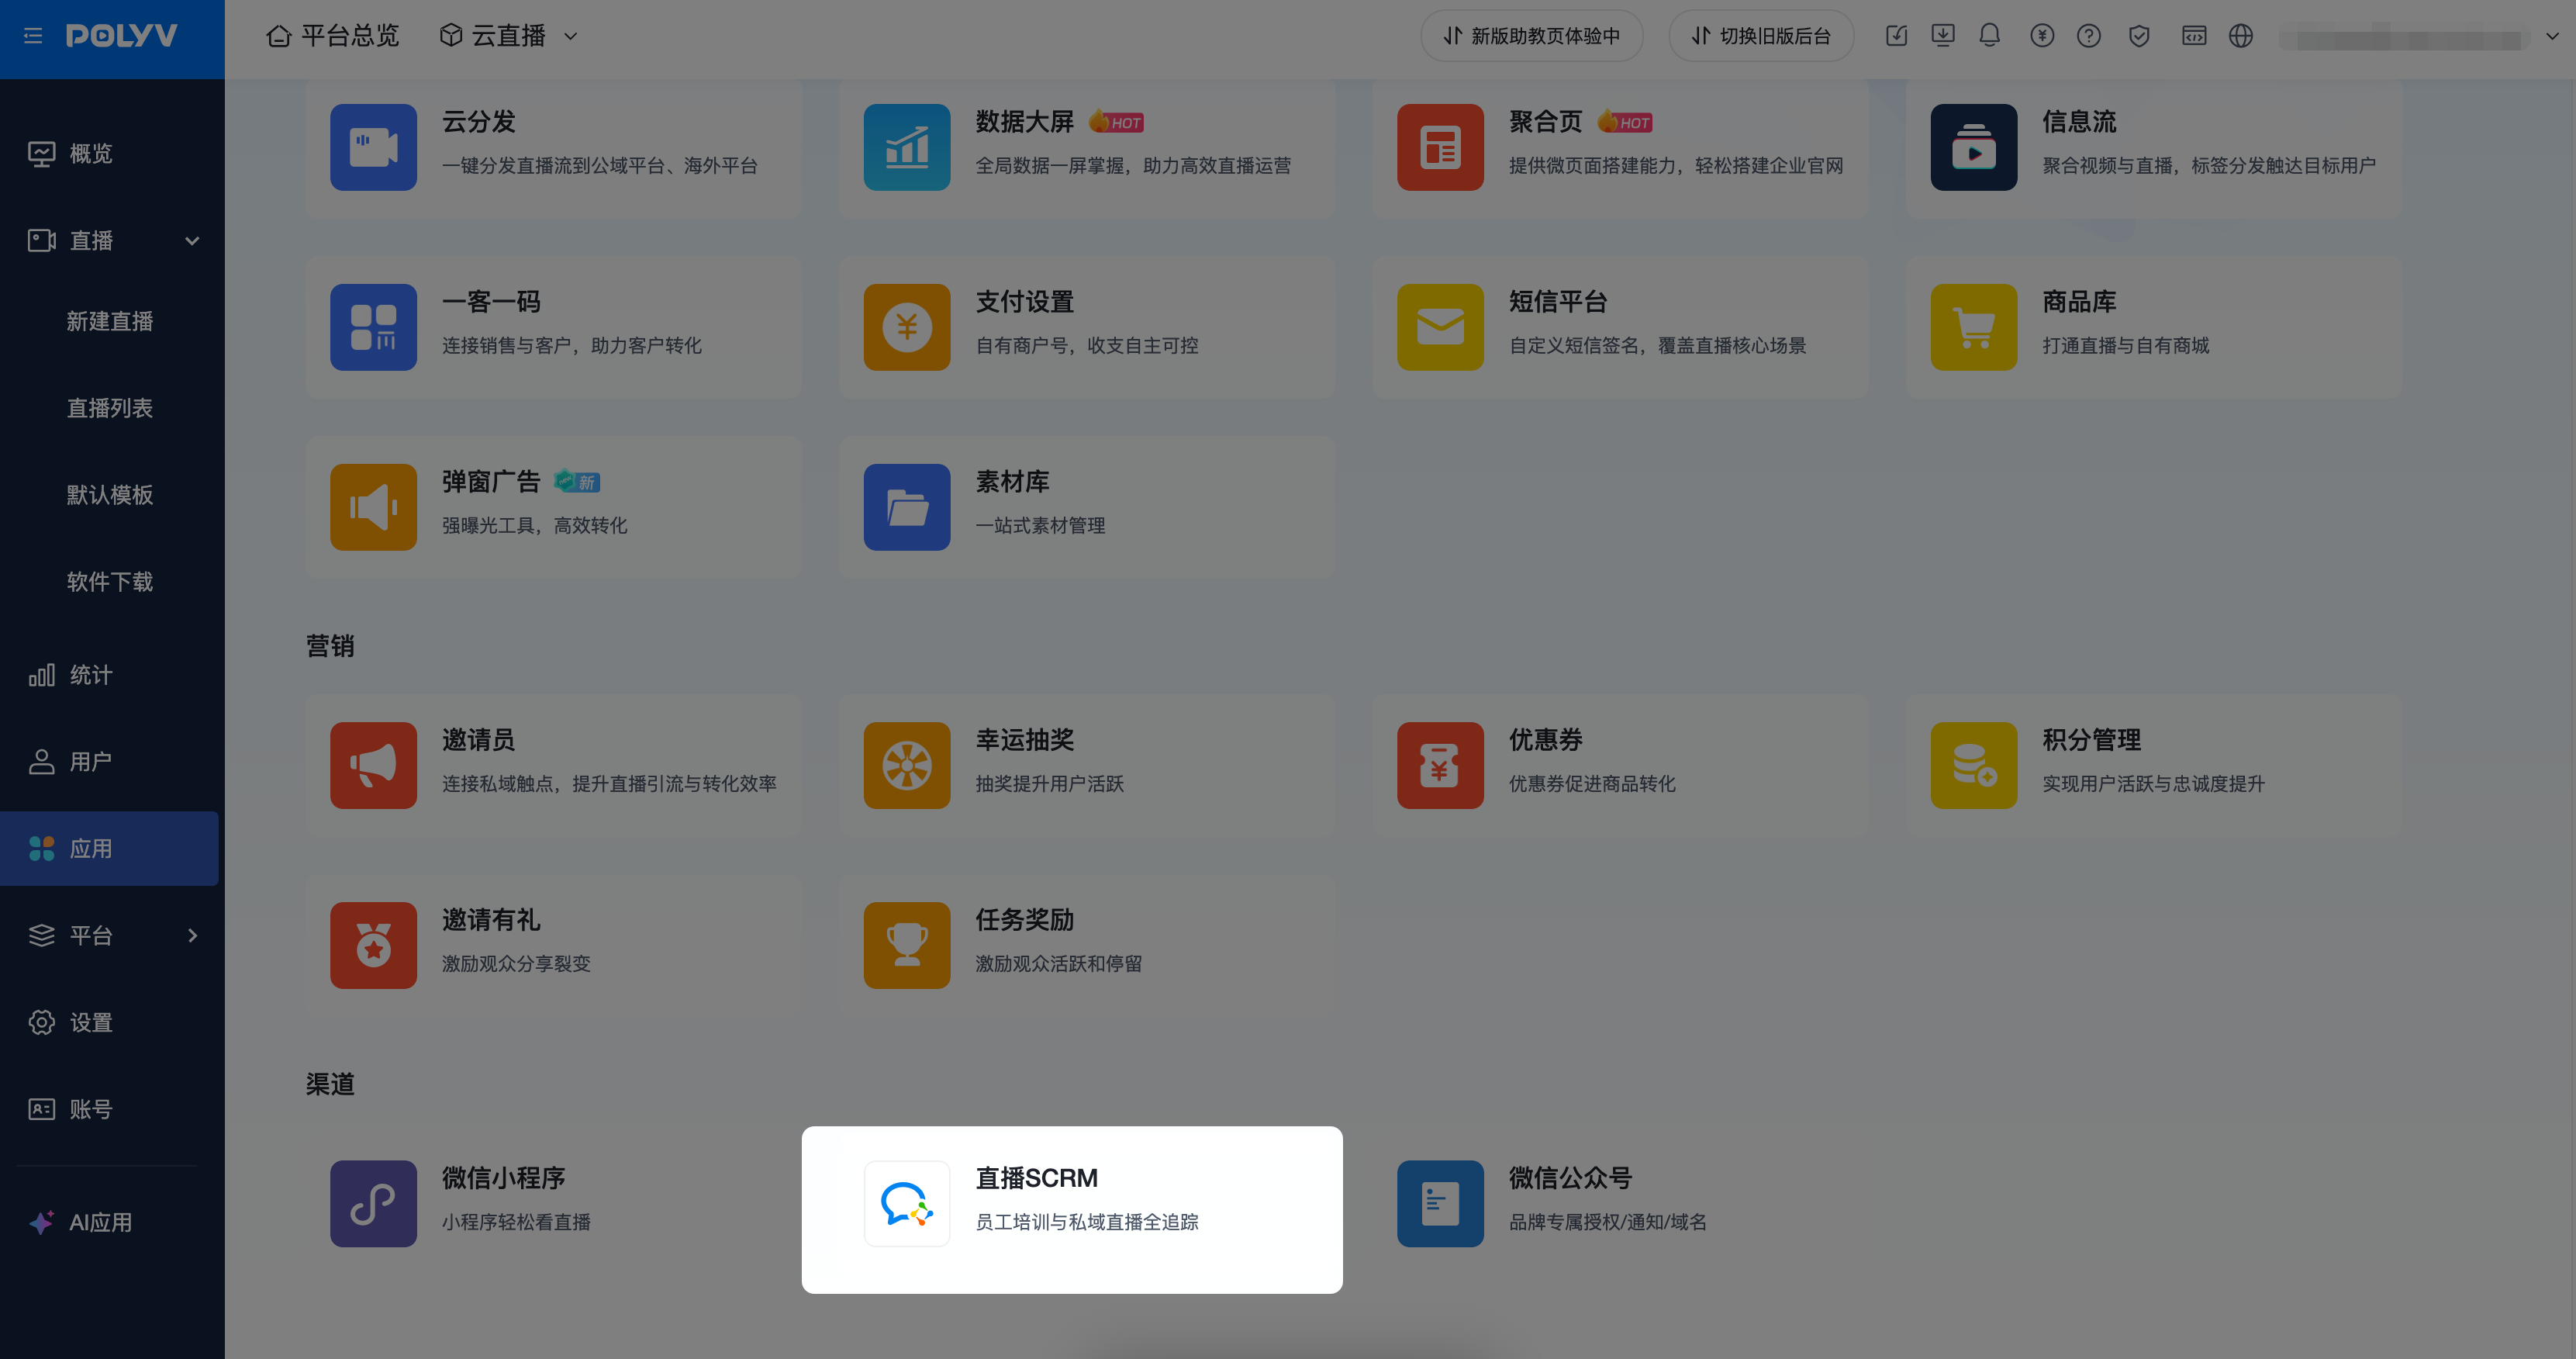
From the Application Center, click on Live SCRM to enter WeCom, then go to WeCom Integration. Turn on the authorization switch and click "Authorize Now". Use a WeCom admin account to scan the QR code to install [Polyv Video Service] and perform the authorization operation on the mobile client.
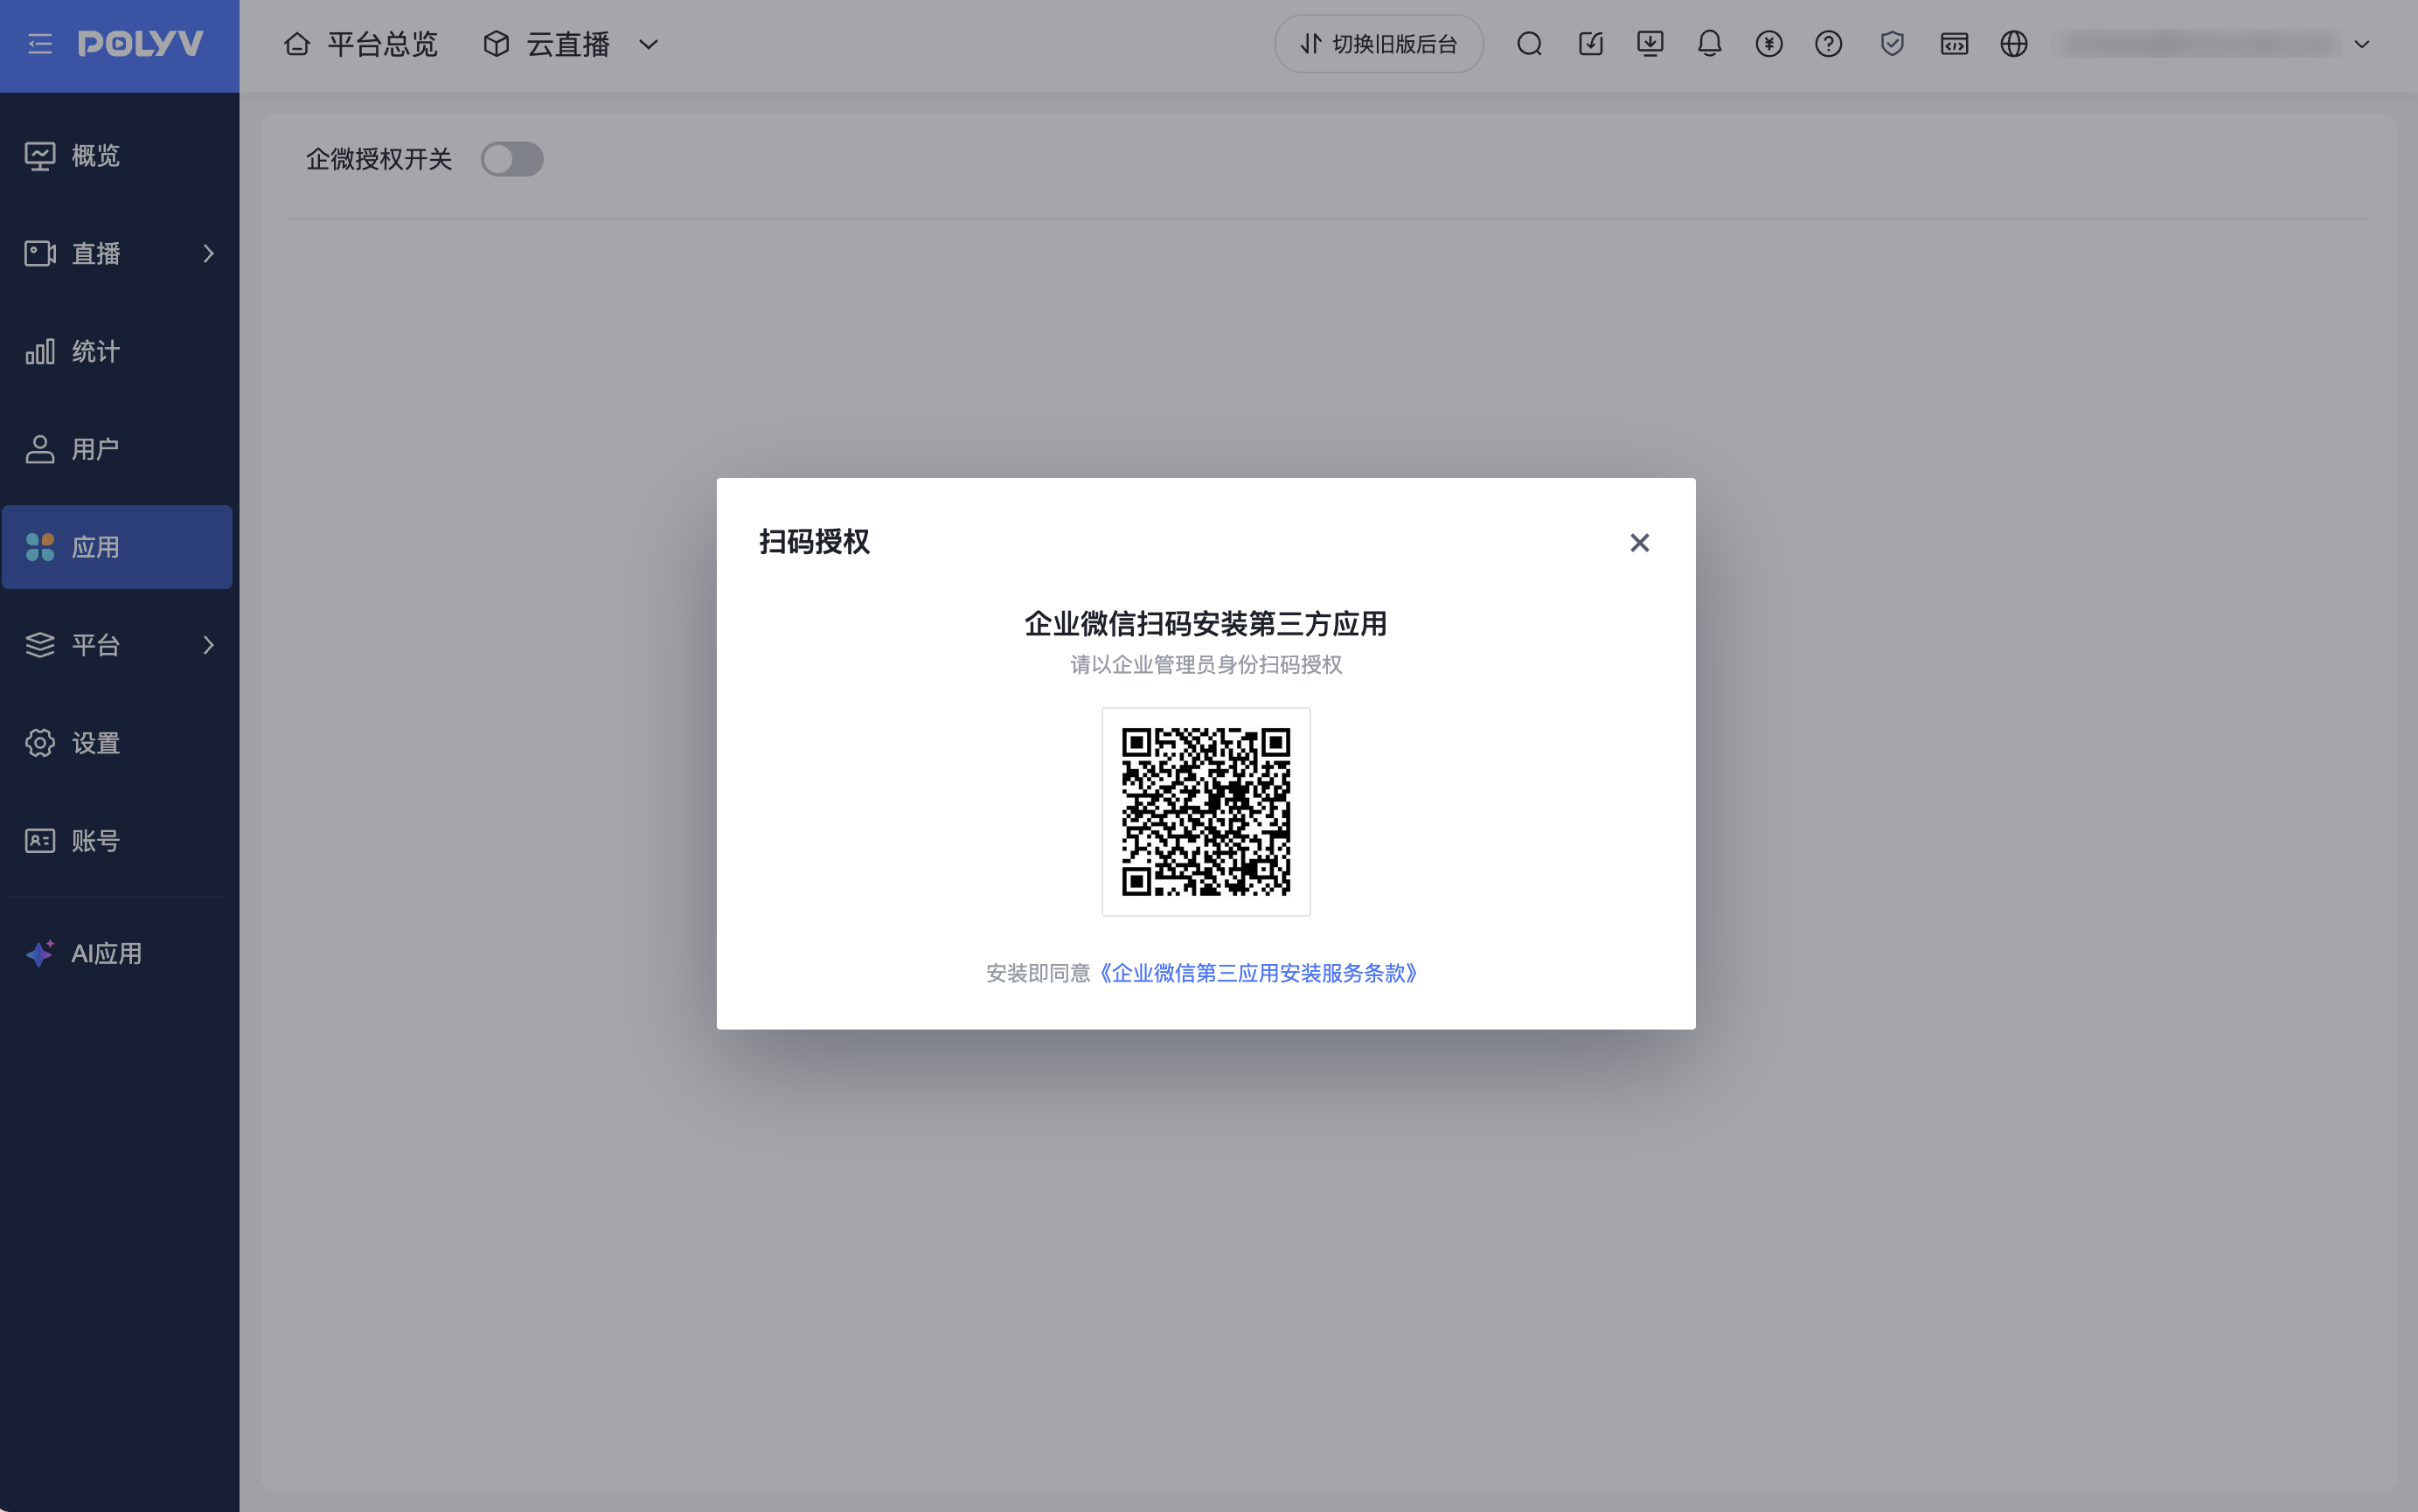
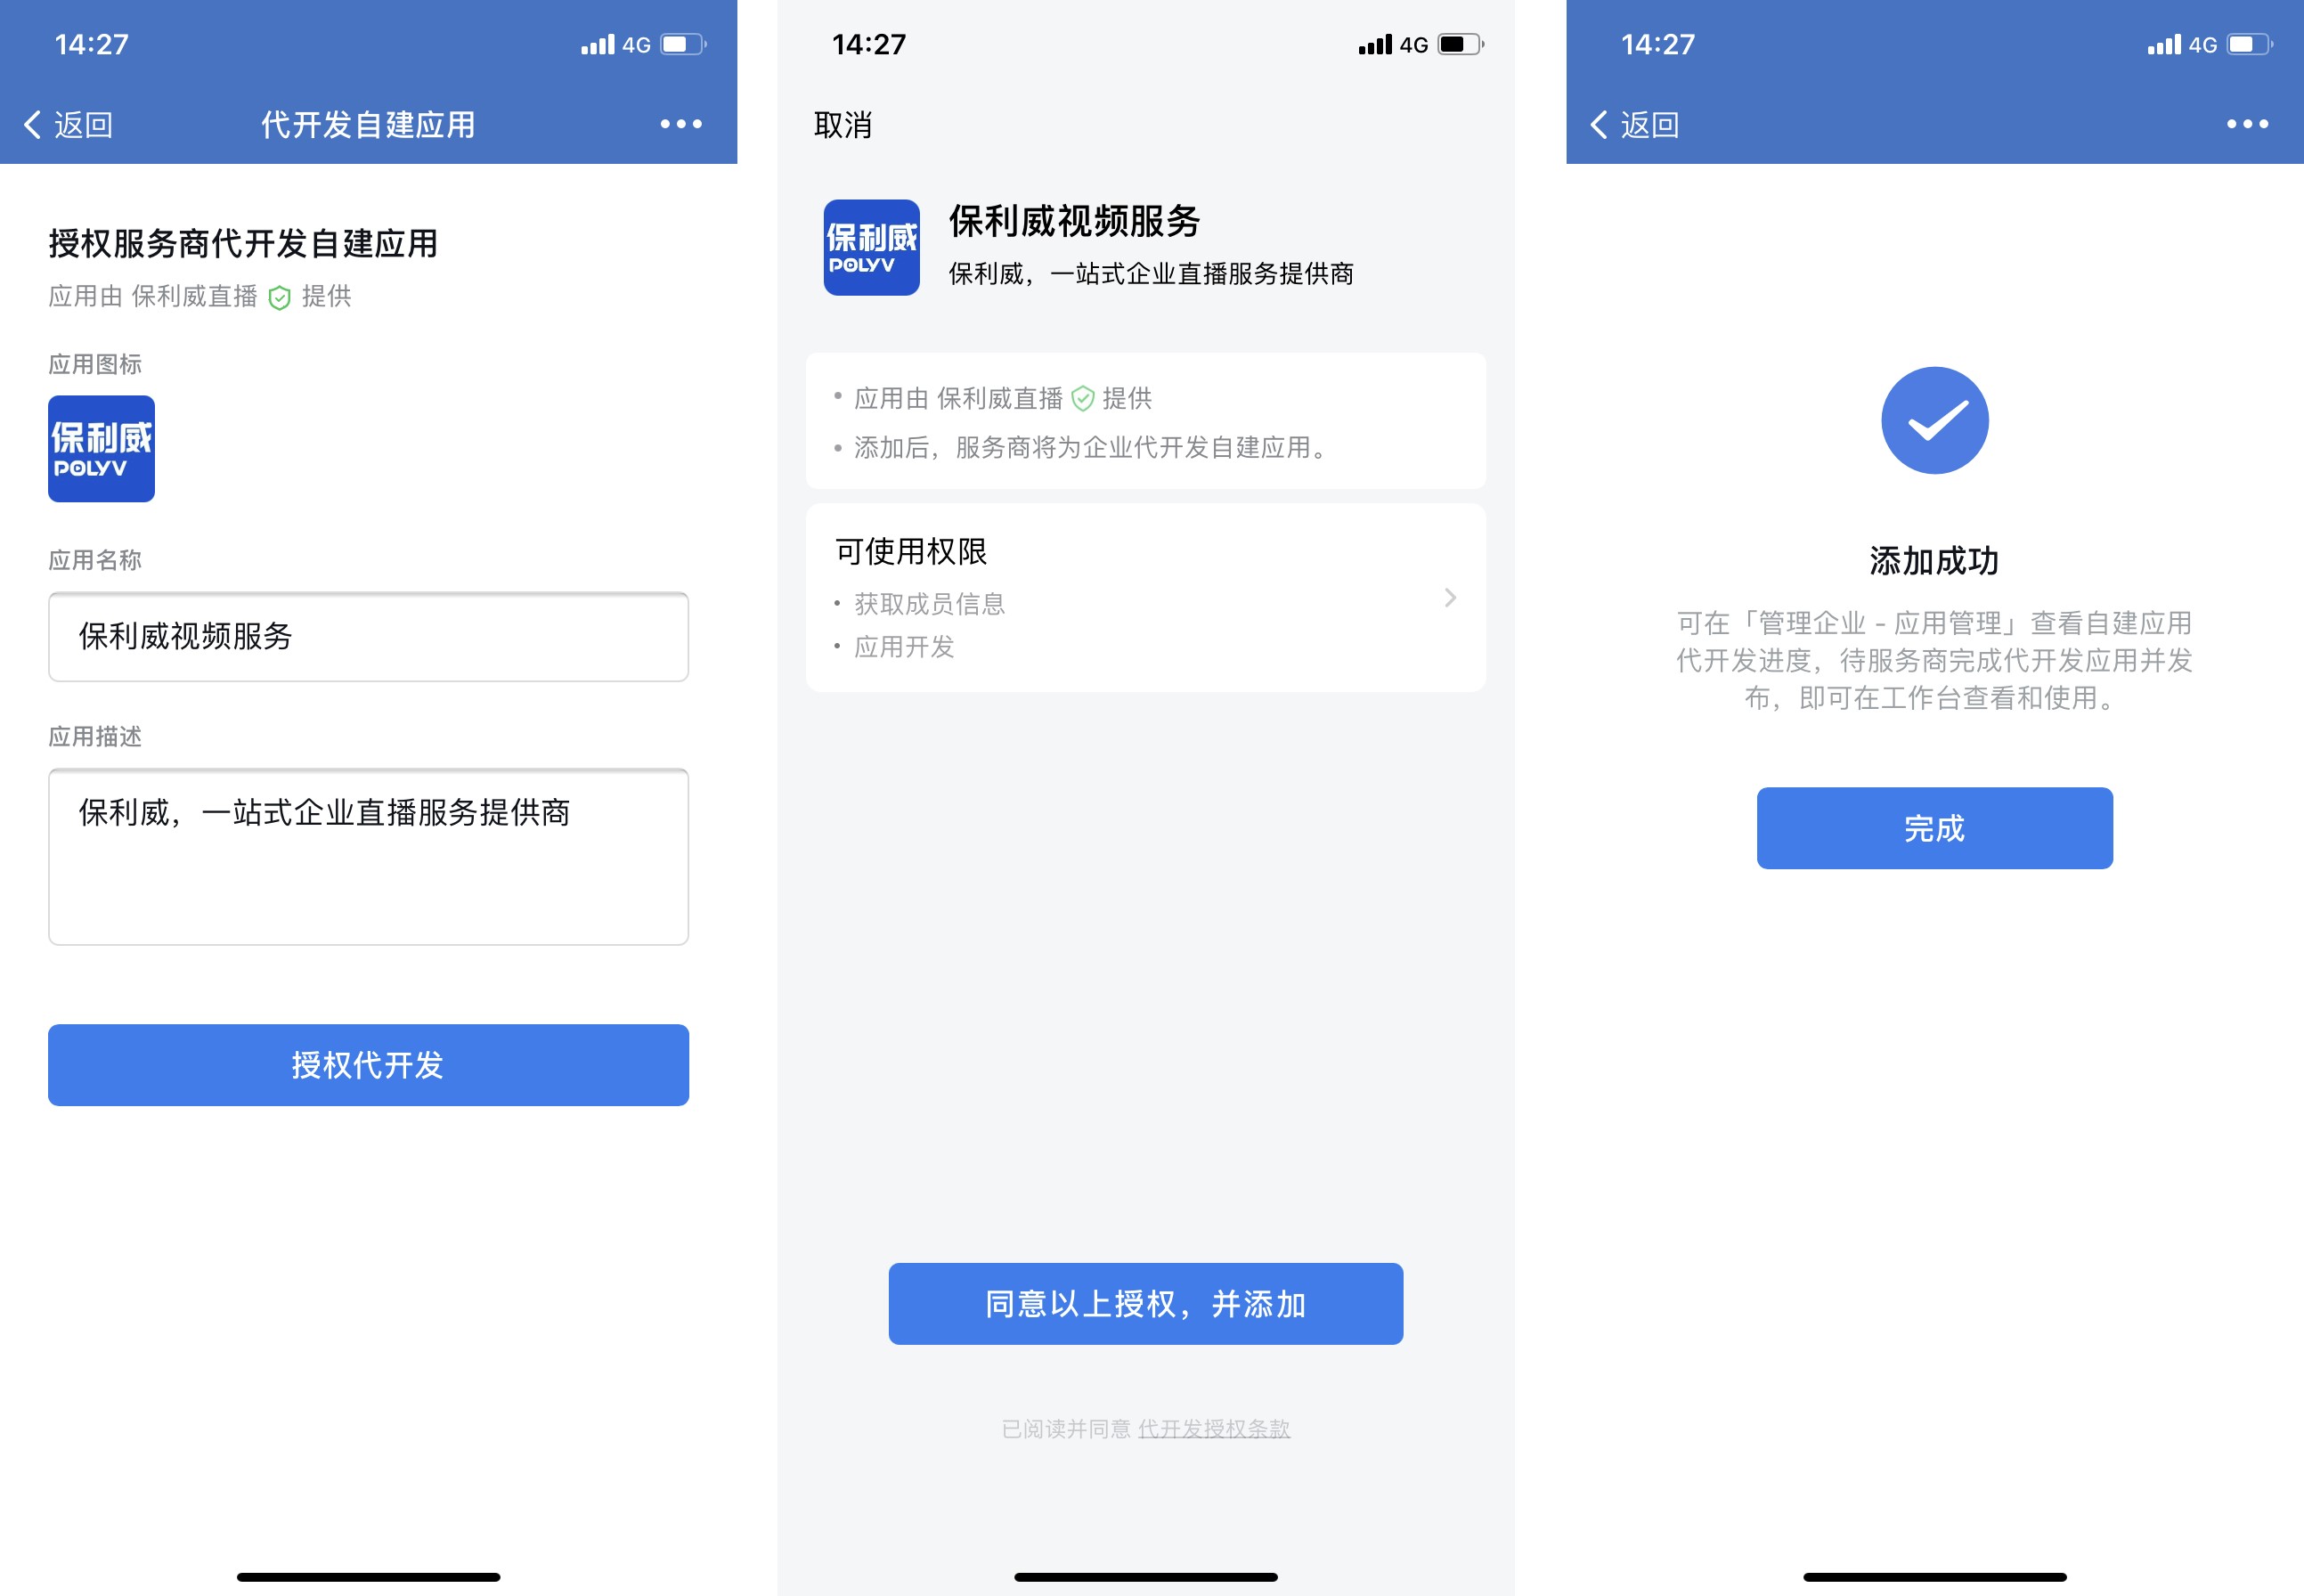
Perform the authorization operation after scanning the QR code.
1.2 Inform Customer Service for Application Deployment Configuration
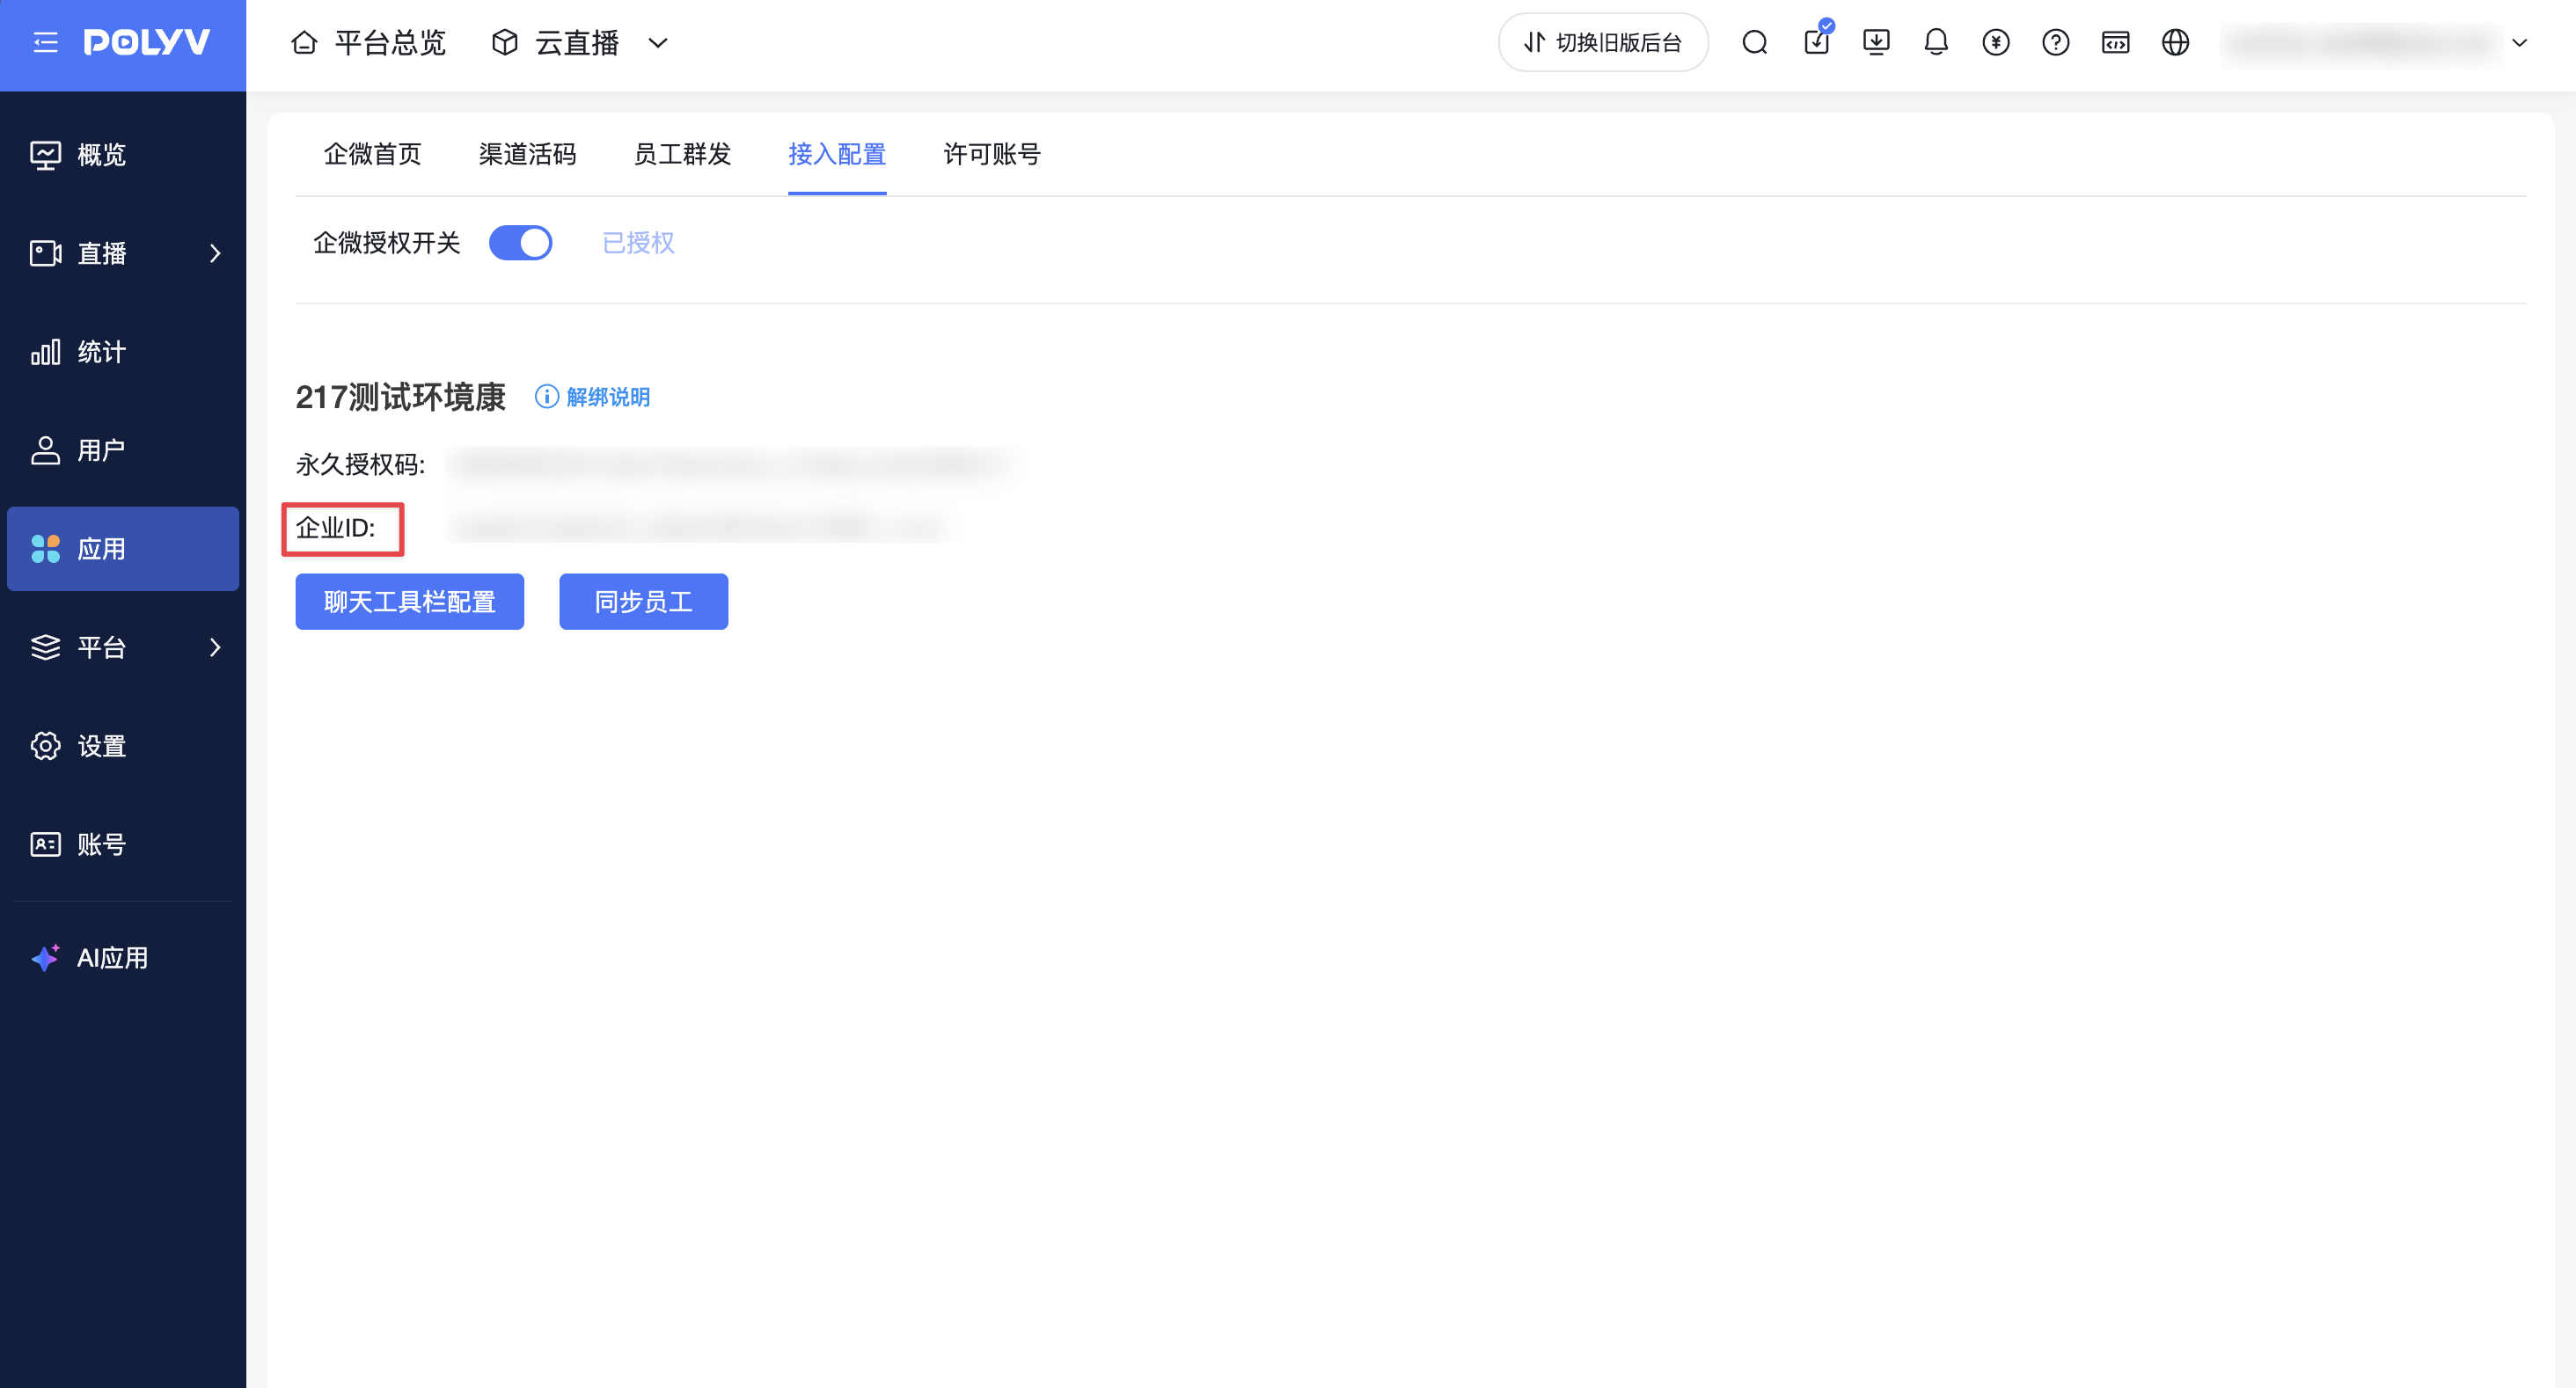
After installation, inform your assigned customer service representative to perform the deployment configuration for the agent-developed application. Provide the corporate ID as shown in the image below. The official review time is estimated at 1-3 business days; the actual time is subject to notification from customer service.
1.3 Consent to Permissions and Configure Visibility Range
During the deployment configuration by customer service, the admin's WeCom will receive a push notification from the WeCom team. You need to consent to the permission requests and configure the visibility range (add the admin who scanned the code and all members who need to use Polyv to the visible range. Crucially, you must add the organizational structure, not individual WeCom members).
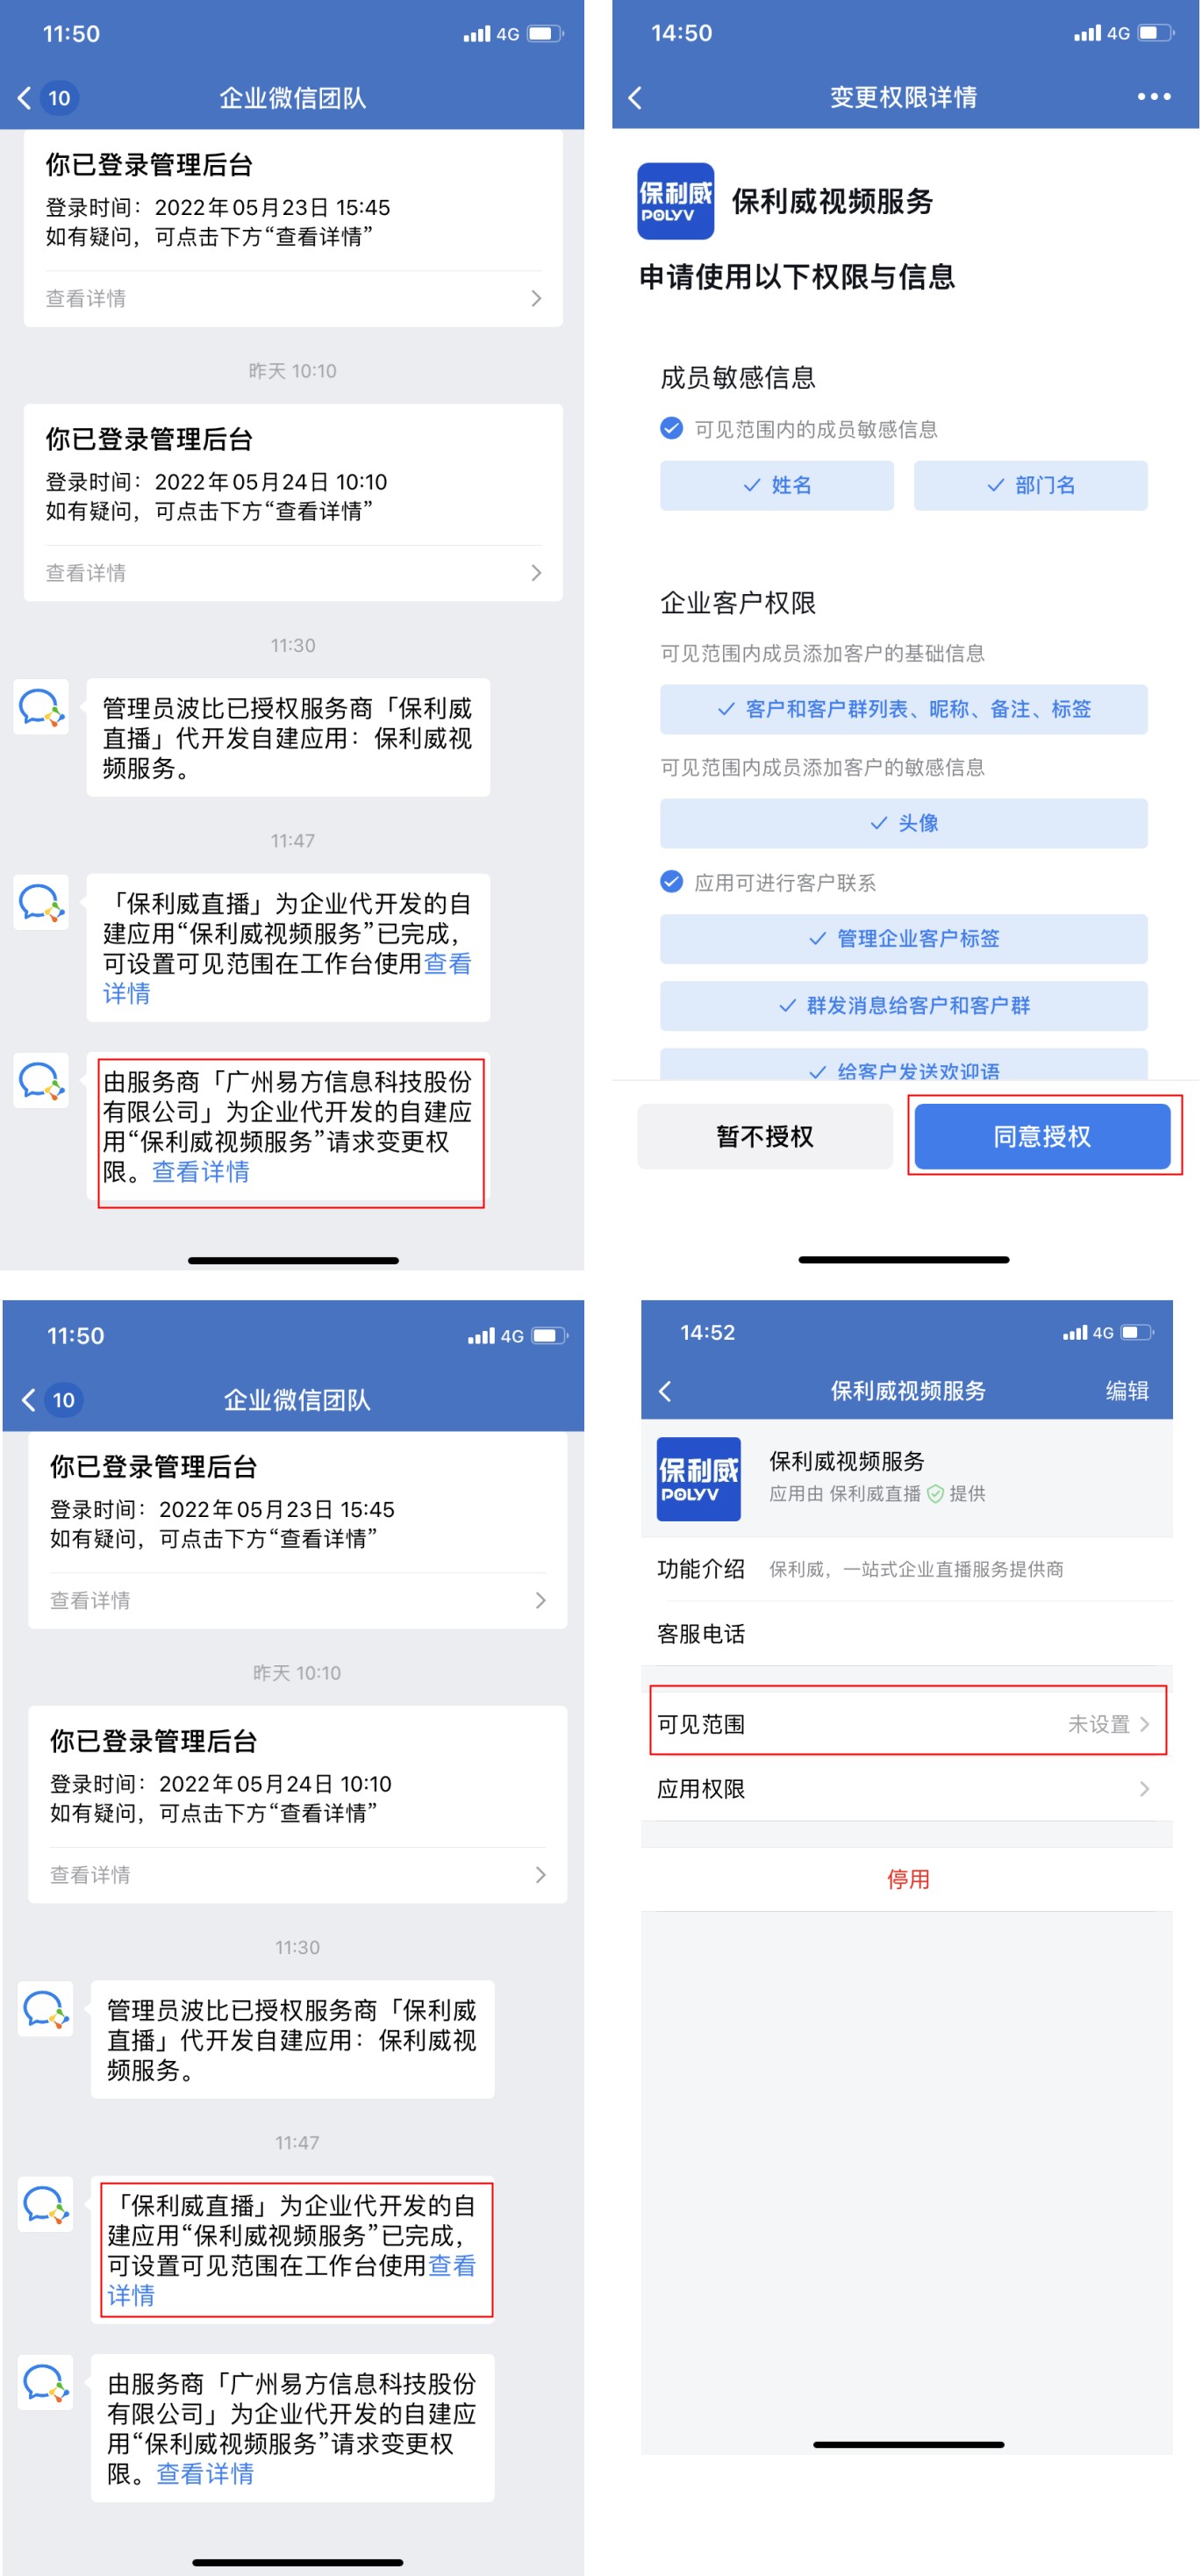
Key Notes:
(1) If you don't receive the push notification from the WeCom team on your mobile device, you can configure it directly via the web interface.
① Permission Settings: Obtain the required permission information from customer service, check all boxes, and save the changes.
Operation Path: WeCom Admin Backend [App Management] > [Polyv Video Service] > [Authorization Info] > [View] > [Custom Permissions] > Click [Member Sensitive Info / Enterprise Customer Permissions]
② Visibility Range Settings for Polyv Video Service: Select the members who need to use the service, check the boxes, and save. (Ensure the admin who registered via scan and the required members are all within the visible range, i.e., consistent with the number of visible members set for the Polyv Video Service above).
Operation Path: WeCom Admin Backend [App Management] > [Polyv Live Service] > Edit and add members.
(2) For external marketing features, WeCom members must have customer contact permissions to use them normally. Therefore, before using the Polyv Live Service, ensure that the WeCom members using it have customer contact permissions.
2. Viewing Conditions
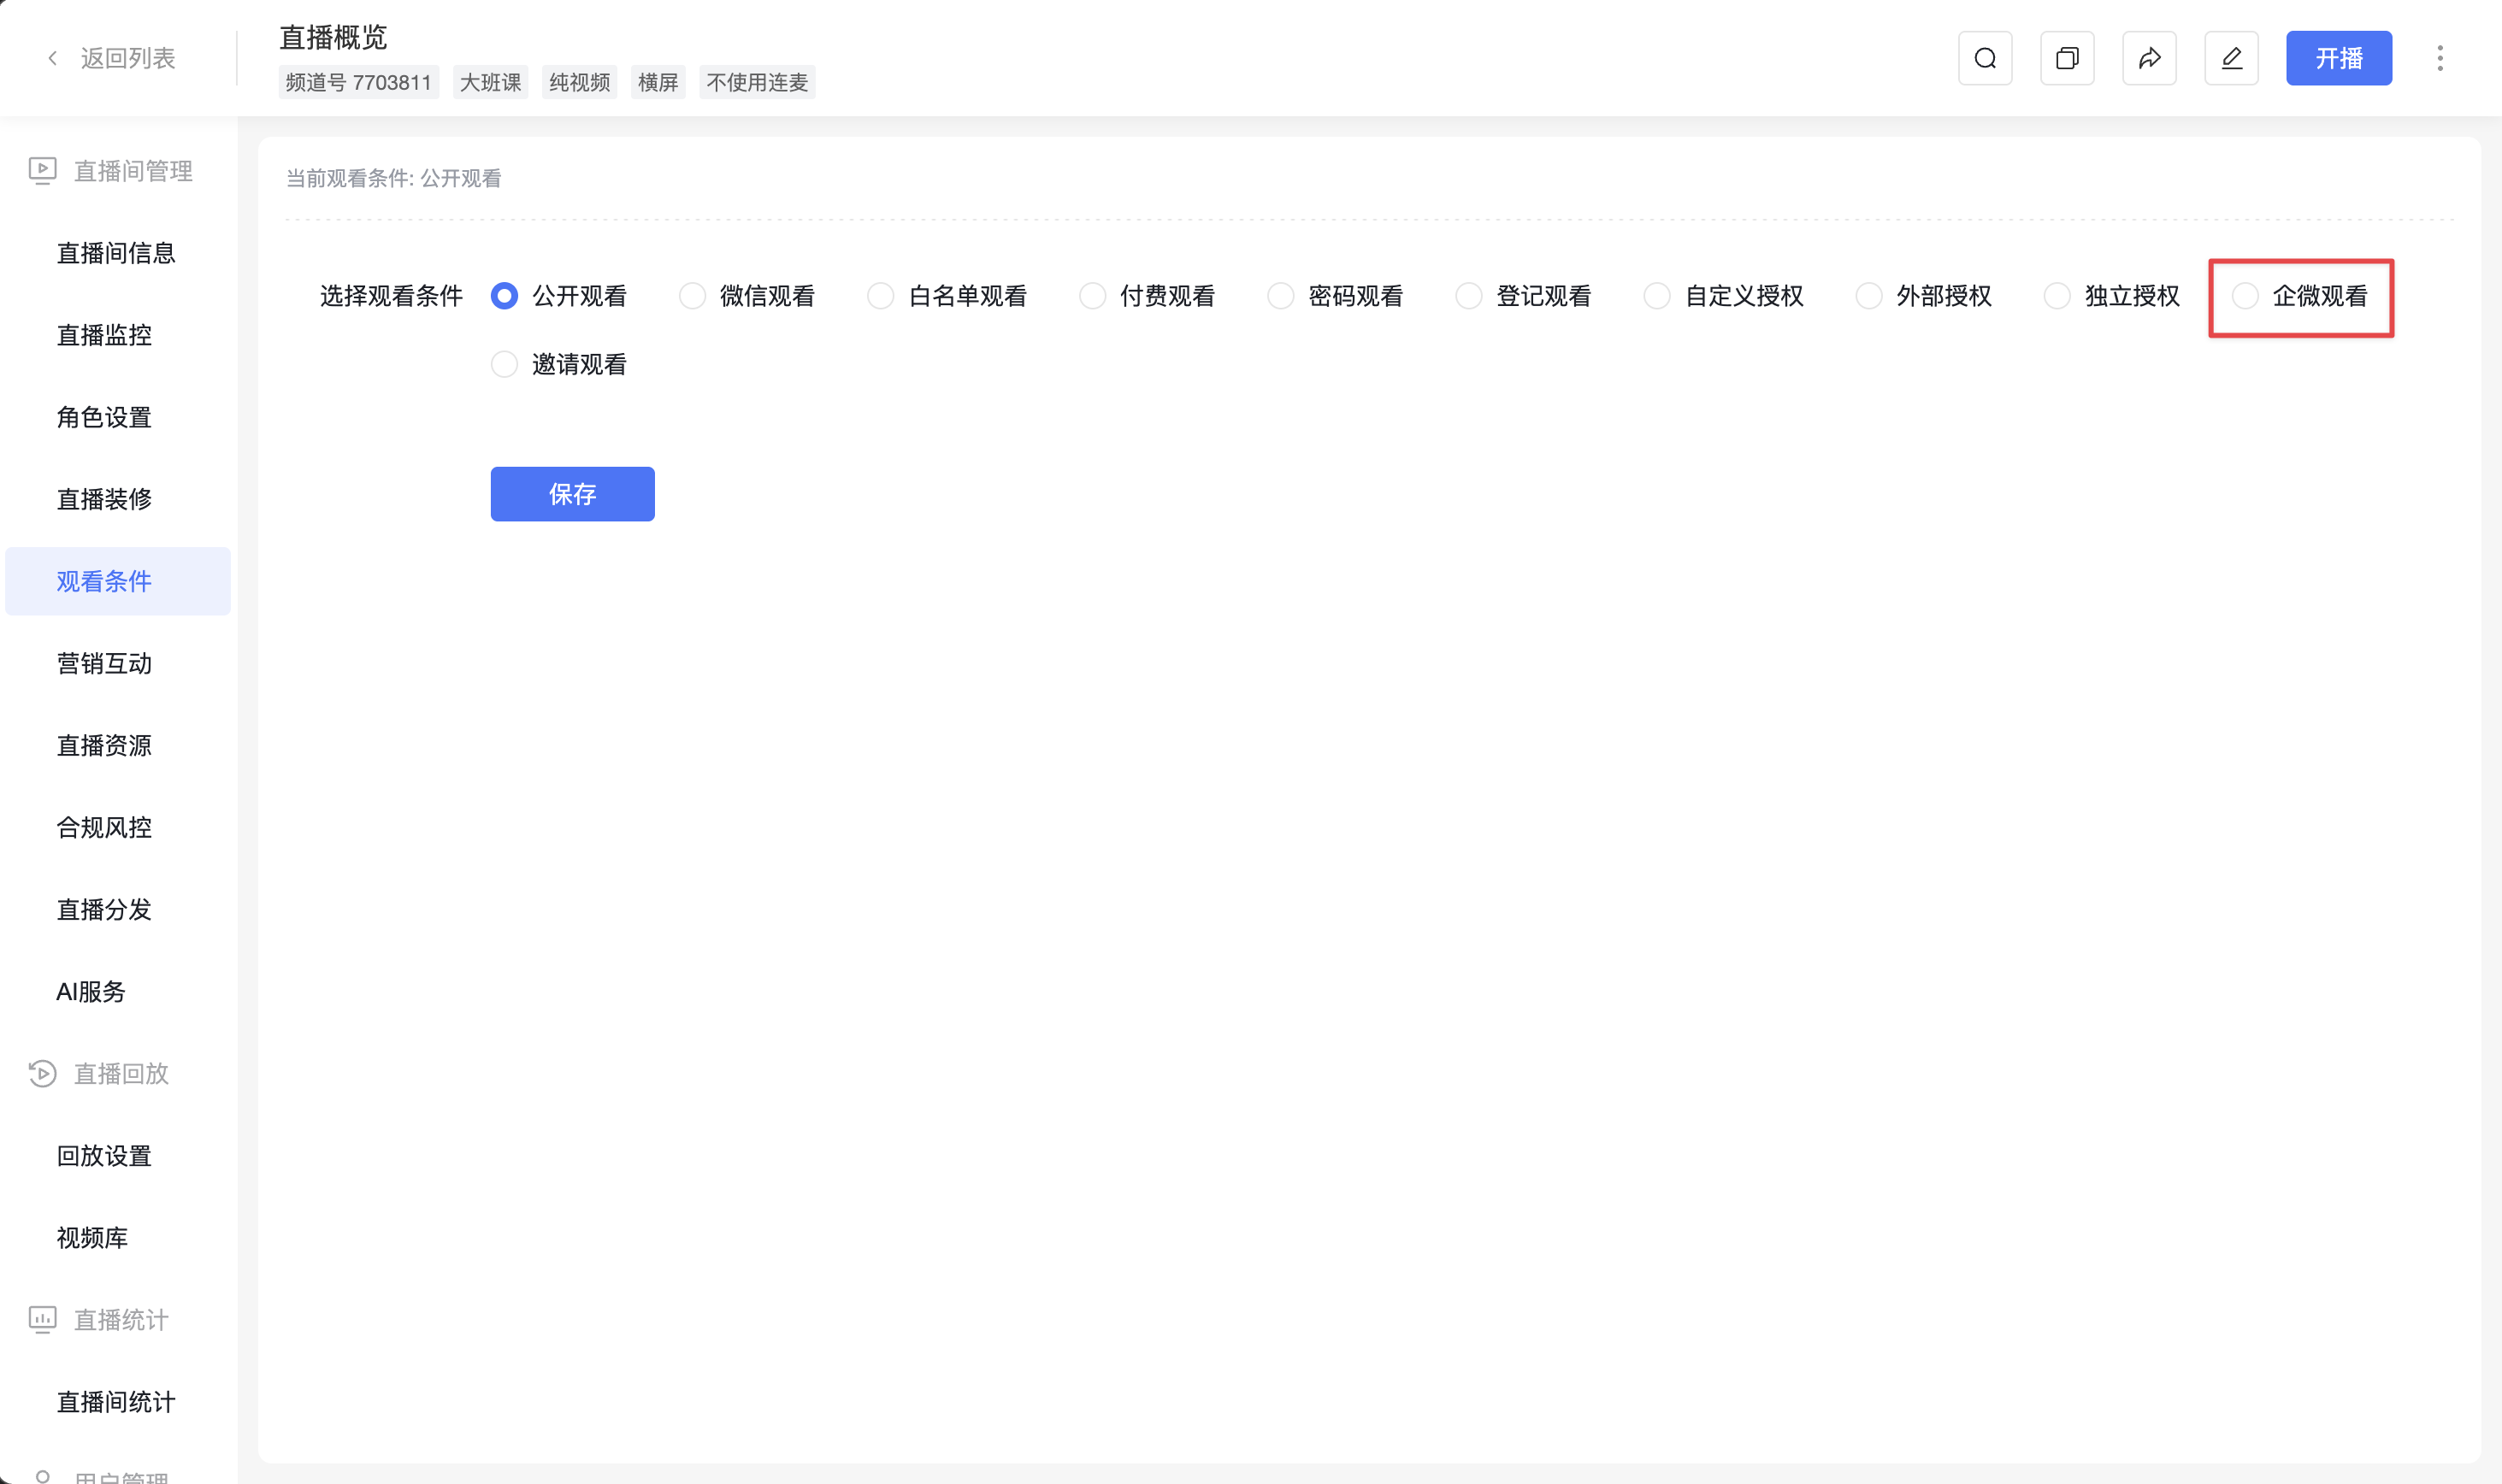
2.1 WeCom Viewing
Using the WeCom internal training scenario can maximize internal live stream security. Employee identities within the enterprise are verified via WeCom before they can enter the live room. Viewing data can be linked to WeCom employees. It also supports external contacts of WeCom employees entering the live room.
3. Feature Description
3.1 Go to Backend [WeCom Integration] to Sync Employee Information
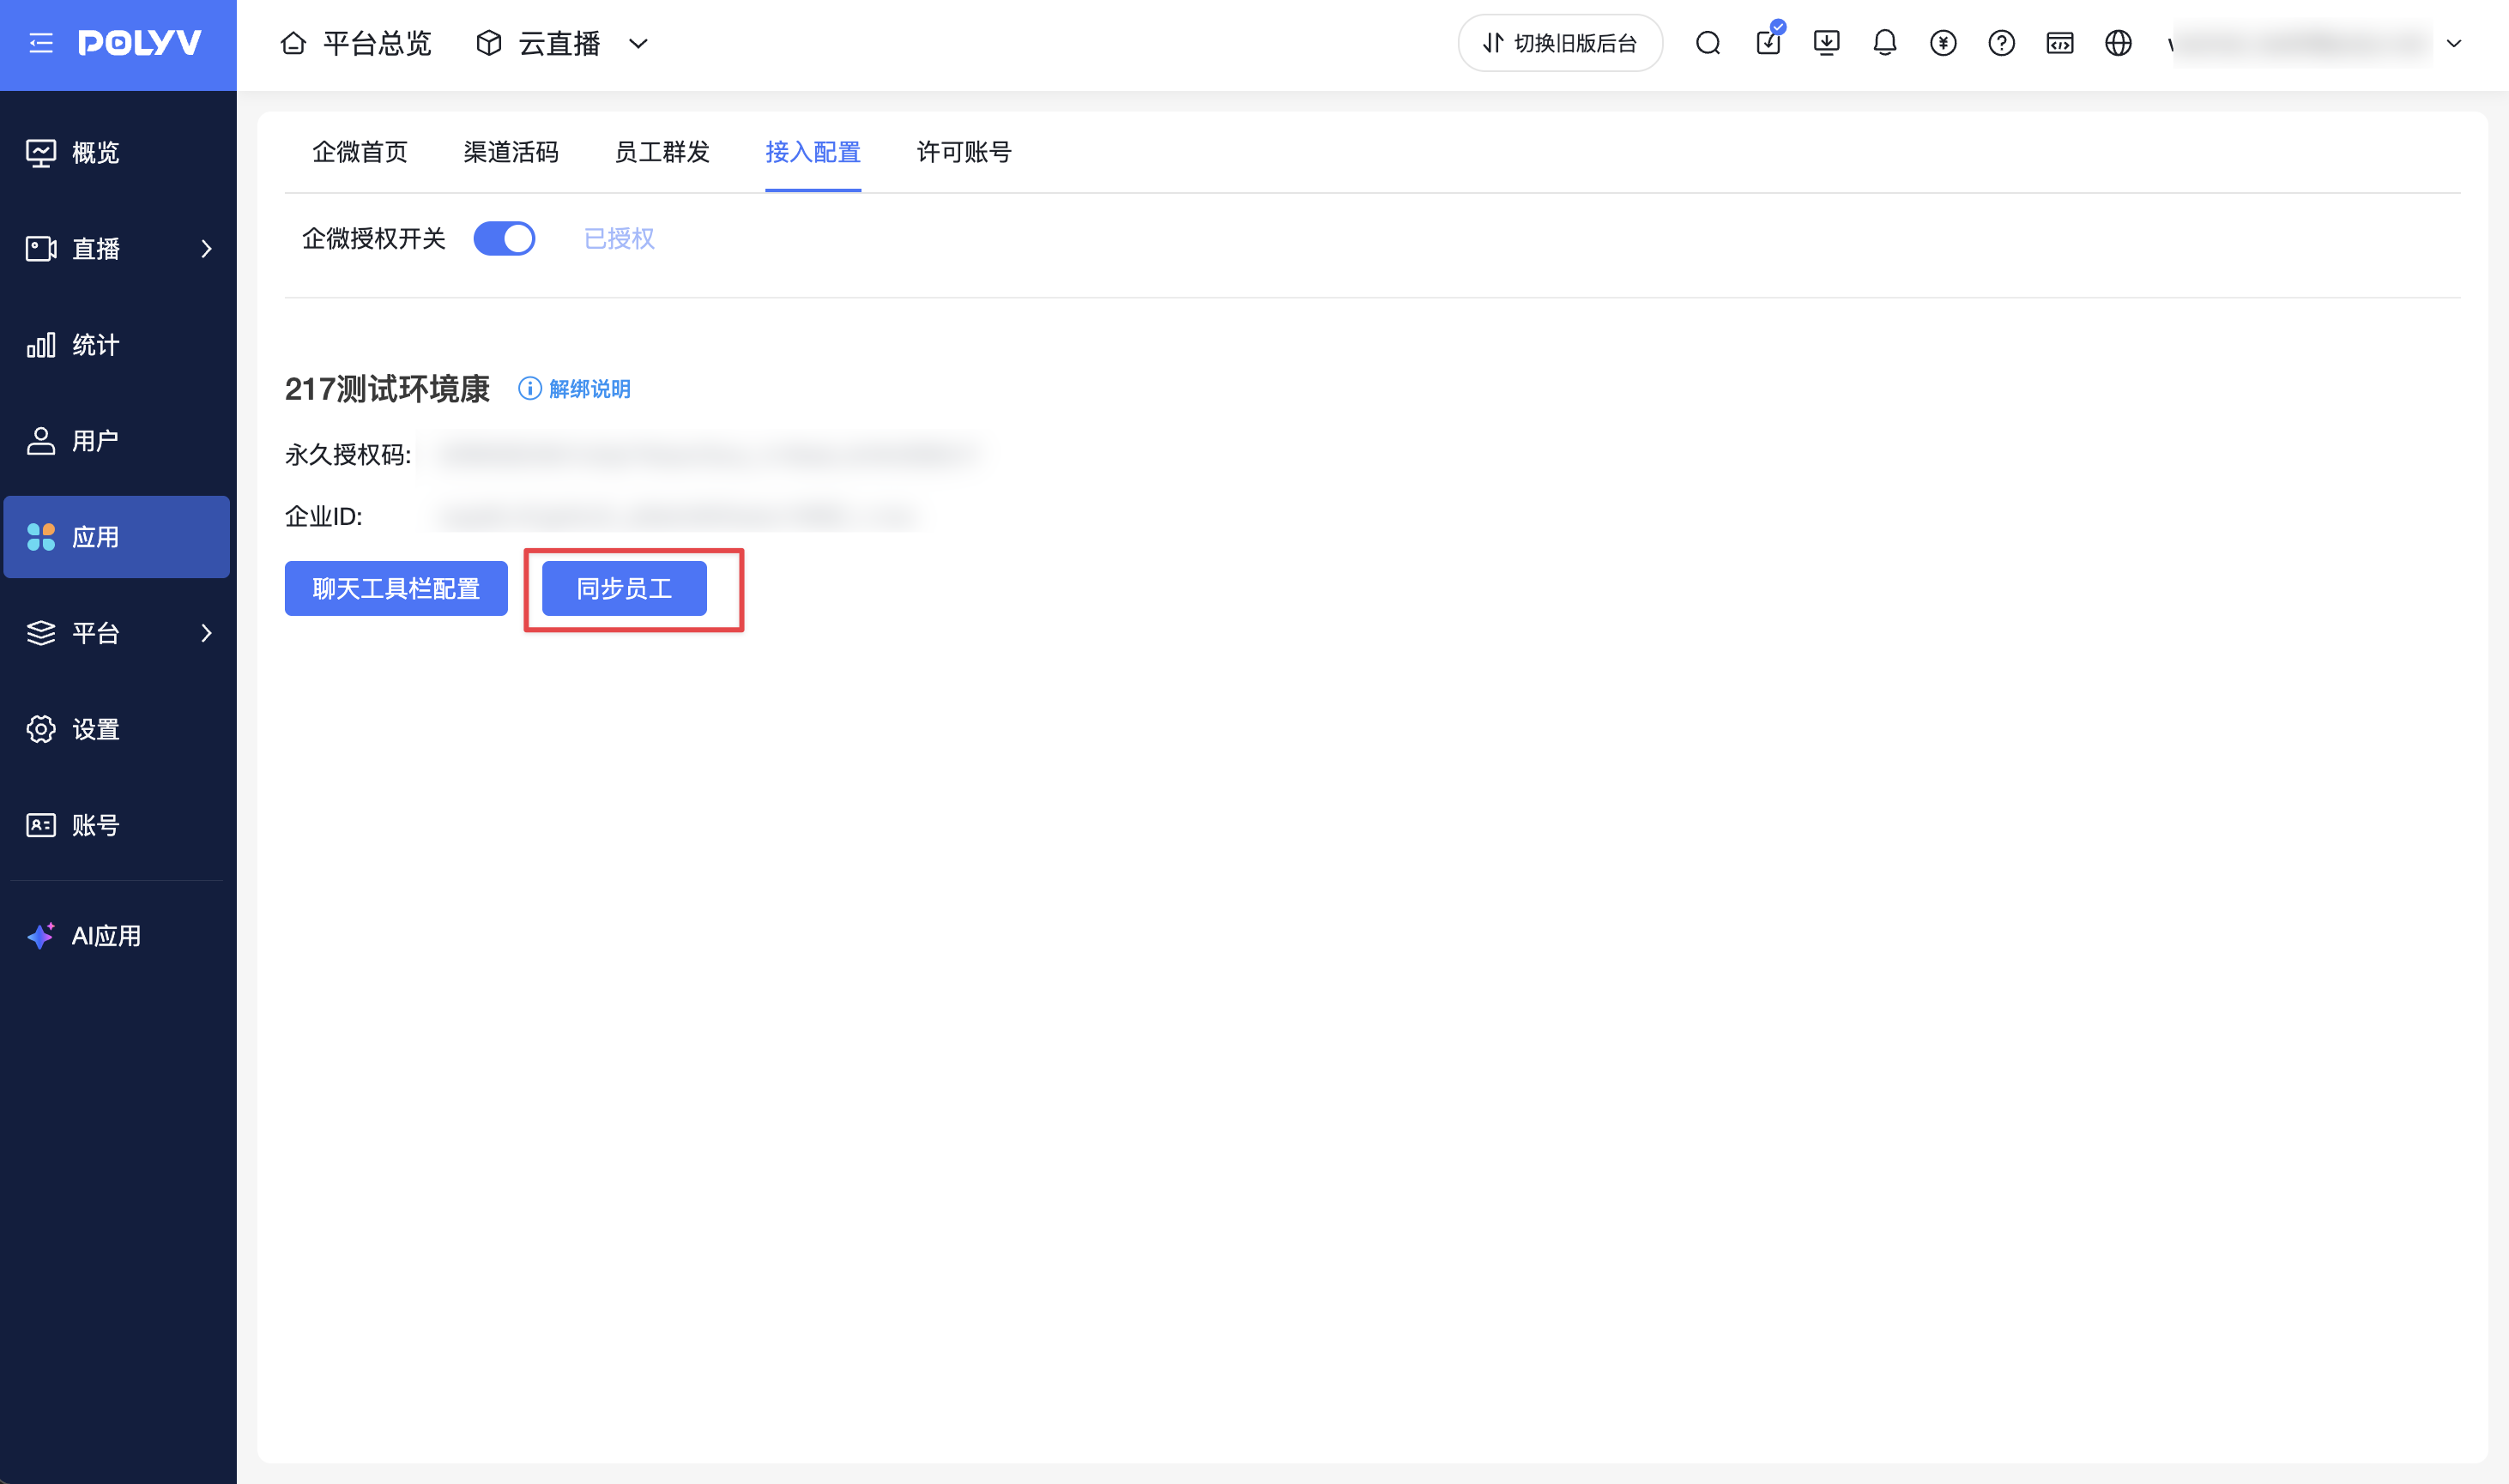
Go to the Cloud Live Broadcast backend [WeCom Integration] and click the [Sync Employees] button. Before syncing, check that the employee visibility range for the Polyv application has been configured in the WeCom admin backend. (When syncing, you must select an organization; selecting individual members will prevent syncing).
3.2 Chat Toolbar Configuration
(1) Obtain Configuration Information
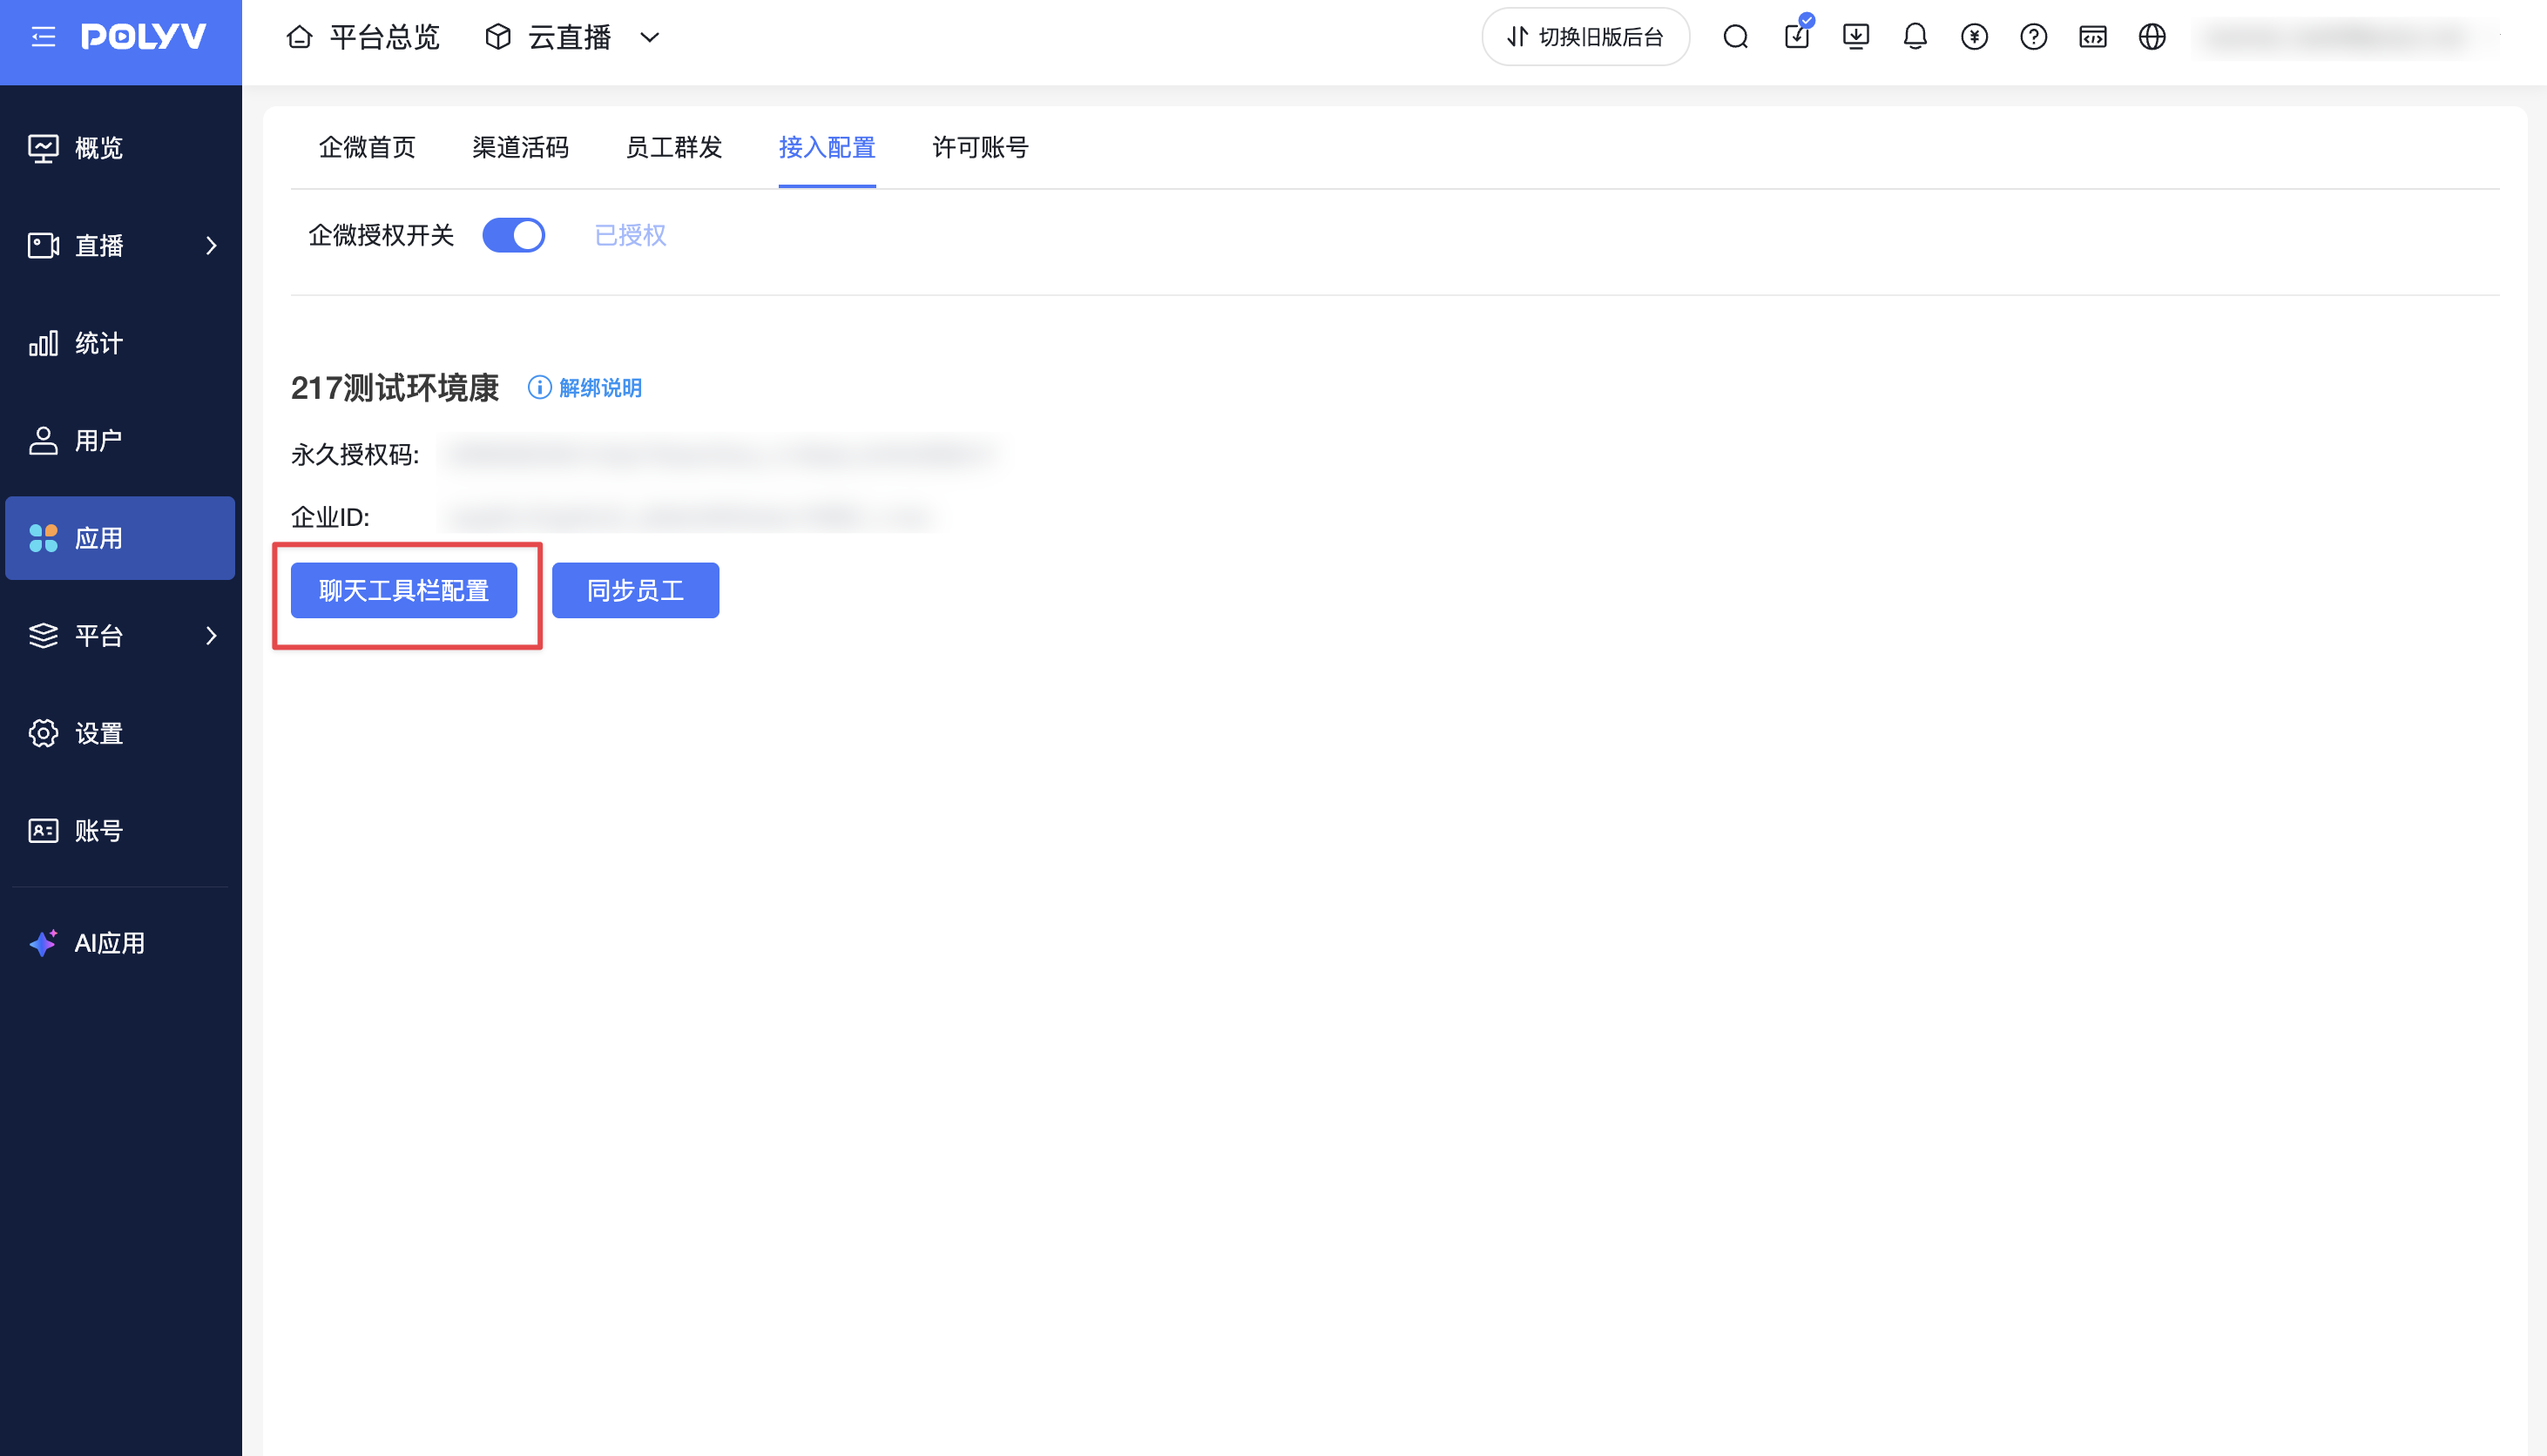
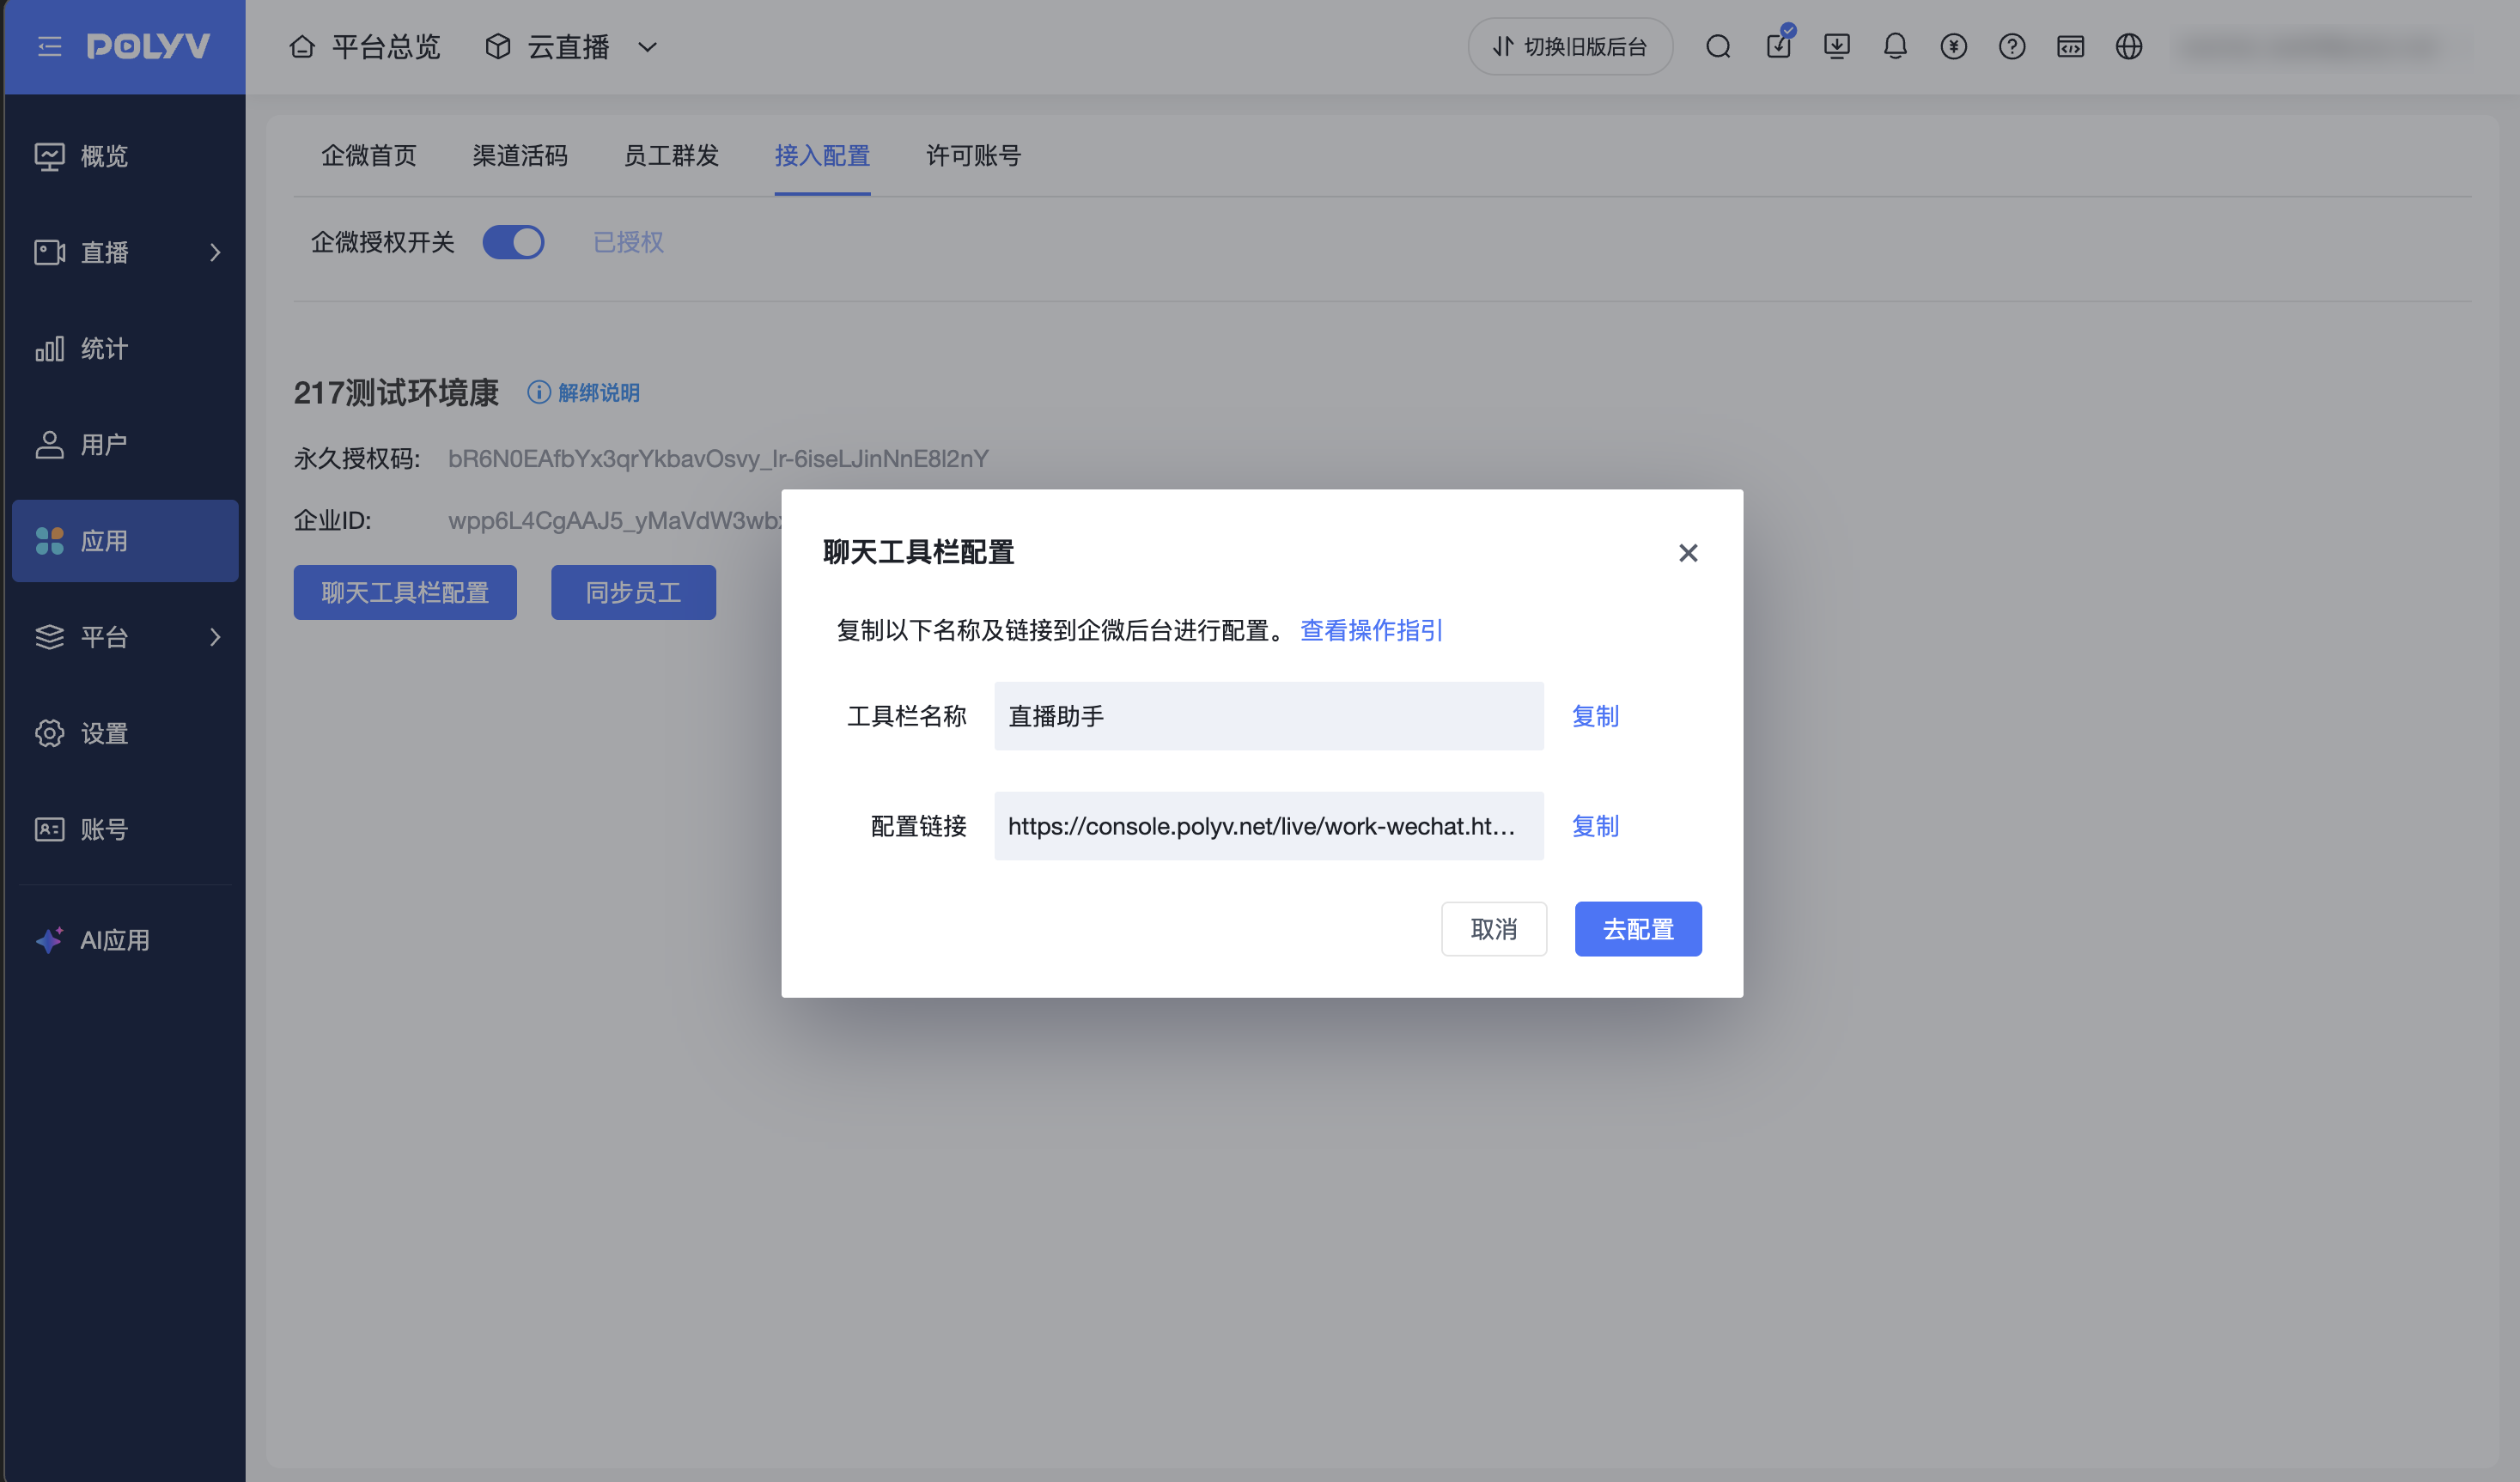
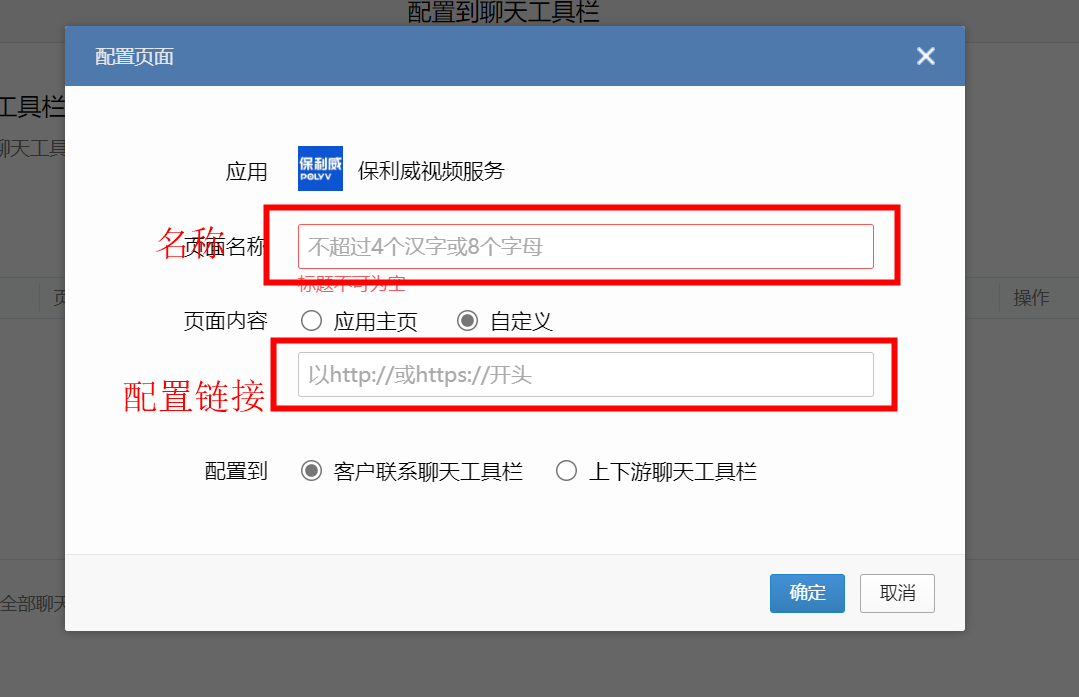
After completing WeCom authorization, click the [Chat Toolbar] button on the [WeCom Integration] page. Copy the [Toolbar Name] and [Configuration Link] from the pop-up window.
(2) Configure in the WeCom Admin Backend
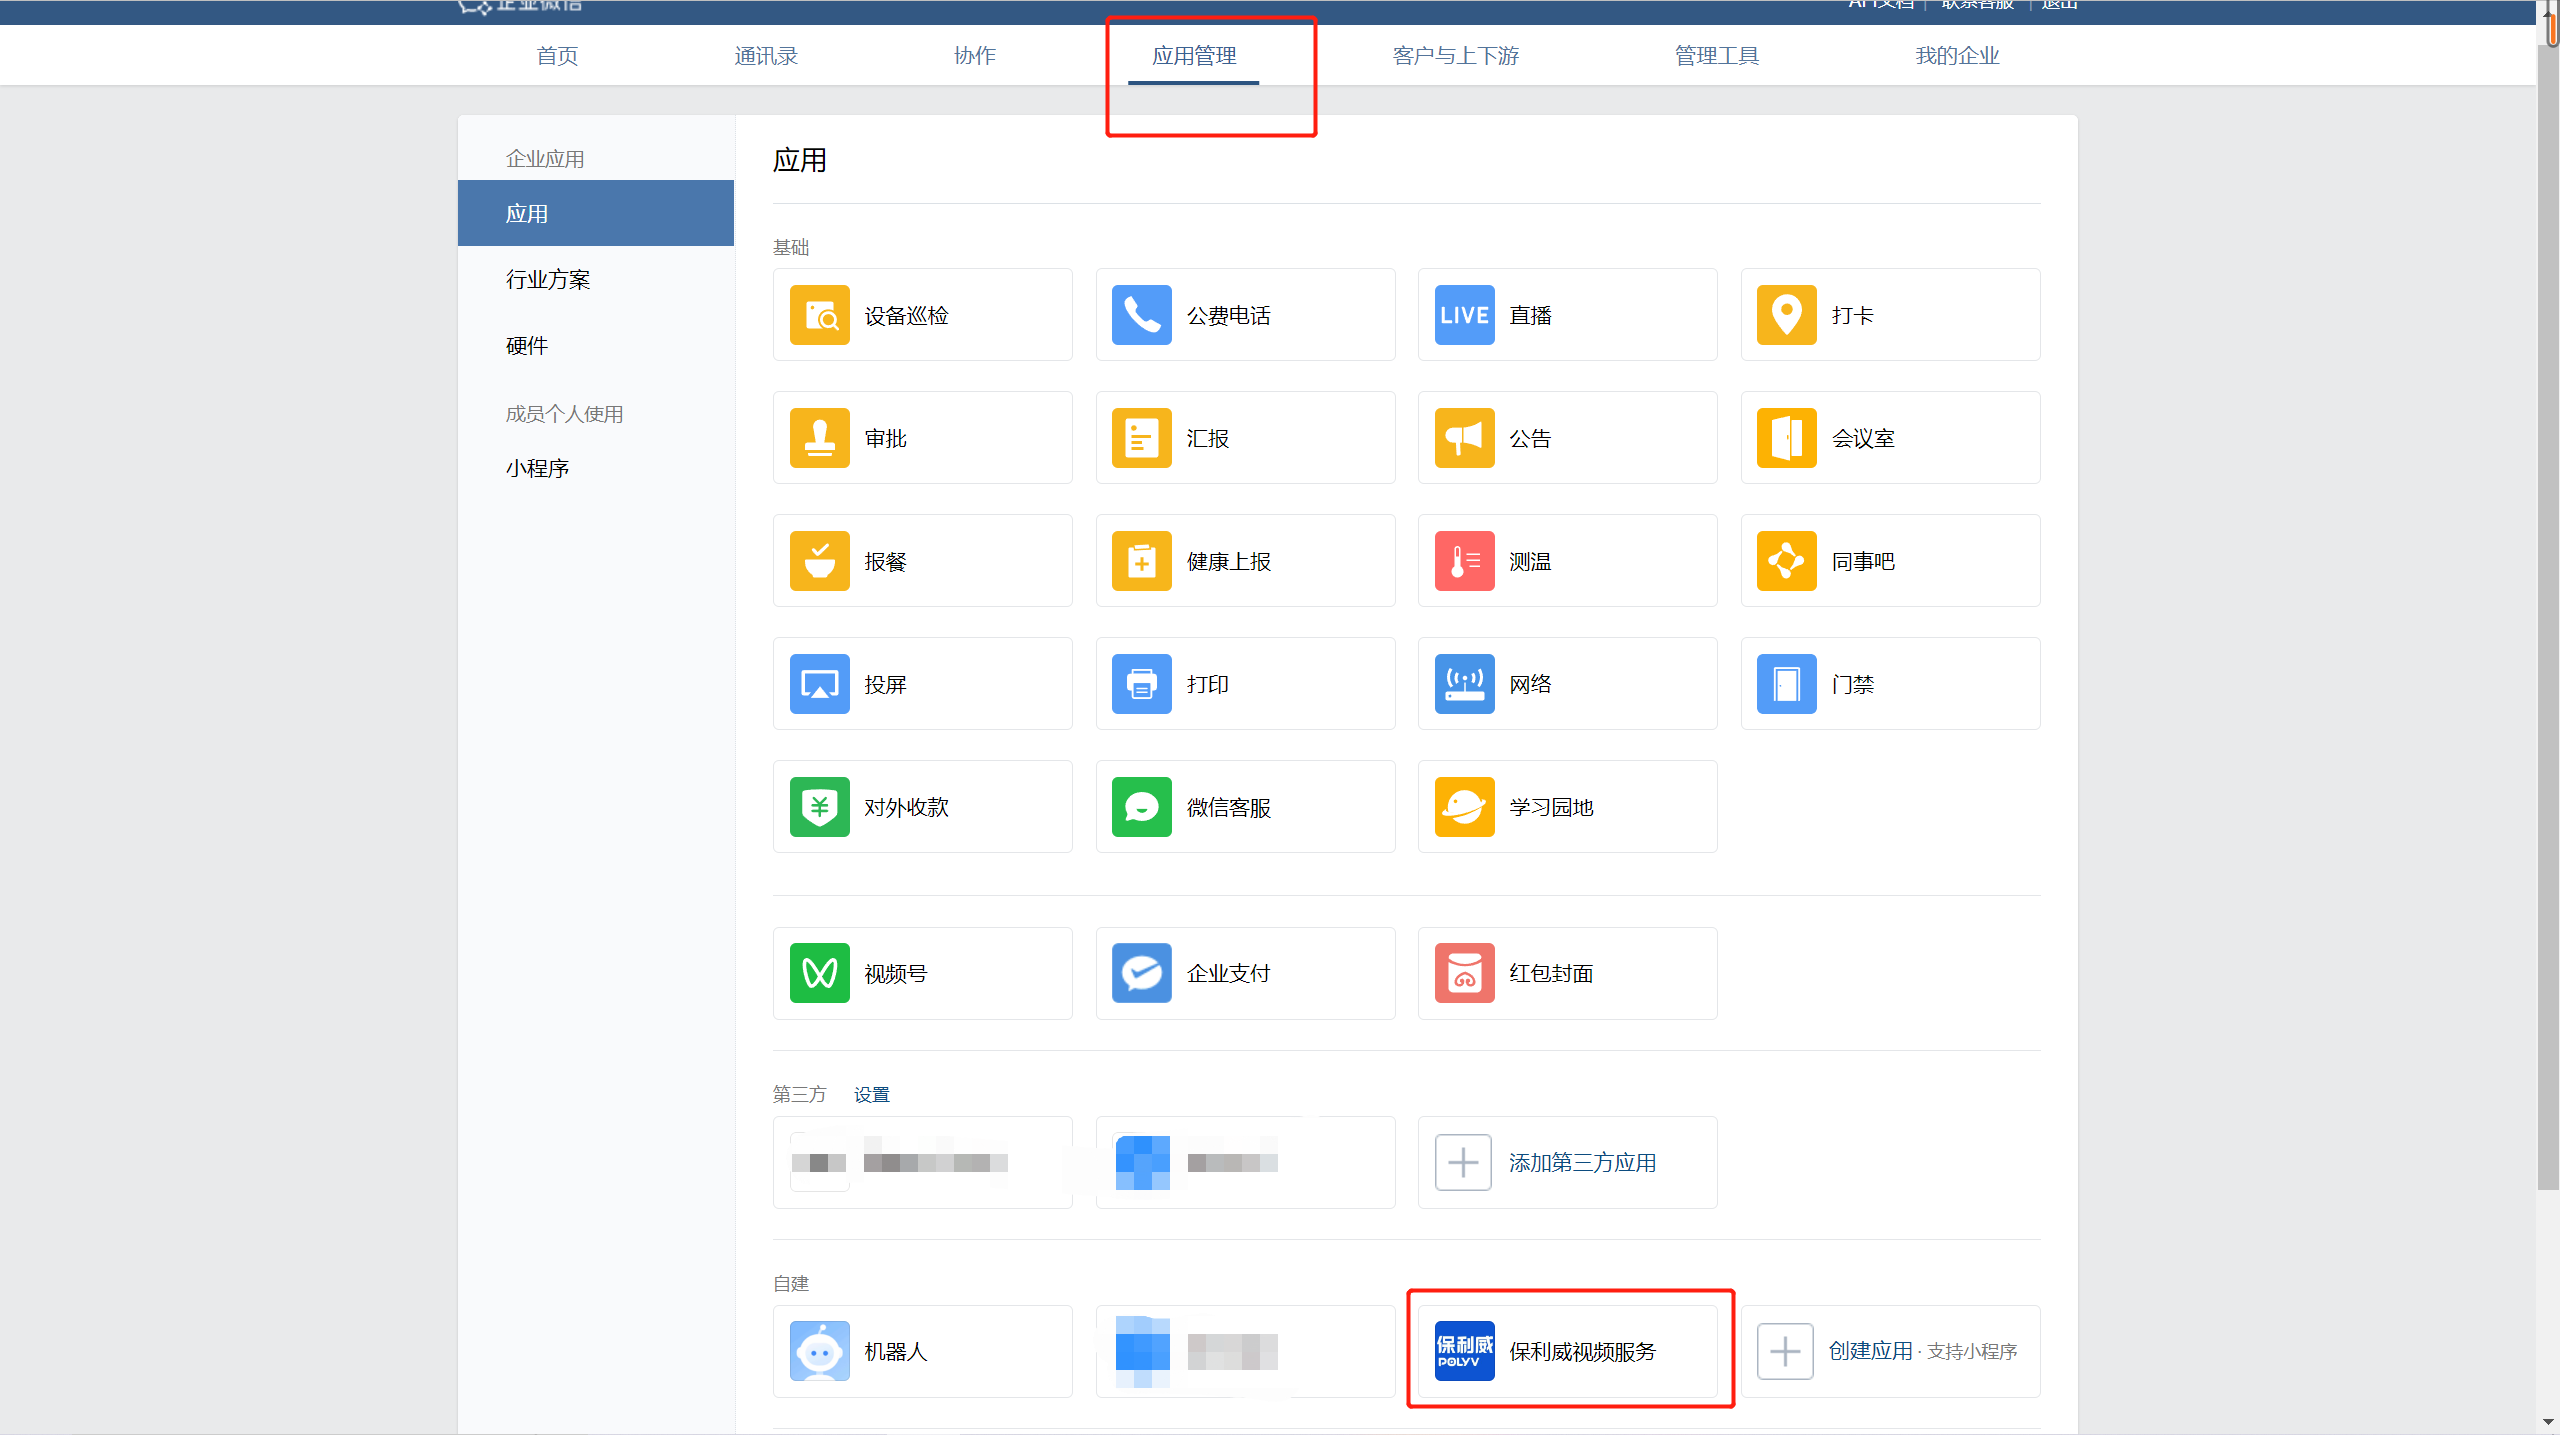
Go to the WeCom admin backend and configure the chat toolbar within the [Polyv Video Service] application.
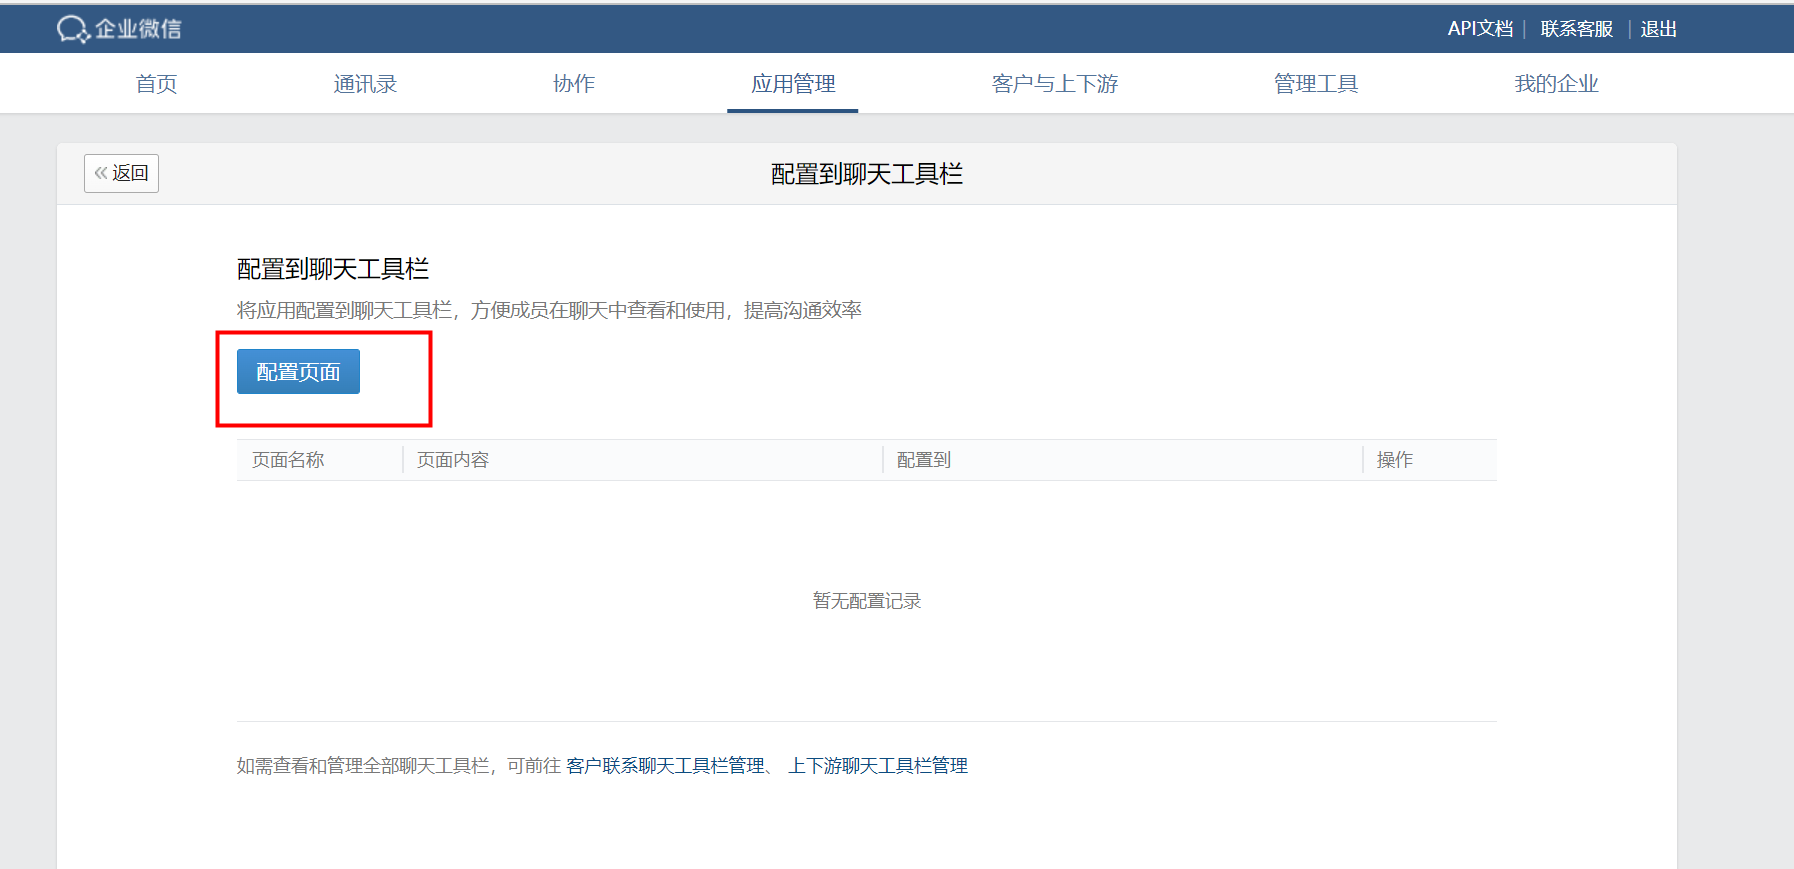
Operation Path: WeCom Admin Backend [App Management] > [Polyv Live Service] > [Chat Toolbar Configuration]
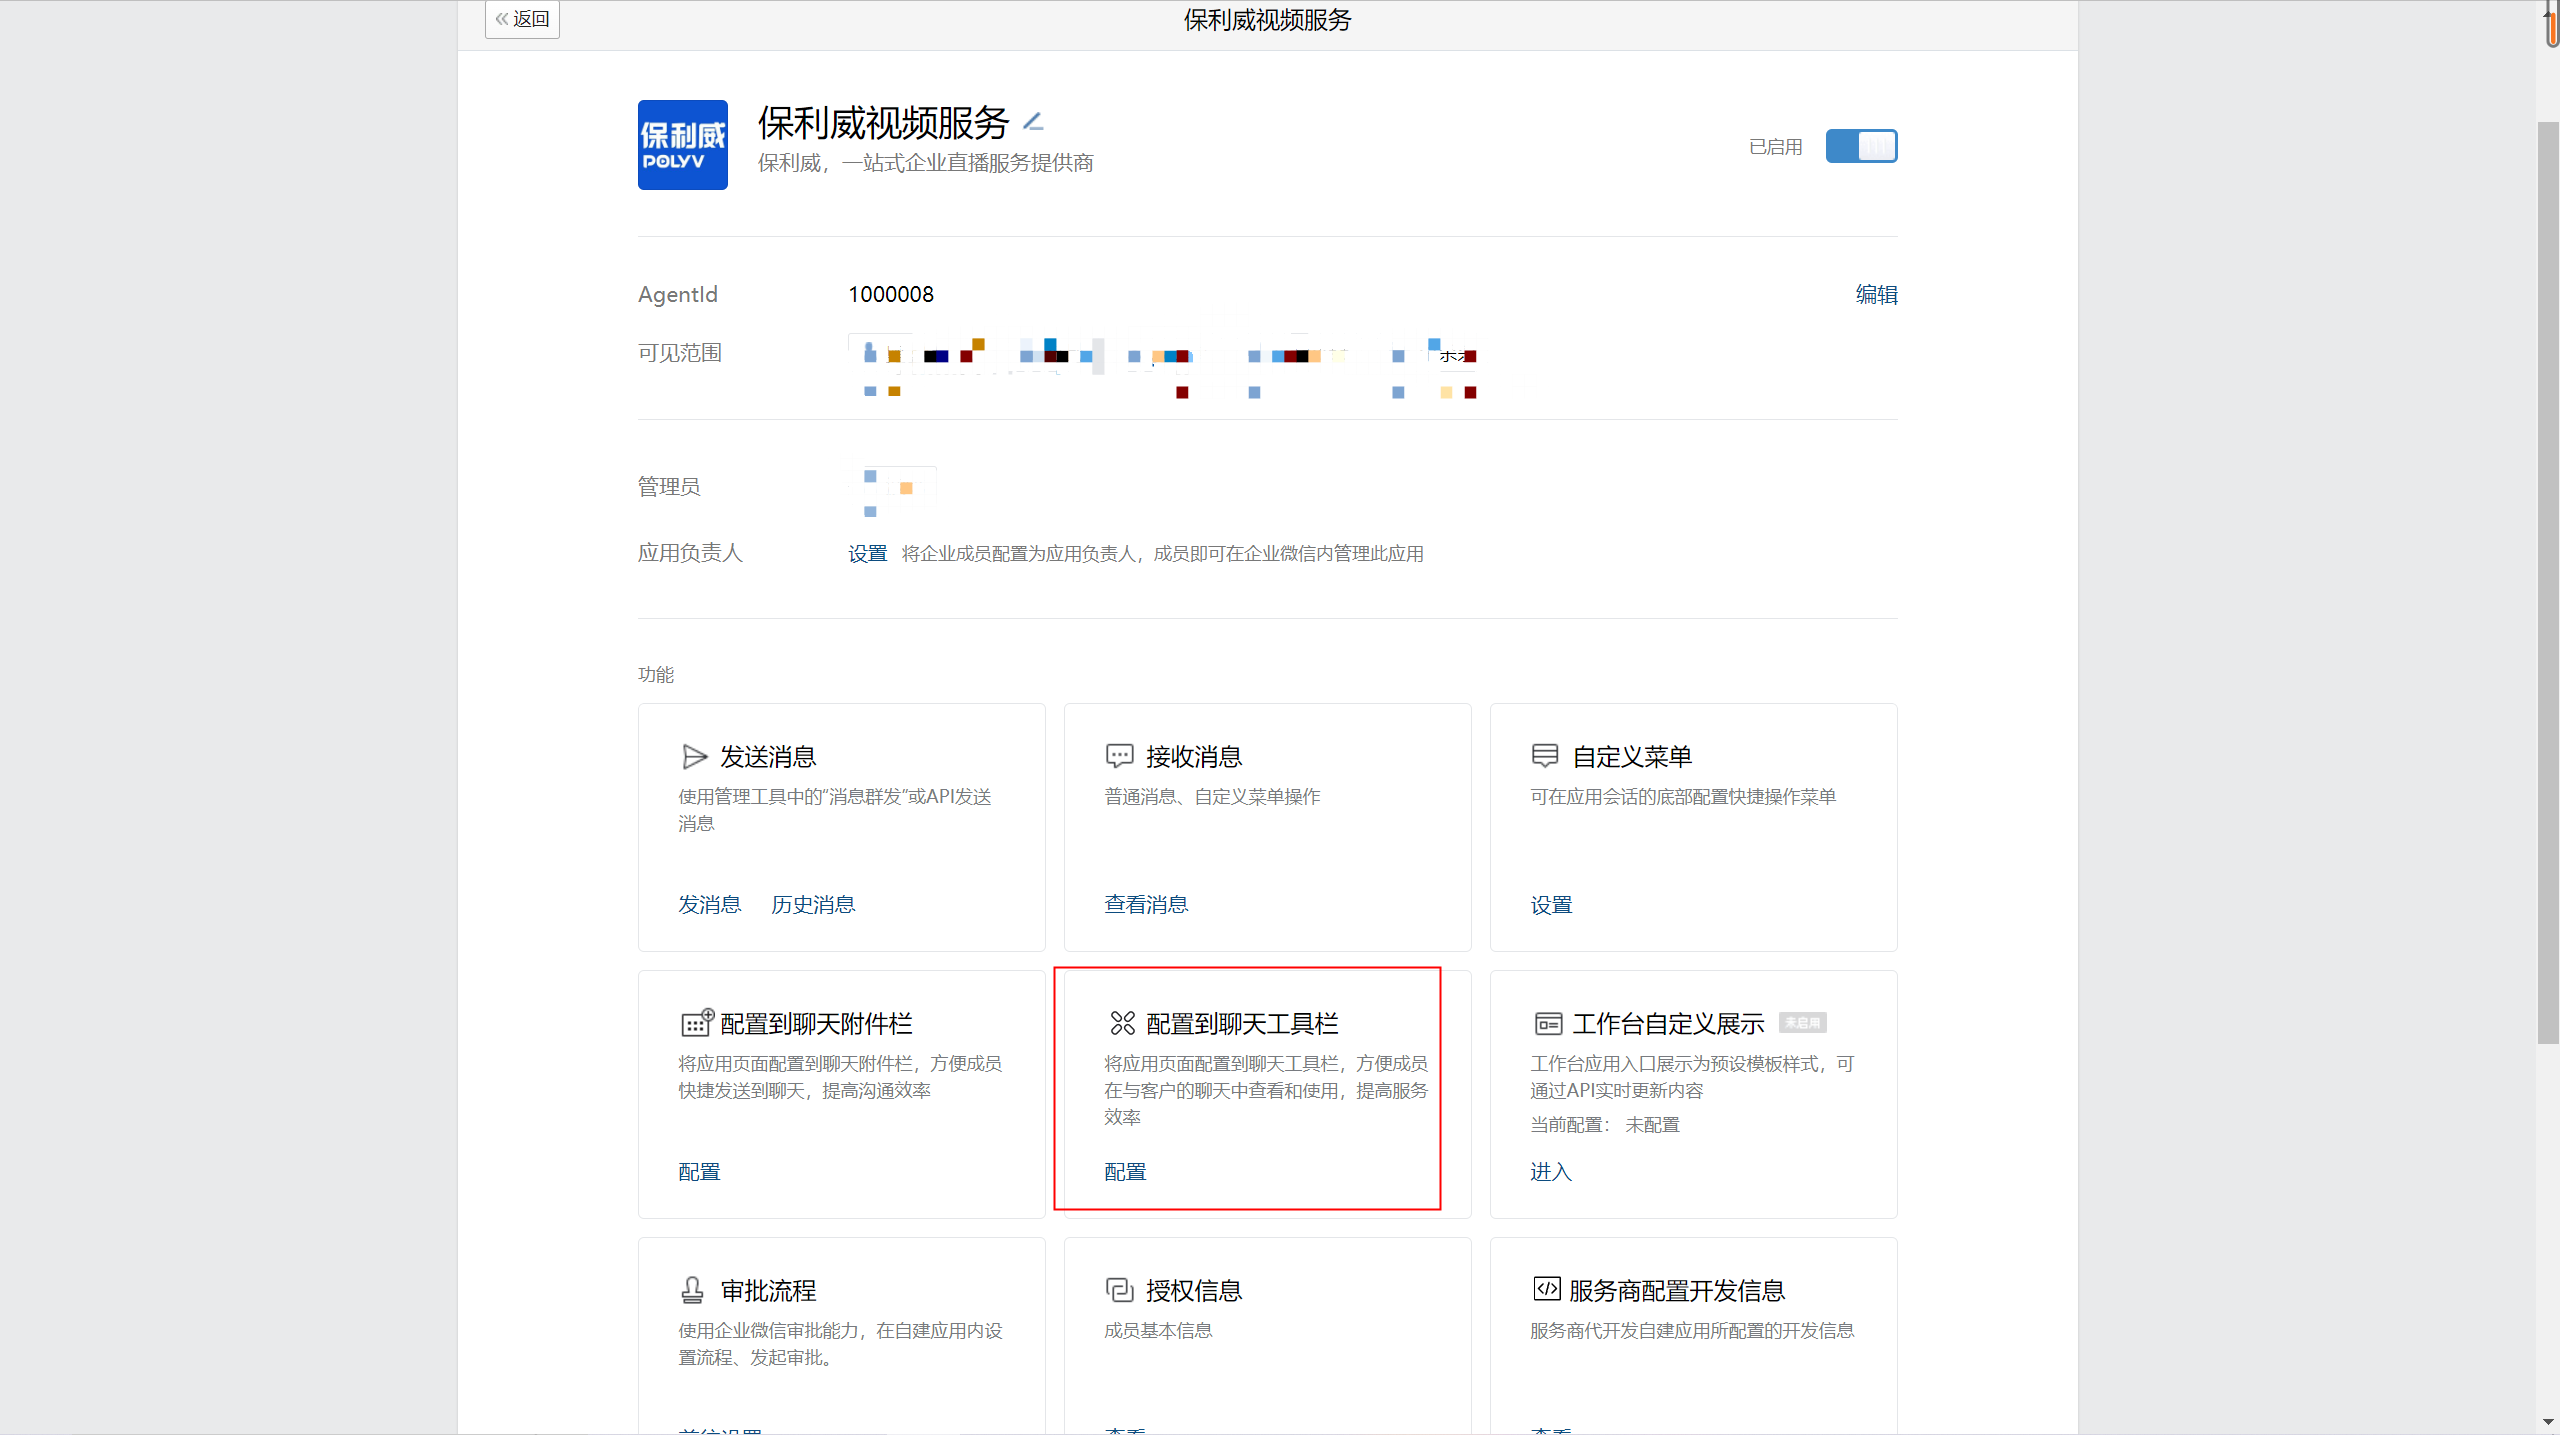
Click [Configure Page].
Fill in the [Name] and [Configuration Link] in the corresponding fields. Note that [Page Content] must be set to [Custom].
Key Note:
Only organizational employees added to the visible range of the [Polyv Video Service] application can use the chat toolbar when opening a chat window with an external customer.
3.3 Backend - WeCom Marketing
(1) Enter Channel's Marketing Interaction - [WeCom Marketing]
After turning on the employee invitation switch, you can grant promotion permissions for this channel to specific employees on the WeCom sidebar. Employees can directly obtain invitation materials with unique identifiers and live room follow-up permissions from the WeCom sidebar.
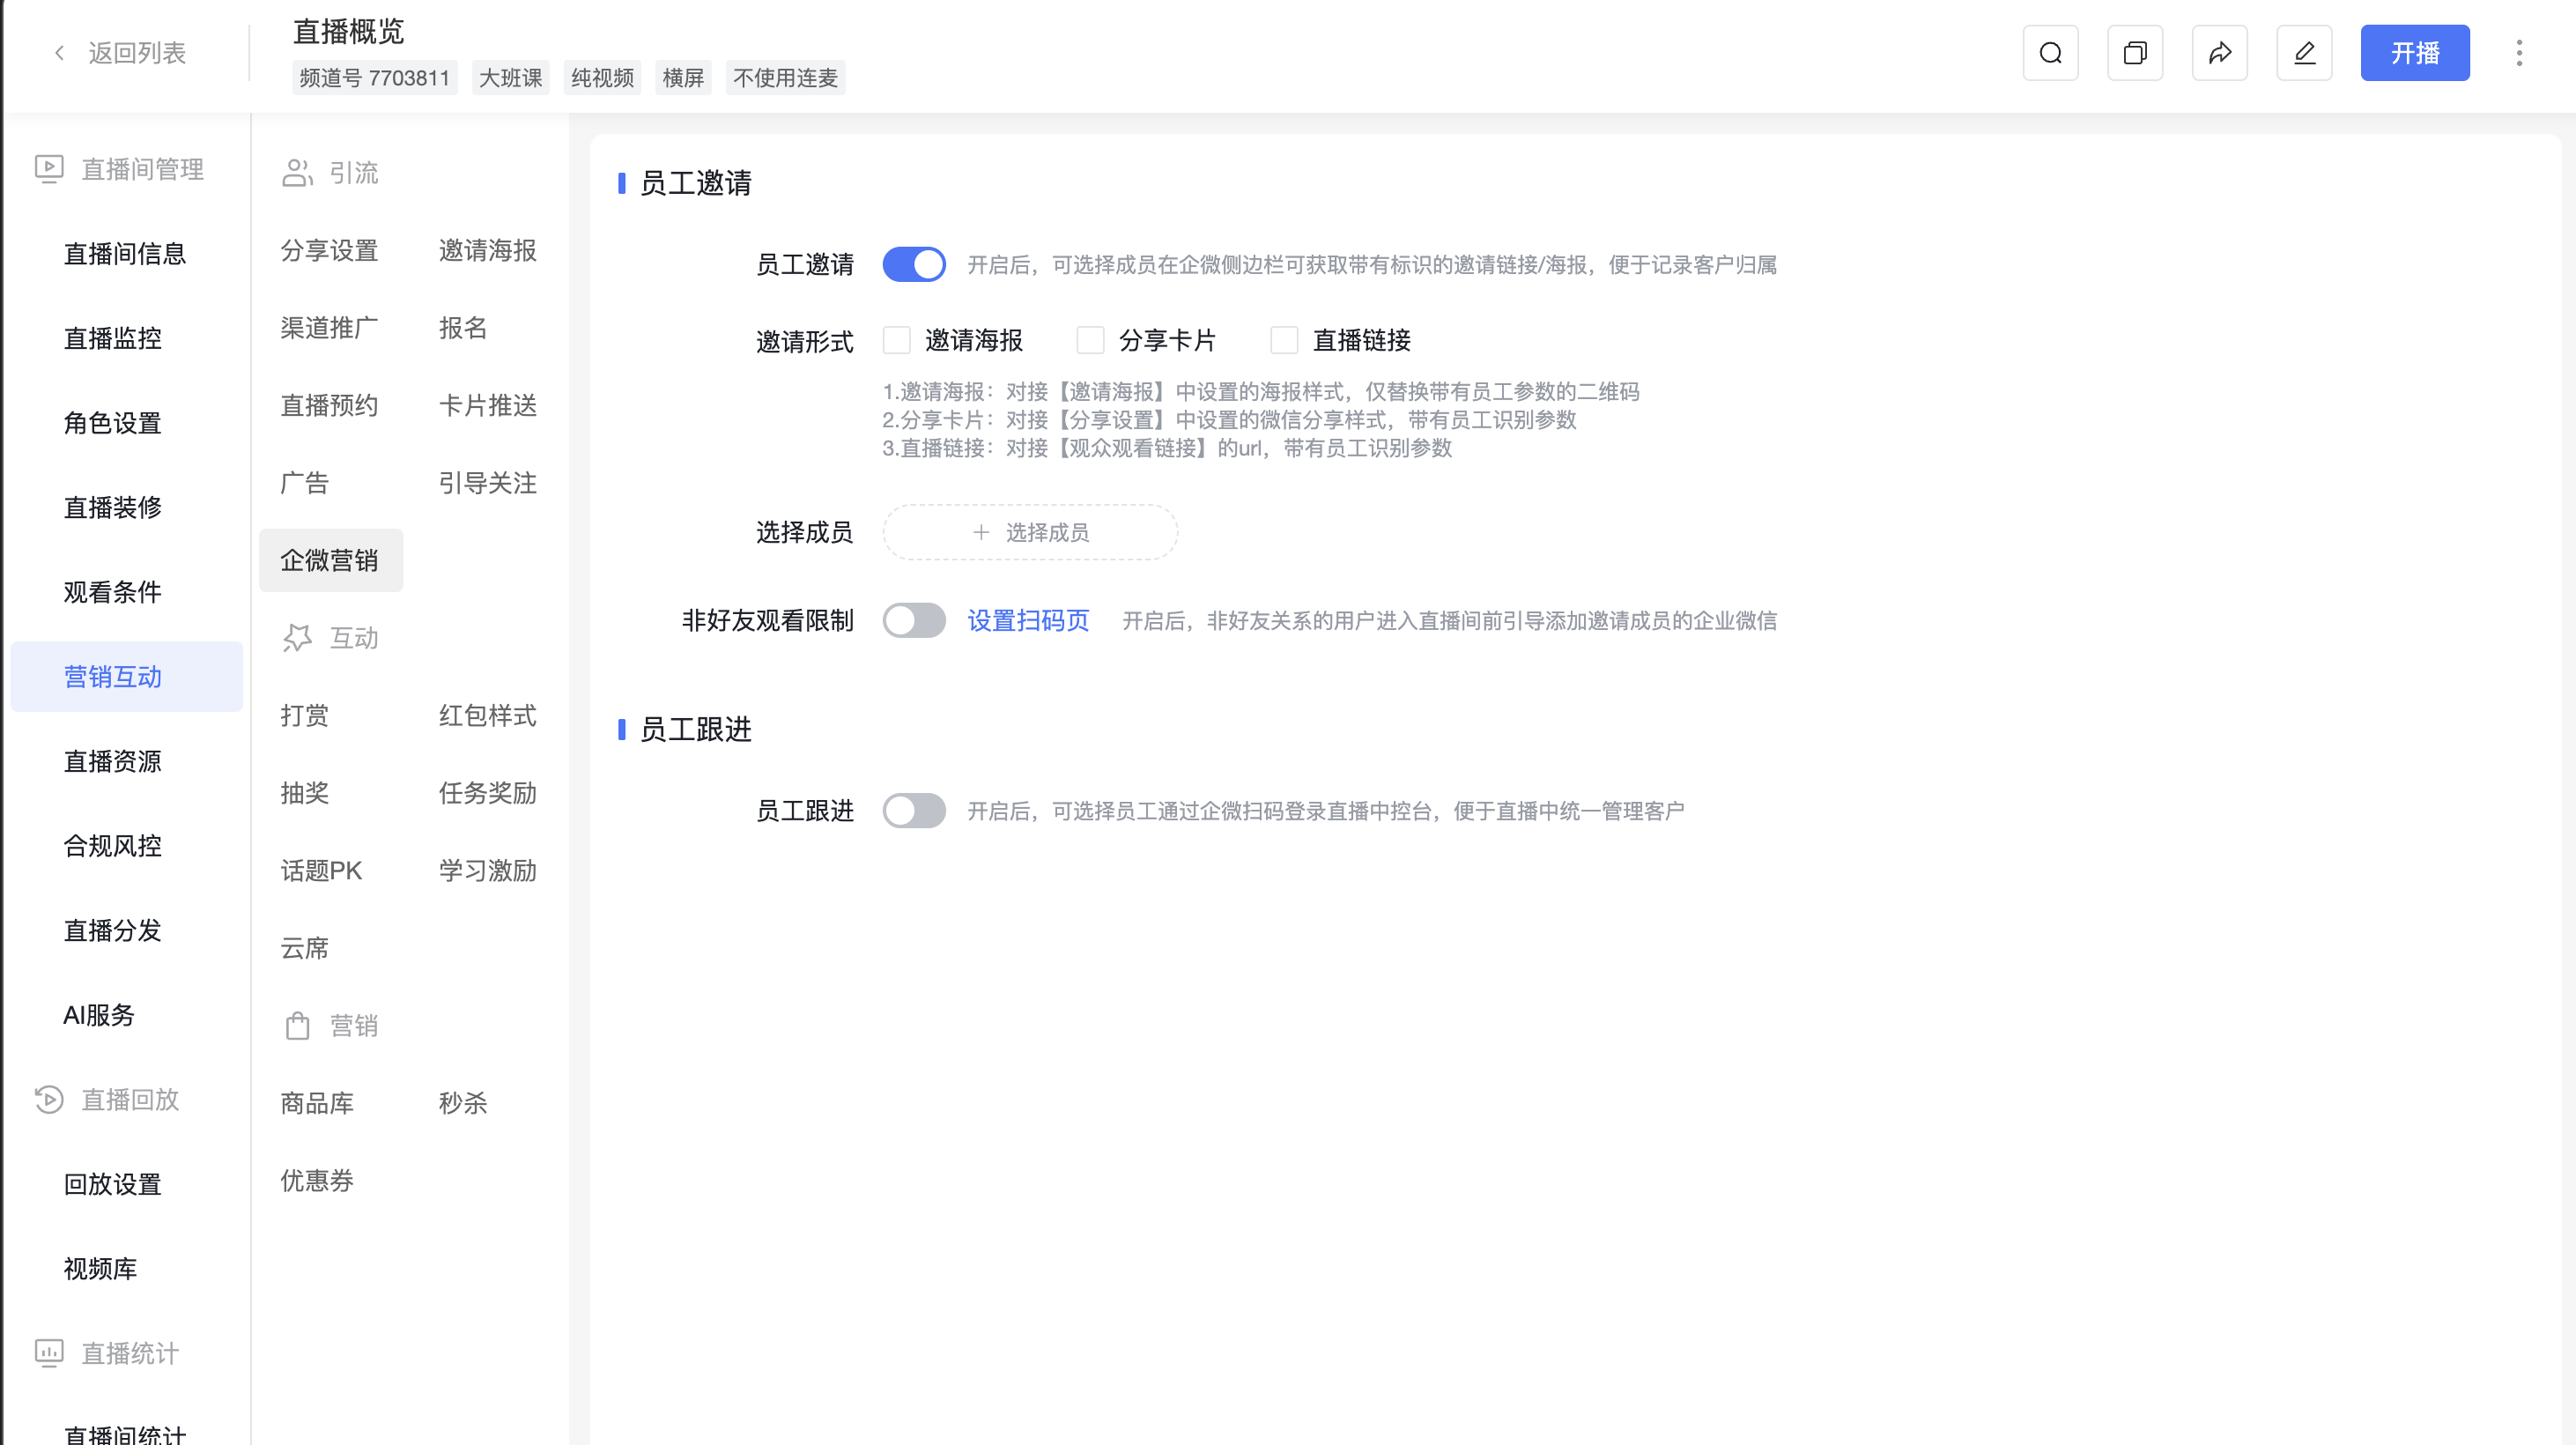
(2) Customize Configuration Based on Marketing Needs
Non-friend Viewing Restriction: When enabled, if a WeChat user who is not a friend scans the QR code or clicks the invitation material, the employee's WeCom friend-adding QR code will be displayed. The WeChat user can scan the code to add the employee as a friend.
Invitation Format: Select the material format for employee invitations. Posters and cards require enabling [Invitation Poster] and [Share Settings] in the marketing features first.
Edit Employees: Click to open the WeCom organizational structure and make selections. Once selected, the invitation permission for this channel is automatically enabled on the employee's WeCom sidebar.
Notification: Send a message notification directly to the employee's WeCom.
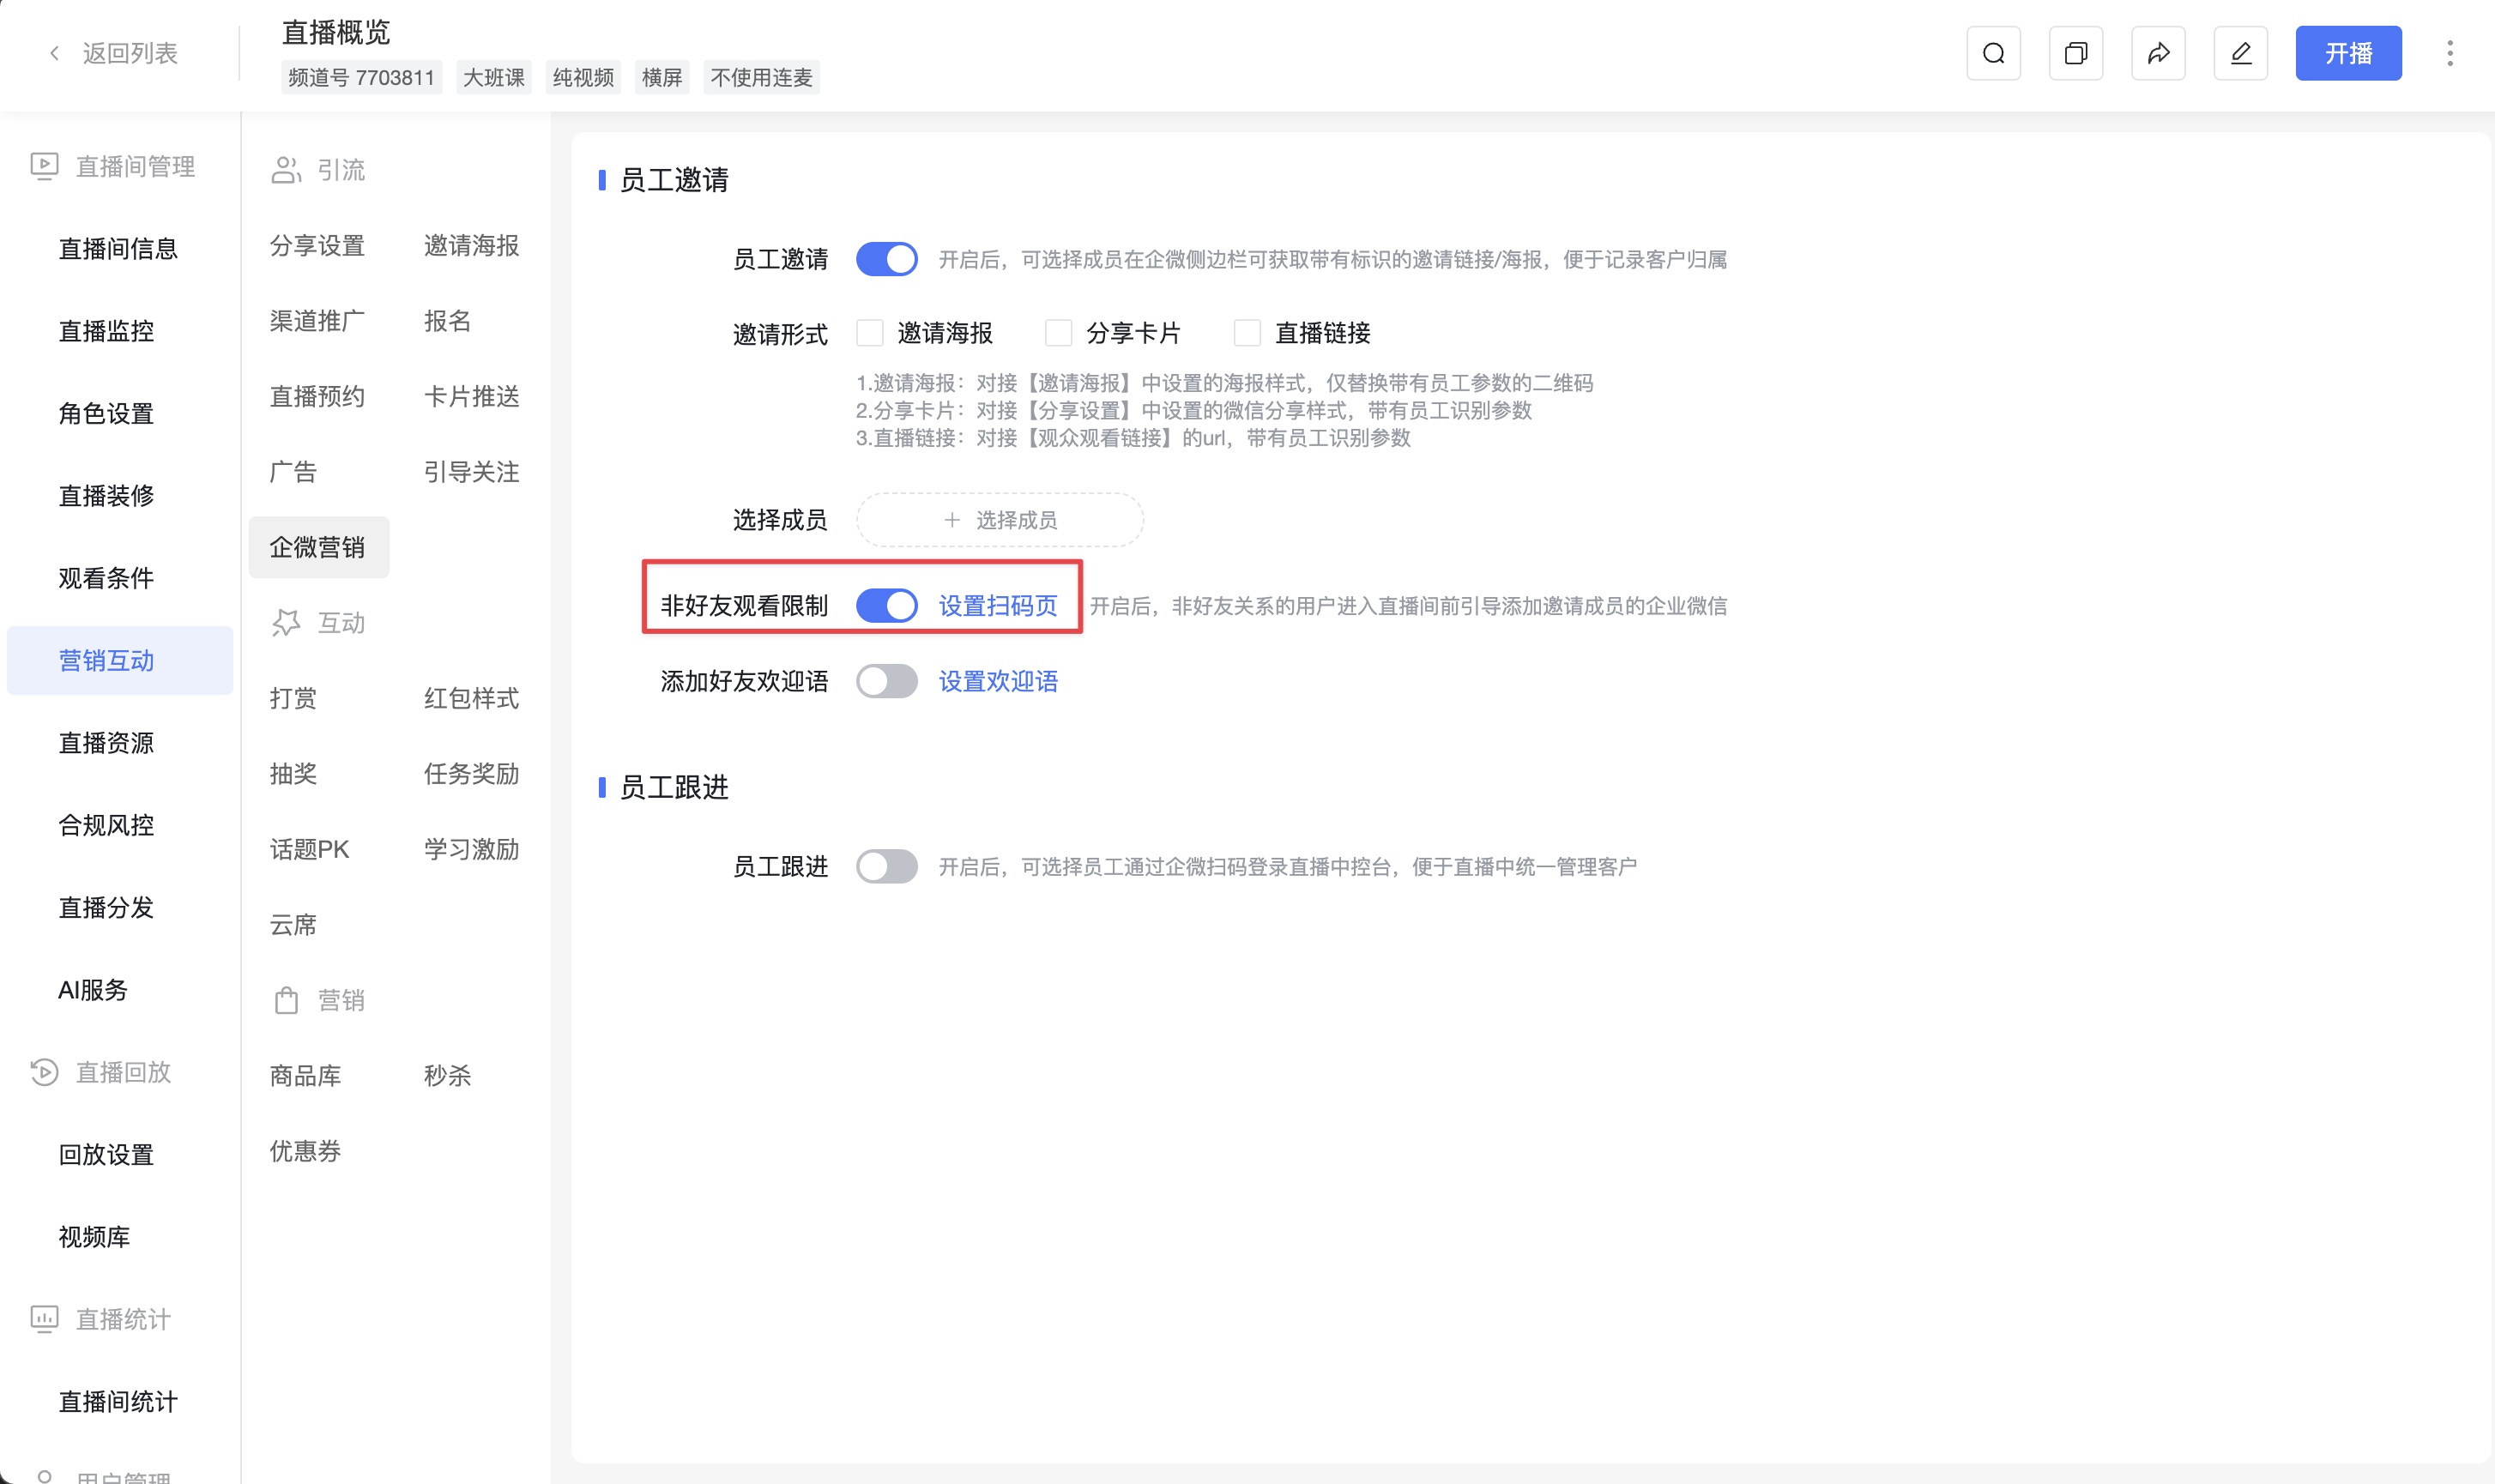
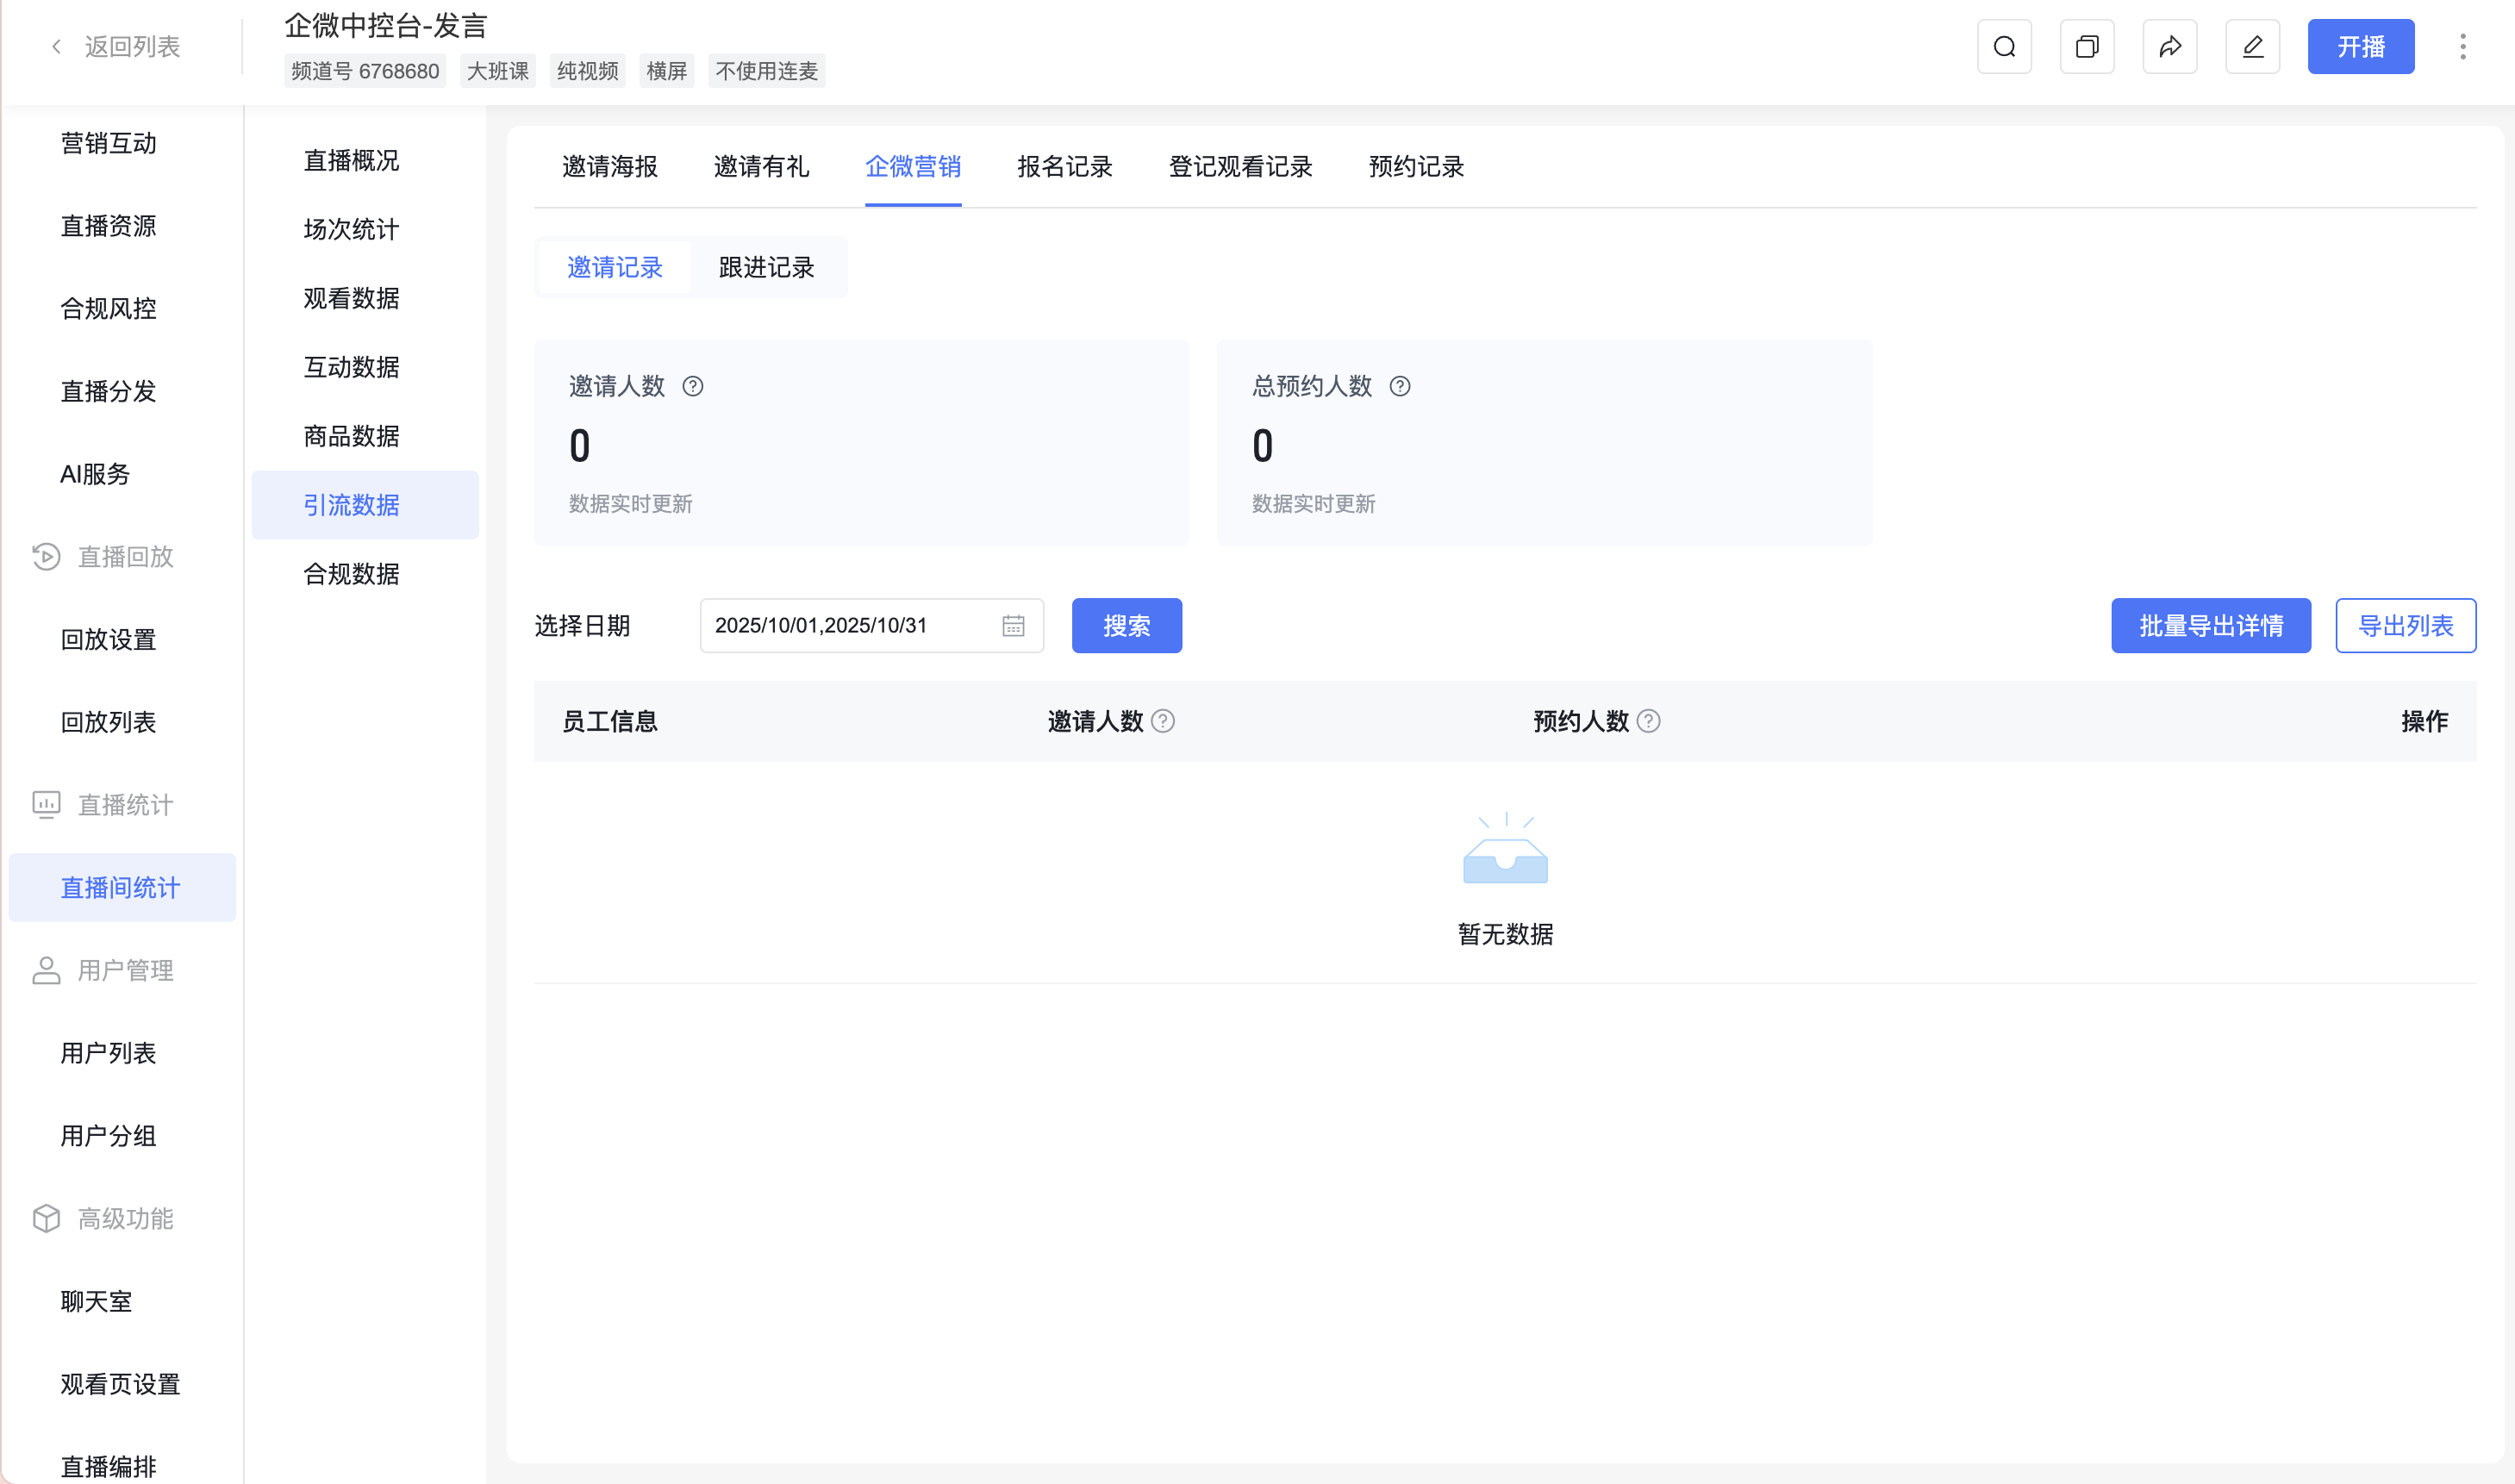
(3) Enter [Live Stream Statistics] to View Employee Invitation Statistics and Download Detailed Invitation Data for Each Employee.
3.4 WeCom Client - Chat Sidebar - Live Assistant
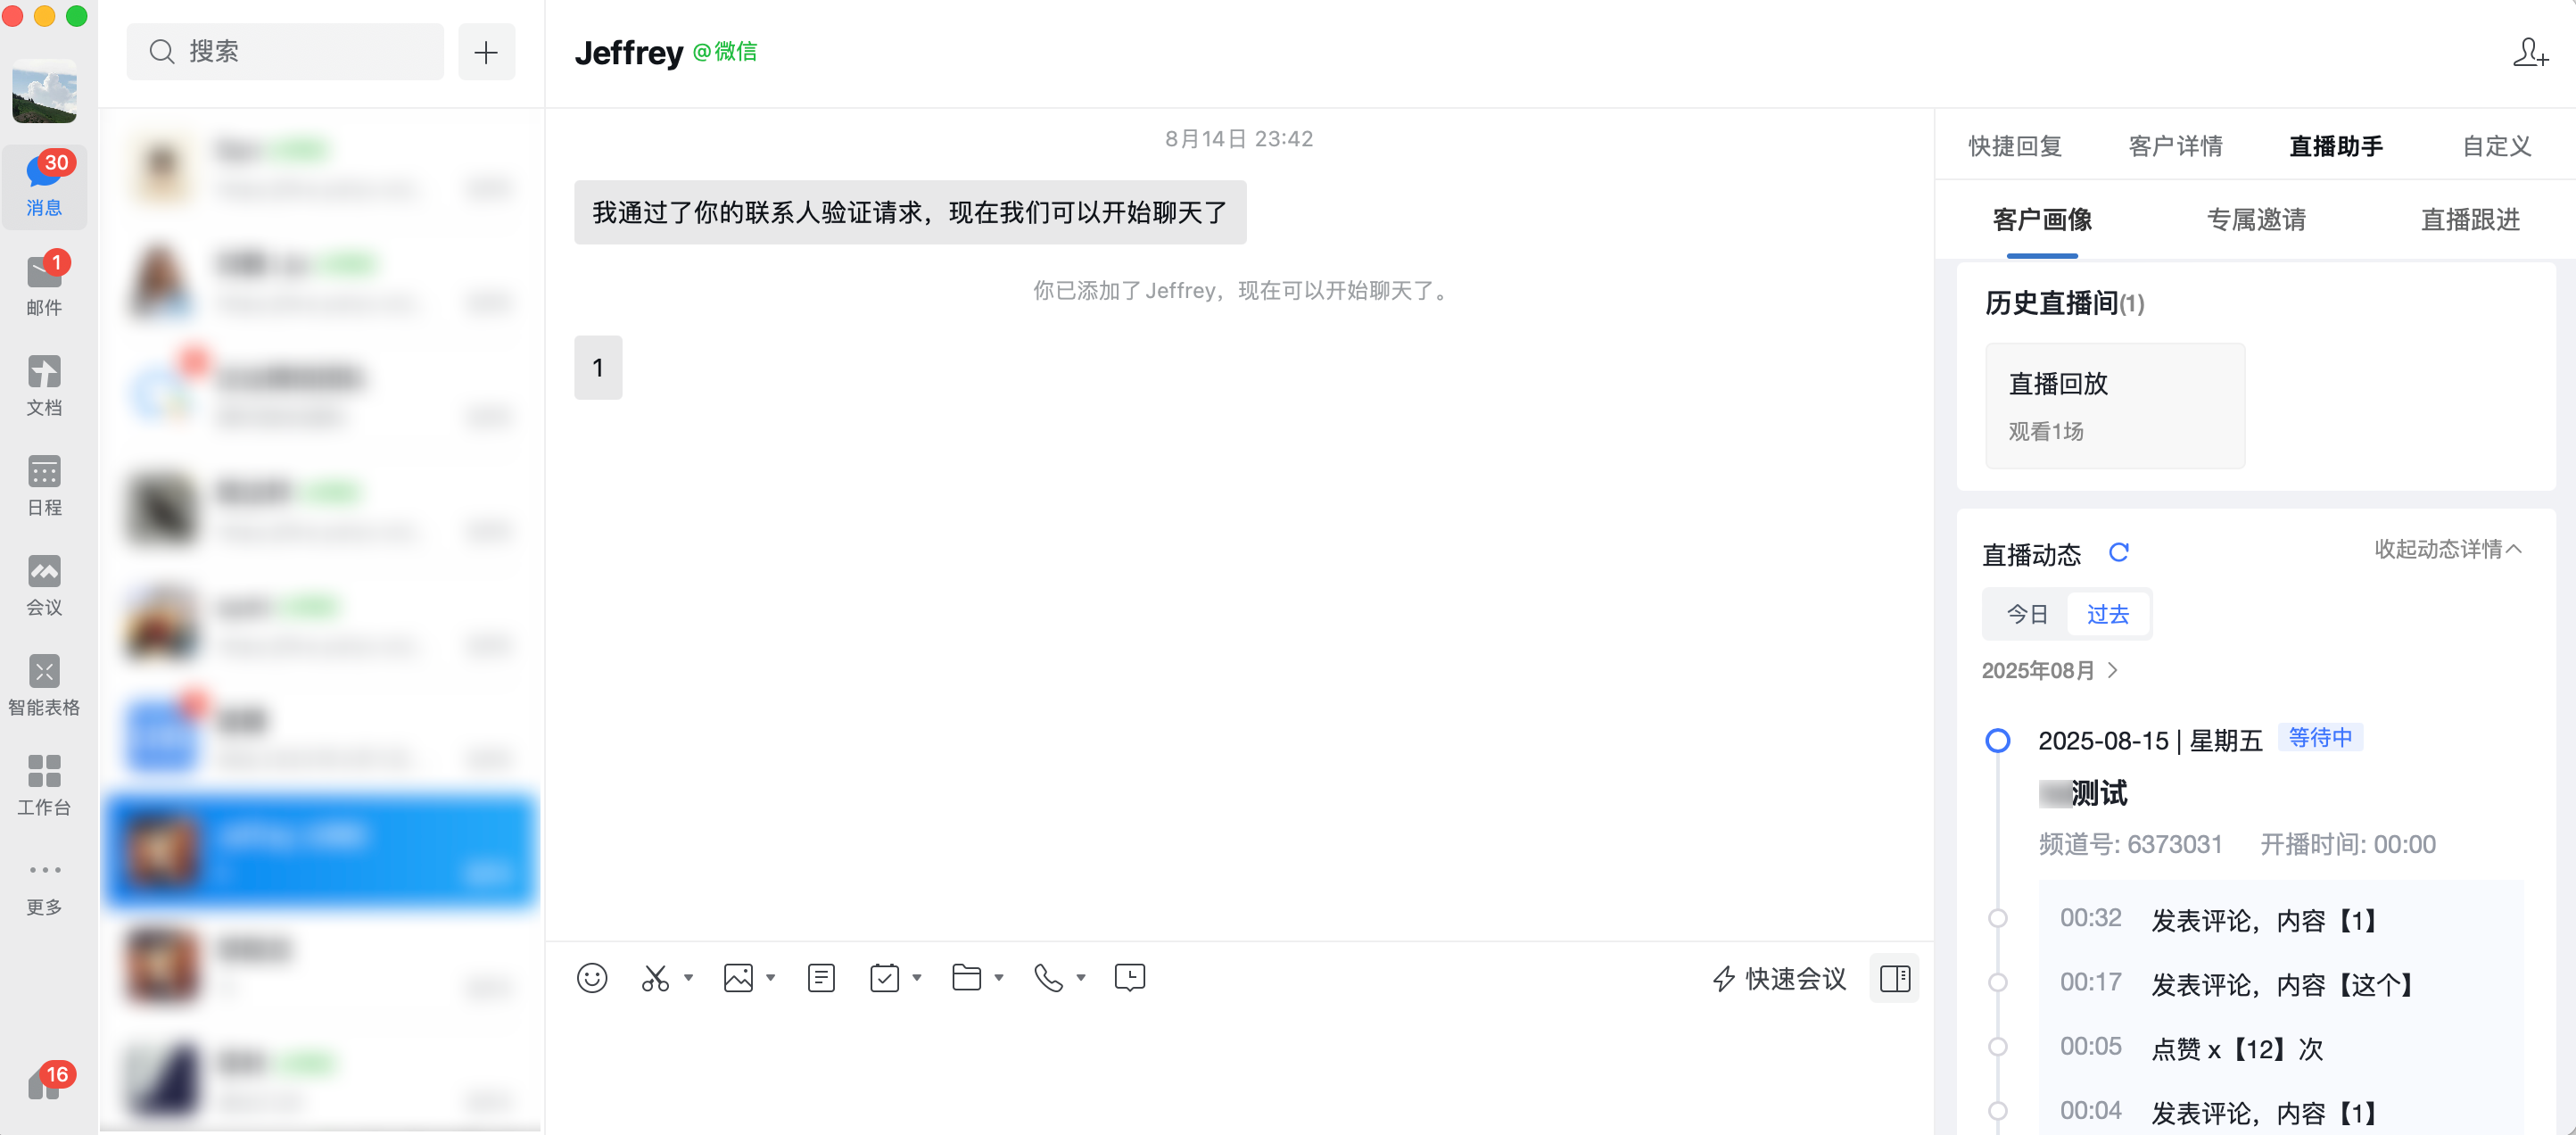
After the WeCom admin completes the [Chat Toolbar Configuration], employees within the application's visible range can click on the chat window of an external contact (individual WeChat user) to display the chat sidebar. This is available on both mobile and PC WeCom. The WeCom sidebar has three functional pages: Customer Profile, Exclusive Invitation, and Live Follow-up.
(1) Customer Profile: Directly displays the customer's viewing data summary.
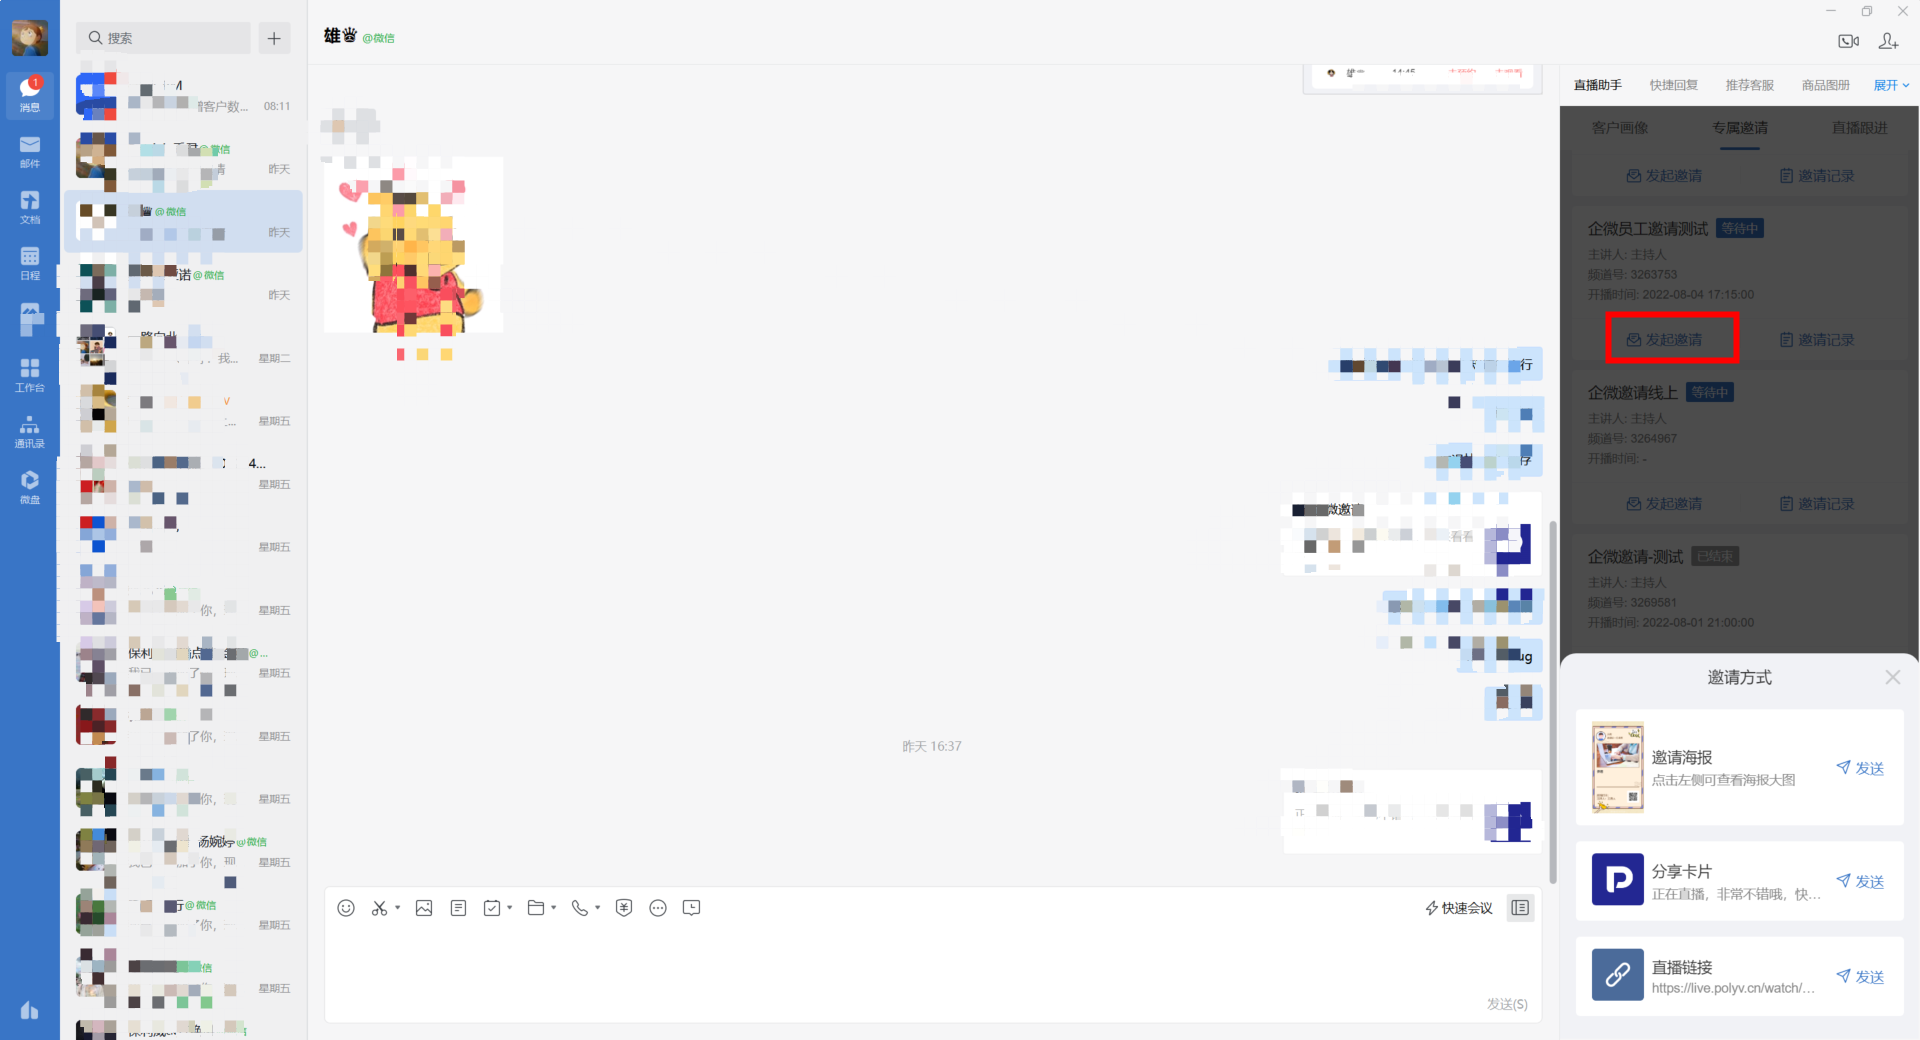
(2) Exclusive Invitation: Employees with channel invitation permissions set in the backend can obtain their personal exclusive invitation materials. Invitation data is traceable.
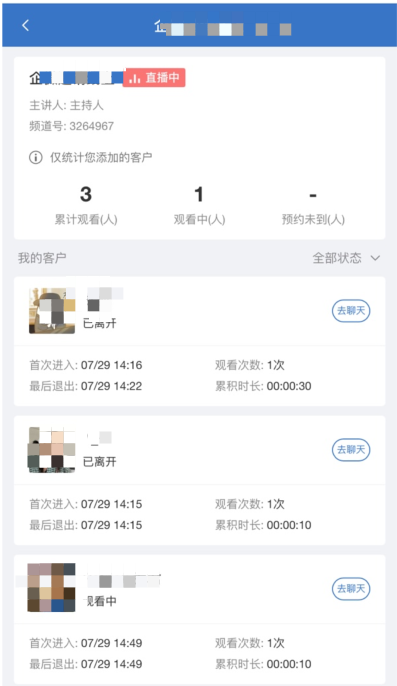
(3) Live Follow-up: Employees with channel invitation permissions set in the backend can directly view the viewing status of all their WeChat friends in the live room and jump to the chat window with one click.
3.5 Licensed Accounts
What is a Licensed Account?
WeCom interface call fee official documentation: https://open.work.weixin.qq.com/wwopen/policyDocument?uuid=hQH47EXznwhv9Nv7umThrb&taskid=4294967646&version=4.0.3.70108
To promote the healthy development of the WeCom third-party ecosystem and improve service providers' ability to utilize platform interfaces reasonably, WeCom will charge service providers based on platform interface call licenses. When a service provider's application calls platform interfaces, it must purchase licensed accounts and pay the corresponding fees. After payment, the purchased account activation codes can be bound to enterprise members to activate their ability to call platform interfaces.
What are Interconnection Accounts and Basic Accounts?:
- Determine the Licensed Account Type:
Licensed accounts, also known as interface call licensed accounts, are divided into two types based on capabilities: Basic Accounts and Interconnection Accounts.
a. When a service provider provides services to an enterprise, it must at least activate a Basic Account for the enterprise member to call interfaces such as identity verification and application messaging.
b. When a service provider provides WeChat customer contact-related functions to an enterprise, it needs to activate an Interconnection Account for the enterprise member.
c. Activating an Interconnection Account automatically grants the capabilities of a Basic Account.
Key Point: Confirm whether the account type to purchase is Basic or Interconnection (Interconnection means the employee needs to add WeChat contacts; buying Interconnection covers Basic). Determine the duration (minimum 1 month). Determine the quantity (minimum 1, maximum 1000 per purchase; quantities exceeding 1000 require price negotiation).
It is recommended to contact our sales team for operational guidance and Q&A.
After purchase, go to Application > Live SCRM > Licensed Account Management to see the activation codes. Verify the quantity of interface activation codes.
- How to Bind After Purchase?
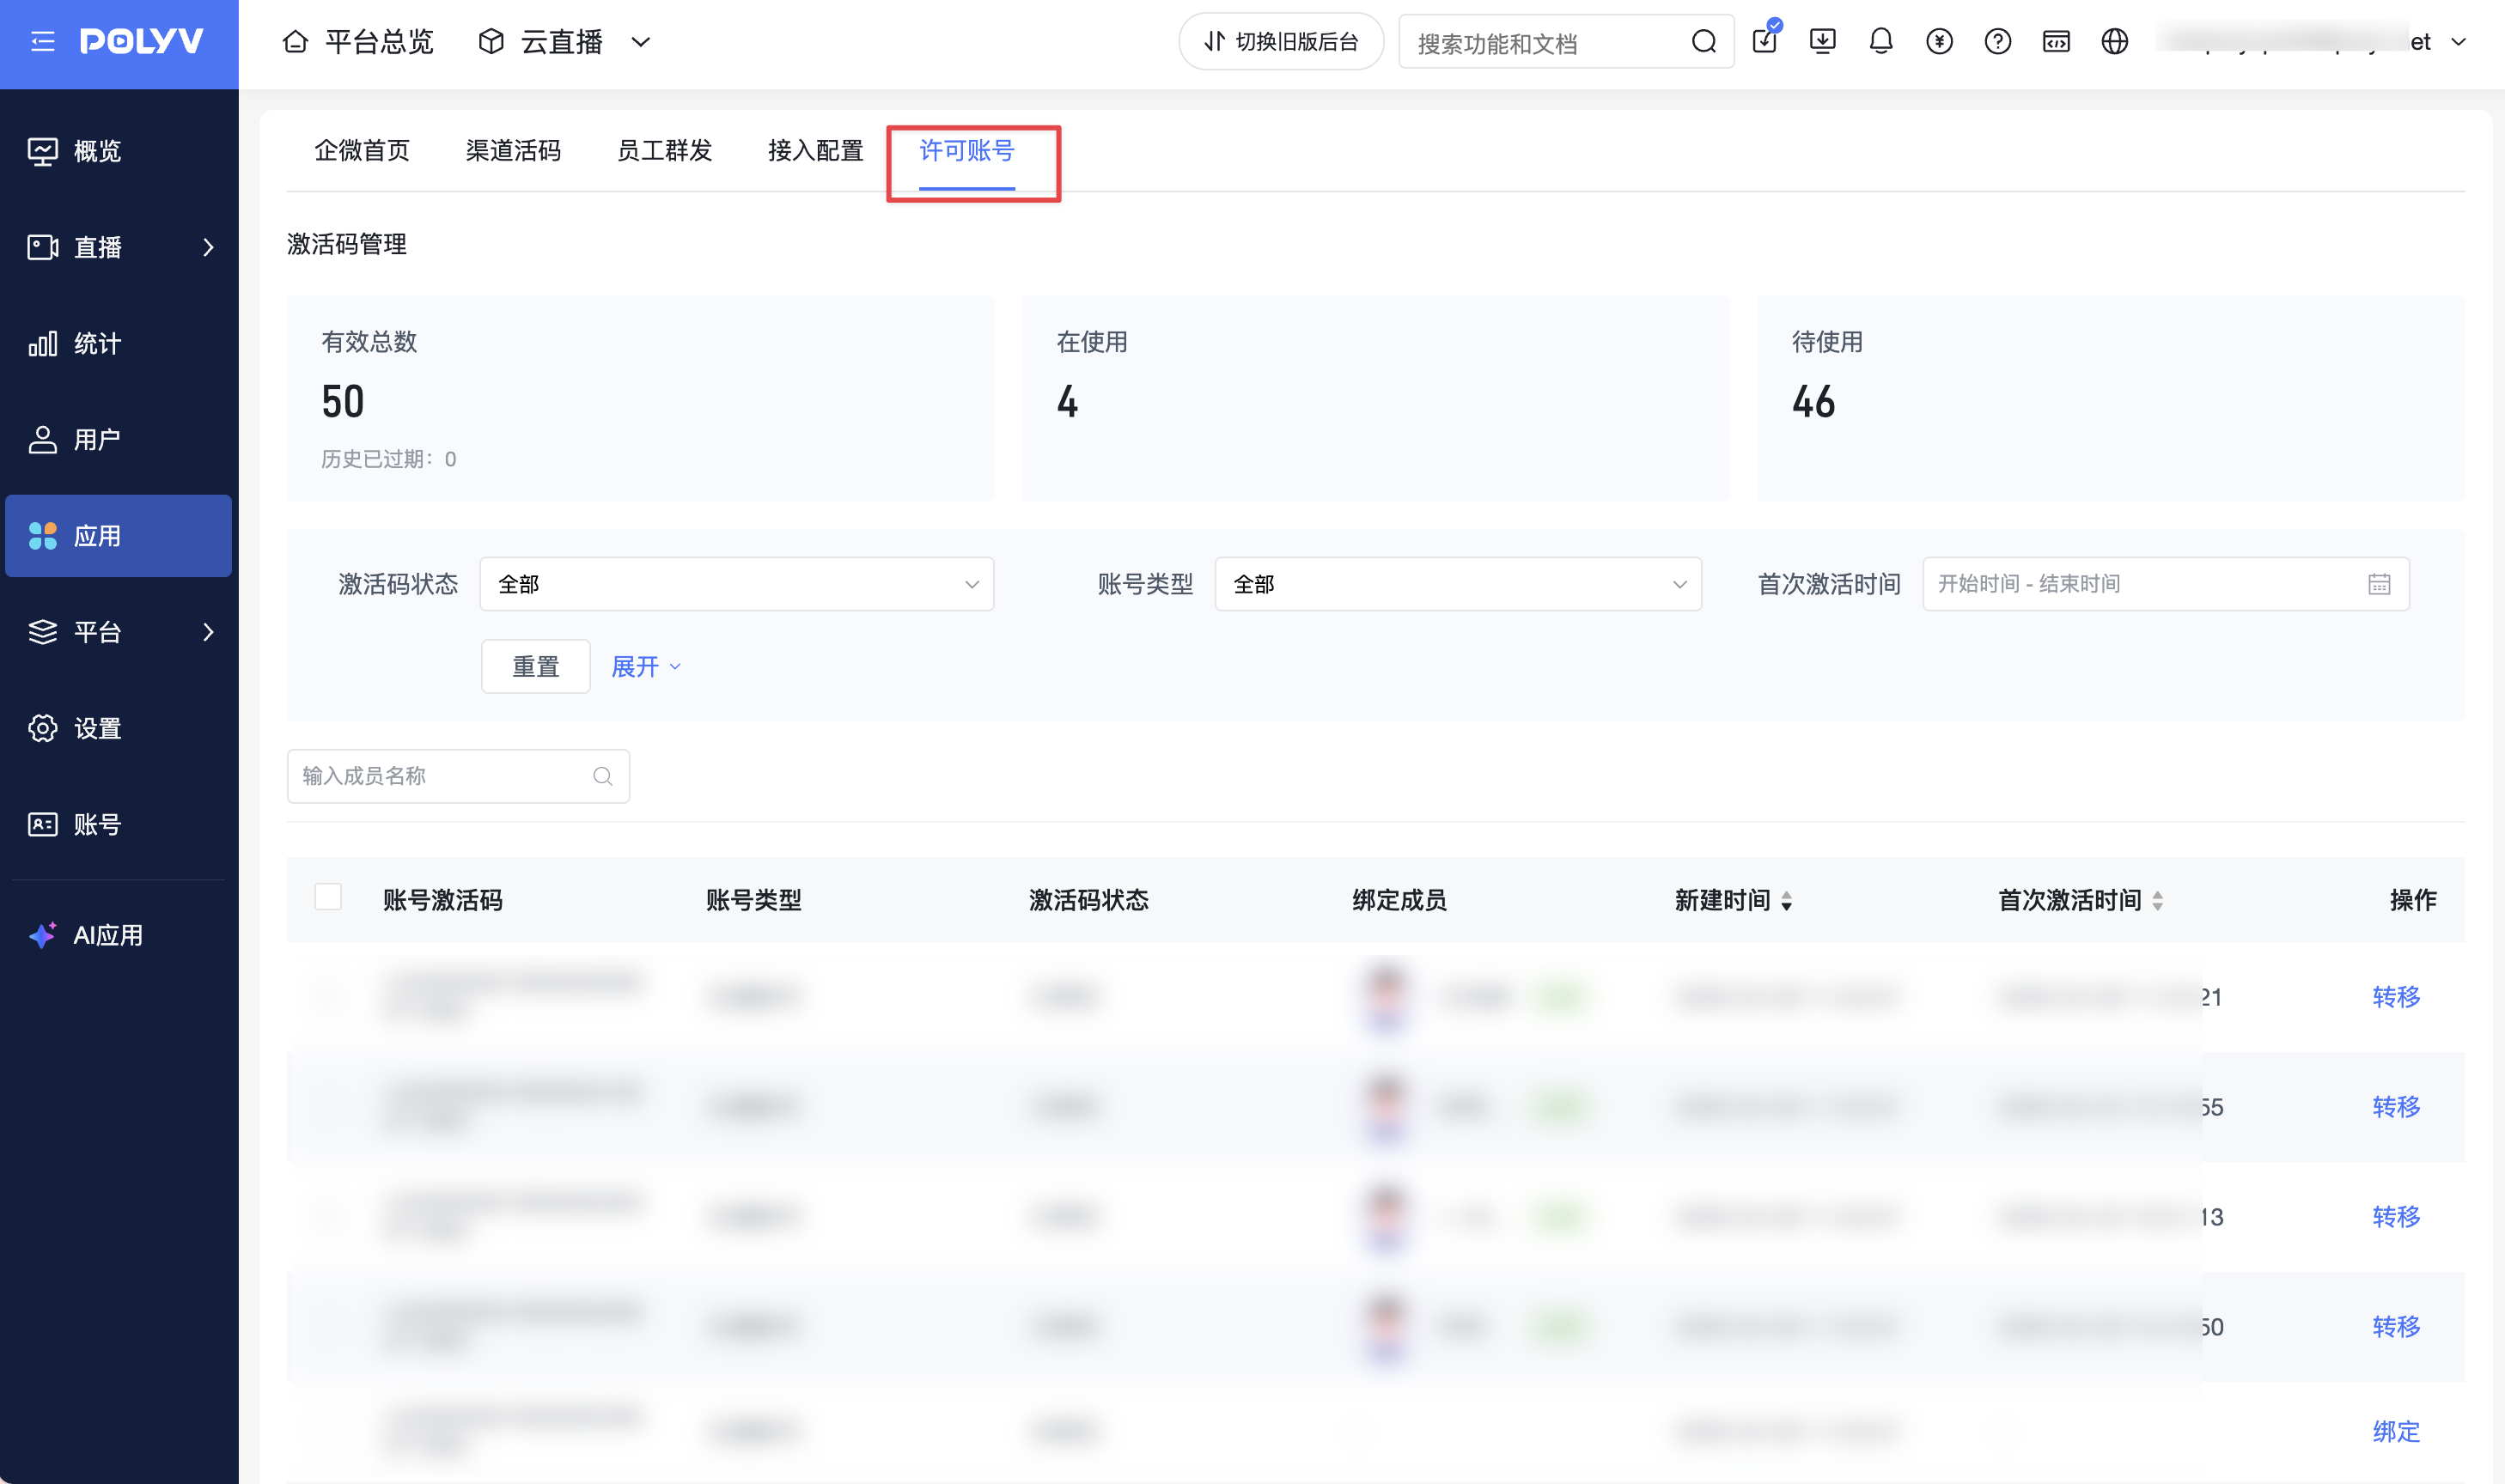
If bound to A (active employee) and you want to switch to B (active employee), you must wait at least 30 days. If bound to A (resigned employee) and you want to switch, it can be done at any time.
3.6 Channel QR Code
When enterprises do pre-live stream promotion, using a single WeChat ID to attract traffic and adding a large number of customer WeChat accounts in a short time may trigger official risk control, potentially limiting feature usage or even getting the account banned. In this case, using the WeCom Channel QR Code for traffic generation is necessary. Customers scanning the code will be randomly assigned to one of the members, significantly reducing the pressure of traffic generation and facilitating business personnel in serving customers better.
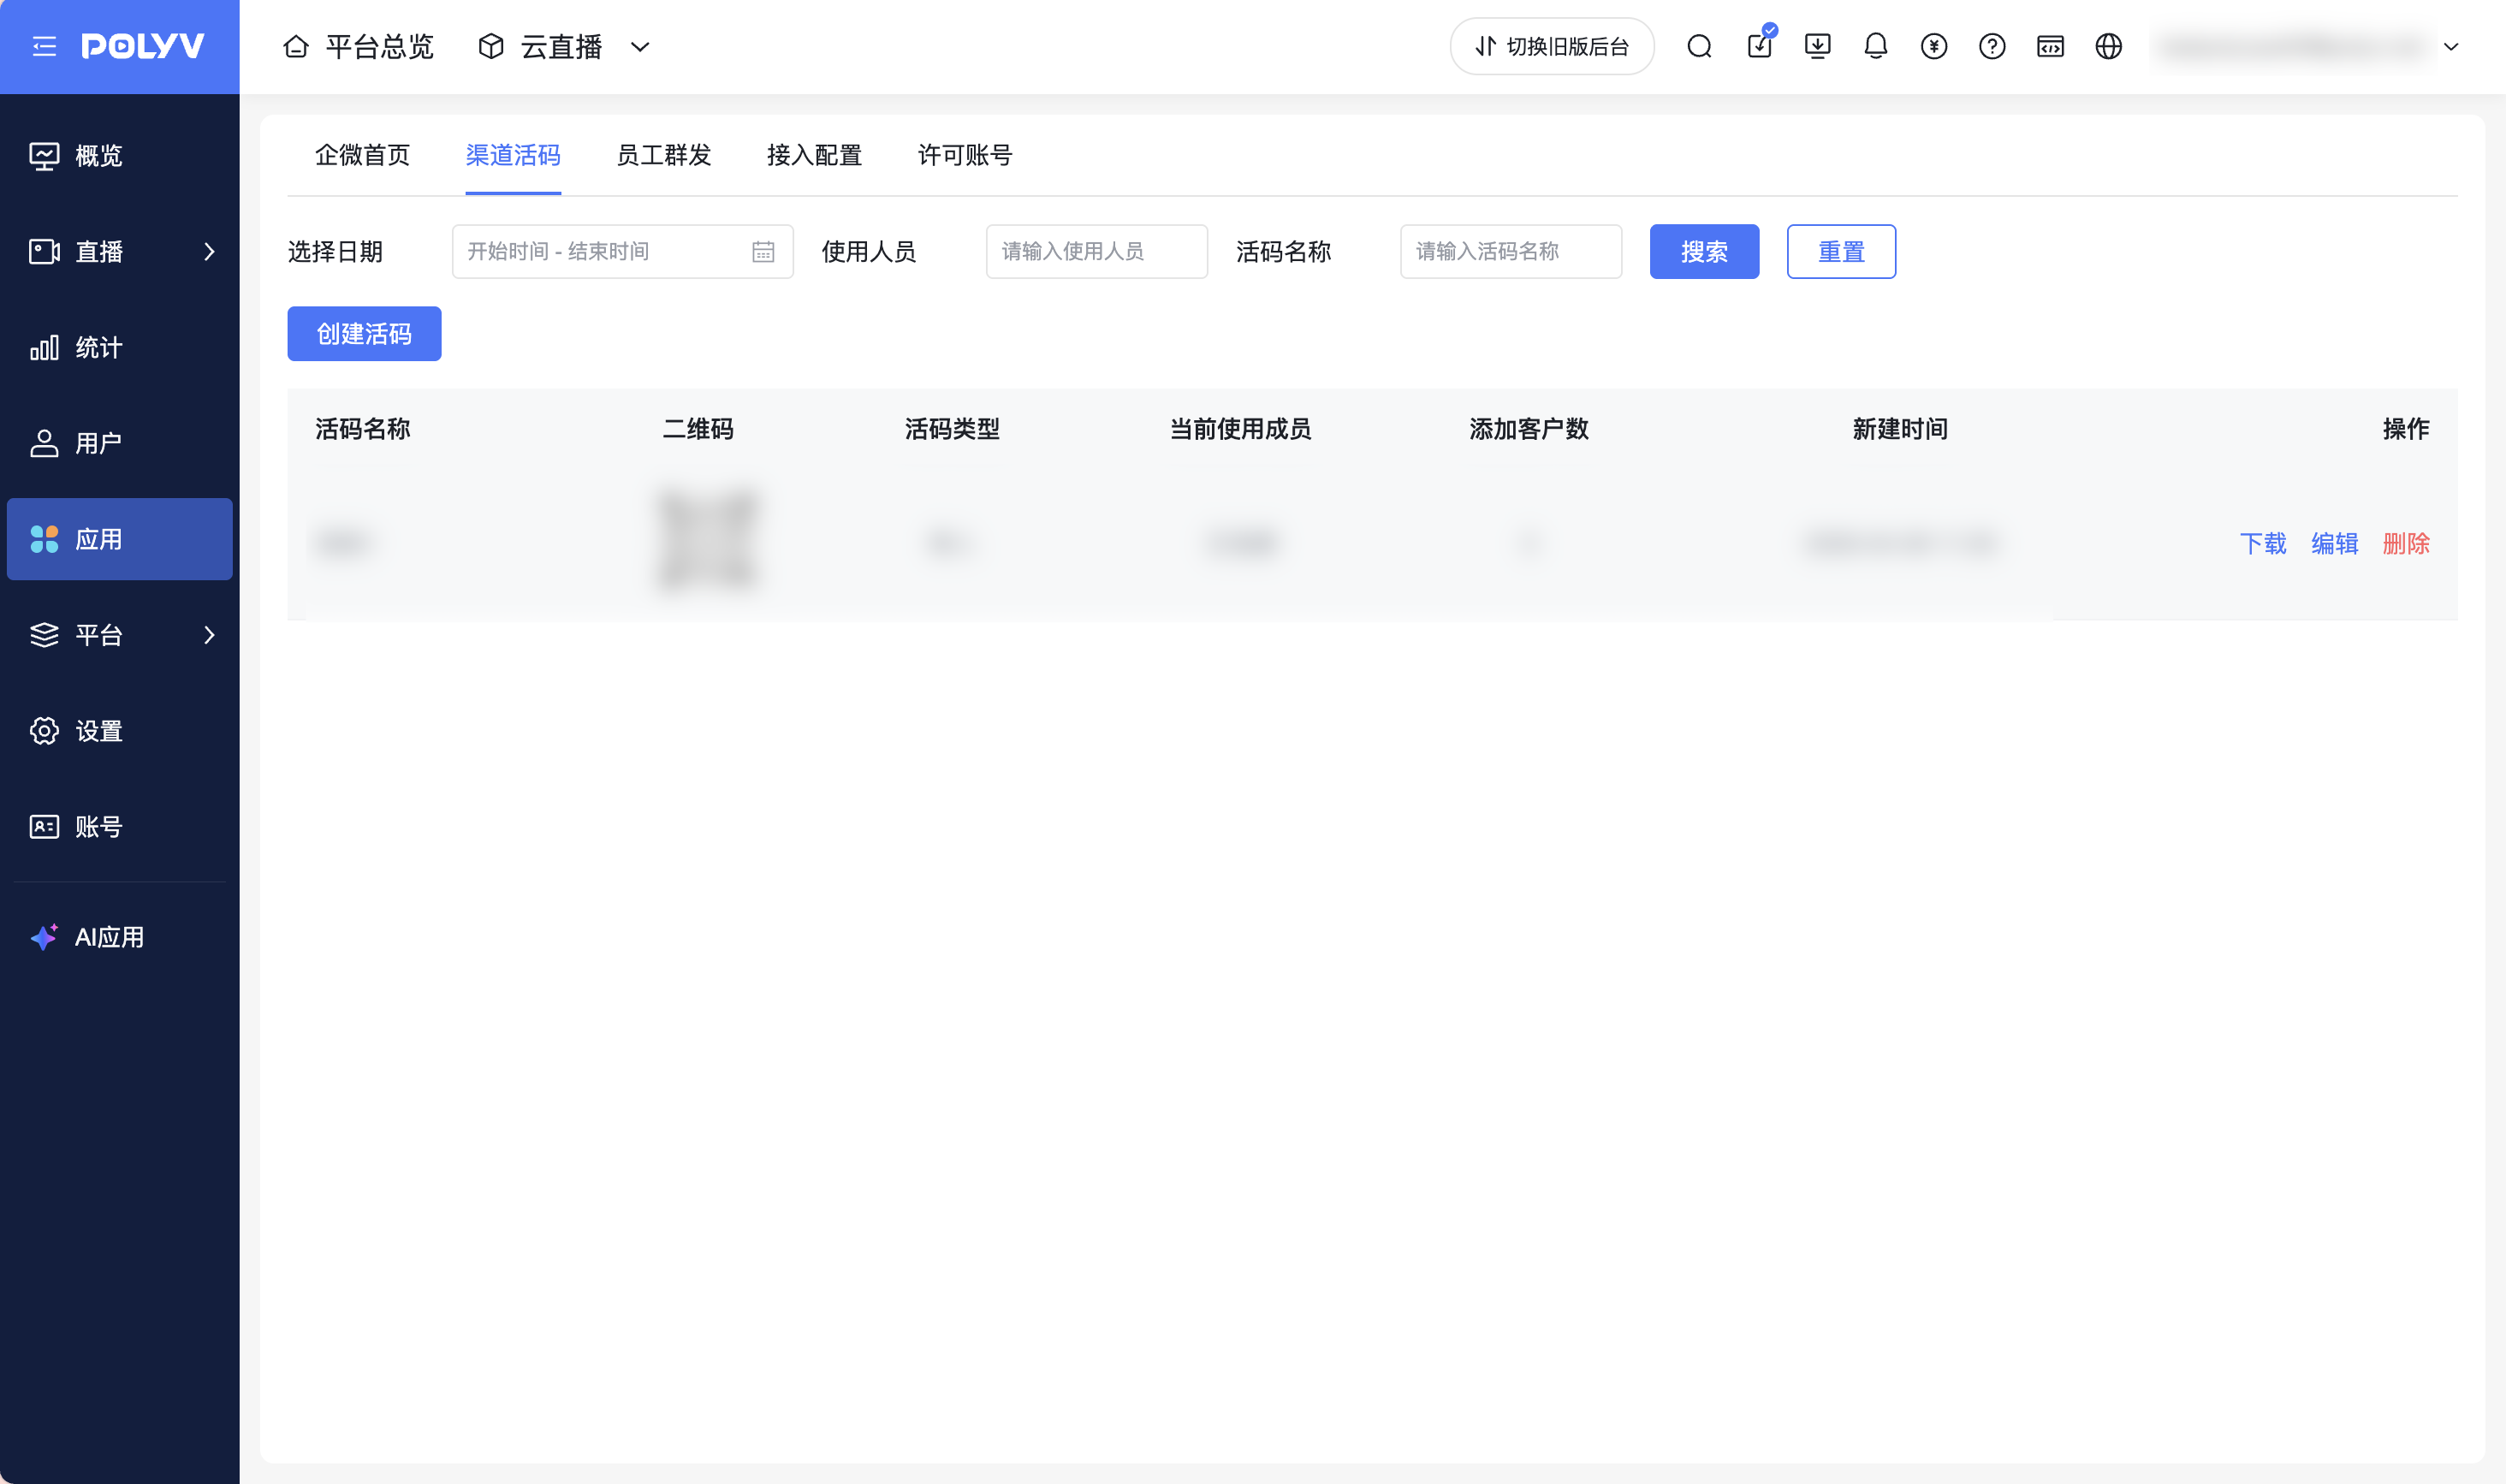
WeCom Channel QR Codes have the following features:
Not subject to the daily limit on passive friend additions.
One QR code, multiple WeCom employees automatically and flexibly assigned.
Automatic identification upon scanning to prevent duplicate group joining/friend adding.
Supports automatic identification of users who scan repeatedly, effectively filtering out duplicate group joiners or friend adders, improving management efficiency.
Real-time tracking of channel placement effectiveness, saving promotion costs.
Each channel code represents a promotion channel, automatically tagging users, easily tracking scan data, and efficiently utilizing promotion resources.
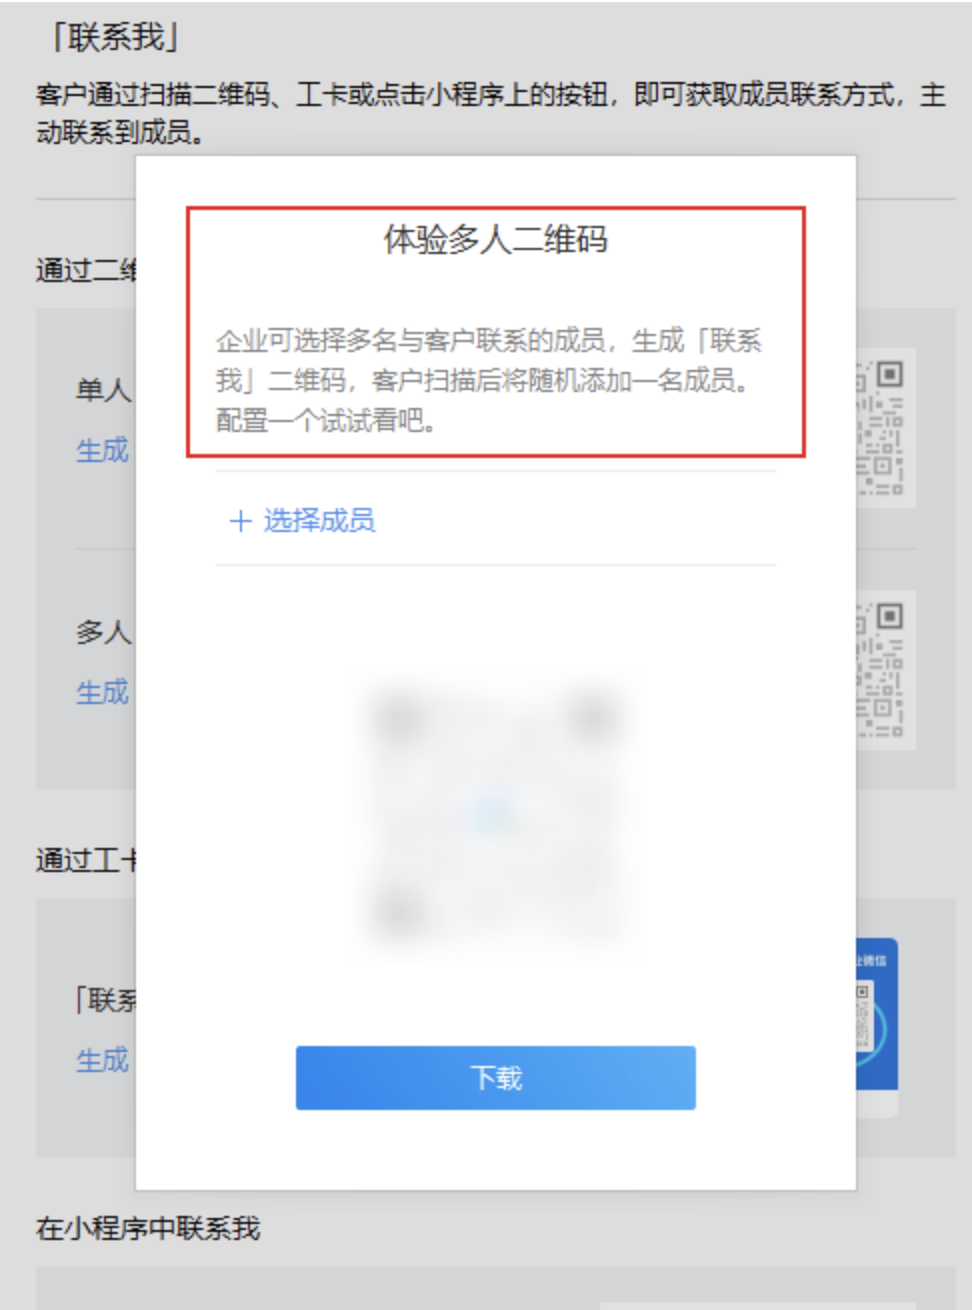
However, using WeCom's built-in QR code function has the following disadvantages:
① Cannot distinguish and track customer acquisition data from different channels. ② Channel welcome messages can only be configured uniformly, not differentiated. ③ When adding friends, tags cannot be added automatically, only manually.
Overall Process Function Path: WeCom Integration > Workbench > Channel QR Code
Preparation
Create QR Code: Click the "Create QR Code" button.
Set Reception Employees: Can set single or multi-person mode. Multi-person mode assigns randomly.
Set Reception Employees: Set tags for customers after adding friends, enabling preliminary customer segmentation.
Set Welcome Message: Can set a unified welcome message for the channel QR code.
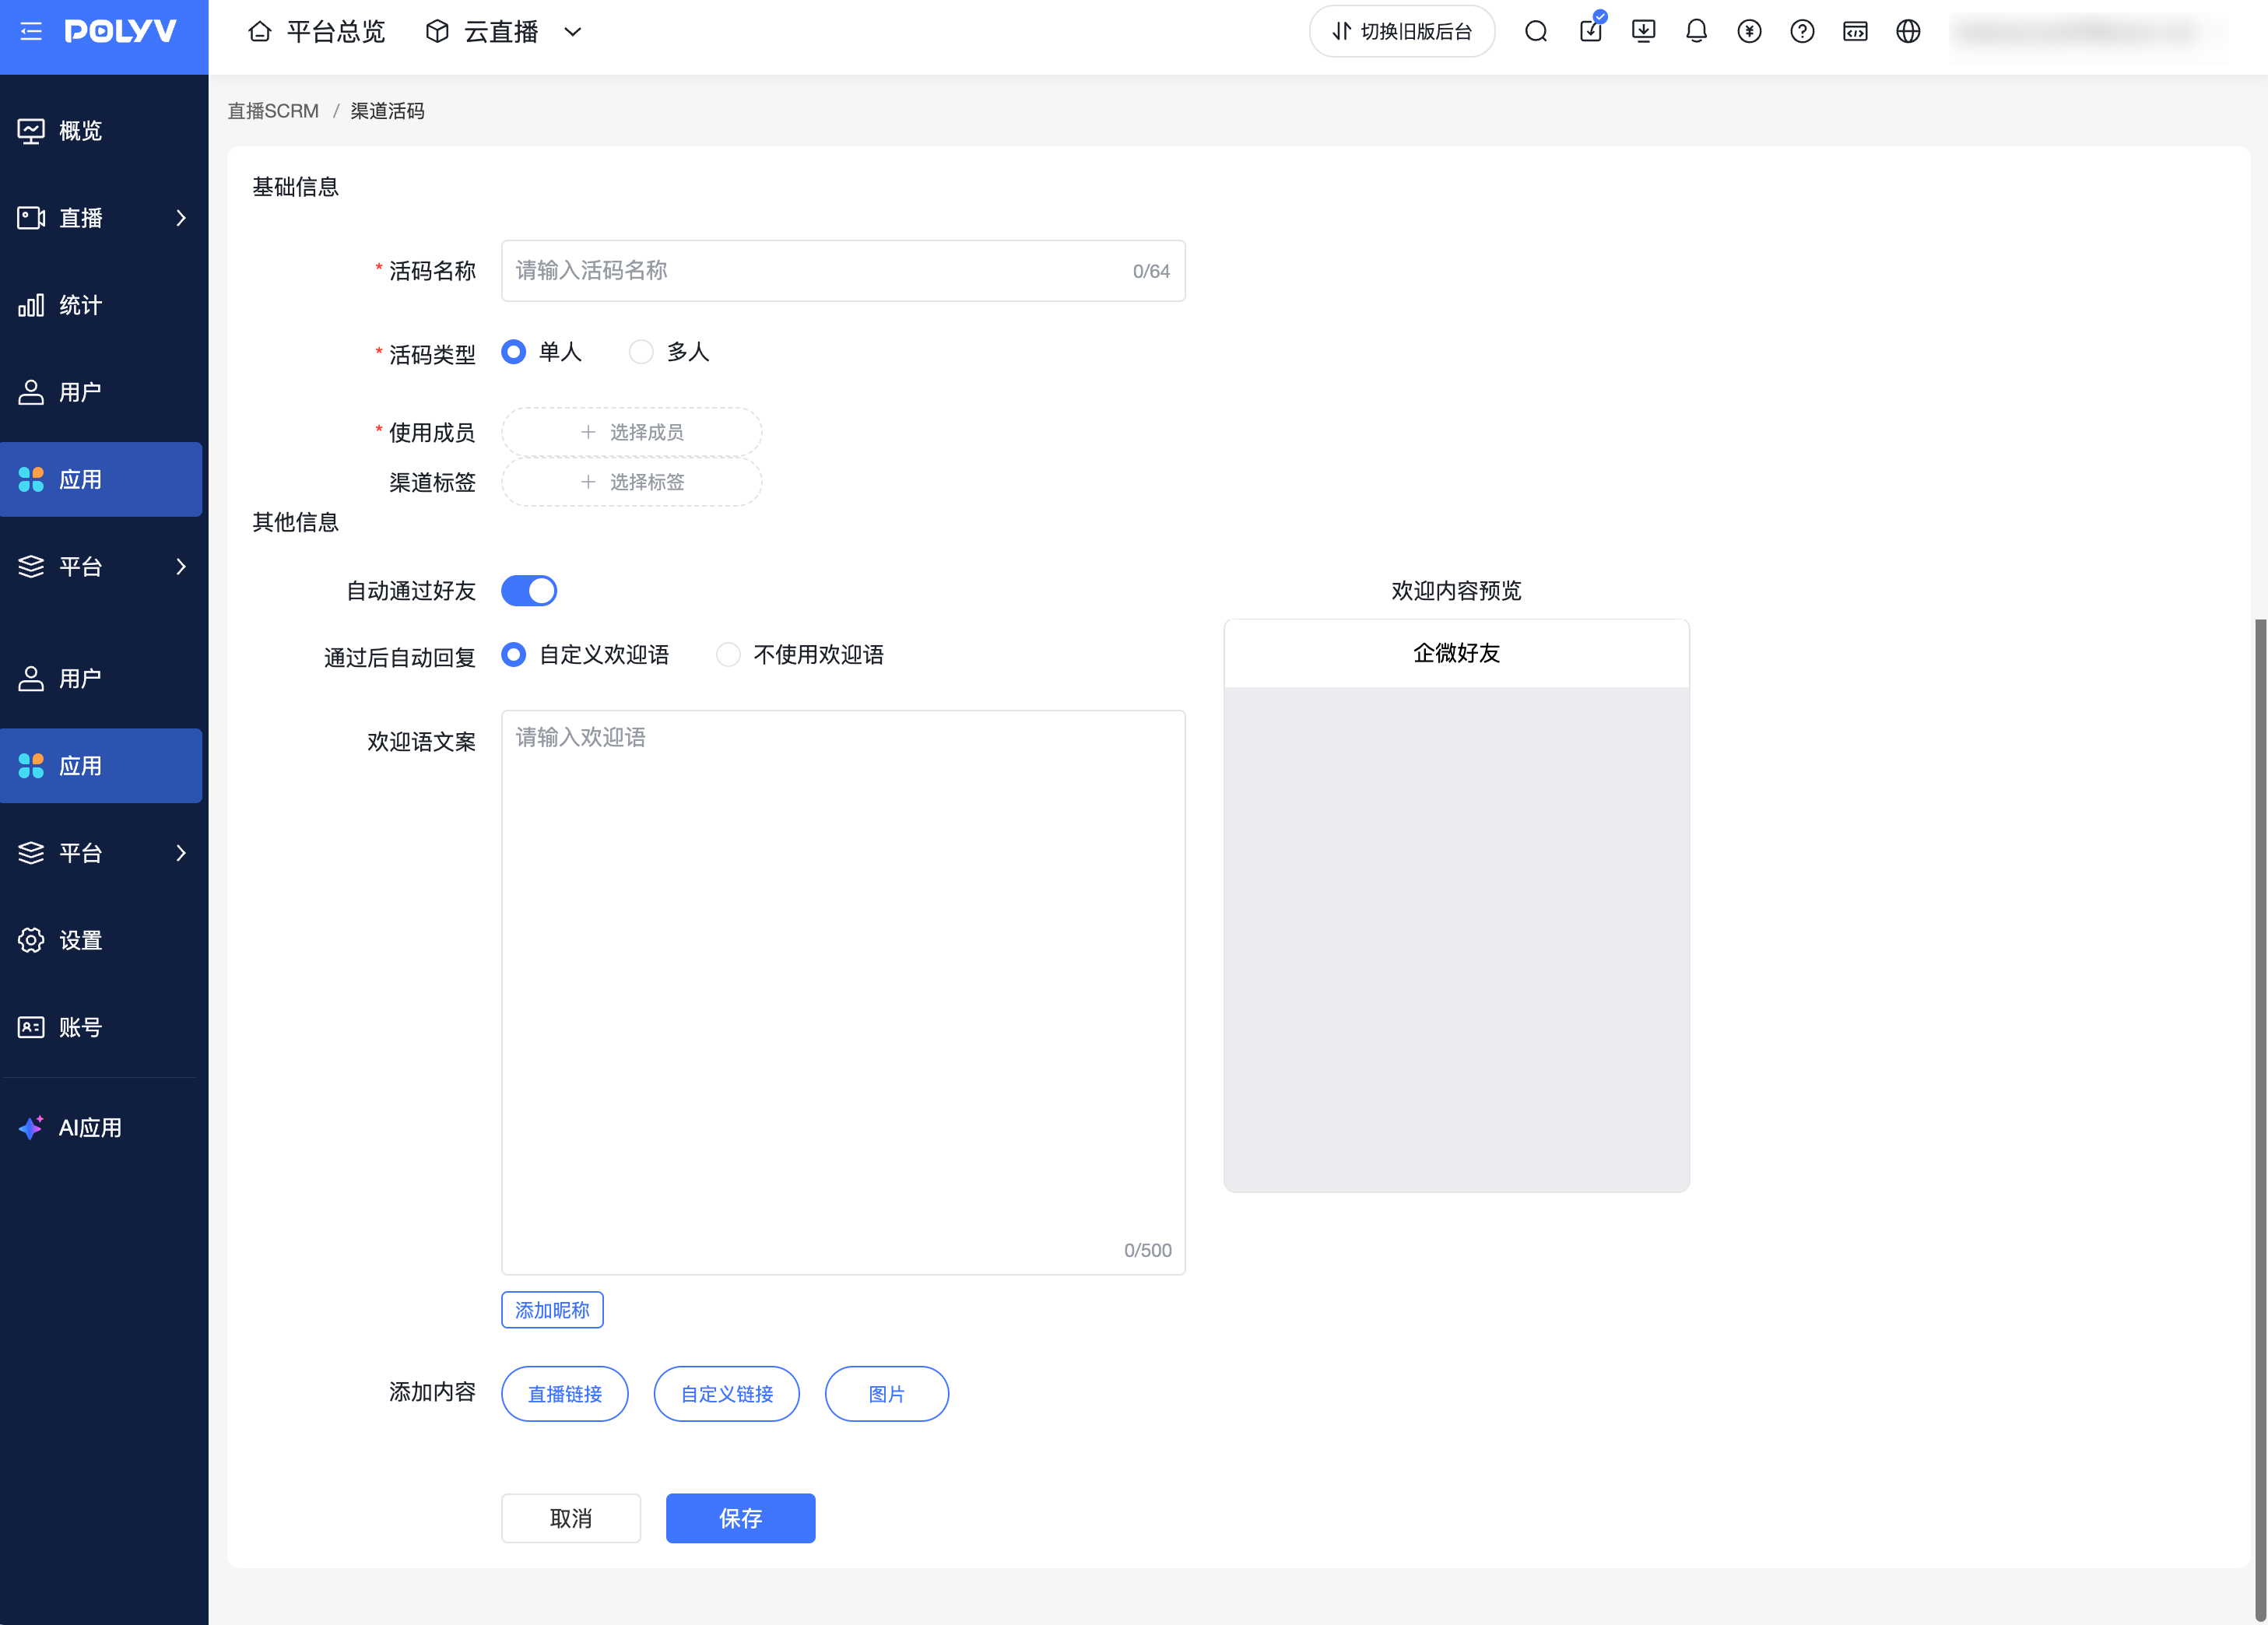
After saving, distribute the channel QR code to various channels for traffic generation.
4. WeCom Employee Follow-up on Customer Activity
Feature Description: Allows WeCom employees to act as "teaching assistants" in the live stream console, accurately following up on their assigned customers during the live stream and managing them. Meanwhile, operators can monitor overall customer status and employee follow-up effectiveness in the management backend.
Operator Side: How to Configure Permissions for WeCom Employees
Operators need to grant login permissions for the console to designated WeCom employees in the management backend.
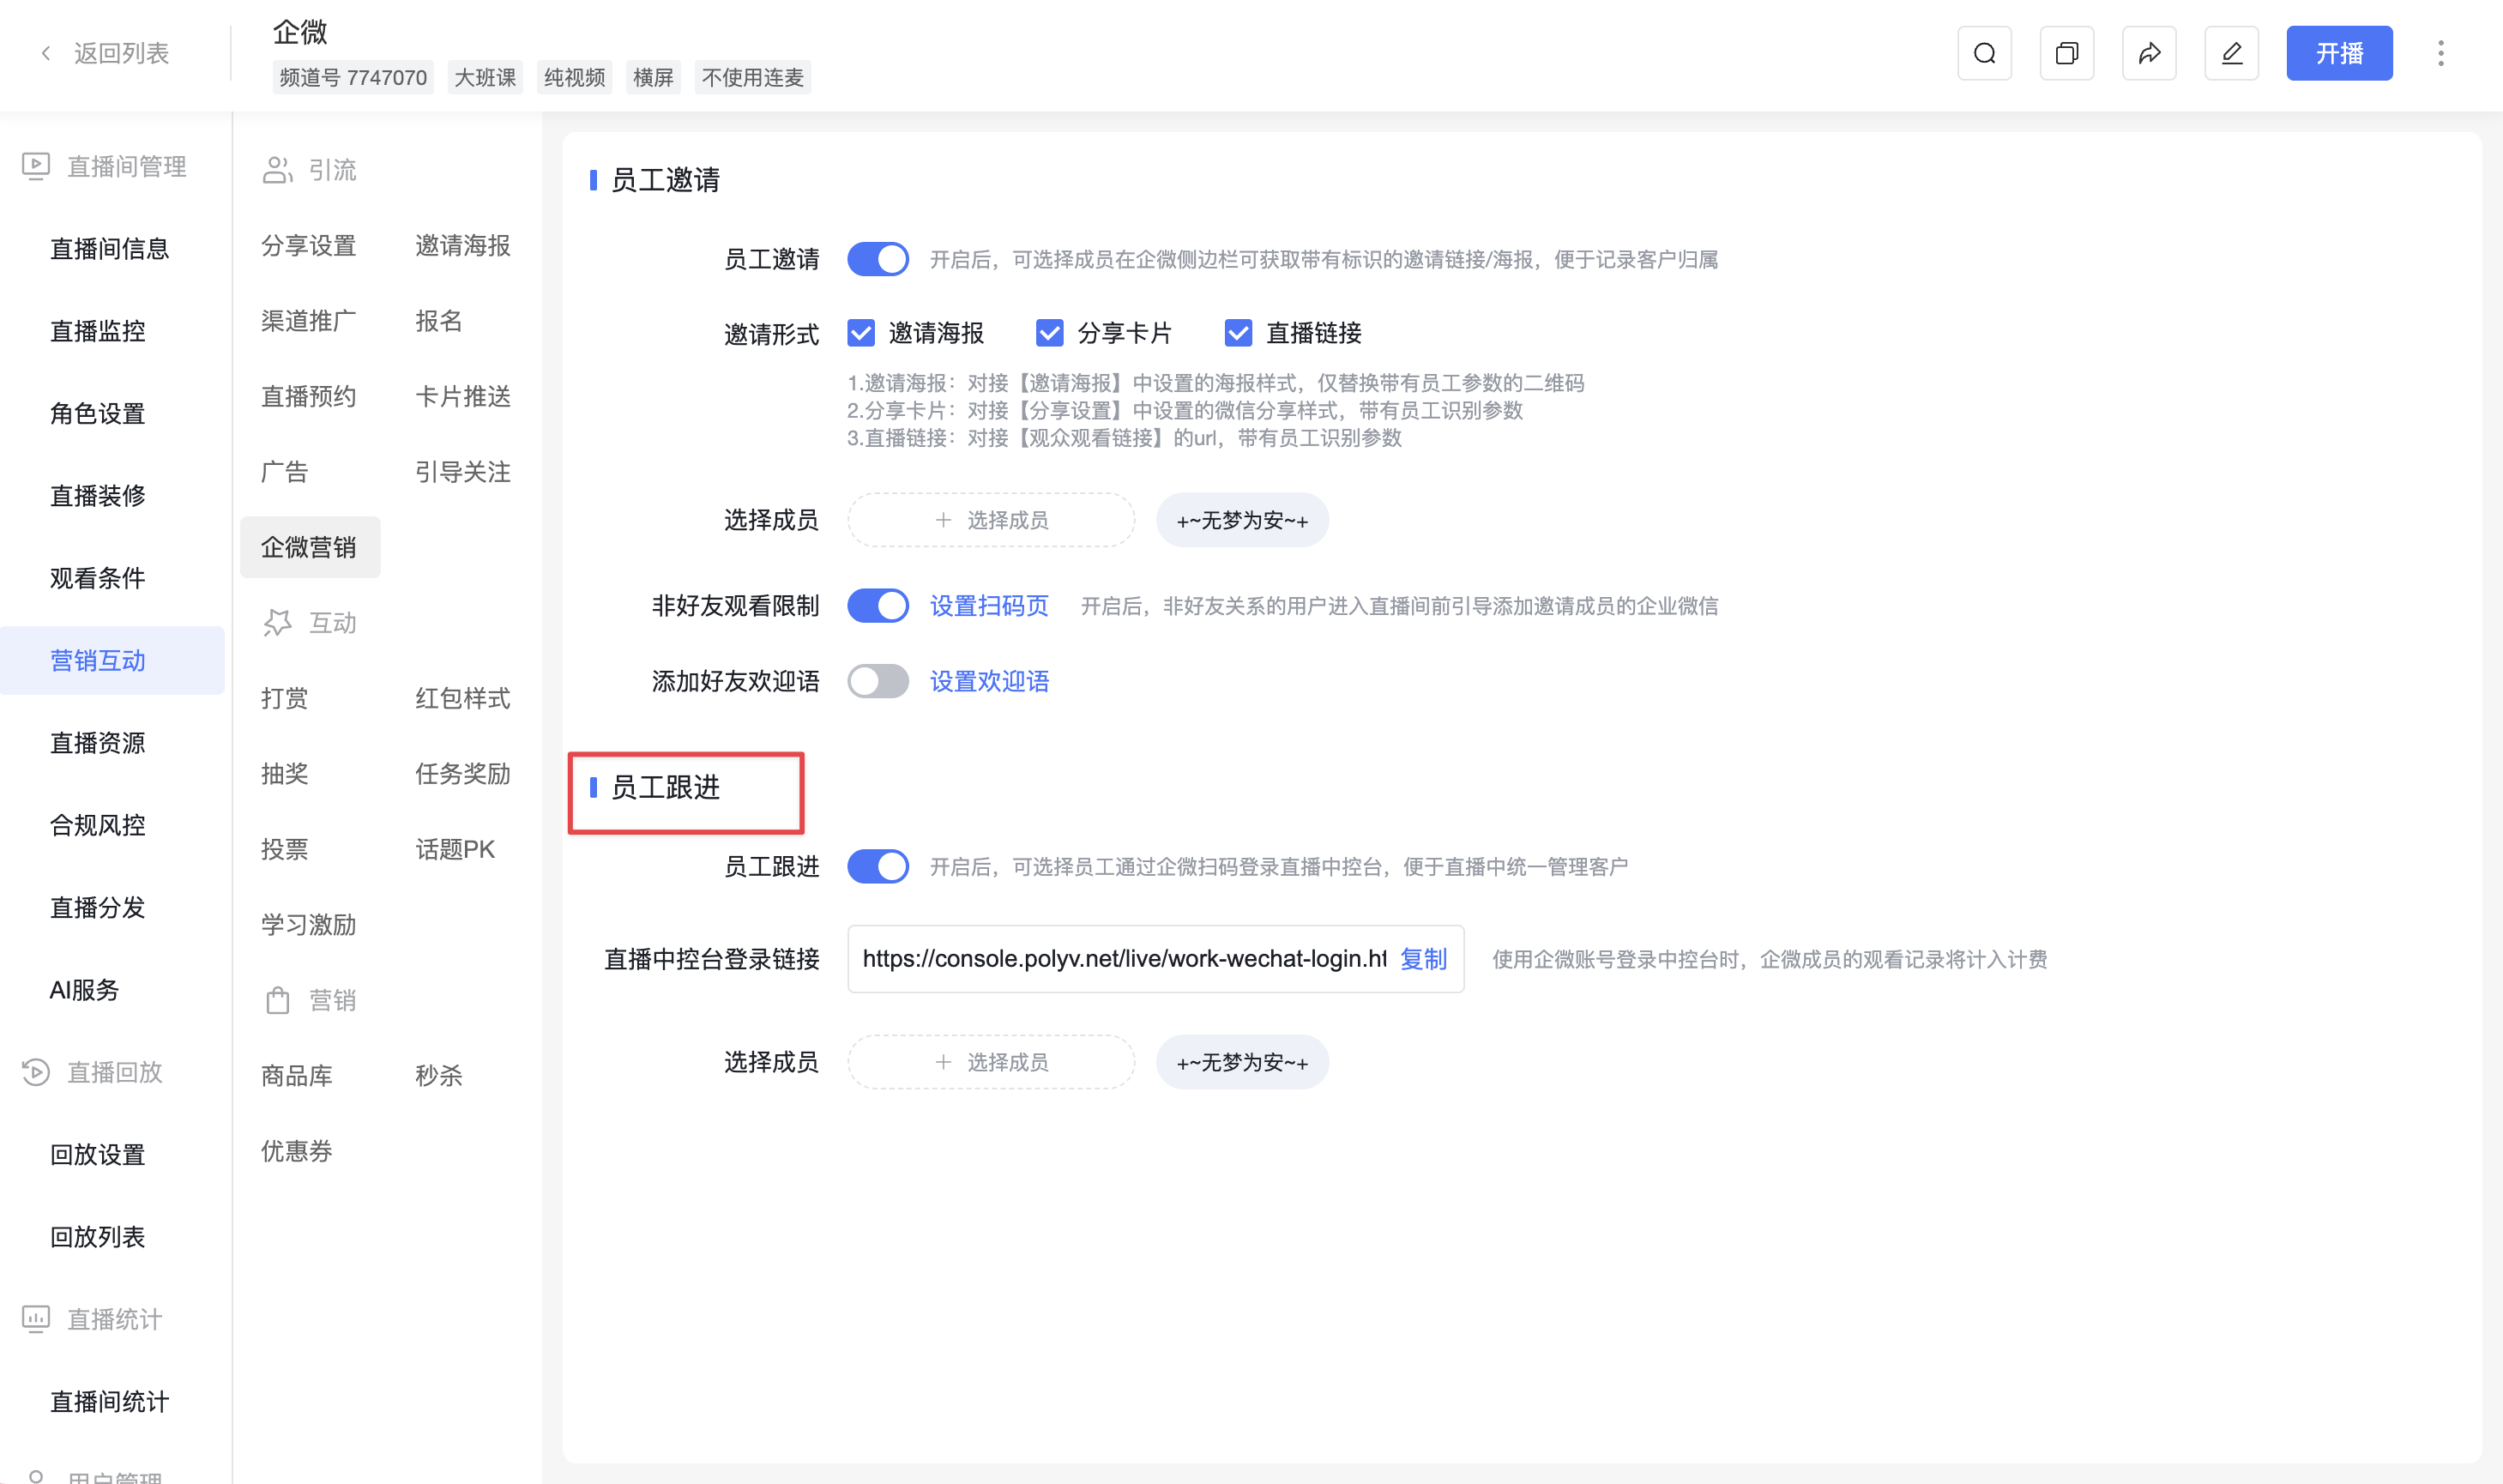
- Step 1: Enter the Configuration Page Operation Path: [Management Backend] > [Channel] > [Marketing Interaction] > [WeCom Marketing] > [Employee Follow-up]
- Step 2: Select and Authorize Employees
- Under "Employee Follow-up", click [Select Members].
- Select the employees to authorize from the WeCom organization. Selected employees will gain login permissions for the live stream console for this channel.
- Step 3: Distribute the Login Link
- After configuration, copy the [Live Stream Console Login Link].
- Distribute this link to the authorized employees. This link is channel-generic; the system will verify the employee's identity upon login.
- Note: When WeCom members log in to the console using their WeCom account, their viewing records will be counted for billing purposes.
- WeCom Employee Side: How to Use the Console
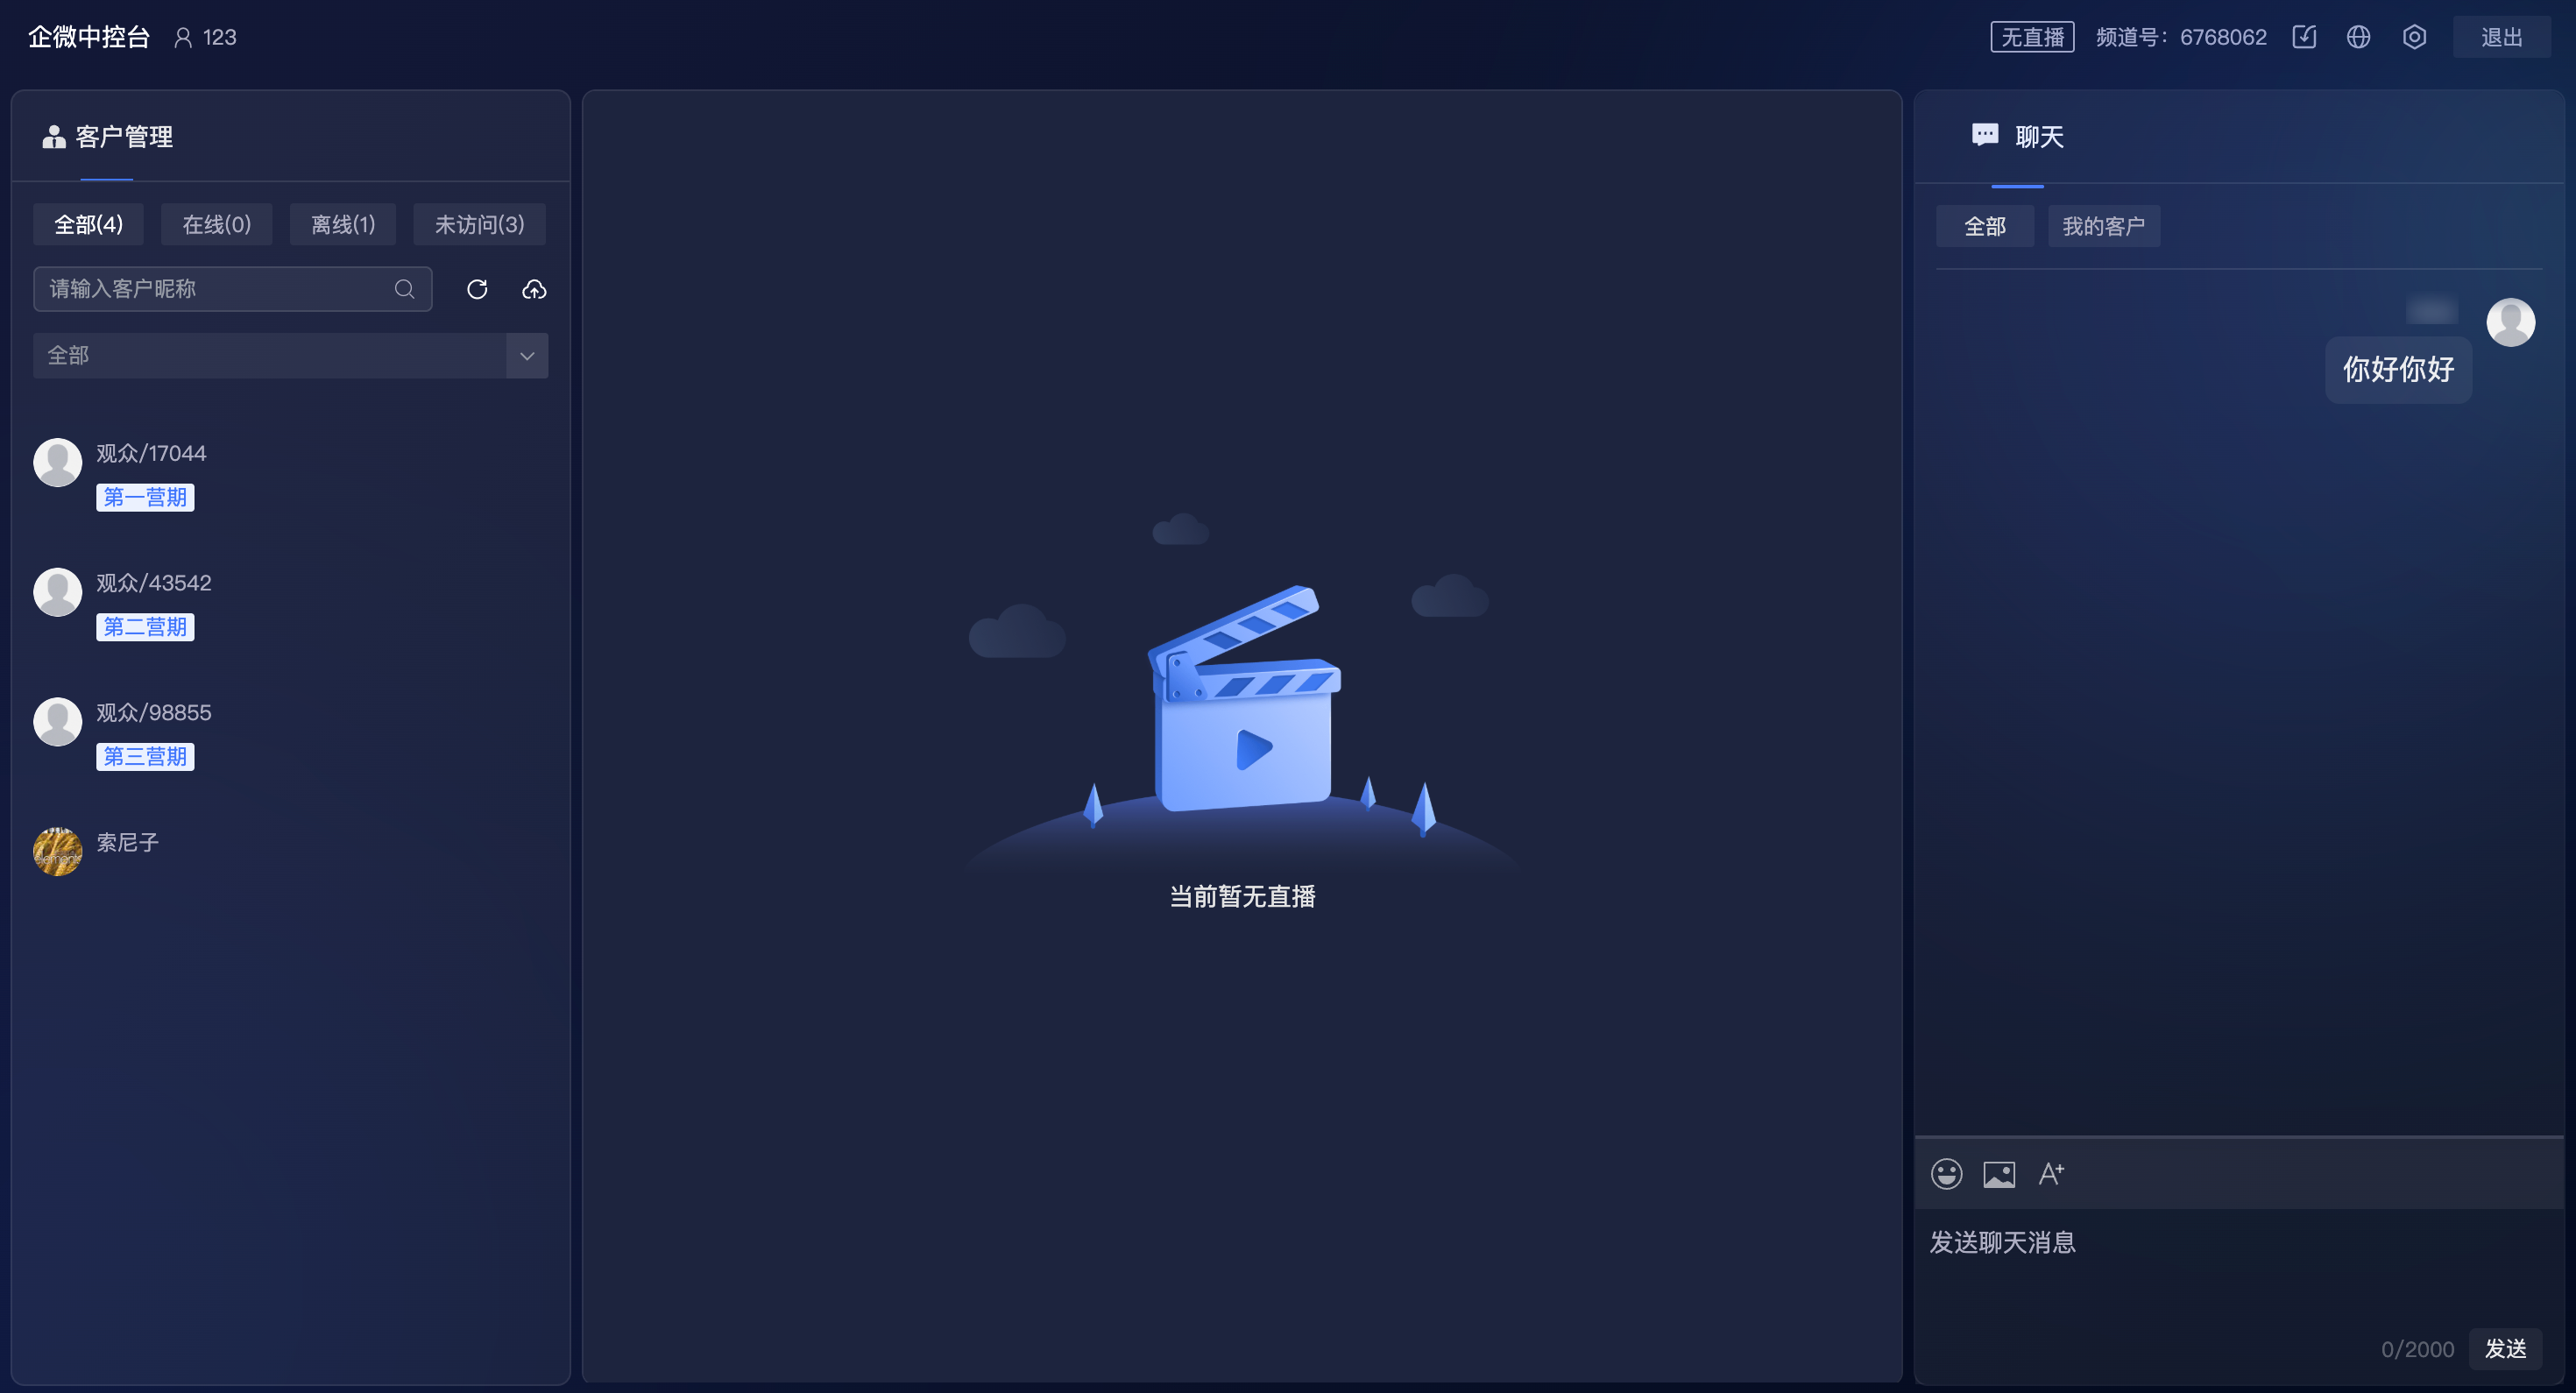
WeCom employees log in to the live stream console by scanning the QR code via WeCom using the link distributed by the operator, and can then start following up on customers.
- Core Features:
Supports Customer Import and Relationship Binding:
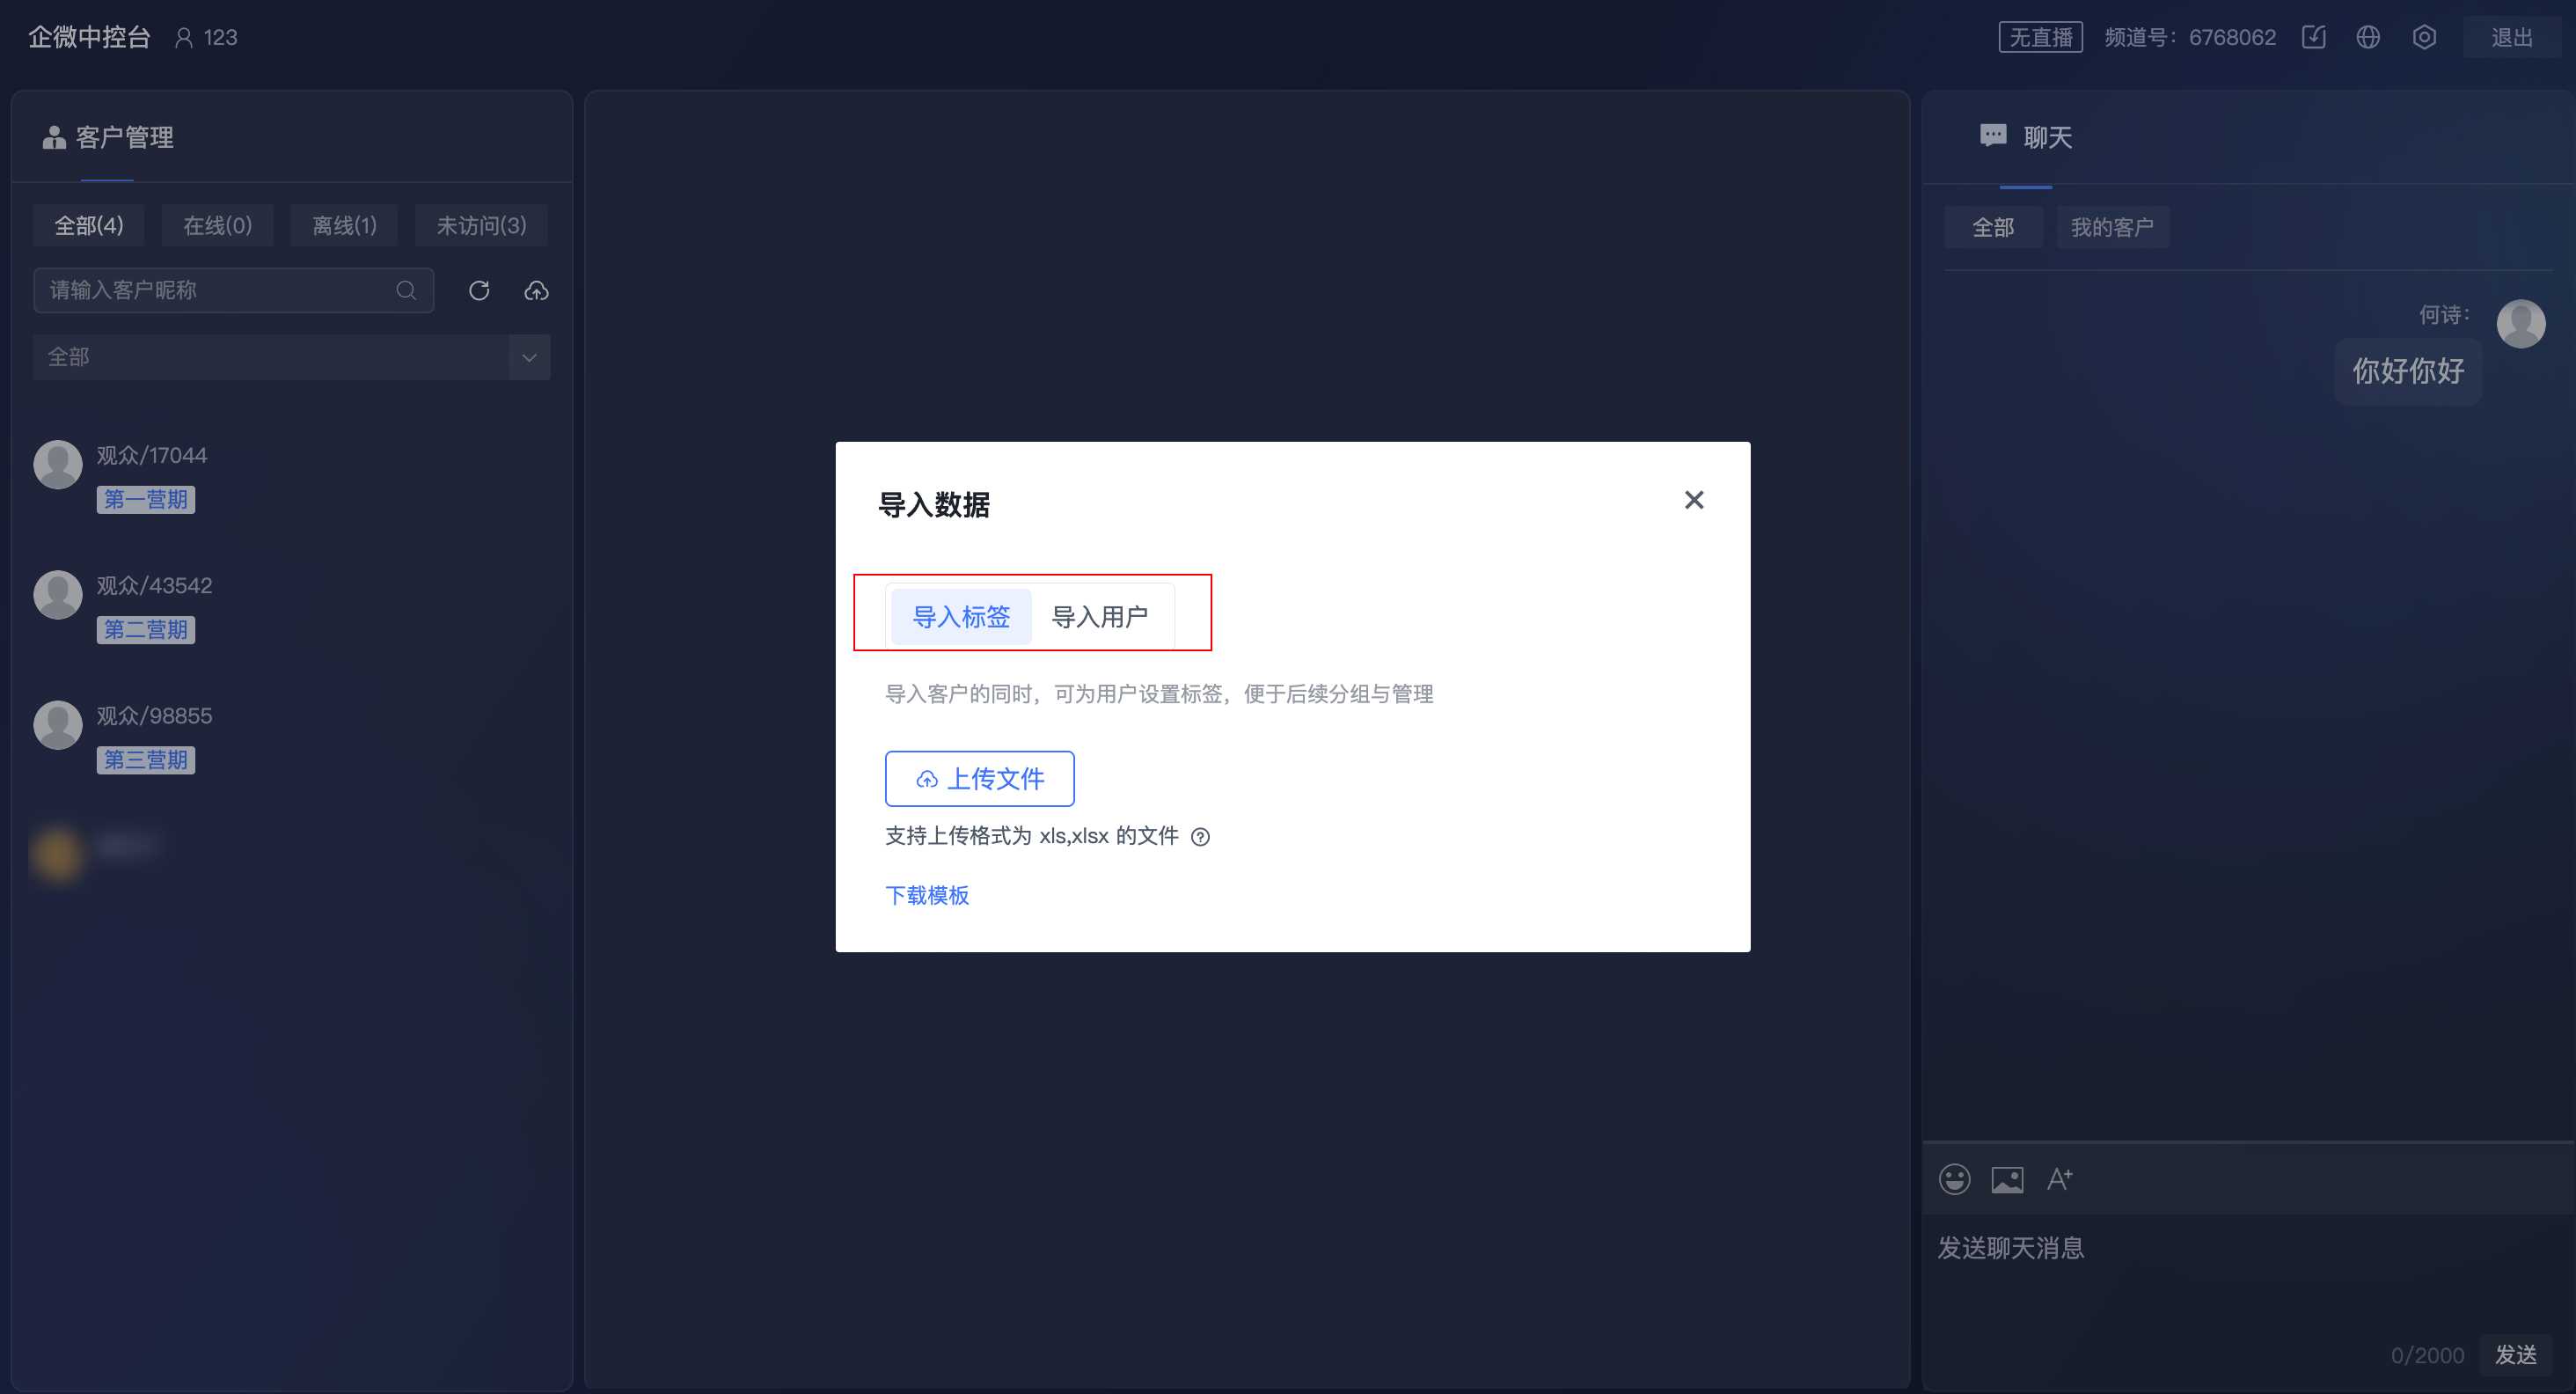
- In the [Customer Management] module, new features [Import Tags] (Phone Number + Tag) and [Import Users] (Phone Number Only) have been added.
- Customers imported via these two methods will be automatically bound to the WeCom employee as the sole follower. This relationship will be displayed synchronously in the "Follower" column under [Management Backend] > [Live Stream Statistics] > [WeCom Marketing] > [Follow-up Records].
Customer List Viewing:
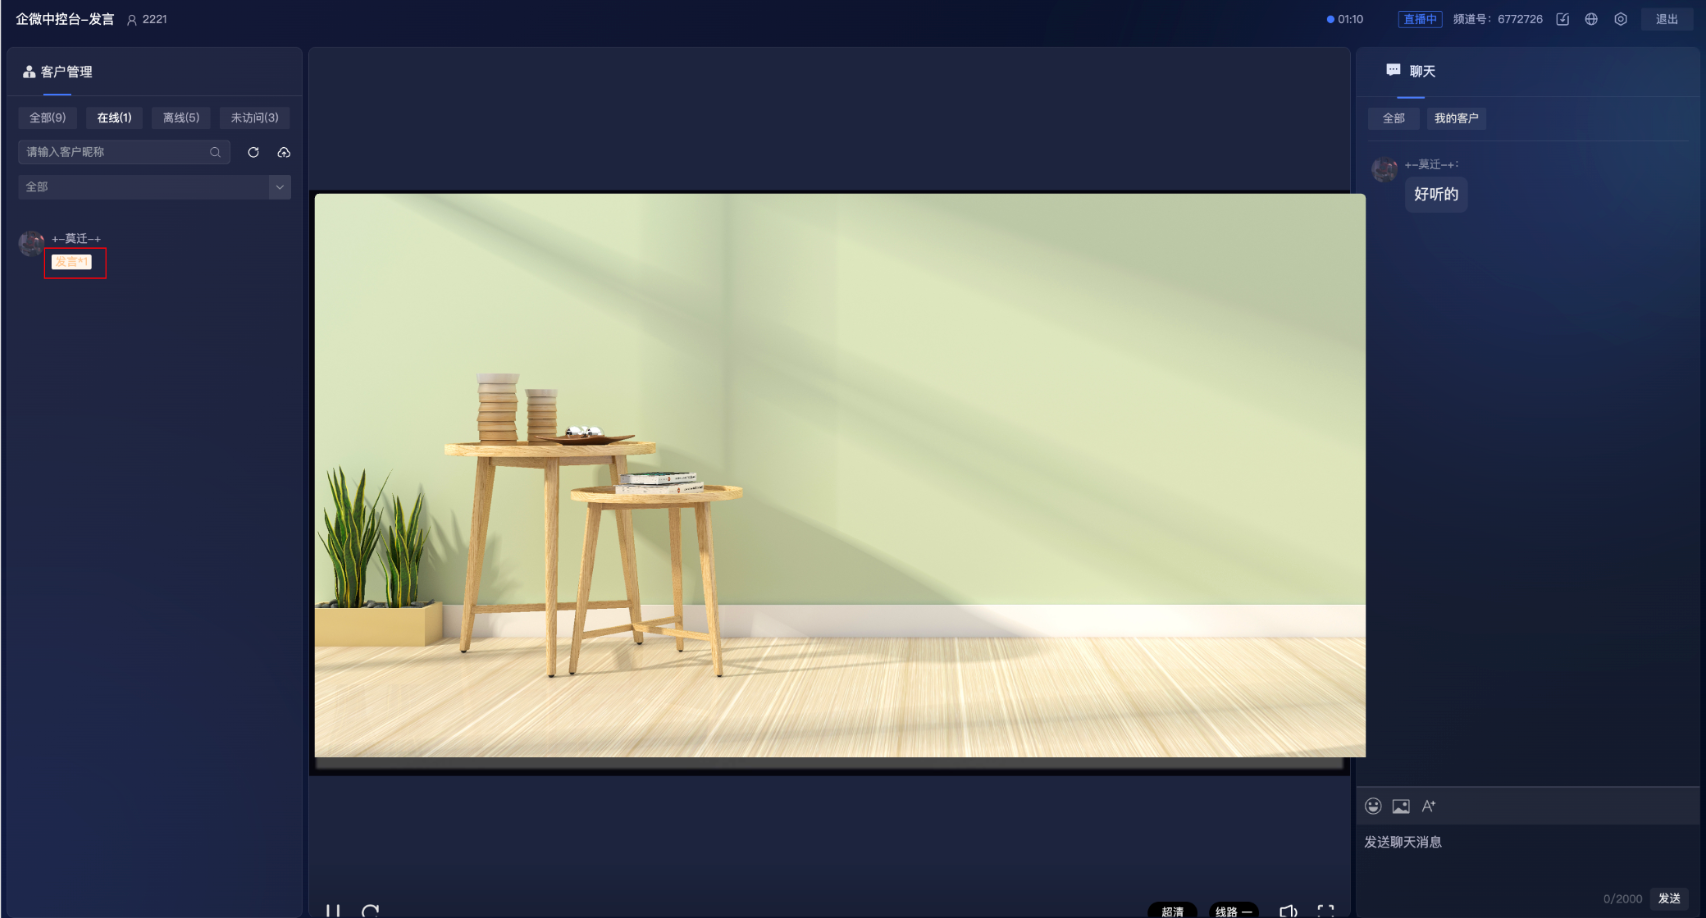
- All: Includes customers imported by the current employee, as well as customers added via WeCom who have visited the viewing page at least once.
- Online: Users from the "All" list who are currently watching this channel.
- Offline: Users from the "All" list who have visited this channel but have now left.
- Not Visited: Users from the "All" list who have never visited this channel.
Customer Data Viewing:
Supports viewing the number of product clicks and chat messages sent by the customer during the live stream.
Customer Tag Filtering:
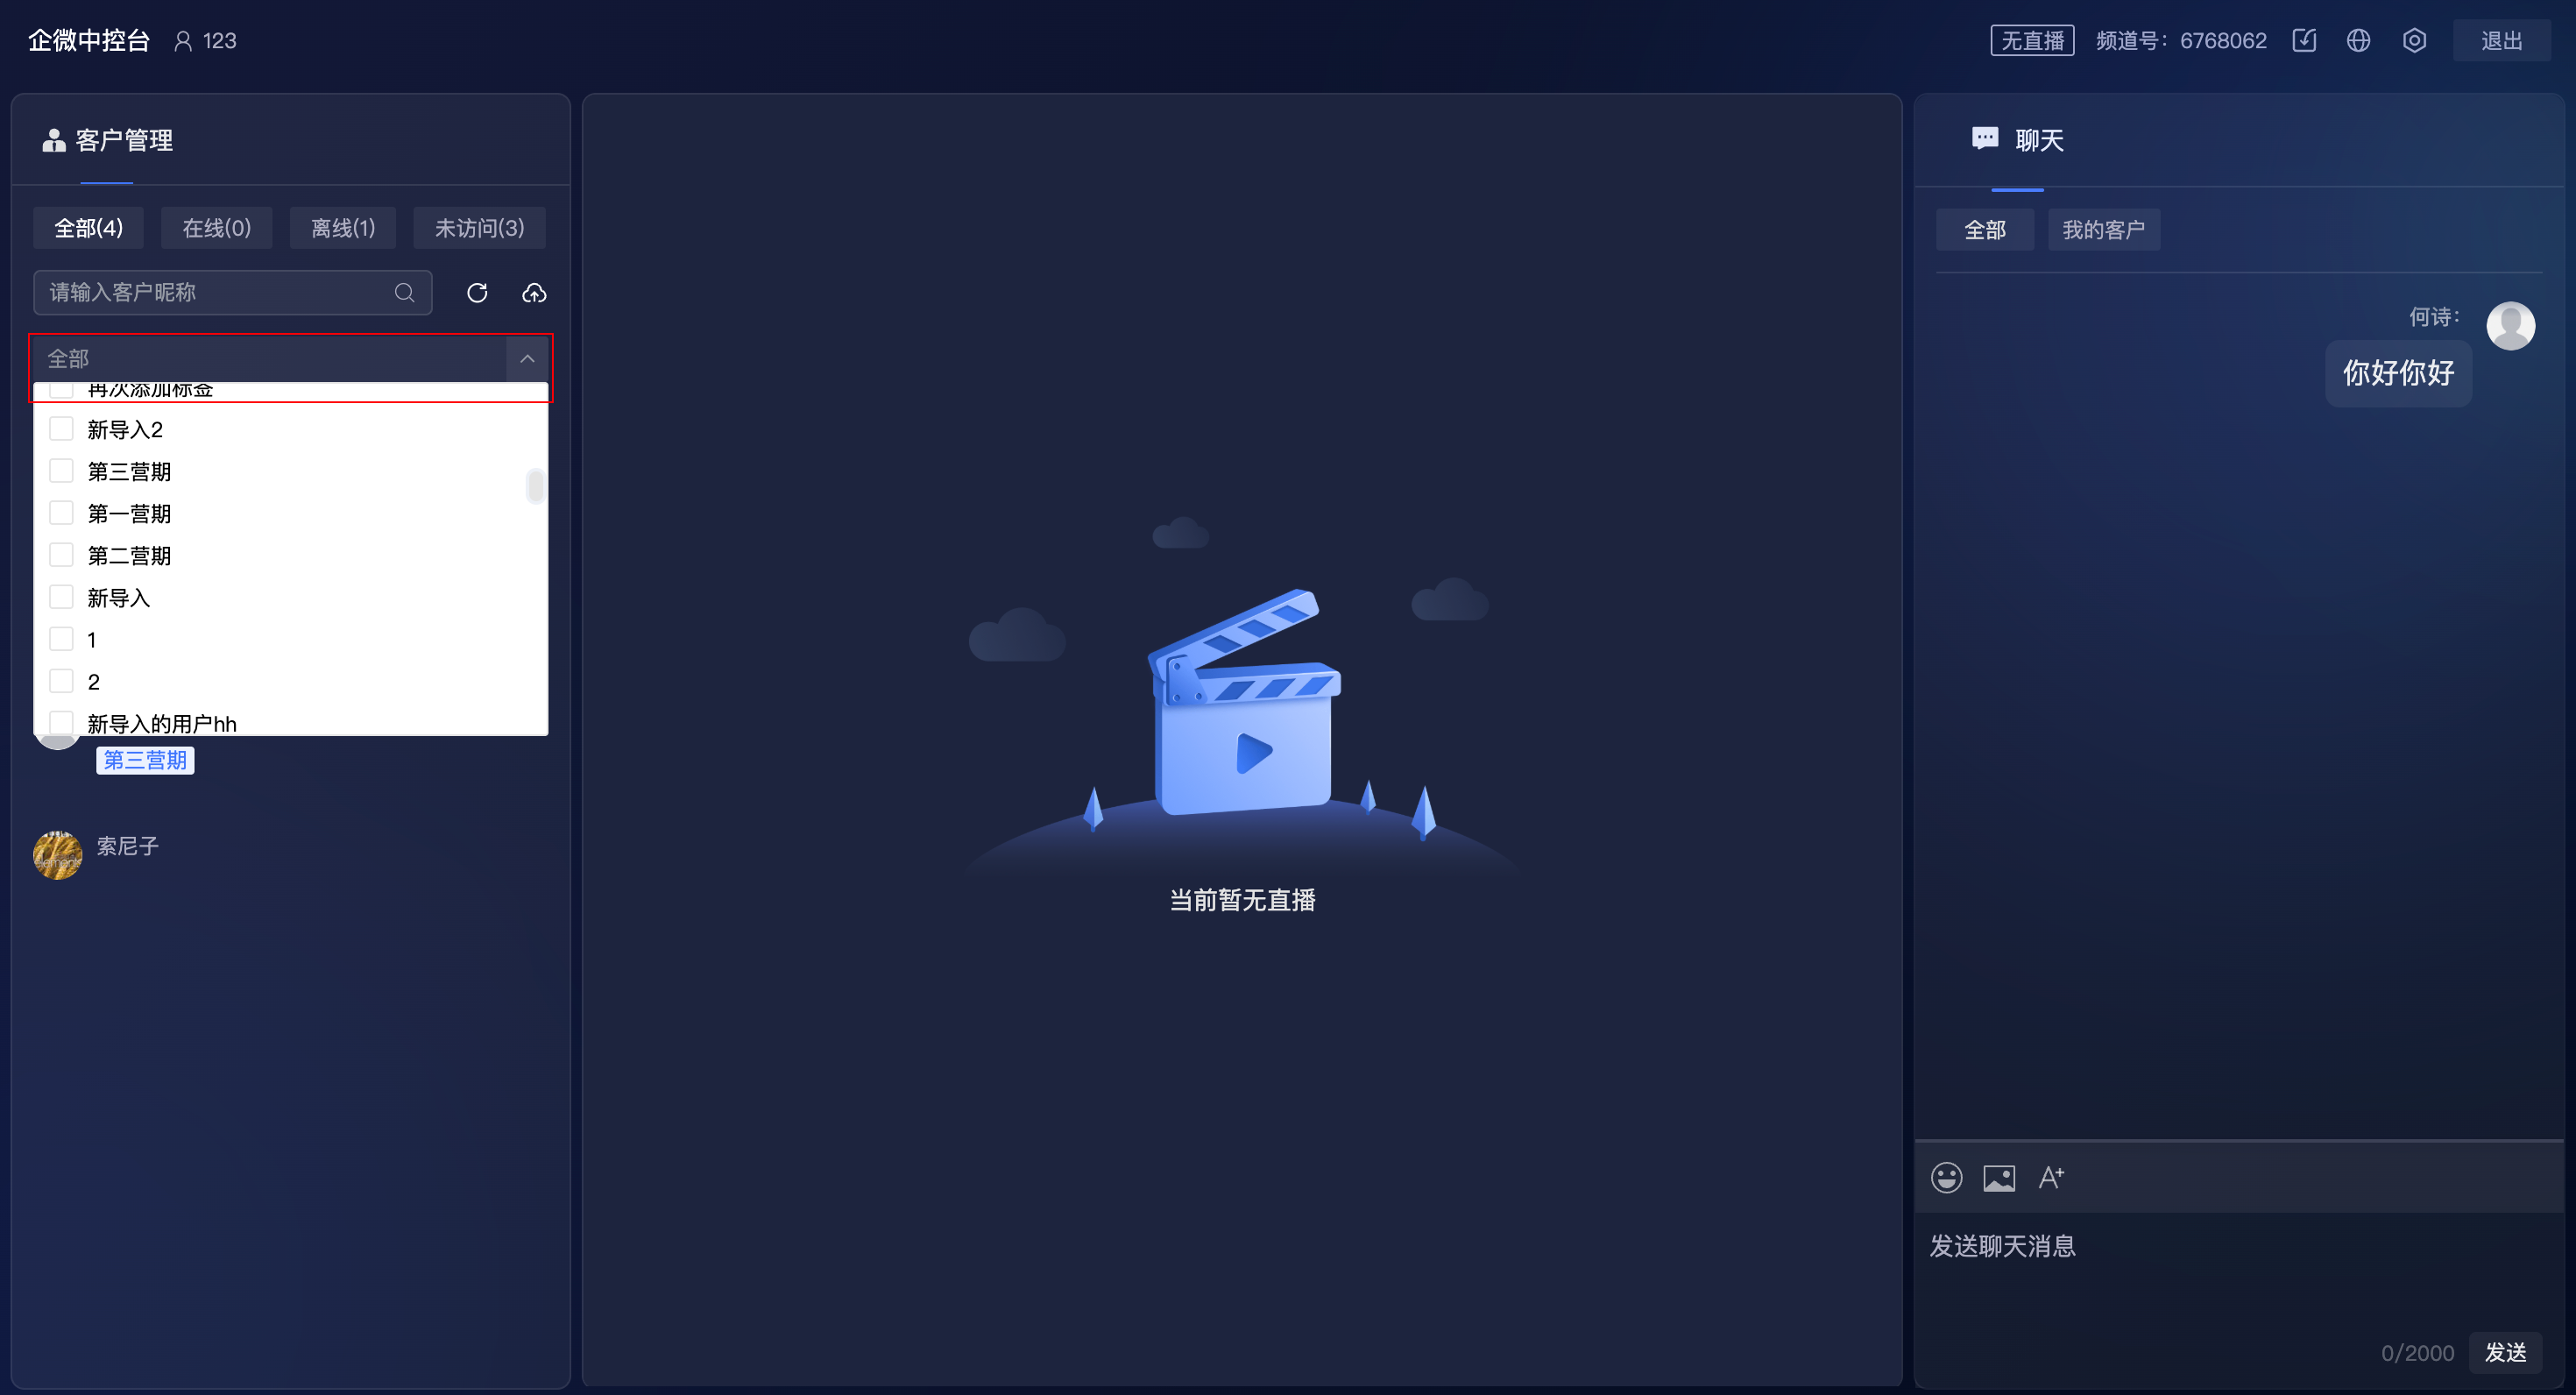
- Filtering Function: Under the above 4 lists, dropdown search and filtering by tags are supported.
- Tags added via the console or API during import can be used for filtering in real-time. Tags added for a user in the management backend can only be filtered in the console after that user enters or refreshes the viewing page. Customers who have never visited cannot be filtered by backend tags yet.
Chat Message Management: Supports viewing all messages in the chat room.
- Can filter to "View Only My Customers" to accurately track customer messages and interact efficiently.
- Requires toggling the button to refresh the chat page.
Interaction Management: When a customer violates rules or makes inappropriate comments, actions such as muting, muting IP, or kicking the customer out of the live room can be taken (also supports unmuting/unmuting IP/un-kicking).
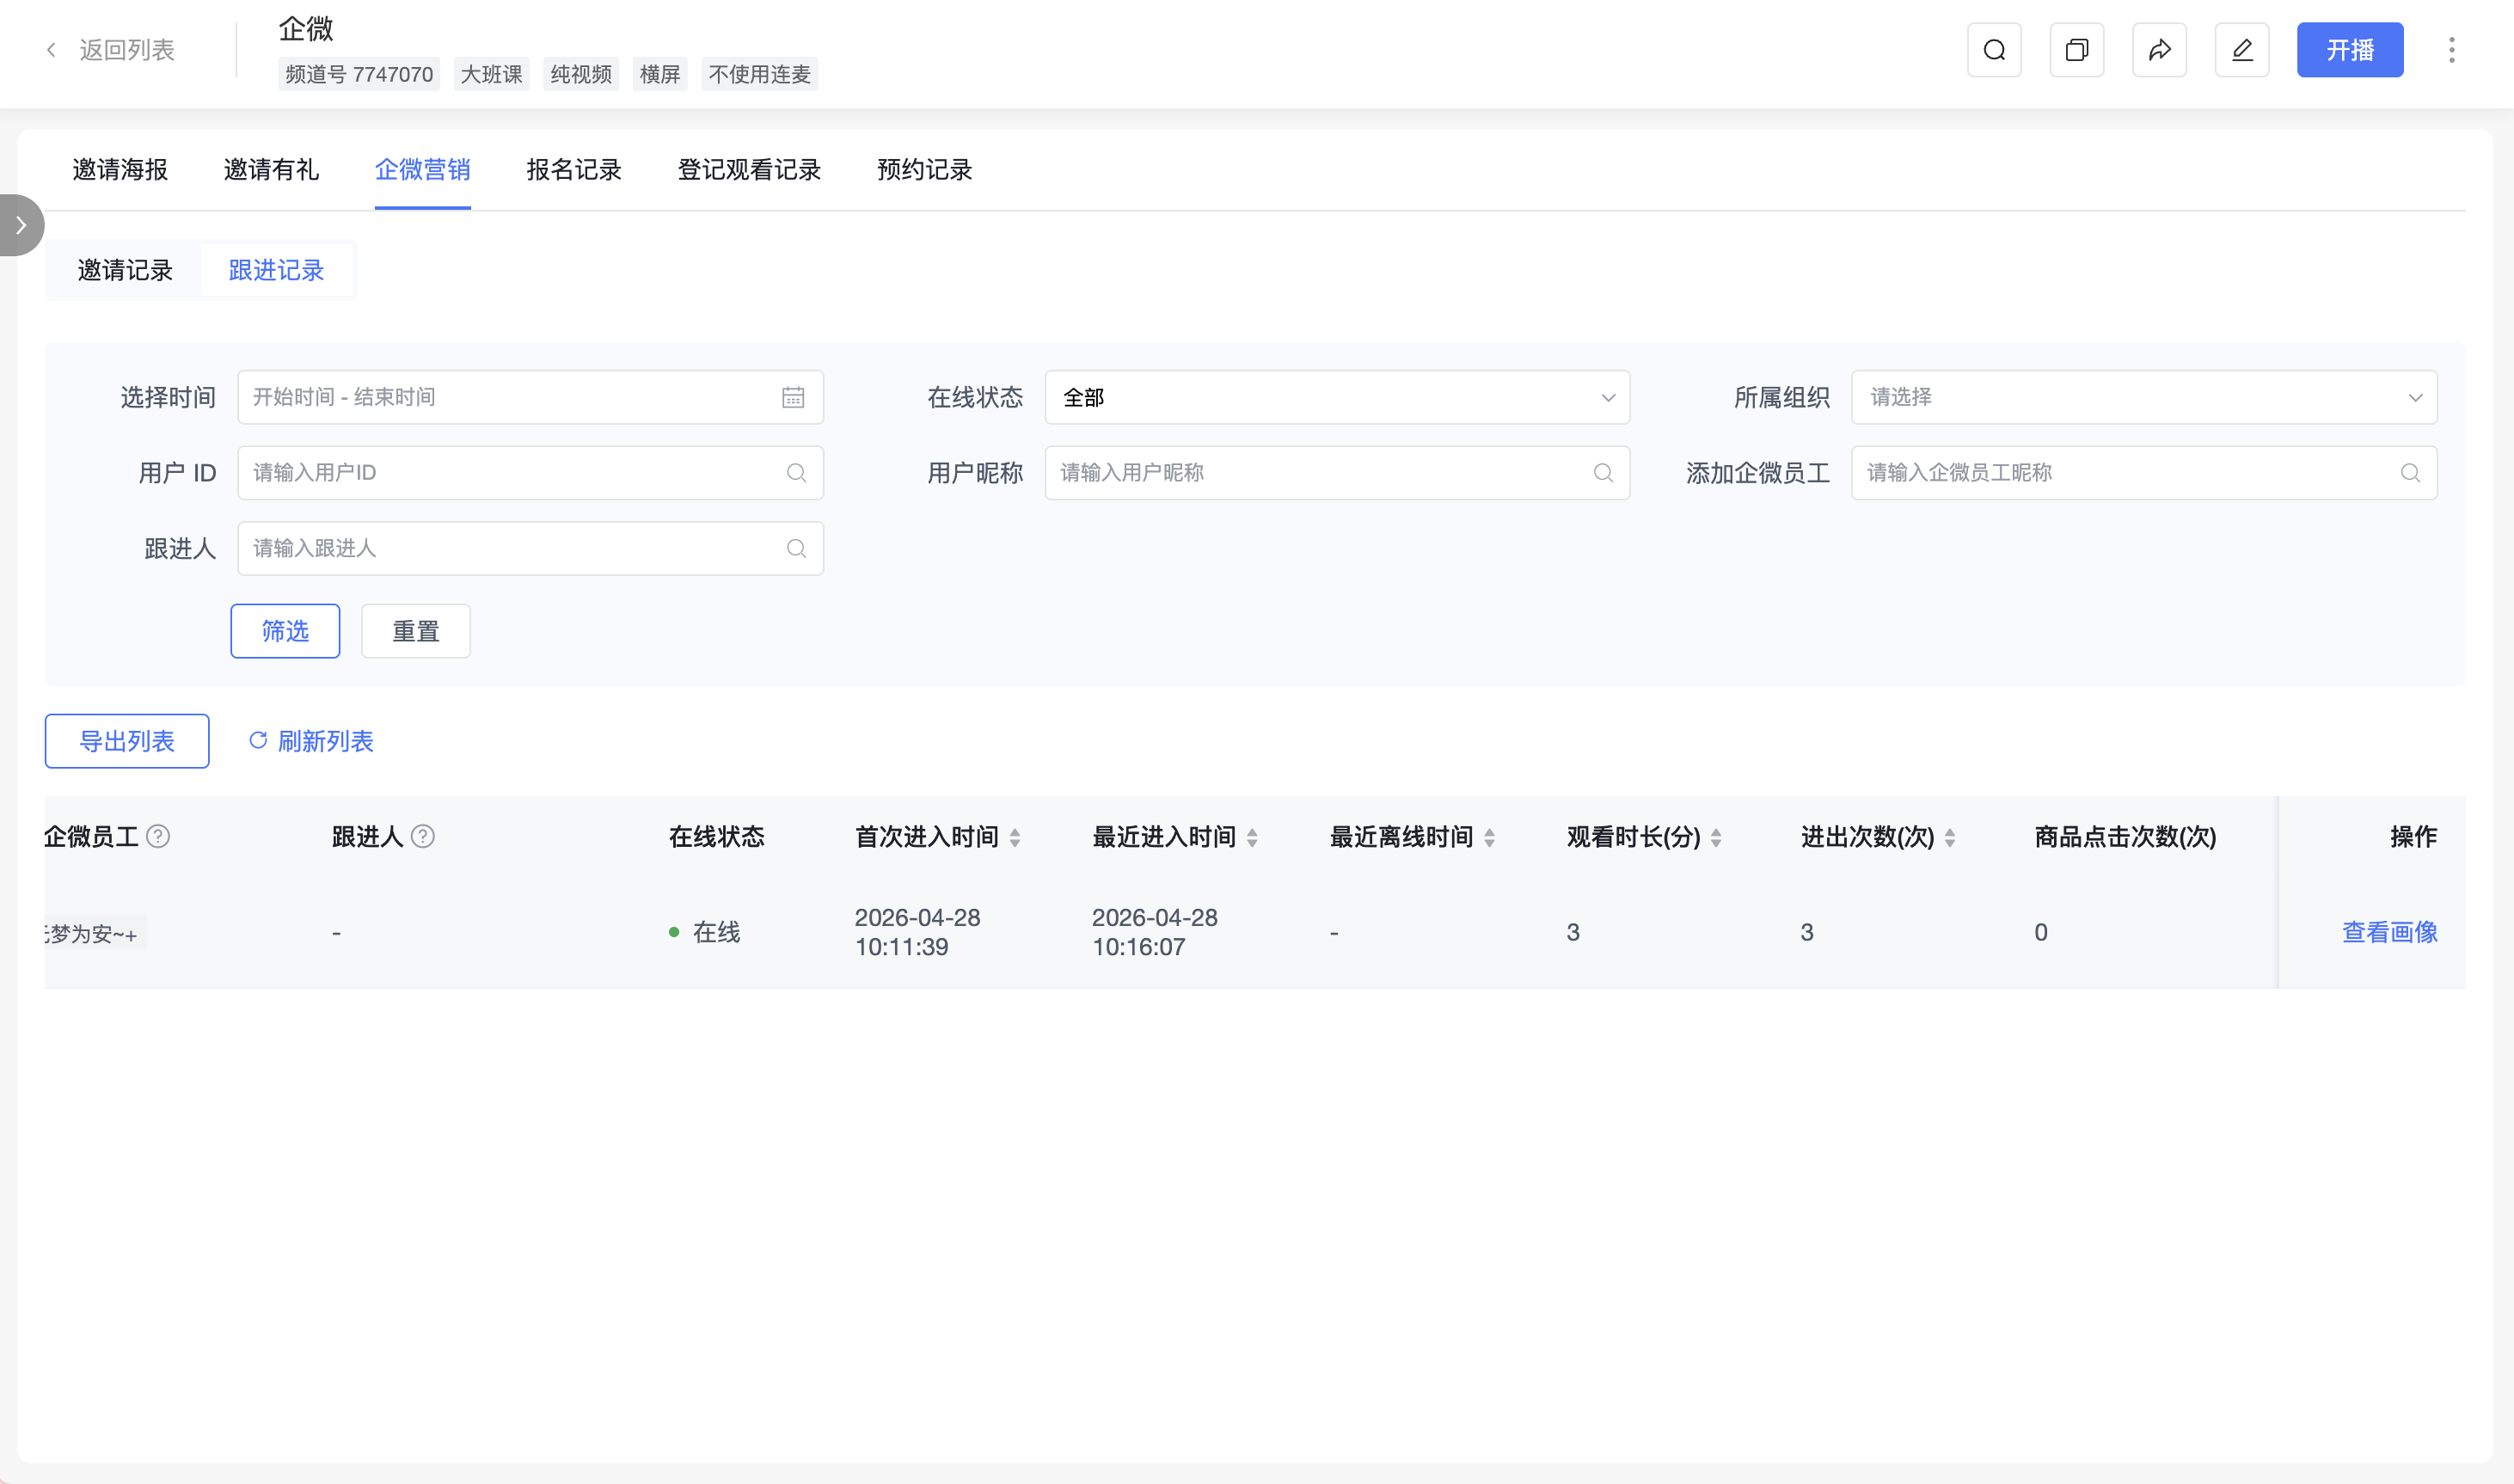
- Operator Side: Operators do not need to log in to the console. They can directly monitor the follow-up status of all WeCom employees and the overall status of customers in this channel from the management backend. -- Location: Management Backend > Channel > Live Stream Statistics > WeCom Marketing > Follow-up Records
- The management backend supports viewing the list of customers added by all WeCom employees (customers must have entered this channel at least once).
- Note:
- Supports viewing customers added by all WeCom employees who have entered this channel at least once.
- Added WeCom Employee: Displays all WeCom employees added by the user; there may be multiple.
- Follower: Displays the sole follower of the user imported via API/console; there is only one.
- When both the "Added WeCom Employee" and "Follower" fields for a user are not empty, the user cannot be filtered out using the "Added WeCom Employee" filter.
- When a user has no follower, the user will appear in the consoles of all WeCom employees they added. If a user has a follower, only that follower can see this user in their console.