


Bind Your Own WeChat Pay Merchant Account
1. Feature Overview
By binding your own WeChat Pay merchant account, you can use the following features with full control over income and expenses.
| Feature | Logic | Payment Capability |
|---|---|---|
| Product Payment | Viewers purchase products directly from the product library | JSAPI Payment |
| Marketing Wallet - Inviter Admin Top-up | Inviter admins prepay marketing funds to the headquarters' WeChat Pay account. Marketing funds are mainly used for red envelope expenses in task reward activities. The marketing wallet can be shared within the same organization. | JSAPI Payment |
| Paid Viewing | Viewers pay to watch live streams | JSAPI Payment, Native Payment |
| Task Rewards | Cash rewards are issued to viewers upon task completion | Merchant Transfer or Merchant Transfer to Wallet |
| Cash Red Envelopes | Operators configure cash red envelopes in the backend, or the host/assistant puts money into red envelopes on the client side. Viewers grab red envelopes on the watch page. | Native Payment, Merchant Transfer or Merchant Transfer to Wallet |
| Tips | Viewers pay to send tips | JSAPI Payment, Native Payment |
Notes:
- If you do not have a merchant account, please apply for one on the WeChat Pay platform first.
- Micro-merchants and individual businesses do not support Merchant Transfer.
- The WeChat Official Account must be linked to the merchant account to complete payments.
- It is recommended to complete all required setup steps in the configuration process before configuring your own WeChat Pay merchant account on the POLYV platform.
2. Configuration Information Setup
2.1. Enable Merchant Transfer to Wallet
After enabling the Merchant Transfer to Wallet feature, any fund expenditure functions you use on the platform will directly draw from your configured merchant account's operating account. Please ensure sufficient funds to meet marketing activity needs.
For example, if you use the Cash Red Envelope feature to send red envelopes to viewers, when a viewer grabs a red envelope, the payment will be made directly from your operating account to the corresponding viewer.
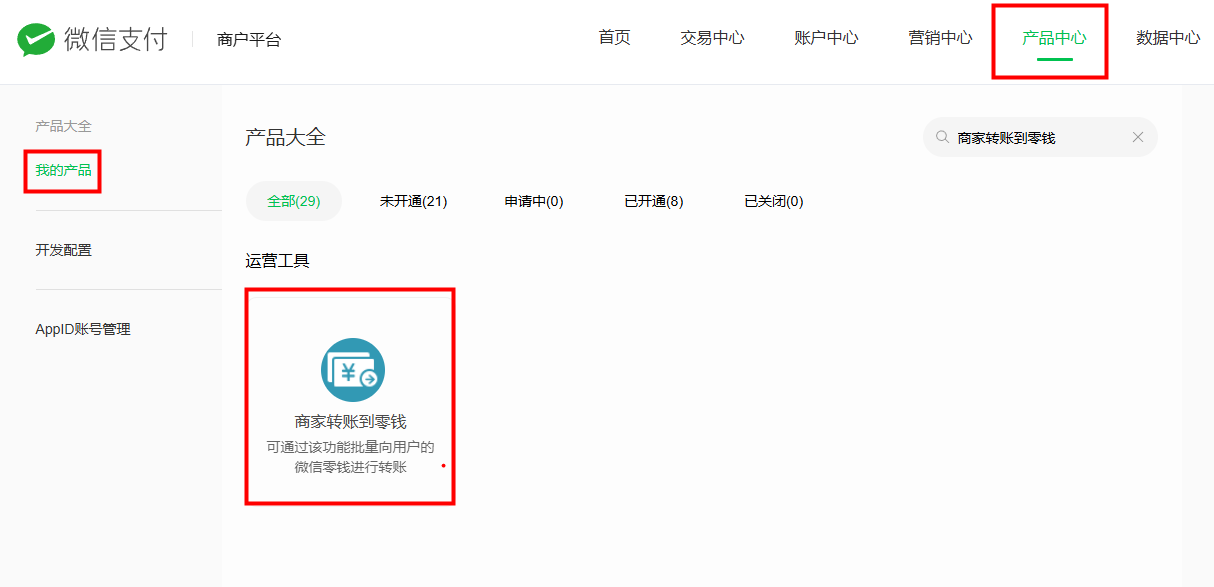
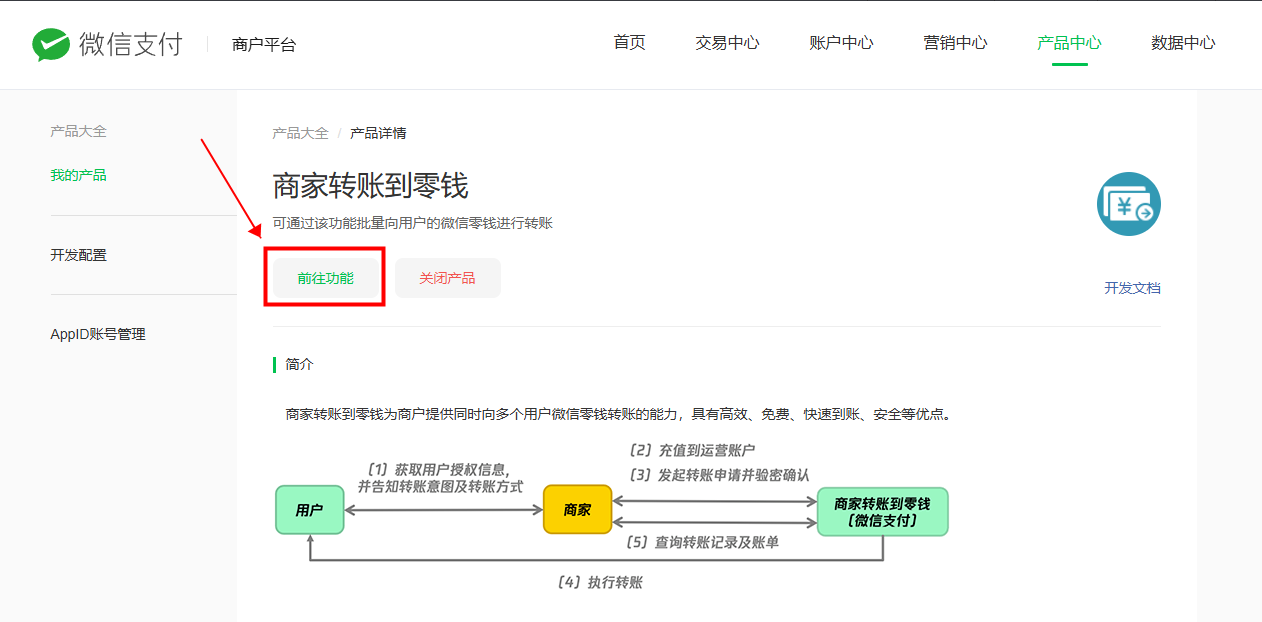
Configuration path reference: WeChat Pay Merchant Backend -> Product Center -> My Products -> Merchant Transfer to Wallet
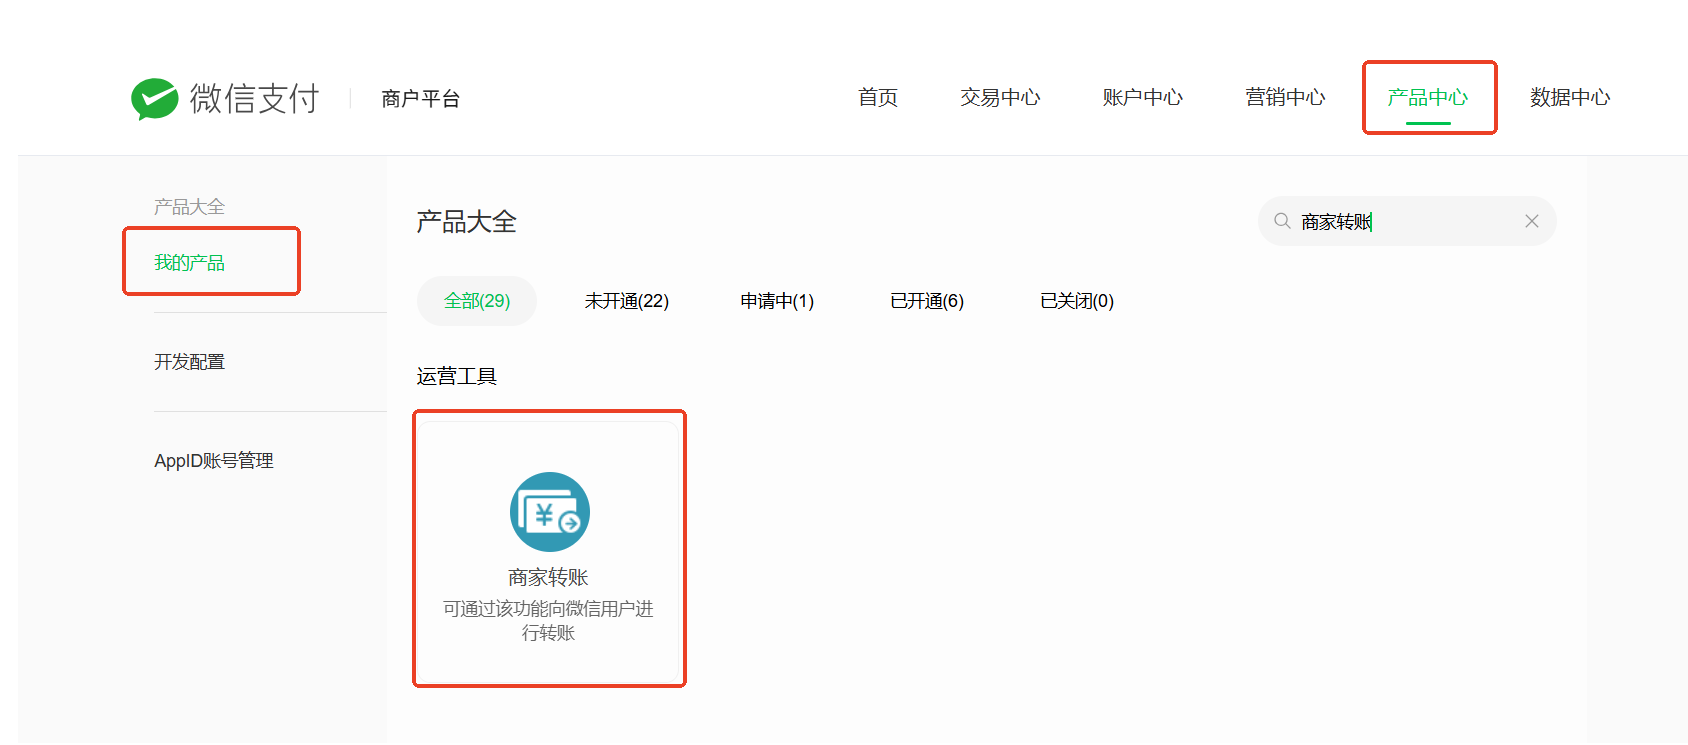
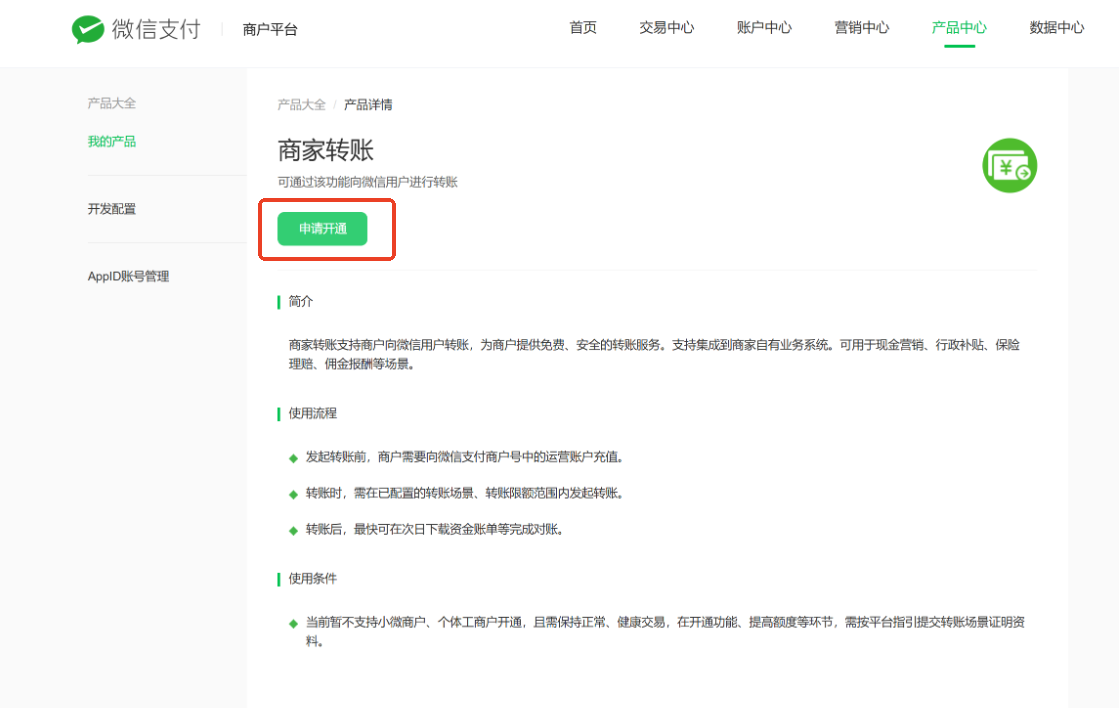
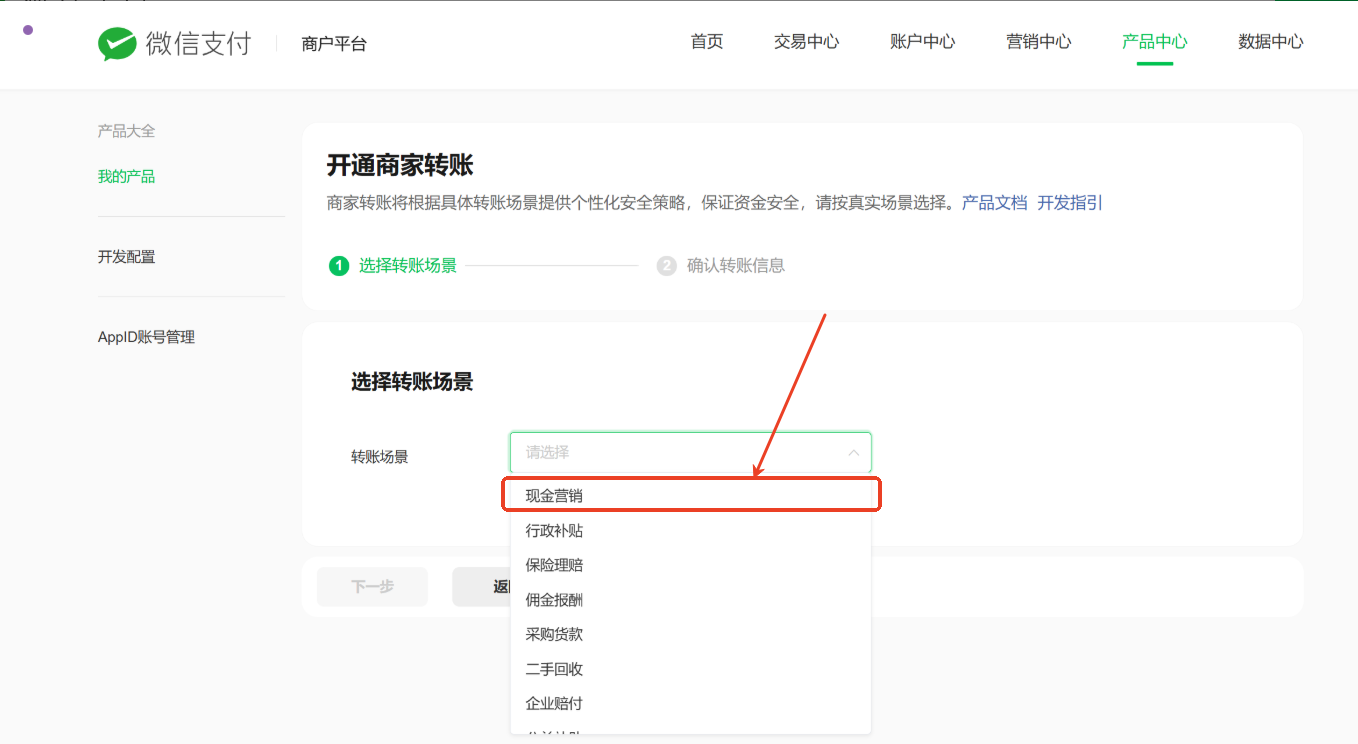
Notes:
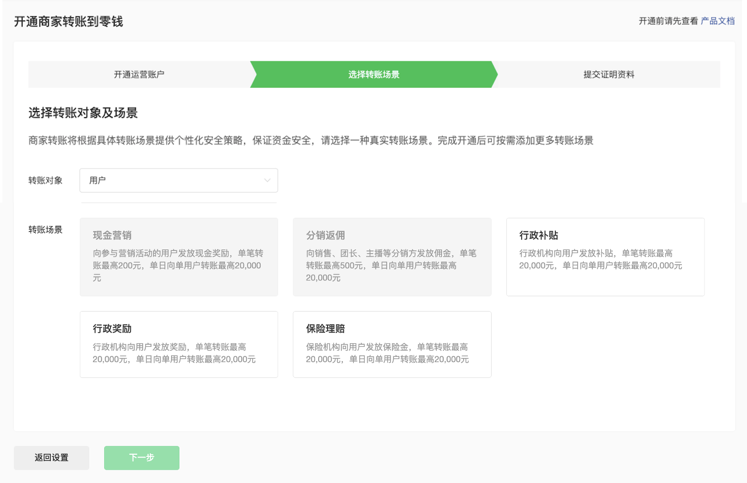
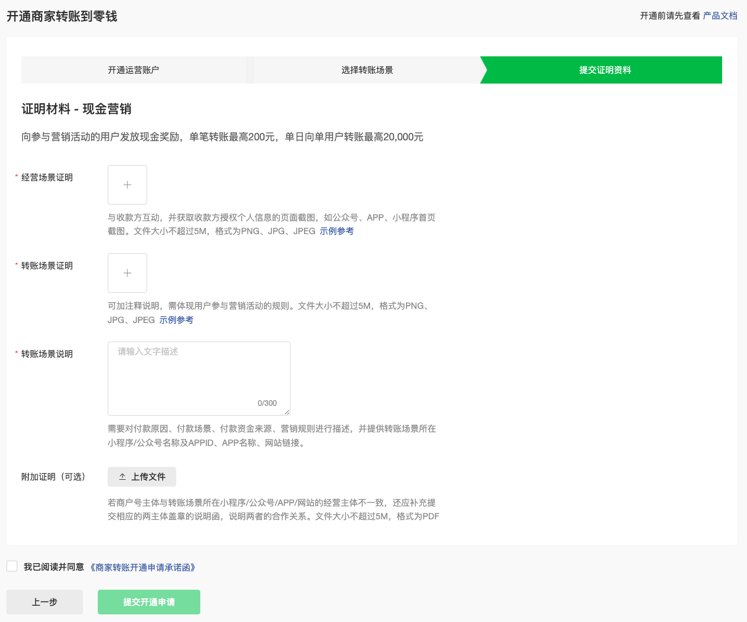
1.1 Applications made after January 15, 2025, are for Merchant Transfer; those made before are for Merchant Transfer to Wallet. The transfer scenario must be set to Cash Marketing.
1.2 For the integration process, please refer to the official documentation: Merchant Transfer to Wallet or Merchant Transfer - Integration Preparation
1.3 Applying for this feature yourself can be time-consuming with a low approval rate. It is recommended to search for "Merchant Transfer to Wallet" on Taobao and find a third-party vendor to assist, as this has a higher success rate.
1.4 You need to describe the payment reason, payment scenario, payment fund source, and marketing rules. You must also provide the Mini Program/Official Account name and AppID, App name, and website link that supports the transfer scenario.
1.5 Screenshots of the business scenario: Screenshots of the page showing interaction with the payee and obtaining the payee's authorization for personal information, such as the homepage of the Official Account, App, or Mini Program.
1.6 Screenshots of the page showing interaction with the payee and obtaining the payee's authorization for personal information, such as the homepage of the Official Account, App, or Mini Program.
2.2. Link WeChat Official Account with Merchant Account
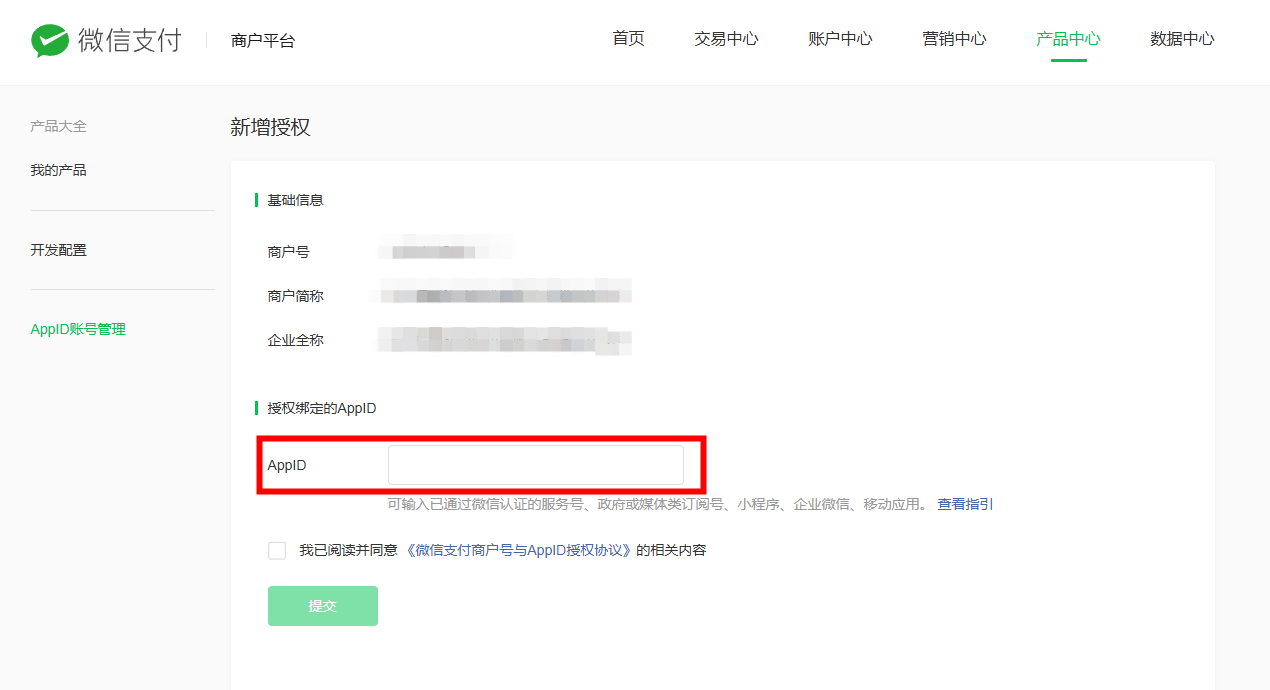
2.1 In the WeChat Pay Merchant Backend [Product Center], select [AppID Account Management], and click the [+ Link AppID] button.
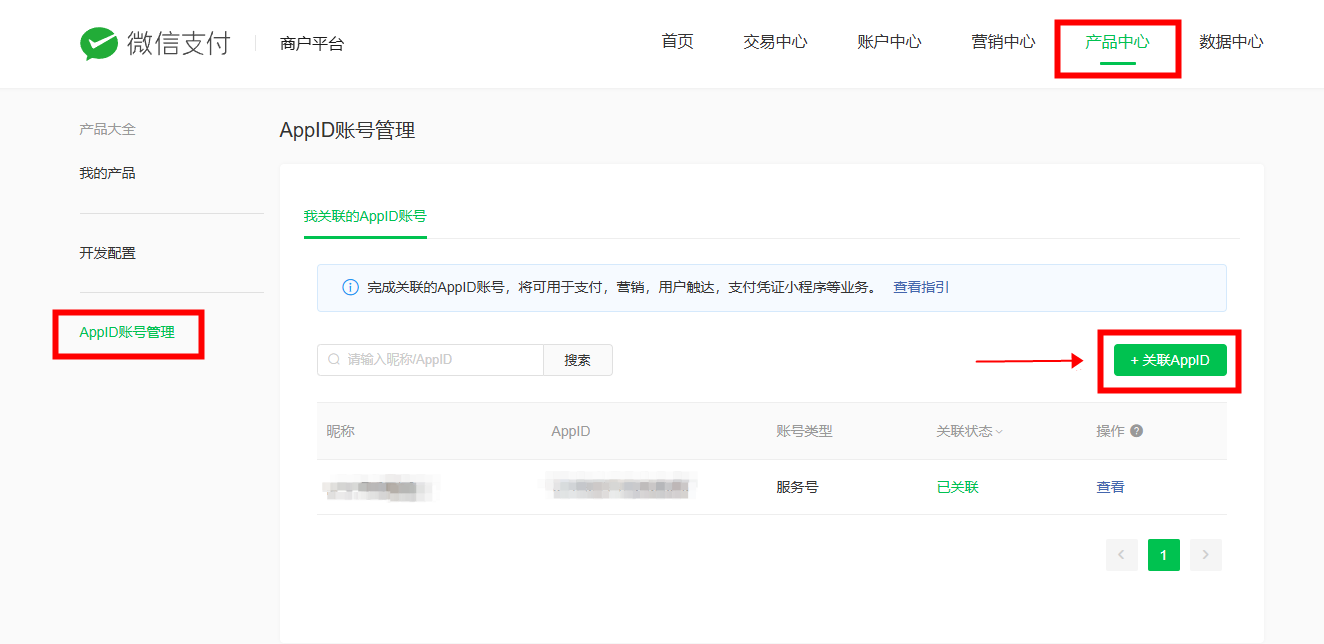
2.2 After clicking the link button, you will be redirected to the authorization addition page. Enter the AppID of the Service Account you need to link and confirm to submit.
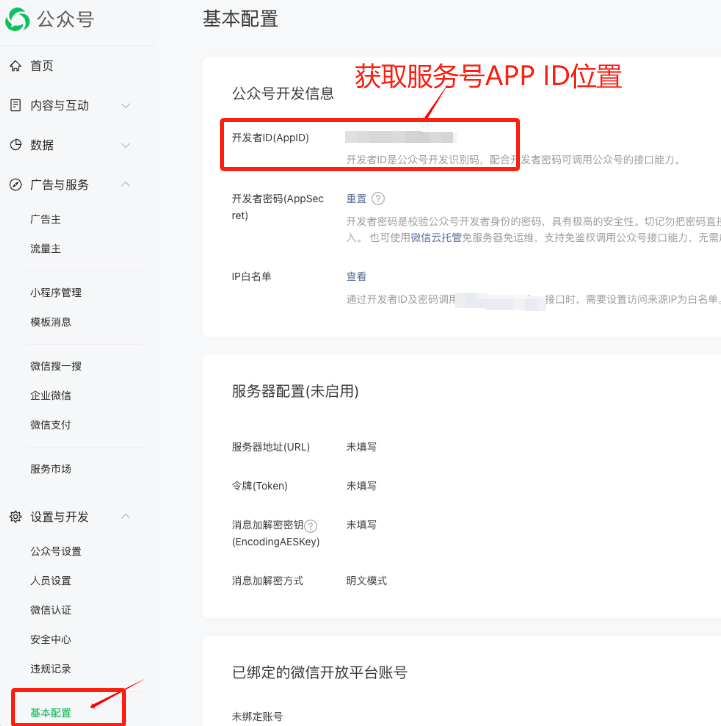
2.3 Below is the specific location to find the Service Account AppID. Go to the Official Account platform, copy it, and paste it into the corresponding field in step 2.2.
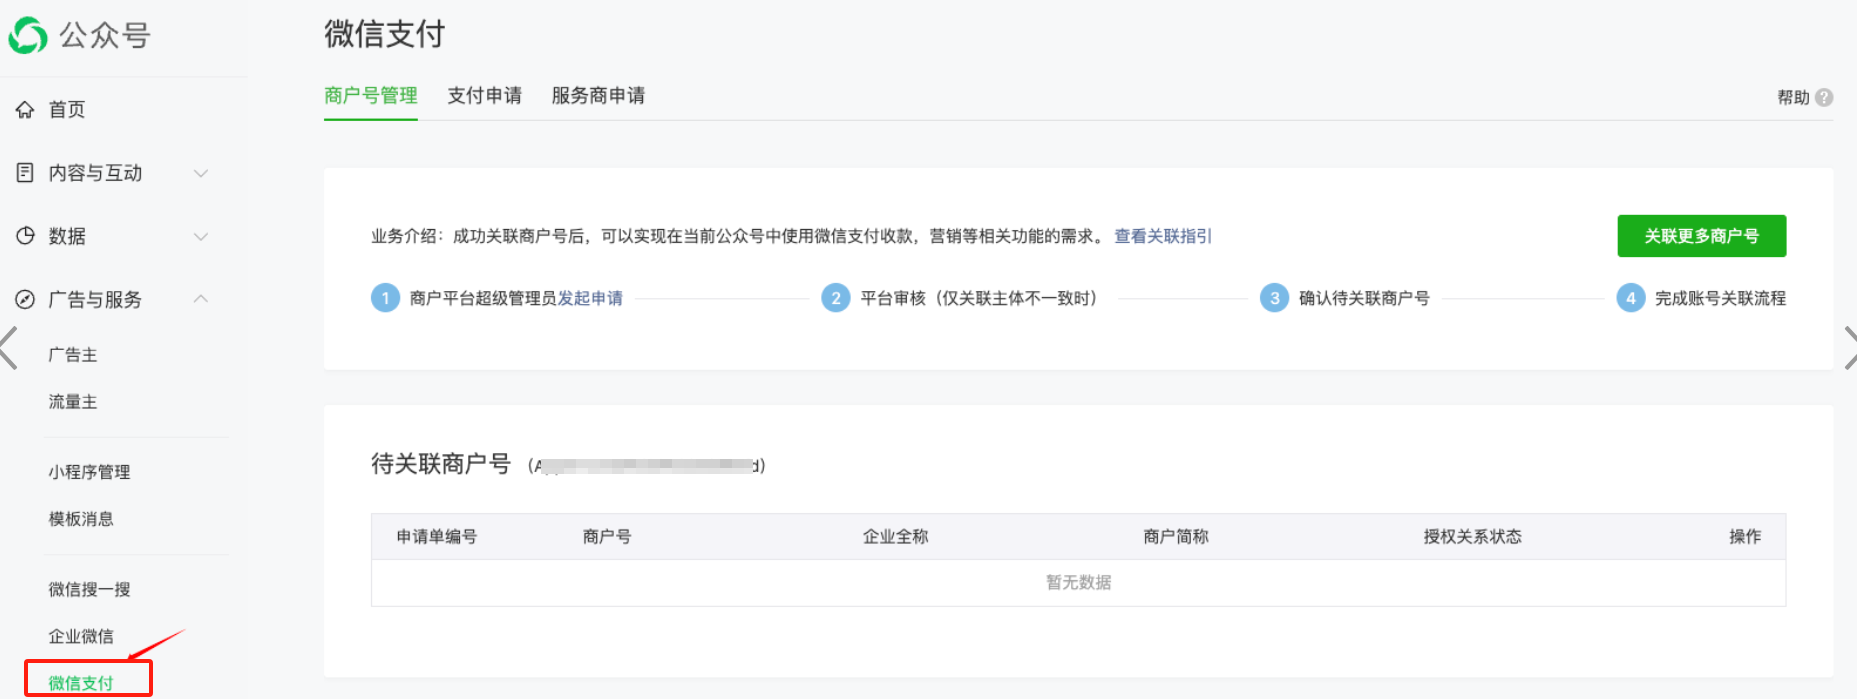
2.4 After submitting the binding request on the merchant platform, go back to the WeChat Official Account backend, navigate to [WeChat Pay] -> [Merchant Account Management], and allow the linked merchant account. After linking, the merchant account and Official Account will be bound.
2.3. Enable Security Doctor
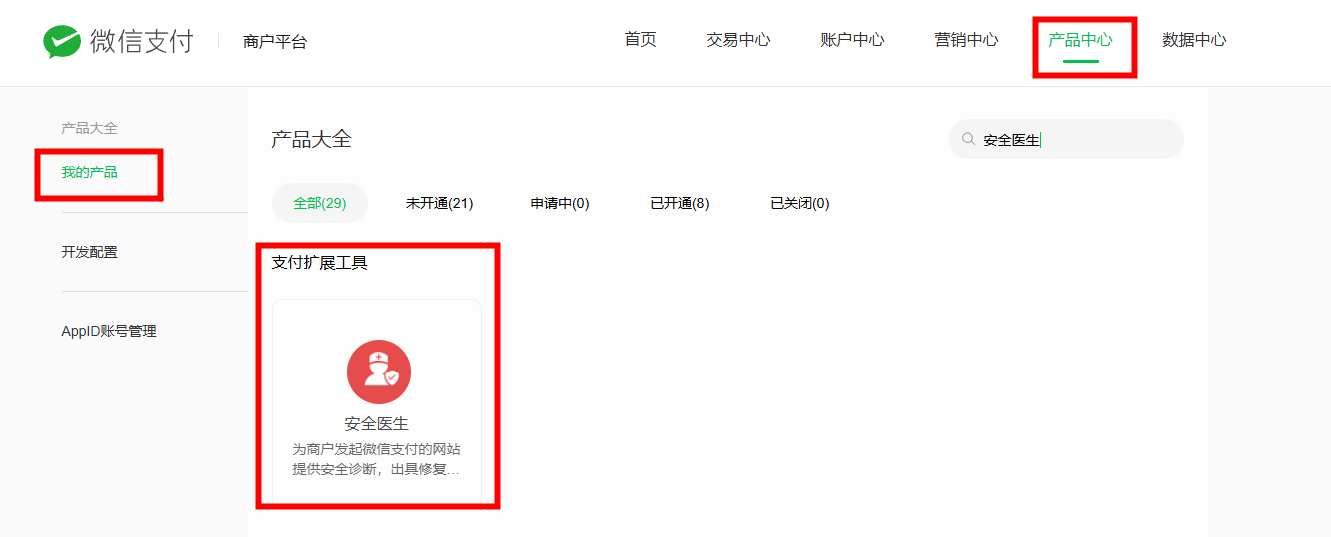
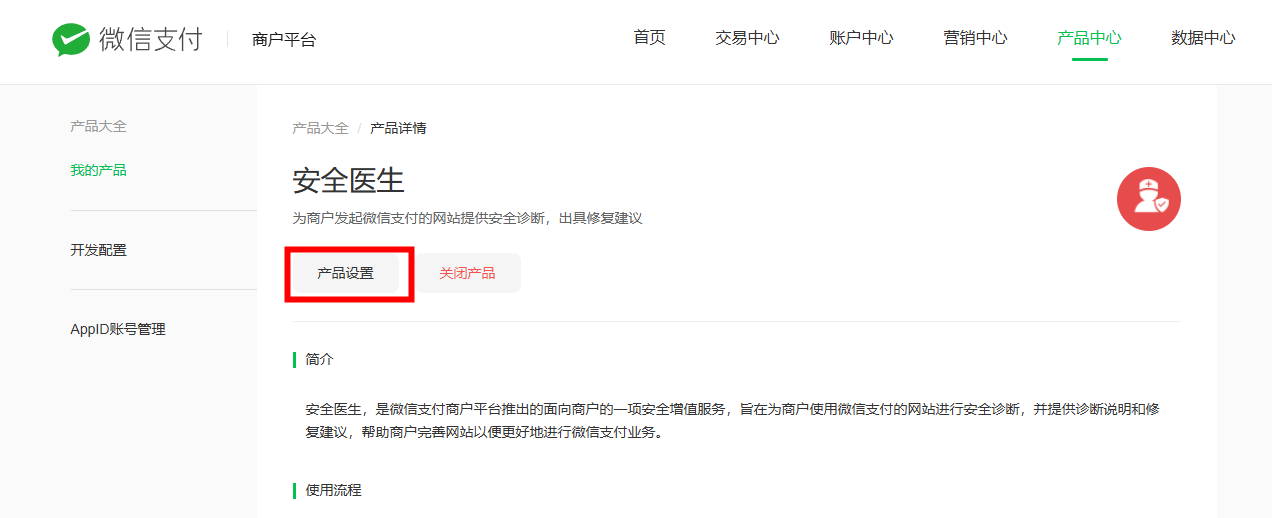
2.3.1 WeChat Pay Merchant Backend -> Product Center -> Payment Extension Tools -> Security Doctor -> Product Settings to enable it.
2.3.2 Download the verification file according to the instructions in the diagnostic link. Send it to the POLYV staff for configuration. The staff will upload the file to the POLYV root domain directory. Then, the staff will send the complete verification file URL to the user. The user adds this address in the diagnostic link. Once the domain verification is successful, the Security Doctor configuration is complete.
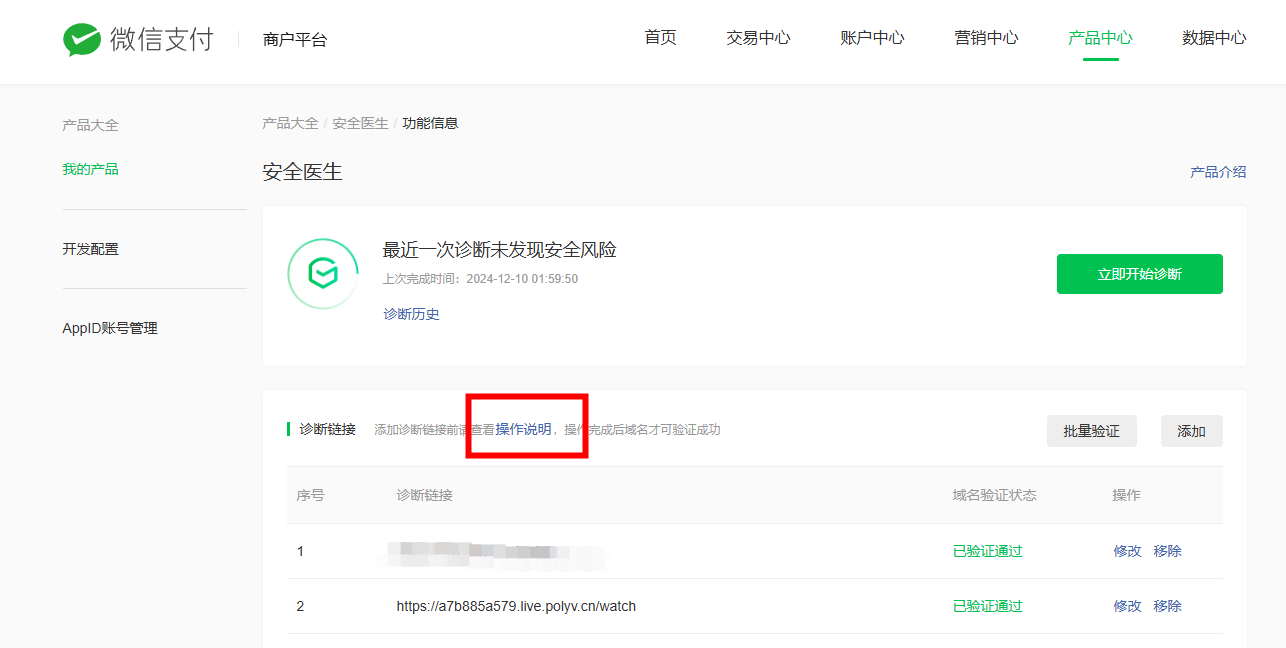
Note: Completing this step is necessary to successfully set the password-free limit and transfer limit. You can skip the password-free limit and transfer limit setup steps temporarily after providing the file to the staff. When setting up, check the box first, and come back to complete the setup after the Security Doctor is enabled. Not enabling it does not affect red envelope testing and distribution, but it requires clicking confirm on the WeChat mobile app during distribution.
2.4. Enable Transfer Limit
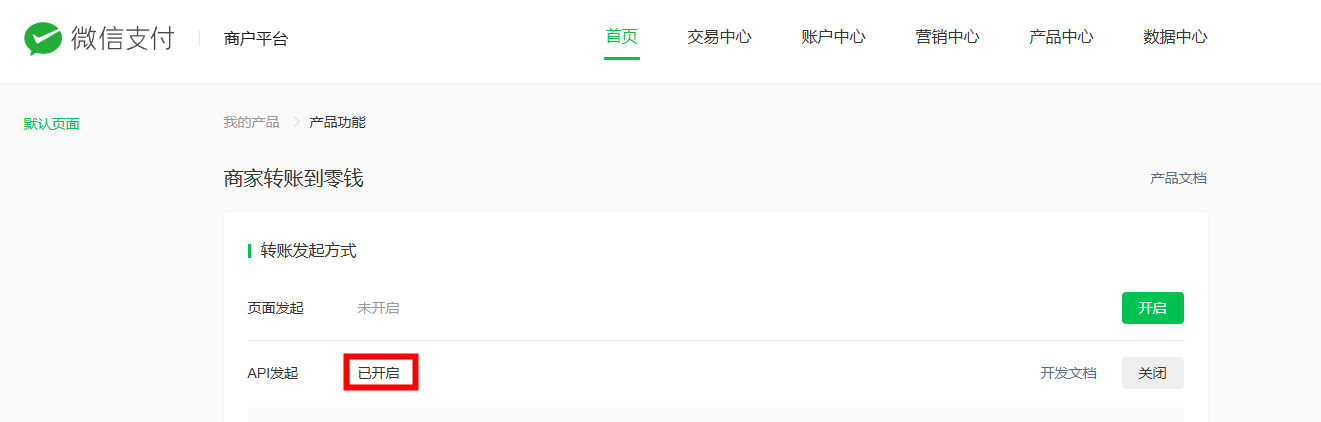
2.4.1 WeChat Pay Merchant Backend -> Product Center -> Merchant Transfer to Wallet -> Go to Feature -> Enable API Initiation in the Transfer Initiation Method.
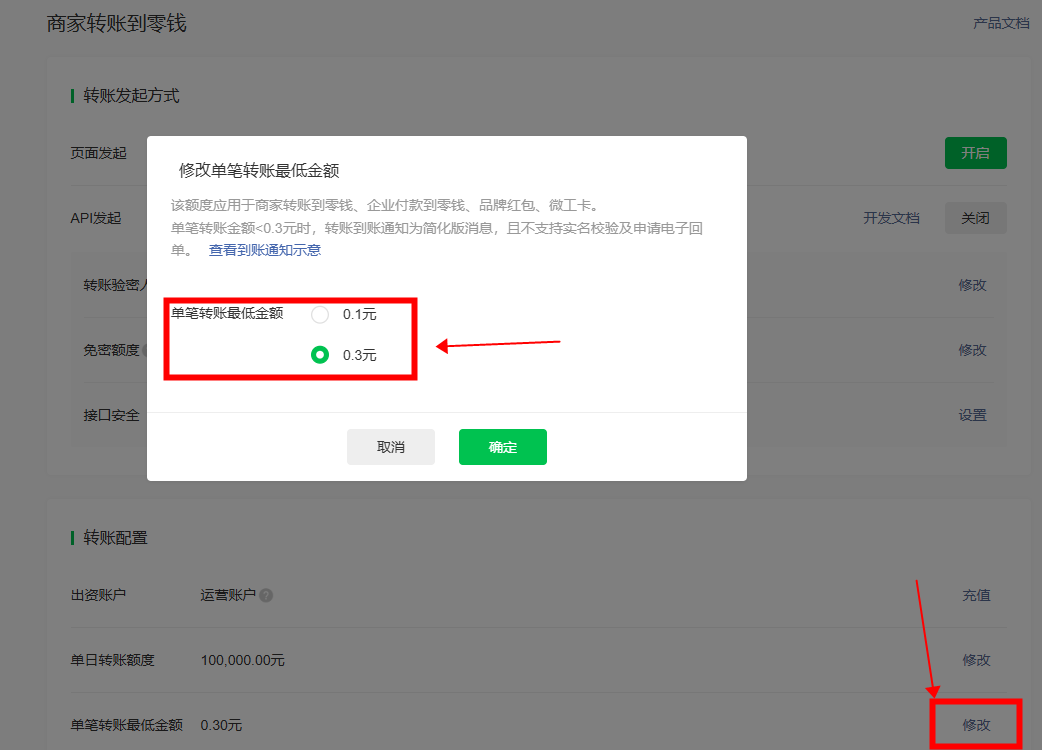
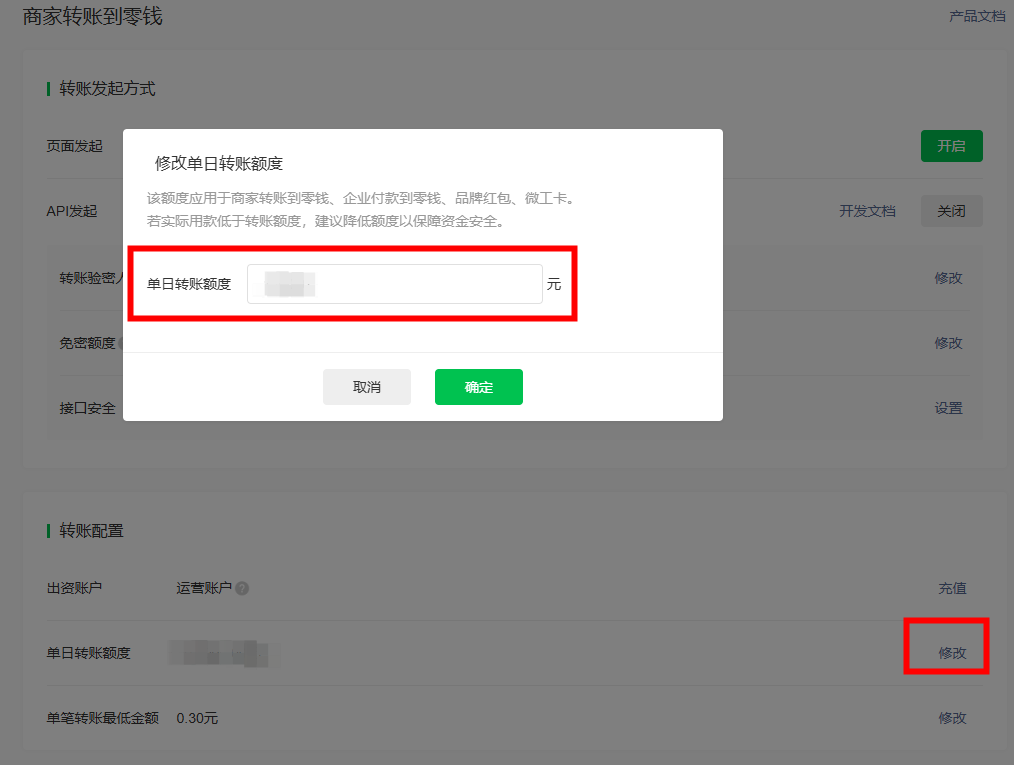
2.4.2 WeChat Pay Merchant Backend -> Product Center -> Merchant Transfer to Wallet -> Go to Feature -> Transfer Configuration -> Change the minimum single transfer amount to 0.1 or 0.3.
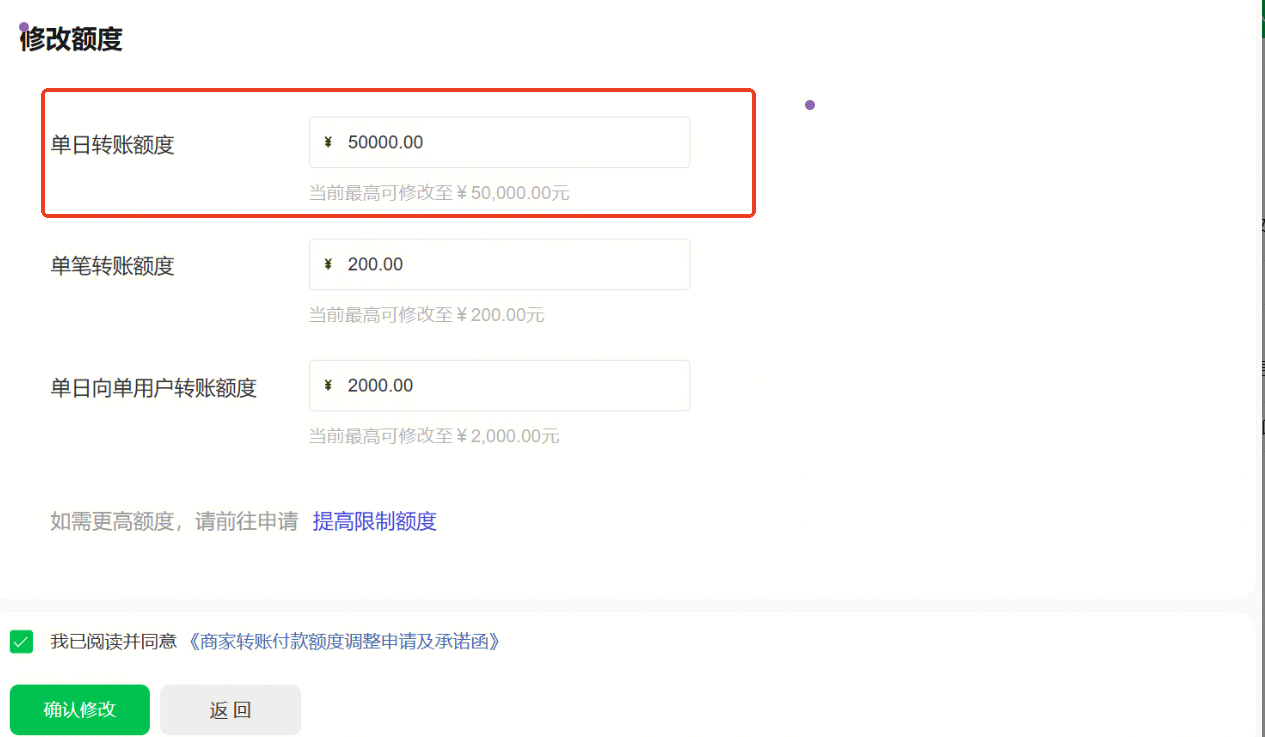
2.4.3 WeChat Pay Merchant Backend -> Product Center -> Merchant Transfer to Wallet -> Go to Feature -> Transfer Configuration -> Change the daily transfer limit to 20,000 or another amount; or Merchant Platform > Product Center > Operational Tools > Merchant Transfer > Go to Feature > Transfer Limit -> Change the daily transfer limit to 20,000 or another amount.
2.5. Enable Password-Free Limit
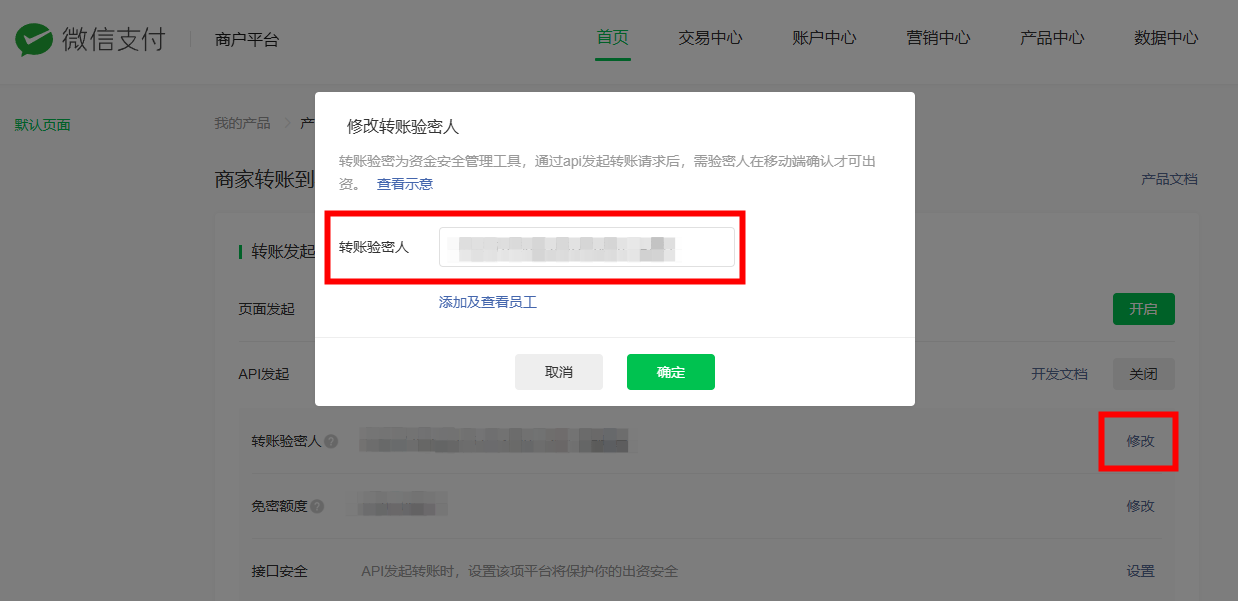
2.5.1 WeChat Pay Merchant Backend -> Product Center -> Merchant Transfer to Wallet -> Go to Feature -> In the Transfer Initiation Method -> Enable API Initiation -> Set the verification personnel in the Transfer Verification Personnel section.
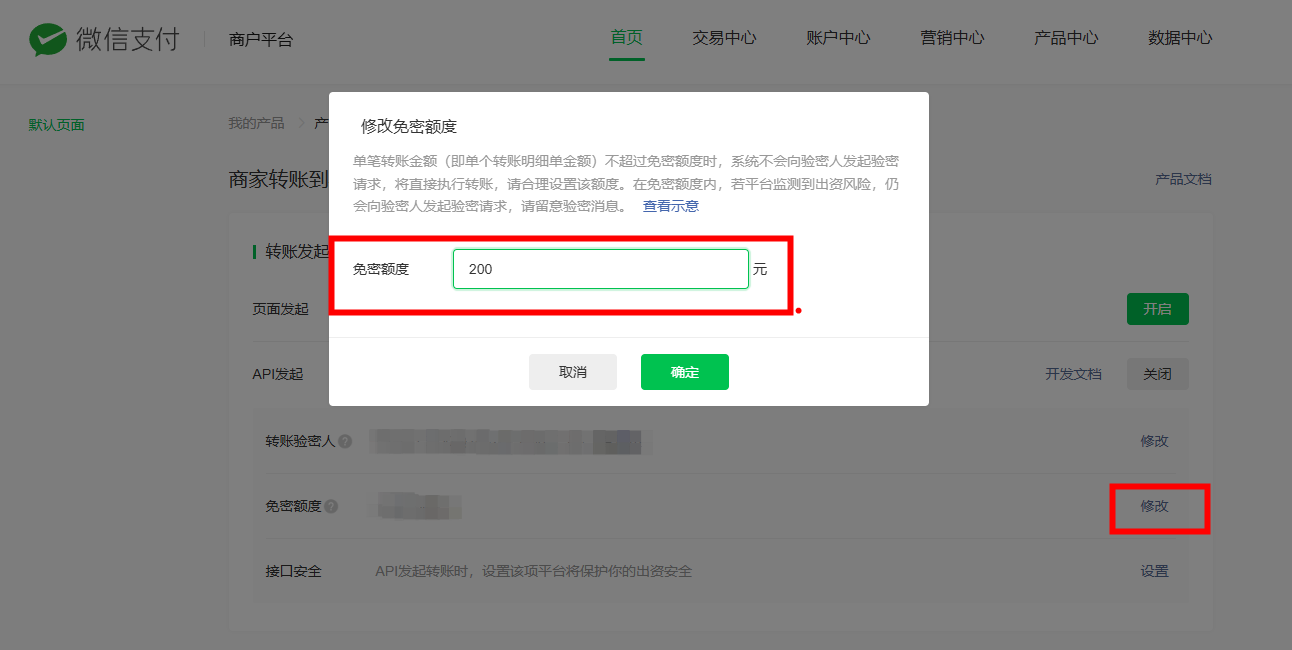
2.5.2 WeChat Pay Merchant Backend -> Product Center -> Merchant Transfer to Wallet -> Go to Feature -> In the Transfer Initiation Method -> Enable API Initiation -> Set the password-free limit in the Password-Free Limit section.
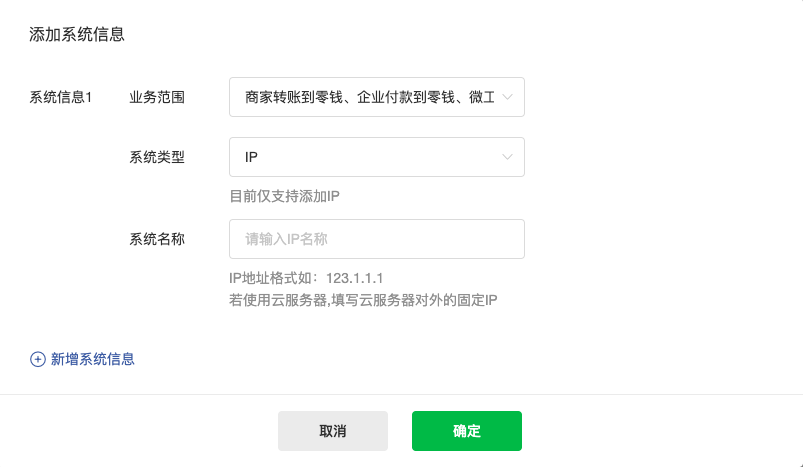
2.6. Configure API Whitelist IPs
2.6.1 WeChat Pay Merchant Backend -> Product Center -> Merchant Transfer to Wallet -> Go to Feature -> Set the application scope in the Enable API Initiation section; or WeChat Pay Merchant Backend -> Product Center -> Merchant Transfer -> Go to Feature -> Set the application scope in the Security Capabilities section.
2.6.2 Business scope selection: Merchant Transfer to Wallet, Enterprise Payment to Wallet, Micro-Work Card, Brand Red Envelope, WeCom Payment.
2.6.3 System type selection: IP. Configure the following IP addresses in the system name (ensure all are added):
47.113.106.140 47.113.122.176 120.25.239.170 120.25.226.252 39.108.232.33 120.78.175.211 39.108.237.123 39.108.237.20 120.78.168.17 120.77.217.78
2.7. Enable Native Payment & JSAPI Payment
Description: This mainly involves enabling WeChat's payment products. Enabling Native Payment is for scanning QR codes to pay on a computer web page. Enabling JSAPI Payment is mainly for payments within the WeChat app on mobile devices.
2.7.1 WeChat Pay Merchant Backend -> Product Center -> Payment Products -> Native Payment -> Click into Product Settings to enable it. No other steps are required.
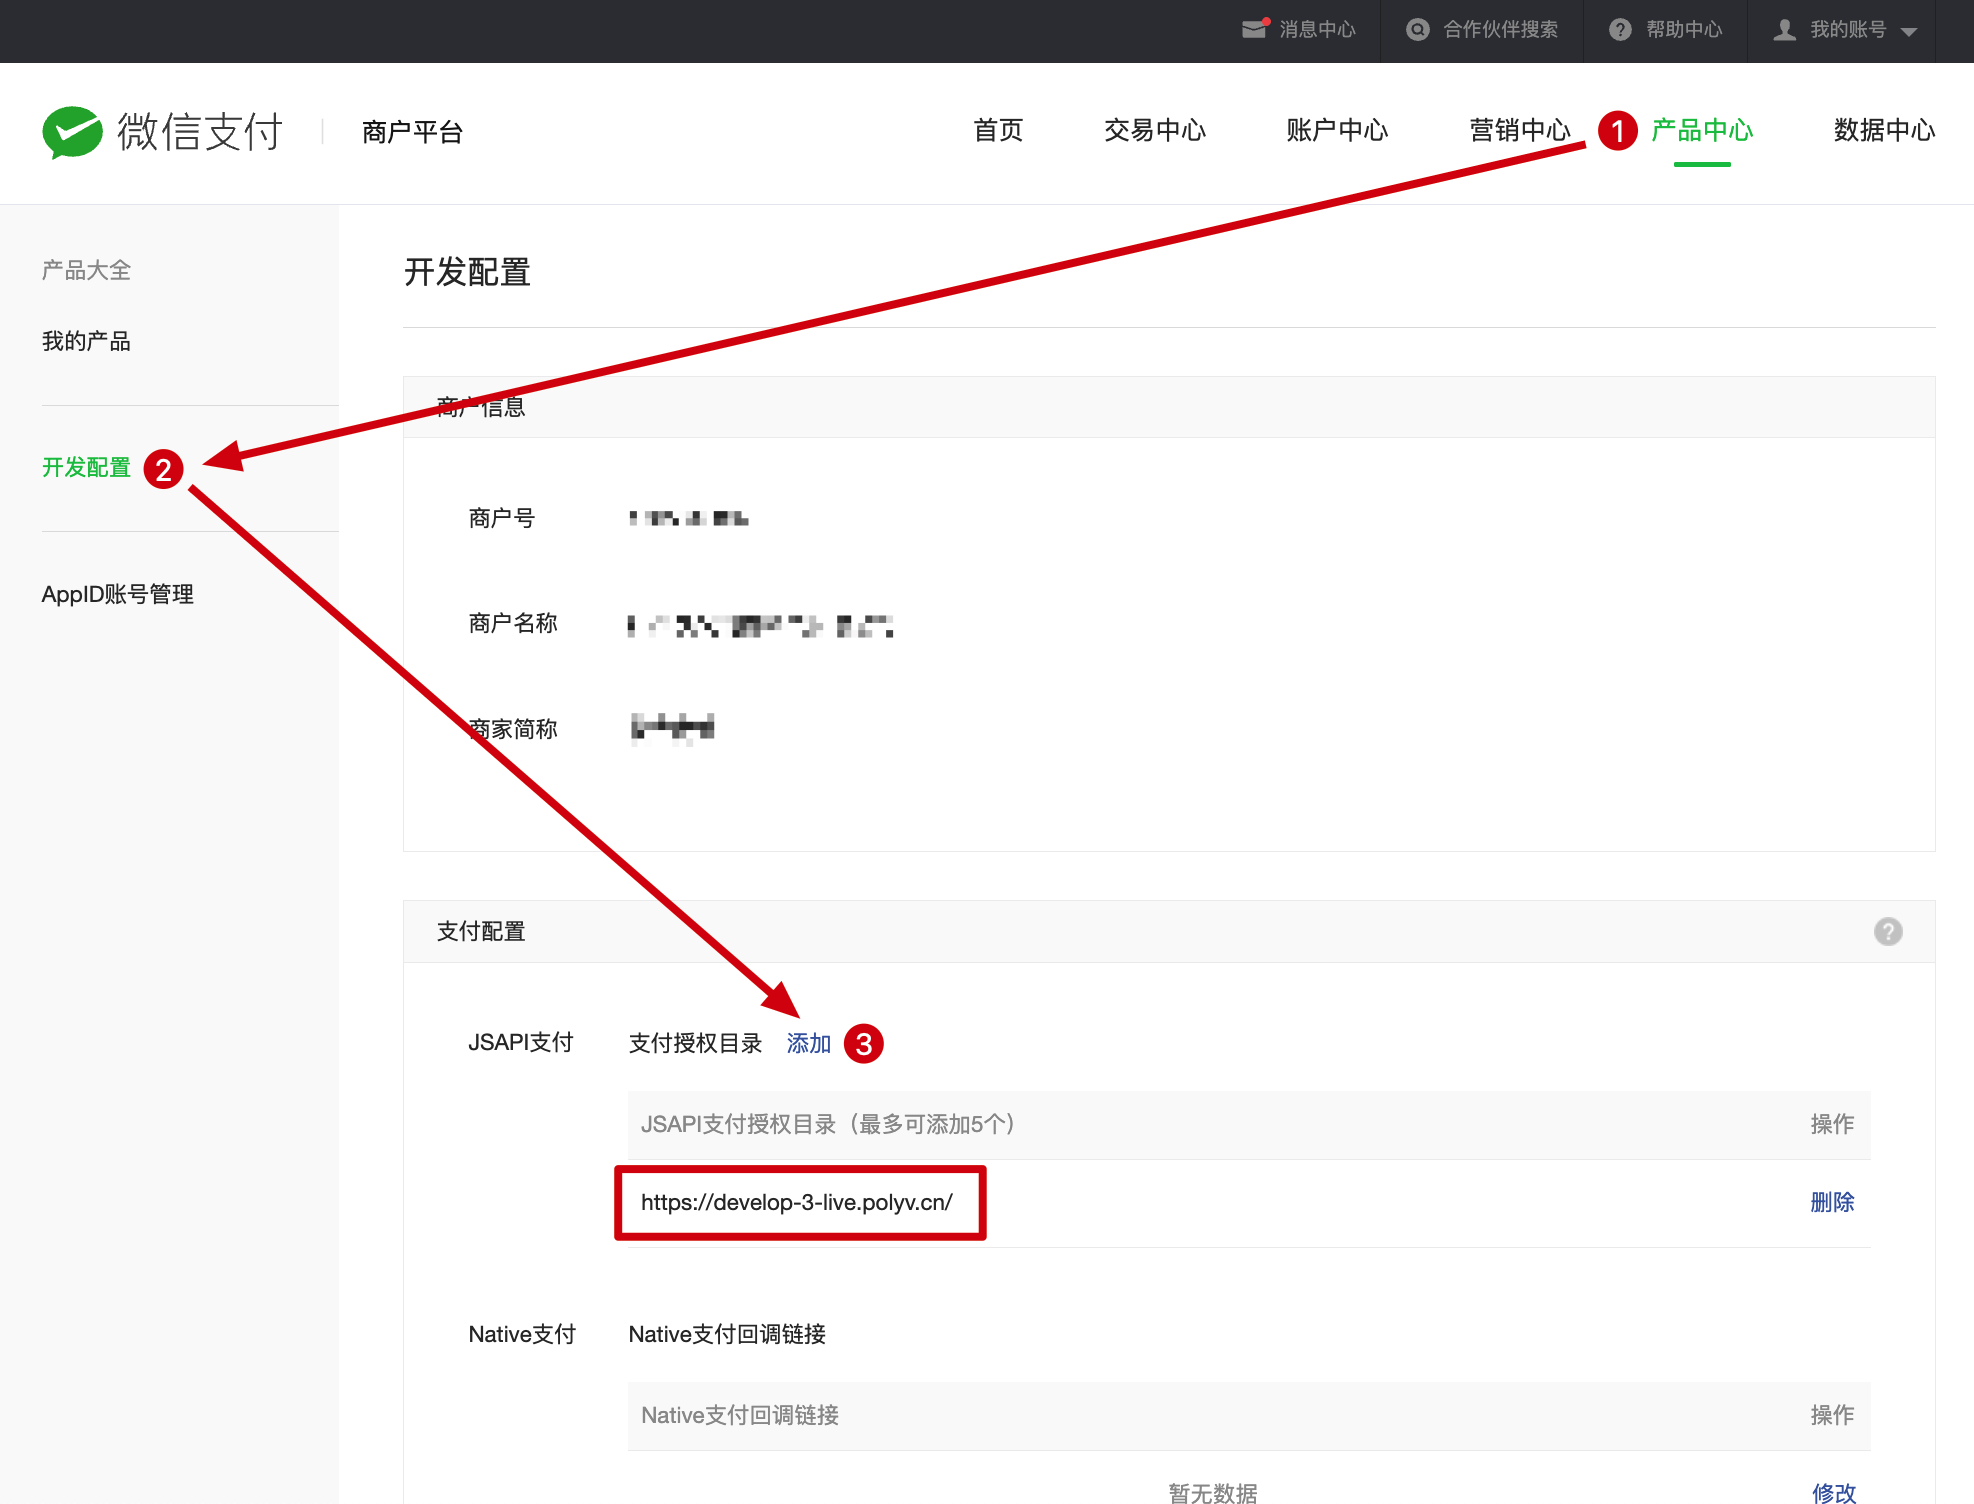
2.7.2 WeChat Pay Merchant Backend -> Product Center -> Payment Products -> JSAPI Payment -> Add the payment authorization directory in Product Settings.
JSAPI Payment configuration content is as follows:
(e.g., https://live.polyv.cn/)
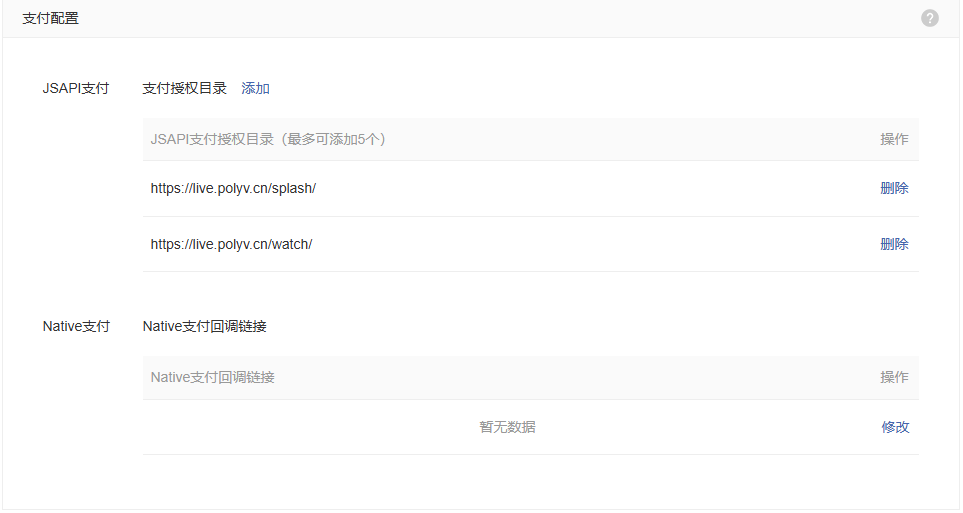
Native Payment configuration content is as follows:
https://cname观看页的域名/weixincallback/wxpay/notify
3. Fill in Merchant Account Information
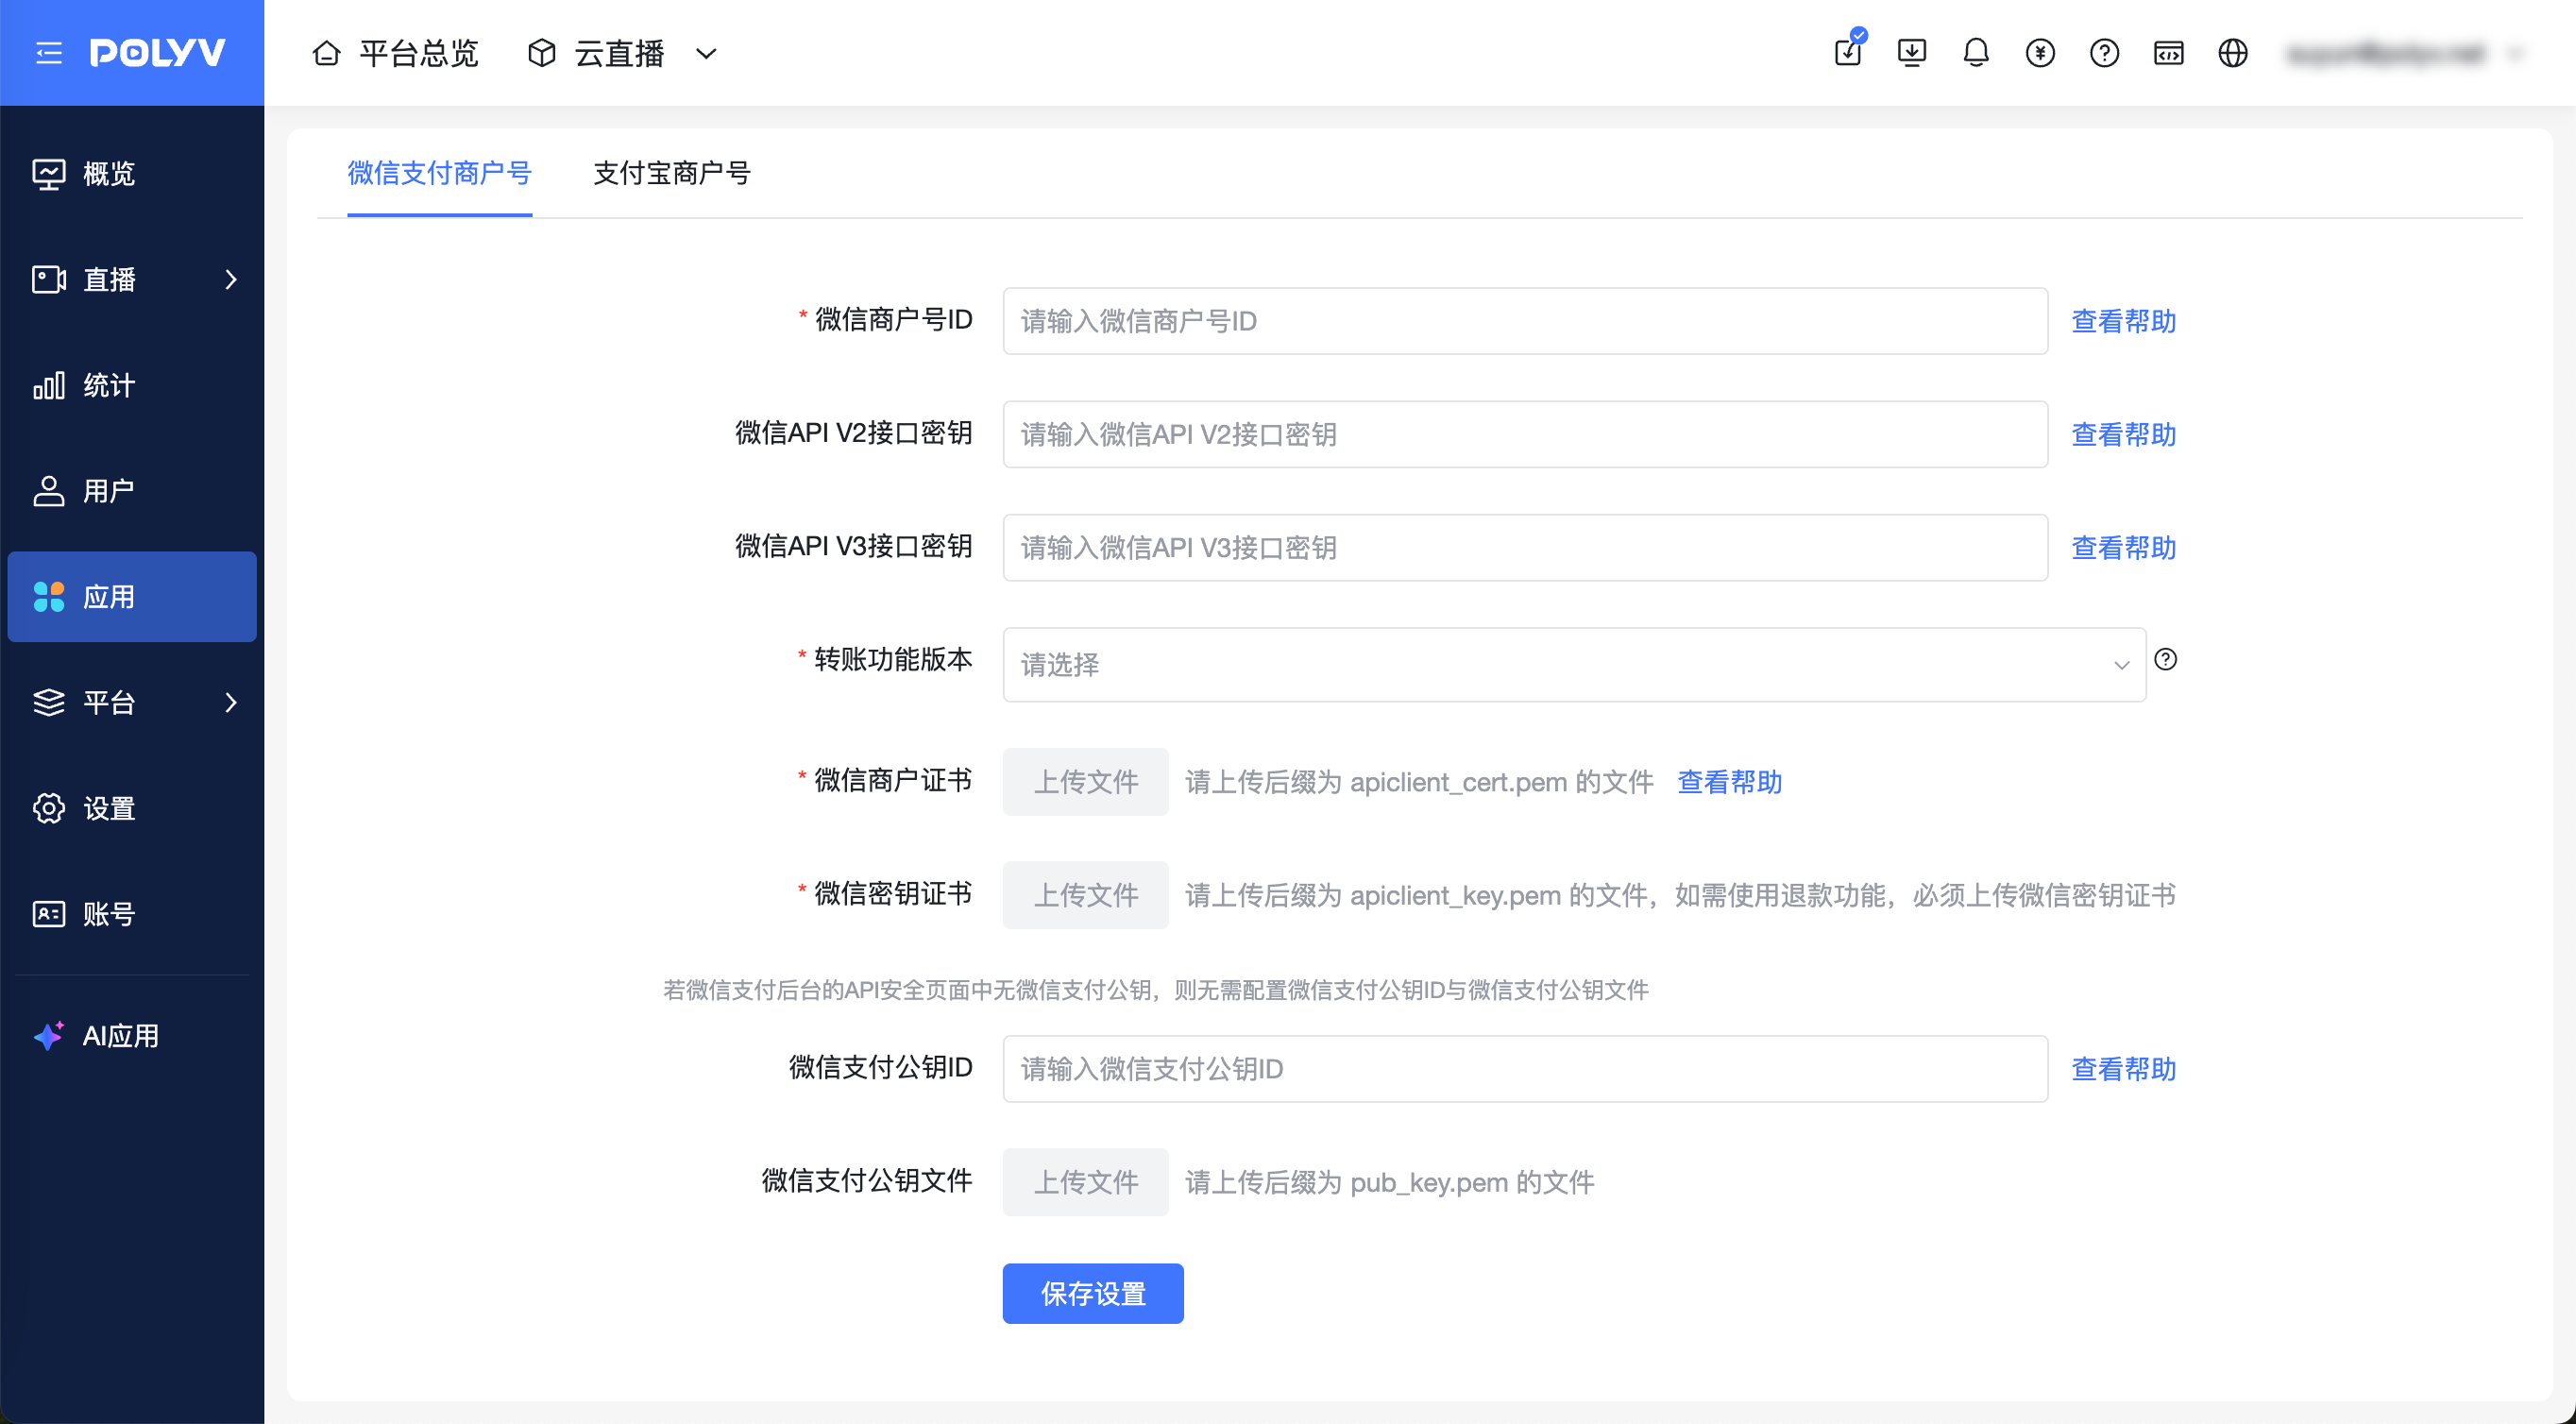
After completing the steps above, go back to the POLYV platform to configure your own merchant account.
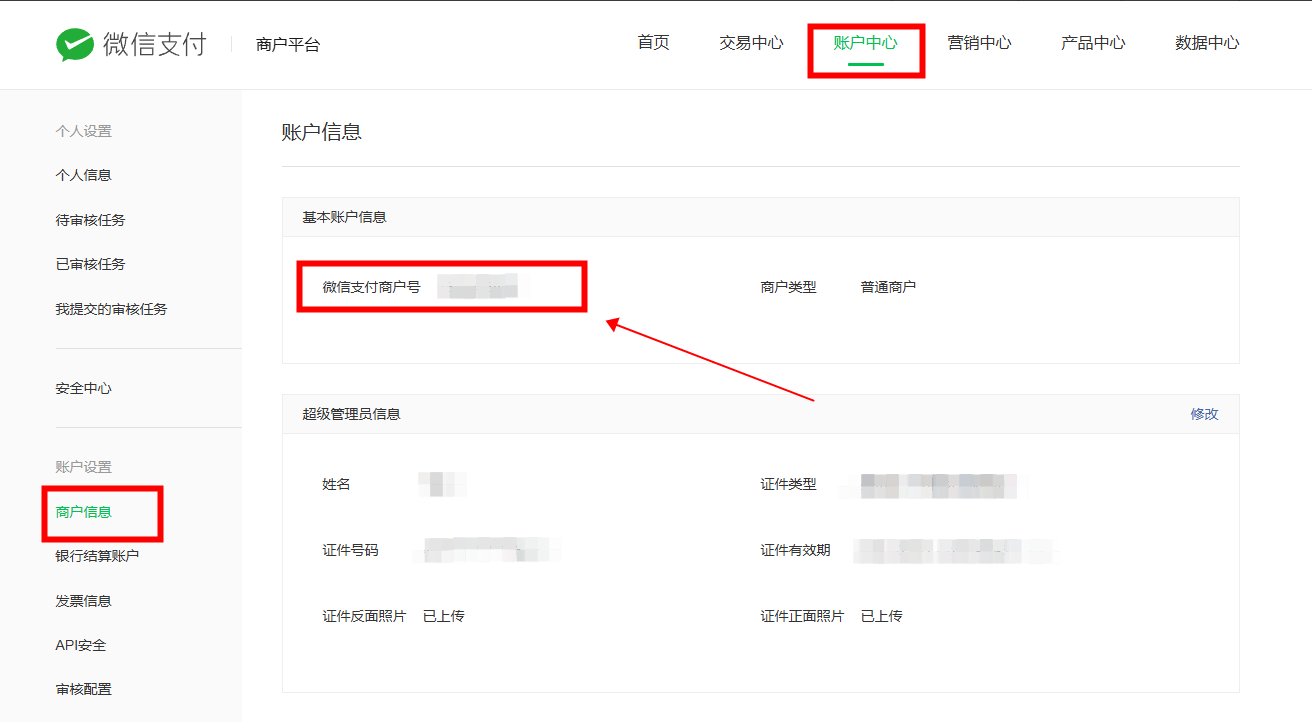
3.1. Get WeChat Merchant ID
Path: WeChat Pay Merchant Backend -> Account Center -> Merchant Settings -> Basic Account Information -> WeChat Pay Merchant ID
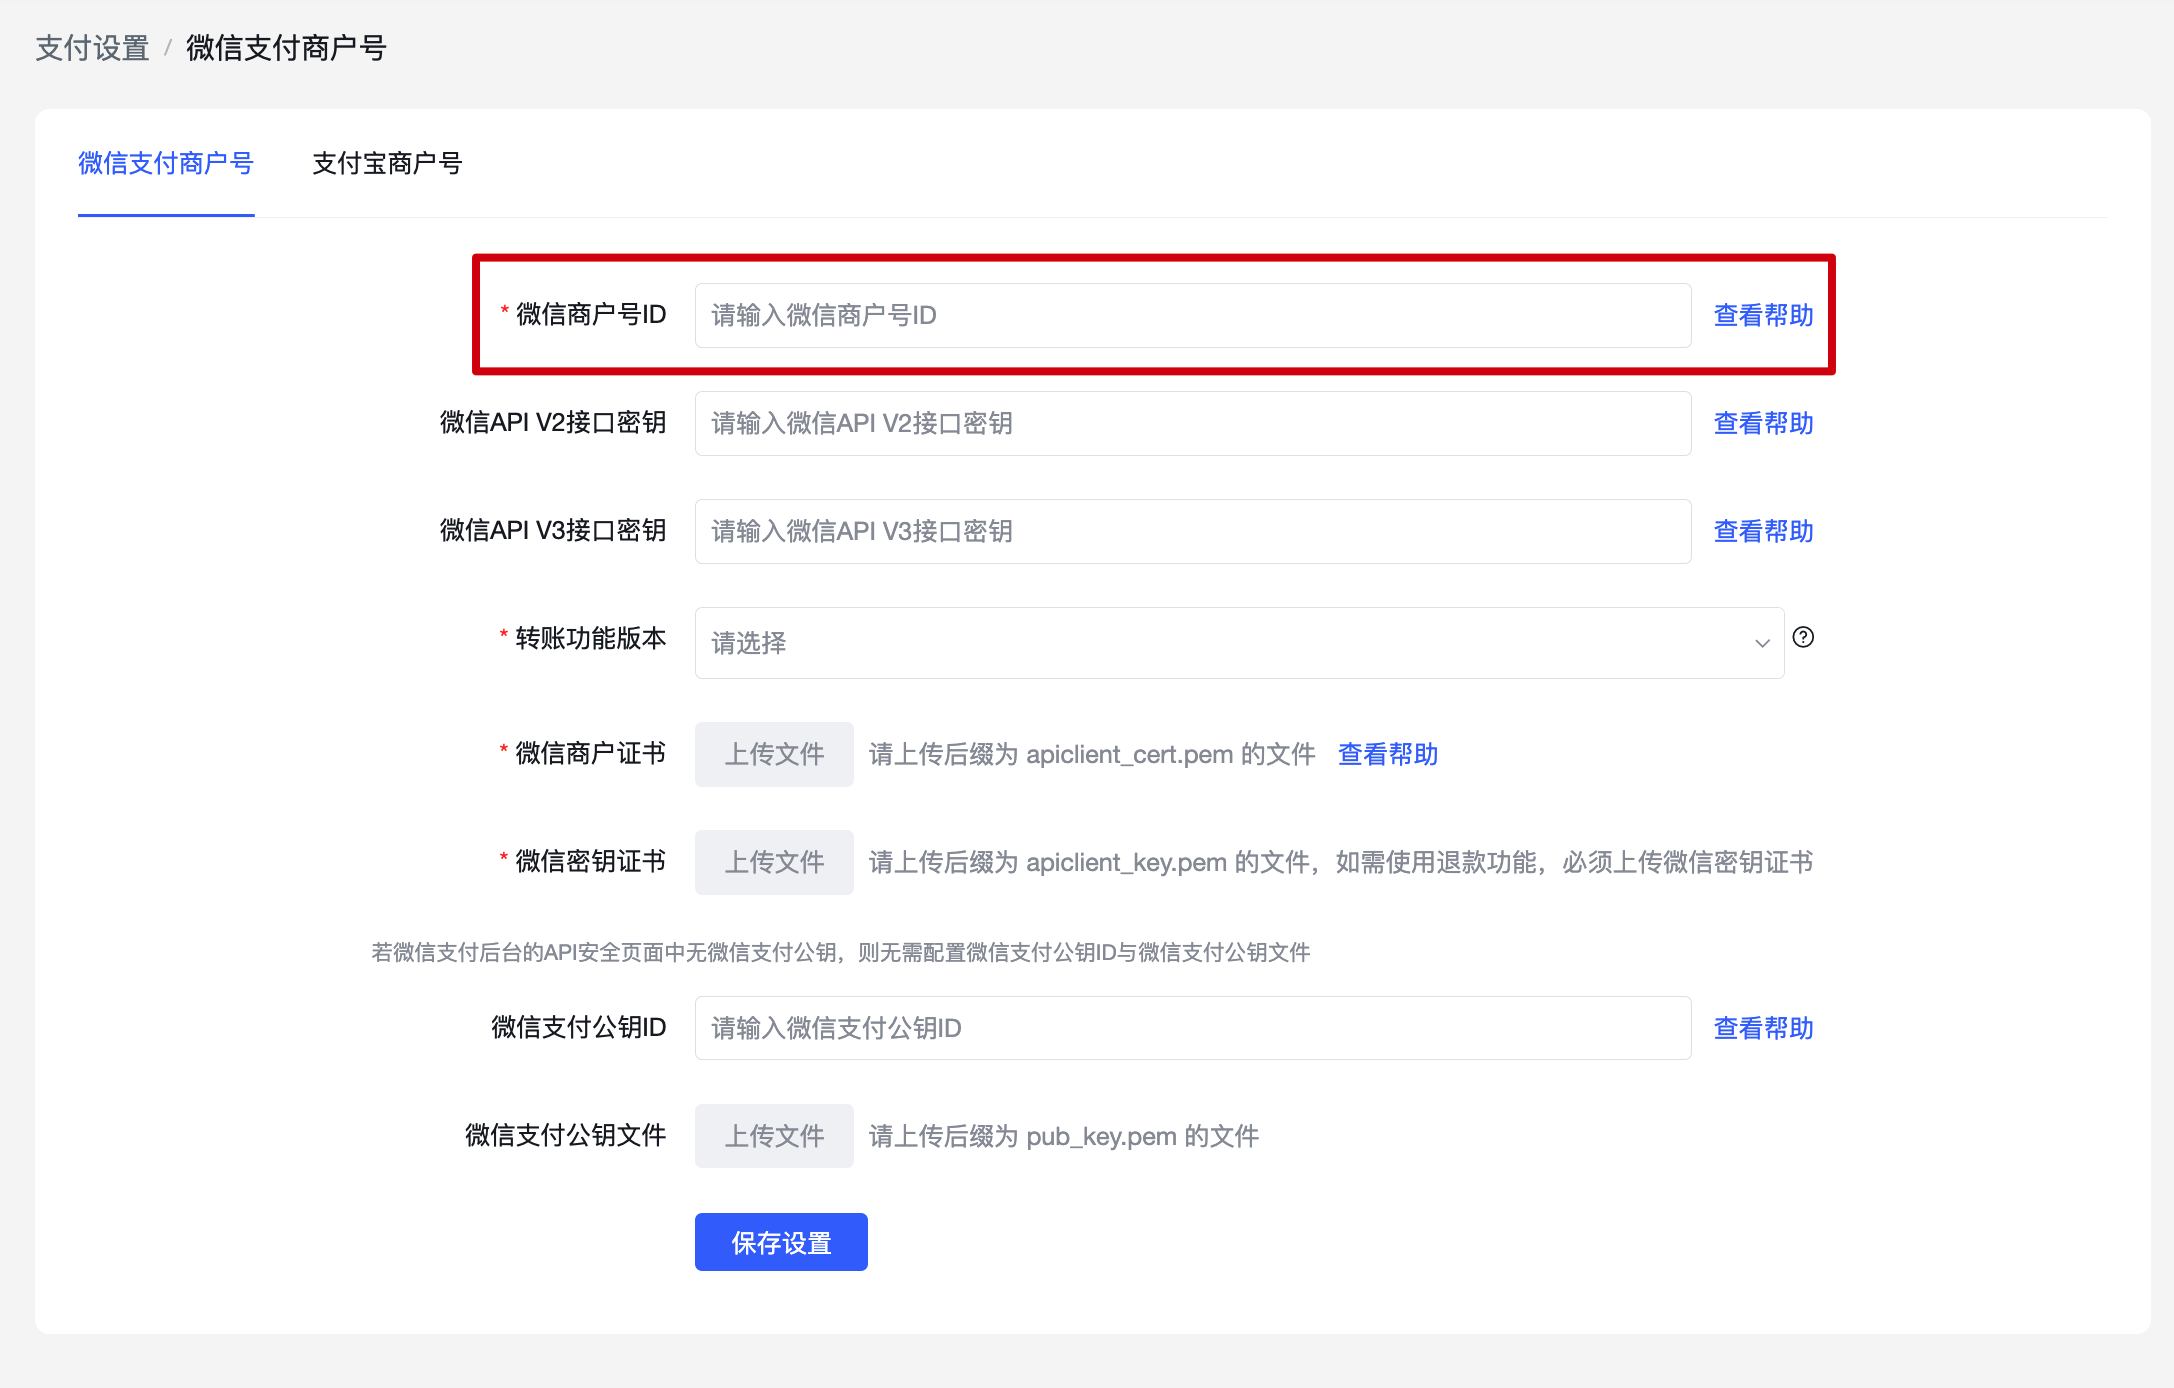
Path to fill in the POLYV backend: Settings -> Payment Settings -> WeChat Pay Merchant Account -> WeChat Merchant ID
3.2. Get WeChat API Keys
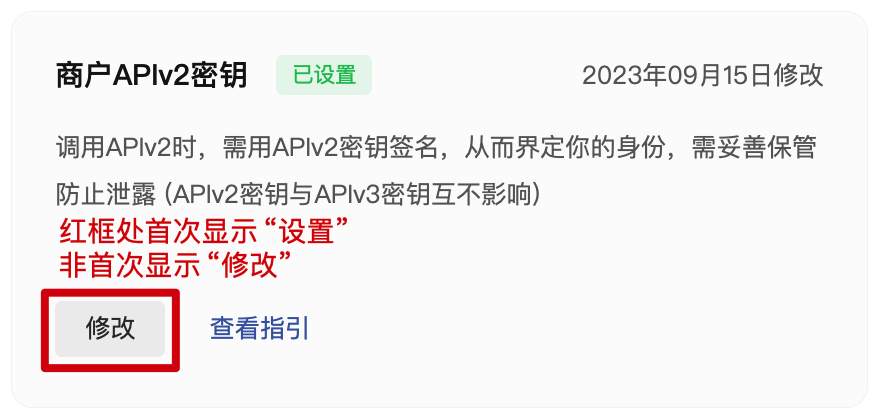
Get WeChat API V2 Key
Path: WeChat Pay Merchant Backend -> Account Center -> Account Settings -> API Security -> Verify Merchant Identity
Notes:
Before setting, please refer to the documentation: APIv2 Key Setting Method
The red box will show "Set" for the first time and "Modify" for subsequent times.
If setting the APIv2 key for the first time, enter a 32-character custom password (must include a mix of uppercase and lowercase letters, otherwise submission will fail), and click "Confirm". (Please record the key in a document beforehand; it cannot be viewed after successful setup, only modified.)
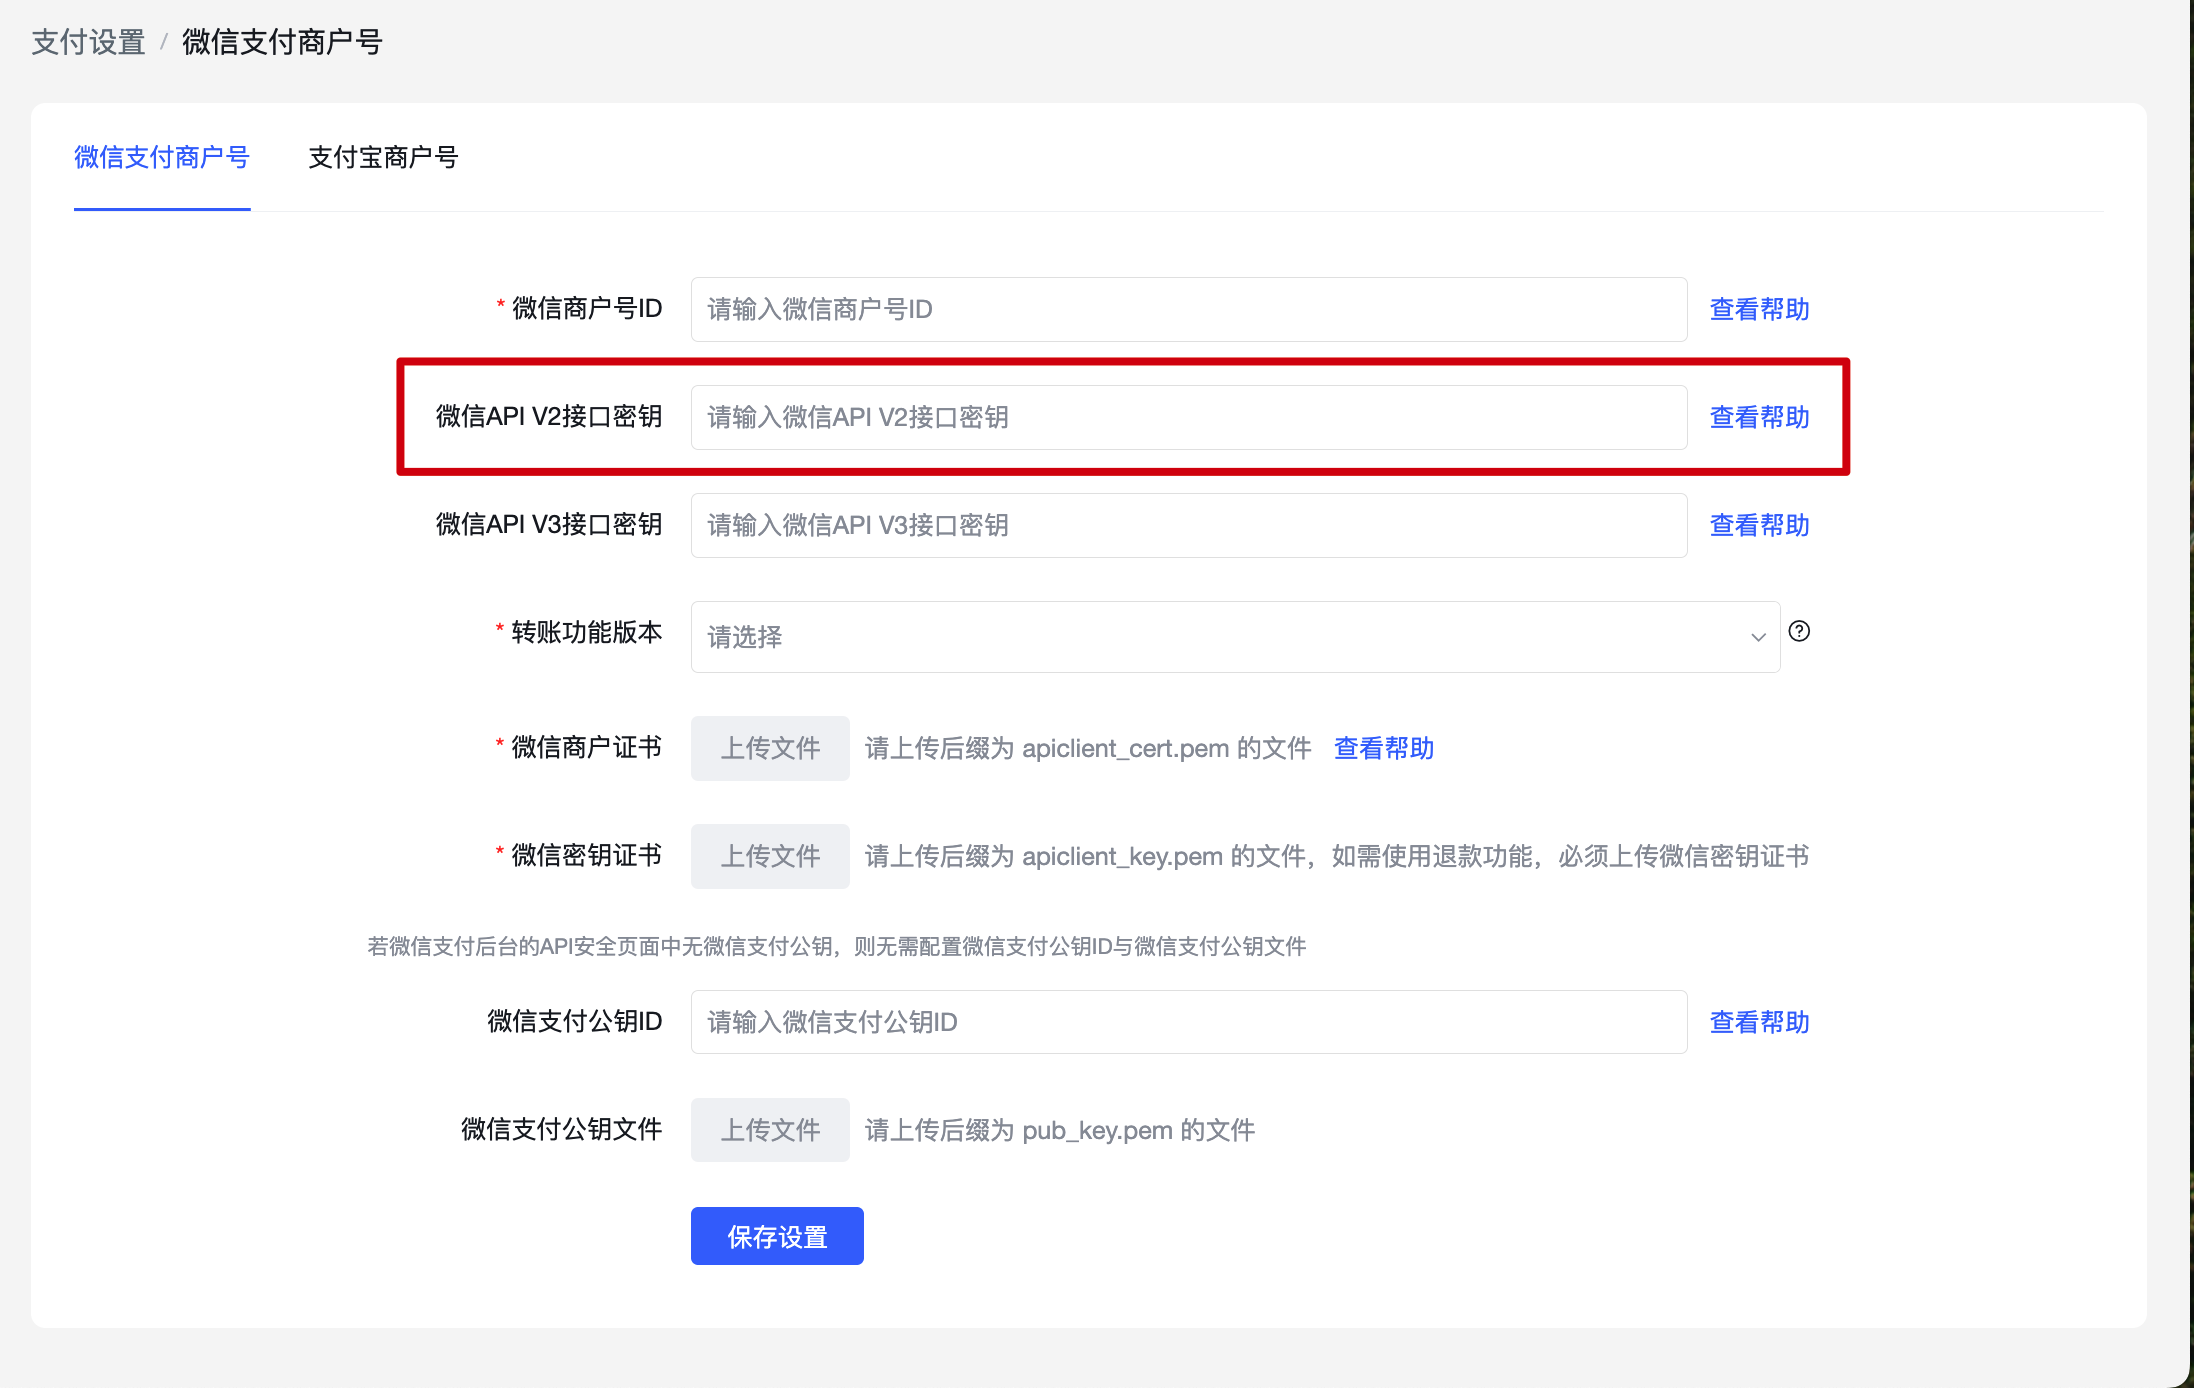
Path to fill in the POLYV backend: Settings -> Payment Settings -> WeChat Pay Merchant Account -> WeChat API V2 Key
Get WeChat API V3 Key
Path: WeChat Pay Merchant Backend -> Account Center -> Account Settings -> API Security -> Decryption Callback
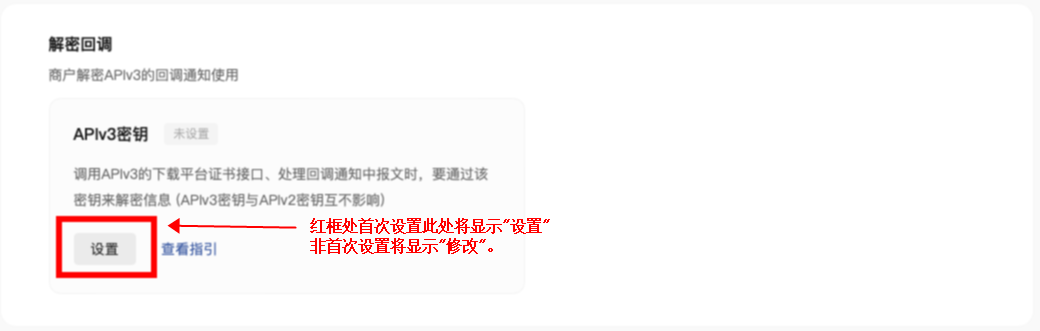
Notes:
Before setting, please refer to the documentation: APIv3 Key Setting Method.
The red box will show "Set" for the first time and "Modify" for subsequent times.
If setting the APIv3 key for the first time, enter a 32-character custom password (must include a mix of uppercase and lowercase letters, otherwise submission will fail), and click "Confirm". (Please record the key in a document beforehand; it cannot be viewed after successful setup, only modified.)
Path to fill in the POLYV backend: Settings -> Payment Settings -> WeChat Pay Merchant Account -> WeChat API V3 Key
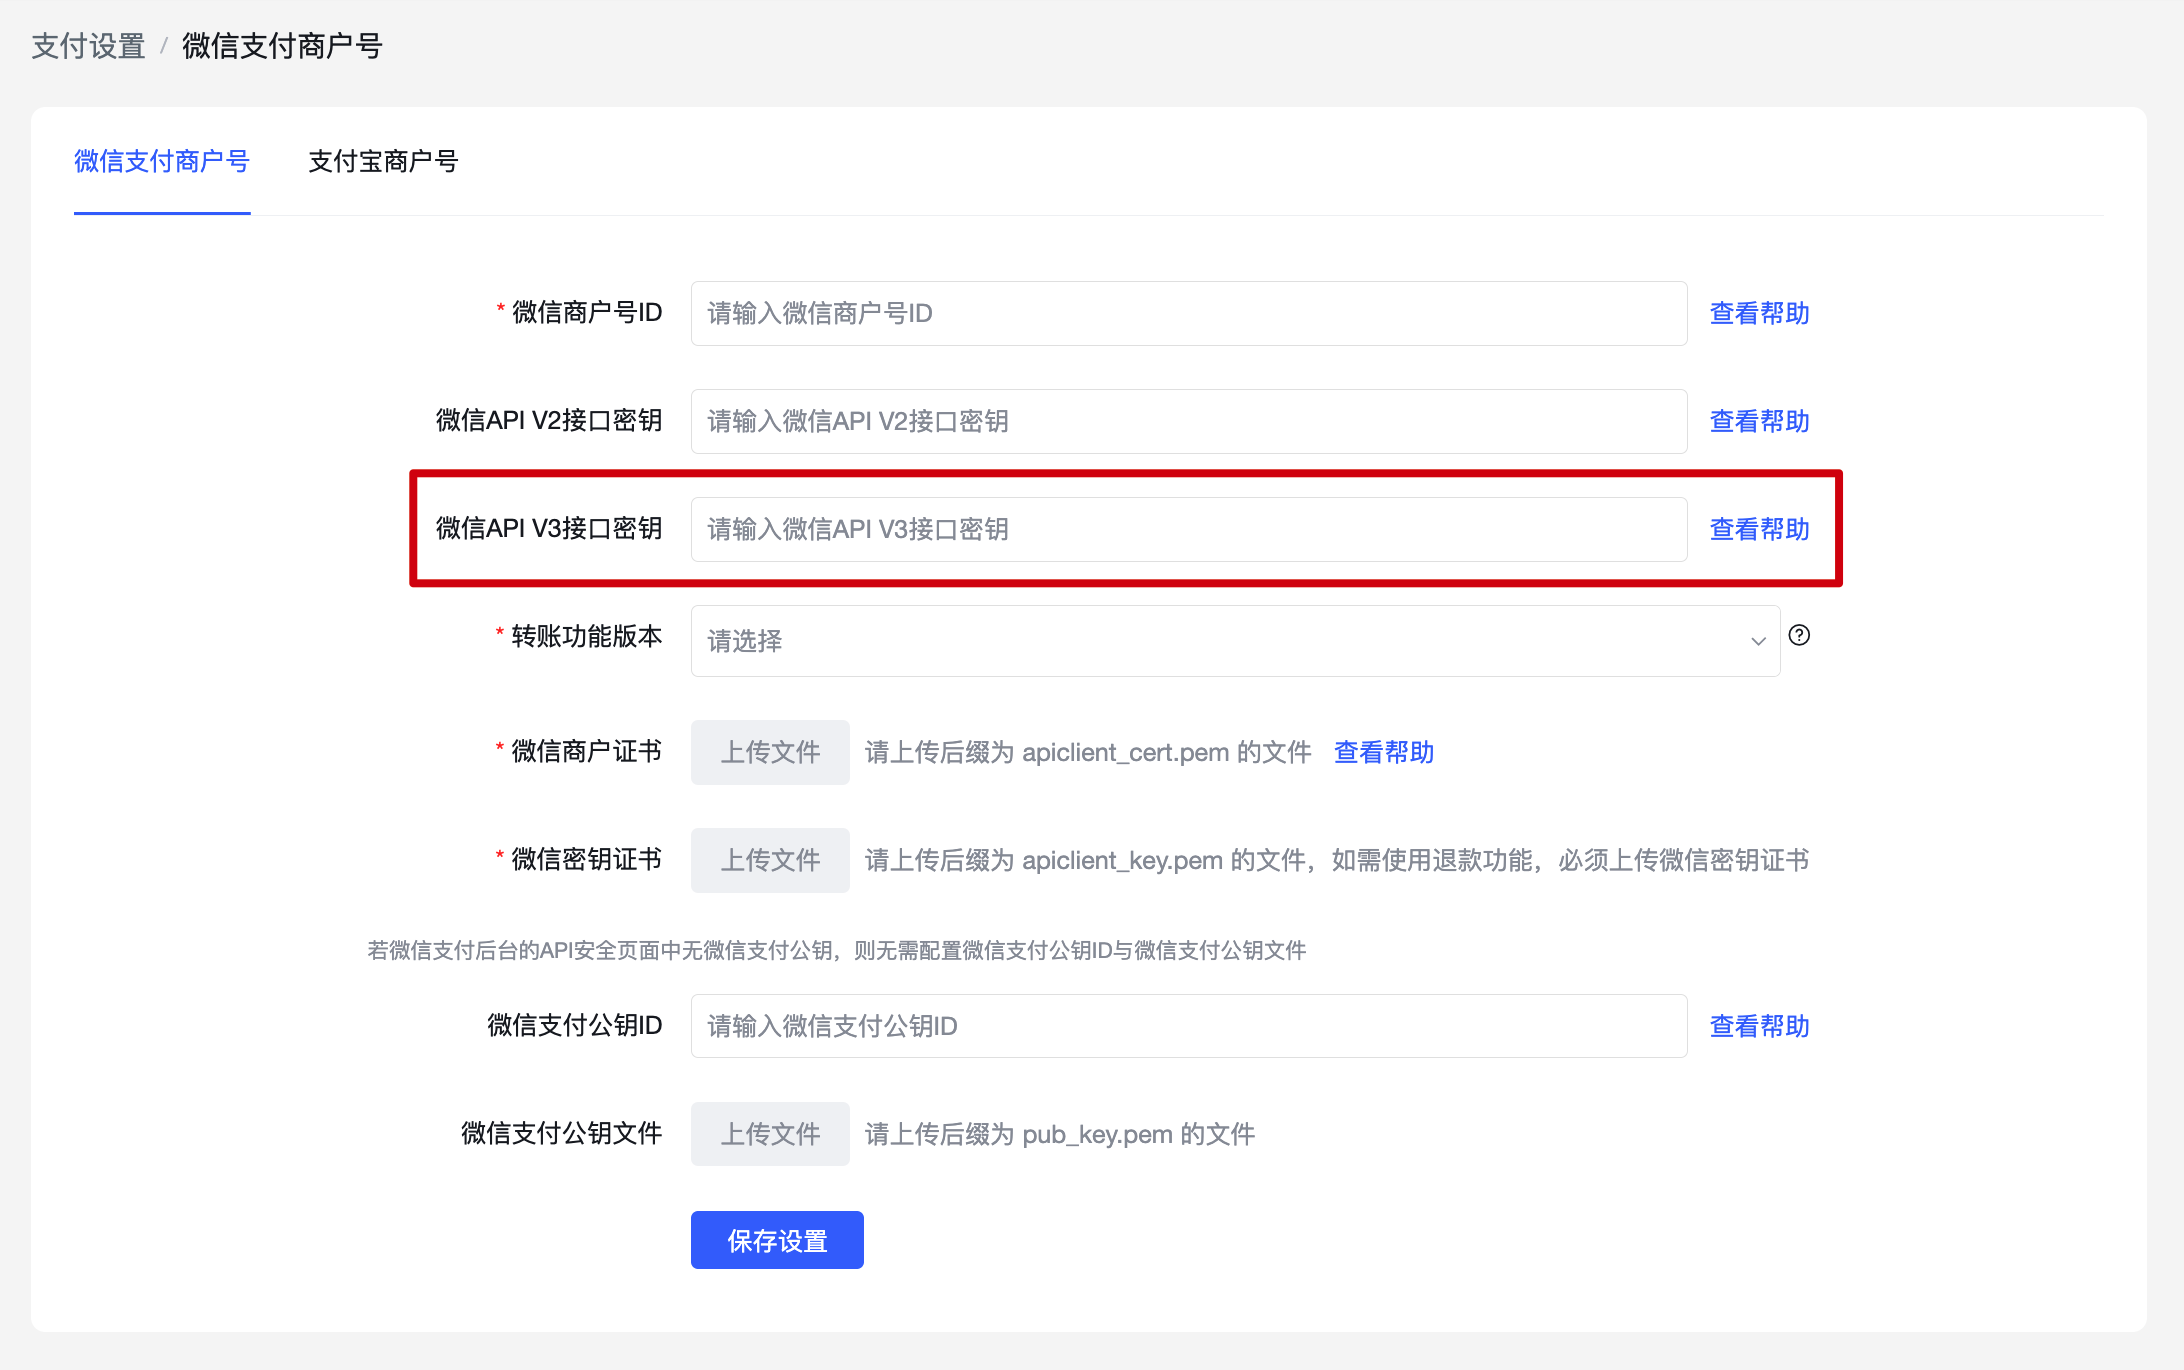
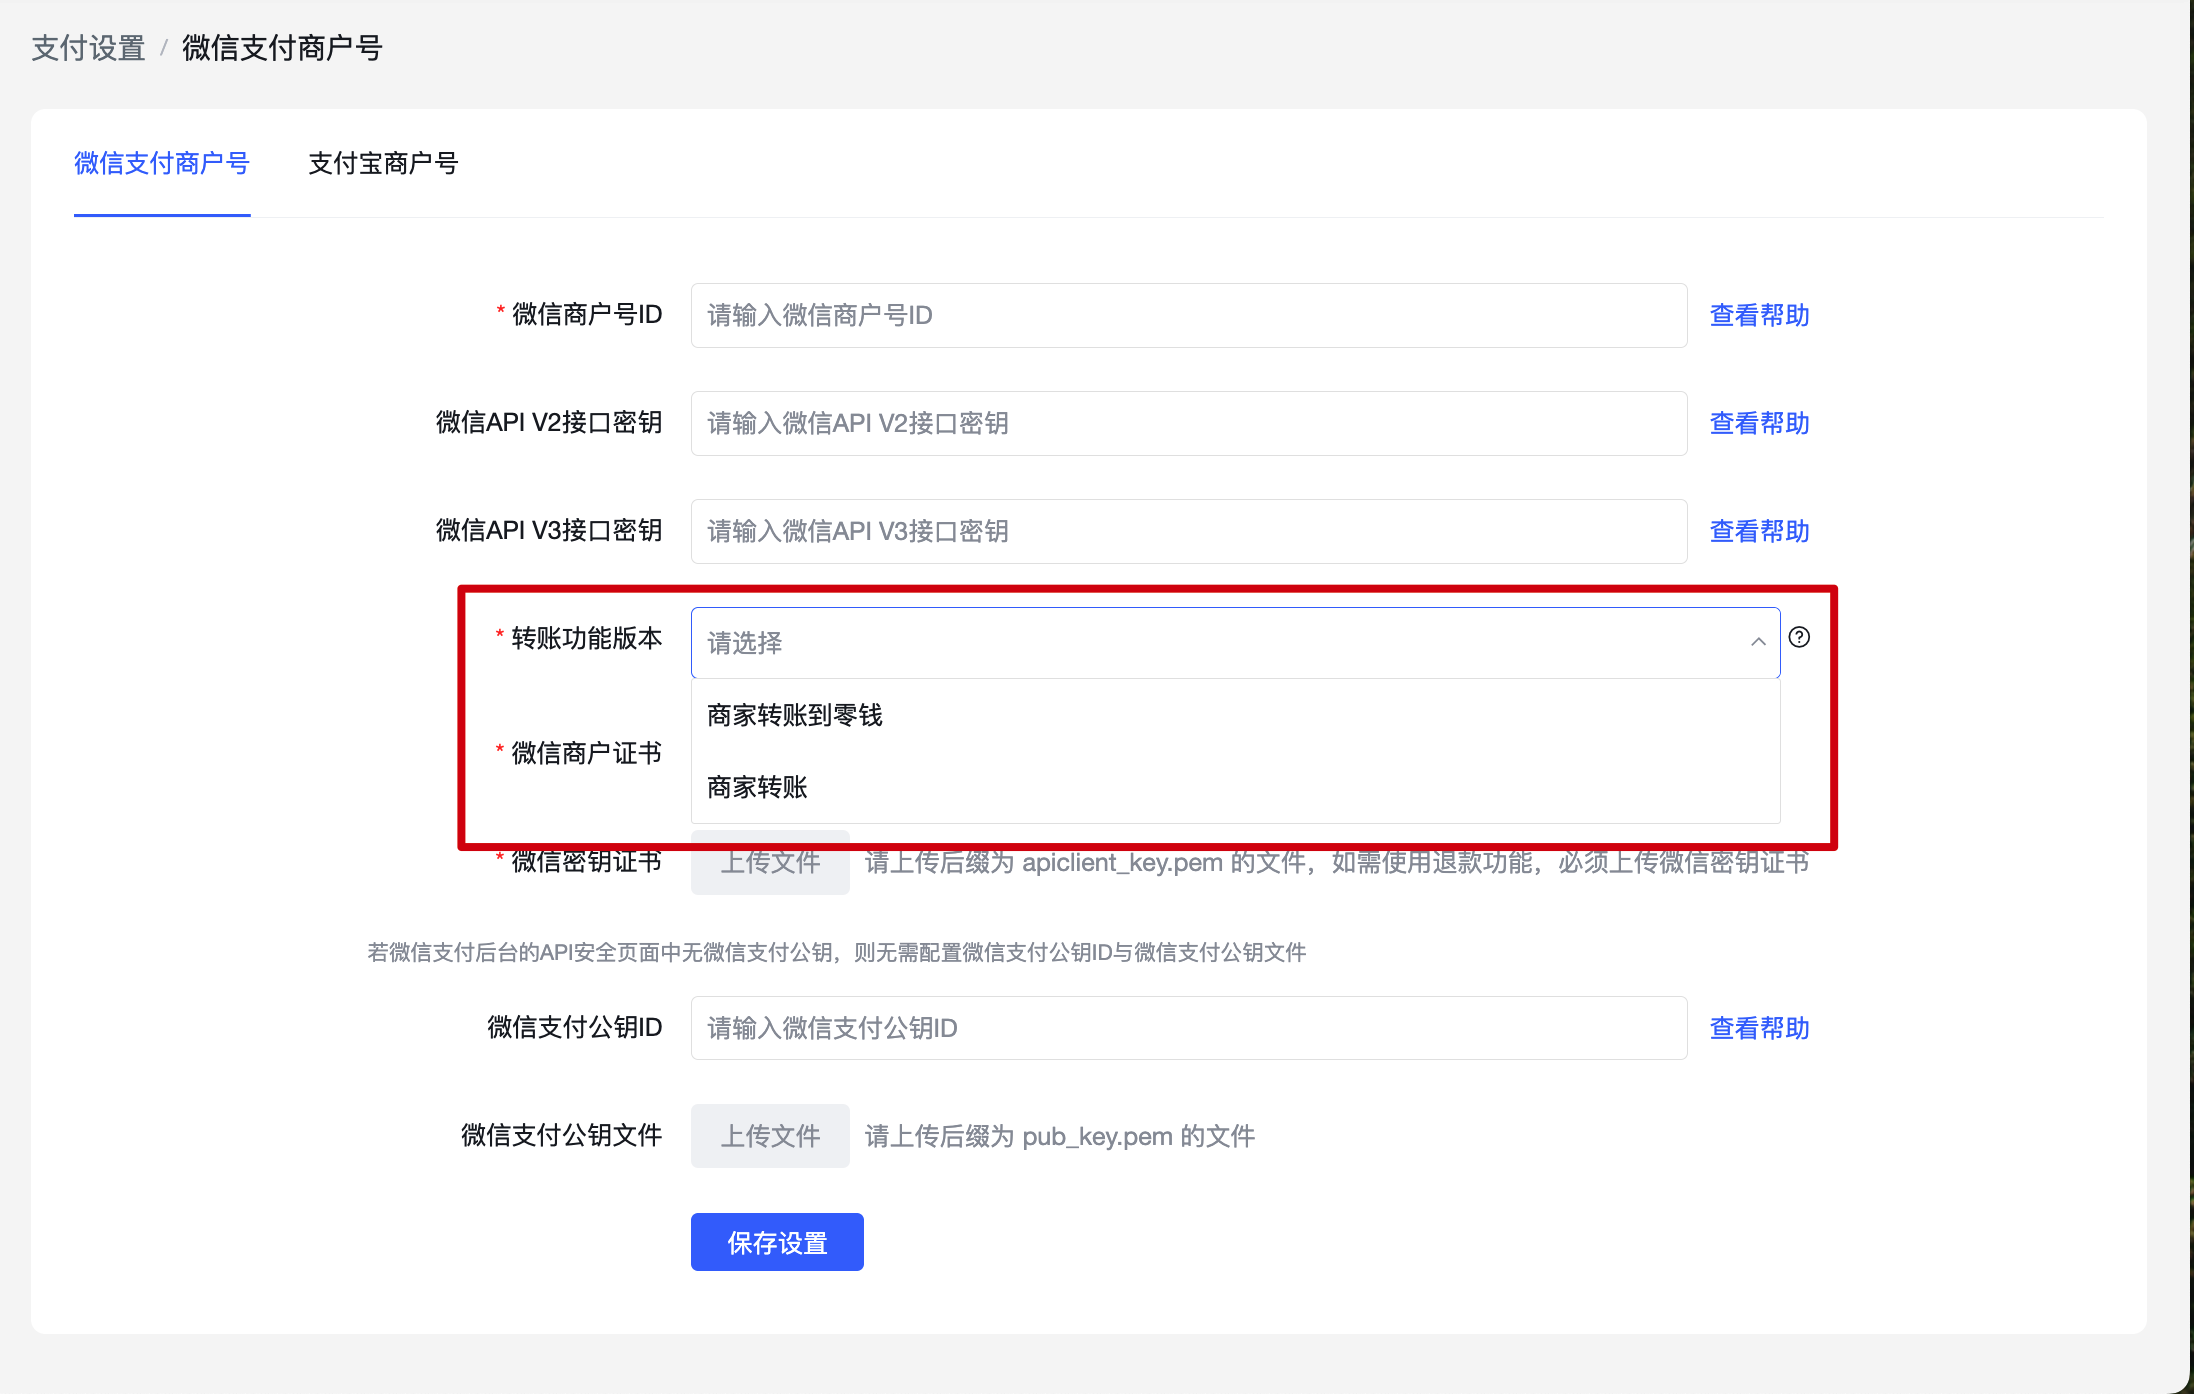
3.3. Select Transfer Function Version
For details on how to determine the transfer function version, see: https://help.polyv.net/index.html#/live/product/live_bgm/transfer_ver
Path to fill in the POLYV backend: Settings -> Payment Settings -> WeChat Pay Merchant Account -> Transfer Function Version
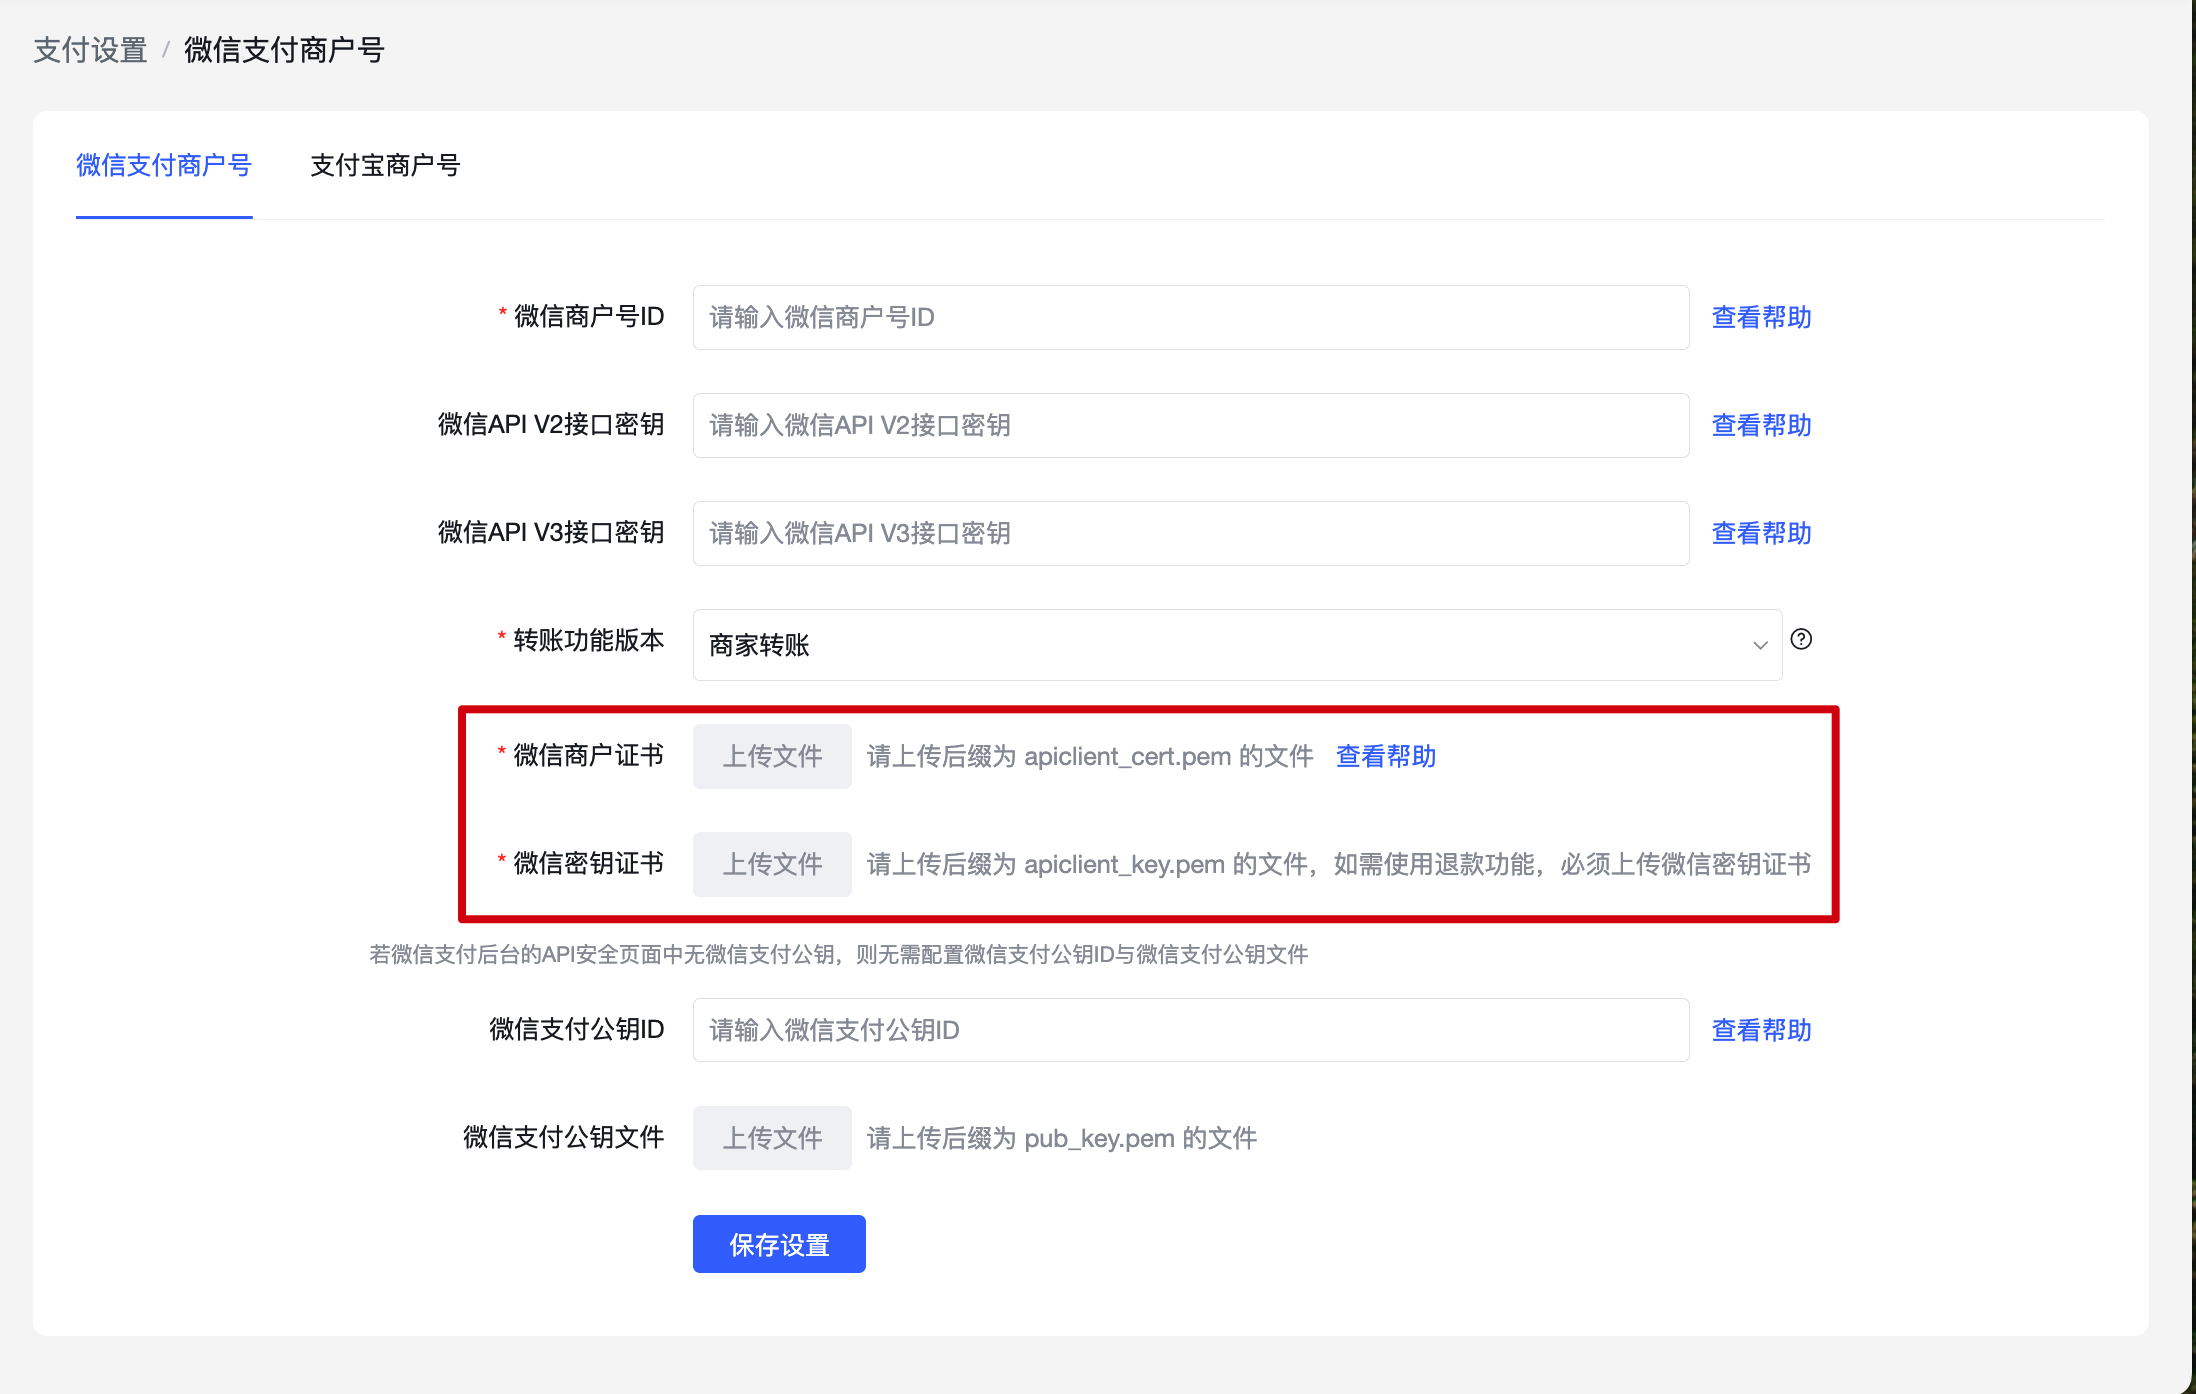
3.4. Get WeChat Merchant Certificate & WeChat Key Certificate
Path: WeChat Pay Merchant Backend -> Account Center -> Account Settings -> API Security -> Verify Merchant Identity -> Merchant API Certificate
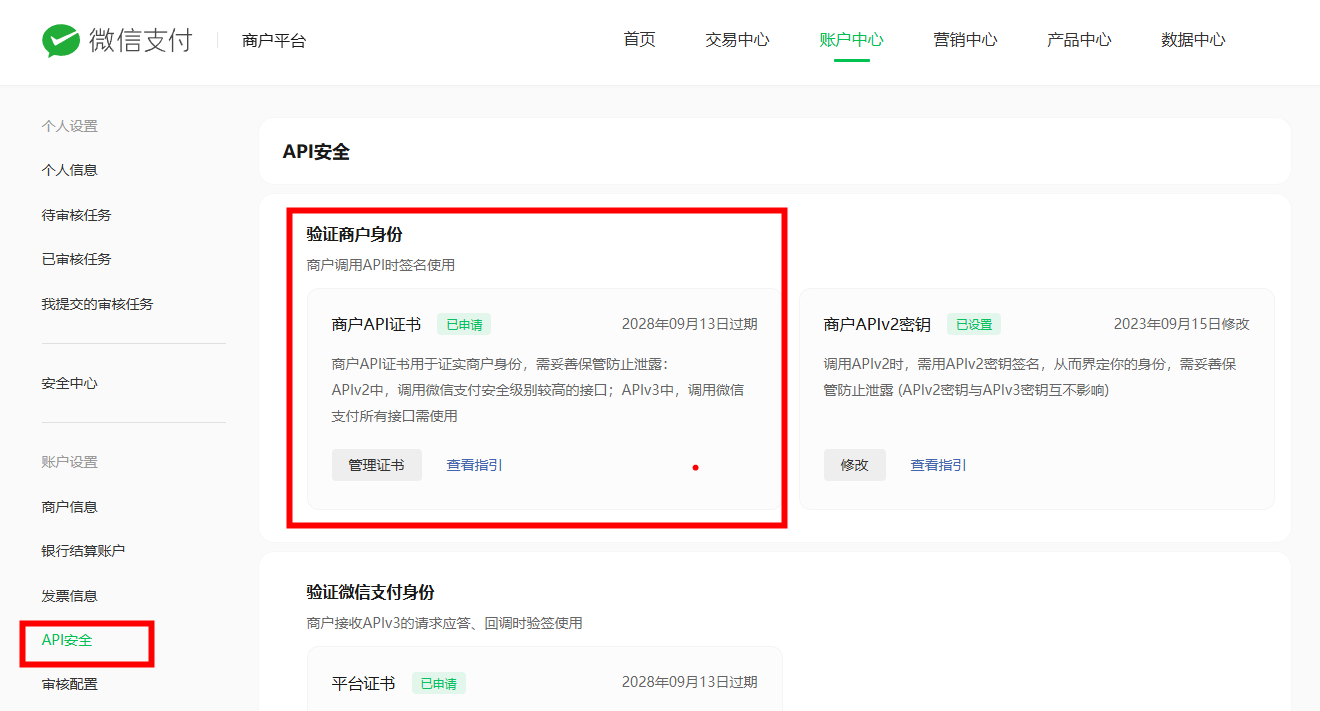
3.4.1 Please refer to the WeChat documentation to generate the certificate: Merchant API Certificate Acquisition Method and Feature Introduction.
3.4.2 After generating the certificate file according to the instructions, unzip the file locally to obtain the certificate file (apiclient_cert.crt) and the key file (apiclient_cert.key). Upload the WeChat merchant certificate in the backend payment settings.
3.4.3 Path to upload files in the POLYV backend: Settings -> Payment Settings -> WeChat Pay Merchant Account -> WeChat Merchant Certificate and WeChat Key Certificate
3.5. Get WeChat Pay Public Key
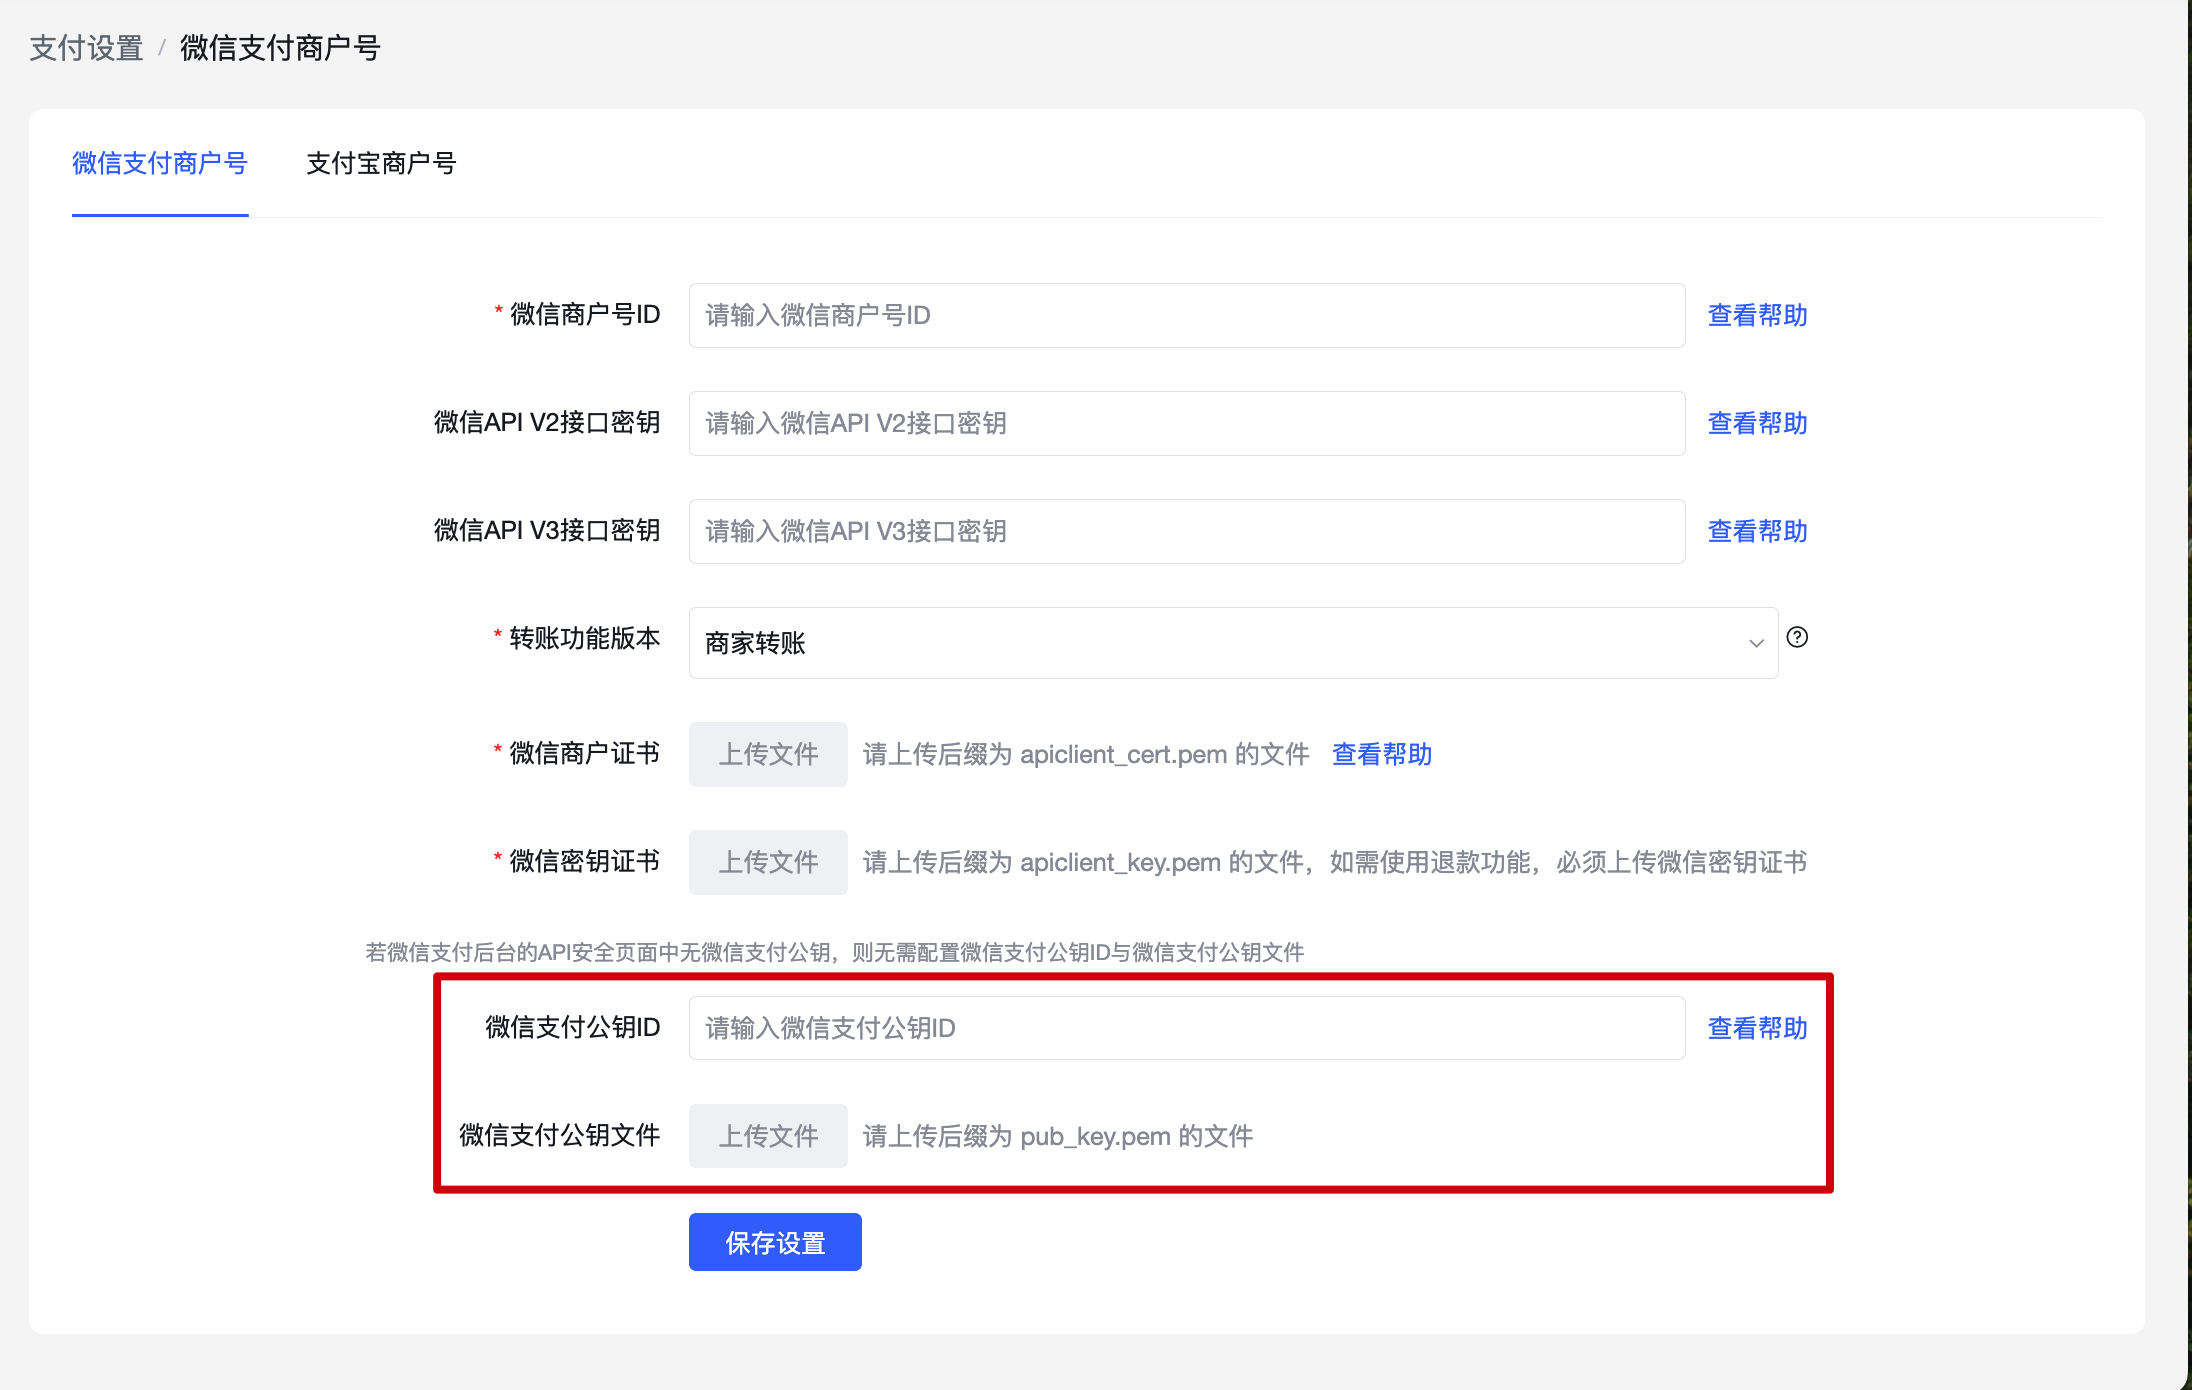
Note: If there is no "WeChat Pay Public Key" option on the API Security page of the WeChat Pay backend, you do not need to configure the WeChat Public Key ID and WeChat Public Key file.
Path: WeChat Pay Merchant Backend -> Account Center -> Account Settings -> API Security -> Verify WeChat Pay Identity -> WeChat Pay Public Key
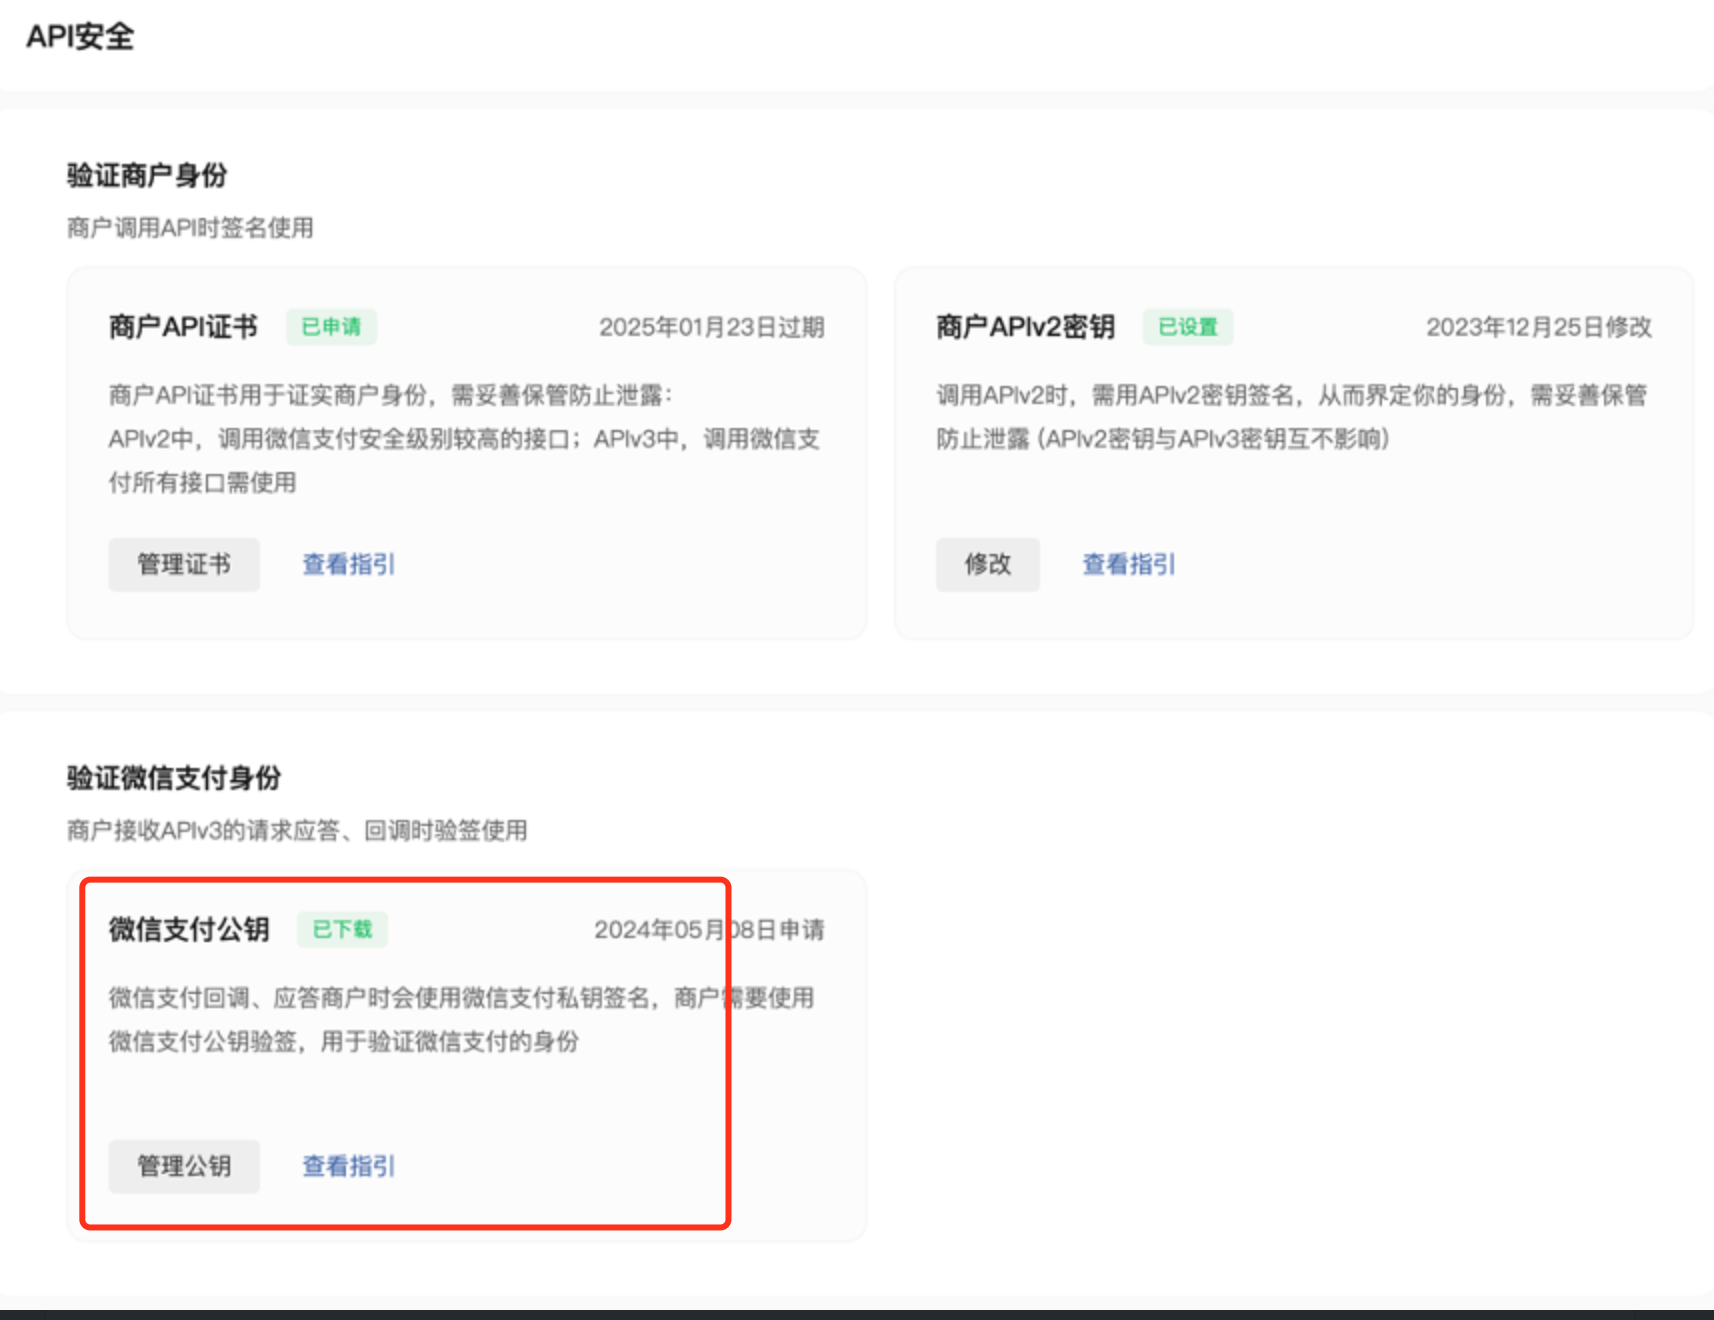
3.5.1 Please refer to the WeChat documentation to generate the certificate: WeChat Pay Public Key Product Introduction and Usage Instructions.
3.5.2 After generating the certificate file according to the instructions, unzip the file locally to obtain the WeChat Pay Public Key ID and the certificate file (apiclient_cert.pem). Configure them in the backend payment settings accordingly.
3.5.3 Path to fill in the POLYV backend: Settings -> Payment Settings -> WeChat Pay Merchant Account -> WeChat Pay Public Key ID and WeChat Pay Public Key File
4. Notes on Unbinding Merchant Account
Notes
If you need to change the current payment merchant account, please unbind the currently bound merchant account first, then bind the new one.
The new merchant account must be bound to the currently used WeChat Official Account. Please refer to the help documentation for the specific configuration process.
After unbinding the merchant account, the payment-related features under the current account will not function properly. They can only be used after reconfiguration. Please proceed with caution.
