Client Start Streaming Operation
1. Client Usage Guide
This document provides functional instructions for the Polyv 4.x version of the live streaming client.
The Polyv client for live streaming is widely compatible with diverse live streaming scenarios. In terms of viewing formats, it offers multiple options such as pure video, three-screen split, and portrait/landscape modes. In terms of application scenarios, it supports marketing promotions, large conferences, professional training, online classrooms, and more.
Additionally, it boasts powerful features, including flexible layout of live video streams and support for multi-scene switching; the ability to add rich media such as multimedia, images, and documents; compatibility with external capture cards; and advanced features like AI background removal, AI beauty effects, and 17-person video co-streaming, catering to the diverse needs of different users.
2. Preparation Before Starting
1. Hardware / Environment Recommendations
Computer Hardware Configuration:
Configuration Description |
Recommended Configuration |
Minimum Configuration |
|---|---|---|
| System | Windows 10 2004 or later, macOS 10.15.0 or later | Windows 7 SP1 or later, macOS 10.15.0 or later |
| CPU | i5-8400 or higher | i3-4160 |
| Memory | 16GB | 4GB |
| Graphics Card | GTX 750 or higher | Integrated Graphics |
Optional Hardware:
- Recording: External camera, camcorder + capture card;
- Audio: Lavalier microphone, headset microphone, professional microphone;
- Playback: Headphones, external speakers;
- On-site: Green, red, blue screens;
- Network: Ethernet cable, 4G network aggregator.
2. Live Streaming Client Download
- Windows (64-bit) client download link: https://soft.polyv.net/rc/PolyvLiveSetup64.exe
- Windows (32-bit) client download link: https://soft.polyv.net/rc/PolyvLiveSetup.exe
- Mac client download link: https://soft.polyv.net/rc/PolyvLiveSetup.dmg
- Notes on Using the Client on Mac
3. Registration and Login
- Register for a Polyv account and obtain the channel ID and password
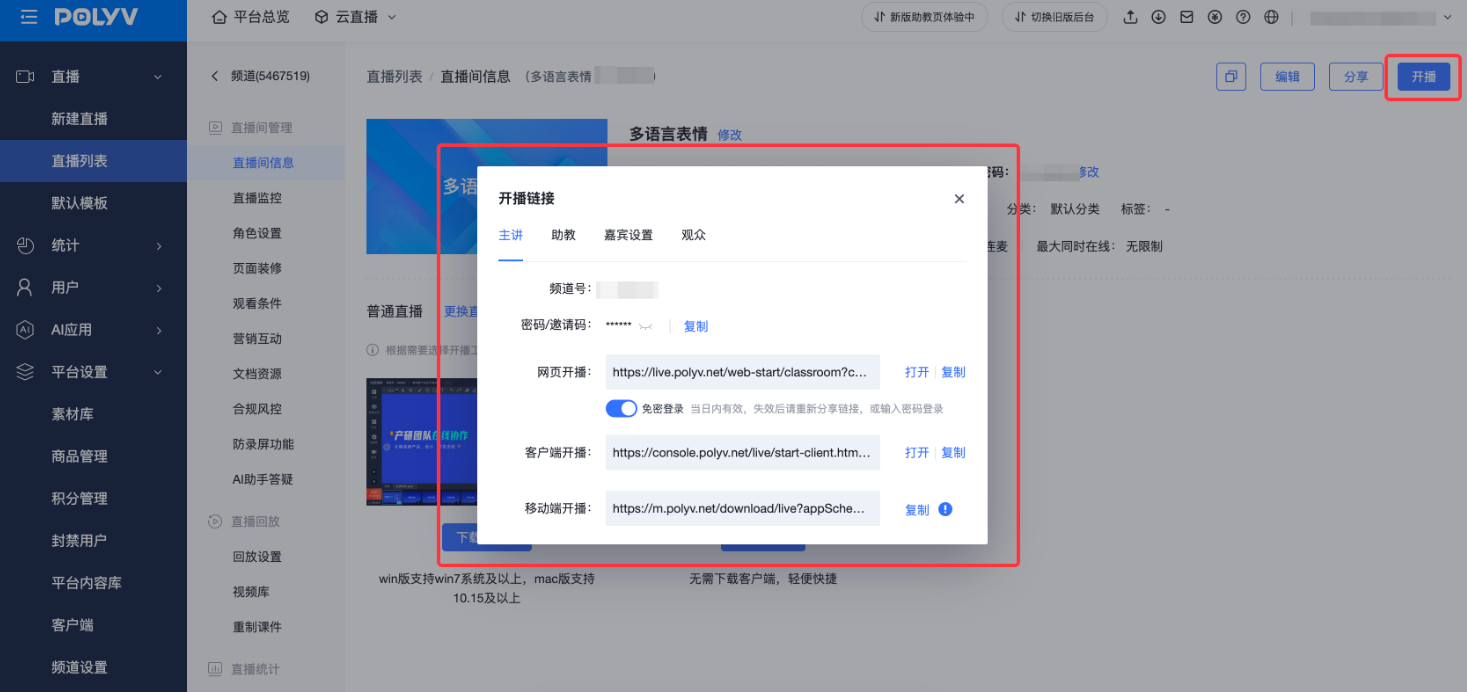
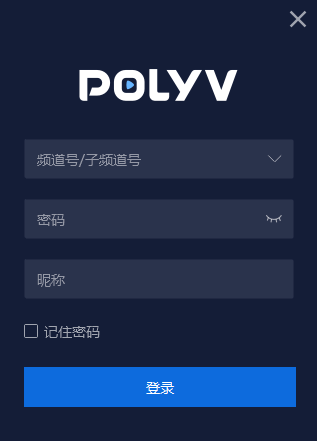
- Log in to the client using the channel number and password. Obtain the live channel number and password from the management backend to log in.
- When logging in with the channel number as an instructor, you can start/end the live stream.
- When logging in via a sub-channel and the co-streaming limit is 0 (co-streaming feature not in use), you can log in to the client in conjunction with the backend cloud director.
- When logging in via a sub-channel and the co-streaming limit is ≥1 person, you cannot log in to the client.
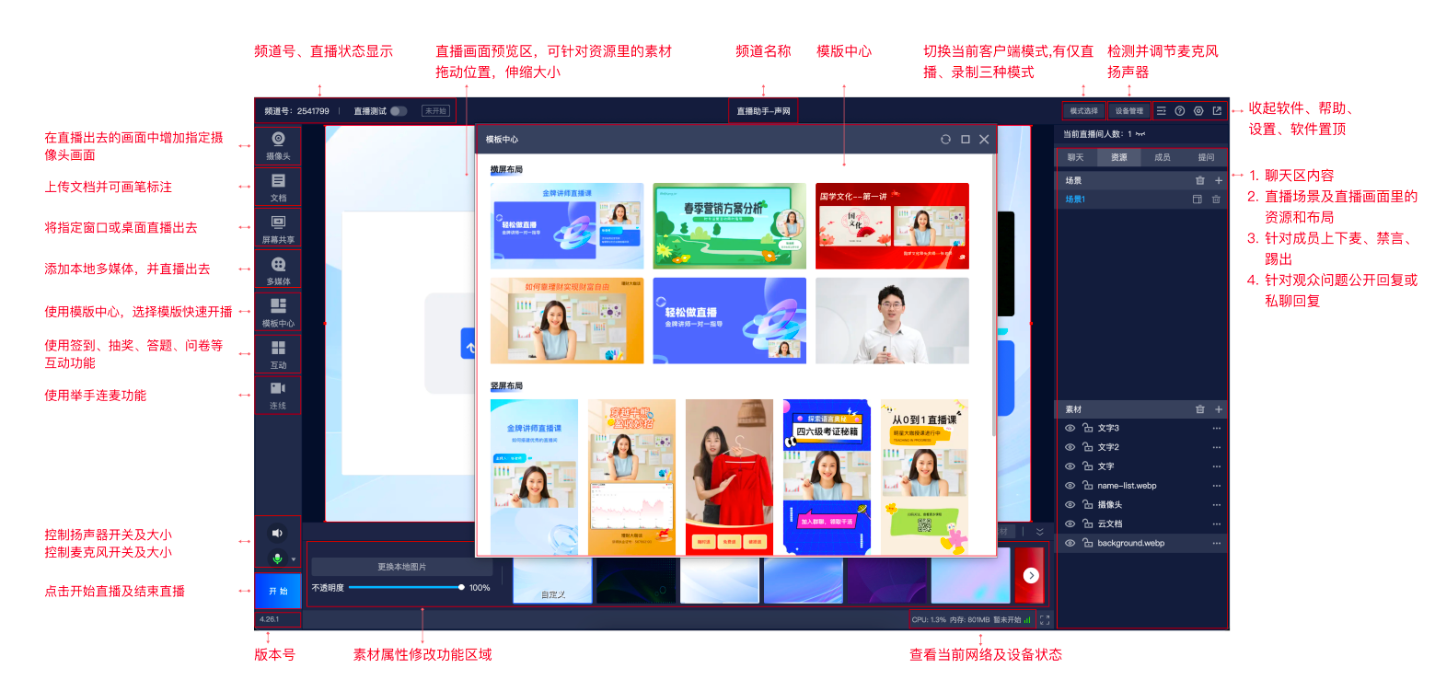
III. Main Interface Overview
- The 4.x client supports two live streaming templates: video-only and three-panel (document + video). The main differences are as follows:
| Feature | Video-Only Template | Document+Video Template |
|---|---|---|
| Switch between Live Only and Live+Co-hosting | ✔️ | ✔️ |
| Local Recording | ✔️ | ❌ |
| Multi-Scene Switching | ✔️ | ❌ |
| Material Addition & Screen Layout | ✔️ | ❌ |
| Insert Multimedia | ✔️ | ✔️ |
| Desktop Live Streaming | ✔️ | ✔️ |
| Desktop & Software Window Sharing | ✔️ | ❌ |
| Two-Way Interactive Whiteboard | ❌ | ✔️ |
| Documents | ✔️ | ✔️ |
| Guest Co-hosting | ✔️ | ✔️ |
| Audience Hand-Raise to Co-host | ✔️ | ✔️ |
| Beauty Filters | ✔️ | ✔️ |
| Background Removal | ✔️ | ✔️ |
| Text Interaction (Chat, Q&A, Polls) | ✔️ | ✔️ |
| Member Management (Online Count, Member Search, Mute, Kick) | ✔️ | ✔️ |
| Interactive Apps (Announcements, Check-in, Lottery, Quiz Cards, Surveys, Red Packet Rain) | ✔️ | ✔️ |
- Pure Video Template
- Three-Part Screen Template (Document + Video)
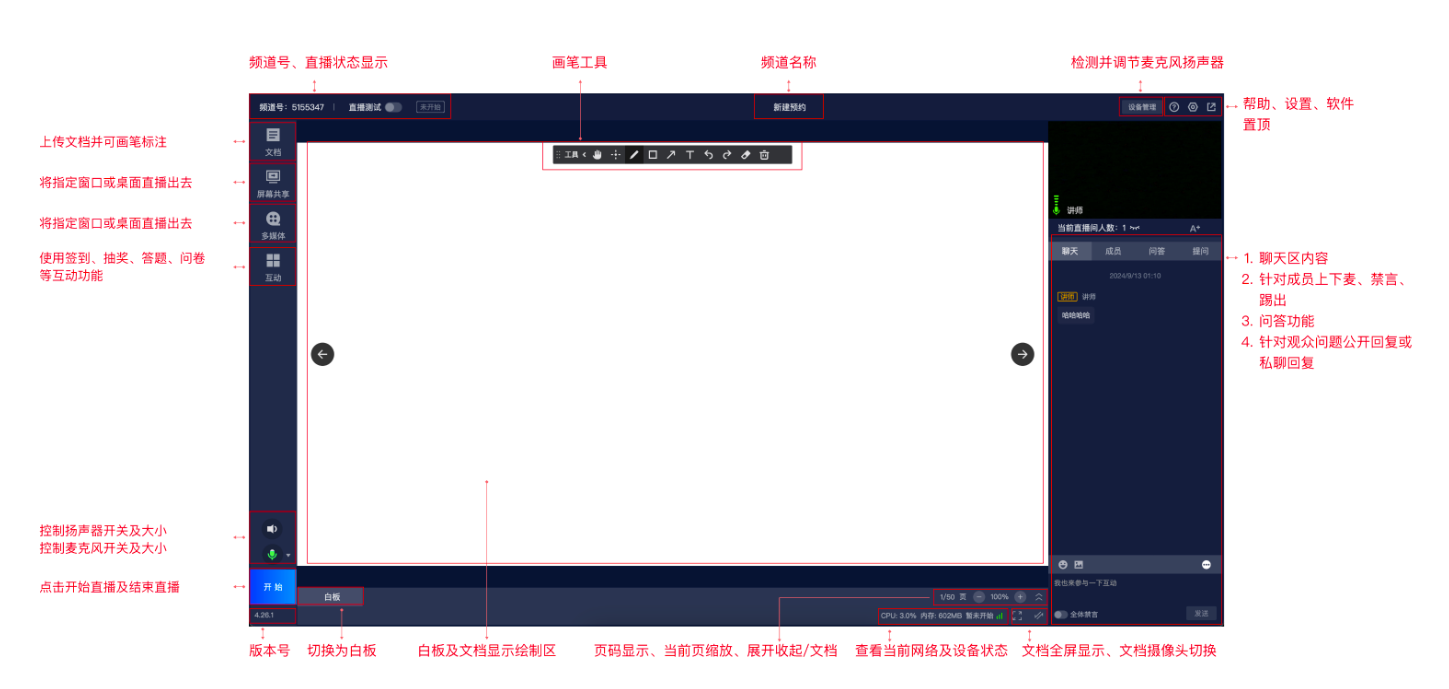
4. Mode Switching
- The client has up to three options for different usage methods.
| Mode | Applicable Scenarios |
|---|---|
| Live-only Mode | Suitable for scenarios without live mic connection, such as large events (mainly shot with HD cameras), HD screen recording teaching live streams, etc. |
| Live + Mic Connection Mode | For live streams that require audio/video mic connection calls while having a large audience of listeners. |
| Recording Mode (Not available in document + video templates) | For scenarios where live streaming is not needed, but video recording is done via the client. |
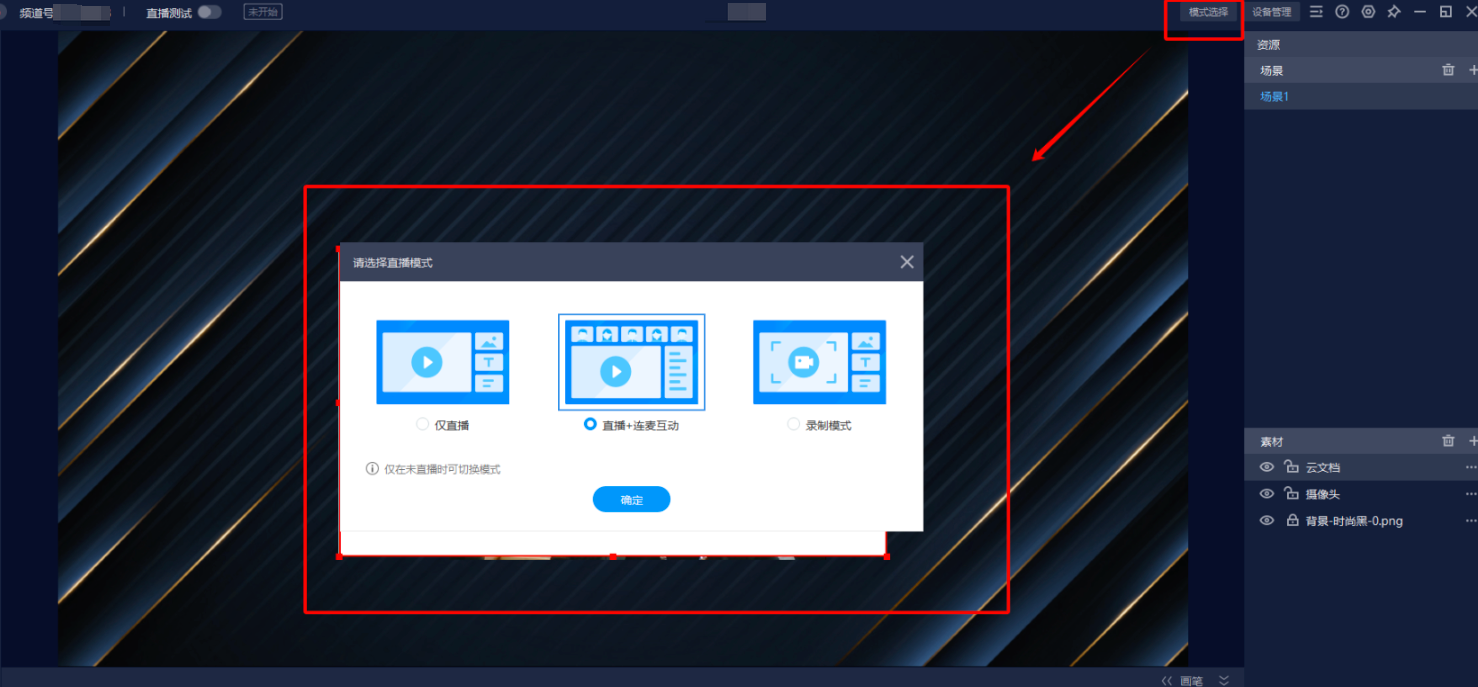
5. How to Perform Device Debugging
- Click the Device Debugging button at the top of the client. A dialog box will appear.
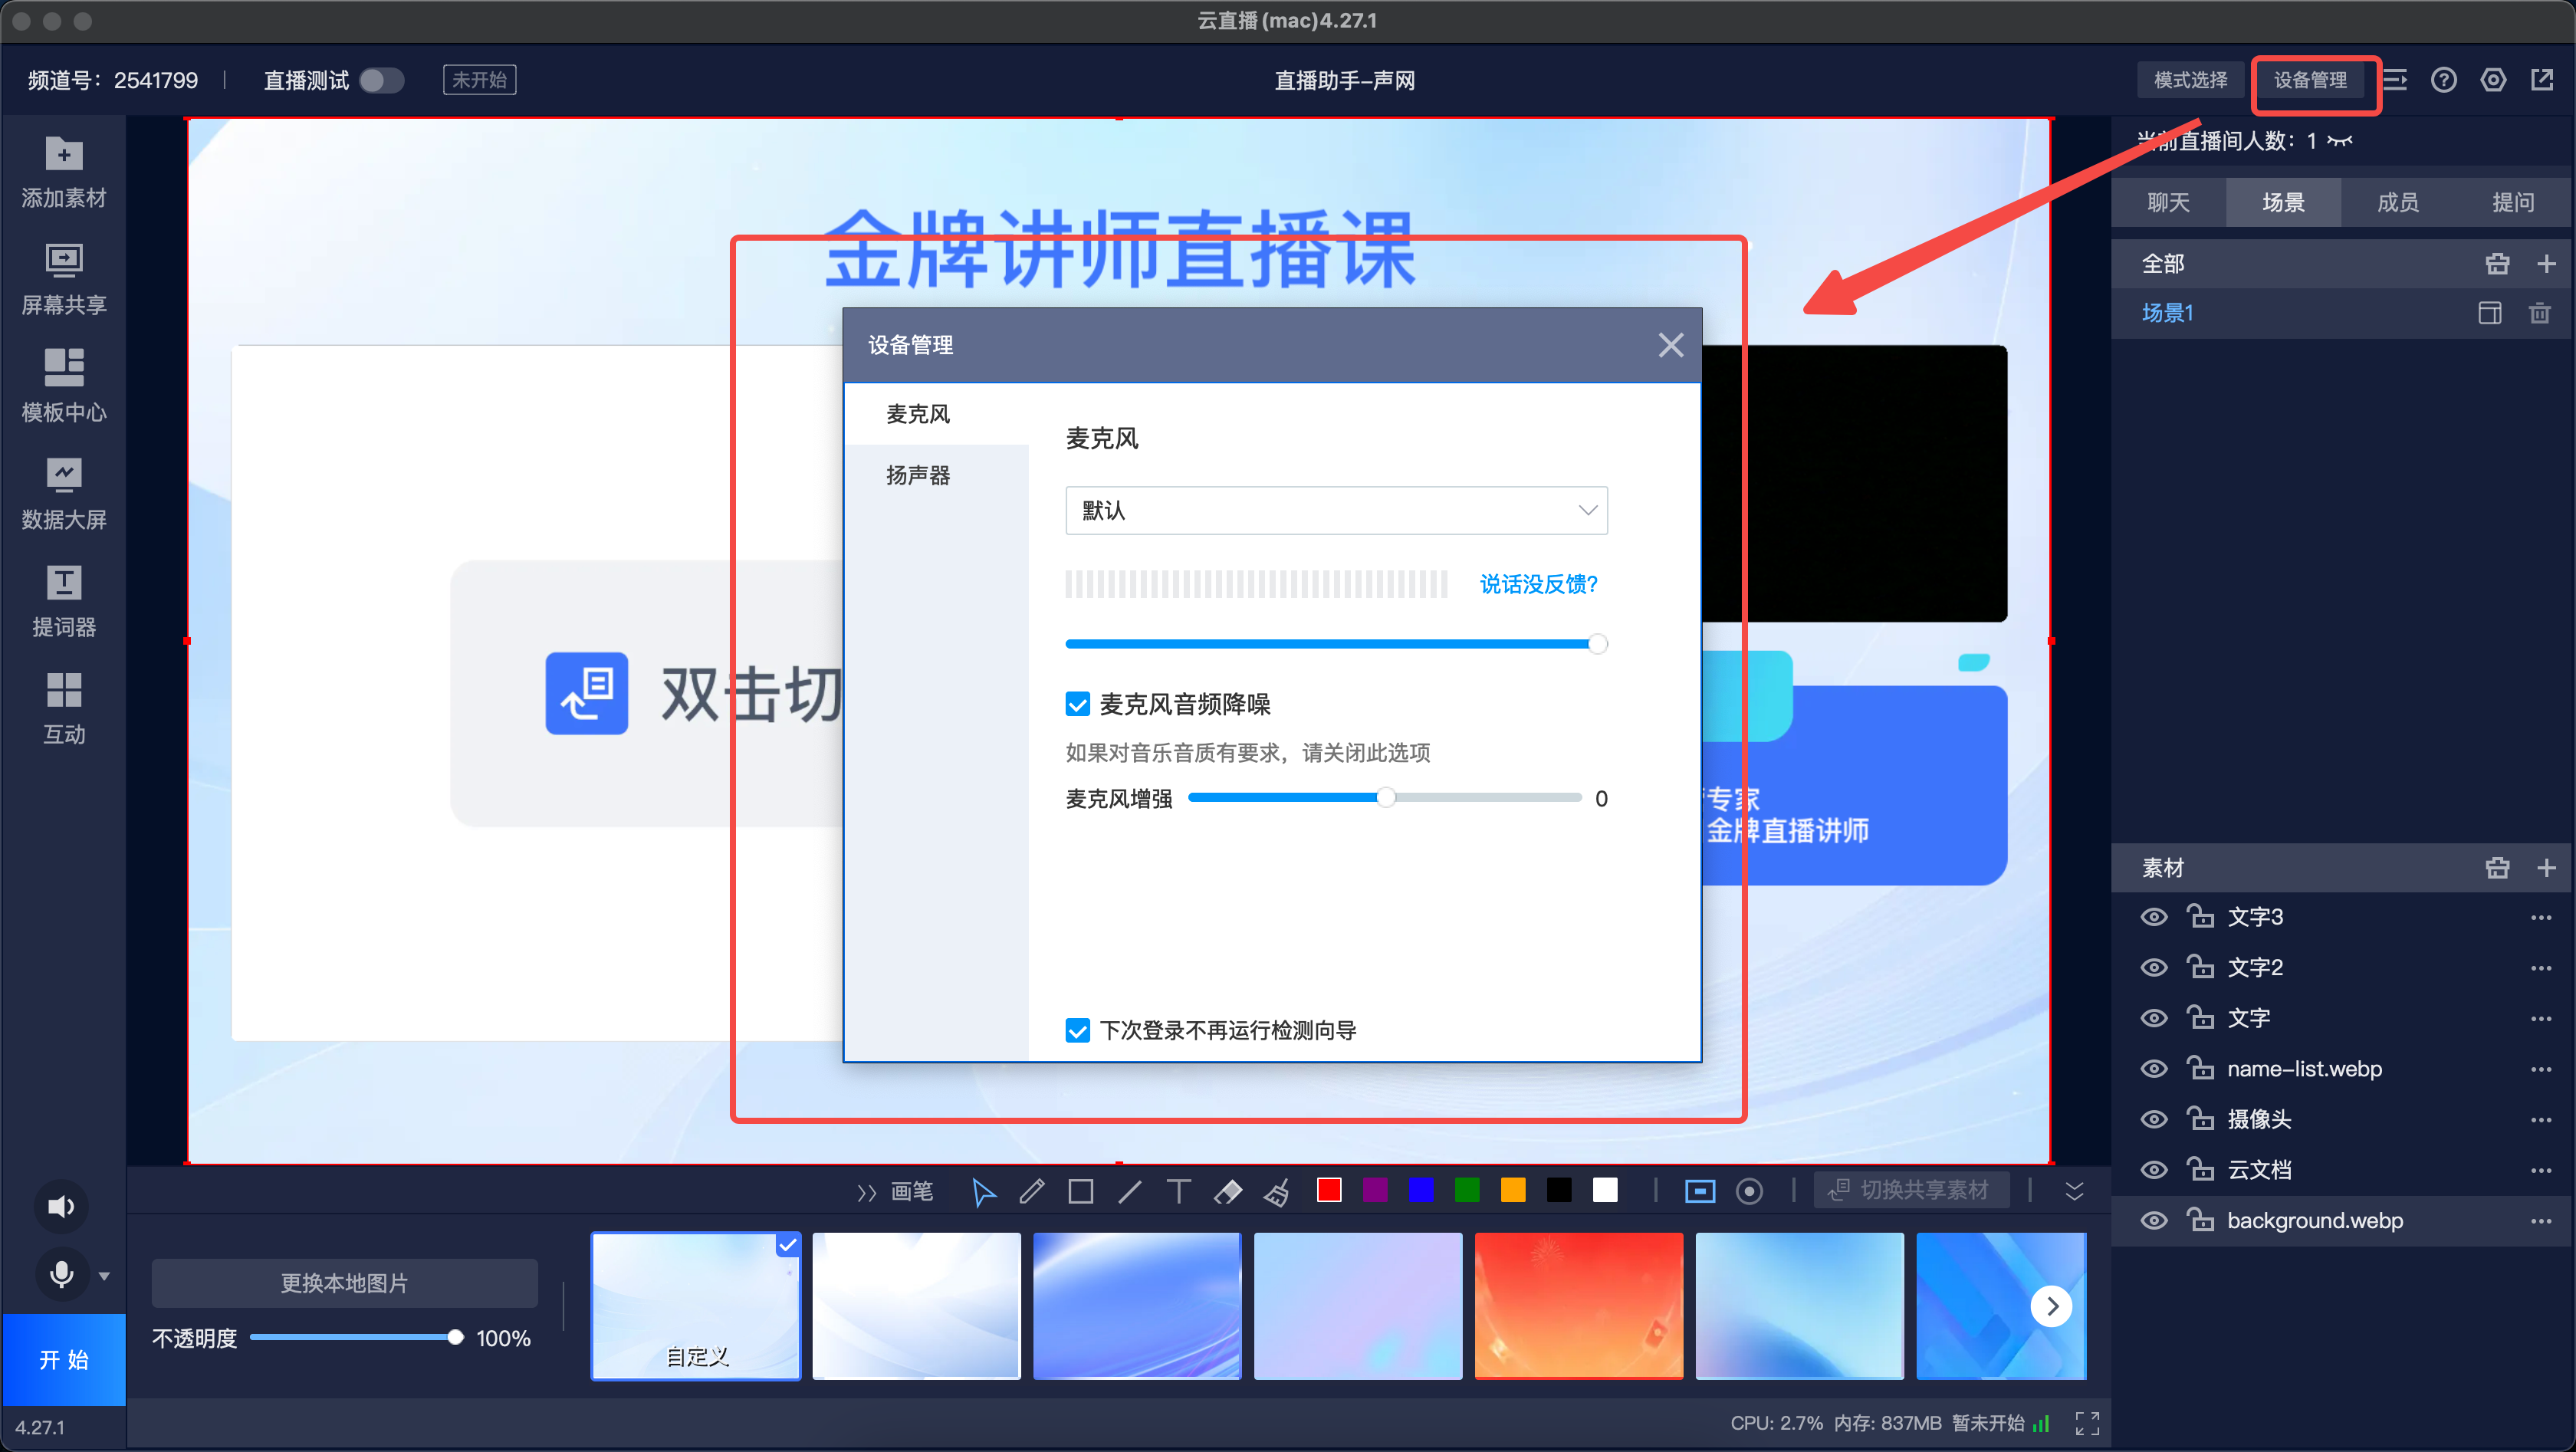
- Microphone
- When the microphone is working properly, a level bar will show movement while speaking. If it does not appear, try switching devices or modifying system settings.
- Adjusting the microphone volume will change the volume heard by the viewer.
- When external noise is high, increase the noise reduction level, but this may make the sound sharper and quieter. Please adjust appropriately.
- If the input sound is low, increase the microphone boost, but this may cause popping sounds. Please adjust appropriately.
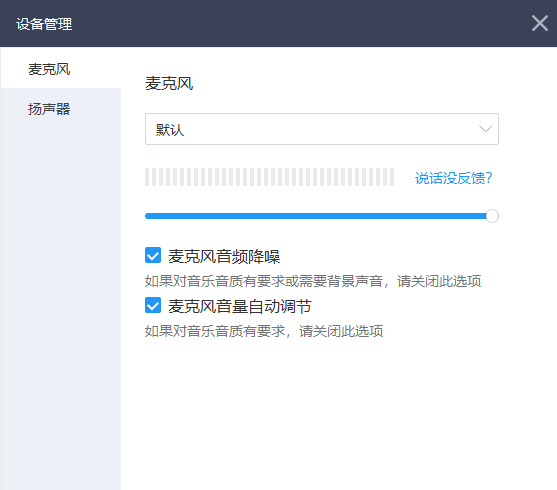
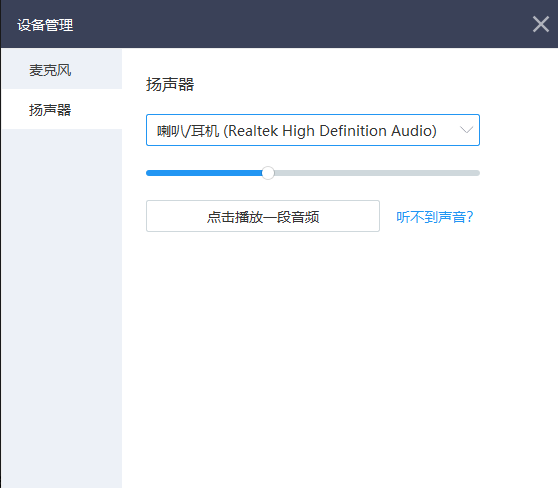
- Speaker
- Speaker test: Click to play audio. If you hear sound locally, the speaker is functioning normally; otherwise, switch devices or adjust system settings.
- Live streaming mode only (number of connected microphones is 0): Adjusting the speaker volume affects the system sound from the computer that the audience hears. For example, turning it down will reduce the volume of system sounds like music that the audience hears.
- Live streaming + connected microphone mode: Adjusting the speaker volume affects the local external playback volume but does not affect the sound heard by remote users. To allow remote users to hear the computer's system sound, enable the [Capture system sound] feature in the settings.
VI. How to Use the Documentation
- After uploading, all PPTs undergo transcoding. A small number of PPTs may have partial content compatibility issues after transcoding. Please refer to the recommendations for uploading PPTs.
- Under the pure video template, documents do not support animated PPT transcoding.
- Documents can be uploaded first in the management backend; the client does not need to re-upload and can directly apply them.
1. Video-Only Template
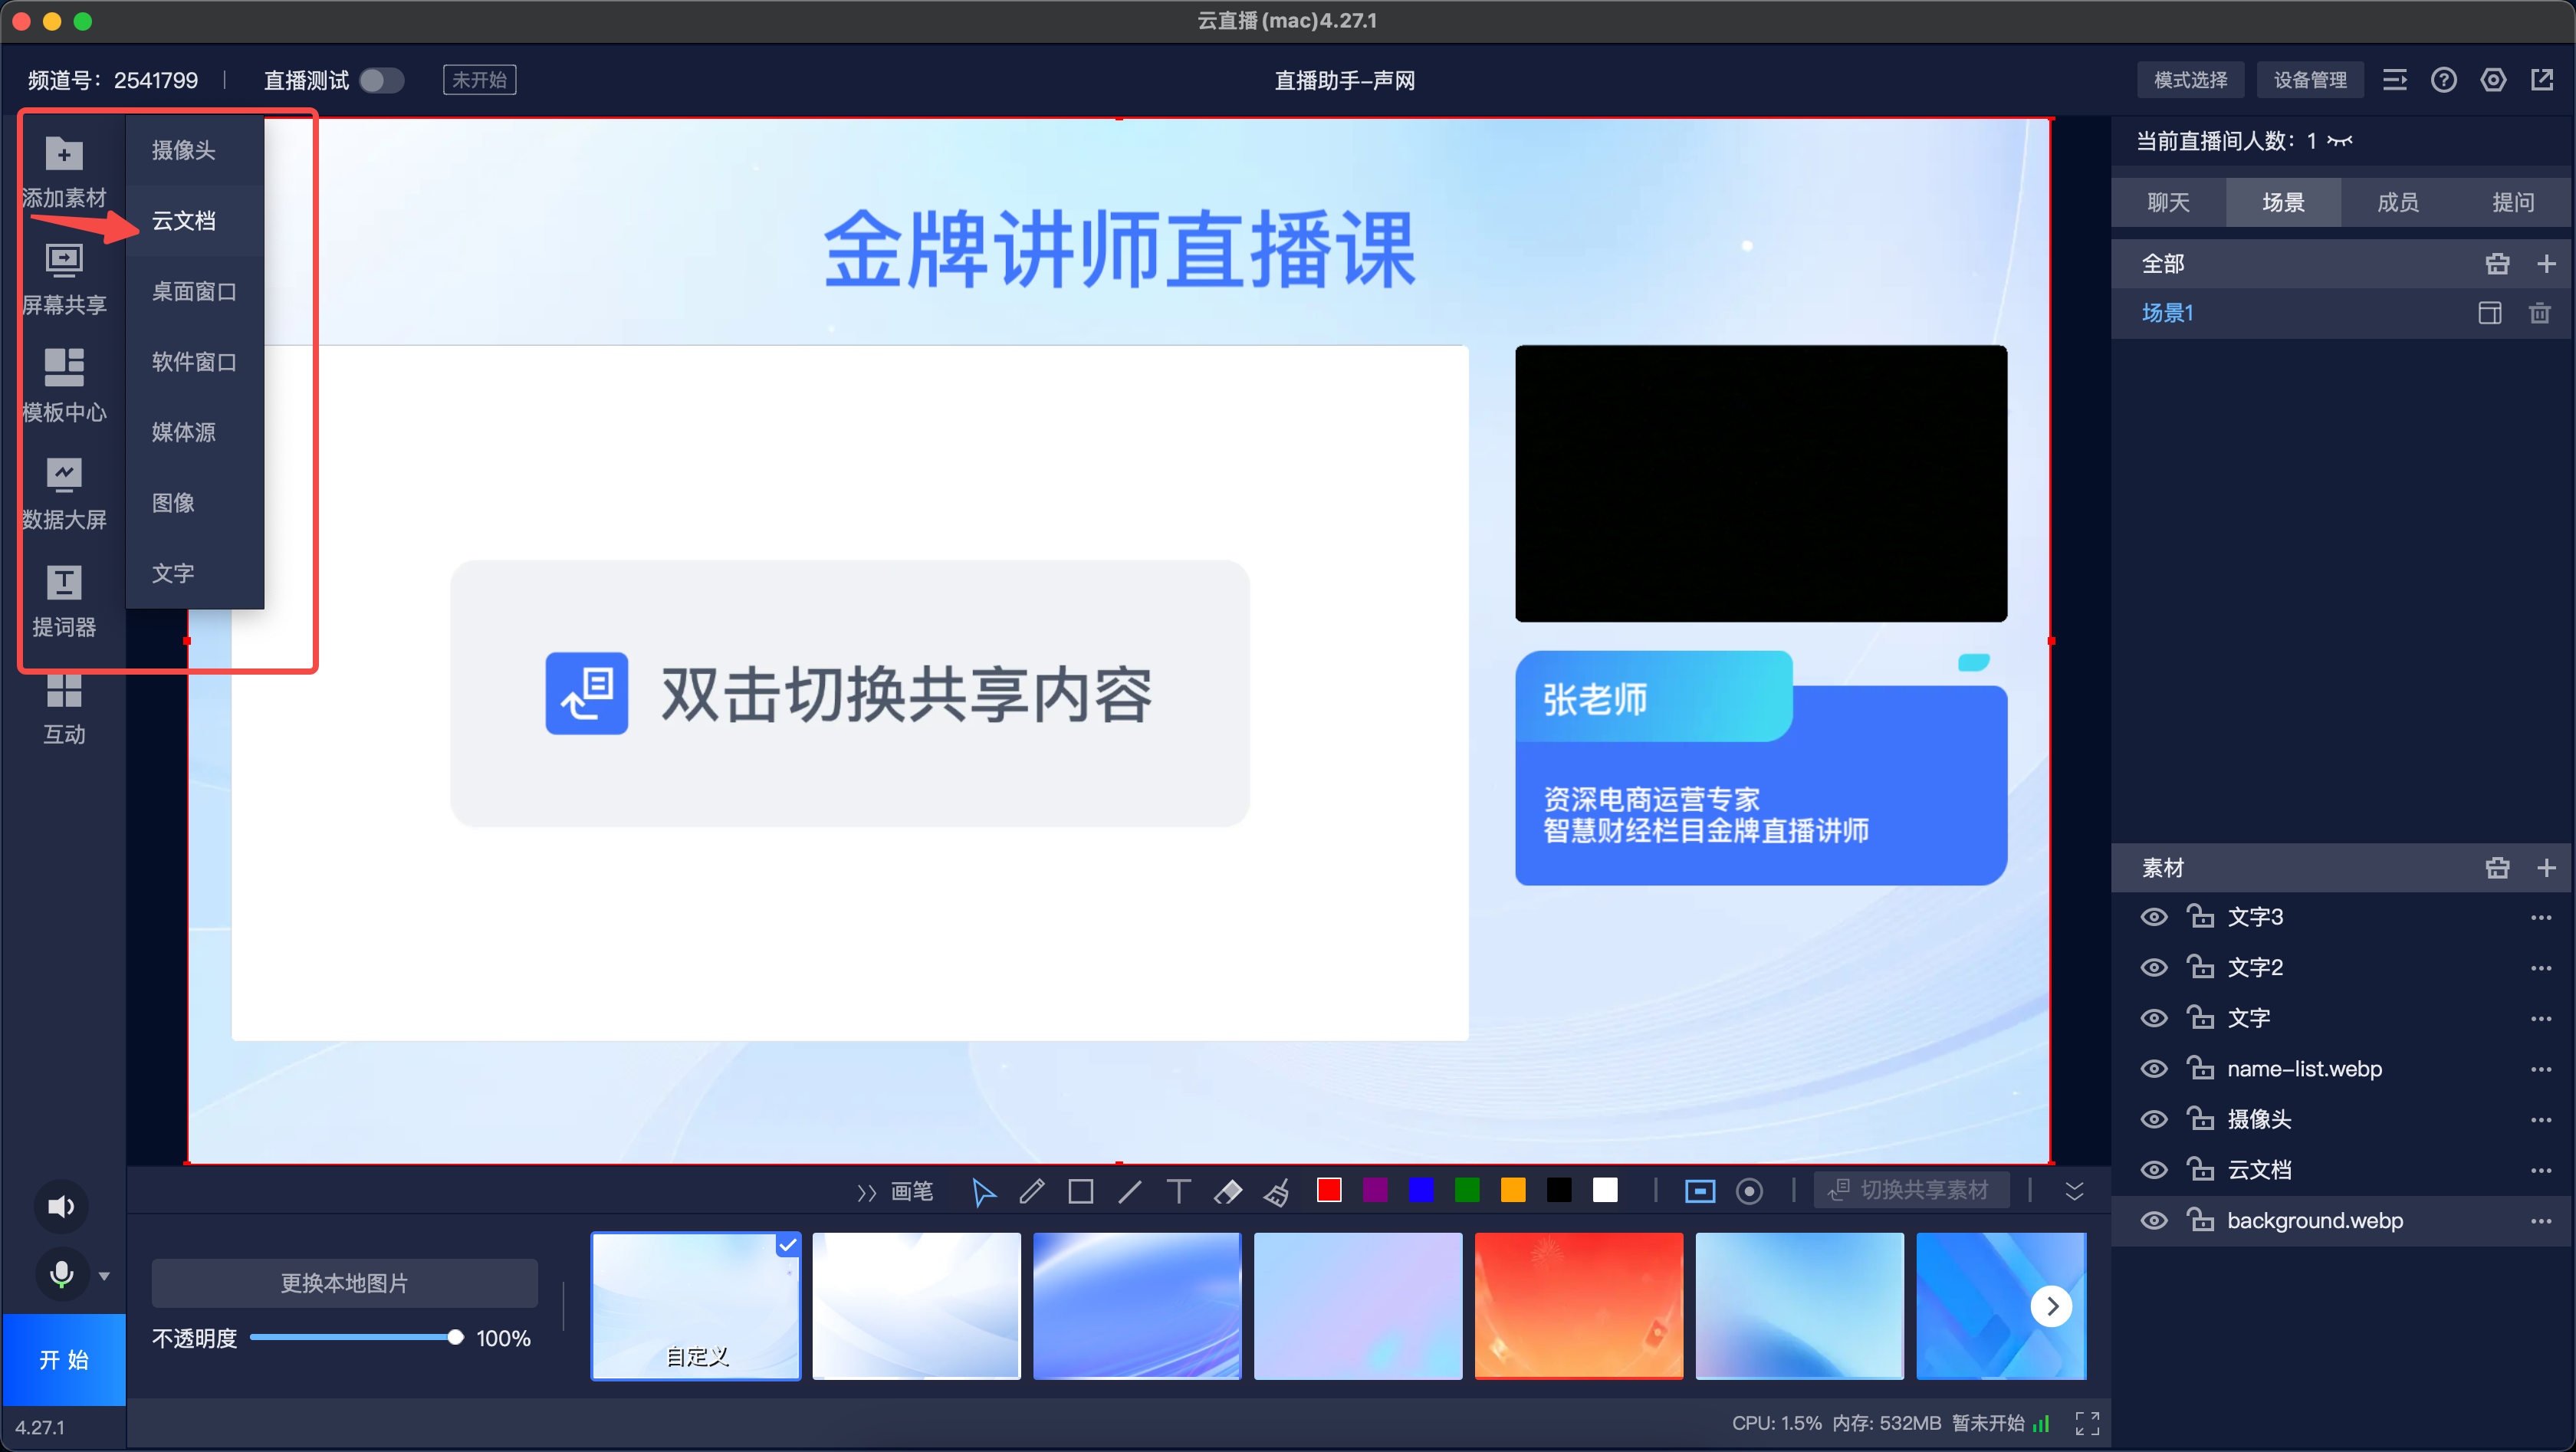
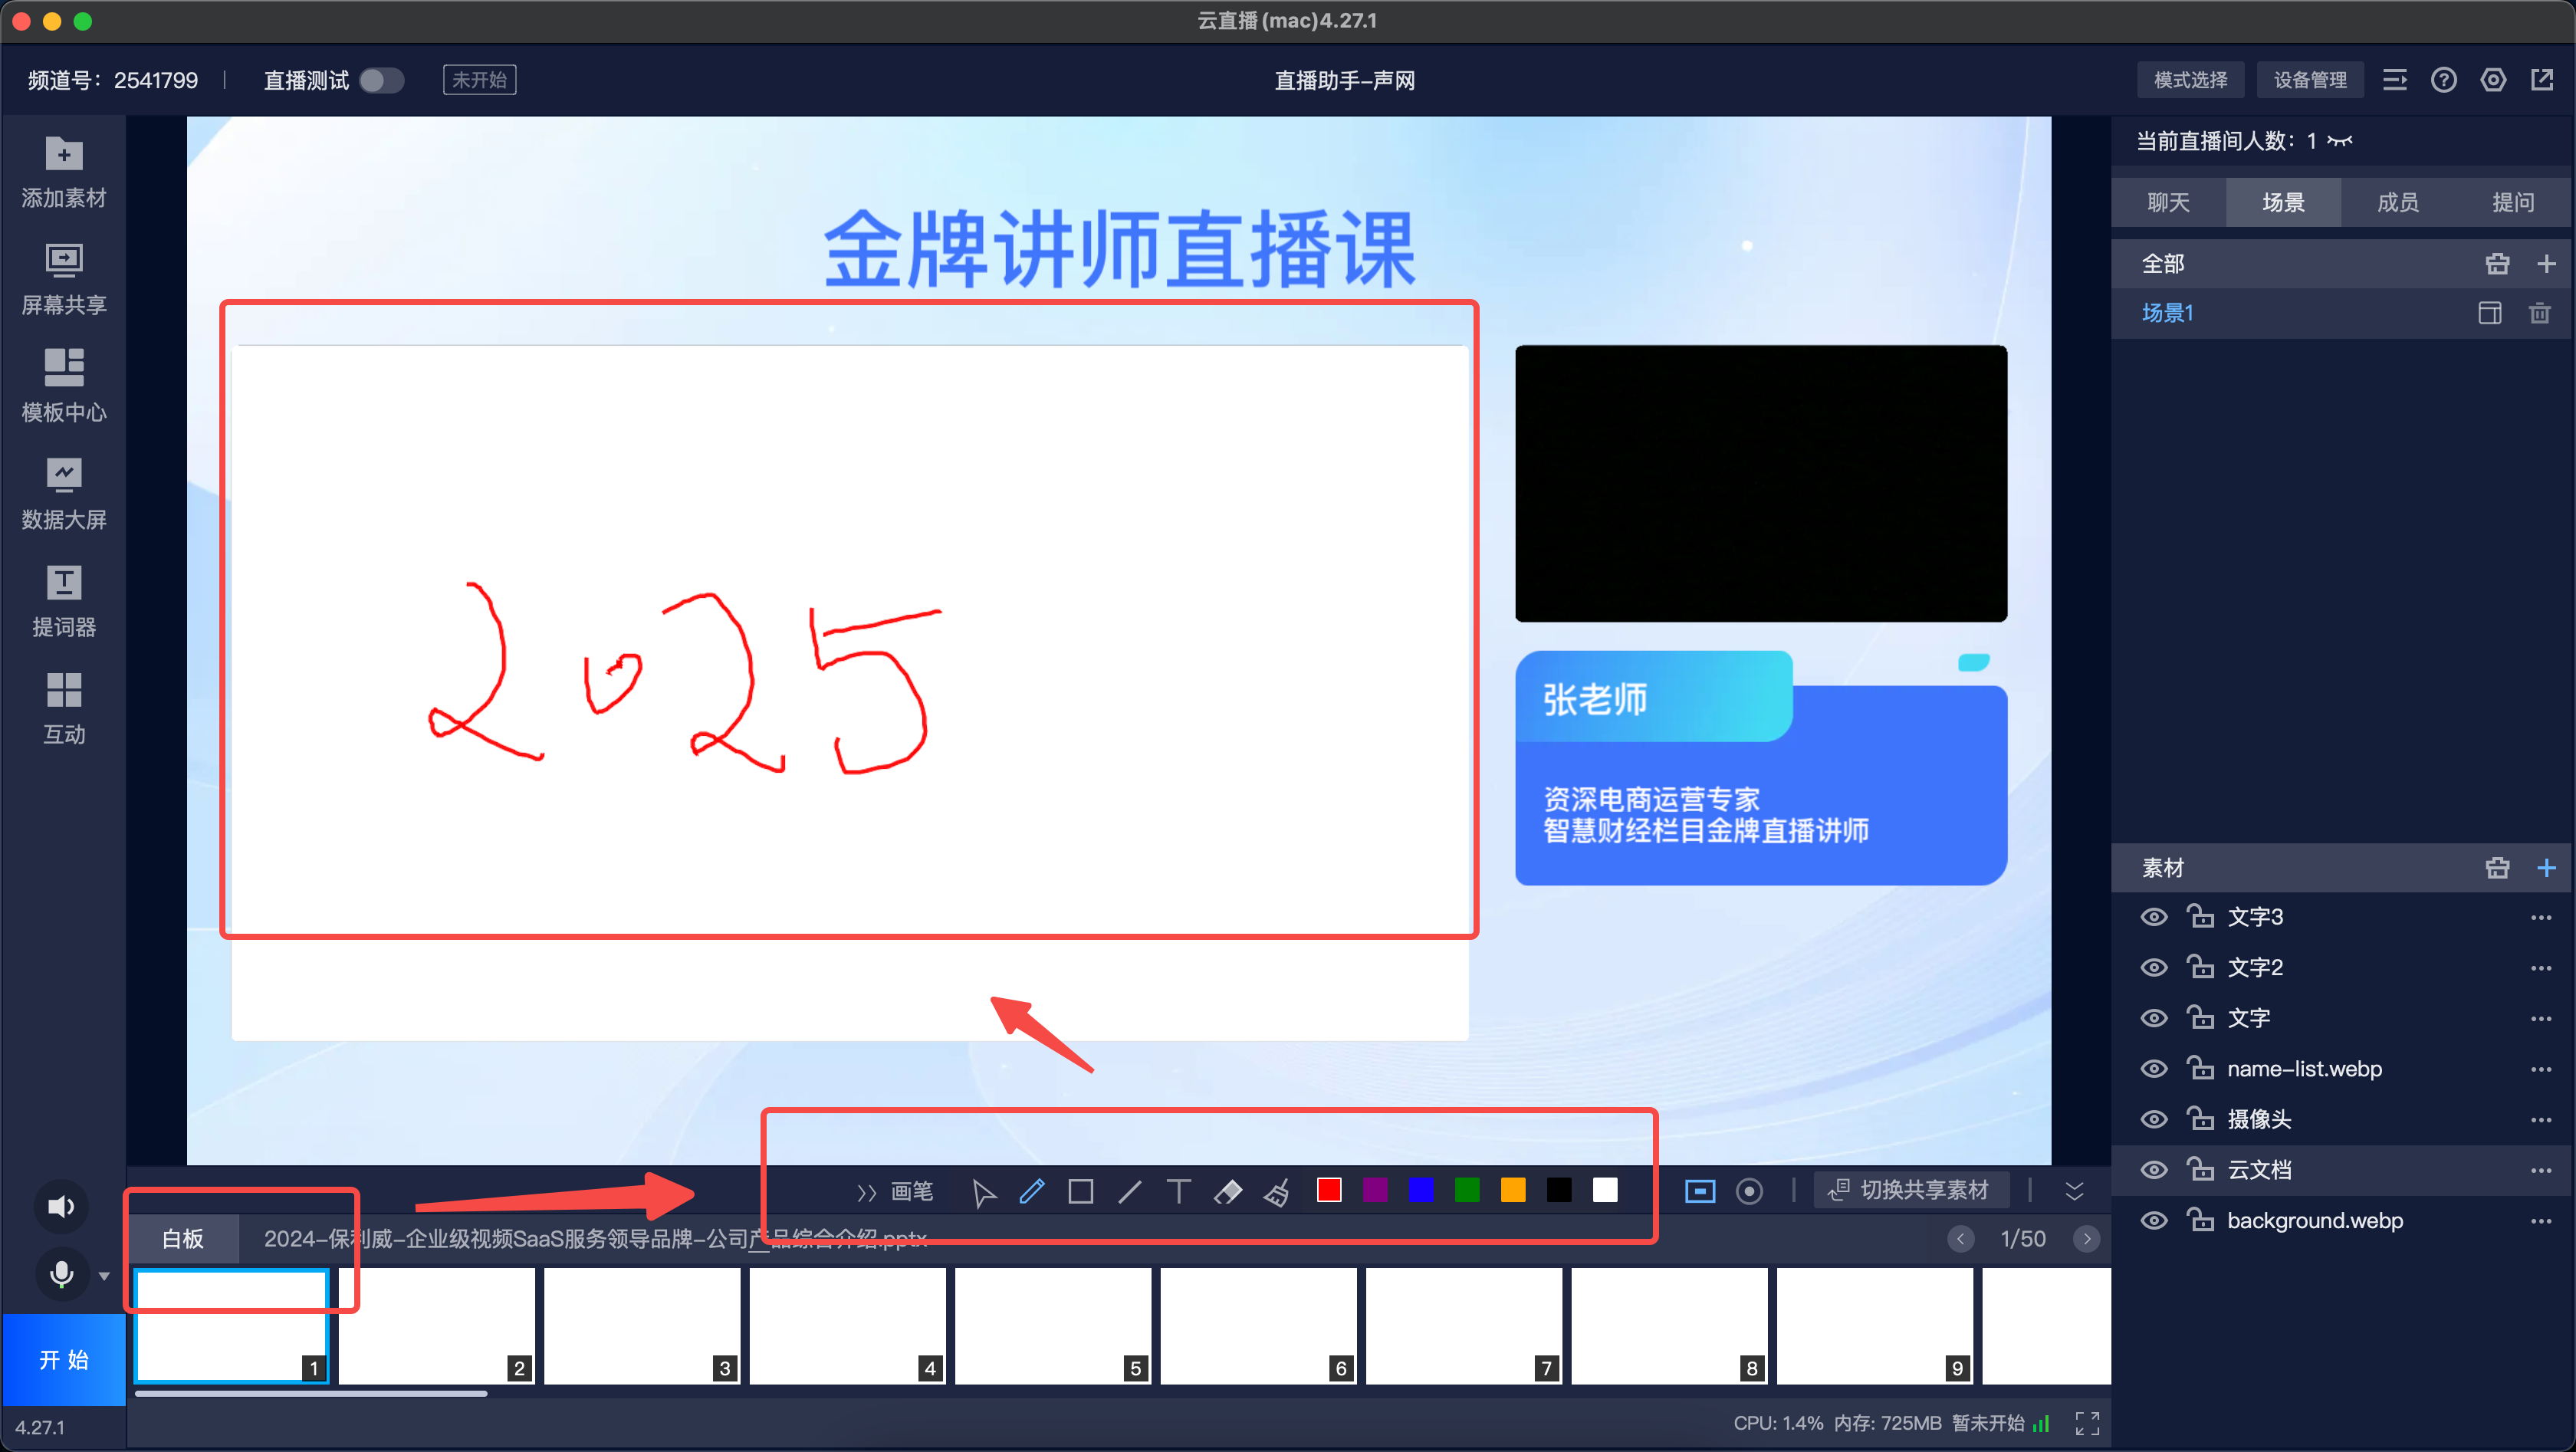
- To add a document, click Add Material > Cloud Document in the left function menu bar, or in the right resource function menu, go to Scene > All > Material + > Cloud Document. Both actions will open the document addition dialog. You can upload local document courseware to the server. After switching computers, log in to the same channel, and you can directly use the uploaded document courseware without re-uploading.
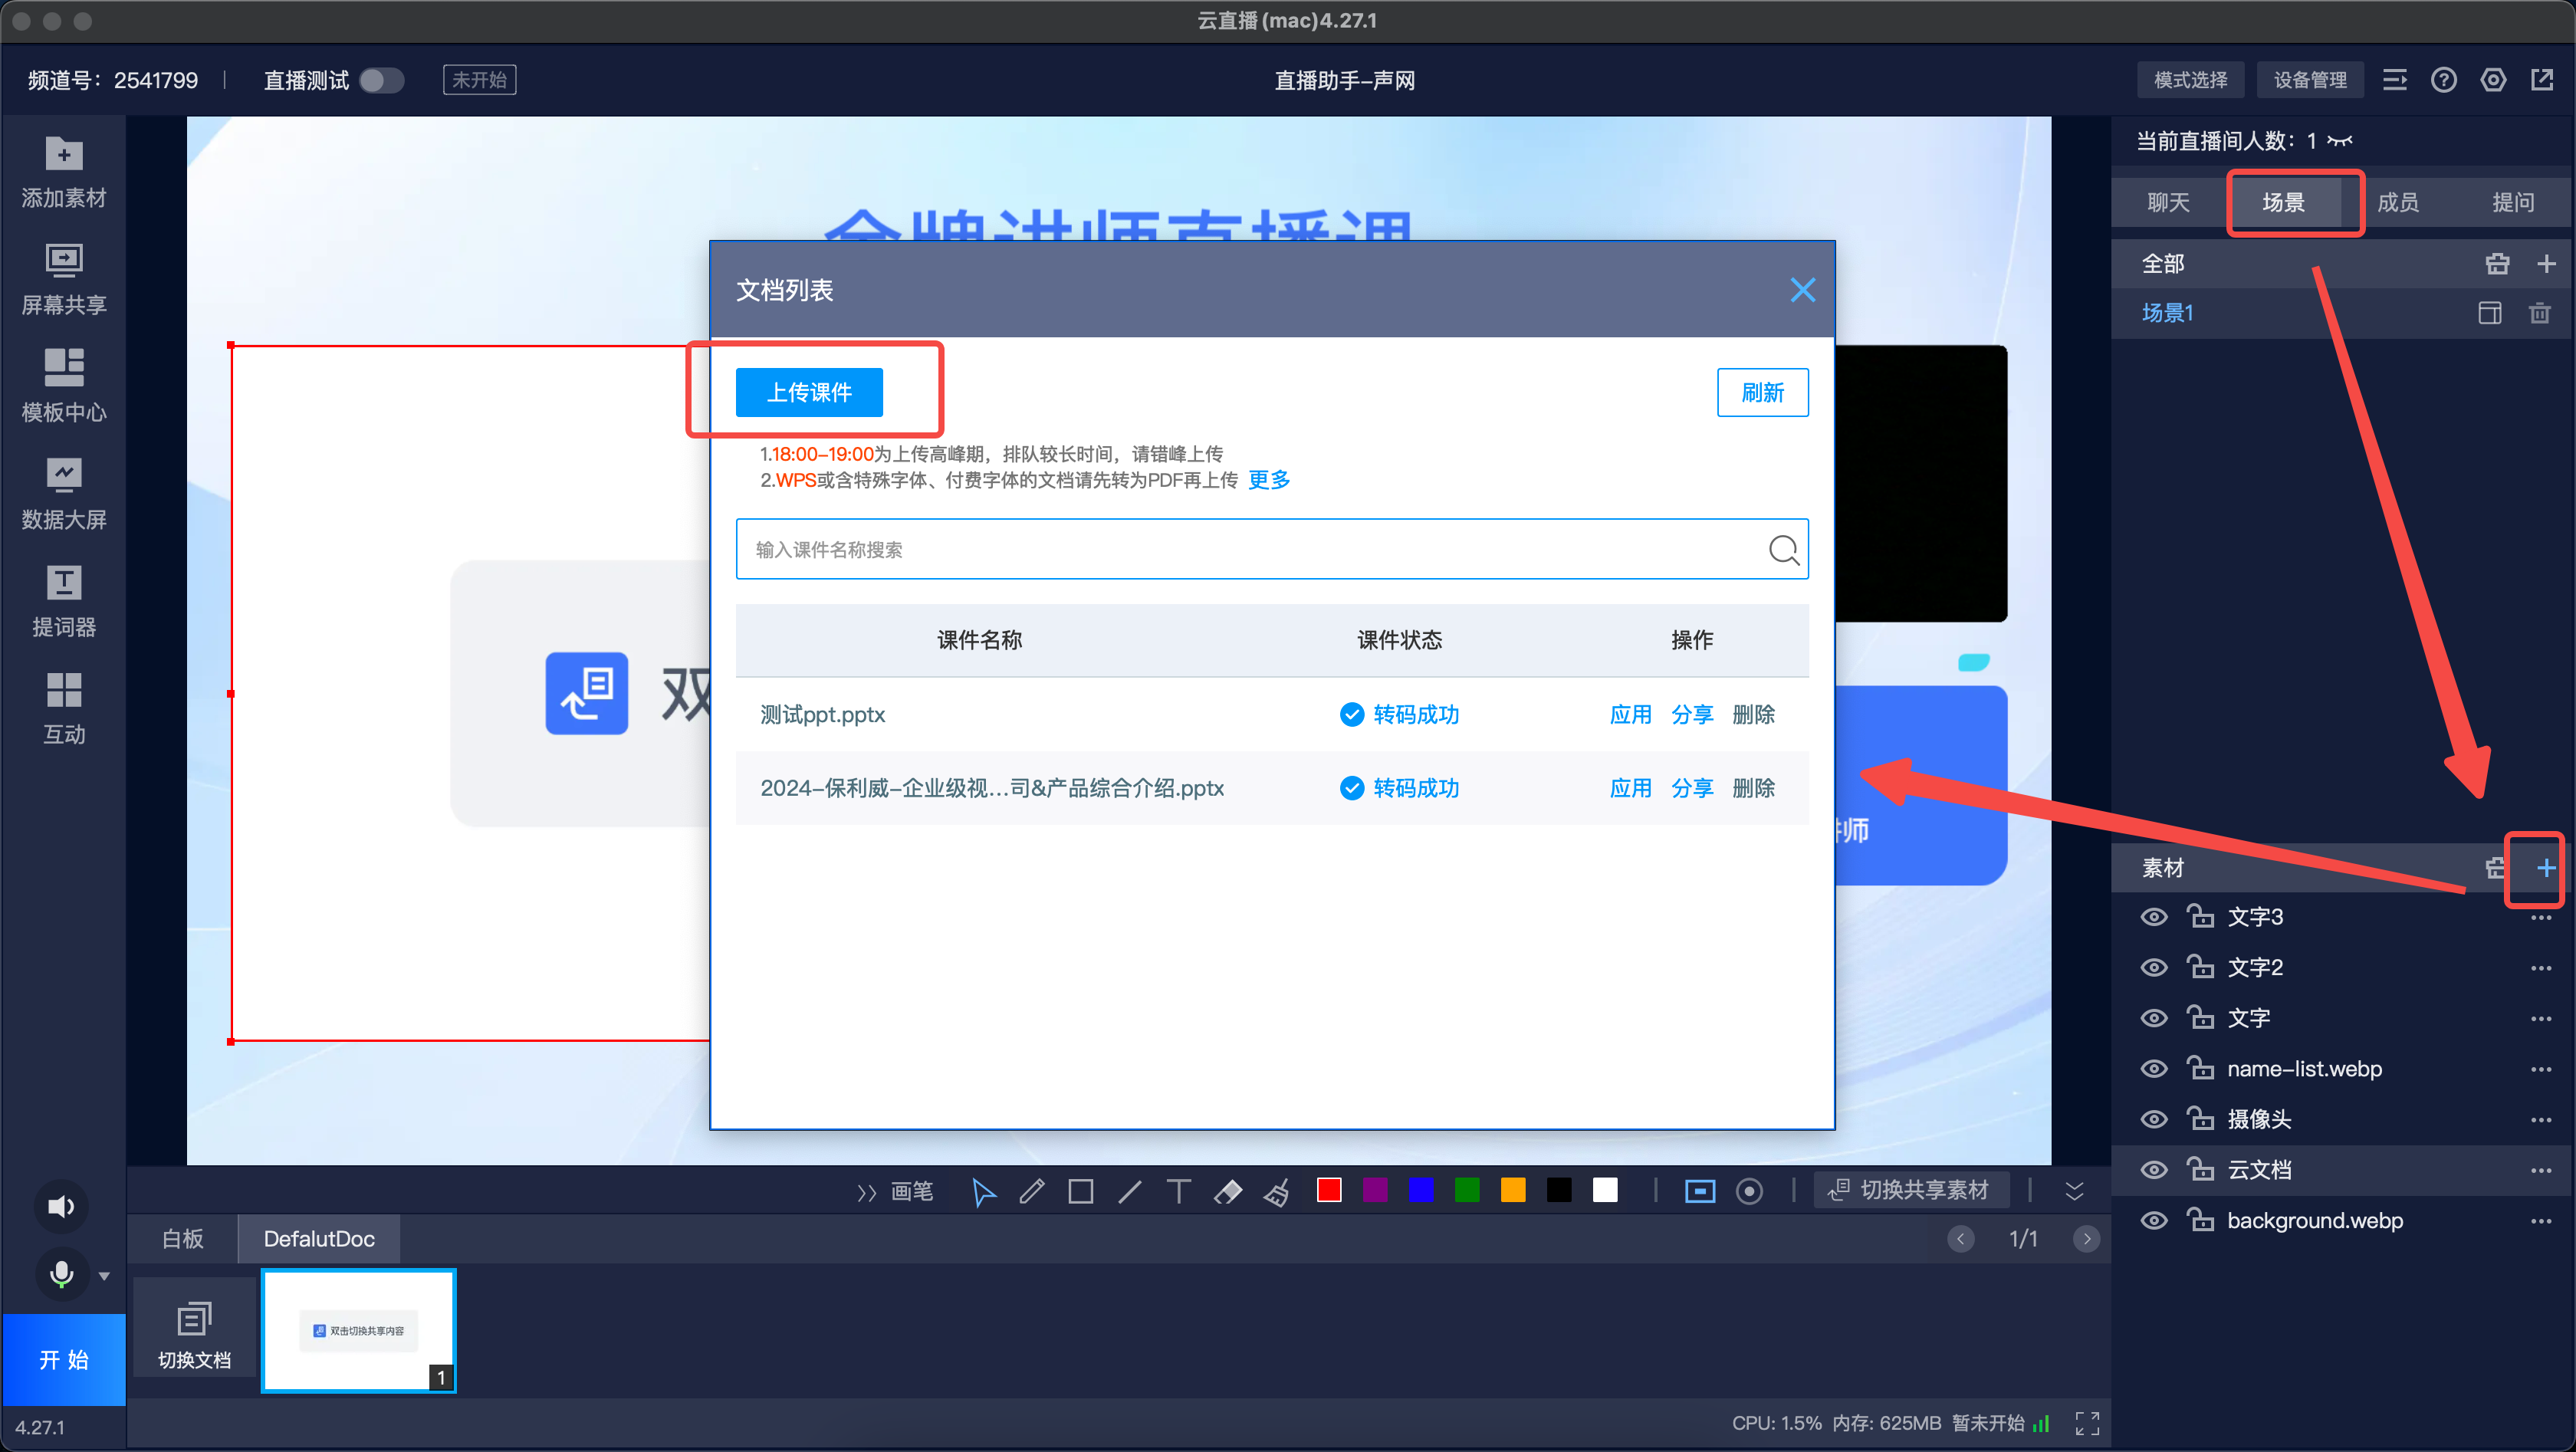
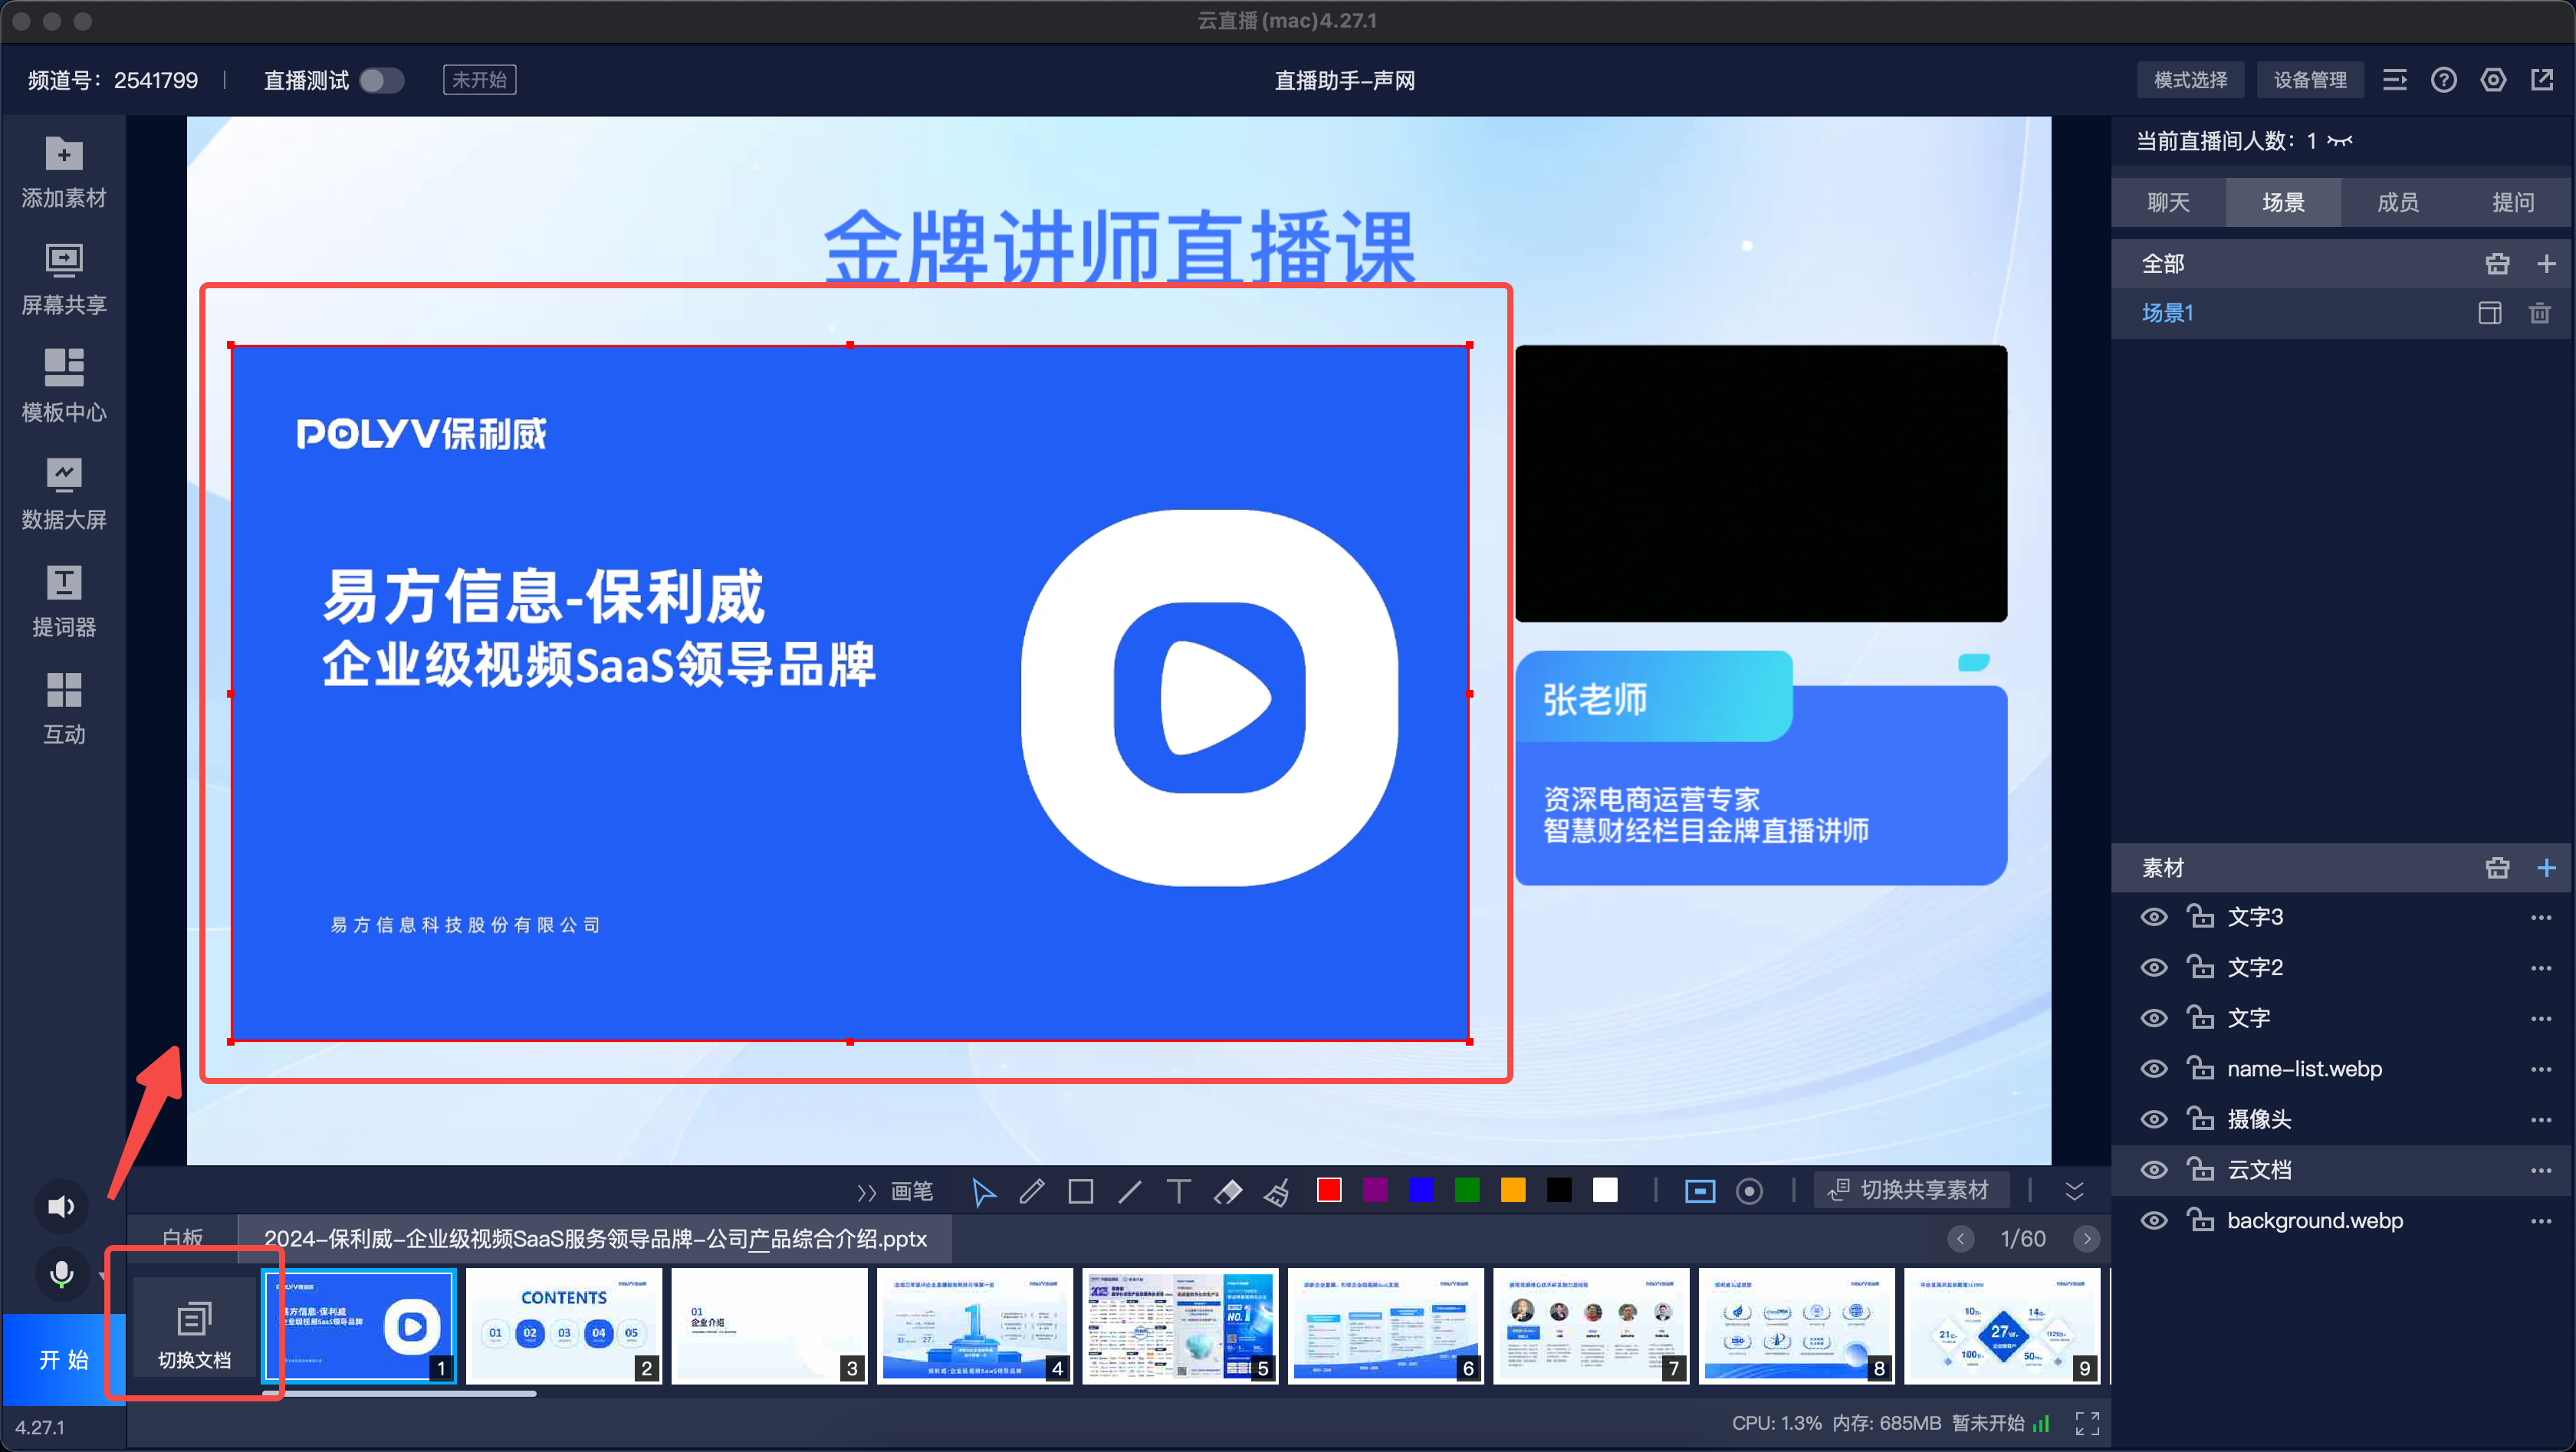
- After successfully uploading the courseware document, click "Apply" to display the document and its properties in the live preview area. Click [Switch Document] to open a pop-up for replacement.
- Supports dragging the horizontal scroll bar for quick page navigation, turning pages one at a time.
- Only one document material is supported per scene. After adding a document for the first time, it will automatically fit the full screen in the preview window.
- Switching Whiteboards
- After adding a document, click the [Whiteboard] button next to the document name.
- The system provides 50 whiteboards by default for use.
- Pen Annotation
- After adding a document as a material, select the document and click the [Pen] button to expand the pen tool, allowing you to draw lines and annotate on the document.
- Annotations will be recorded on each page of the document or whiteboard and will be captured and streamed in real time.
- Once the pen annotation feature is activated, the document material cannot be dragged or repositioned within the preview area. After collapsing the pen tool, you can drag the document material again.
2. Document + Video Template (Three-Panel Layout)
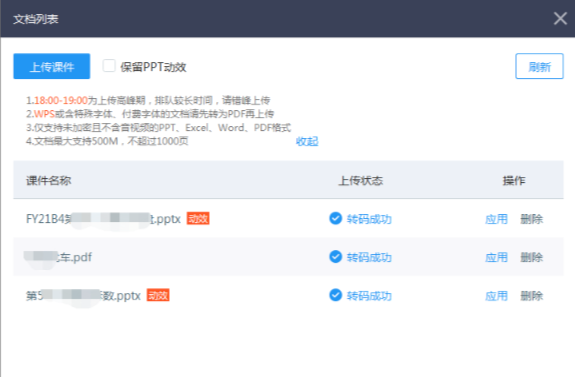
- To add a document, click the Document button in the left navigation bar. This will open a document selection pop-up window. Click Upload Courseware to upload a new local document.
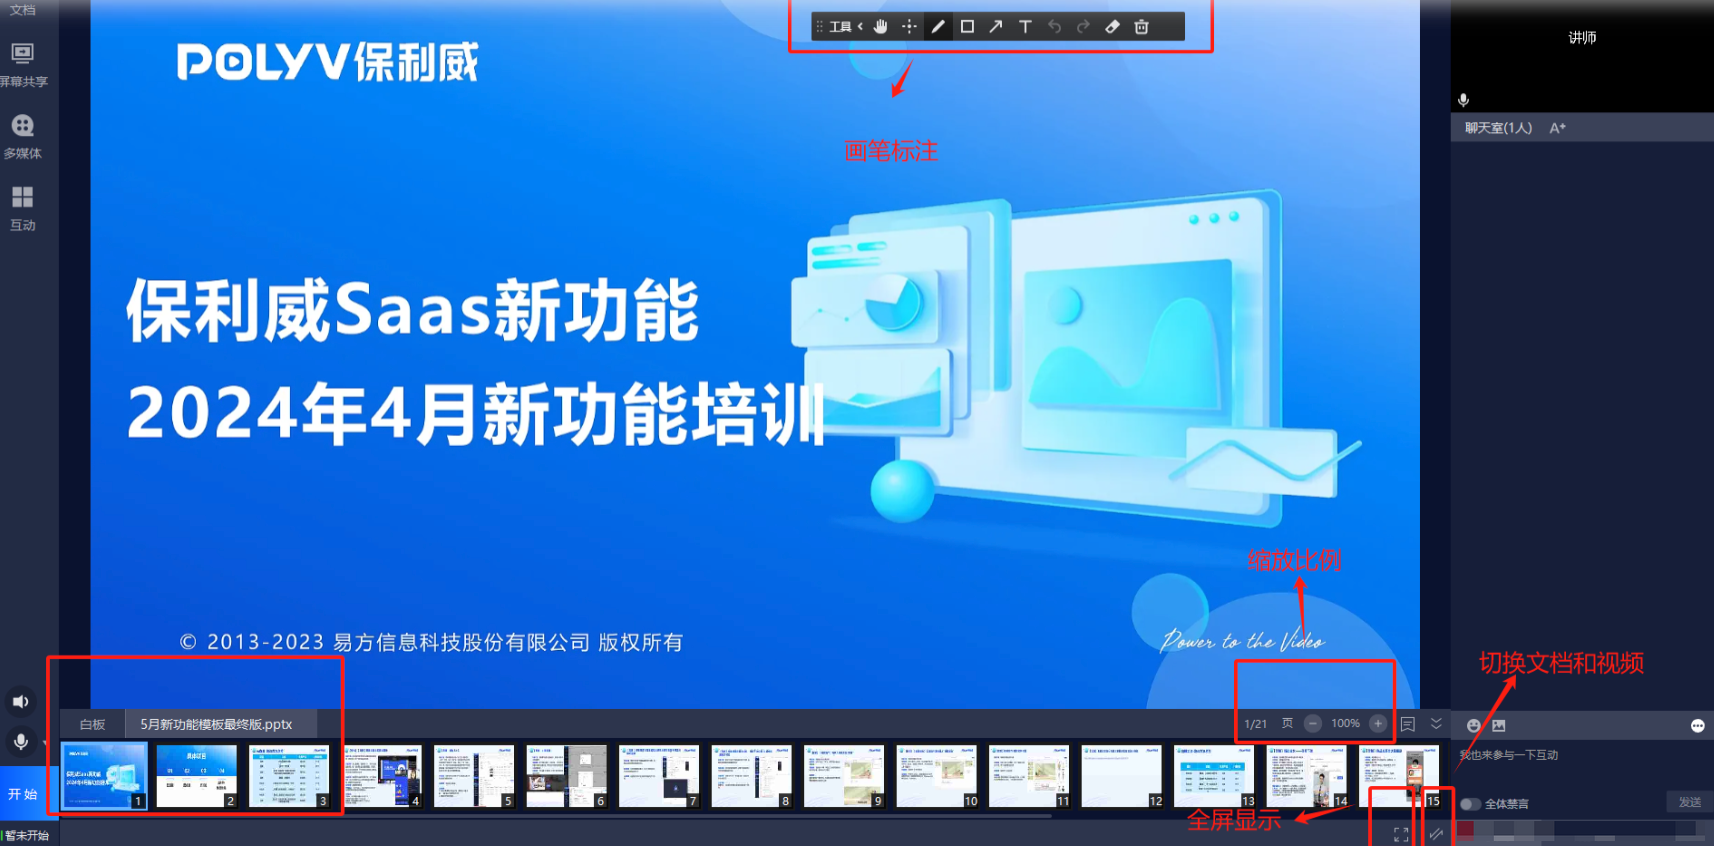
- Using the whiteboard: When the default software opens, the whiteboard feature is displayed immediately, with 50 whiteboards available by default.
- Switching between documents and the whiteboard: For documents that have already been added, a document name tab will appear on the right side of the whiteboard. Clicking this tab allows you to switch to another document.
- Document page navigation: Click the [Expand] button to display page navigation, enabling quick page turning to locate a specific whiteboard. Click again to collapse the navigation.
- Pen annotation: In the whiteboard or application document, you can annotate and write.
- Switching between documents and video: Click the [Switch] button to swap the positions of the document and video. Click again to restore the original layout.
- Full-screen document display: When the document is the main view, click the [Full Screen] button to maximize the document display. This is useful for scenarios where you need to project the document locally for a live audience. Press ESC to exit full-screen mode.
7. How to Screen Share
1. Document-Only Template
- Differences between screen sharing methods: The client provides three screen sharing methods (generally, "Desktop Live Streaming" is sufficient).
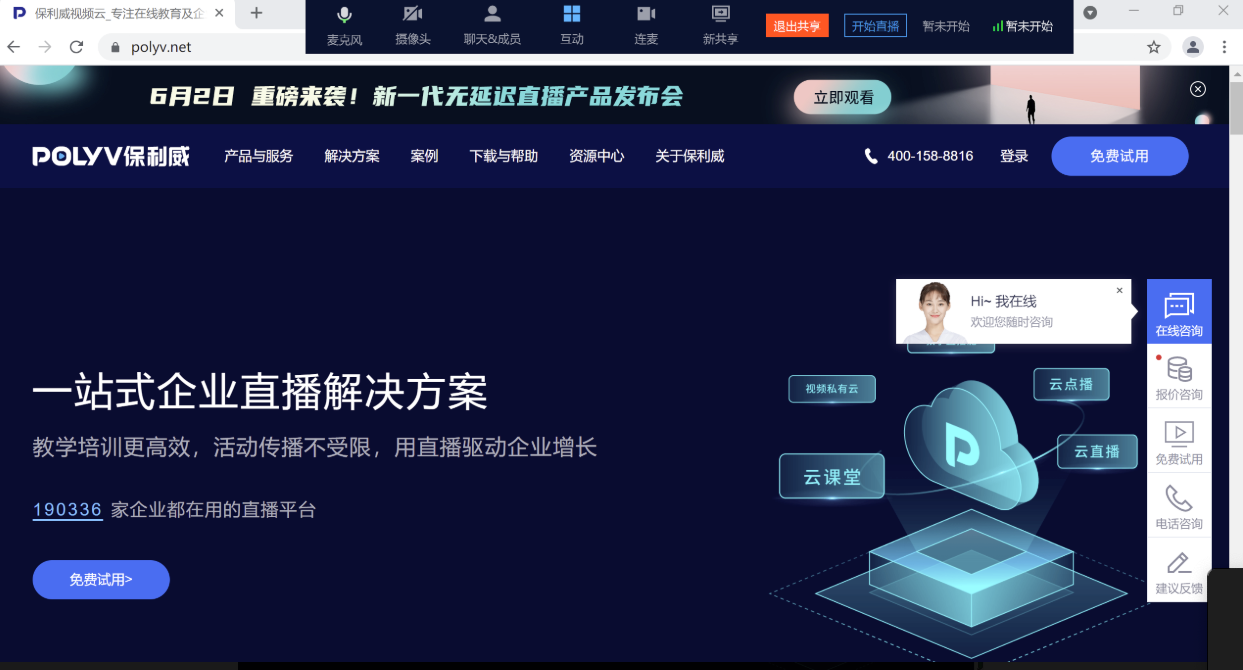
- Desktop Live Streaming: Suitable for most screen sharing live streaming scenarios. When enabled, the client interface collapses into a top toolbar. The host side will not experience a looping screen. More operations can be accessed via the top toolbar, such as turning on the camera, toggling the microphone, interacting with users, switching to share another screen, or switching to region sharing.
- Desktop Window: Suitable for multi-monitor setups. When enabled, it is similar to adding a document resource. The preview will automatically be full-screen and adaptive. You can adjust the position and size in the preview area.
- Software Window: Suitable for live streaming scenarios where only a specific software window needs to be shared without the entire desktop. When in use, the shared software must not be minimized; otherwise, the broadcasted software screen will be the last static frame before minimization.
- To switch to Desktop Live Streaming, click the Screen Share button in the left navigation bar and select Desktop Live Streaming. The client software will then collapse into a top toolbar style.
- To add a desktop window, click the Screen Share button in the left navigation bar and select Desktop Window, or in the right resource bar, go to Scene -> "All" -> "Material" + -> Desktop Window. This will add the shared desktop screen, which will automatically be set to full-screen fit within the preview window by default. After adding, you can modify it to another screen (if multiple monitors are available) in the properties area.
- To add a software window, click the Screen Share button in the left navigation bar and select Software Window, or in the right resource bar, go to Scene -> "All" -> "Material" + -> Software Window. This will open a software window selection dialog, where you can choose the software window you want to share.
2. Document + Video Template
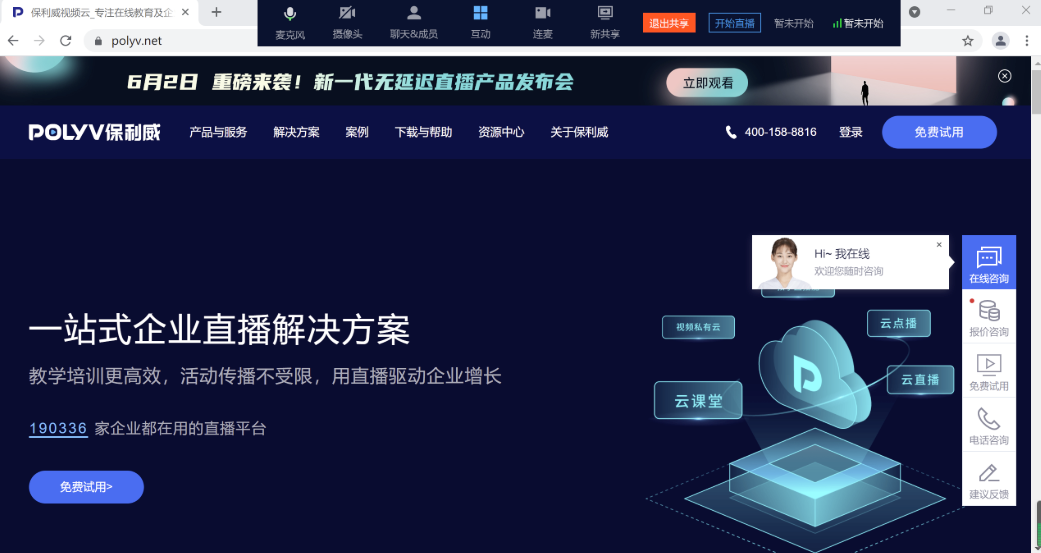
- Use screen sharing. Click the Screen Sharing button in the left-side function navigation, and the client software will collapse into a top function bar style. More operations can be accessed through the top function bar, such as turning on the camera, toggling the microphone, displaying chat & members, using interactions, enabling co-hosting, and switching sharing.
8. How to Insert Multimedia
- Adding Multimedia
- You can click the Multimedia button in the left function navigation, or in the right resource function bar, go to Scene -> "All" -> "Material" + -> Multimedia (only supported in pure video templates). A system dialog will then appear, guiding you to select the multimedia video to play.
- The added multimedia will automatically fill the preview window in full-screen adaptive mode. Once the multimedia is successfully added, the multimedia property operation panel will appear.
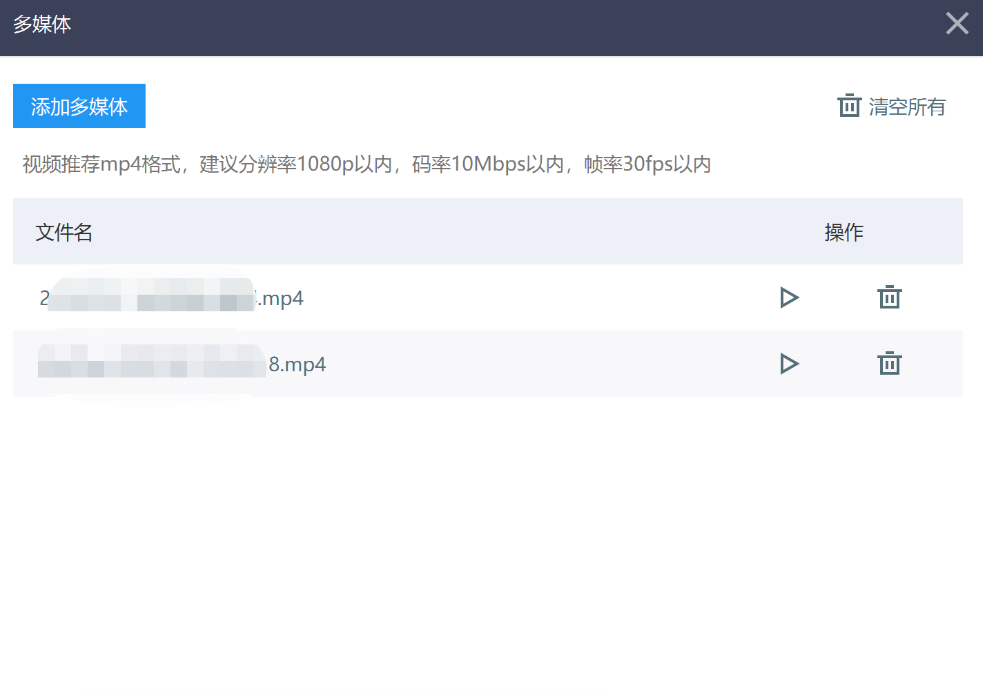
- Switch Media: After adding a multimedia video, click Switch Media to replace the currently playing multimedia video with a different one.
- Media Loop Modes: Options include Single Loop, Sequential Play, Loop Play, and No Loop (default).
- Local Playback: When playing multimedia locally, the audio will not be output to the host who is currently streaming, to prevent echo. If the host needs to hear the multimedia audio locally, click Local Mute to disable local muting. Ensure that after disabling local muting, no echo occurs on the audience side.
- Recommended Media Specifications: The bitrate of the inserted multimedia file should not exceed 10 Mbps, resolution should not exceed 1920 x 1080, and frame rate should not exceed 30 fps. Before starting the stream, use a video compression tool to process the file before adding it, to avoid streaming abnormalities caused by insufficient computer performance.
9. How to Connect with the Audience via Co-hosting
- The co-hosting feature is only available in the Live + Co-hosting mode. Please ensure that the number of co-hosting participants in the channel created in the backend is greater than 0.
- For the supported platforms, the client must select the Live + Co-hosting mode. The co-hosting feature can only be enabled after the live broadcast has started and is only supported in Scenario 1. See the table below for supported platforms.
| Platform | Version |
|---|---|
| Web | Supports Chrome 60 and above Supports Safari 11 and above Supports Firefox 56 and above Supports Opera 50 and above Supports Edge browser 79 and above Supports QQ Browser 10 and above Supports 360 Safe Browser 10 and above Supports 360 Speed Browser 12 and above |
| Android | Supports Android 4.1 and above |
| iOS | Supports iPhone or iPad with iOS 9.0 and above |
| Windows | Supports Windows 7 and above |
- How to Enable and Disable Co-hosting
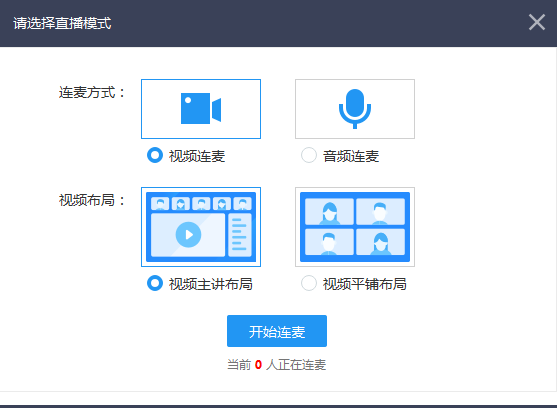
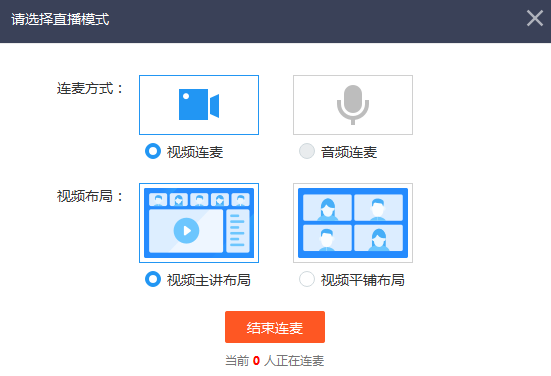
- Start Co-hosting: After the live stream begins, click the [Co-hosting] button in the left toolbar. A co-hosting dialog box appears. Click [Start Co-hosting]; the button turns red and displays [End Co-hosting].
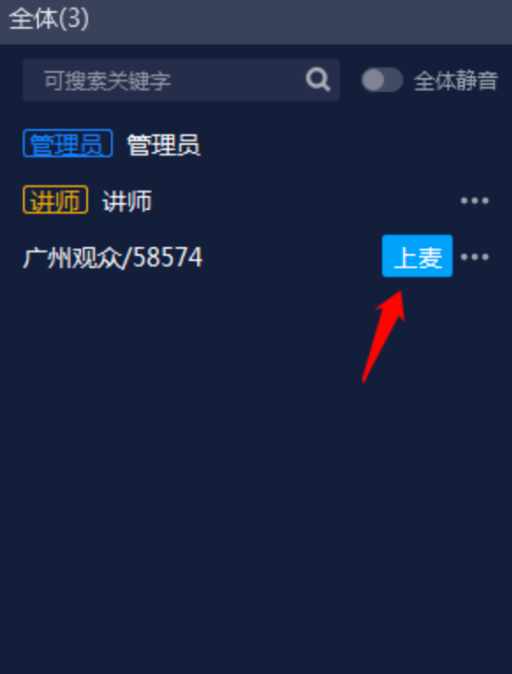
- Audience Request: The audience side displays a co-hosting request feature. After a user submits a request, the [Go on Stage] button appears in the member management panel on the right.
- Co-hosting Operation: Click the [Go on Stage] button to start an audio/video call with the audience member.
- Co-hosting Continuation: Closing the co-hosting pop-up does not interrupt the co-hosting session. Only clicking [End Co-hosting] will terminate all calls.
- Change the method of co-hosting
- Fixed co-hosting method: Once co-hosting starts, the method cannot be changed; the default is video co-hosting.
- Modifying the co-hosting method: To switch to audio co-hosting, the current co-hosting session must be ended first.
- Audio co-hosting applicable scenarios: Suitable for viewers who do not need to show their faces or have poor network conditions.
- Change the video layout
- Local screen projection layout: To allow offline viewers to see equally sized co-hosting screens, switch the video layout to the tiled layout.
- Does not affect the online layout: This operation does not affect the screen layout for online viewers.
- Modifying the online layout: To adjust the screen layout for online viewers, go to [Settings] - [Other Settings] - [Stream Mixing Layout] to make changes.
10. How to Manage Members
- In live-only mode, members can be muted or removed.
- In live + co-host mode, members can be muted, removed, have their microphone or camera toggled (for users already connected), be taken off stage, granted/revoked presenter permissions, granted/revoked drawing permissions, set as the primary view, or globally muted.
- Special members — instructors, teaching assistants, administrators, and guests — are designated as special roles with a unique title identifier. They cannot be muted or removed.
- Audience members are regular members and can be managed by instructors, teaching assistants, administrators, and guests.
- Search for members: Enter a keyword from a member's nickname and click the search button to find a list of members whose nicknames contain the keyword. The host can then manage them further.
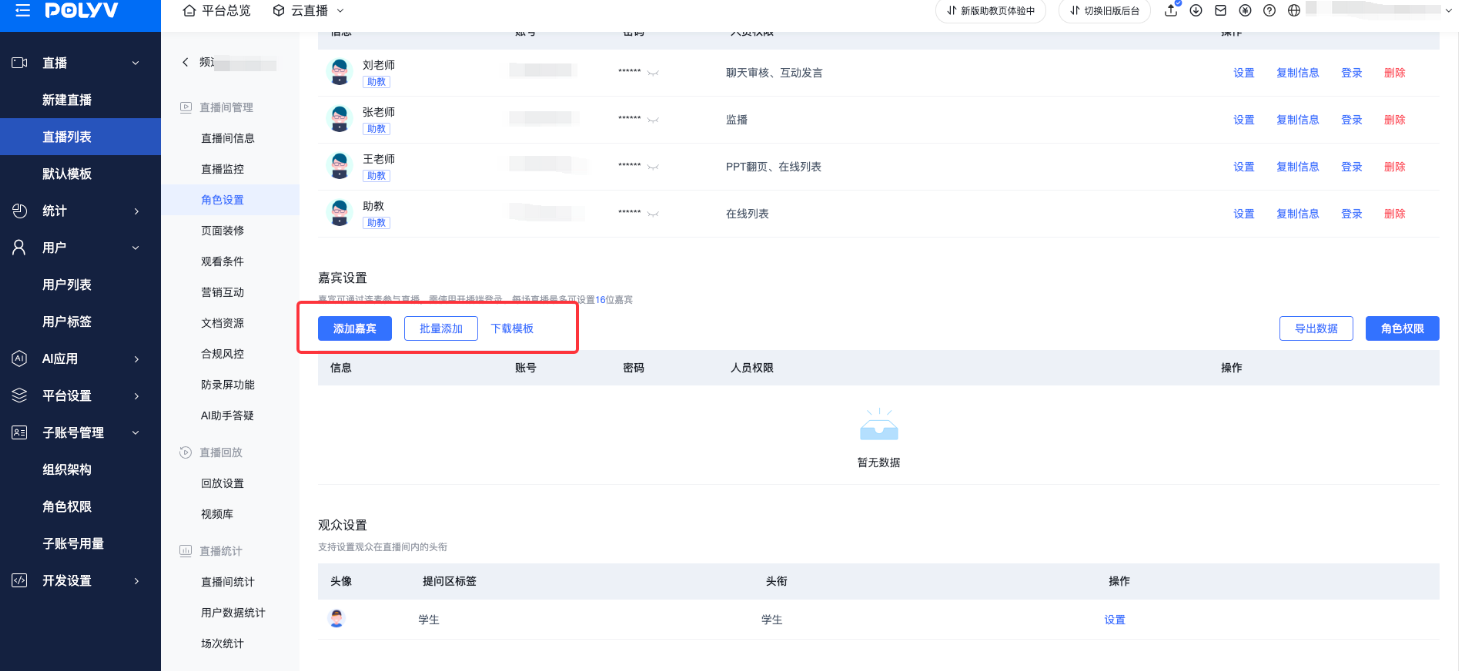
- Obtain guest sub-channel number and password: In the Document + Video channel, go to the management backend → Role Permissions, where you can add a guest and obtain their sub-channel number and password.
- Host Permission: In live streaming + co-hosting mode, within a channel, the instructor always holds host permission, while guests can be granted host permission by the instructor. Once granted host permission, the user can operate documents, synchronize page turns with others, use annotation tools, share screens, play multimedia, and initiate interactive features. Granting host permission automatically grants annotation permission. The instructor can only authorize host permission to one person at most.
- Annotation Permission: In live streaming + co-hosting mode, within a channel, guests who have joined the stage can be individually granted annotation permission. This allows the user to annotate on the current document or whiteboard but not to turn pages. The instructor can authorize annotation permission to multiple users, but the number cannot exceed the number of users on stage.
- Set as Primary View: In live streaming + co-hosting mode, when a user on stage is set as the primary view, they occupy the main position in both the client and viewer screens, highlighting their importance.
- Member Operation Permission Table: In live streaming + co-hosting mode, see the table below.
| Permission Feature | Instructor | Guest | Teaching Assistant | Admin | Audience |
|---|---|---|---|---|---|
| Toggle hand-raising & mic | ✔️ | ❌ | ❌ | ❌ | ❌ |
| Control mic on/off | ✔️ | ❌ | ❌ | ❌ | ❌ |
| Speak on mic | ✔️ | ✔️ | ❌ | ❌ | ✔️ (partial PC browsers) |
| Toggle others' camera | ✔️ | ❌ | ❌ | ❌ | ❌ |
| Toggle others' microphone | ✔️ | ❌ | ❌ | ❌ | ❌ |
| Grant/revoke presenter role | ✔️ | ❌ | ❌ | ❌ | ❌ |
| Grant/revoke annotation | ✔️ | ❌ | ❌ | ❌ | ❌ |
| Add document/whiteboard | ✔️ | Requires presenter role | ❌ | ❌ | ❌ |
| Sync document/whiteboard page to others | ✔️ | Requires presenter role | ❌ | ❌ | ❌ |
| Draw/annotate on current page | ✔️ | Requires presenter or annotation role | ❌ | ❌ | ❌ |
| Screen share | ✔️ | Requires presenter role | ❌ | ❌ | ❌ |
| Insert multimedia | ✔️ | Requires presenter role | ❌ | ❌ | ❌ |
| Launch interaction | ✔️ | Requires presenter role | ✔️ | ✔️ | ❌ |
| Mute, remove | ✔️ | ✔️ | ✔️ | ✔️ | ❌ |
- Pure video templates do not support syncing document whiteboard page turns with others, nor do they allow multiple users to write or draw on a single document simultaneously.
11. Scenes and Materials (Pure Video Only)
- Scenes
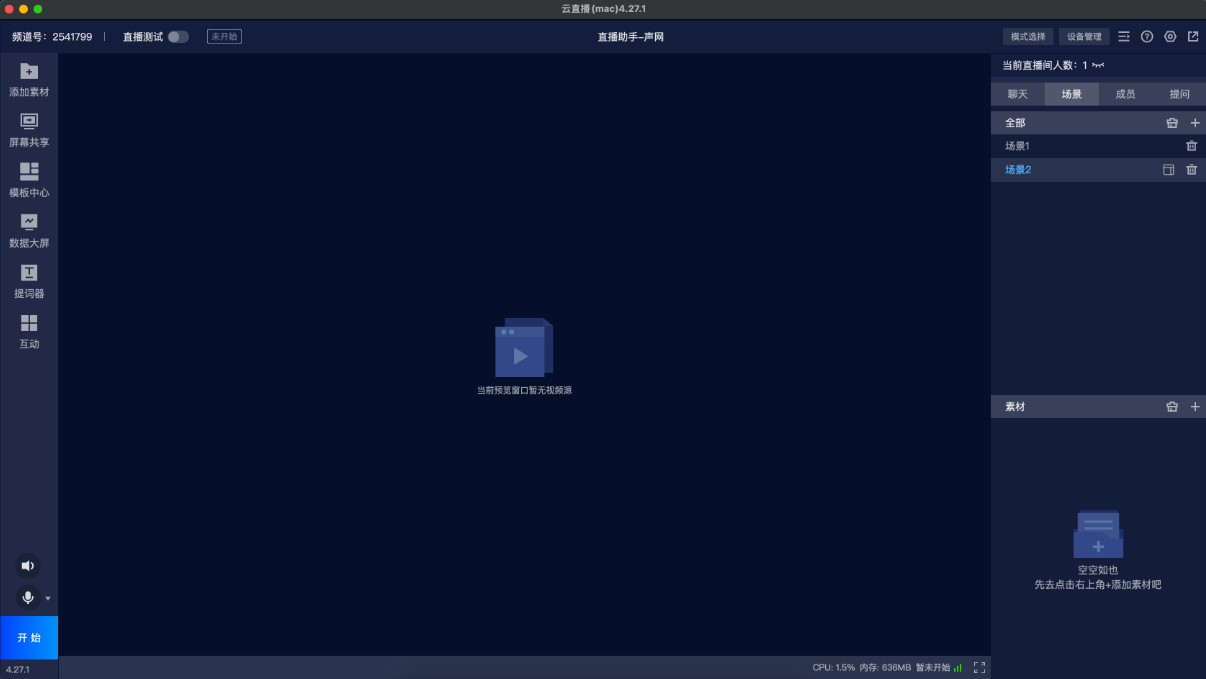
- Multiple scenes can be added to a live stream. Each scene represents a specific visual content, and you can switch between scenes during the broadcast.
- For example, before the official live stream begins, you can show the audience a warm-up video scene. Once the broadcast officially starts, switch to the scene of the event venue.
- Each scene can contain multiple materials.
- Materials
- These are the basic elements that make up the live stream's visual content, including cameras, screen sharing, multimedia, documents, images, text, etc. Multiple materials can be added to the same scene to compose the desired layout. For instance, in a teaching scenario, both the instructor's document and camera can be displayed simultaneously.
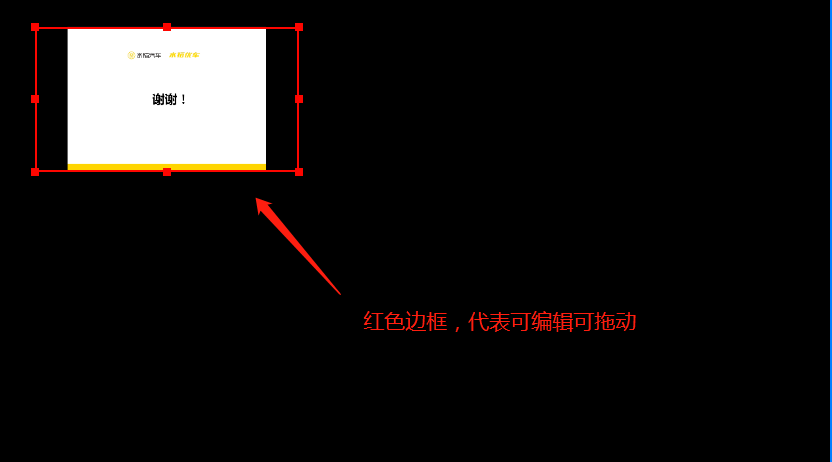
- When a material is in a draggable and editable state, its border is red. When a material is selected but not draggable or editable, its border is blue.
12. How to Switch Between Multiple Scenes (Pure Video Only)
The multi-scene switching feature allows you to present different visual content to your audience during a single live stream.
For example, before the official live stream starts, you may only need to play a warm-up video. Once the stream begins, you may need to display document content. During the stream, you might want to show an exciting lottery screen, and near the end, present QR codes for event registration and follow-up. To meet these requirements, you can create four scenes, each with its own pre-configured materials and layout. During the live stream, you only need to focus on the switching sequence.
- Adding a Scene
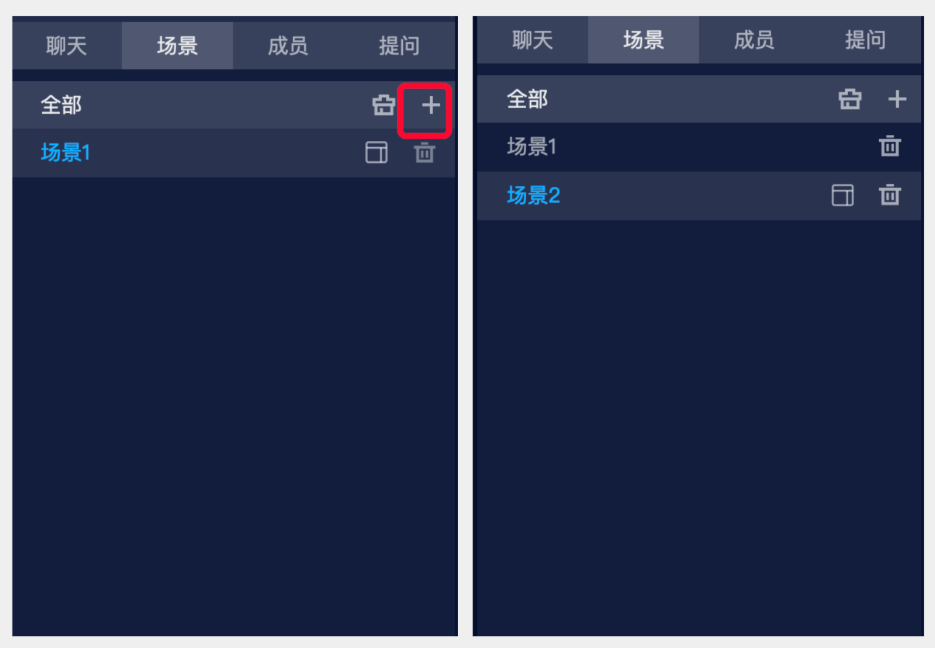
- In the resource panel on the right, go to Scenes → click the “+” under “All” to add a new scene below the current one.
- A newly added scene contains no materials by default.
- Switching Scenes
- Click the target scene name to switch to it.
- When switching to a scene, the content displayed in the preview window is what the audience sees in the live stream.
- Double-click the "Scene Name" to edit the scene name.
13. How to Use Image and Text Materials (Video Only)
Adding Images
- In the right-side resource panel, go to [Scene] → "All" → [Material] [+] → [Image] to add an image.
- The added image will automatically fit the preview window in full screen. Supported formats include BMP, JPG, PNG, GIF, and other common image formats.
- After adding the image, you can adjust its opacity in the properties panel.
- In the preview area, hold down the Alt key while dragging to crop the image.
- In the preview area, hold down the Shift key while dragging to freely scale the image.
Adding Text
- In the right-side resource panel, go to [Scene] → "All" → [Material] [+] → [Text] to add text.
- After adding, a red selection box will appear in the upper-left corner of the preview window.
- Edit the text content and properties in the properties panel, including font, font size, color, direction, and whether to enable scrolling.

14. How to Edit the Content Layout of the Preview Window (Pure Video Only)
During a live stream, the content displayed in the preview window is exactly what is broadcast. Therefore, adjusting the size, position, and layout of various materials within the preview window directly affects the audience's viewing experience.
- Adjusting the Layer Order of Materials
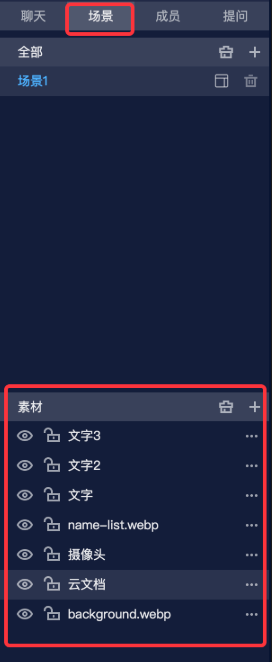
- If the live stream画面 consists of a PPT with an overlay of a camera feed, ensure there are two materials: the PPT layer and the camera layer. The camera layer must be placed above the PPT layer to avoid being obscured.
- Adjustment method: In the right-side panel, go to [Scene] > "All" > "Materials", select the material you want to adjust, and drag it up or down to change the layer order.
- Adjust the position of a material in the preview screen
- Select the material you want to adjust. A red border will appear around the material, indicating it is editable and draggable. Drag it directly to the desired position in the preview screen.
- If there are too many materials to select easily, first select the target material in the "Add Material" area of the resource menu, then drag and adjust it in the preview screen.
- Adjust the visibility of materials in the preview screen
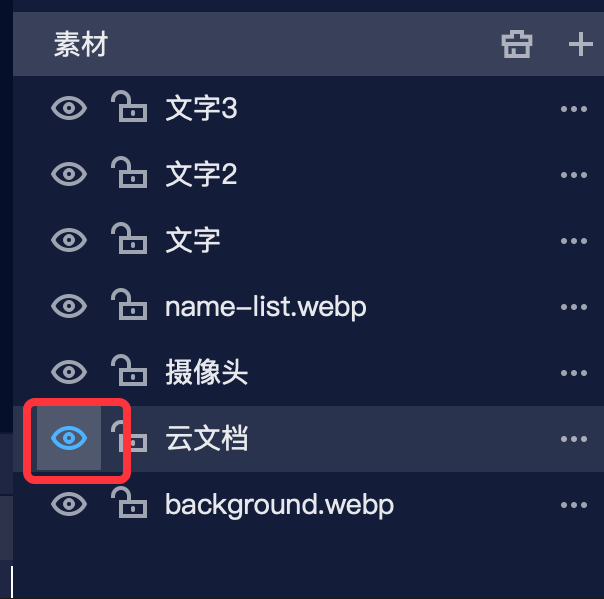
- Select the material to be adjusted. In the resource function menu bar, at the material addition section, click the eye icon to hide the material.
- Click the eye icon again to unhide and restore the material's display in the screen.
15. Introduction to Chat, Questions, and Q&A
The chat, questions, and Q&A features respond to the backend settings of the channel. In the admin backend, chat and questions are enabled by default. If the client lacks the corresponding feature menu, it needs to be enabled in the admin backend.
- Chat feature: A public chat room where users can send text, emojis, and images. It supports muting likes and tip messages, enabling/disabling global mute, and quoting and replying to user messages.
- Questions feature: Audience question messages are only visible to specific members and can be replied to; other audience members cannot see them.
- Q&A feature: Audience Q&A messages are only visible to specific members and can be replied to. Instructors, teaching assistants, and administrators can send them privately to individual audience members or broadcast them to all audience members.
16. Introduction to Interactive Features
Interactive features enhance communication and engagement between hosts/instructors and the audience, making live streams more enjoyable and increasing audience participation. In the left-side function navigation, click Interactive to open the feature pop-up. If the desired interactive feature is not available in the pop-up, please confirm with your business representative whether it has been enabled.
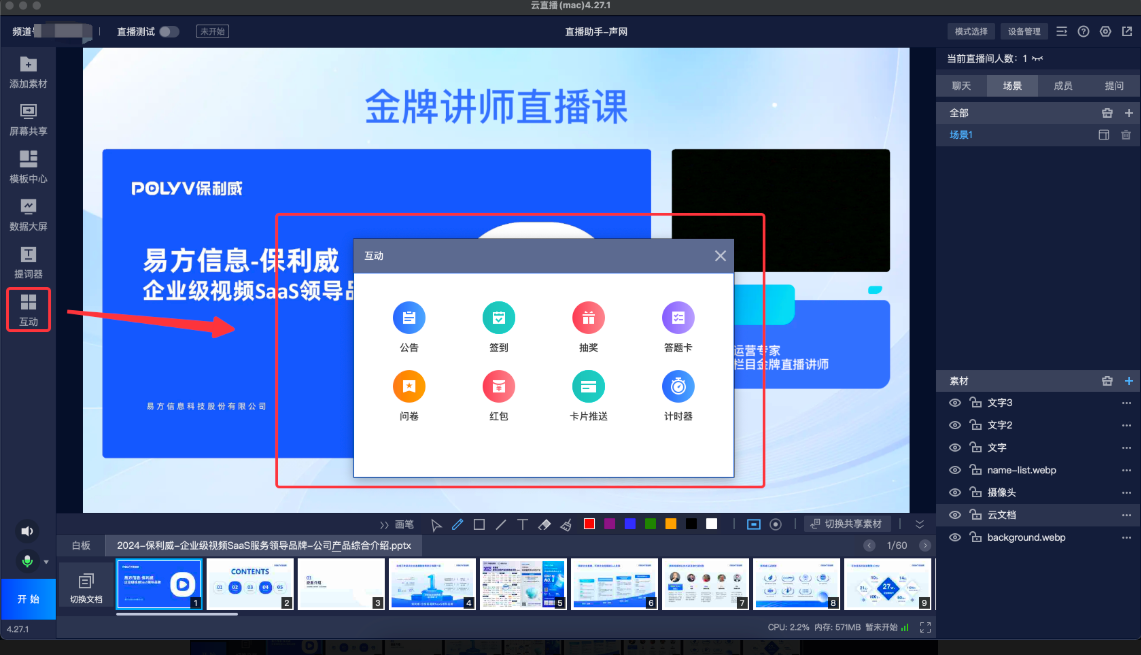
- Announcement: After sending an announcement, a forced pop-up window will appear on the audience side for strong reminder scenarios.
- Check-in: Counts the number of attendees within a specified time period.
- Lucky Draw: Used to liven up the live stream atmosphere or increase viewer engagement. Supports setting prize details, claim information, etc., to improve prize distribution efficiency.
- Quiz Card: Used for in-class quizzes to reinforce learning. Supports sending questions with only options or questions with both a stem and options.
- Survey: Used for exams in teaching or surveys in marketing. Supports multiple-choice questions and subjective questions.
- Red Packet Rain: Used to liven up the live stream atmosphere.
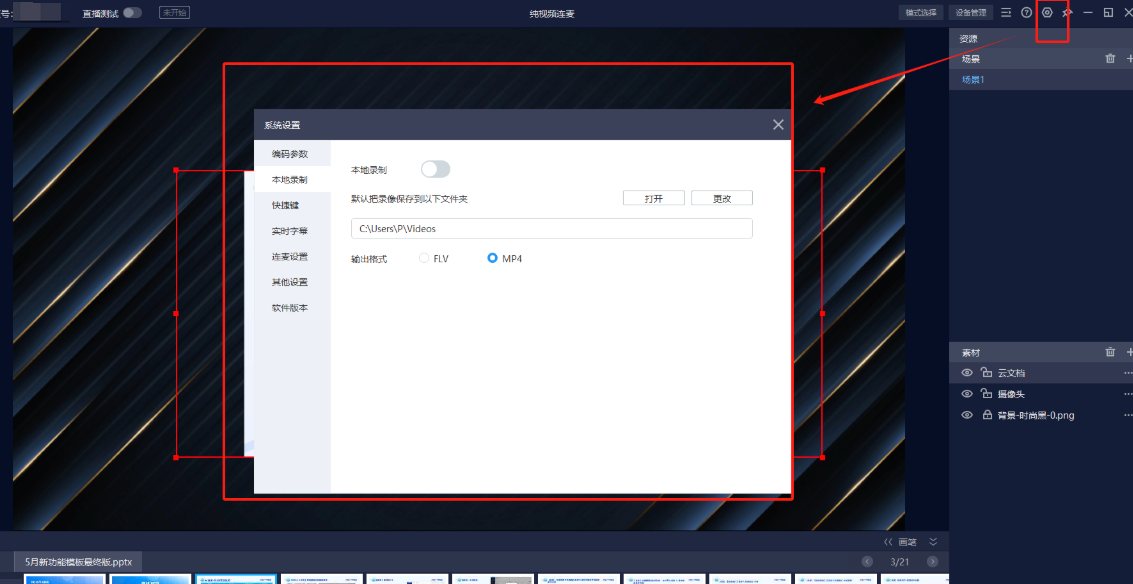
17. How to Use Local Recording to Save Live Stream Files (Video Only)
- Cloud recording automatically records during the live stream. After the stream ends, the recorded content can be viewed and downloaded from the playback management page in the admin console. Additionally, a local recording feature is provided to save the video directly, eliminating the need for downloading.
- Enabling/Disabling Local Recording
- Go to Settings -> Local Recording to enable the local recording feature. You can modify the default save path and the video format of the recording files.
- When using local recording, ensure that your computer has sufficient disk space to save the video; otherwise, the video may not be saved properly.
- Using local recording will increase CPU consumption on your local computer. If your computer configuration is insufficient, it may severely impact the live stream process. Be sure to test this feature before using it.
18. How to Set Required Encoding Parameters
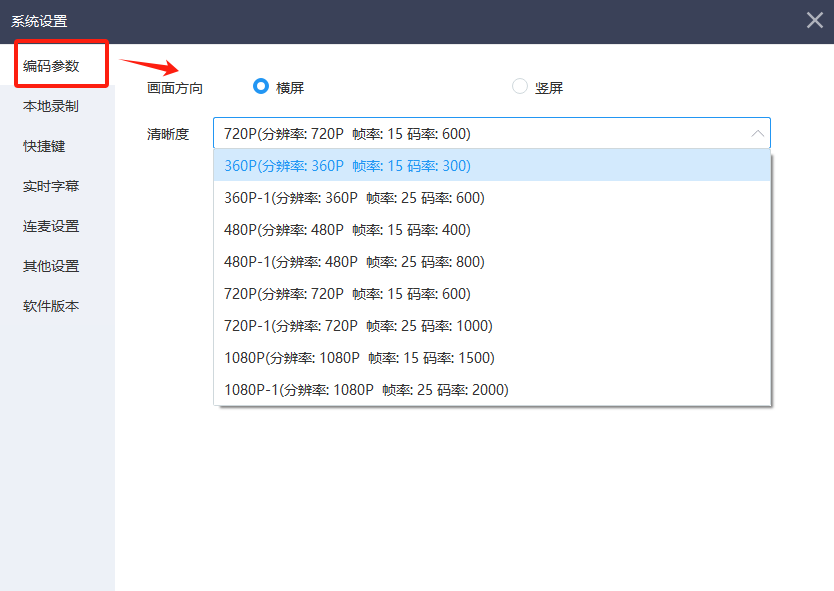
Encoding parameters are critical to the live streaming effect. Default parameters are generally used, but adjusting them in specific scenarios can optimize the live streaming experience, such as:
- Screen recording teaching live streams
- If the live stream primarily involves screen sharing or screen recording, to improve clarity, ensure the live stream resolution matches the shared screen resolution. For example, if the monitor resolution is 1920x1080, adjust the resolution to 1920x1080 in the settings and appropriately adjust the bitrate based on network conditions.
- Business roadshows and conference live streams
- When the footage includes a lot of people moving or dance actions with significant changes, maintain a resolution of 1280 x 720, increase the frame rate to 25–30, and raise the bitrate to over 1000 kbps. Adjust the push stream quality to 2–3 as appropriate.
- If the live stream network is stable and the uplink is guaranteed, you can choose a fixed bitrate to increase clarity (only supported in live streaming scenarios). The actual effect should be determined by on-site adjustments and viewing after the stream is broadcast.
19. Channel Selection
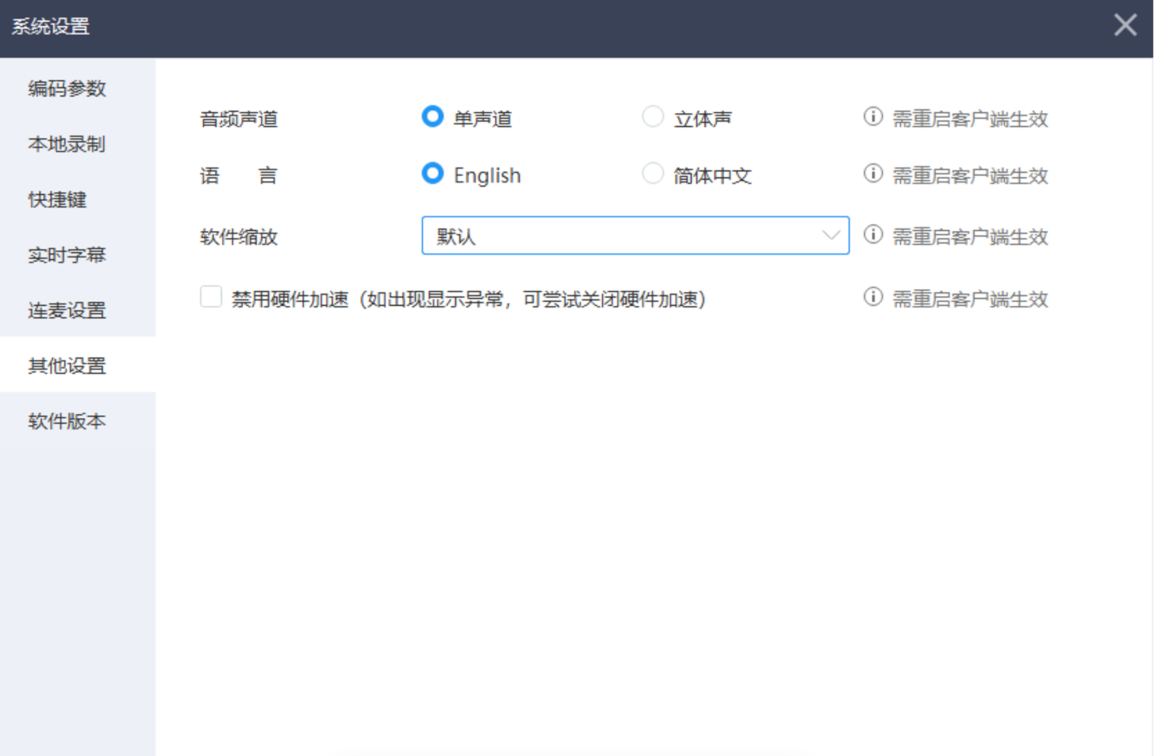
- When using a hardware mixer, if the sound from the phone's speaker is unclear but plays normally through headphones, it may be due to incorrect left and right channel wiring on the mixer causing sound cancellation. Solution: Without changing the mixer wiring, set the audio channel to mono.
- Under normal circumstances, keep the default stereo setting.