Live Streaming Backend Operations #
Live Streaming Monitoring
Live monitoring is mainly divided into two functions: monitoring the live room video and managing the chat room.
- The preview area displays the live stream. The stop button allows administrators to forcibly stop the live stream in emergencies.
- In the chat area, administrators can delete messages, mute users, and kick users.
- Administrators can modify their own information, publish announcements, and initiate check-ins.
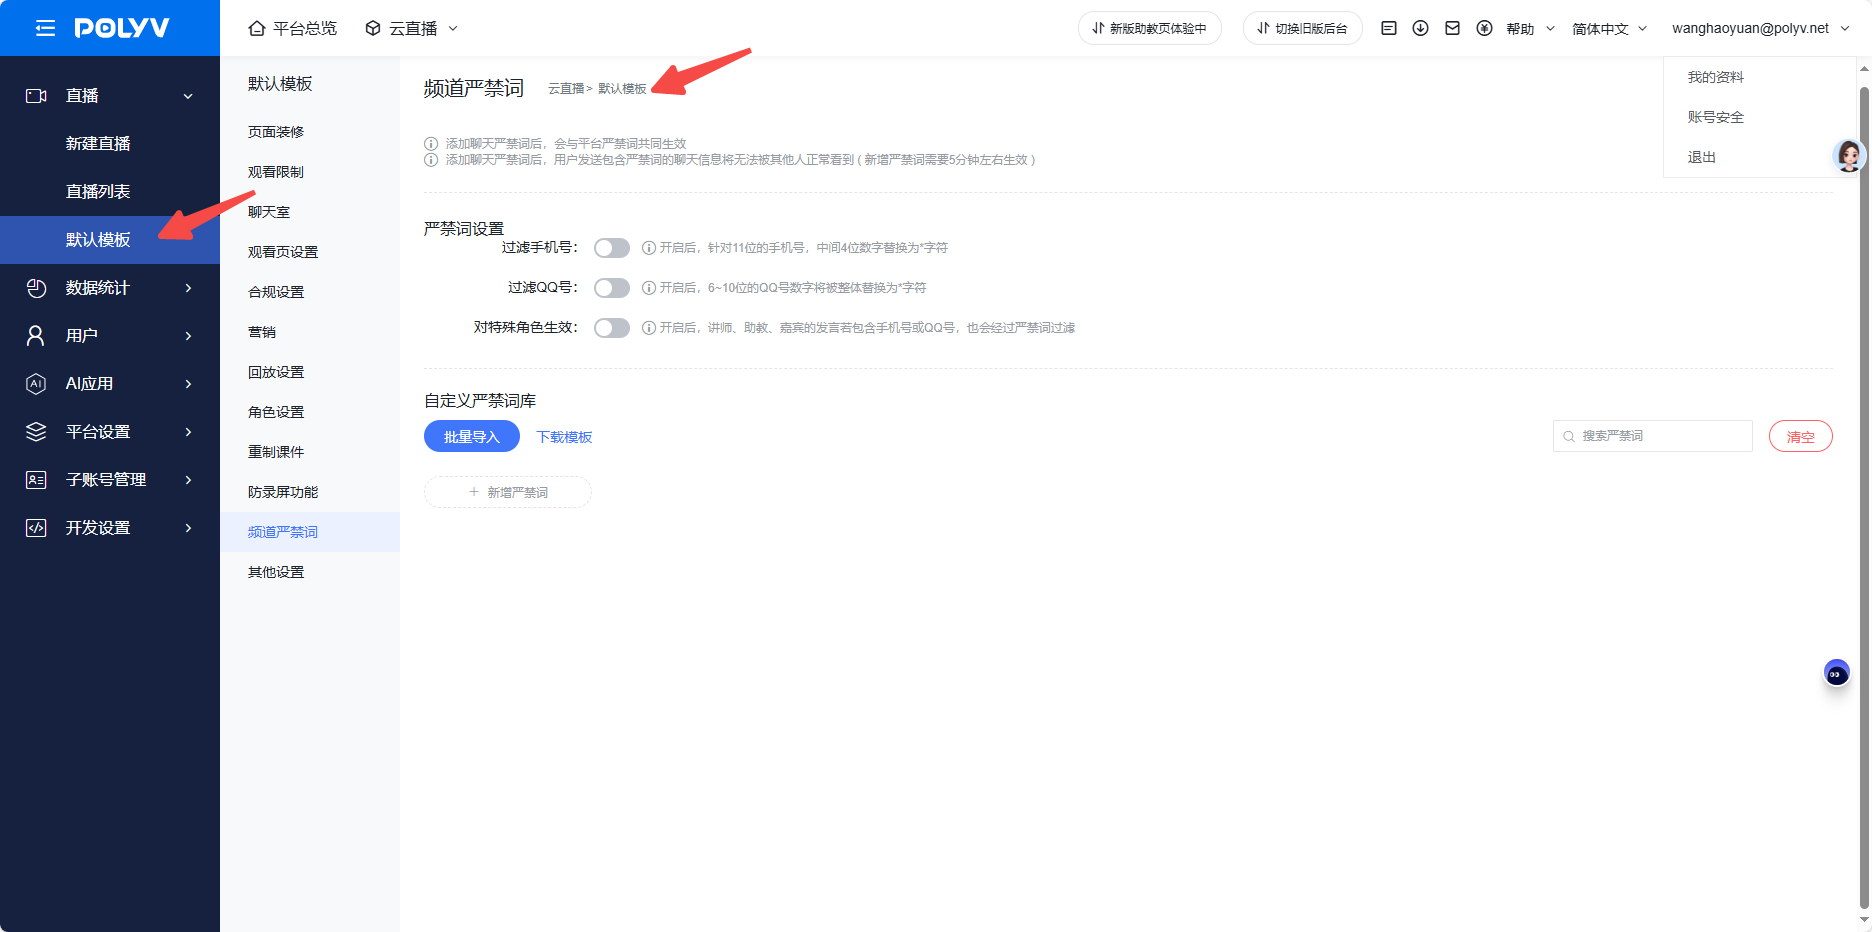
- There are two ways to add prohibited words: adding them one by one or in bulk. For bulk addition, download the template, fill in the prohibited words, and re-upload it.
- When test mode is enabled, only teaching assistants and administrators can see the live stream; others cannot. To officially start the live stream, test mode must be disabled.
- When chat review is enabled, messages will only appear in the chat area after being reviewed by an administrator.
Page Decoration
Page Menu Settings
"My Live Streaming → Channel Settings → Page Menu Settings". By default, the system provides three menus: Live Introduction, Interactive Chat, and Consultation Q&A.
- Live Stream Introduction: You can edit the live stream's text and image information. The editing interface is simple and lightweight, offering a what-you-see-is-what-you-get experience. The content you edit can be previewed in real-time on the right side to see the final effect.
- Add New Menus as Needed: You can add up to 7 menus. Two types are available: promotional external links and custom text-and-image menus.
2.1 Custom Text-and-Image Menu: Allows you to edit personalized text and image information.
2.2 Promotional External Link Menu: Enter the URL of the promotional external link. The corresponding URL page will then be displayed under the menu bar. A friendly reminder: The promotional external link menu is only effective on the mobile viewing page, and only one such menu can be added. - Menu Management Features: You can modify menu names, adjust menu order, and delete menus. Note: If you need to disable the "Consultation & Q&A" menu, you can directly click the link above to go to the feature switch settings.
Live Player LOGO Settings
The player allows you to set the LOGO's position, transparency, and the redirect URL after clicking.
1. Uploaded images should ideally be no larger than 140×50 pixels, supporting jpg, jpeg, and png formats. If the logo has an alpha channel, it is recommended to use PNG format.
2. The default position of the logo is the top right corner, which can be adjusted.
3. A redirect link can be set for the logo, allowing users to navigate to a specified page upon clicking.
4. Live replay videos need to be configured in the VOD player.
Page Skin Settings
Feature Overview
Different enterprises have different brand colors and usage scenarios. To accommodate diverse scenario needs, we can configure different skin styles for the viewing page under "Live Room List - Page Decoration - Skin Style". Currently, multiple styles are available, including Fashion Black, Tech Blue, Festive Red, Mint Green, Rich Gold, and Classic White.
Operation Instructions
Go to the channel's live streaming backend management page via "Live Backend - Live List".
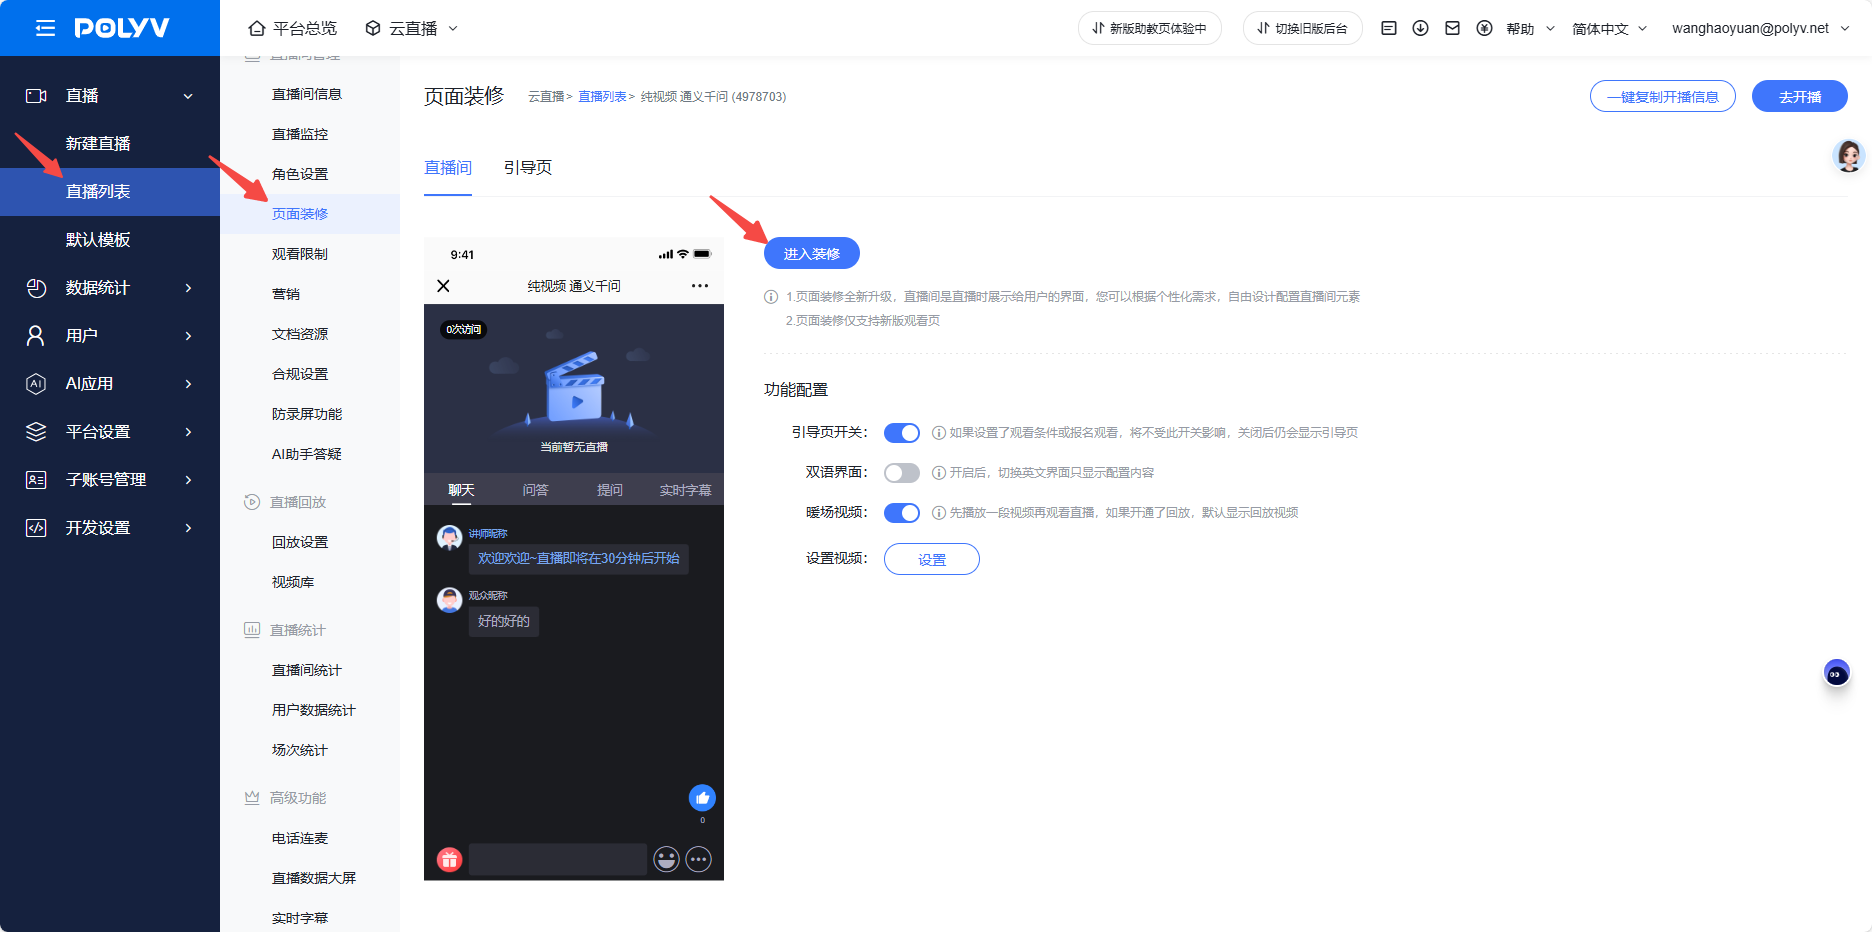
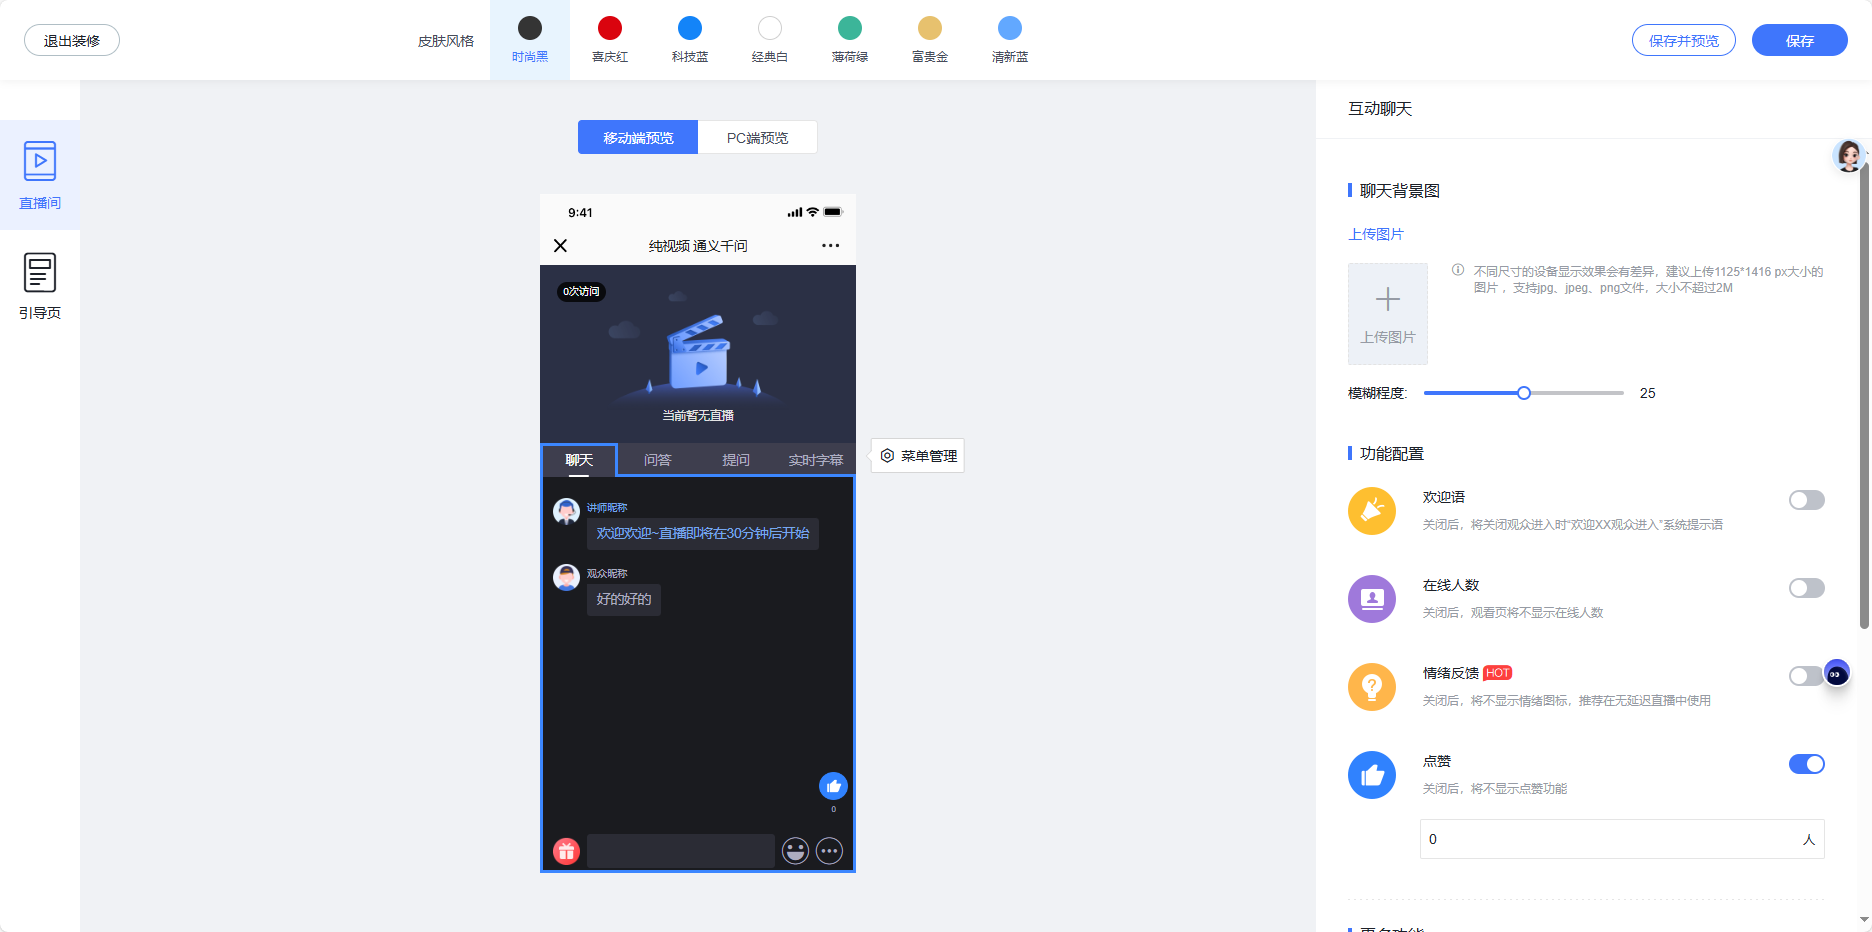
In "Watch Page Management - Page Skin Settings", select the desired style to preview it on the watch page.
Watch Page Style
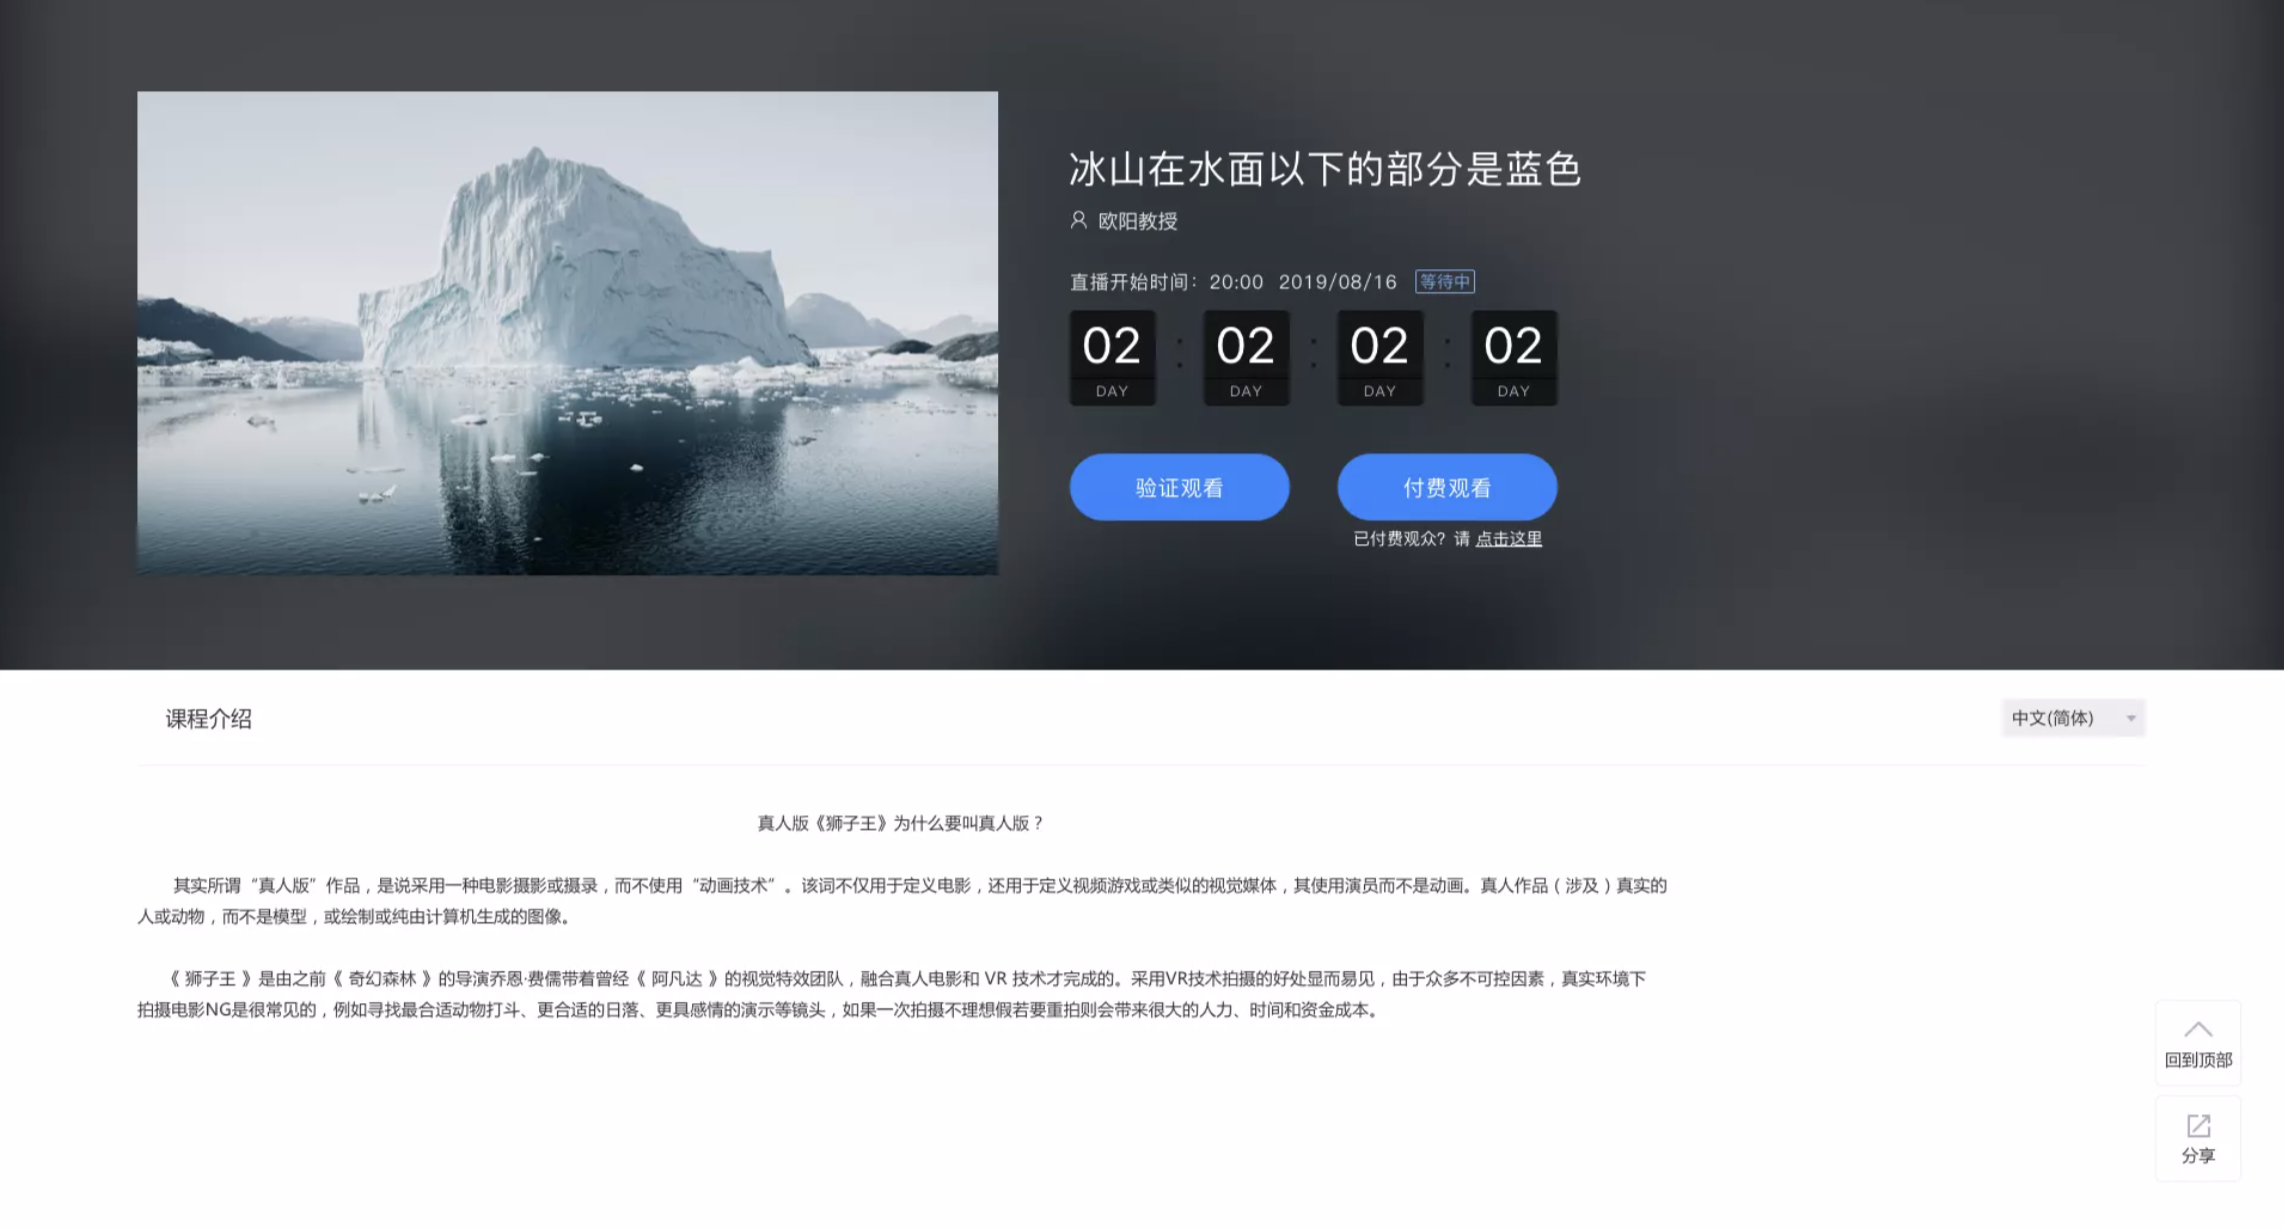
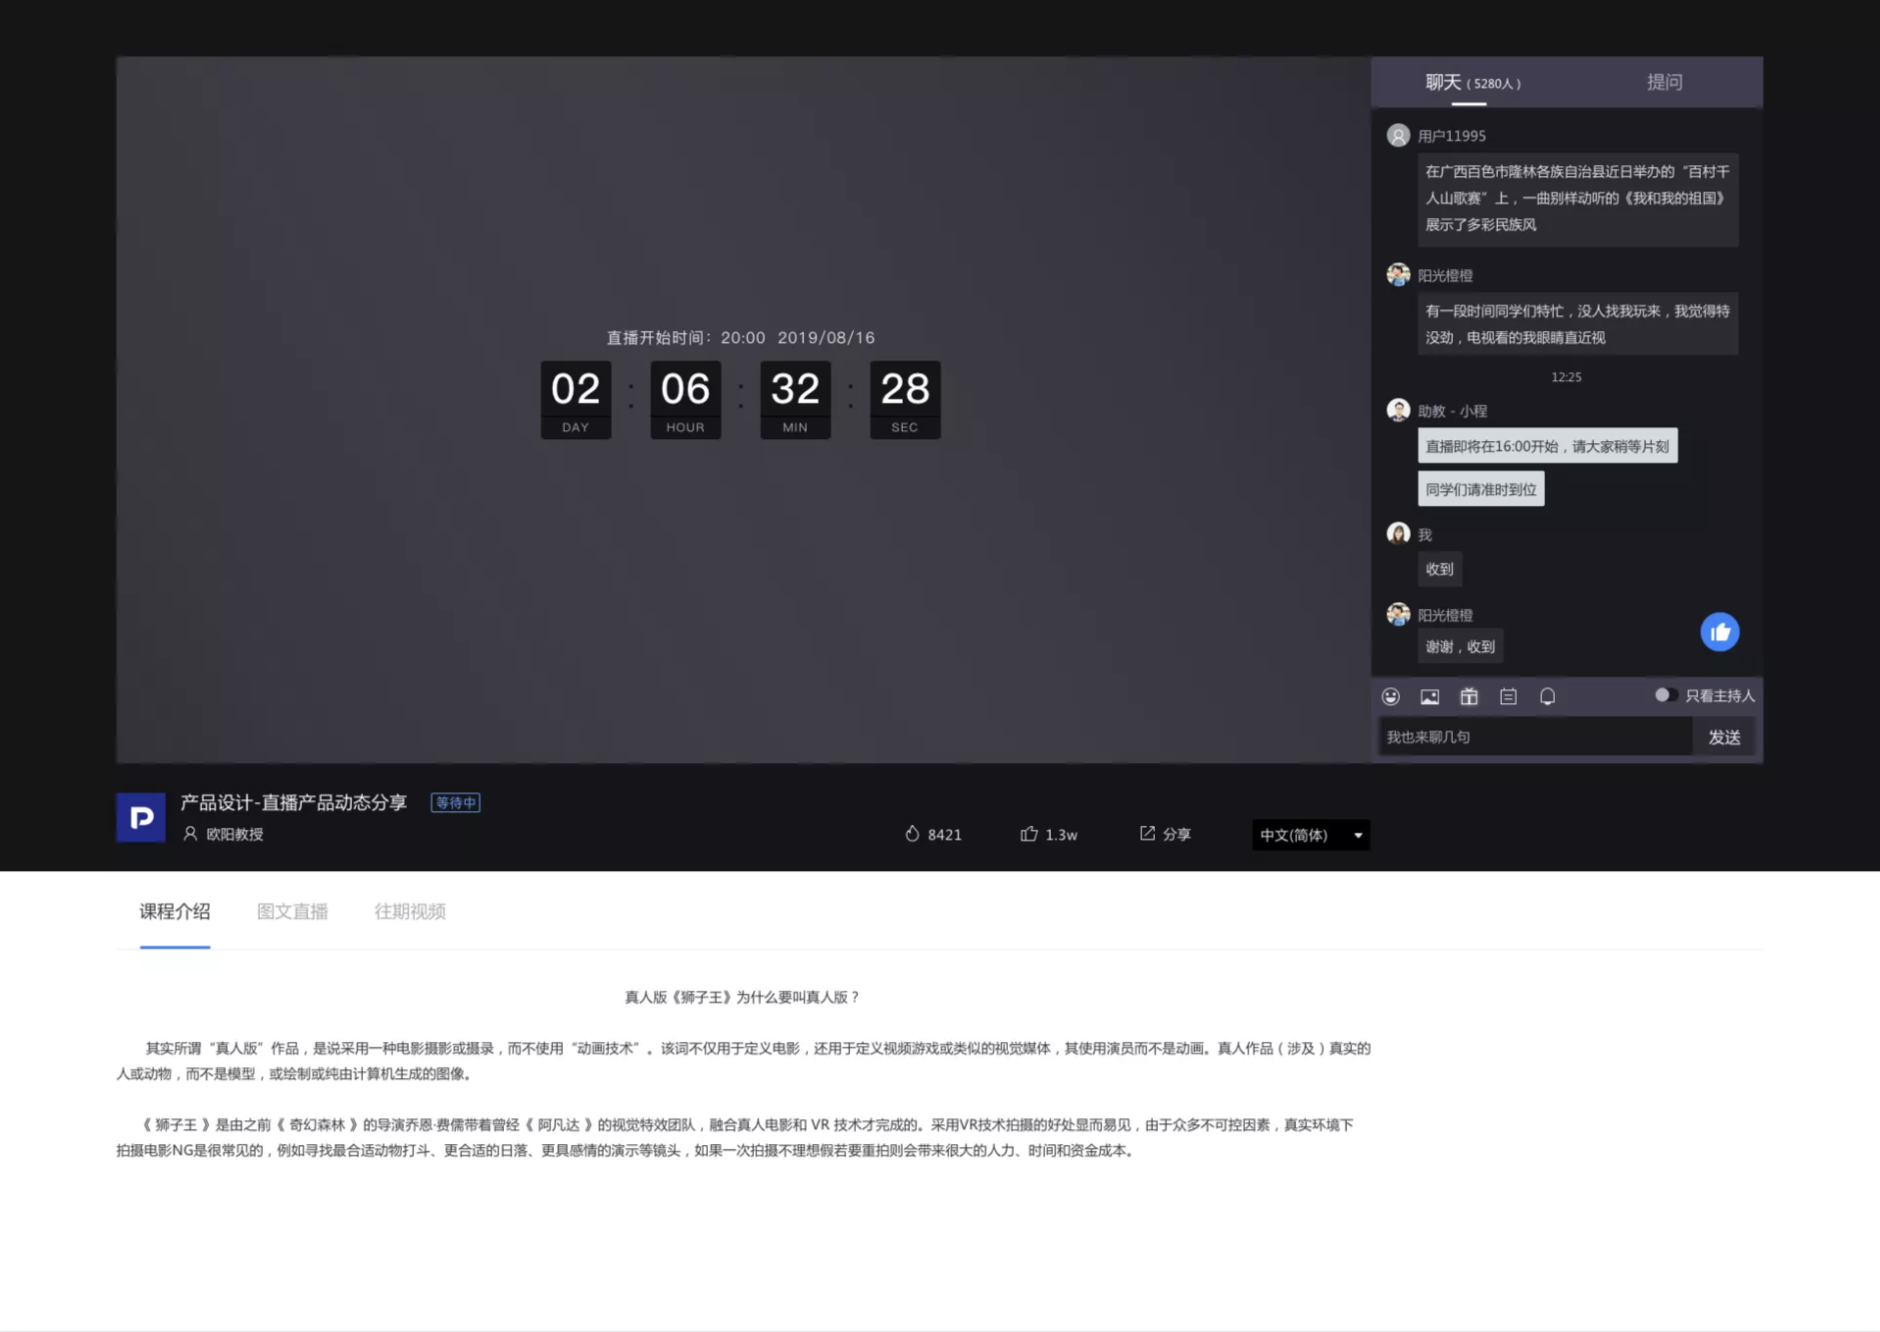
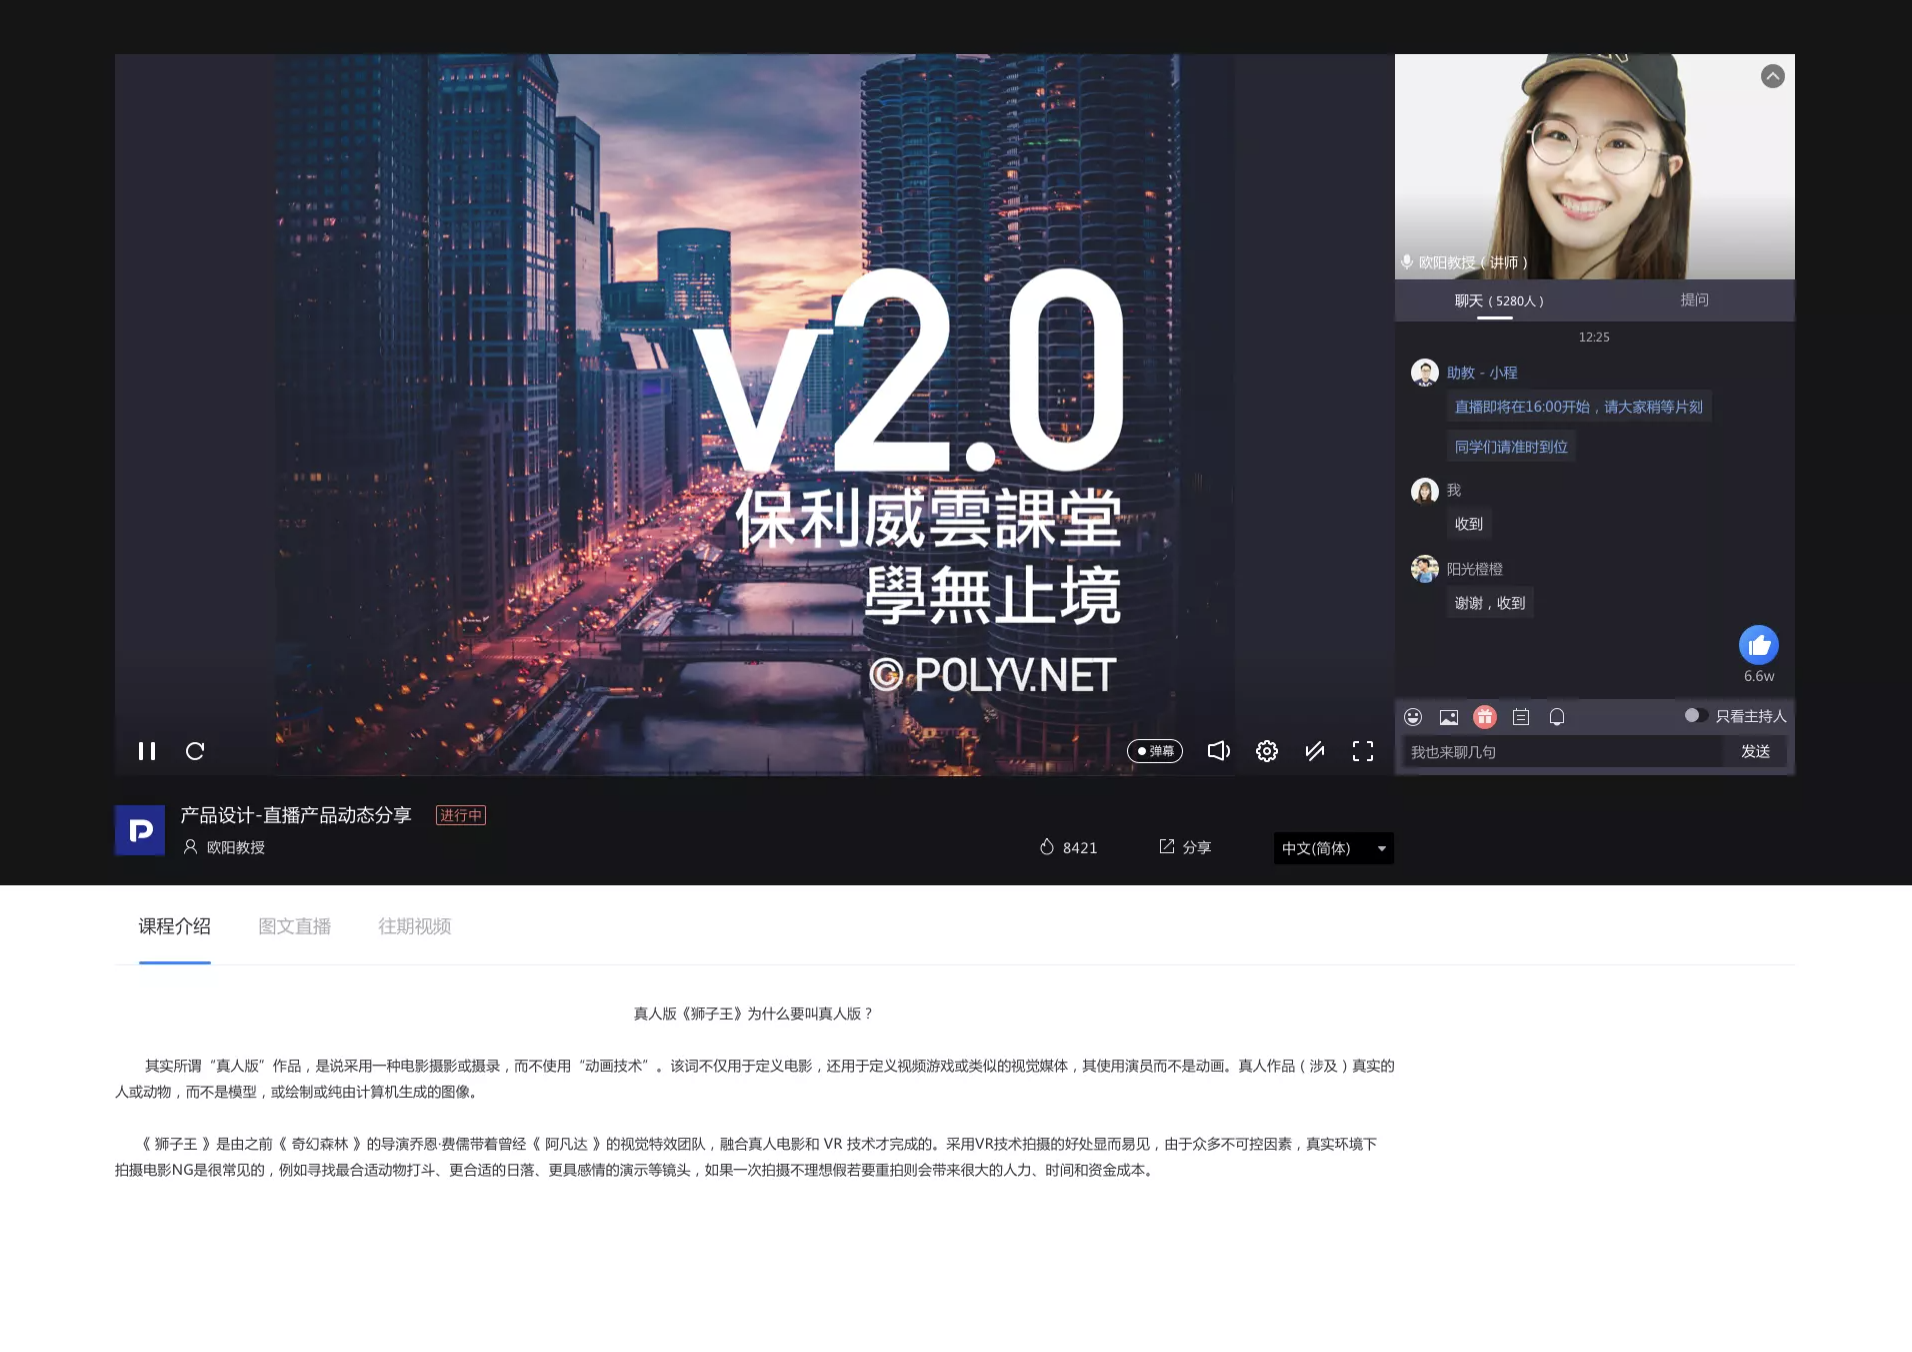
Fashion Black
Immersive experience, suitable for various scenarios.
PC style:
Mobile styles:
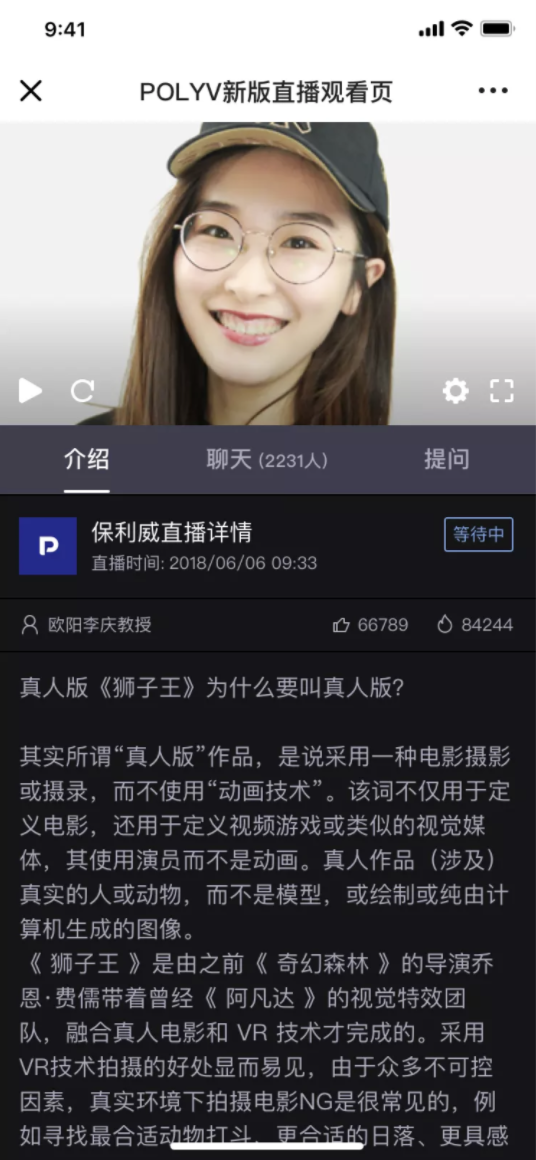
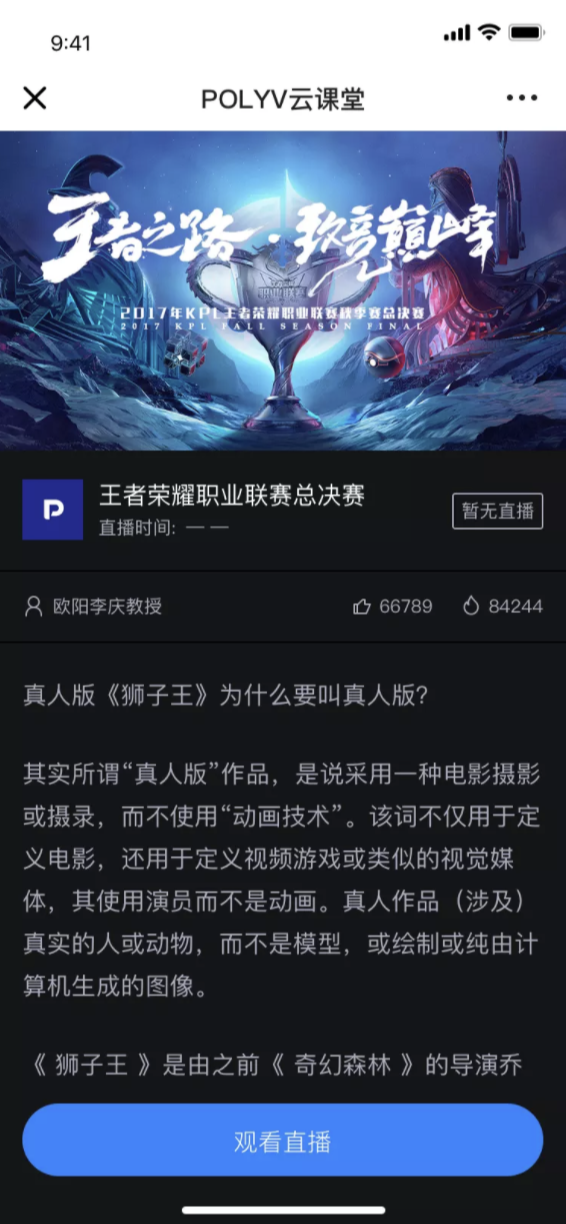
Note: For each skin style, the guide page, viewing page, and replay page on both PC and mobile have been adapted to match the skin style.
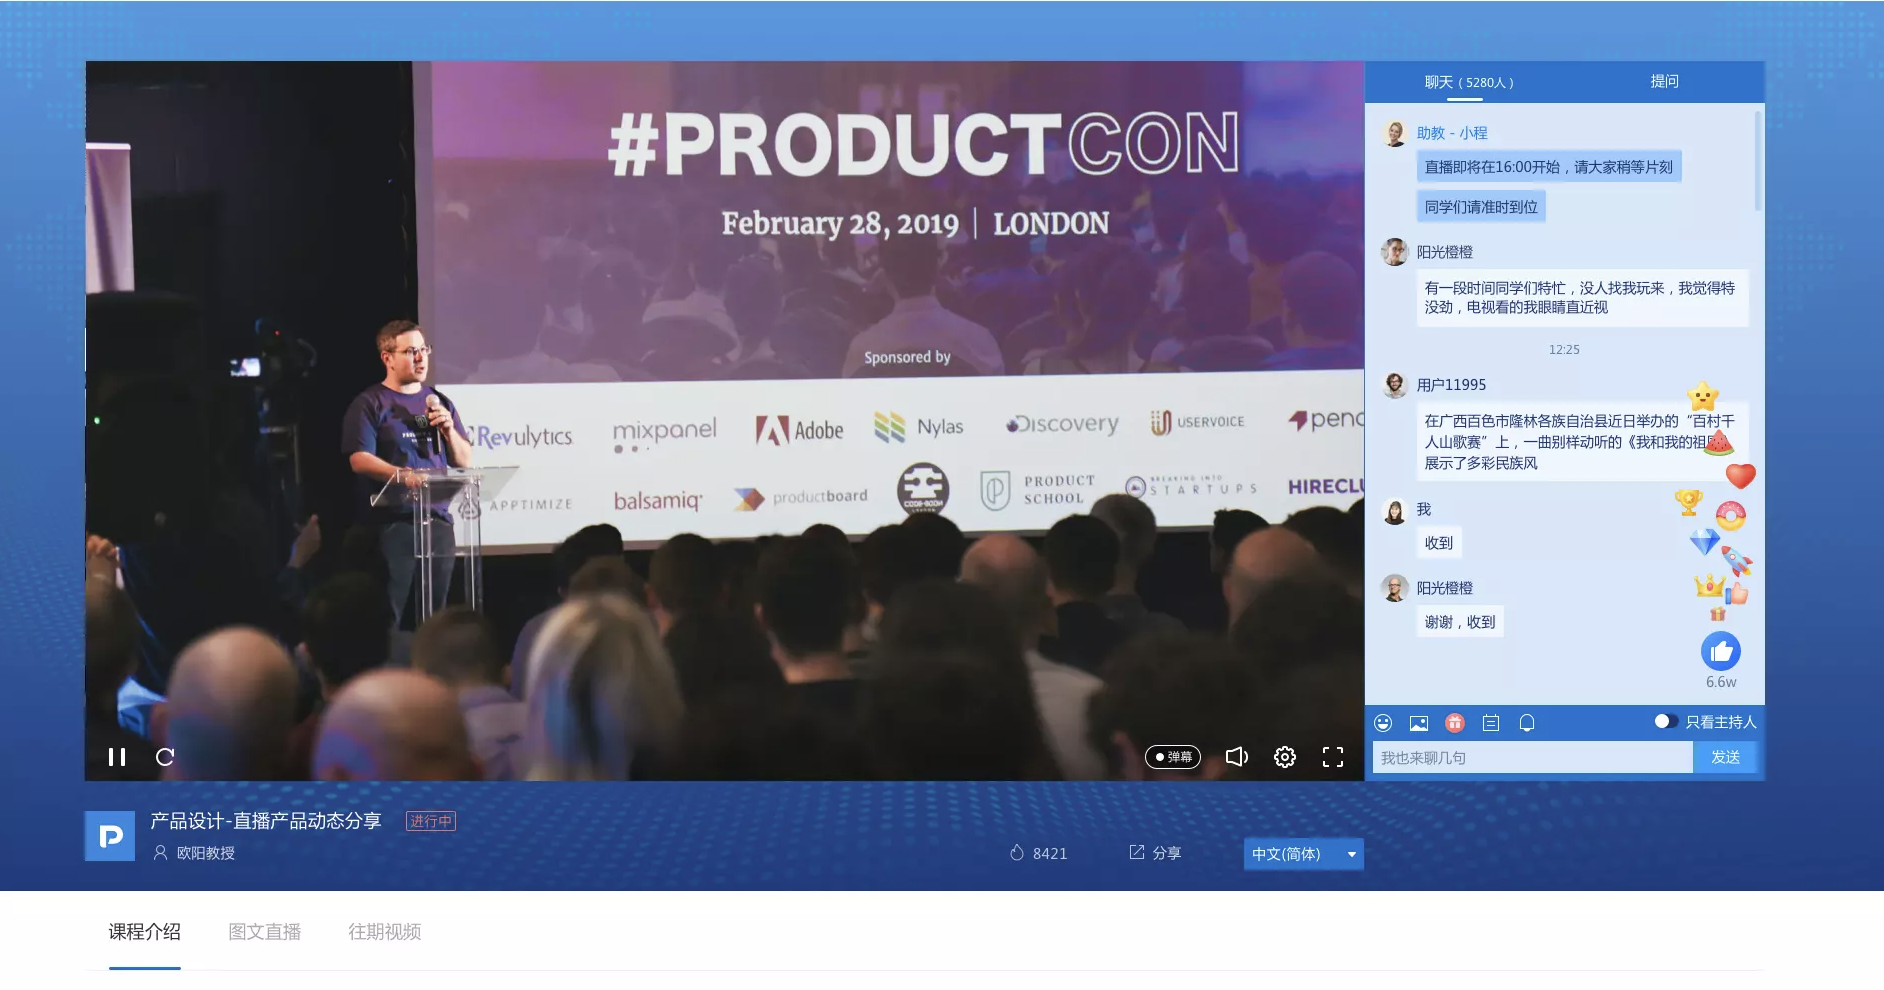
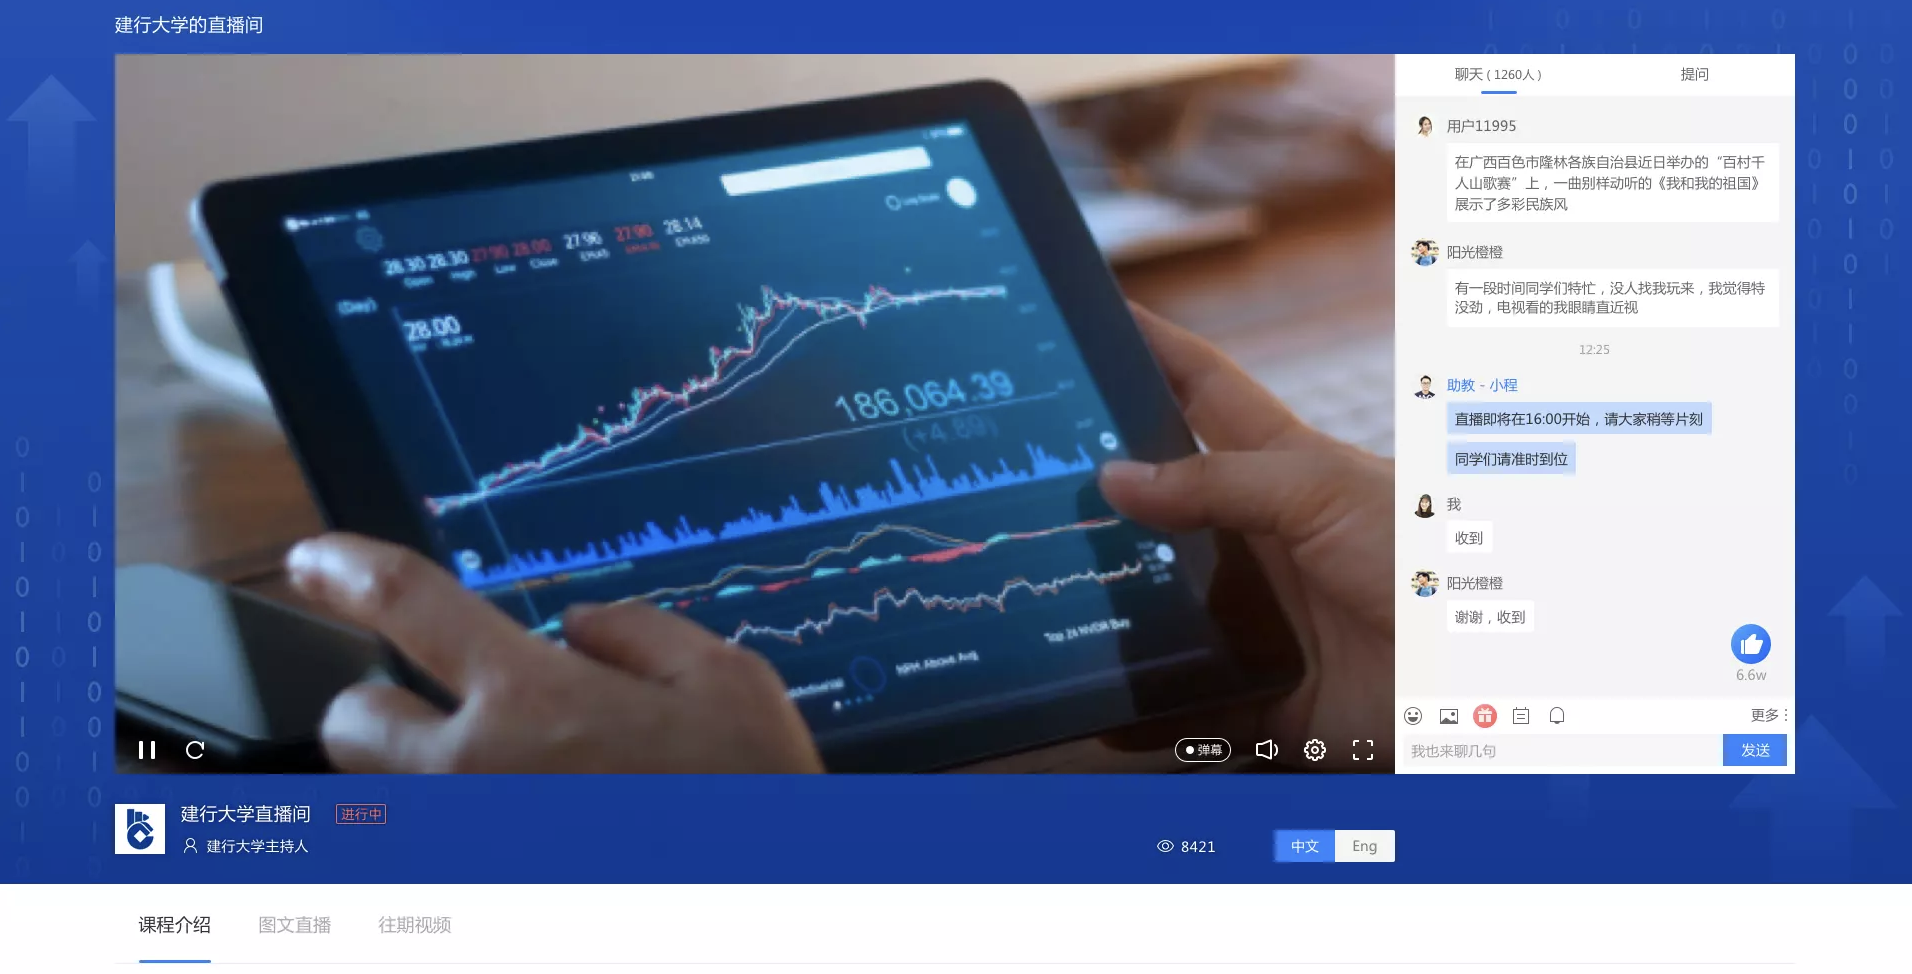
Tech Blue
Applicable to scenarios such as technology, science, business, and innovative products.
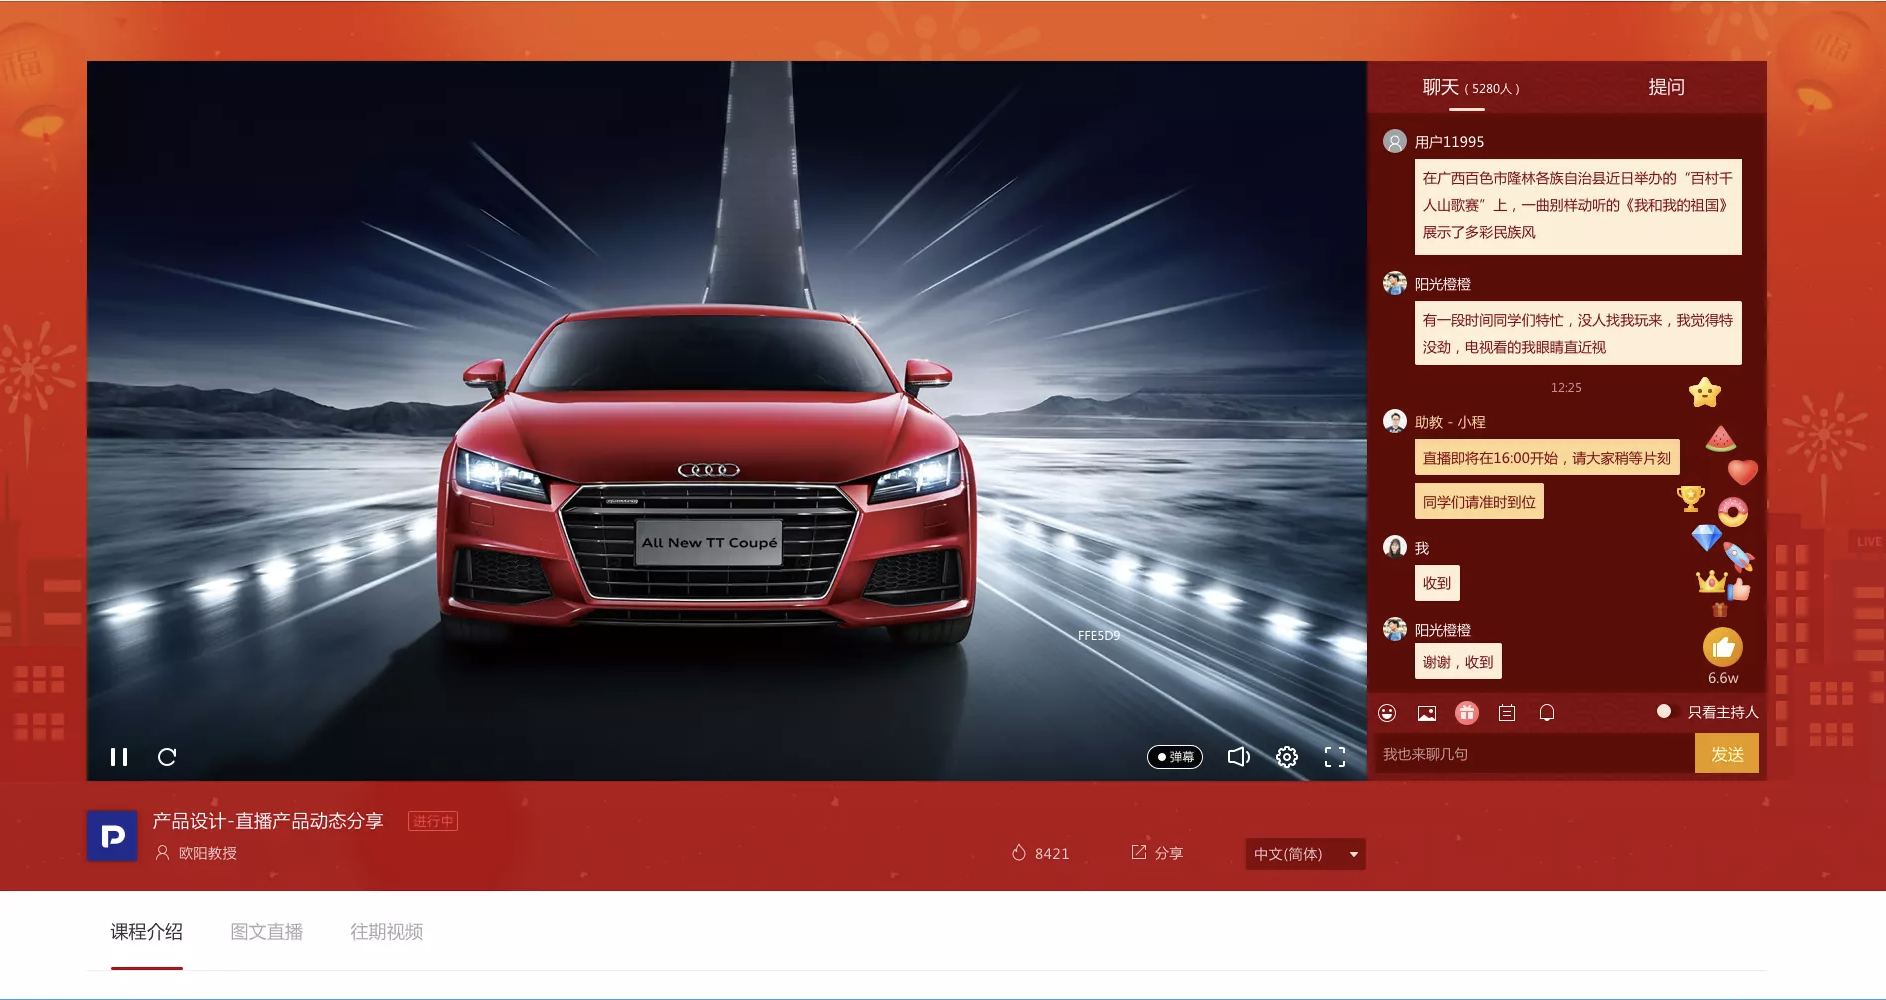
Festive Red
Suitable for festivals, annual meetings, events, and other scenarios.
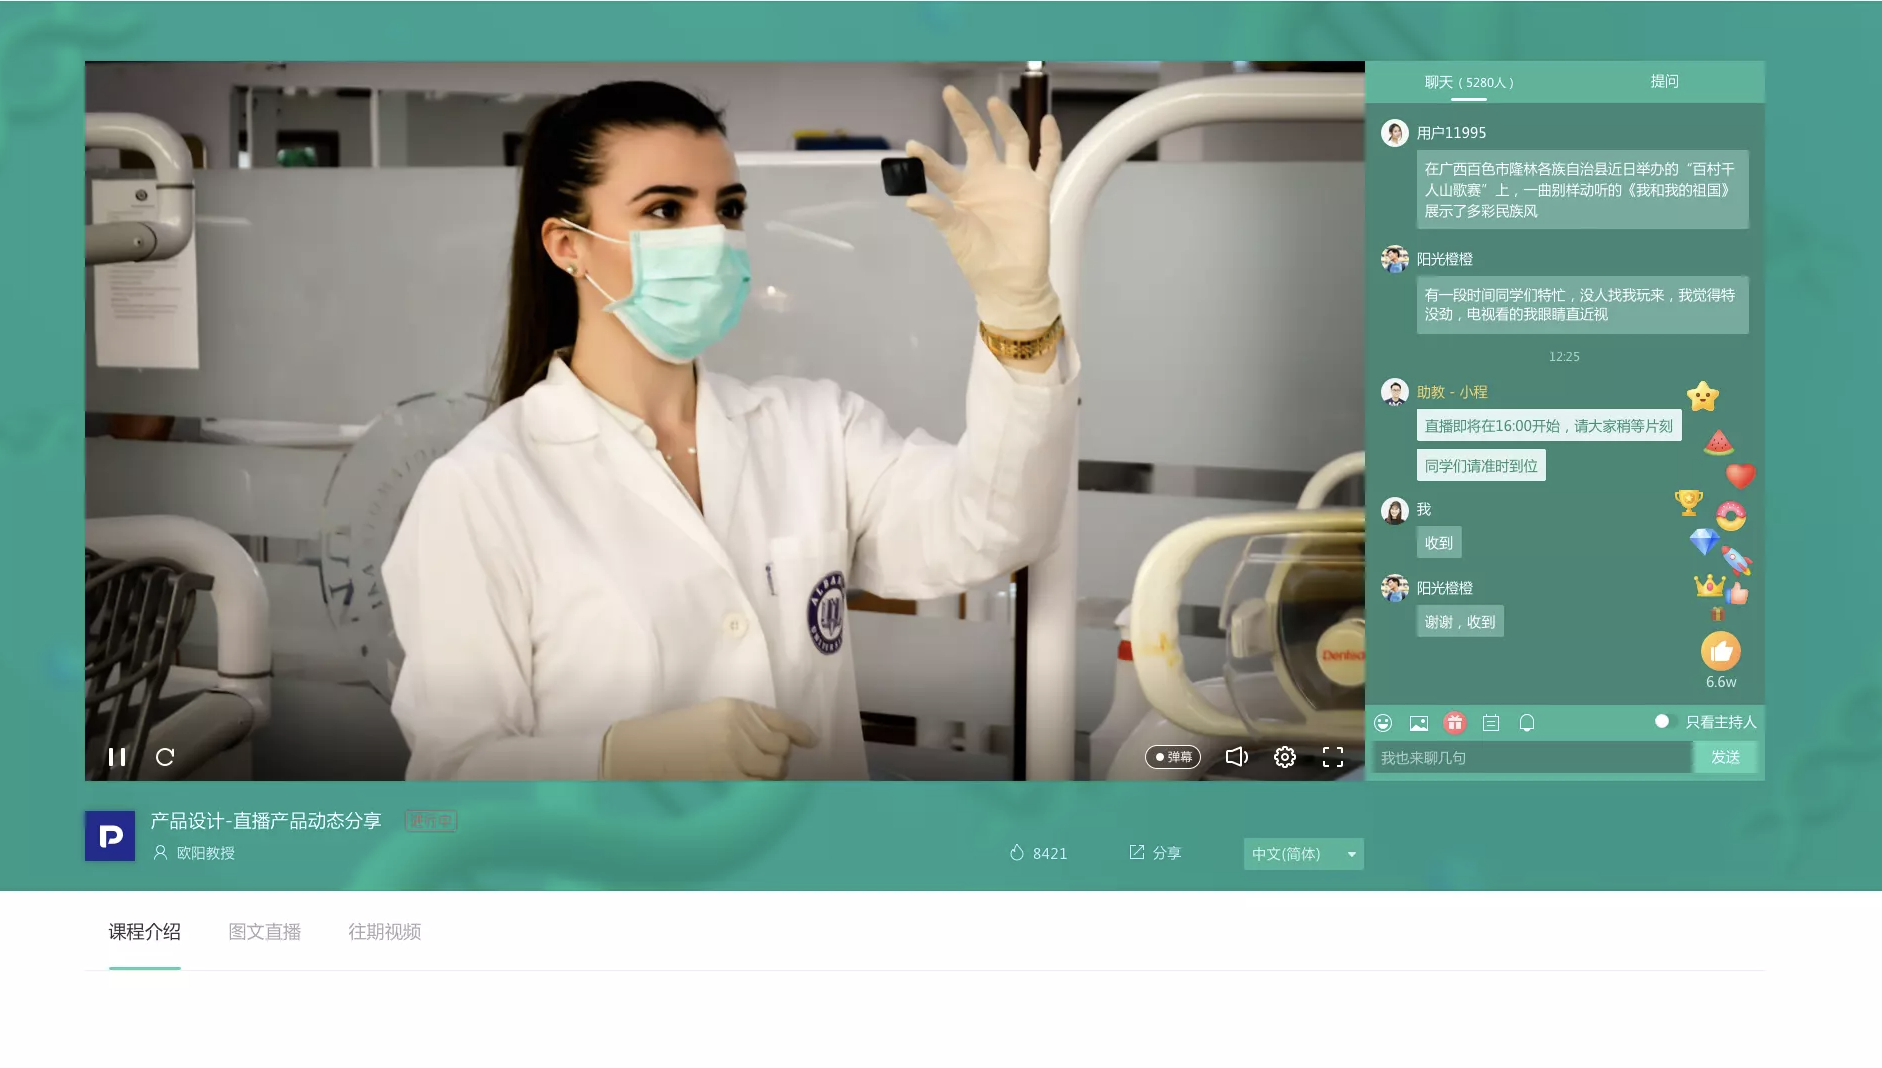
Mint Green
Applicable to medical, health, environmental protection, and other scenarios.
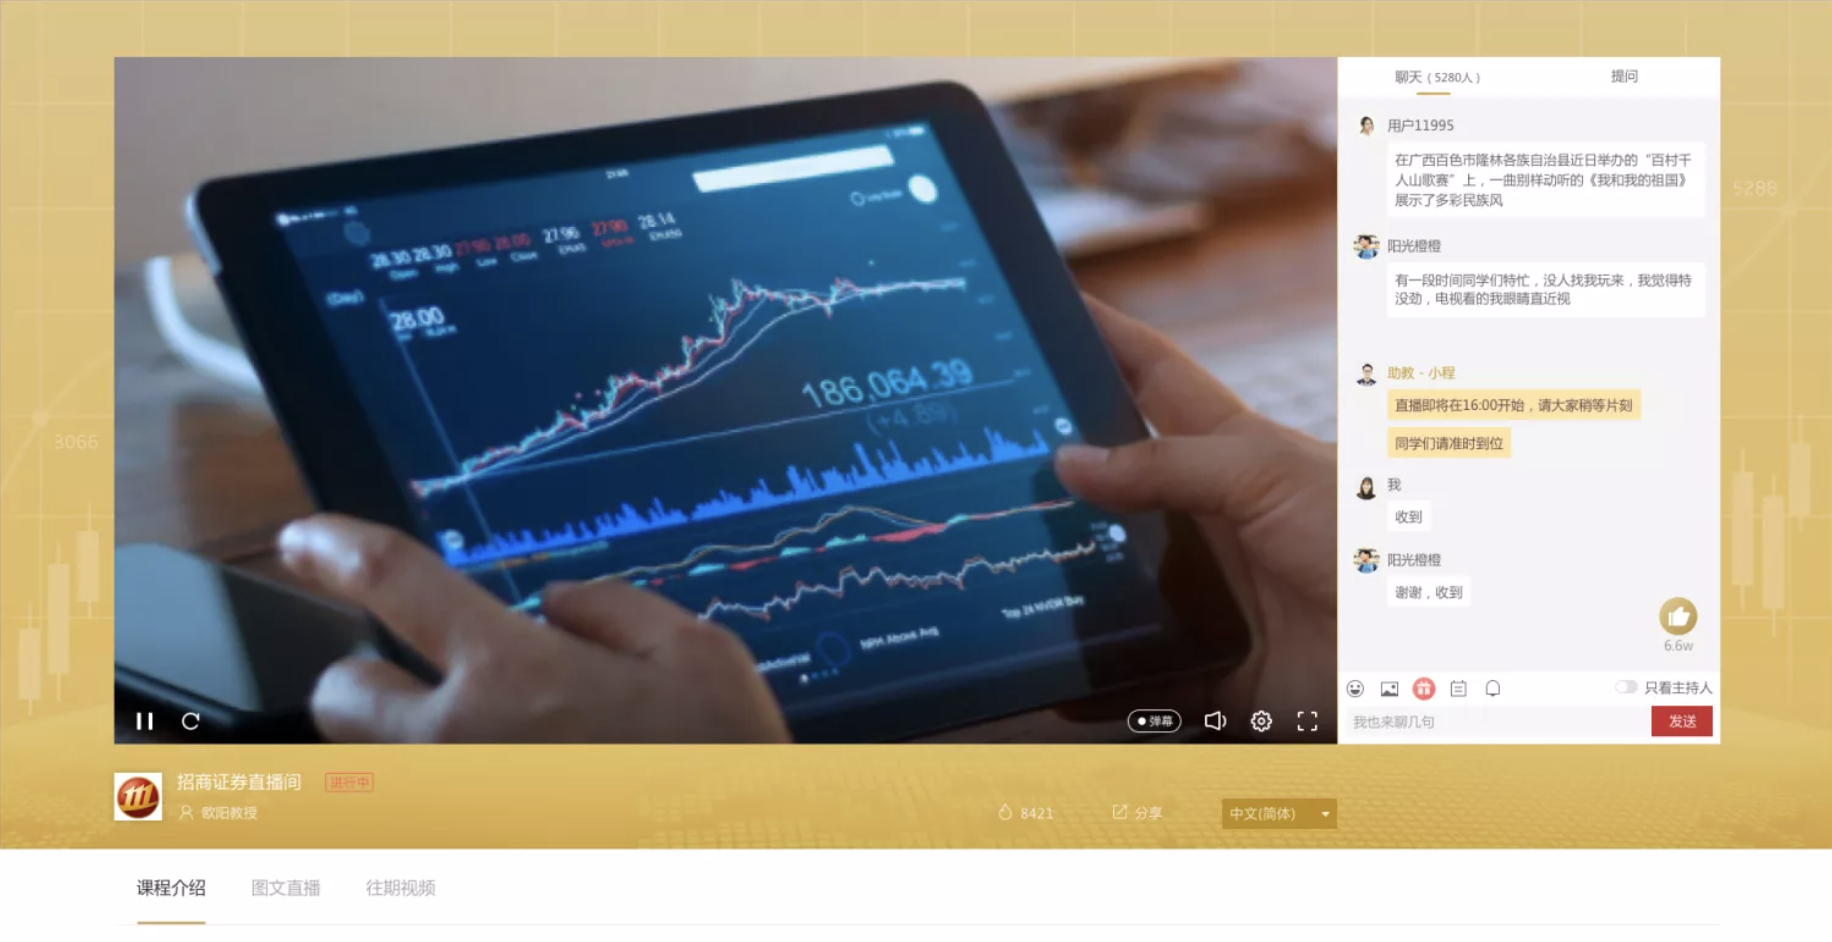
Fugui Gold
Applicable to scenarios such as wealth management, finance, automotive, and real estate.
Classic White
Relatively universal, suitable for various scenarios.
Warm-up Settings
Before the live stream begins, you can set a video to play or an image to display, in order to alleviate the anxiety of the audience waiting.
1. For video warm-up, turn on the warm-up switch, upload a video no larger than 50MB, or enter an MP4 online video URL in the video address field.
2. For image warm-up, you can upload an image. The recommended image size is 1280×720 pixels, and supported formats include jpg, jpeg, png, and gif.
3. Image warm-up supports setting a redirect link; clicking the image will navigate to the specified page.
Watch Condition Settings
Now, the viewing condition settings can have two conditions coexisting, but the two conditions under the dual-condition mode cannot be identical. Additionally, share-based viewing can only be set as a secondary viewing condition.
The dual-condition effect works as follows: selecting any verification method and passing it allows entry into the live stream.
Pay to Watch:
In the backend, set the price for live streaming viewing and select the payment validity period. There are three options available; choose according to actual needs.
At this point, viewers must pay successfully to enter the live streaming viewing page.
Whitelist Viewing:
Users on the whitelist can directly watch the live stream after entering the correct verification, which can also be understood as setting up VIP member users.
The specific setup is as follows: first, download the whitelist template table, enter the member list information, import it into the backend, and save it. Note that the imported template must be downloaded from here. Click "View Whitelist" to see the current list information.
Register to Watch:
In the backend, configure the information to be registered, such as name, phone number, etc., with a maximum of 5 fields.
On the live streaming viewing page, fill in the relevant information to watch the stream. Click to view the registration list, check the information filled in by viewers, and export the list as marketing data support.
CAPTCHA Verification for Viewing:
In the backend, after entering the correct verification code, upload the QR code of the official account, fill in the prompt text, and you're done. This way, the audience can scan the QR code to obtain the verification code information and watch the live stream. The verification code is unique and specific. This viewing condition can help attract followers to the official account~
Custom Authorization:
For specific process and parameter descriptions, refer to: Custom Authorization
External Authorization:
For specific process and parameter descriptions, refer to: External Authorization
Live Stream Subscription Settings
Feature Overview
This feature is designed for viewers who wish to follow the official account. Obtain the official account QR code from the backend, upload it to the platform, and when viewers enter the live stream page, a pop-up will display the QR code. Viewers can long-press to follow the official account.
Instructions
In the "Live Stream Backend - Marketing - Follow Official Account" section, upload the official account QR code. After confirming and saving, a "Follow" button will appear on the live stream page. If the automatic pop-up is enabled, the QR code and prompt text will be displayed automatically. If disabled, viewers will need to click the "Follow" button to see the pop-up.
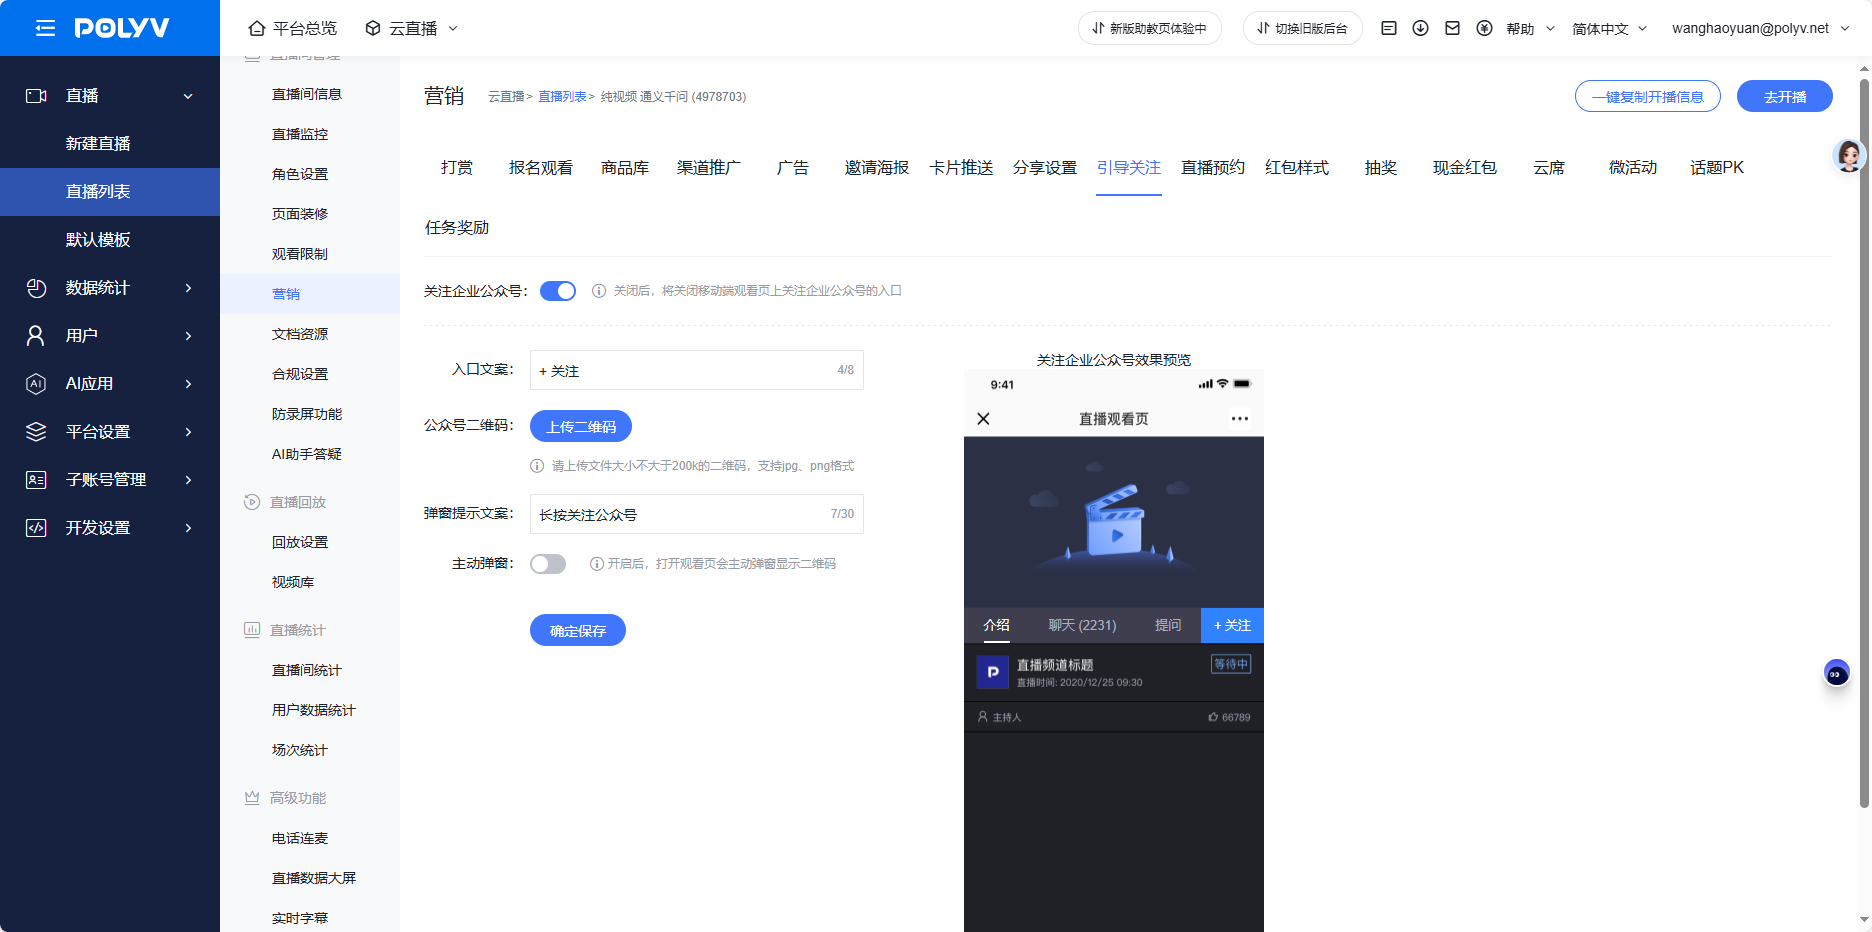
A QR code appears on the viewing page; long press to follow the official account.
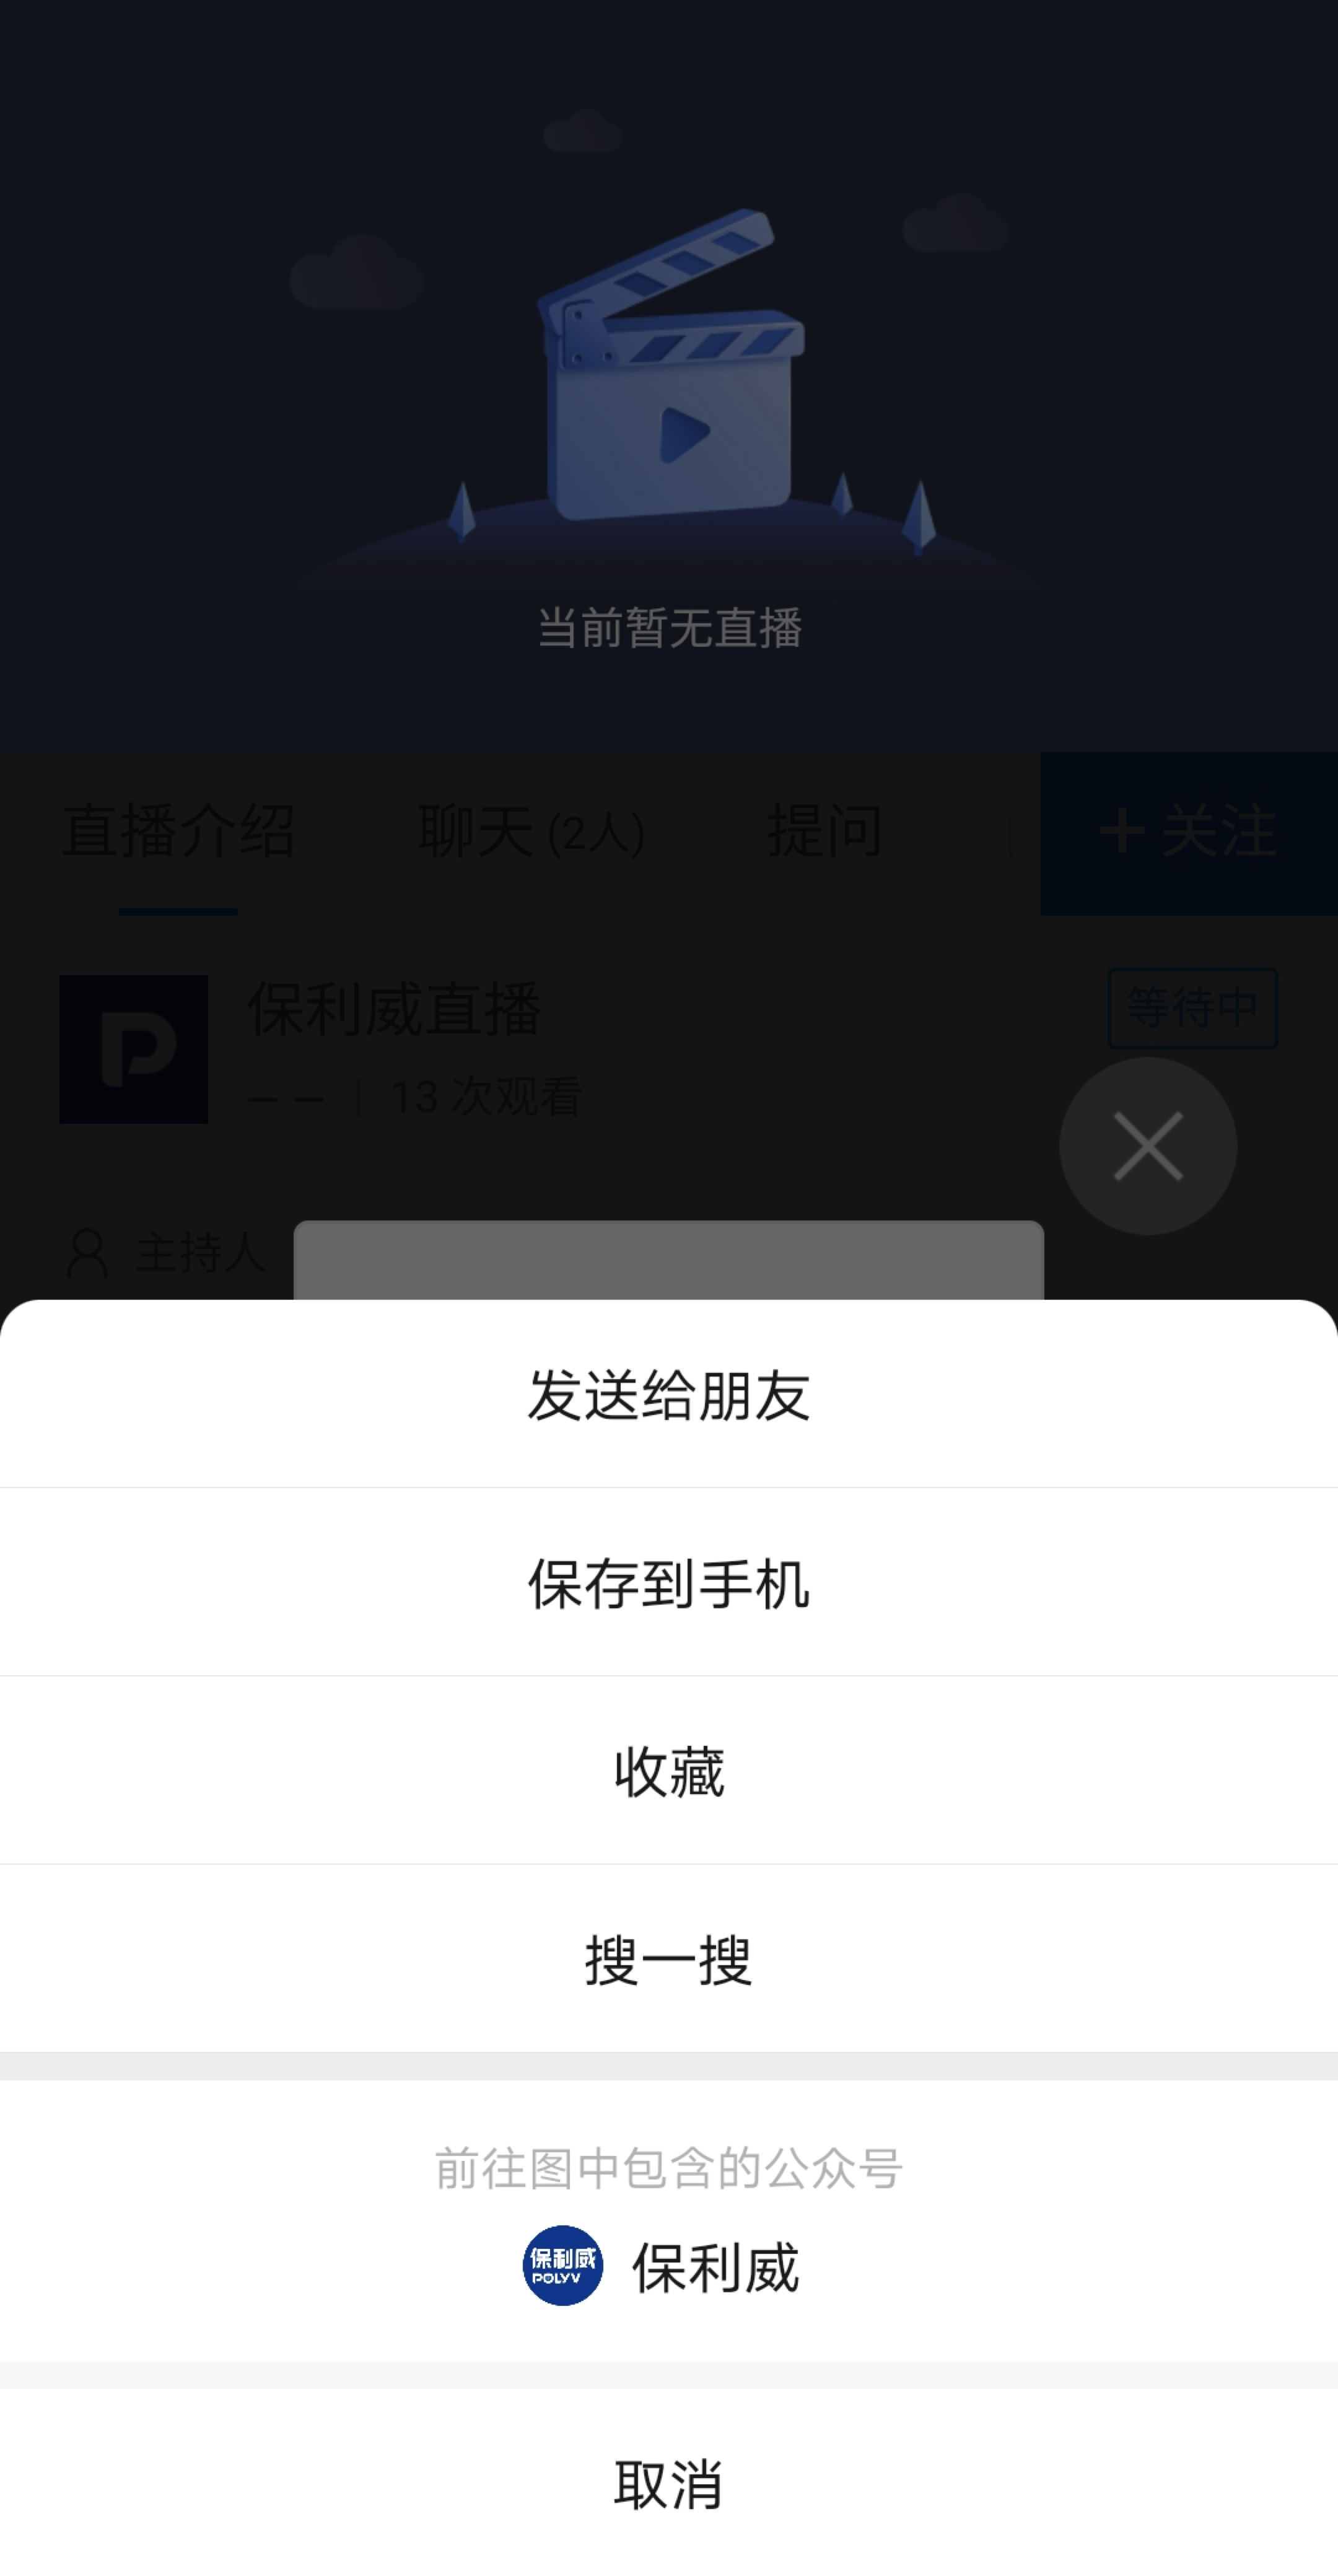
Note: QR code links, personal WeChat IDs, WeChat group links, and enterprise WeChat QR codes are all acceptable.
Marketing Promotion Settings
<script>
  new Vue({
    el: '#player',
    data() {
    return {
      vodPlayerJs: 'https://player.polyv.net/script/player.js',',
      vid:'88083abbf593941c95d94d6ea7f419c7_8',
    };
  },
  mounted(){
      this.loadPlayerScript(this.loadPlayer);
  },
  methods: {
    loadPlayerScript(callback) {
      if (!window.polyvPlayer) {
        const myScript = document.createElement('script');
        myScript.setAttribute('src', this.vodPlayerJs);
        myScript.onload = callback;
        document.body.appendChild(myScript);
      } else {
        callback();
      }
    },
    loadPlayer() {
      const polyvPlayer = window.polyvPlayer;
      this.player = polyvPlayer({
        wrap: '#player',
        vid: this.vid ,
        autoplay:false
      });
    }
  },
  destroyed() {
    if (this.player) {
        this.player.destroy();
    }
  }
  })
</script>
Want to increase live stream traffic, exposure, and achieve viral spread? The live streaming marketing feature can help you achieve this. Let's take a look:
Enter the channel management backend and open the marketing settings.
Feature 1: Promotion
After enabling this feature, an entry to follow the official account will be displayed on the mobile viewing page during live streaming.
The specific settings are as follows: click to enable, set the entry text, and the entry will appear on the right side of the custom menu bar. Then upload a QR code smaller than 200KB along with the pop-up prompt text. You can preview the effect in the preview area on the right. Enable the active pop-up as needed, and after completing the settings, click Confirm to save.
Feature 2: Invitation Poster
Once this feature is enabled, you can automatically generate beautiful live streaming posters in just a few steps without any design work. The generated poster can be shared to WeChat, and viewers can enter the live stream by scanning the QR code on their phones.
Let's take a look at the specific settings. First, you can replace the cover image. The cover image supports JPG, JPEG, and PNG formats, with a file size not exceeding 2 MB. Then, set the live stream name, host, and start time. There are five poster styles to choose from based on the live stream's theme. After completing the settings, click Confirm to save. Finally, click the Download Poster button in the top right corner to share the image to mobile devices.
The Invitation Ranking feature uses marketing incentives to help you achieve live stream virality. Once enabled, viewers can access the invitation interface from the bottom right of the mobile viewing page. After selecting a poster style, they can save the image and share it with WeChat friends. When a friend scans the poster's QR code to enter the live stream, the viewer gains one invite count. Clicking on the Invitation Ranking allows you to view each viewer's invite count and ranking.
Feature 3: Share Settings
This section primarily edits the link content shared to WeChat. You can modify the channel icon, set the title and description, and preview the effect in the preview area on the right.
Both the WeChat client and web client allow customizing the share URL. Once configured, when viewers open your shared link, they will be redirected directly to the custom address.
For the settings of advertisements and invitation card features, scan the QR code below to learn more details.
Product Promotion Settings
Feature Overview
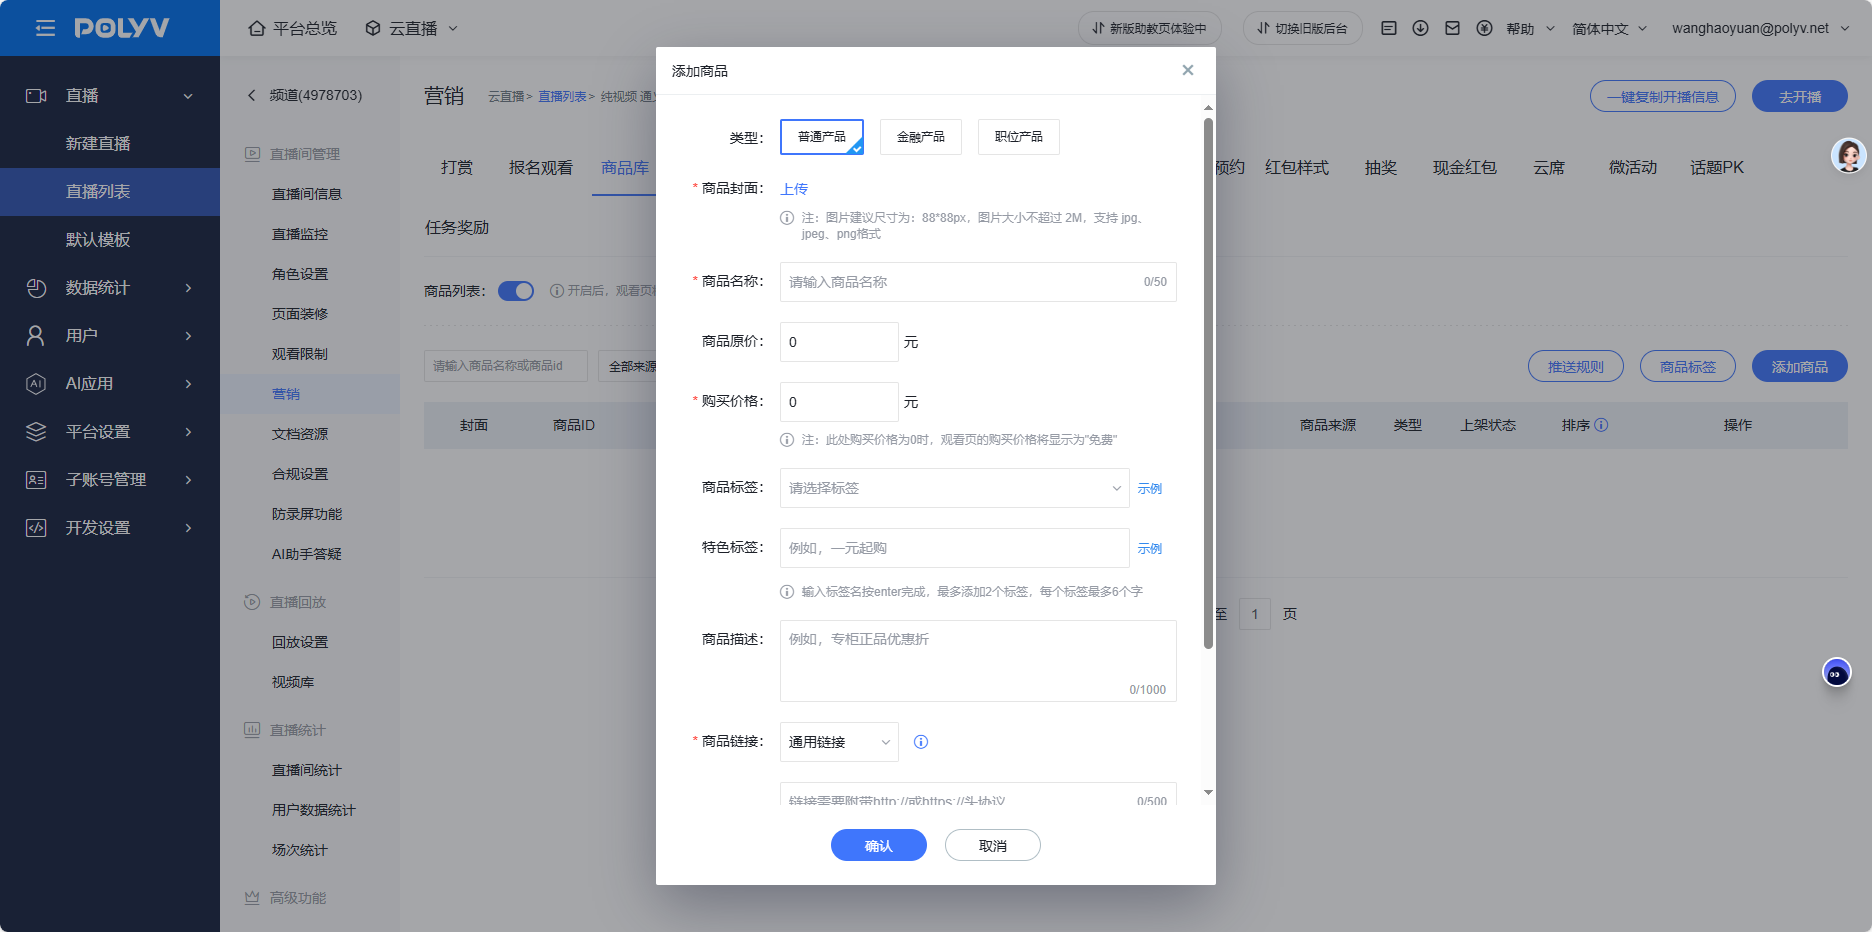
In a live-streaming e-commerce scenario, products can be added and pushed to the viewing page for viewers to purchase. The product library is where product management takes place, allowing the setup of both general products and financial products. For each product, settings such as name, image, price, tags, and redirect links can be configured. Product push and management of the product list order are also supported.
Operation Instructions
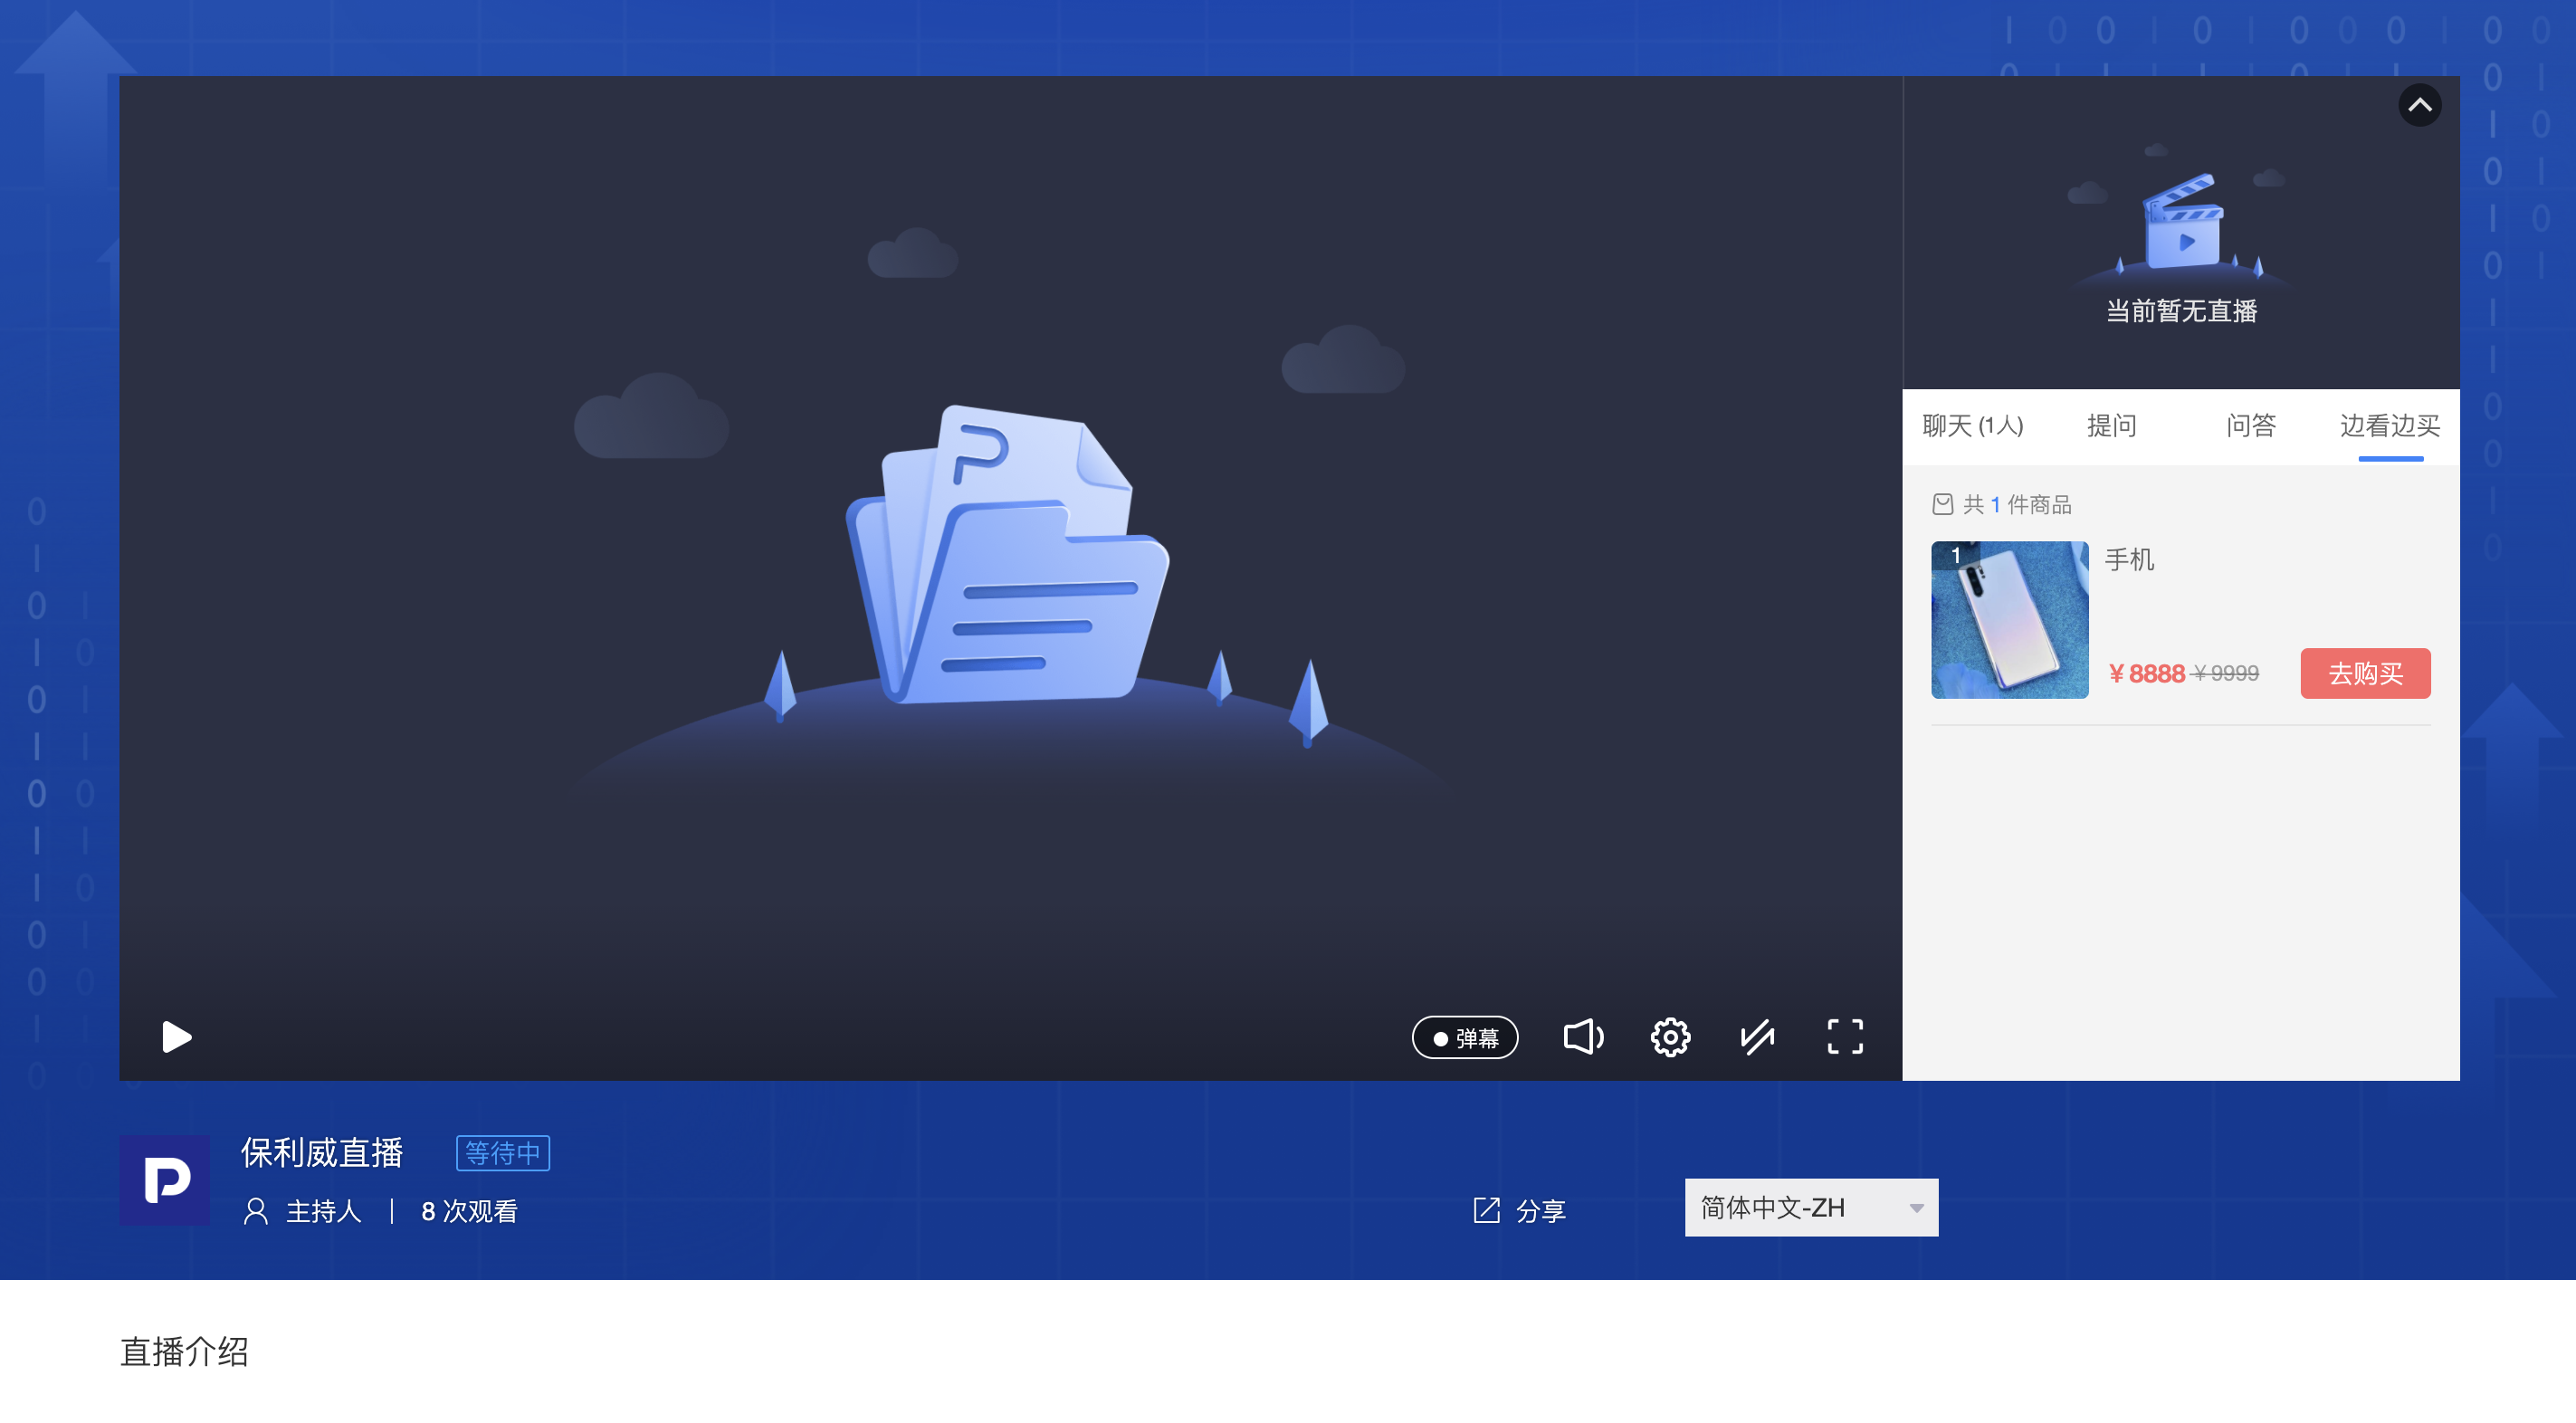
In "Live Streaming Backend - Viewing Page Management - Product Library", toggle the switch on. The regular live streaming viewing page will then display "Watch and Buy", while the shopping live stream will show the Product Library icon.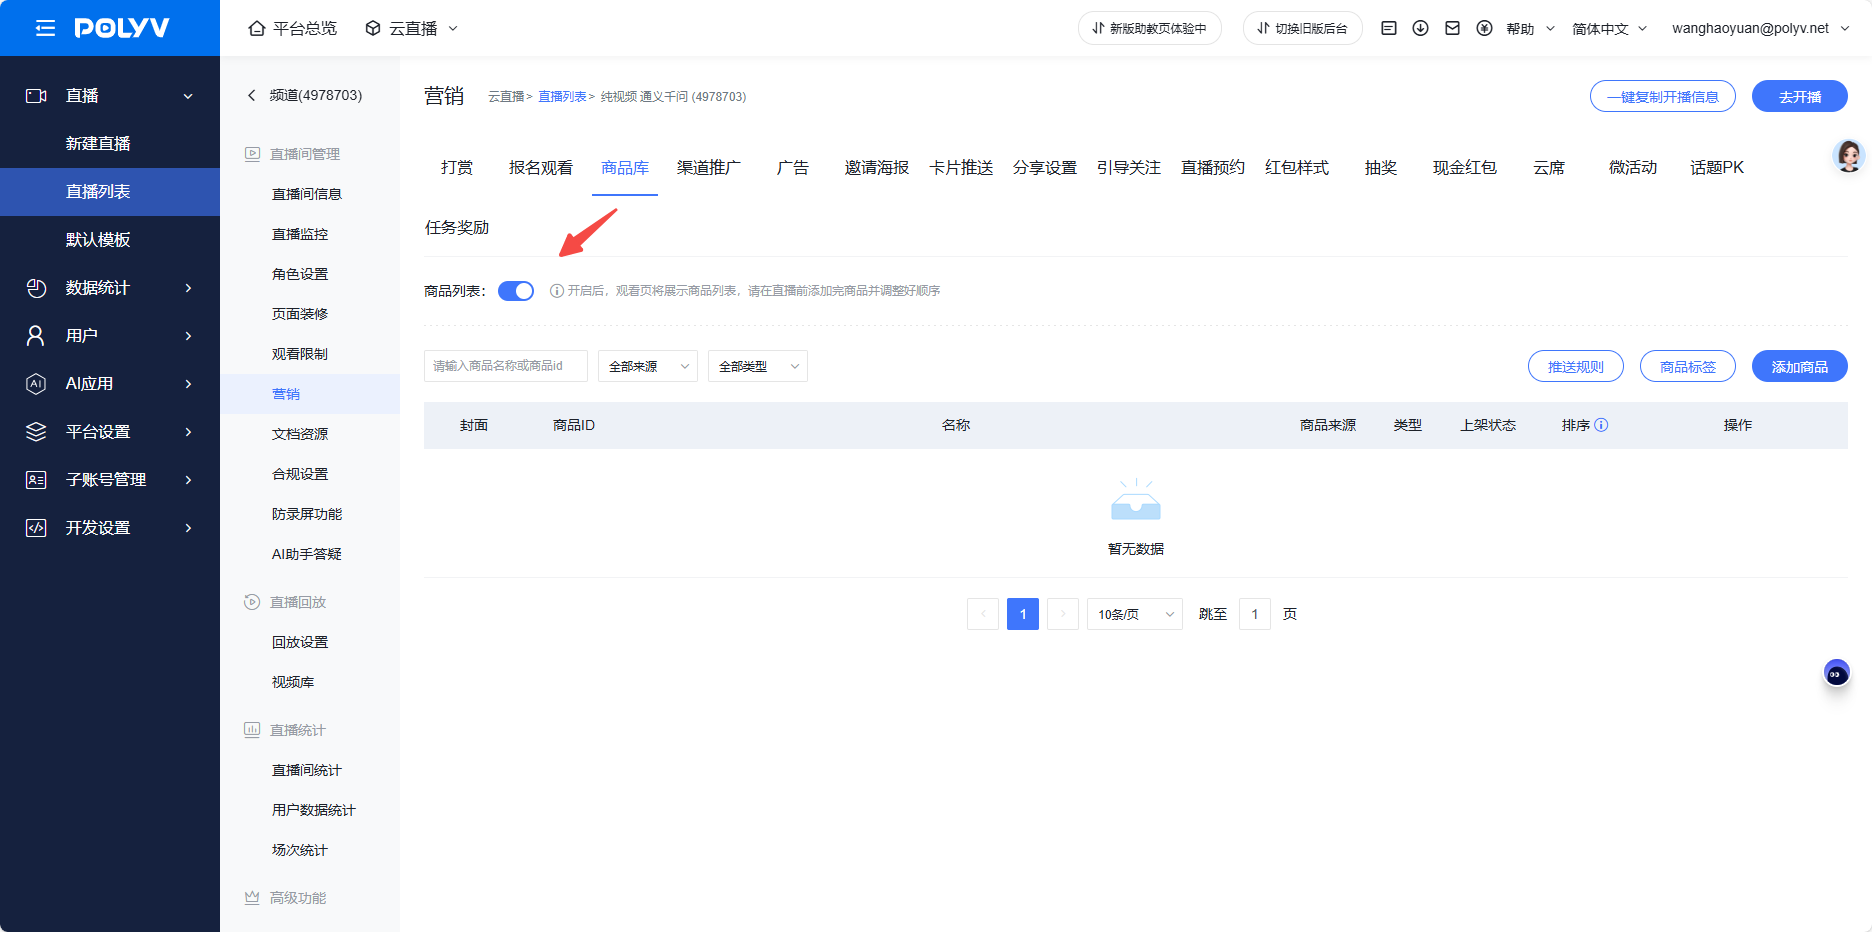
Click "Add Product" to configure product information. After filling in the details, select "Confirm".
Notes:
- The web-side redirect link must include http://或https://头协议,否则链接将不可用.
- The redirect links are purchase links for Taobao and Tmall. When clicking "Go to Purchase" in WeChat, it will redirect to a blank page or prompt "Please open the link in a browser."
- WeChat Mini Programs can be integrated. For details, refer to the official WeChat documentation https://developers.weixin.qq.com/doc/offiaccount/OA_Web_Apps/Wechat_Open_Tag.html.
After the product is added, click Push to send it to the viewing page.
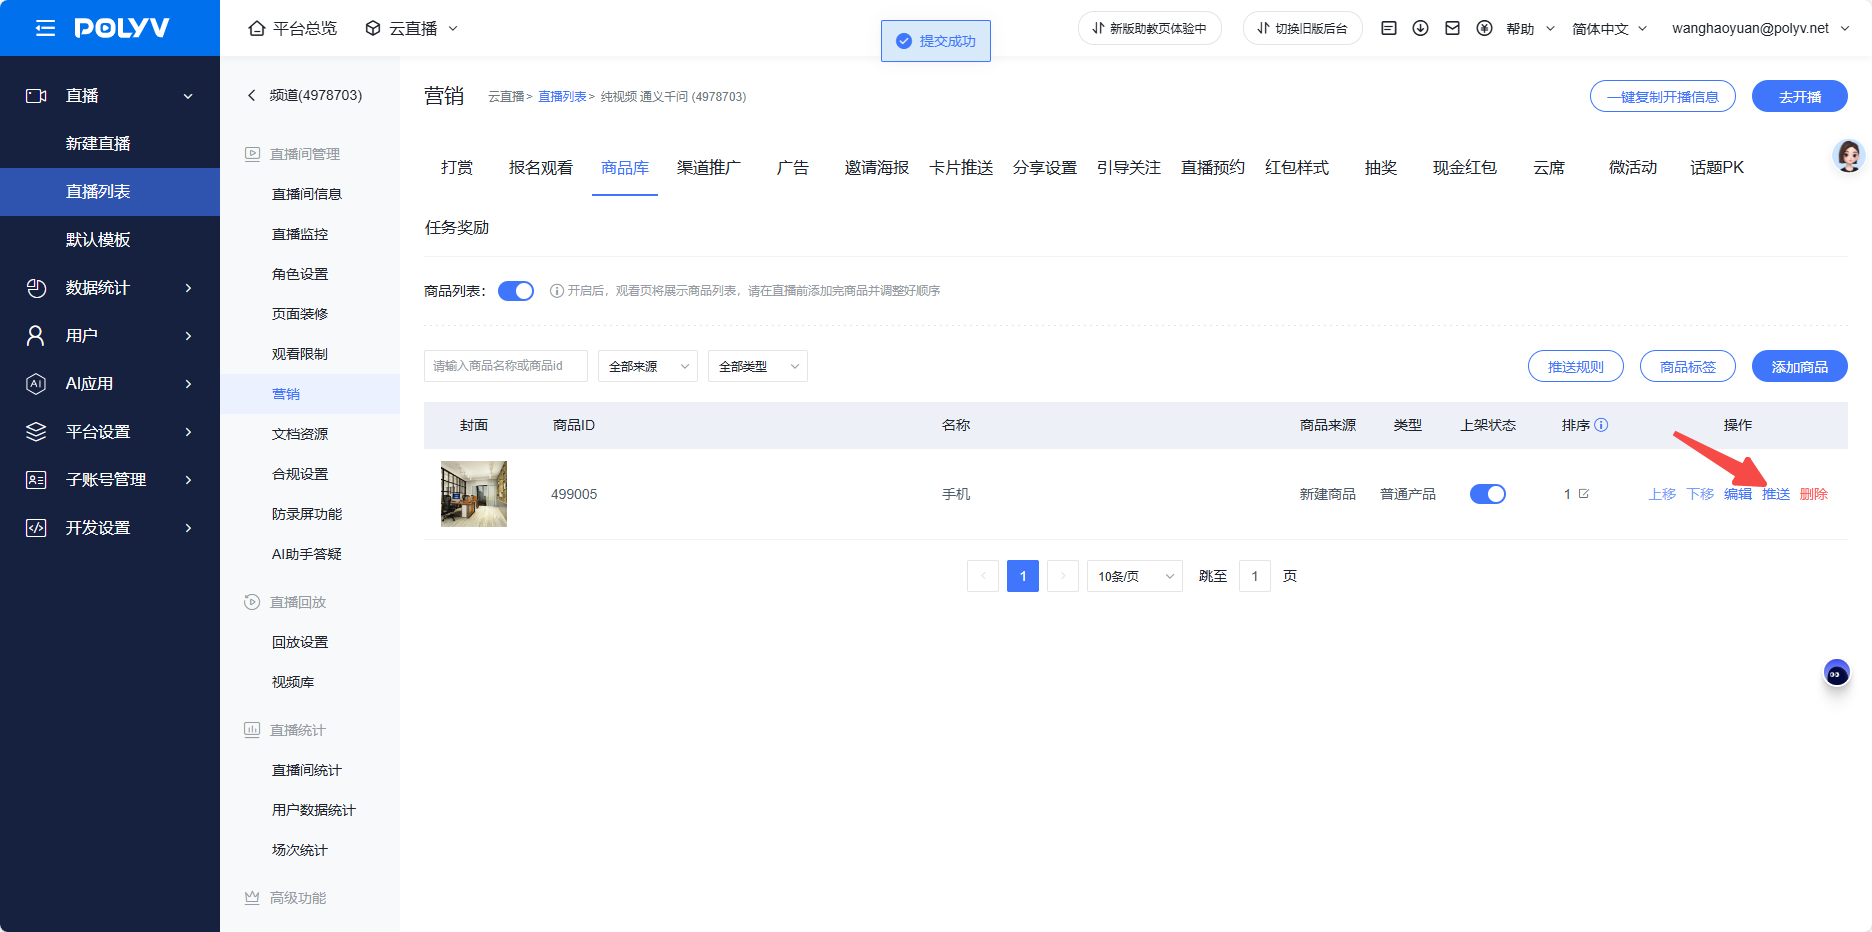
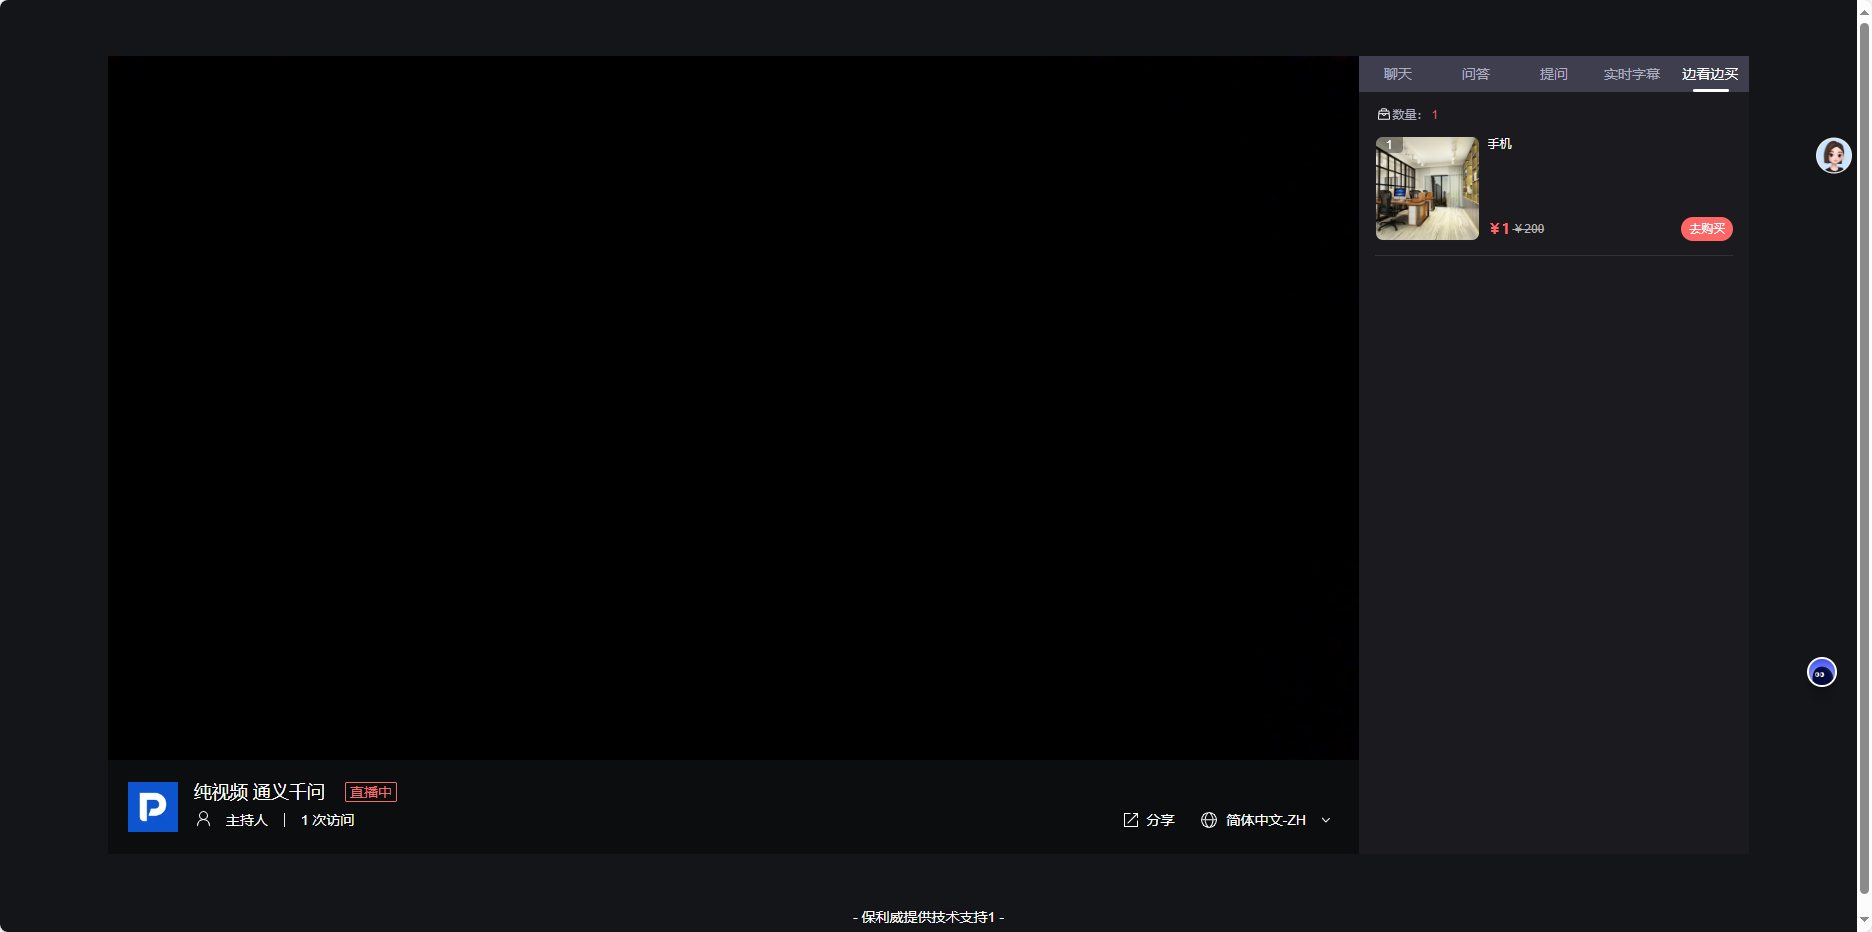
Products will be pushed in the form of cards, with each push lasting 5 seconds.
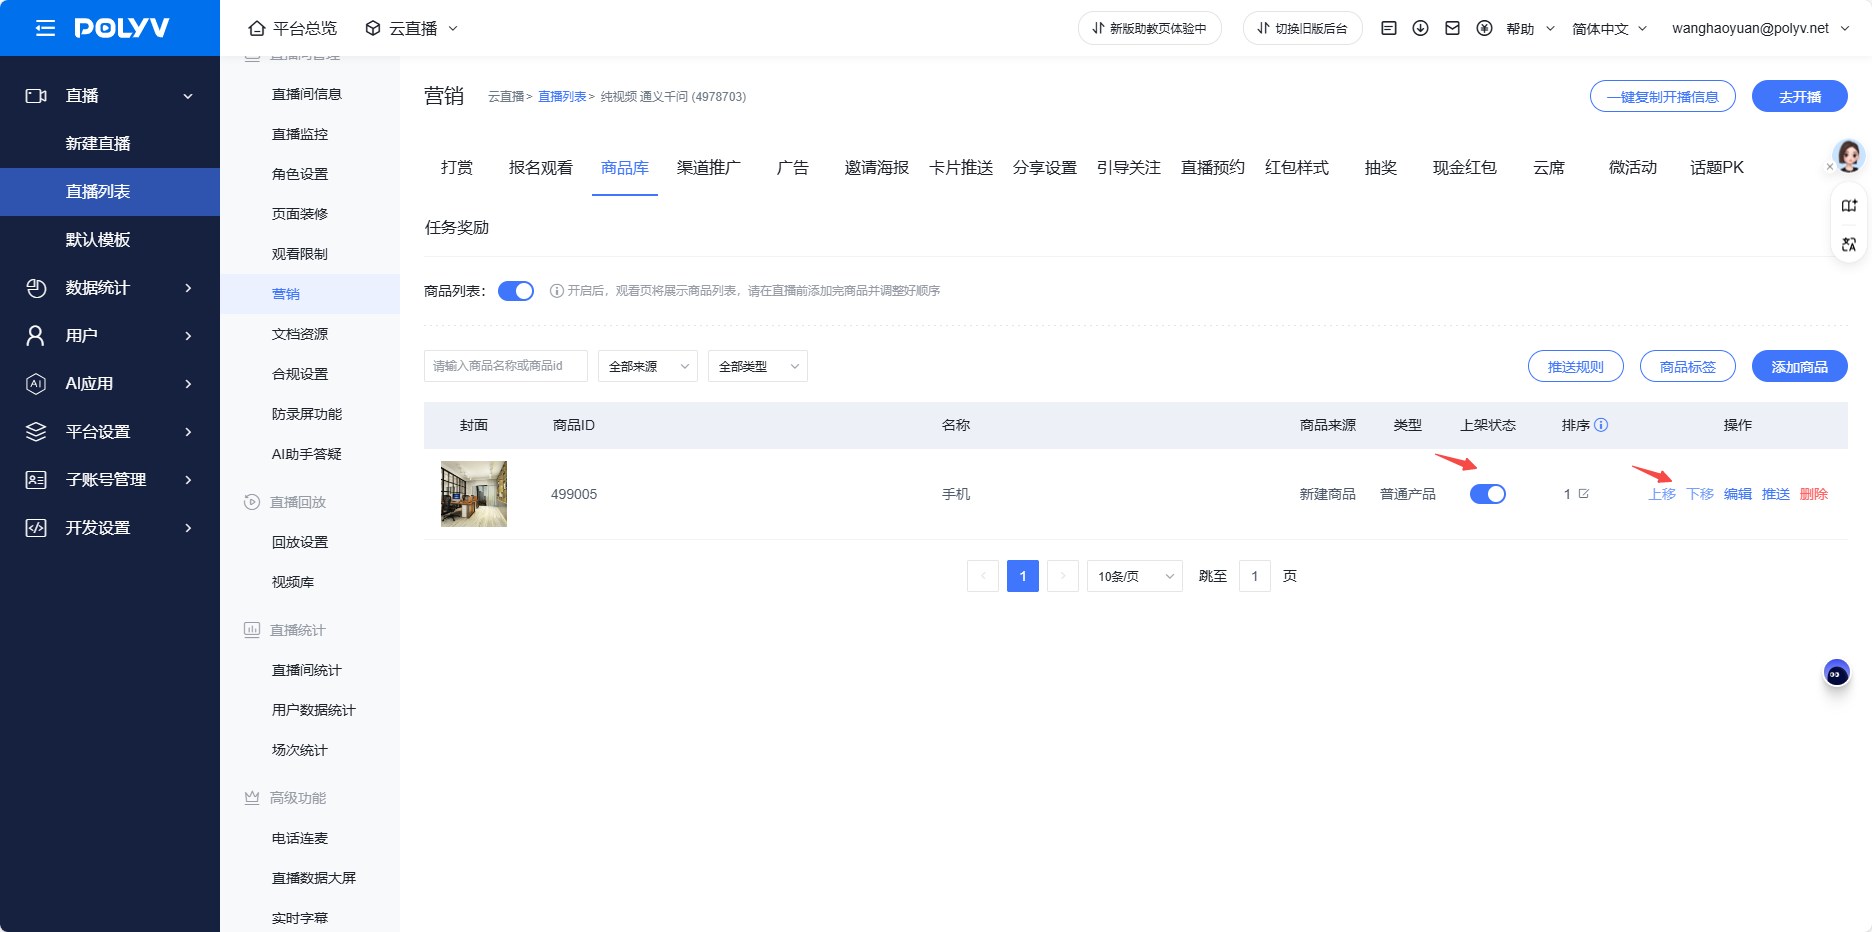
When the listing status toggle is off, the product will not be displayed to viewers; conversely, it will be shown. Click "Move Up" or "Move Down" to adjust the product order, and the product order on the viewing page will change accordingly.
Playback Settings
<script>
  new Vue({
    el: '#player',
    data() {
    return {
      vodPlayerJs: 'https://player.polyv.net/script/player.js',',
      vid:'88083abbf50f3f8a735848fab5f78b89_8',
    };
  },
  mounted(){
      this.loadPlayerScript(this.loadPlayer);
  },
  methods: {
    loadPlayerScript(callback) {
      if (!window.polyvPlayer) {
        const myScript = document.createElement('script');
        myScript.setAttribute('src', this.vodPlayerJs);
        myScript.onload = callback;
        document.body.appendChild(myScript);
      } else {
        callback();
      }
    },
    loadPlayer() {
      const polyvPlayer = window.polyvPlayer;
      this.player = polyvPlayer({
        wrap: '#player',
        vid: this.vid ,
        autoplay:false
      });
    }
  },
  destroyed() {
    if (this.player) {
        this.player.destroy();
    }
  }
  })
</script>
How to set up live replay after the live broadcast ends?
Step 1:
Enable the channel number replay function. Log in to the Polyv official website backend, click on Cloud Live, select the live room that requires replay, click Settings, then under Replay Management, click "Replay Settings" and turn on the replay function on the viewing page.
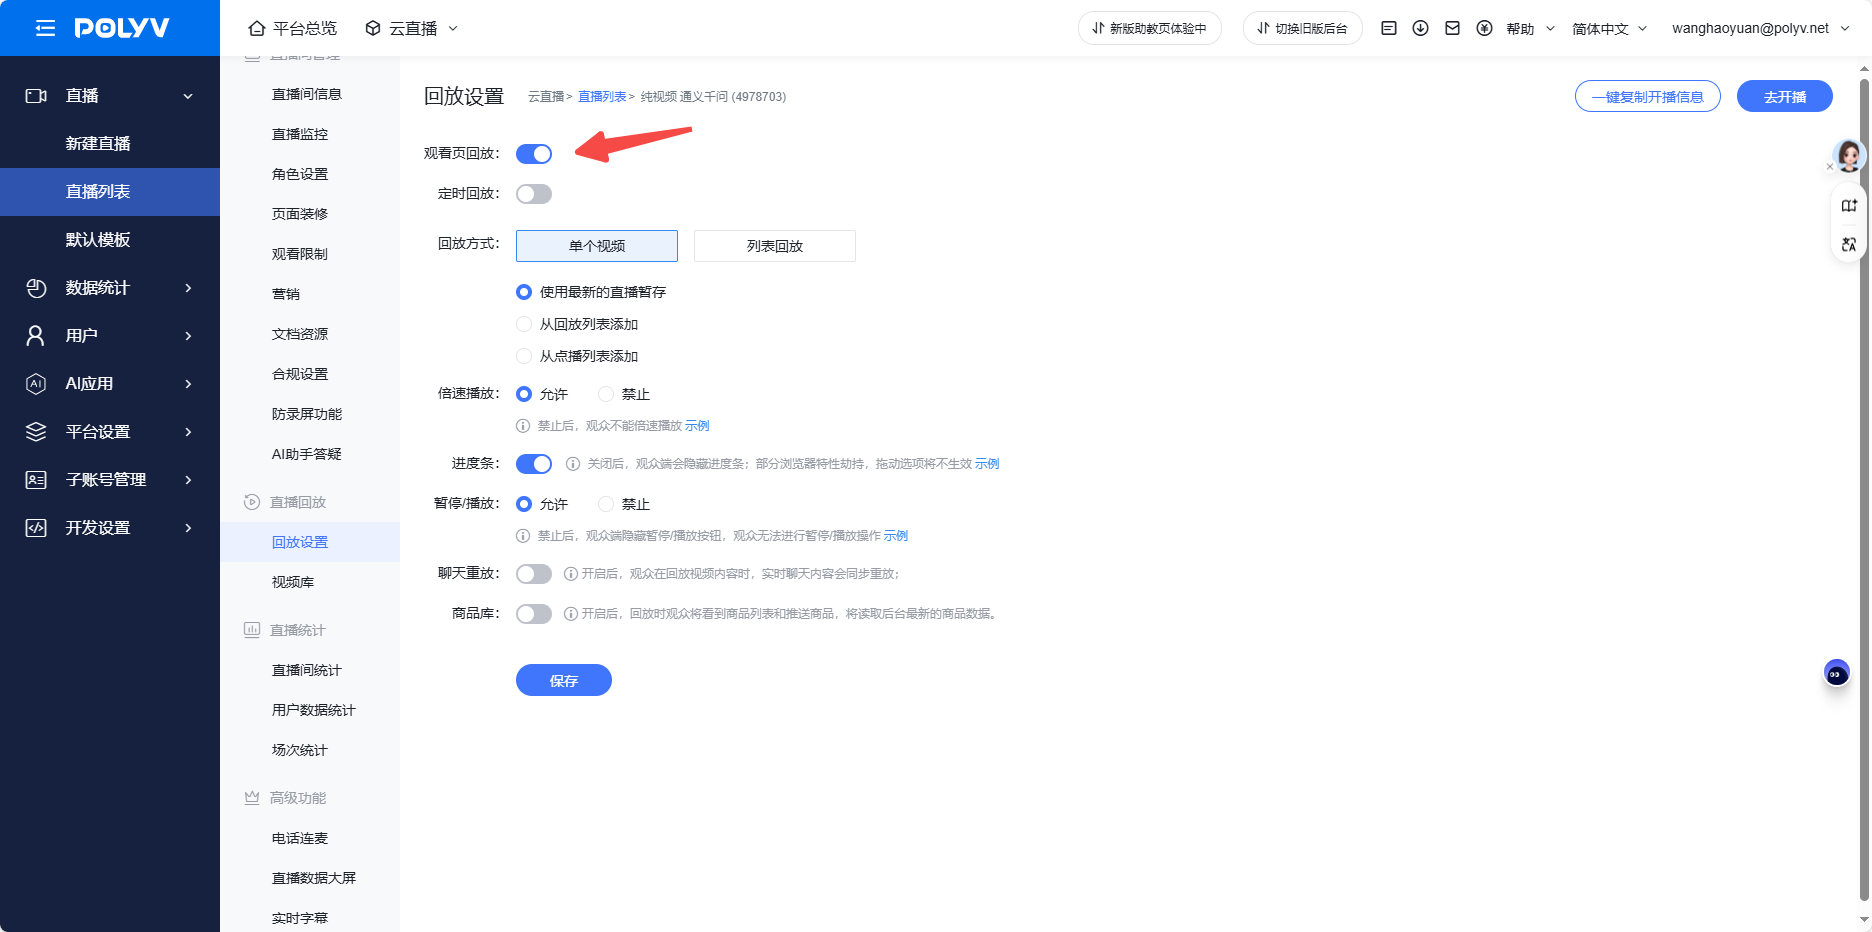
Step 2:
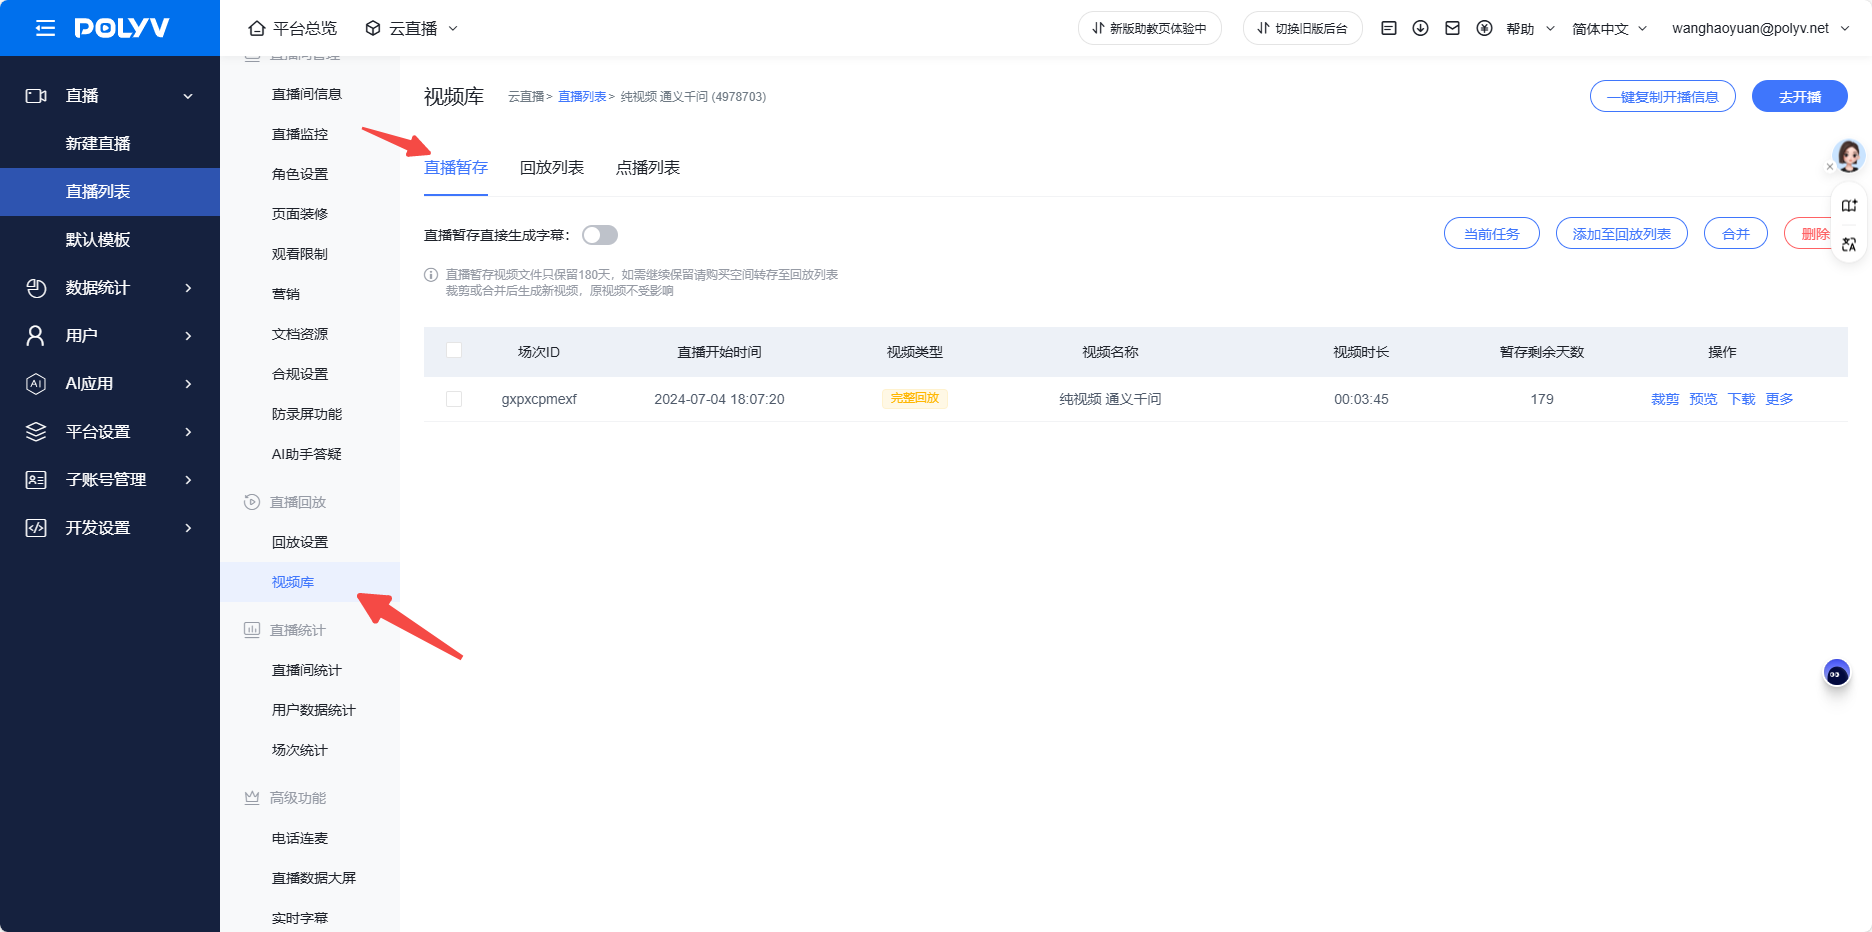
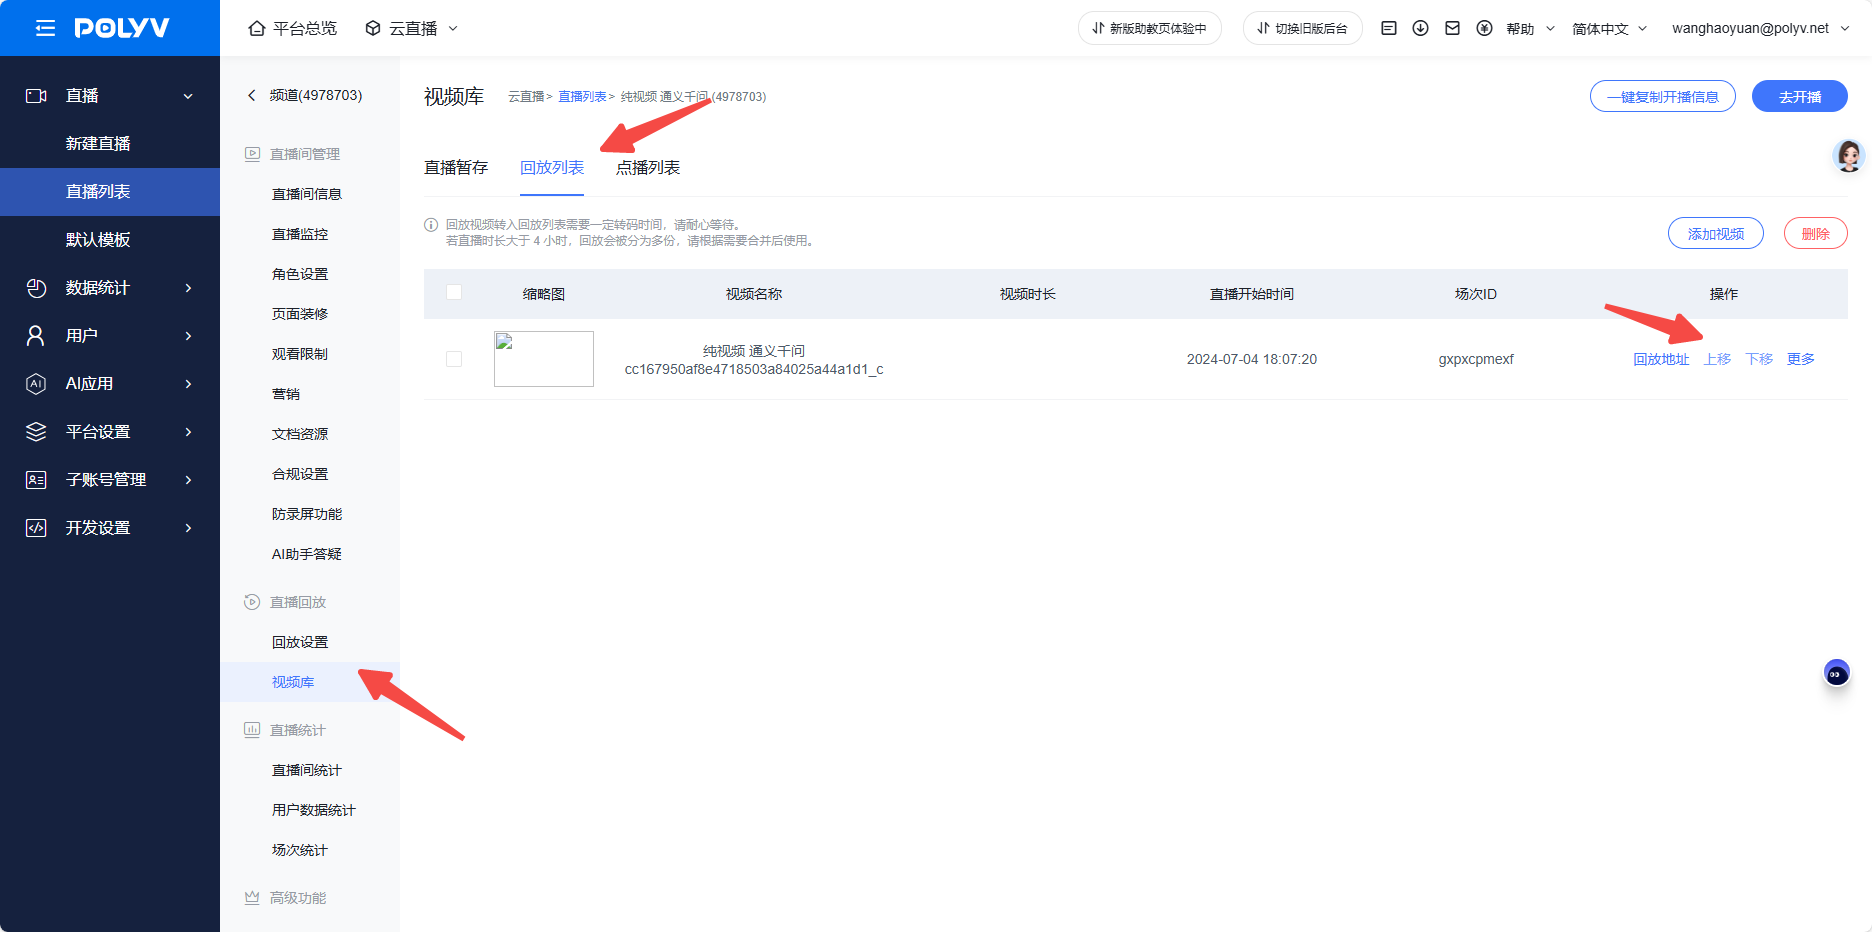
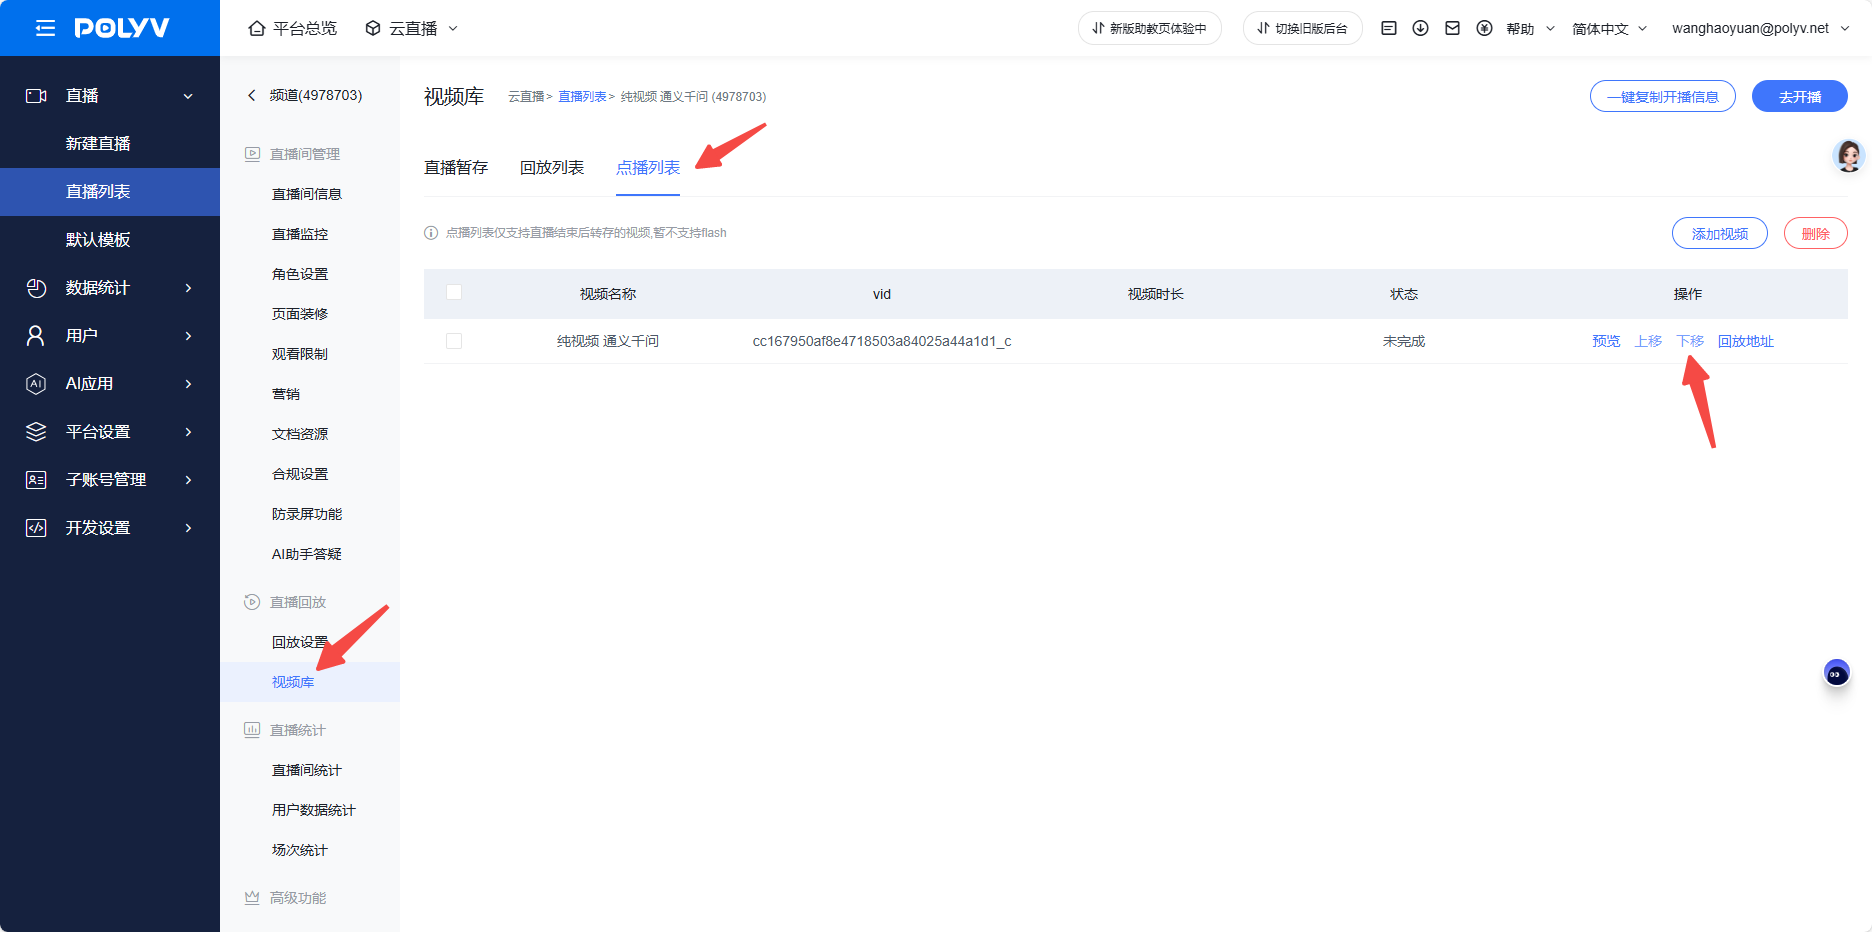
Add the replay video. As you can see, there are two replay modes. The first is "Single Video," where the viewing page only replays the specified video. The second is "Replay List," where the viewing page replays videos from a configured video list. Choose according to your needs. Now, you need to add a replay video. Since all replay videos that can be added are selected from the video library, we first need to set up the video library. Click on "Video Library." Note: In the three-screen mode, the video library has two options, while in the standard live streaming mode, it has three options. We will use standard live streaming as an example; the same applies to the three-screen mode.
Live Recording Staging:
After a live stream ends, a video file is generated and retained in the live recording staging area.
Playlist:
Supports playing multiple live replay videos. During live streaming staging, select multiple videos to replay, click "Add to Replay List". After the videos are successfully transferred, you can open the replay list and adjust the playback order by moving items up or down. You can also enable auto-transfer in the general settings feature toggle, so that after a live stream ends, staged files are automatically added to the replay list. When live staging videos are saved to the replay list, they are simultaneously generated in the cloud VOD video list. Note that the viewing history of the replay list is stored in the account statistics of the cloud live streaming service.
VOD List:
In addition to adding live replay videos, you can also add videos uploaded via VOD. How exactly do you add them? Click on Cloud VOD, then Video List, select a video, click "Video Settings", enter the live channel number in the tag field. Then, go back to the VOD list, click "Add Video", and select the video you want to add. Similarly, videos added to the VOD list can have their playback order adjusted.
Note that the viewing history of the VOD list is saved in the data statistics of Cloud VOD.
Now that all videos in the video library have been added, let's go back to the replay settings and add videos to the replay list.
Single Video Playback:
1. Click "Use the latest live stream cache", confirm to save, and the viewing page will default to playing back the most recent live stream content.
2. Click "Add from playback list", select the video to be played back, click "Add video", choose a video to confirm the addition, then click save. The viewing page will play back the selected video.
3. Click "Add from on-demand list", similarly select the video to be played back, confirm the addition, and save. The viewing page will play back the selected on-demand video.
List Playback:
Simply select the previously configured playback list or on-demand list, and it will work.
Finally, two points to note:
1. Video files in the live stream cache are retained for only 180 days. To keep them permanently, please transfer them to the playback list.
2. After the live stream ends, generating the live stream cache file requires some transcoding time. Please be patient.
Data Statistics
The statistical summary mainly aggregates live streaming data across all channels on different dates, including visit count, watch duration, number of viewers, average watch duration per viewer, and average visit count per viewer.
Data statistics are categorized and calculated based on different conditions.
- Channel Summary: Aggregates live streaming data for each channel across different time periods.
- Daily Summary: Aggregates live streaming data for the current day across different time periods. Available in both list and chart views.
- Geographic Distribution: Shows the geographic distribution of viewers across different time periods, including China and global distribution. The right side displays a top 10 regional share ranking.
- Viewing Devices: Shows the device distribution of viewers across different time periods. The right side displays a top 10 device share ranking.
- Peak Concurrent Viewers: Shows the peak number of concurrent viewers across different time periods. The right side displays a channel distribution table for peak concurrent viewers.
- Channel Viewing Details: Tracks each viewer's activity, including watch duration, viewing address, and region.
- Channel Concurrent Viewers: Exclusive to channel statistics, allows viewing real-time concurrent viewers and historical concurrency numbers.
Live Streaming Anti-Screen Recording Marquee
Using the POLYV video marquee, fixed text or visitor IDs can be displayed moving irregularly across the video, thereby preventing screen recording.
- There are three types of marquee to choose from: fixed value, login username, and custom marquee.
- Fixed value means entering a fixed piece of content, which will scroll across the screen in the form of a marquee.
- Login username: when a whitelist or custom authorization is set, the marquee will display the viewer's username.
- Custom marquee allows you to set a personalized marquee style via an API. For specific parameters, click the link below to view the API documentation.
General Settings
I. Functional Approach
Cloud Live Streaming → Live Streaming → Default Template
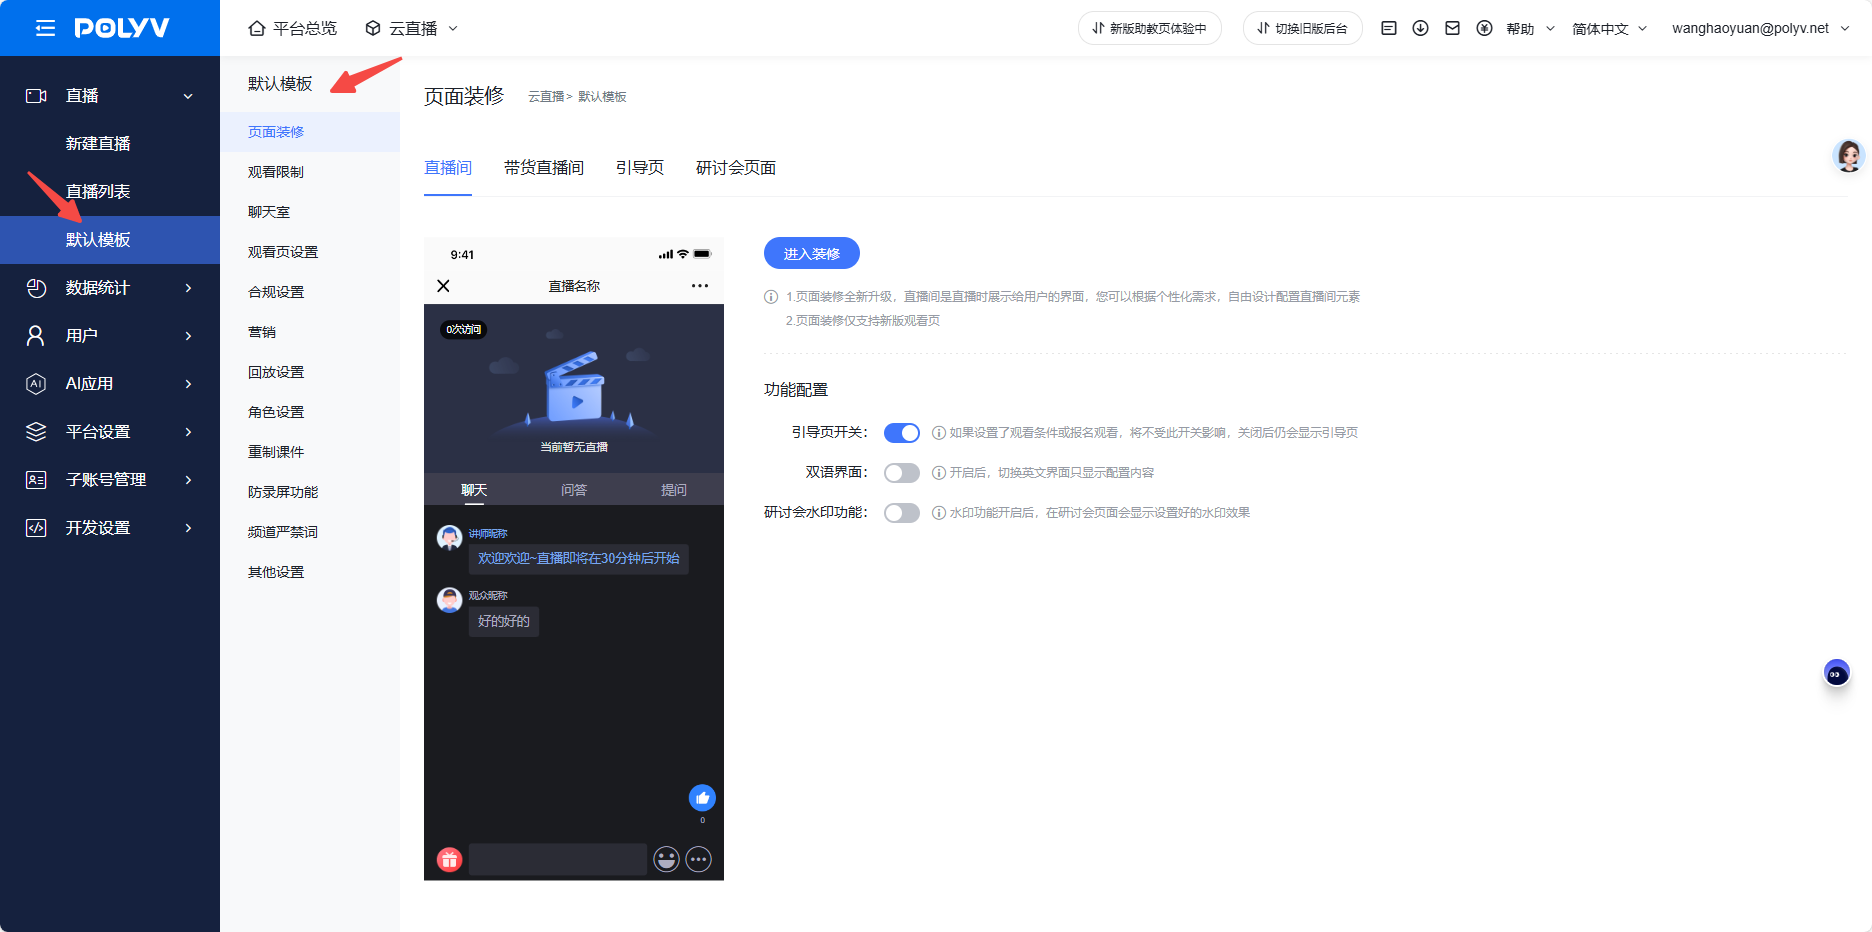
II. Feature Introduction
- Features in General Settings apply to all channels within the account.
- The features in General Settings include:
- General Settings: Prohibited words in chat rooms
- Default Value Settings: Viewing conditions, tipping settings, advertisement settings, anti-screen recording marquee
Note:
1. Chat room prohibited words: Apply to all channels and coexist with the prohibited word settings within individual channel settings.
2. Viewing conditions, tip settings, ad settings, anti-recording watermark: For newly created channels, the above features use default values. For channels that have already been configured, the channel settings take the highest priority, meaning you can only choose between the default values and the channel settings.