


Host User Guide
1. Login and Device Check
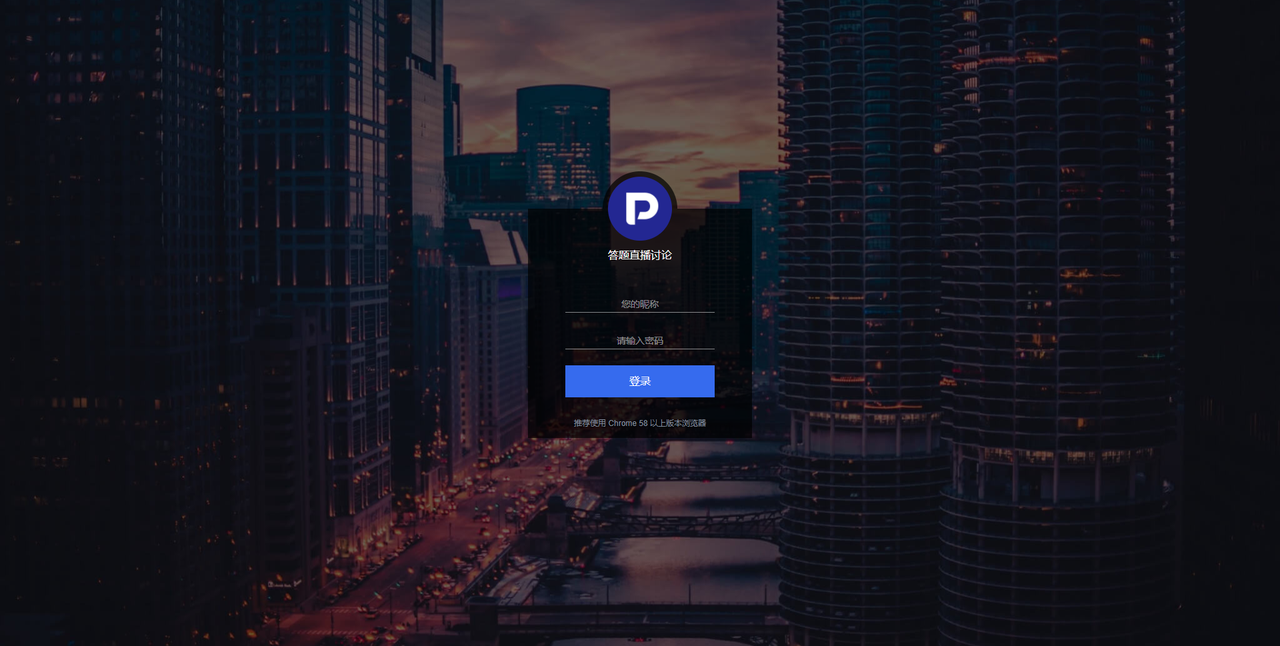
The host opens the login URL in a browser, enters the host nickname and password, and clicks the login button to enter the device check process.
Note:
- If the host password is changed, please log in with the new password.
- If the nickname does not meet the requirements, please modify it according to the on-screen prompts before logging in.
- Currently, only computer browsers are supported for login.
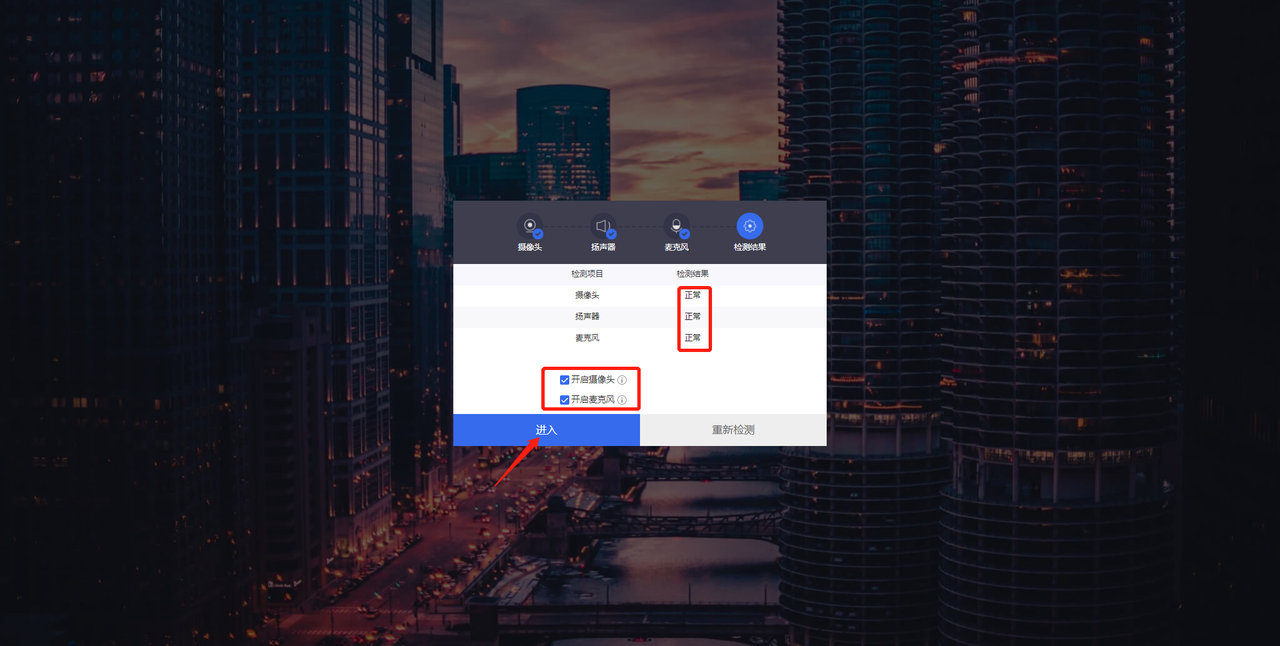
The device check includes camera, microphone, and speaker tests. After the check is complete, the results will be displayed, and the device status for entering the seminar will be set. Click the "Enter" button.
2. Page Layout
| Supported Layout UI Versions | Left-Right Layout | Grid Layout | Speaker Layout |
|---|---|---|---|
| Old UI Layout | Supported️ | Not Supported️ | Supported️ |
| New UI Layout | Supported️ | Supported | Supported️ |
1. Old Seminar UI Layout
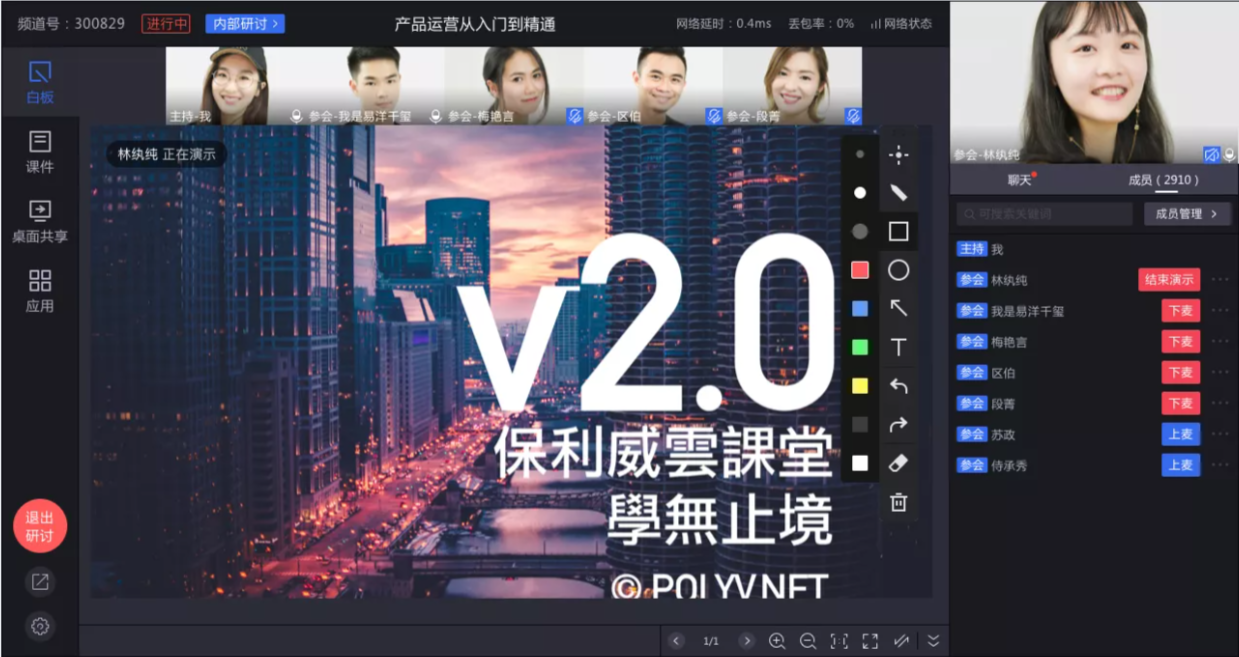
2. New Seminar UI Layout
Grid Layout
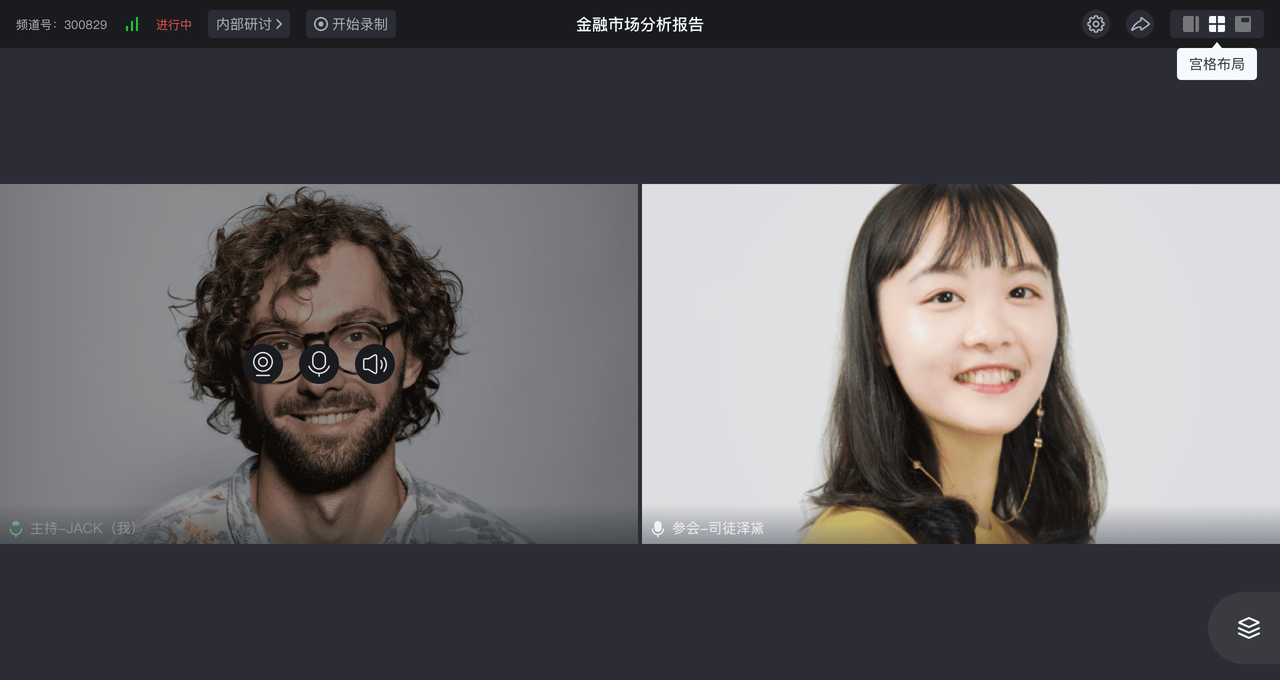
"Number of Participants - Layout Selection" Logic:
| Number of Participants (Host + Attendees) | 1 | 2 | 3~4 | 5~9 | 10~16 | 17~25 |
|---|---|---|---|---|---|---|
| Displayed Layout | Single Grid | Two Grids | Four Grids | Nine Grids | 16 Grids | 25 Grids |
Left-Right Layout
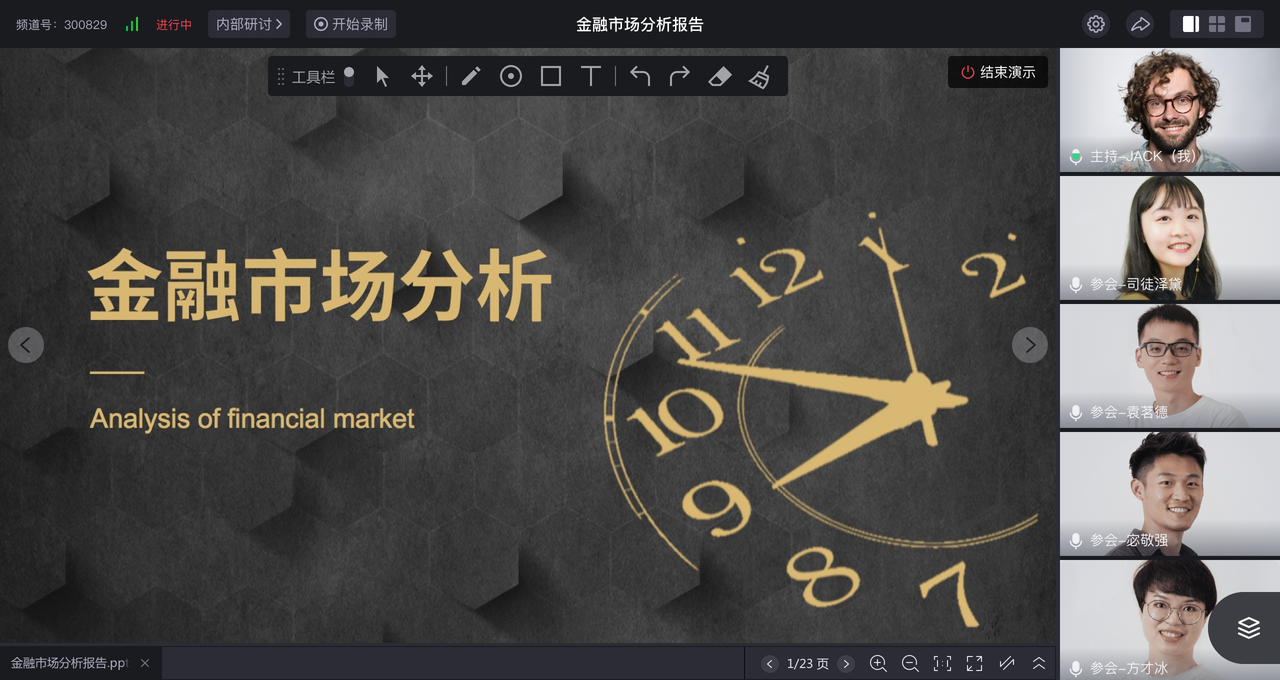
- Screen Distribution:
- Left side: The presenter's demonstration area (courseware, whiteboard content, screen sharing, etc.);
- Right side: The attendee list, displayed in the order they joined the meeting, with a maximum of 17 people (including one host). If there are too many people, scroll down to see more members.
- Bottom right: Toolbar. Click to operate "Camera", "Microphone", "Speaker", "Presentation", "Members", "Messages", etc.
Layout Differences and Switching
Default Style:
In the new seminar layout, the default entry style is "Grid Layout";
Style Applicable Scenarios:
"Grid Layout" is suitable for collective discussions where all attendees discuss a common topic in a decentralized manner;
"Left-Right Layout" focuses all attendees on a specific presenter's shared area for targeted discussion;
Layout Switching:
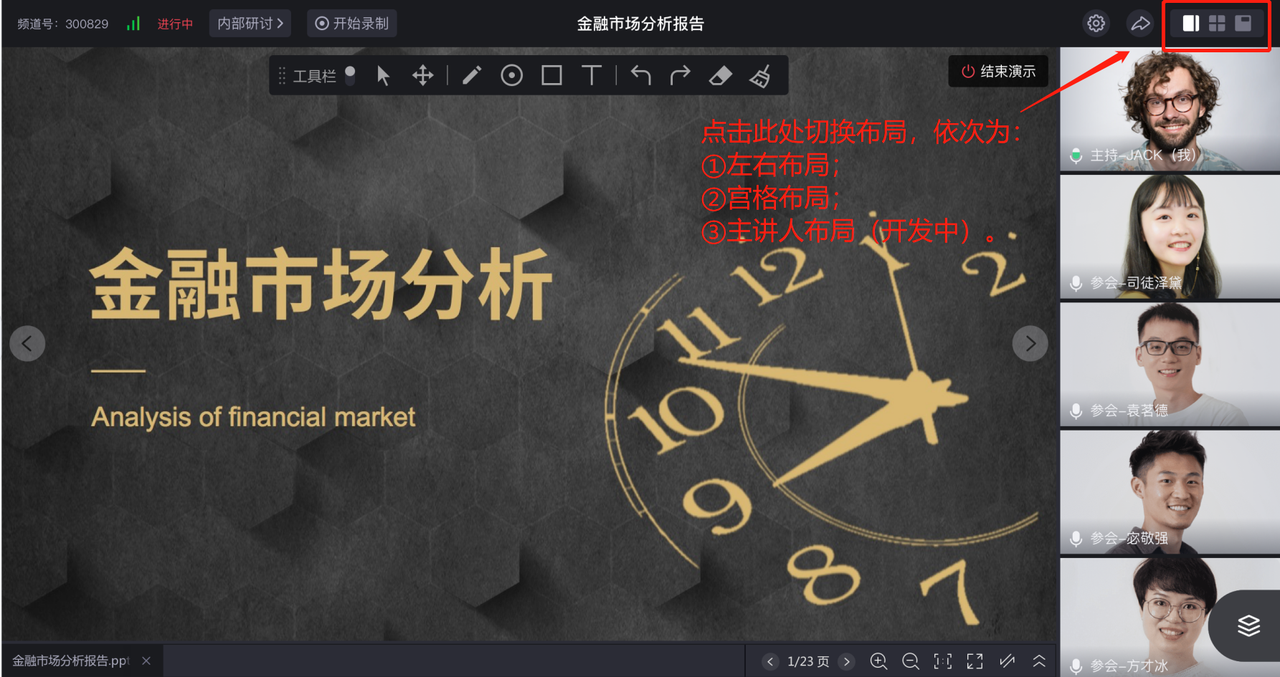
Switch using the "Layout Switch" button in the top right corner of the page, as shown below:
3. Round-Robin Invitation to Speak
Instructions: During the live stream, the host can use the round-robin function to automatically invite attendees to speak in batches without requiring their consent. Applicable scenario: The host wants to see the status of all online attendees. The operation video is below. You can also click to view more operation videos Seminar, Round-Robin Invitation to Speak Tutorial
4. Setting a Co-Host
Instructions: The host can set an attendee as a co-host. The co-host's role is to assist the host in managing the meeting room and displaying content/documents. The operation video is below. You can also click to view more operation videos Seminar, Co-Host Tutorial
5. Inviting to Speak
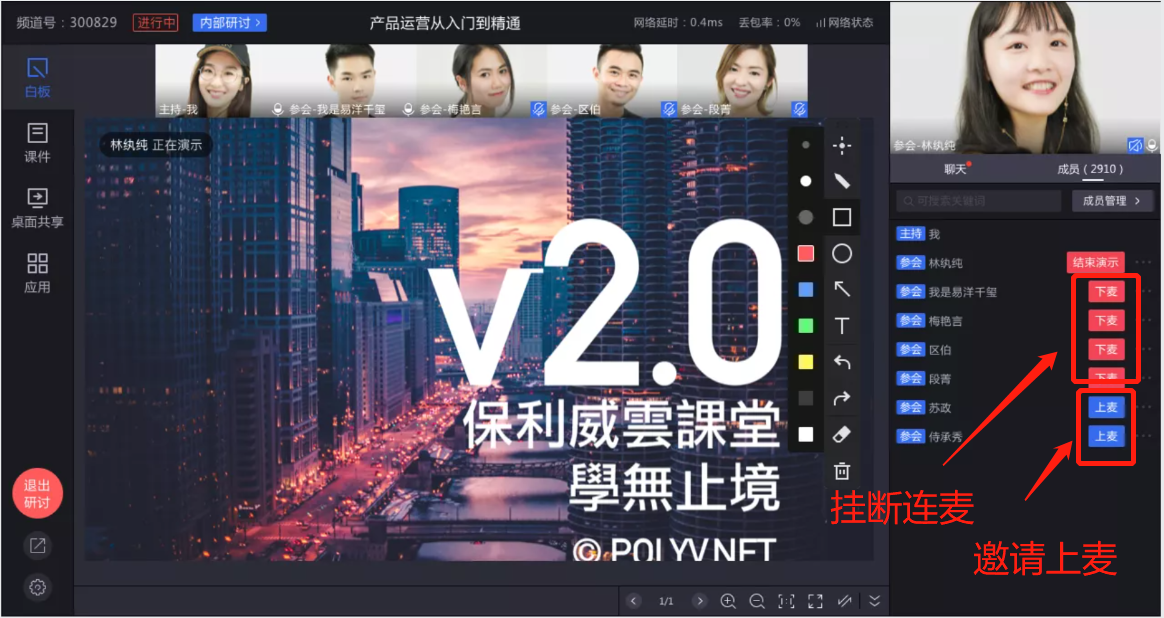
In the member list on the right, the host clicks the "Invite to Speak" button to send a microphone connection invitation to the attendee. The connection starts after the attendee agrees. Click the "Disconnect" button to disconnect an attendee who is currently speaking (hovering over the speaking screen also allows disconnecting, or toggling the other party's camera/microphone, or setting them as the primary screen).
Note:
- A maximum of 16 people can speak simultaneously. If there are more than 16, please disconnect some attendees before inviting others.
- Attendees can decline the invitation to speak; after connecting, they can actively end the connection or toggle their camera/microphone.
- If an attendee does not respond within 30 seconds after the invitation is sent, the invitation is automatically declined.
6. Inviting to Present
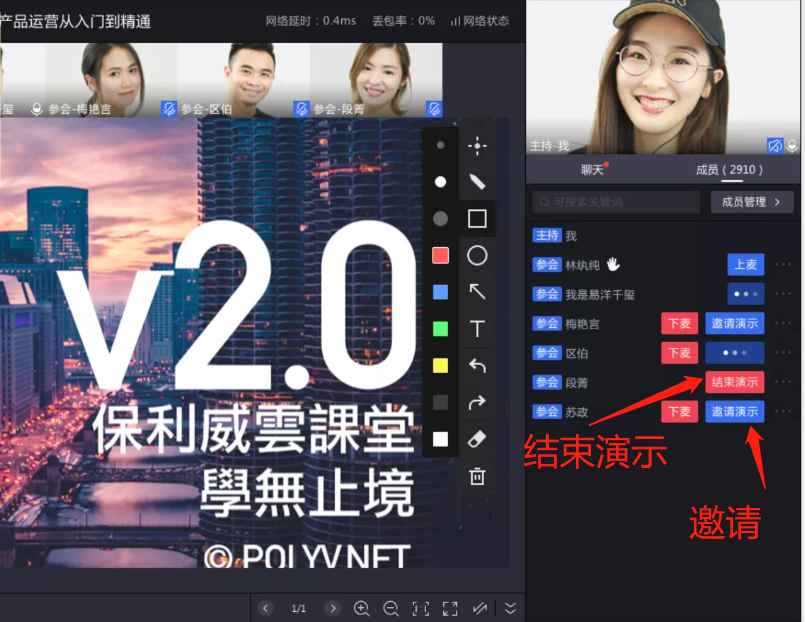
In the member list on the left, the host clicks the "Invite to Present" button to send a presentation invitation to the attendee. After the attendee agrees, they can use the whiteboard, documents, and screen sharing functions to share content. Click the "End Presentation" button to disconnect the attendee who is currently presenting.
Note:
- Only one person can be invited to present at a time. Inviting a new attendee to present during an ongoing presentation will replace the original presenter's functional permissions.
- Attendees can decline the presentation invitation and can actively end the presentation during the process.
- After ending the presentation, the attendee remains in the microphone connection state.
- The current H5 page does not yet support "Invited Presentation" (we are working hard on this feature).
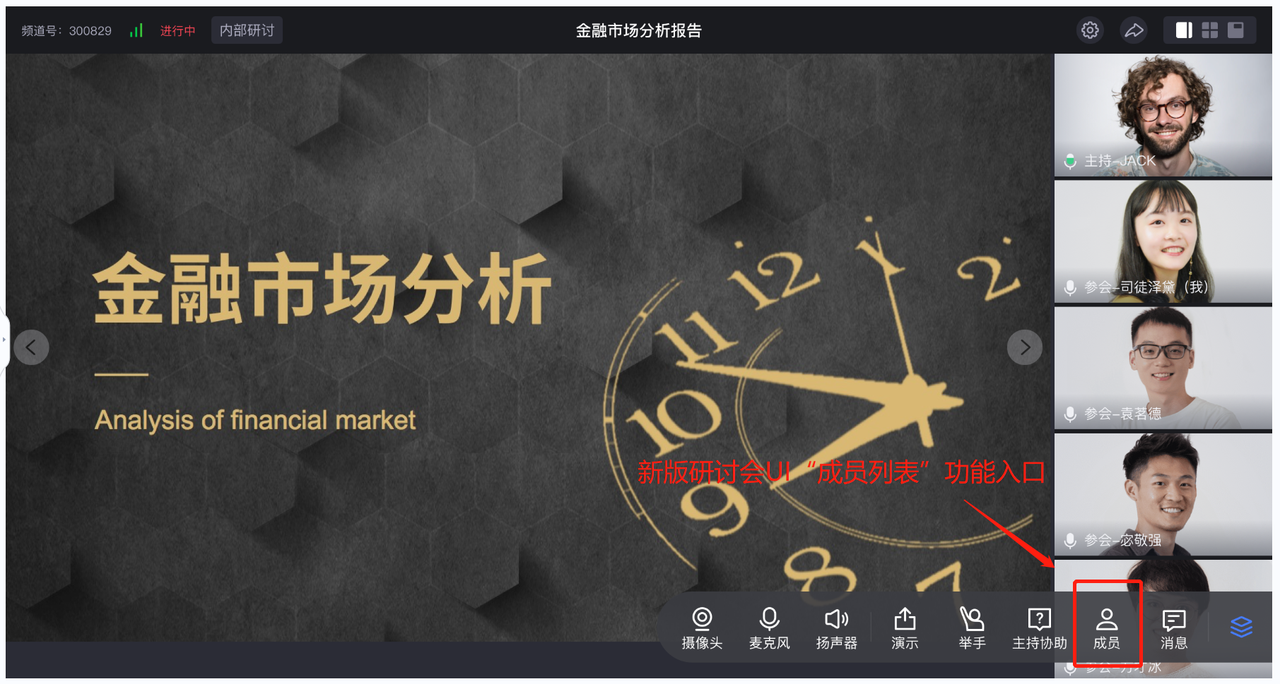
- The interaction is the same for old and new versions. The difference is the entry point in the new version, which is "Toolbar - Members".
7. External Live Streaming
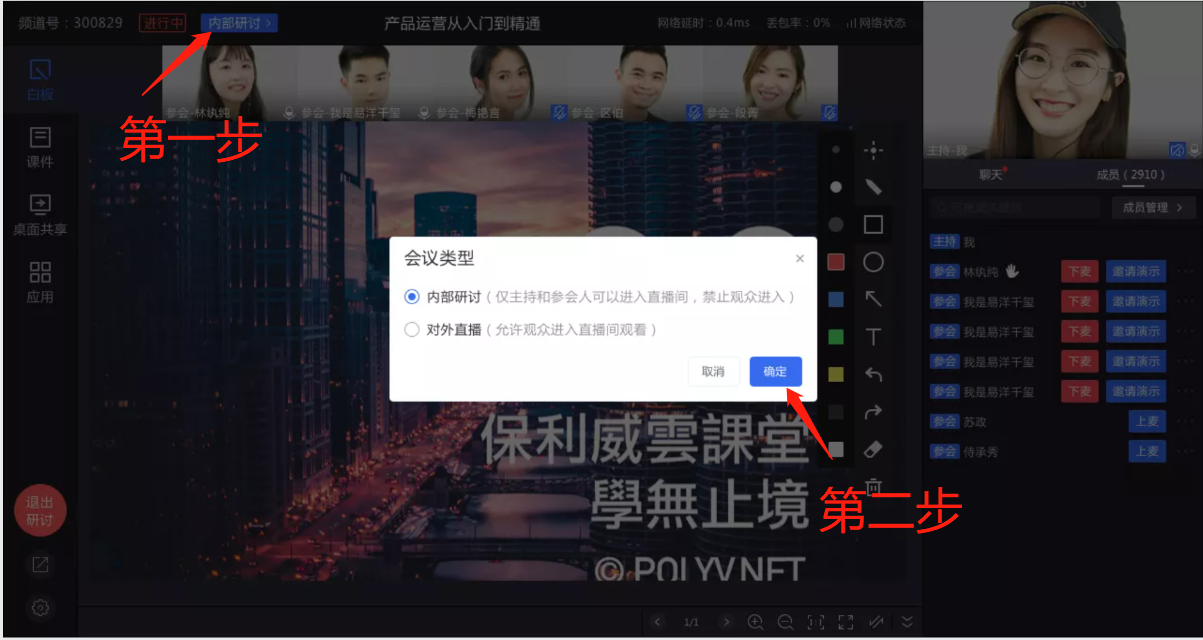
The host clicks the top button to open the meeting type selection window. After making a selection, click "Confirm" to apply.
Internal Seminar: Viewers cannot see the seminar content on the viewing page and cannot use the chat room.
External Live Stream: Viewers can see the seminar content on the viewing page and participate in chat interactions.
Note:
The seminar is not open for external live streaming by default.
8. Breakout Groups
Breakout Group Function Applicable Scenarios:
The host convenes attendees to discuss one or more specific topics publicly, gather important opinions, and ultimately make decisions. When there are many attendees, breakout groups are often used.
Advantages of Breakout Groups: 1. Facilitates organization and leadership. 2. Allows every participant to discuss and express different opinions. 3. Improves discussion efficiency.
Concept Explanation
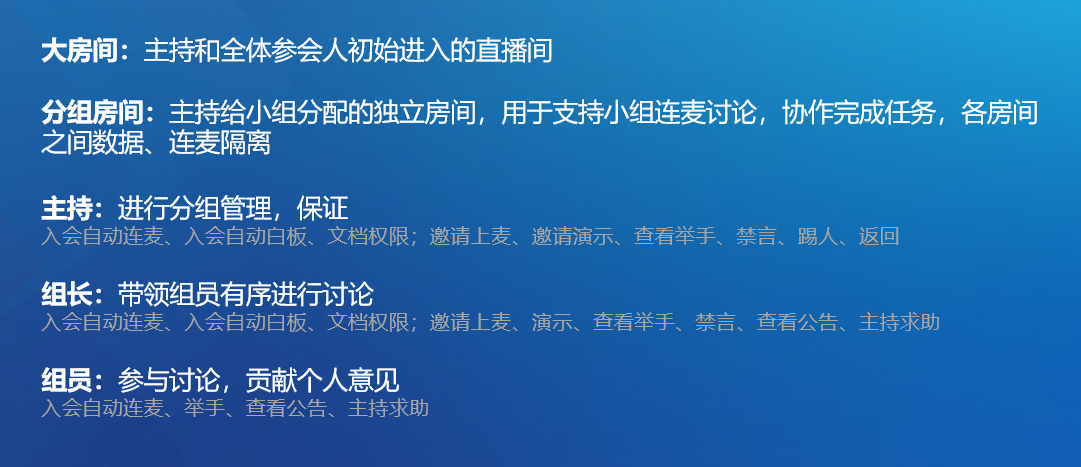
During the grouping process, new identity concepts naturally emerge, as shown below.
1. Group Management
Creating Groups
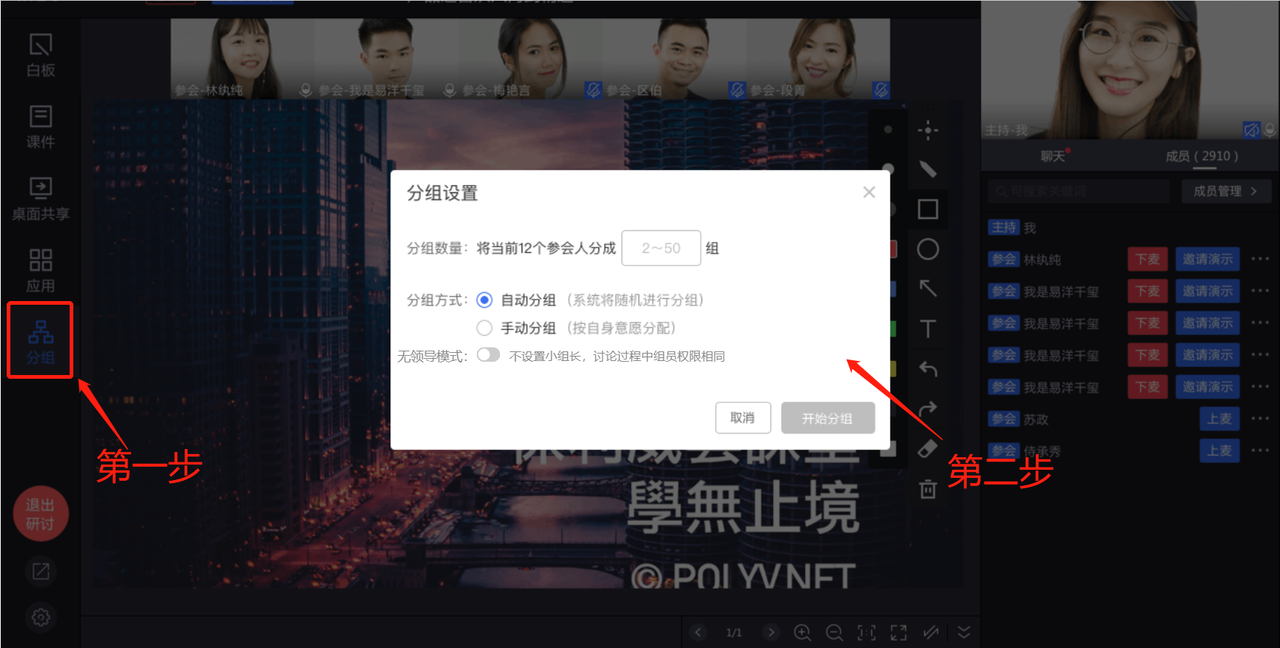
Step 1: Start Grouping
The host clicks the "Group" button on the left to trigger the group settings window.
Step 2: Define Specific Group Information
Fill in the number of groups, select the grouping method, choose whether to enable "Leaderless Mode", and click "Start Grouping" to complete the creation process.
- Automatic Grouping: Creates groups based on the specified number and randomly assigns attendees evenly to each group.
- Manual Grouping: Creates groups based on the specified number. The host can assign attendees from the unassigned list to specific groups.
- Leaderless Mode: In standard grouping mode (this option is off), each group randomly assigns a leader who authorizes presentations for group members and leads the group discussion. If this option is checked, no leader role is established after grouping, and all group members have equal permissions.
Note:
- The number of groups that can be created is 2-50. There is no limit on the number of members per group.
- Only attendees can participate in groups; viewers cannot.
- Automatic grouping randomly assigns leaders to each group.
The generated grouping results are displayed as cards, as shown below.
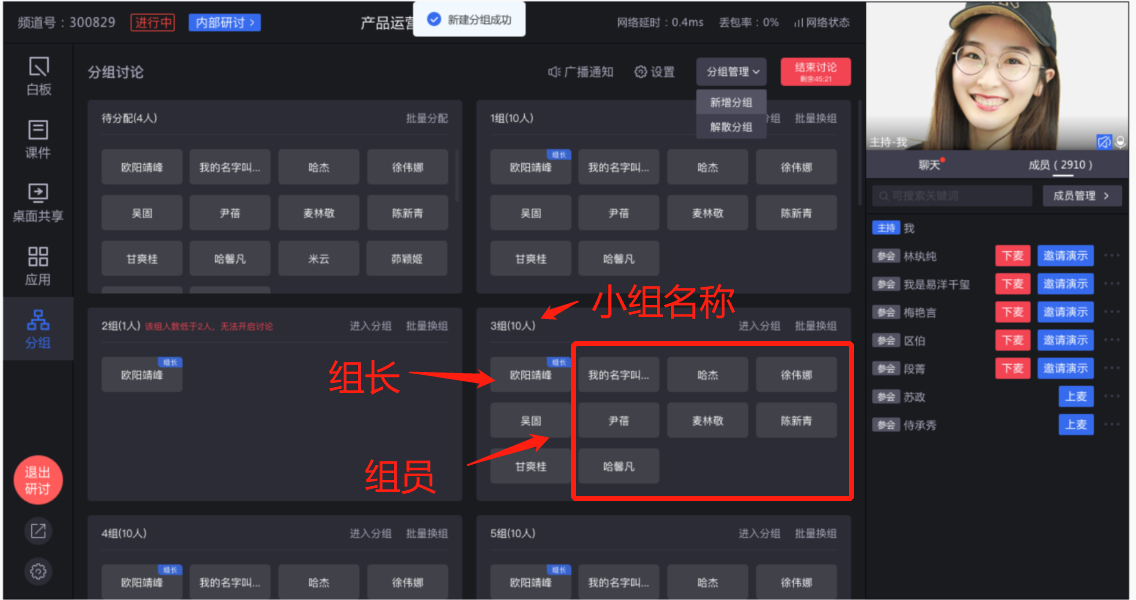
Note:
- The card displays group members and the leader. The leader has a blue identifier in the top right corner.
- The "Unassigned" card in the top left shows attendees who joined after the grouping was completed. The host can assign them to any group.
2. Member Management
Changing the Leader
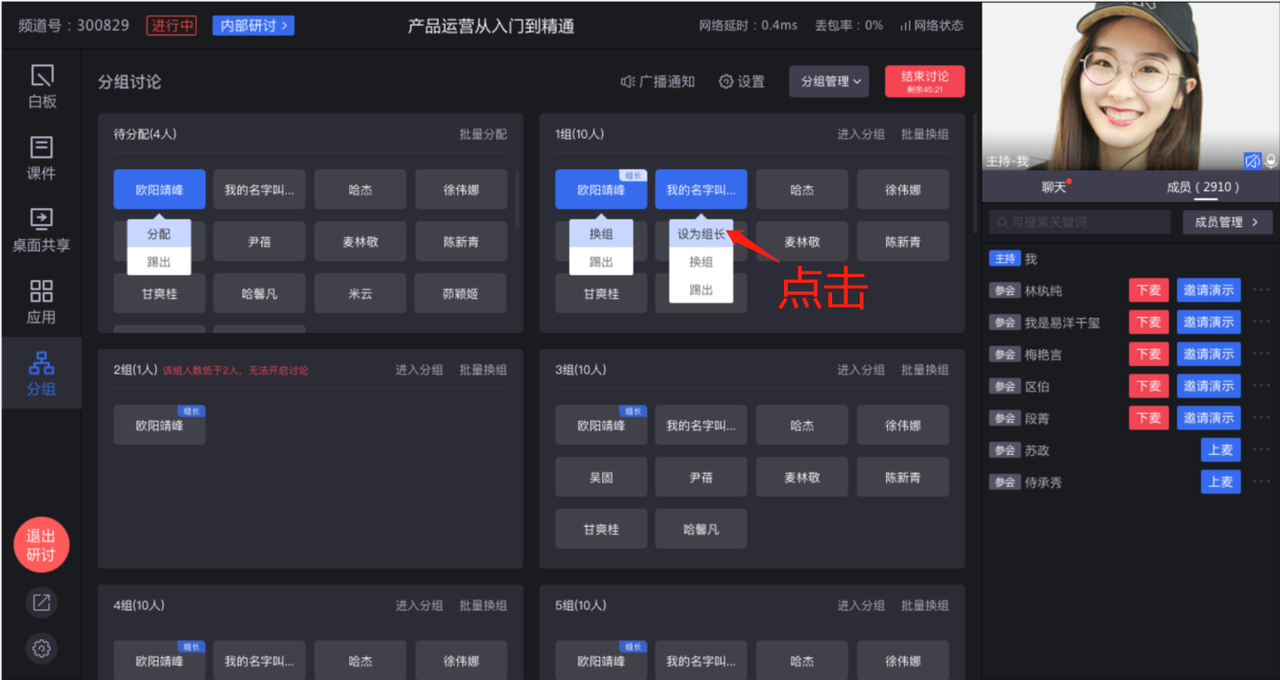
Click the nickname of the person you want to set as the leader in the group, then click "Set as Leader" in the menu to complete the leader change.
Note:
- If a leader is moved to another group or goes offline, a random member in the group will be designated as the leader.
- Group changes and leader settings can also be done during the discussion.
- If "Leaderless Group" was selected during group creation, there is no "Leader" role within the group.
Moving Members
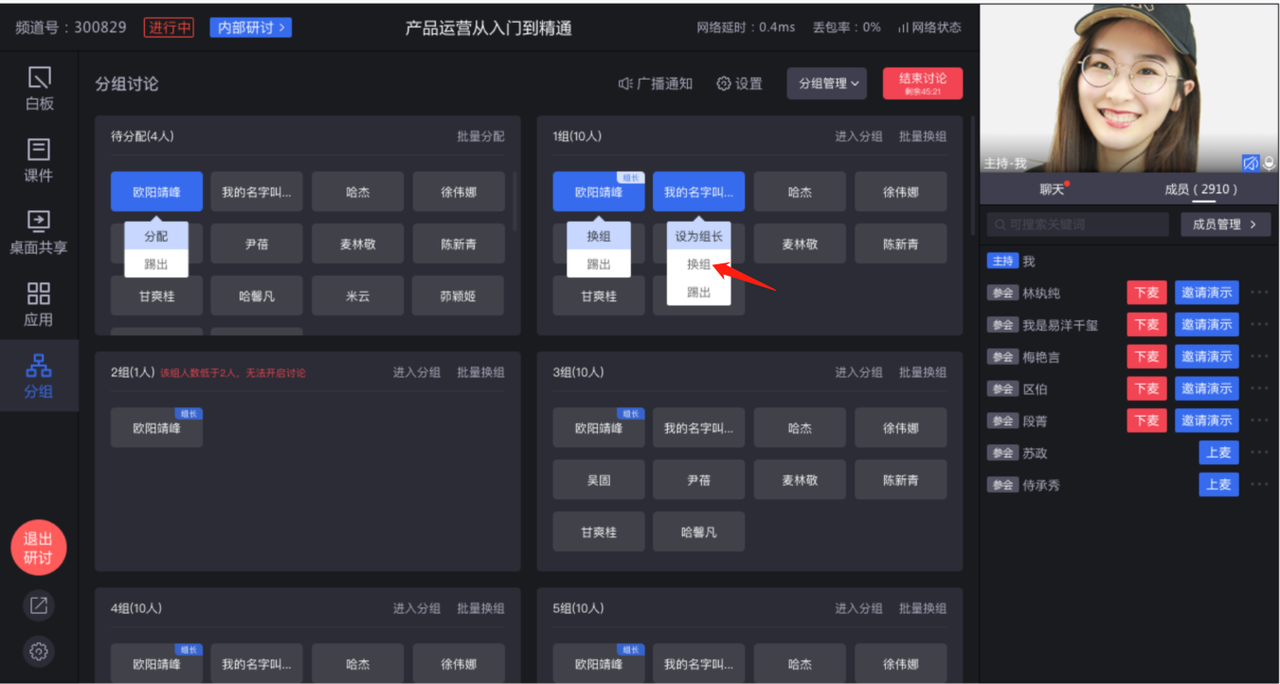
Click the nickname of the member you want to move in the group, then click "Move Group" in the menu.
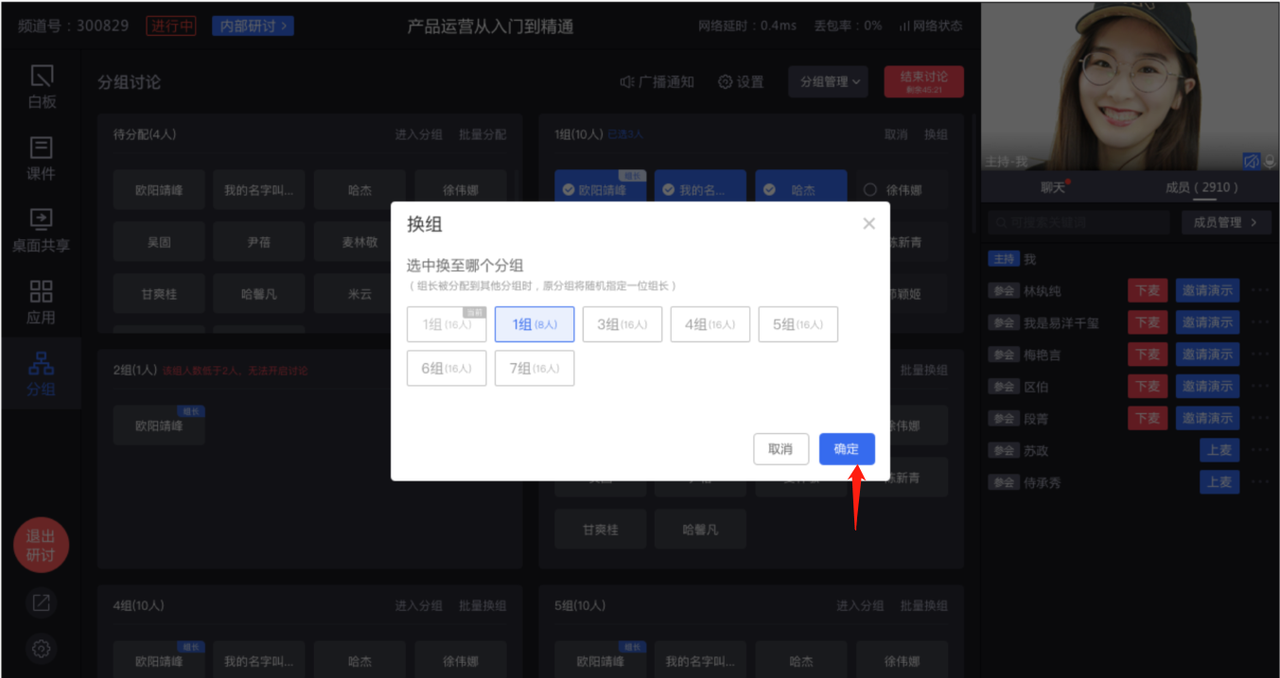
In the pop-up window, select the target group name and click "Confirm" to complete the move.
To move multiple people at once, click "Batch Move" in the top right corner of the group card. In batch selection mode, select all the members you want to move and click the "Move Group" button.
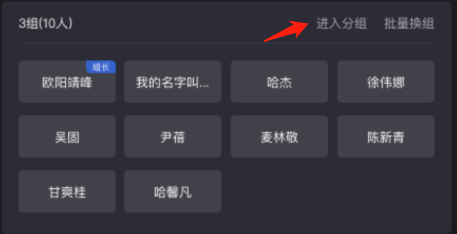
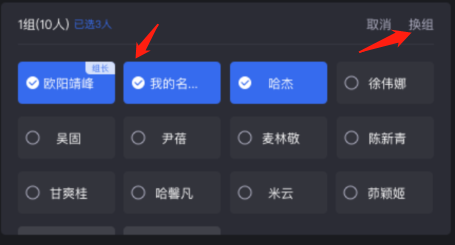
Assigning Attendees
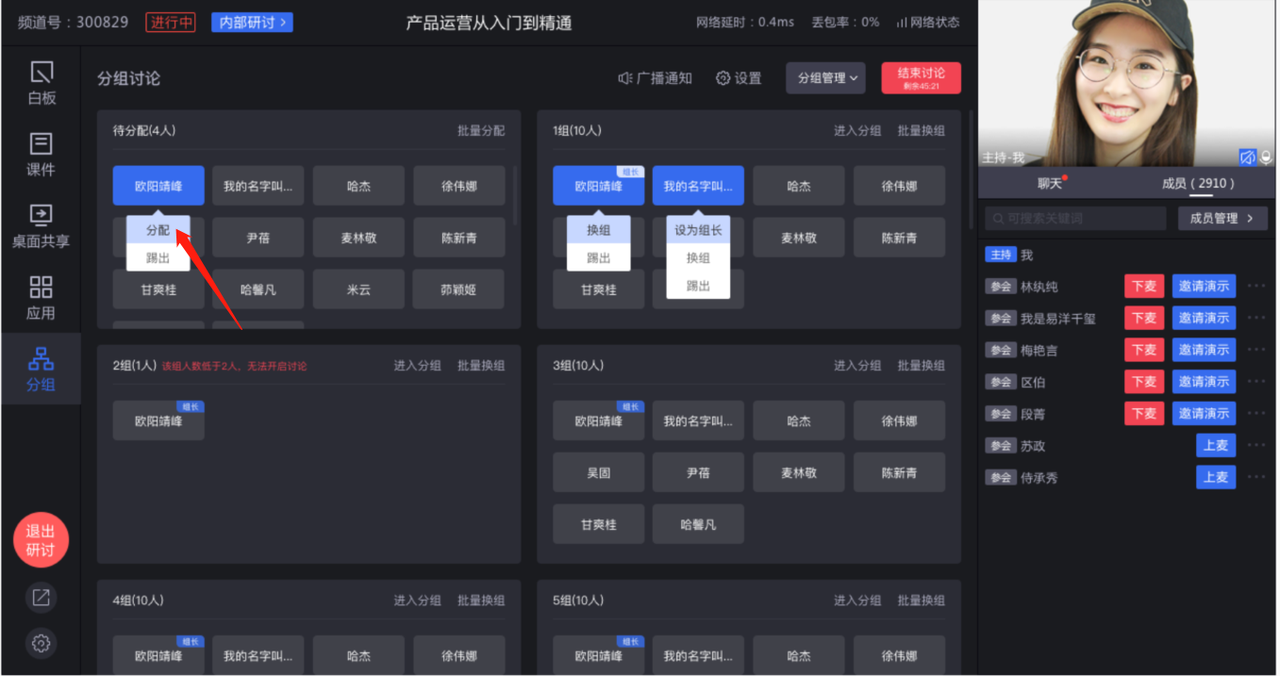
Click the nickname of the attendee in the "Unassigned" card, click the "Assign" button, select the target group name in the pop-up window, and click "Confirm" to complete the assignment.
3. Discussion Settings
Starting/Ending Discussion
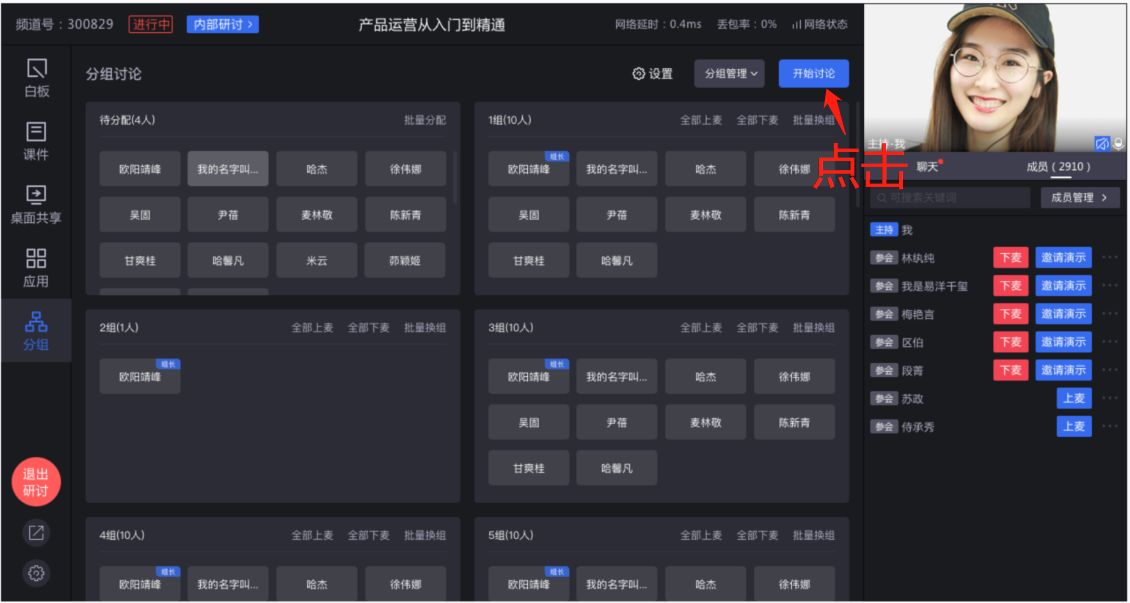
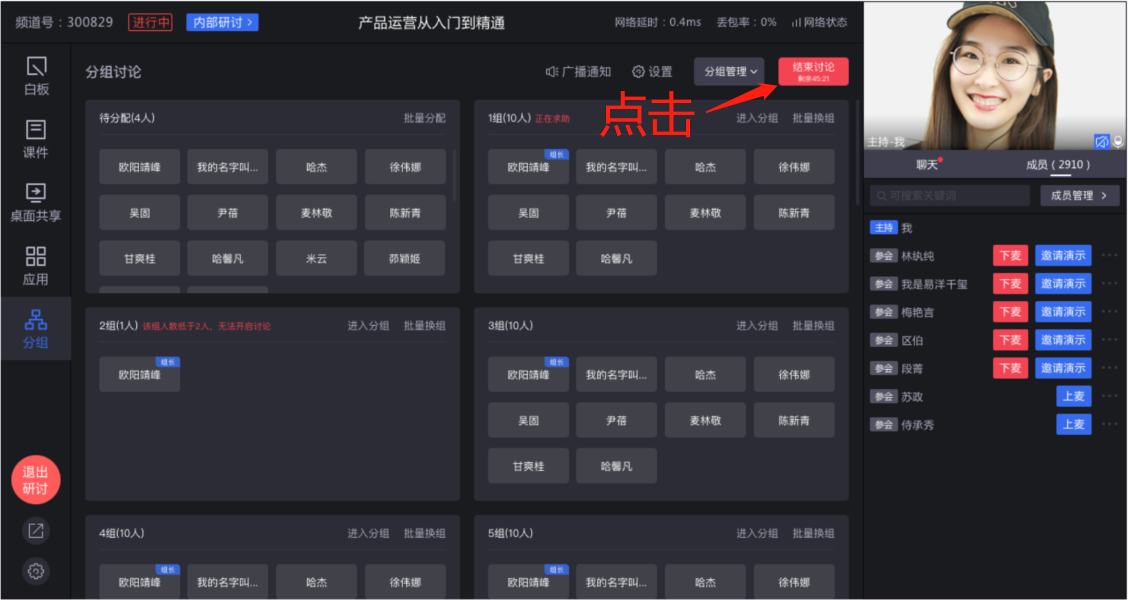
In the group interface, click the "Start Discussion" button in the top right corner. Group members immediately enter their respective group rooms.
In the group interface, click the "End Discussion" button in the top right corner. Group members immediately return to the main room from their respective group rooms.
Note:
- Microphone connections, chats, whiteboards, etc., within group rooms are independent of each other.
- The host and group leaders automatically connect their microphones when entering a group room. The maximum number of connected members per room is 15.
- If the host goes offline, group members cannot return to the main room.
- Recording and streaming can only capture content from the main room.
Broadcast Notification
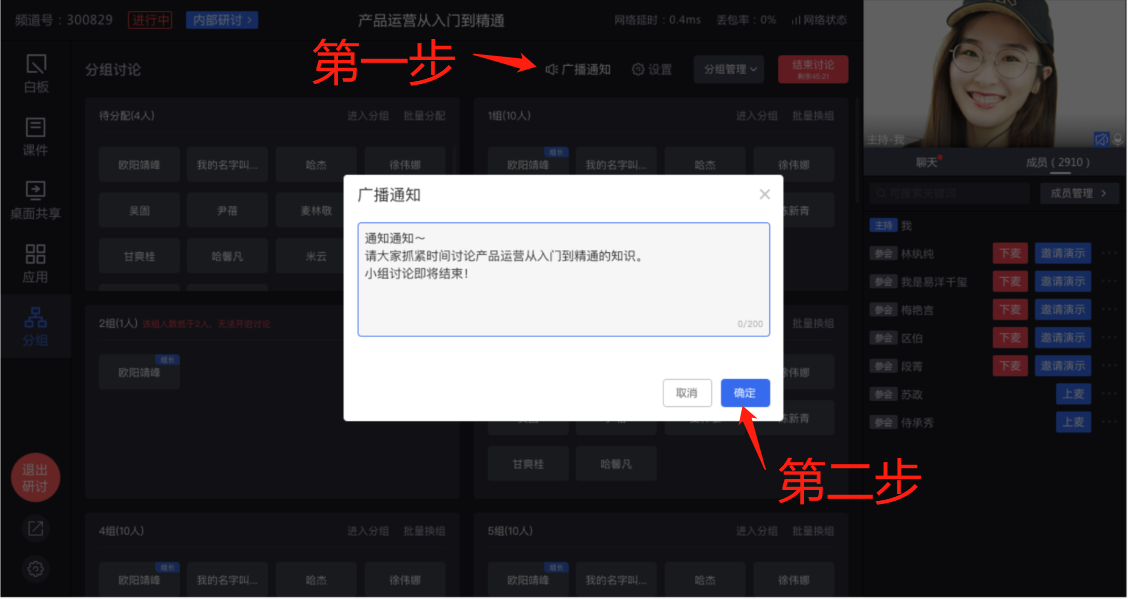
Click the "Broadcast Notification" button in the top right corner. Enter the notification content in the pop-up window and click "Confirm" to send the notification to all group rooms.
Note:
- The "Broadcast Notification" button is only available during the discussion.
- The notification is sent to group leaders and members within the group rooms. Attendees and viewers in the main live room do not receive it.
Requesting Assistance
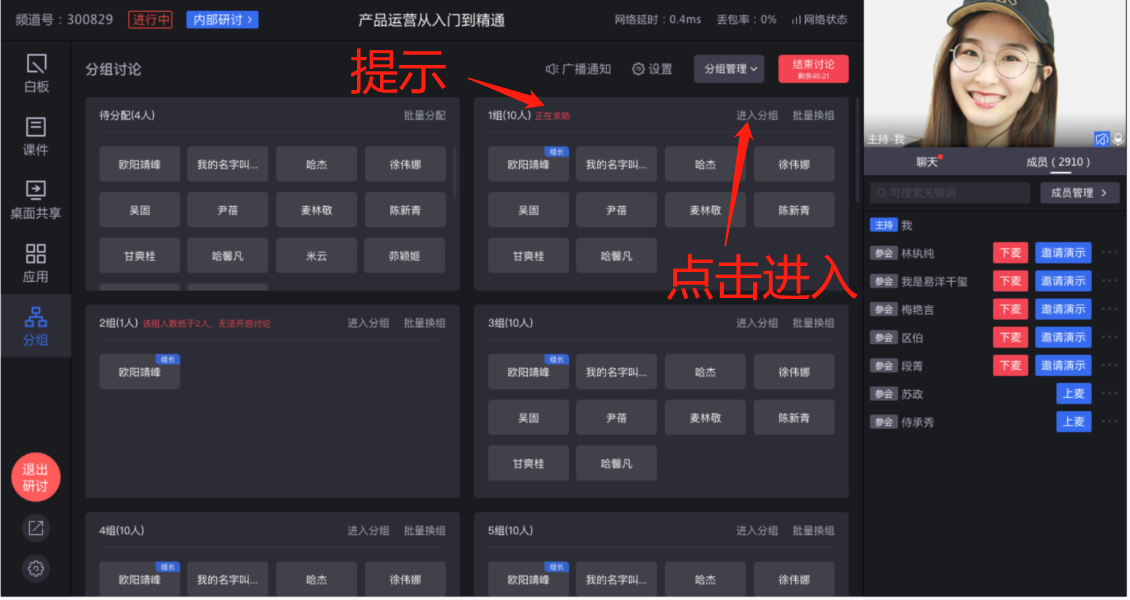
During the discussion, group leaders or members in a group room can request the host to enter their group for assistance. The host clicks the "Enter Group" button in the top right corner of the group card to jump into the group room.
Note:
- The "Enter Group" button is only available during the discussion.
- The host automatically connects their microphone upon entering a group room and has the highest authority.
- After the host enters a group room, viewers and attendees in the main room can no longer see the host's screen.
4. Pre-Grouping
Instructions: In real enterprise training scenarios, the list for breakout groups is often decided before the meeting. The pre-grouping function can improve the host's efficiency during the live stream. The operation video is below. You can also click to view more operation videos.
9. Recording
Automatic Recording
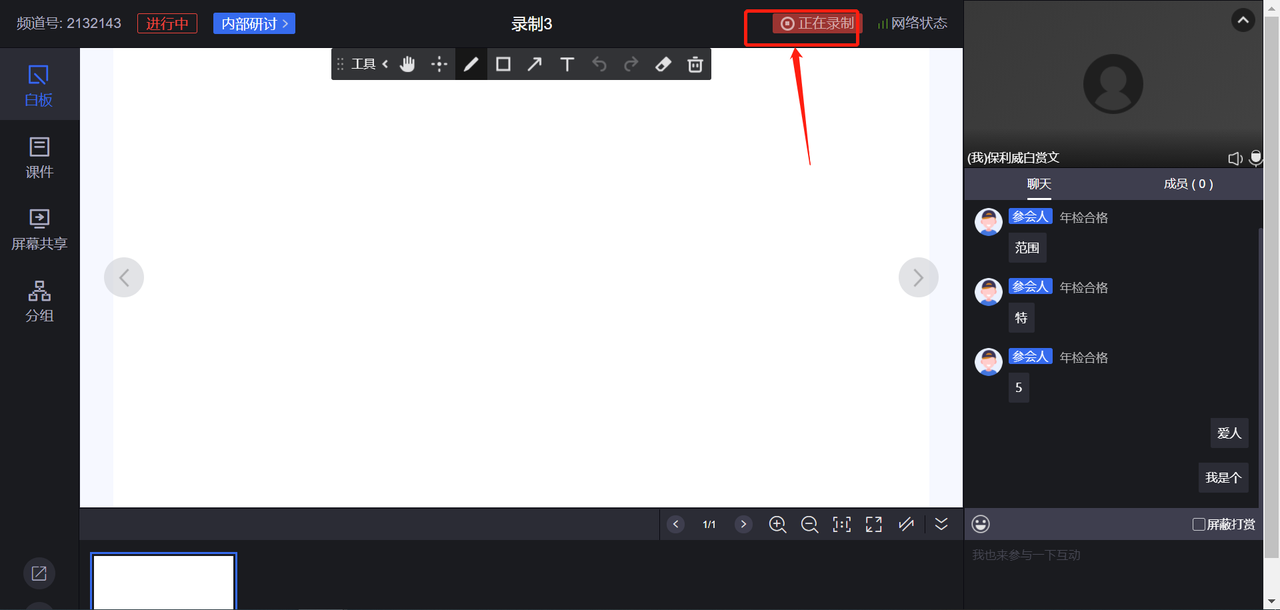
Recording starts automatically when the host or an attendee enters the live room. A "Recording" indicator is displayed in the top right corner.
- Since the seminar's start and end times are defined as "the time the first attendee enters → the time the last attendee leaves", automatic recording starts when the first attendee enters.
- A single seminar has a 10-hour limit for automatic recording (longer durations require prior communication and resource arrangement).
Manual Recording
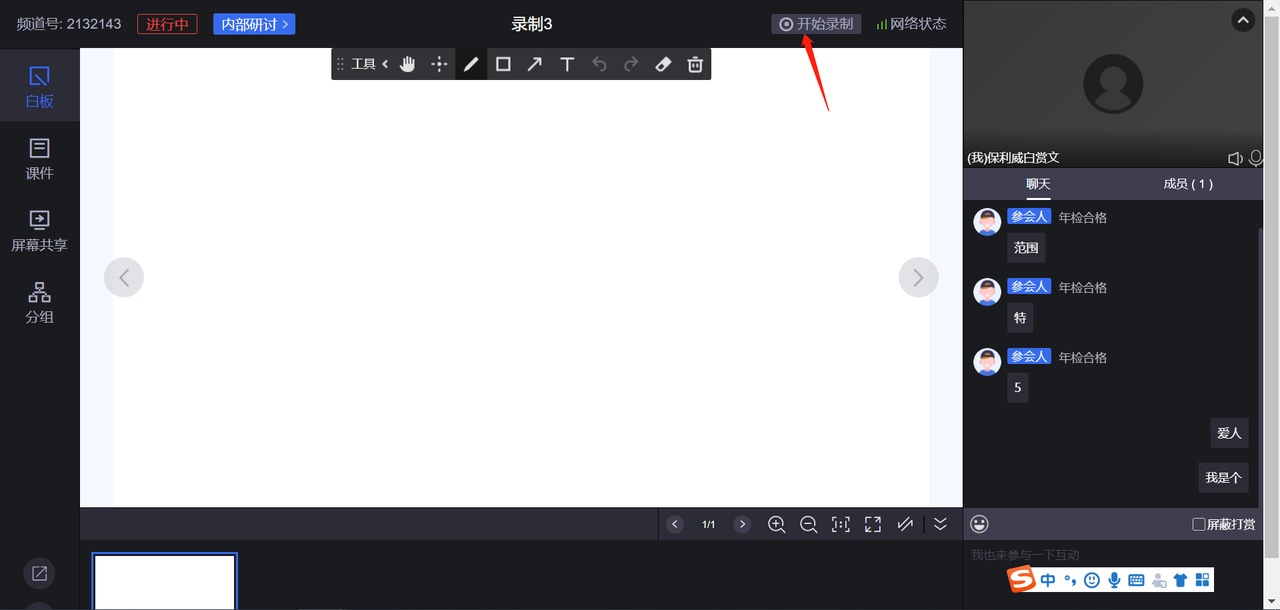
| Start Recording | Stop Recording |
|---|---|
 |
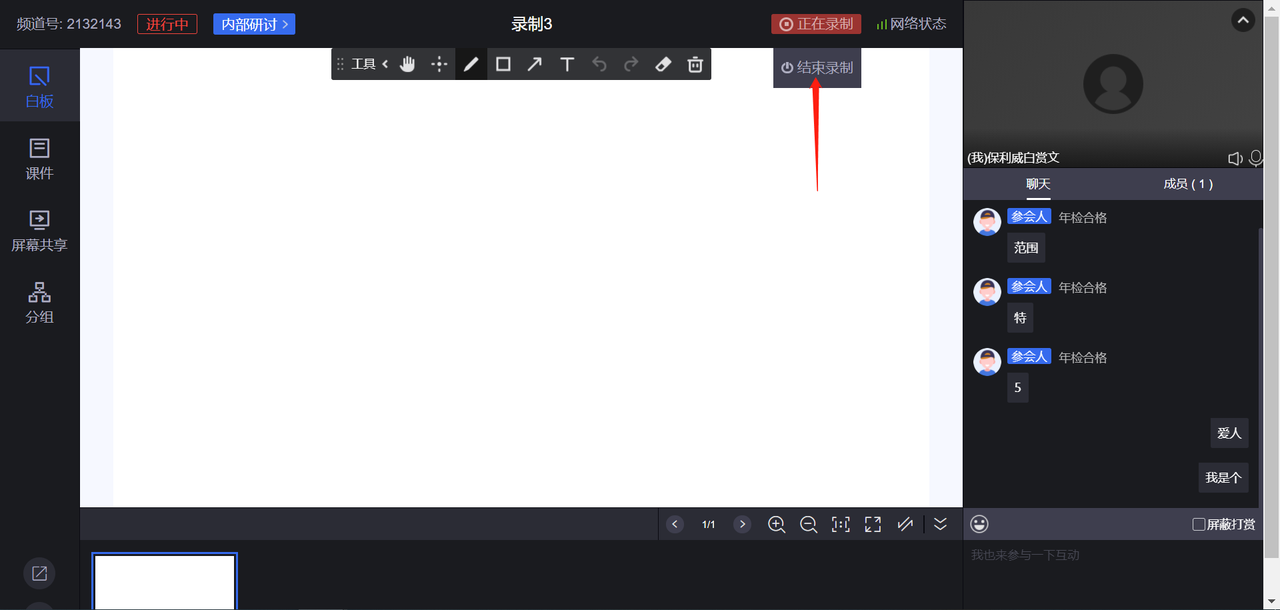 |
The host can click the "Start Recording" button in the top right corner to start recording. A "Recording" indicator is displayed in the top right corner during the process. To stop recording, click the "Stop Recording" button.
Note:
- Only the host can perform manual recording.
- Recording startup takes some time. Please start recording about 30 seconds in advance.
- If recording fails, please refresh the page and try again.
- Breakout group discussions are not recorded.
