Overview
If developers do not need Polyv's SaaS viewing condition verification, they can use the Polyv API to generate a viewer login token (hereinafter referred to as the login token). Once the token is verified, the viewing condition restrictions can be bypassed to enter the live streaming page. For detailed usage, refer to the following documentation:
1. Process Flow
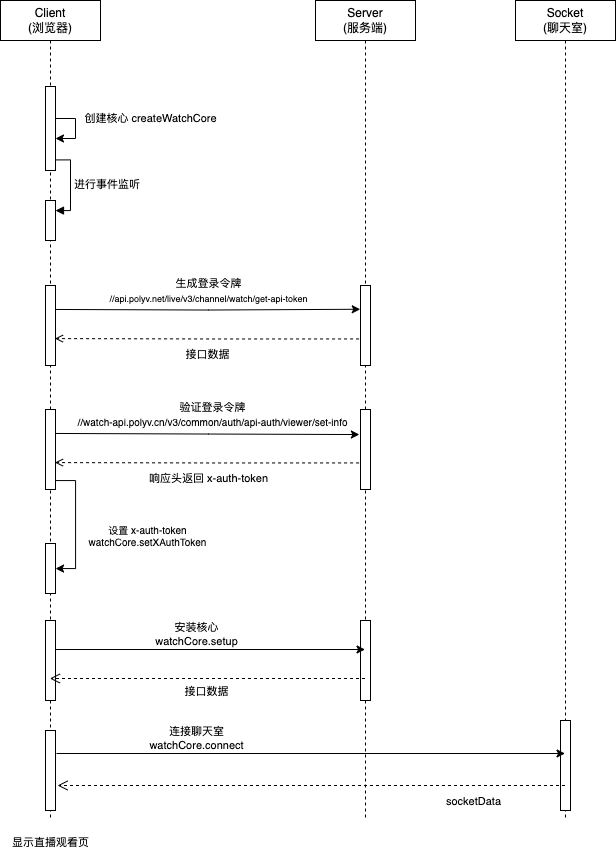
1.1 Step 1: Obtain the Login Token
Obtain the viewer login token via the Polyv API. See the API documentation: Generate Login Token.
Since this API requires parameter signing using
appSecret, it is recommended to perform this step on the server side.
1.2 Step 2: Verify the Login Token
After generating the login token in Step 1, verify it using the verification API. Upon successful verification, obtain x-auth-token from the response header. This token is the verification token used by the viewing page SDK. See the API documentation: Verify Login Token.
1.3 Step 3: Set x-auth-token
After obtaining x-auth-token in Step 2, call the setXAuthToken method of the viewing page SDK core instance to set the token.
1.4 Step 4: Install the Core Instance
After setting the token in Step 3, proceed with the normal process to install the core instance. Note that the login token flow is only required before the first installation; it is not needed for subsequent installations.
2. Example Code
Below is an example code snippet for the JS-based flow:
import { send } from '@just4/ajax/ajax';
import md5 from 'md5';
import { createWatchCore } from '@polv/live-watch-sdk';

/**
 * 生成签名
 * @param {Object} data 请求参数
 * @param {String} secret 签名密钥
 * @returns 签名串
 */
function getSign(data, secret) {
  let text = '';
  const keys = Object.keys(data).sort();

  for (const key of keys) {
    text += `${key}${data[key]}`;
  }
  const sign = md5(secret + text + secret);
  return sign.toUpperCase();
}

async function example() {
  const channelId = '频道号';

  // 创建观看页 SDK 核心实例
  const watchCore = createWatchCore({
    channelId,
  });

  // 请求数据
  const reqData = {
    appId: '应用 ID,从管理后台获取',
    timestamp: Date.now(),
    channelId,
    viewerId: '观众 id',
    nickname: '观众昵称',
  };
  // 应用密钥,从管理后台获取,建议获取登录令牌流程在服务端中进行,避免将应用密钥直接暴露在 js 中
  const appSecret = 'xxxxx';
  // 生成签名
  const sign = getSign(reqData, appSecret);
  reqData.sign = sign;

  // 步骤1:通过 ajax 获取登录令牌
  const response = await send('//api.polyv.net/live/v3/channel/watch/get-api-token', {
    method: 'post',
    data: reqData,
  });
  const result = response.data;
  const loginToken = result.data.token;

  // 步骤2:验证登录令牌
  const res = await send('//watch-api.polyv.cn/v3/common/auth/api-auth/viewer/set-info', {
    method: 'post',
    data: {
      channelId,
      token: loginToken,
    },
  });
  // 从响应头中获取 x-auth-token
  const xAuthToken = res.xhr.getResponseHeader('x-auth-token');
  if (!xAuthToken) {
    throw new Error('获取失败,响应头中没有 x-auth-token')
  }

  // 步骤3:设置 x-auth-token
  watchCore.setXAuthToken(xAuthToken);

  // 步骤4:安装核心实例
  await watchCore.setup();
}
3. Sequence Diagram
The flow diagram for the login token is as follows: