Installation and Initialization
This document mainly introduces how to quickly import the Watch Page Mini Program SDK and create a core instance of the Watch Page Mini Program SDK.
Prerequisites
- An account has been created via the Polyv SaaS video platform. Registration link.
- A live streaming channel has been created via the live streaming management backend. Create live streaming channel link.
Step 1: Import the SDK
When importing the SDK via npm, you need to be familiar with the WeChat Mini Program official documentation: npm Support.
Install the SDK
npm install @polyv/live-watch-miniprogram-sdk --save
Import the SDK
import { createWatchCore } from '@polyv/live-watch-miniprogram-sdk';
Step 2: Create a Core Instance
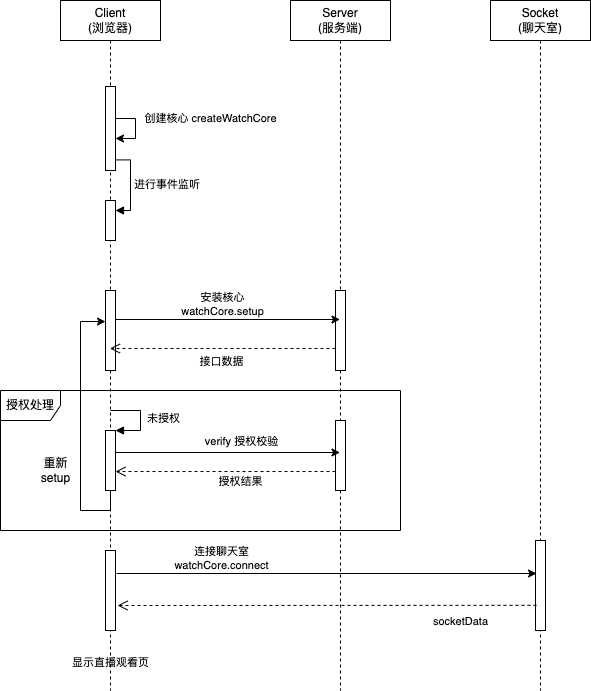
Create 观看页核心单一实例(watchCore) using the createWatchCore method, hereinafter referred to as watchCore.
import { createWatchCore } from '@polyv/live-watch-miniprogram-sdk';

const watchCore = createWatchCore({
  channelId: 'xxxxx', // 传入观看页的频道号
});
For detailed API instructions, see: Watch Page Core
Step 3: Install the Core Instance
After creating watchCore, you need to call the setup method to install the core instance.
import { PolyvWatchCoreEvents } from '@polyv/live-watch-miniprogram-sdk';

// 监听 setup 钩子
watchCore.eventEmitter.on(PolyvWatchCoreEvents.WatchCoreSetuped, () => {
  console.info('观看页核心实例安装完成');
});

// 安装核心实例
await watchCore.setup();
For detailed API instructions, see: Watch Page Core
Note that setup is only used to install the watchCore instance and its internal modules. If internal modules need to synchronously depend on other Polyv supporting feature SDKs, such as interaction and player features, you also need to call the corresponding module's method to install the feature SDK. For example, install the player SDK watchCore.player.setupPlayer().
Other modules, such as co-hosting, have similar methods. Please refer directly to the corresponding module documentation for details. The installation timing can generally be executed synchronously when the corresponding UI component is initialized.
At this point, the content of the watch page can be displayed, such as the guidance/authorization page and the live streaming watch page. Note that entering the live streaming watch page requires determining whether the current viewer has been authorized for viewing conditions before displaying. See Step 4:
Step 4: Authorization and Connecting to the Chat Room
After creating watchCore and installing the instance via setup, determine whether the viewer has been authorized for viewing conditions:
- Not authorized: Display the guidance/authorization page for viewing condition authorization.
- Authorized: Call the
connectmethod to connect to the chat room, then display the live streaming watch page.
Example:
// 观众未进行观看条件授权
if (!watchCore.auth.isAuthorized()) {
  // TODO:显示引导/授权页

  // 观众点击观看页入口或执行观看条件授权,如:无条件授权
  const result = await watchCore.auth.verifyNoneAuth();
  if (!result.success) {
    console.error('授权失败了!!', result.failReason);
    return;
  }

  // 当观众执行观看条件授权成功,需要重新安装 watchCore
  await watchCore.setup();
}

// 当完成观看条件授权后,即可连接聊天室进入直播观看页
await watchCore.connect();

// TODO:连接成功,显示直播观看页
For detailed API instructions, see: Watch Page Core
Page Flowchart
The sequence diagram for the watch page application is as follows: